4.3 图像旋转
旋转在常规的图像处理中都会用到,比如在图形匹配、图像对齐,以及其他基于图像的算法。本节旋转例子的输入是一张图,输出是一张旋转了Θ度的图。旋转完成后,就如同图4.2中所示。
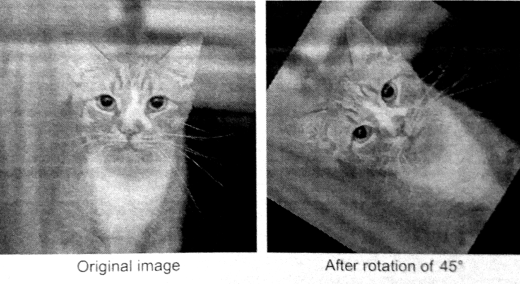
图4.2 旋转了45°的图像。超出图像范围的部分会返回黑色像素。
假设其中一个像素点的坐标为(x, y),中心旋转点的坐标为(x0, y0),当原始坐标旋转Θ度时,该点的新坐标为(x’, y’)。这些数据的计算公式如下所示:
x' = cosΘ(x - x0) + sinΘ(y - y0)y' = -sinΘ(x - x0) + cosΘ(y - y0)
根据以上的等式,可以清楚的了解每个像素点坐标的计算都是独立的。注意,每个输入和输出的坐标值不一定是整数。因此,我们就要利用OpenCL内置函数支持浮点坐标计算,并且内部支持的线性差值方式也能生成高质量的输出图像。
如果将工作项映射到输出图像的位置上,那么工作项的全局ID就对应着输出的(x’, y’),并使用上面的等式进行计算。该例子中我们以图像的中间点,作为旋转中心点。根据之前的等式,我们能推算出原始的坐标位置,以便每个工作项完成其计算:
x = x'cosΘ - y'sinΘ + x0y = x'sinΘ + y'cosΘ + y0
相关的OpenCL C伪代码如下:
gidx = get_global_id(0);gidy = get_global_id(1);x0 = width / 2;y0 = height / 2;x = gidx * cos(theta) - gidy * sin(theta) + x0y = gidx * sin(theta) + gidy * cos(theta) + y0
代码清单4.3中展示了如何使用OpenCL内核处理图像旋转。第3章,我们提到过图像,其对象对编程者是不透明,必须使用相关类型的内置函数。这个内核代码中,我们使用了read_imagef()(第38行)用来处理浮点数据。如同所有用来访问图像的函数一样,read_imagef()会返回一个具有4个元素的矢量类型。当我们对单通道数据进行处理(会在之后进行描述),我们只需要在读取函数之后访问.x即可(第38行)。当我们调用写入图像的函数时,会将一个具有4个元素的矢量直接写入图像中,而不管数据实际的类型,这里就需要硬件进行适当的处理。因此,在调用write_imagef()时,我们必须将结果转换为一个float4矢量类型(第41行)。
{%ace edit=false, lang=’c_cpp’%} __constant sampler_t sampler = CLK_NORMALIZED_COORDS_FALSE | CLK_FILTER_LINEAR | CLK_ADDRESS_CLAMP;
kernel void rotation( read_only image2d_t inputImage, __write_only image2d_t ouputImage, int imageWidth, int imageHeigt, float theta) { / Get global ID for ouput coordinates / int x = get_global_id(0); int y = get_global_id(1);
/ Compute image center / float x0 = imageWidth / 2.0f; float y0 = imageHeight / 2.0f;
/* Compute the work-item’s location relative
to the image center */ int xprime = x - x0; int yprime = y - y0;
/ Compute sine and cosine / float sinTheta = sin(theta); float cosTheta = cos(theta);
/ Compute the input location / float2 readCoord; readCoord.x = xprime cosTheta - yprime sinTheta + x0; readCoord.y = xprime sinTheta + yprime cosTheta + y0;
/ Read the input image / float value; value = read_imagef(inputImage, sampler, readCoord).x;
/ Write the output image / write_imagef(outputImage, (int2)(x, y), (float4)(value, 0.f, 0.f, 0.f)); } {%endace%}
代码清单4.3 图像旋转内核
内核4.3代码中使用图像采样器(sampler_t sampler),用来描述如何访问图像。采样器指定如何处理访问到的图像位置,比如,当访问到图像之外的区域,或是当访问到多个坐标时,不进行差值操作。
访问到的坐标不是就被标准化(比如,取值范围在0到1之间),就是使用基于像素值地址。使用CLK_NORMALIZED_COORDS_FALSE标识指定基于像素地址的寻址。OpenCL支持很多用于处理跨边界访问寻址方式。本节例程中,我们将是用CL_ADDRESS_CLAMP用来指定,当访问到图像之外的区域,会将RGB三个通道的值设置成0,并且将A通道设置成1或0(由图像格式决定)。所以,超出范围的像素将会返回黑色。最后,采样器允许我们指定一种过滤模式。过滤模式将决定将如何返回图像所取到的值。选项CLK_FILTER_NEAREST只是简单的返回离所提供左边最近的图像元素。或者使用CLK_FILTER_LINEAR将坐标附近的像素进行线性差值。本节图像旋转的例子中,我们将使用线性差值的方式提供质量更加上乘的旋转图像。
之前版本的OpenCL中,全局工作项的数量是由NDRange进行配置,每个维度上工作项的数量必须是工作组数量的整数倍。通常,这就会导致NDRange设置的大小要远大于已经映射的数据。当访问到图像外区域时,编程者不得不传入元数据到内核当中去,用于判断每个工作项所访问到的位置是否合法——本节例子中,就需要将图像的宽和高传入内核当中。访问到非法位置的工作项将不参与计算,有时这样的做法将使内核代码变得奇怪或低效。OpenCL 2.0标准中,设备所需的NDRange中,工作组尺寸在图像边界处可变。这就用到剩余工作组(remainder work-groups)的概念,第5章还会继续讨论。将OpenCL的性能特性使用到代码清单4.3中,将会使代码简单高效。
之前的例子中,创建程序对象的过程与向量相加中创建程序对象的过程很类似。不过本节的例子中我们在内核中使用的是图像。从一副图中读取图像后,我们将其元素转换为单精度浮点类型,并将其作为OpenCL图像对象的数据来源。
分配图像对象的工作由clCreateImage() API完成。创建图像时,需要指定其维度(1,2,3维),并且设置其图像空间大小,这些都由图像描述器(类型为cl_image_desc)对象来完成。像素类型和通道布局都有图像格式(类型为cl_image_format)来指定。图像中所存储的每个元素都为四通道,分别为R,G,B和A通道。因此,一个图像将使用CL_RGBA来表示,其每个元素向量中通道的顺序。或者,一副图像中的每个像素只用一个值来表示(比如:灰度缩放图或数据矩阵),数据需要使用CL_R来指定图像为单通道。当在数据格式中指定数据类型,并通过签名和尺寸组合标识的方式来指定整数类型。例如,CL_SIGNED_INT32代表32位有符号整型数据,CL_UNSIGNED_INT8与C语言中无符号字符类型一样。单精度浮点数据,可以使用CL_FLOAT指定,并且这个标识用在了本节的例子中。
代码清单4.4展示了在主机端创建输入和输出图像的例子。图像对象创建完成之后,我们使用clEnqueueWriteImage()将主机端的输入数据传输到图像对象当中。
{%ace edit=false, lang=’c_cpp’%} /* The image descriptor describes how the data will be stored
- in memory. This descriptor initializes a 2D image with no pitch */ cl_image_desc desc; desc.image_type = CL_MEM_OBJECT_IMAGE2D; desc.image_width = width; desc.image_height = height; desc.image_depth = 0; desc.image_array_size = 0; desc.image_row_pitch = 0; desc.image_slice_pitch = 0; desc.num_mip_levels = 0; desc.num_samples = 0; desc.buffer = NULL;
/ The image format descibes the properties of each pixel / cl_image_format format; format.image_channel_order = CL_R; // single channel format.image_channel_data_type = CL_FLOAT;
/* Create the input image and initialize it using a
- pointer to the image data on the host */ cl_mem inputImage = clCreateImage(context, CL_MEM_READ_ONLY, &format, &desc, NULL, NULL);
/ Create the output image / cl_mem ouputImage = clCreateImage(context, CL_MEM_WRITE_ONLY, &formatm, &desc, NULL, NULL);
/ Copy the host image data to the device / size_t origin[3] = {0,0,0}; // Offset within the image to copy form size_t region[3] = {width, height, 1}; // Elements to per dimension clEnqueueWriteImage(queue, inputImage, CL_TRUE, origin, region, 0 / row-pitch /, 0 / slice-pitch /, hostInputImage, 0, NULL, NULL); {%endace%}
代码清单4.4 为旋转例程创建图像对象
旋转例程的完整代码在代码清单4.5中展示。 {%ace edit=false, lang=’c_cpp’%} / System includes /
include
include
include
/ OpenCL includes /
include
/ Utility functions /
include “utils.h”
include “bmp-utils.h”
int main(int argc, char *argv) { / Host data / float hInputImage = NULL; float *hOutputImage = NULL;
/ Angle for rotation (degrees) / const float theta = 45.f;
/* Allocate space for the input image and read the
data from disk / int imageRows; int imageCols; hInputImage = readBmpFloat(“cat.bmp”, &imageRow, &imageCols); const int imageElements = imageRows imageCols; const size_t imageSize = imageElements * sizeof(float);
/ Allocate space for the ouput image / hOutputImage = (float *)malloc(imageSize); if (!hOutputImage){ exit(-1); }
/ Use this to check the output of each API call / cl_int status;
/ Get the first platform / cl_platform_id platform; status = clGetPlatformIDs(1, &platform, NULL); check(status);
/ Get the first device / cl_device_id device; status = clGetDeviceIDs(platform, CL_DEVICE_TYPE_GPU, 1, &device, NULL); check(status);
/ Create a context and associate it with the device / cl_context context; context = clCreateContext(NULL, 1, &device, NULL, NULL, &status); check(status);
/ Create a command-queue and associate it with the device / cl_command_queue cmdQueue; cmdQueue = clCreateCommandQueue(context, device, 0, &status); check(status);
/* The image descriptor describes how the data will be stored
in memory. This descriptor initializes a 2D image with no pitch */ cl_image_desc desc; desc.image_type = CL_MEM_OBJECT_IMAGE2D; desc.image_width = width; desc.image_height = height; desc.image_depth = 0; desc.image_array_size = 0; desc.image_row_pitch = 0; desc.image_slice_pitch = 0; desc.num_mip_levels = 0; desc.num_samples = 0; desc.buffer = NULL;
/ The image format describes the properties of each pixel / cl_image_format format; format.image_channel_order = CL_R; // single channel format.image_channel_data_type = CL_FLOAT;
/* Create the input image and initialize it using a
pointer to the image data on the host */ cl_mem inputImage = clCreateImage(context, CL_MEM_READ_ONLY, &format, &desc, NULL, NULL);
/ Create the ouput image / cl_mem outputImage = clCreateImage(context, CL_MEM_WRITE_ONLY, &format, &desc, NULL, NULL);
/ Copy the host image data to the device / size_t origin[3] = {0,0,0}; // Offset within the image to copy from size_t region[3] = {imageCols, imageRows, 1}; // Elements to per dimension clEnqueueWriteImage(cmdQueue, inputImage, CL_TRUE, origin, region, 0 / row-pitch /, 0 / slice-pitch /, hInputImage, 0, NULL, NULL);
/ Create a program with source code / char programSource = readFile(“image-rotation.cl”); size_t programSourceLen = strlen(programSource); cl_program program = clCreateProgramWithSource(context, 1, (const char *)&programSource, &programSourceLen, &status); check(status);
/ Build (compile) the program for the device / status = clBuildProgram(program, 1, &device, NULL, NULL, NULL); if (status != CL_SUCCESS){ printCompilerError(program, device); exit(-1); }
/ Create the kernel / cl_kernel kernel; kernel = clCreateKernel(program, “rotation”, &status); check(status);
/ Set the kernel arguments / status = clSetkernelArg(kernel, 0, sizeof(cl_mem), &inputImage); status |= clSetKernelArg(kernel, 1, sizeof(cl_mem), &outputImage); status |= clSetKernelArg(kernel, 2, sizeof(int), &imageCols); status |= clSetKernelArg(kernel, 3, sizeof(int), &imageRows); status |= clSetKernelArg(kernel, 4, sizeof(float), &theta); check(status);
/ Define the index space and work-group size / size_t globalWorkSize[2]; globalWorkSize[0] = imageCols; globalWorkSize[1] = imageRows;
size_t localWorkSize[2]; localWorkSize[0] = 8; localWorkSize[1] = 8;
/ Enqueue the kernel for execution / status = clEnqueueReadImage(cmdQueue, outputImage, CL_TRUE, origin, region, 0 / row-pitch /, 0 / slice-pitch /, hOutputImage, 0, NULL, NULL); check(status);
/ Write the output image to file / writeBmpFloat(hOutputImage, “rotated-cat.bmp”, imageRows, imageCols, “cat.bmp”);
/ Free OpenCL resources / clReleaseKernel(kernel); clReleaseProgram(program); clReleaseCommandQueue(cmdQueue); clReleaseMemObject(inputImage); clReleaseMemObject(outputImage); clReleaseContext(context);
/ Free host resources / free(hInputImage); free(hOutputImage); free(programSource);
return 0; } {%endace%}
代码清单4.5 图像旋转主机端的完整代码

若有收获,就点个赞吧
0 人点赞
