Californium
Let’s go!
引入Californium开源框架的依赖californium-core
启动服务端:
public static void main(String[] args) {// 创建服务端CoapServer server = new CoapServer();// 启动服务端server.start();}
让我们从CoapServer这个类开始,对整个框架进行分析。首先让我们看看构造方法CoapServer()里面做了什么:
public CoapServer(final NetworkConfig config, final int... ports) {// 初始化配置if (config != null) {this.config = config;} else {this.config = NetworkConfig.getStandard();}// 初始化Resourcethis.root = createRoot();// 初始化MessageDelivererthis.deliverer = new ServerMessageDeliverer(root);CoapResource wellKnown = new CoapResource(".well-known");wellKnown.setVisible(false);wellKnown.add(new DiscoveryResource(root));root.add(wellKnown);// 初始化EndPointsthis.endpoints = new ArrayList<>();// 初始化线程池this.executor = Executors.newScheduledThreadPool(this.config.getInt(NetworkConfig.Keys.PROTOCOL_STAGE_THREAD_COUNT), new NamedThreadFactory("CoapServer#"));// 添加Endpointfor (int port : ports) {addEndpoint(new CoapEndpoint(port, this.config));}}
构造方法初始化了一些成员变量。其中,Endpoint负责与网络进行通信,MessageDeliverer负责分发请求,Resource负责处理请求。接着让我们看看启动方法start()又做了哪些事:
public void start() {// 如果没有一个Endpoint与CoapServer进行绑定,那就创建一个默认的Endpoint...// 一个一个地将Endpoint启动int started = 0;for (Endpoint ep:endpoints) {try {ep.start();++started;} catch (IOException e) {LOGGER.log(Level.SEVERE, "Cannot start server endpoint [" + ep.getAddress() + "]", e);}}if (started==0) {throw new IllegalStateException("None of the server endpoints could be started");}}
启动方法很简单,主要是将所有的Endpoint一个个启动。至此,服务端算是启动成功了。让我们稍微总结一下几个类的关系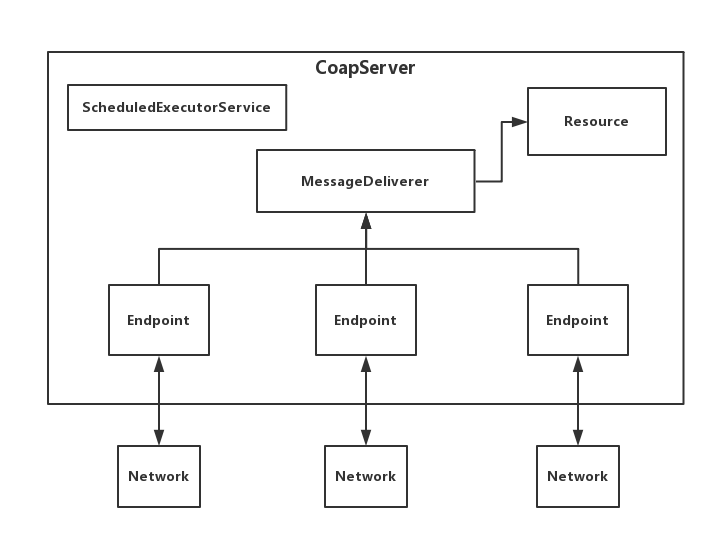
如上图,消息会从Network模块传输给对应的Endpoint节点,所有的Endpoint节点都会将消息推给MessageDeliverer,MessageDeliverer根据消息的内容传输给指定的Resource,Resource再对消息内容进行处理。
接下来,将让我们再模拟一个客户端发起一个GET请求,看看服务端是如何接收和处理的吧!客户端代码如下:
public static void main(String[] args) throws URISyntaxException {// 确定请求路径URI uri = new URI("127.0.0.1");// 创建客户端CoapClient client = new CoapClient(uri);// 发起一个GET请求client.get();}
通过前面分析,我们知道Endpoint是直接与网络进行交互的,那么客户端发起的GET请求,应该在服务端的Endpoint中收到。框架中Endpoint接口的实现类只有CoapEndpoint,让我们深入了解一下CoapEndpoint的内部实现,看看它是如何接收和处理请求的。
CoapEndpoint类
CoapEndpoint类实现了Endpoint接口,其构造方法如下:
public CoapEndpoint(Connector connector, NetworkConfig config, ObservationStore store) {this.config = config;this.connector = connector;if (store == null) {this.matcher = new Matcher(config, new NotificationDispatcher(), new InMemoryObservationStore());} else {this.matcher = new Matcher(config, new NotificationDispatcher(), store);}this.coapstack = new CoapStack(config, new OutboxImpl());this.connector.setRawDataReceiver(new InboxImpl());}
从构造方法可以了解到,其内部结构如下所示:
那么,也就是说客户端发起的GET请求将被InboxImpl类接收。InboxImpl类实现了RawDataChannel接口,该接口只有一个receiveData(RawData raw)方法,InboxImpl类的该方法如下:
public void receiveData(final RawData raw) {// 参数校验...// 启动线程处理收到的消息runInProtocolStage(new Runnable() {@Overridepublic void run() {receiveMessage(raw);}});}
再往receiveMessage(RawData raw)方法里看:
private void receiveMessage(final RawData raw) {// 解析数据源DataParser parser = new DataParser(raw.getBytes());// 如果是请求数据if (parser.isRequest()) {// 一些非关键操作...// 消息拦截器接收请求for (MessageInterceptor interceptor:interceptors) {interceptor.receiveRequest(request);}// 匹配器接收请求,并返回Exchange对象Exchange exchange = matcher.receiveRequest(request);// Coap协议栈接收请求coapstack.receiveRequest(exchange, request);}// 如果是响应数据,则与请求数据一样,分别由消息拦截器、匹配器、Coap协议栈接收响应...// 如果是空数据,则与请求数据、响应数据一样,分别由消息拦截器、匹配器、Coap协议栈接收空数据...// 一些非关键操作...}
接下来,我们分别对MessageInterceptor(消息拦截器)、Matcher(匹配器)、CoapStack(Coap协议栈)进行分析,看看他们接收到请求后做了什么处理。
MessageInterceptor接口
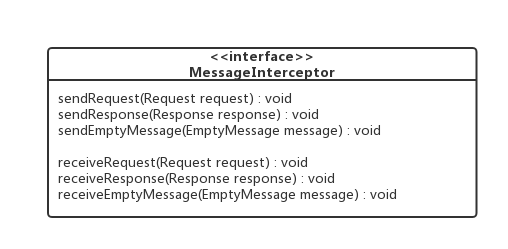
框架本身并没有提供该接口的任何实现类,我们可以根据业务需求实现该接口,并通过CoapEndpoint.addInterceptor(MessageInterceptor interceptor)方法添加具体的实现类。
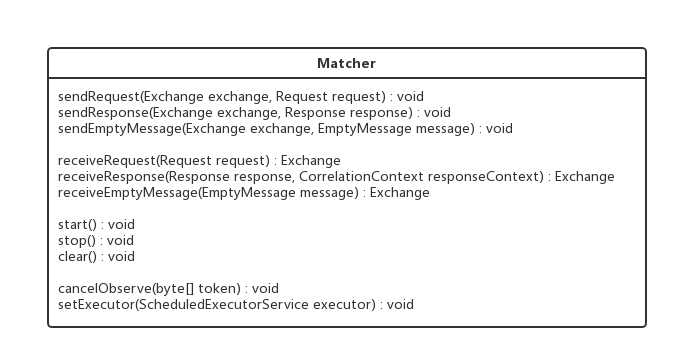
Matcher类
 】
】
我们主要看receiveRequest(Request request)方法,看它对客户端的GET请求做了哪些操作:
public Exchange receiveRequest(Request request) {// 根据Request请求,填充并返回Exchange对象...}
CoapStack类
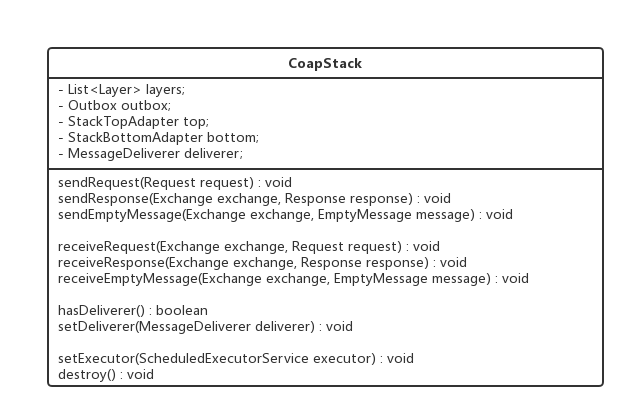
CoapStack的类图比较复杂,其结构可以简化为下图: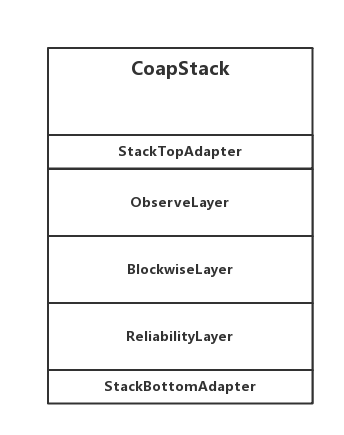
有人可能会疑惑,这个结构图是怎么来,答案就在构造方法里:
public CoapStack(NetworkConfig config, Outbox outbox) {// 初始化栈顶this.top = new StackTopAdapter();// 初始化栈底this.bottom = new StackBottomAdapter();// 初始化出口this.outbox = outbox;// 初始化ReliabilityLayer...// 初始化层级this.layers =new Layer.TopDownBuilder().add(top).add(new ObserveLayer(config)).add(new BlockwiseLayer(config)).add(reliabilityLayer).add(bottom).create();}
回归正题,继续看CoapStack.receiveRequest(Exchange exchange, Request request)方法是怎么处理客户端的GET请求:
public void receiveRequest(Exchange exchange, Request request) {bottom.receiveRequest(exchange, request);}
CoapStack在收到请求后,交给了StackBottomAdapter去处理,StackBottomAdapter处理完后就会依次向上传递给ReliabilityLayer、BlockwiseLayer、ObserveLayer,最终传递给StackTopAdapter。中间的处理细节就不详述了,直接看StackTopAdapter.receiveRequest(Exchange exchange, Request request)方法:
public void receiveRequest(Exchange exchange, Request request) {// 一些非关键操作...// 将请求传递给消息分发器deliverer.deliverRequest(exchange);}
可以看到,StackTopAdapter最后会将请求传递给MessageDeliverer,至此CoapEndpoint的任务也就算完成了,我们可以通过一张请求消息流程图来回顾一下,一个客户端GET请求最终是如何到达MessageDeliverer的: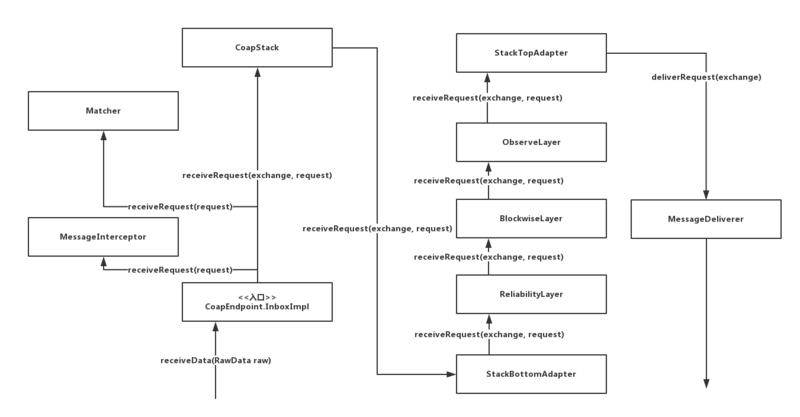
MessageDeliverer接口
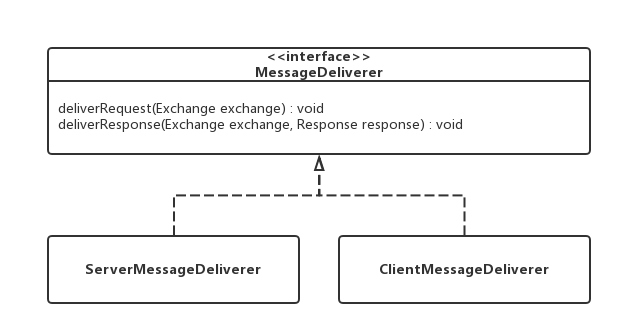
框架有ServerMessageDeliverer和ClientMessageDeliverer两个实现类。从CoapServer的构造方法里知道使用的是ServerMessageDeliverer类。那么就让我们看看ServerMessageDeliverer.deliverRequest(Exchange exchange)方法是如何分发GET请求的:
public void deliverRequest(final Exchange exchange) {// 从exchange里获取requestRequest request = exchange.getRequest();// 从request里获取请求路径List<String> path = request.getOptions().getUriPath();// 找出请求路径对应的Resourcefinal Resource resource = findResource(path);// 一些非关键操作...// 由Resource来真正地处理请求resource.handleRequest(exchange);// 一些非关键操作...}
当MessageDeliverer找到Request请求对应的Resource资源后,就会交由Resource资源来处理请求。(是不是很像Spring MVC中的DispatcherServlet,它也负责分发请求给对应的Controller,再由Controller自己处理请求)
Resource接口
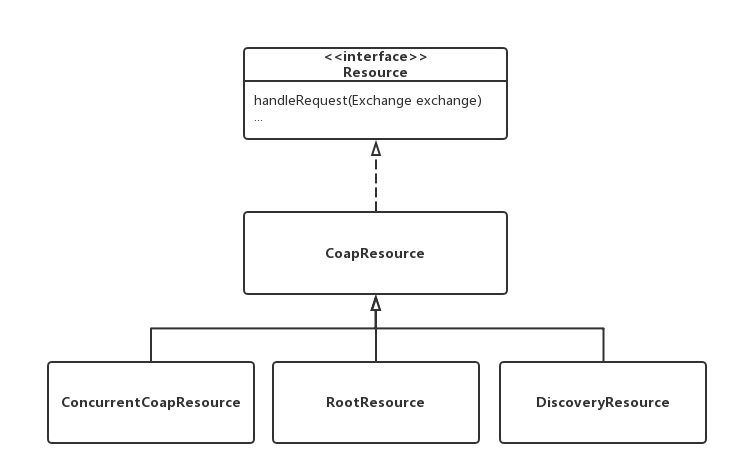
还记得CoapServer构造方法里创建了一个RootResource吗?它的资源路径为空,而客户端发起的GET请求默认也是空路径。那么ServerMessageDeliverer就会把请求分发给RootResource处理。RootResource类没有覆写handleRequest(Exchange exchange)方法,所以我们看看CoapResource父类的实现:
public void handleRequest(final Exchange exchange) {Code code = exchange.getRequest().getCode();switch (code) {case GET: handleGET(new CoapExchange(exchange, this)); break;case POST: handlePOST(new CoapExchange(exchange, this)); break;case PUT: handlePUT(new CoapExchange(exchange, this)); break;case DELETE: handleDELETE(new CoapExchange(exchange, this)); break;}}
由于我们客户端发起的是GET请求,那么将会进入到RootResource.handleGET(CoapExchange exchange)方法:
public void handleGET(CoapExchange exchange) {// 由CoapExchange返回响应exchange.respond(ResponseCode.CONTENT, msg);}
再接着看CoapExchange.respond(ResponseCode code, String payload)方法:
public void respond(ResponseCode code, String payload) {// 生成响应并赋值Response response = new Response(code);response.setPayload(payload);response.getOptions().setContentFormat(MediaTypeRegistry.TEXT_PLAIN);// 调用同名函数respond(response);}
看看同名函数里又做了哪些操作:
public void respond(Response response) {// 参数校验...// 设置Response属性...// 检查关系resource.checkObserveRelation(exchange, response);// 由成员变量Exchange发送响应exchange.sendResponse(response);}
那么Exchange.sendResponse(Response response)又是如何发送响应的呢?
public void sendResponse(Response response) {// 设置Response属性response.setDestination(request.getSource());response.setDestinationPort(request.getSourcePort());setResponse(response);// 由Endpoint发送响应endpoint.sendResponse(this, response);}
原来最终还是交给了Endpoint去发送响应了啊!之前的GET请求就是从Endpoint中来的。这真是和达康书记一样,从人民中来,再到人民中去。
在CoapEndpoint类一章节中我们有介绍它的内部结构。那么当发送响应的时候,将与之前接收请求相反,先由StackTopAdapter处理、再是依次ObserveLayer、BlockwiseLayer、ReliabilityLayer处理,最后由StackBottomAdapter处理,中间的细节还是老样子忽略,让我们直接看StackBottomAdapter.sendResponse(Exchange exchange, Response response)方法:
public void sendResponse(Exchange exchange, Response response) {outbox.sendResponse(exchange, response);}
请求入口是CoapEndpoint.InboxImpl,而响应出口是CoapEndpint.OutboxImpl,简单明了。最后,让我们看看OutboxImpl.sendResponse(Exchange exchange, Response response)吧:
public void sendResponse(Exchange exchange, Response response) {// 一些非关键操作...// 匹配器发送响应matcher.sendResponse(exchange, response);// 消息拦截器发送响应for (MessageInterceptor interceptor:interceptors) {interceptor.sendResponse(response);}// 真正地发送响应到网络里connector.send(Serializer.serialize(response));}
通过一张响应消息流程图来回顾一下,一个服务端响应最终是如何传输到网络里去: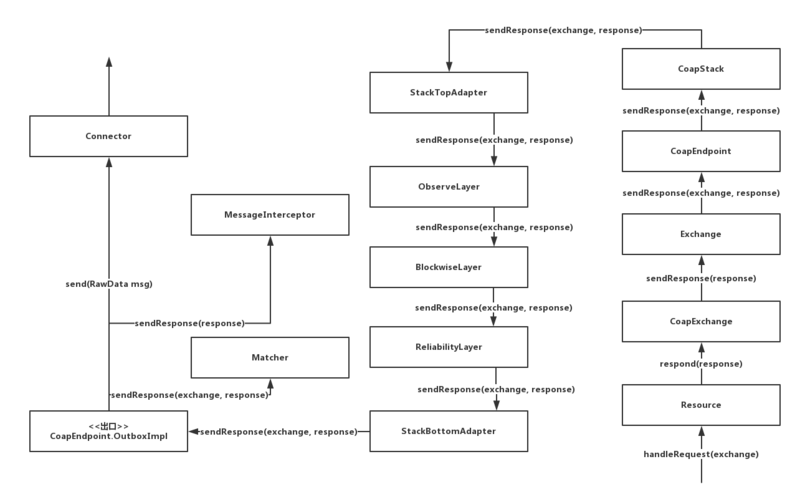
总结
通过服务端的创建和启动,客户端发起GET请求,服务端接收请求并返回响应流程,我们对Californium框架有了一个整体的了解。俗话说,师父领进门,修行看个人。在分析这个流程的过程中,我省略了很多的细节,意在让大家对框架有个概念上的理解,在以后二次开发或定位问题时更能抓住重点,着重针对某个模块。最后,也不得不赞叹一下这款开源框架代码逻辑清晰,模块职责划分明确,灵活地使用设计模式,非常值得我们学习!
如果对你有帮助,点赞收藏手有余香!

若有收获,就点个赞吧
0 人点赞
