deeplab环境安装
2021年12月24日 tf最高版本2.6,对应最新的models文件。在research文件中的deeplab代码是tf1版本 ,因此环境推荐安装
tensorflow = 1.15cudatoolkit = 10.0.130cudnn = 7.6.5opencv-python = 4.5.3.56labelme = 3.9pip install labelme -i https://baidu.com/pypi/simple
剩下的缺什么装什么,tf安装好后别的库版本都会自动适配。
测试环境通过后,开始制作数据集。
制作数据集
首先对数据集进行标注,使用labelme,标注时注意标签一致(区分大小写)。
在jpg文件夹下会出现对应的同名json文件、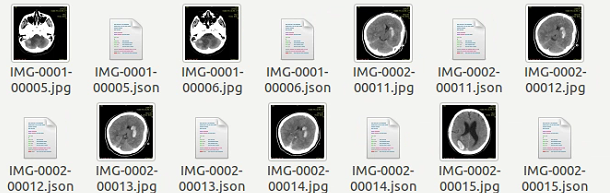
首先对每个类别的数据,进行重命名,同时检验标签是否一致:
import osimport jsonfrom PIL import Imagepath = "/media/neal/neal/Dataset/medical2021.11.13/YF2021.10.30"output_path = "/media/neal/neal/Dataset/medical2021.11.13/YF"class_name = "yf"count = os.listdir(path)cnt = 0for i in range(0, len(count)):if count[i].endswith("jpg"):cnt += 1jpg_path = os.path.join(path, count[i])img = Image.open(jpg_path)new_img_name = class_name + '_' + '%05d' % int(cnt) + '.jpg'img.save(output_path + '/' + new_img_name)json_path = path + "/" + count[i].split('.')[0] + '.json'with open(json_path , 'rb') as f:params = json.load(f)if params["shapes"][0]["label"] != class_name:print("dataset label has error !!!")params['imagePath'] = new_img_namenew_json_name = os.path.join(output_path, new_img_name.replace("jpg", "json"))with open(new_json_name, 'w') as r:json.dump(params, r, indent = 4)r.close()f.close()
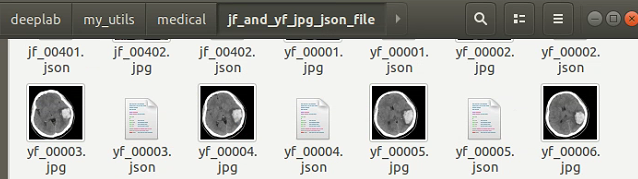
然后将所有类别的jpg和json文件一起放在jpg_json_dir文件夹中,具体文件夹格式见代码,运行代码:
import osfrom PIL import Imageimport numpy as np"""input : workspace_dir,jpg_json_dir ,class_name.txtoutput: pngrequired pkgs: pip install labelme+ workspace_dir root目录+ jpg_json_dir 在root目录下的子文件夹,存放原始jpg图片和labelme标注后生成的json文件- *.jpg- *.json+ labelme_output 所有图片的labelme输出文件夹+ jpg 所有jpg图片+ png 用于最终训练的全景图,单通道- class_name.txt 按行存放所有的标签,第一行 _background_"""# 文件路径处理workspace_dir = "/media/neal/neal/deeplab/models/research/deeplab/my_utils/medical"assert (os.path.exists(workspace_dir)), "please check workspace_dir folder"jpg_json_dir = os.path.join(workspace_dir, "jf_and_yf_jpg_json_file")assert (os.path.exists(jpg_json_dir)), "please check jpg_json_dir folder"jpg_dir = os.path.join(workspace_dir, "jpg")png_dir = os.path.join(workspace_dir, "png")class_name_path = workspace_dir + "/class_name.txt"if not os.path.exists(class_name_path): print("clsaa_name.txt is not found")if not os.path.exists(jpg_dir): os.mkdir(jpg_dir)if not os.path.exists(png_dir): os.mkdir(png_dir)def generate_labelme_output_file():json_file = os.listdir(jpg_json_dir)for file in json_file:if file.split('.')[1] == 'json':os.system("labelme_json_to_dataset %s" % (jpg_json_dir + '/' + file)) #def main():# 读取原文件夹count = os.listdir(jpg_json_dir)for i in range(0, len(count)):# 如果里的文件以jpg结尾,保存到jpg文件夹,寻找它对应的pngif count[i].endswith("jpg"):jpg_path = os.path.join(jpg_json_dir, count[i])img = Image.open(jpg_path)img.save(os.path.join(jpg_dir, count[i]))# 找到对应的pnglabelme_png_path = jpg_json_dir + "/" + count[i].split(".")[0] + "_json/label.png"img = Image.open(labelme_png_path)with open(jpg_json_dir + "/" + count[i].split(".")[0] + "_json/label_names.txt", "r") as f:new = Image.new("P", (img.width, img.height))label = f.read().splitlines()[1]# label = f.read().splitlines()# class_txt = open(class_name_path, "r")# class_name = class_txt.read().splitlines()# # 找到局部的类在全局中的类的序号# for name in label:# # index_json是x_json文件里存在的类label_names.txt,局部类# index_json = label.index(name)# # index_all是全局的类,# index_all = class_name.index(name)# new = new + (index_all * (np.array(img) == index_json))if label == "jf":new = new + (1 * (np.array(img) == 1))elif label == "yf":new = new + (2 * (np.array(img) == 1))else:print(" label_names has error -->{}".format(labelme_png_path))# # 找到全局的类# class_txt = open(class_name_path, "r")# class_name = class_txt.read().splitlines()# print(class_name)# # ["bk","cat","dog"] 全局的类# # 打开x_json文件里面存在的类,称其为局部类# with open(output_dir + "/" + count[i].split(".")[0] + "_json/label_names.txt", "r") as f:# names = f.read().splitlines()# # ["bk","dog"] 局部的类# # 新建一张空白图片, 单通道# new = Image.new("P", (img.width, img.height))## # 找到局部的类在全局中的类的序号# for name in names:# # index_json是x_json文件里存在的类label_names.txt,局部类# index_json = names.index(name)# # index_all是全局的类,# index_all = class_name.index(name)## # 将局部类转换成为全局类# # 将原图img中像素点的值为index_json的像素点乘以其在全局中的像素点的所对应的类的序号 得到 其实际在数据集中像素点的值# # 比如dog,在局部类(output/x_json/label_names)中它的序号为1,dog在原图中的像素点的值也为1.# # 但是在全局的类(before/classes.txt)中其对应的序号为2,所以在新的图片中要将局部类的像素点的值*全局类的序号,从而得到标签文件# new = new + (index_all * (np.array(img) == index_json))new = Image.fromarray(np.uint8(new))new = new.convert("P")new.save(os.path.join(png_dir, count[i].replace("jpg", "png")))# 找到新的标签文件中像素点值的最大值和最小值,最大值为像素点对应的类在class_name.txt中的序号,最小值为背景,即0print(np.max(new), np.min(new), count[i].replace("jpg", "png"))if __name__ == '__main__':#generate_labelme_output_file()main()
出现对应的全局mask(或者叫全景图)训练文件,我保存在png文件夹下(注意是单通道图),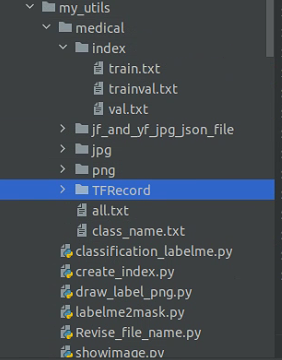
使用showimage文件可以查看单张图片中具体位置的像素值:
import cv2img= cv2.imread('/media/neal/neal/deeplab/models/research/deeplab/my_utils/medical/png/jf_10.png') #定义图片位置#img= cv2.cvtColor(img, cv2.COLOR_BGR2GRAY) #转化为灰度图 因为我读取的直接是灰度标签图片就不用转化了def onmouse(event, x, y, flags, param): #标准鼠标交互函数if event==cv2.EVENT_MOUSEMOVE: #当鼠标移动时print(img[y,x]) #显示鼠标所在像素的数值,注意像素表示方法和坐标位置的不同def main():cv2.namedWindow("img") #构建窗口cv2.setMouseCallback("img", onmouse) #回调绑定窗口while True: #无限循环cv2.imshow("img",img) #显示图像if cv2.waitKey() == ord('q'):break #按下‘q'键,退出cv2.destroyAllWindows() #关闭窗口if __name__ == '__main__': #运行main()
然后,制作index标签:
# 文件名写入txtimport randomimport globimg_path = glob.glob('/media/neal/neal/deeplab/models/research/deeplab/my_utils/medical/jf_and_yf_jpg_json_file/*.jpg')all_txt = '/media/neal/neal/deeplab/models/research/deeplab/my_utils/medical/all.txt'train_txt = "/media/neal/neal/deeplab/models/research/deeplab/my_utils/medical/index/train.txt"trainval_txt = "/media/neal/neal/deeplab/models/research/deeplab/my_utils/medical/index/trainval.txt"val_txt = "/media/neal/neal/deeplab/models/research/deeplab/my_utils/medical/index/val.txt"def clear_file():with open(all_txt, 'a') as f:f.truncate(0)with open(train_txt, 'a') as f:f.truncate(0)with open(trainval_txt, 'a') as f:f.truncate(0)with open(val_txt, 'a') as f:f.truncate(0)def split_train_val():for each in img_path:with open(all_txt, 'a') as f:f.write(each.split("/")[-1][:-4] + '\n') # 切片换成自己路径对应的文件名with open('/media/neal/neal/deeplab/models/research/deeplab/my_utils/medical/all.txt', 'r') as f:lines = f.readlines()g = [i for i in range(1, len(img_path)+1)] # 设置文件总数random.shuffle(g)# 设置需要的文件数train = g[:len(img_path)*7//10]print("train num --> {}".format(len(train)))trainval = g[len(img_path)*7//10:len(img_path)*9//10]print("trainval num --> {}".format(len(trainval)))val = g[len(img_path)*9//10:]print("val num --> {}".format(len(val)))for index, line in enumerate(lines, 1):if index in train:with open(train_txt, 'a') as trainf:trainf.write(line)elif index in trainval:with open(trainval_txt, 'a') as trainvalf:trainvalf.write(line)elif index in val:with open(val_txt, 'a') as valf:valf.write(line)if __name__ == '__main__':clear_file()split_train_val()
下一步生成TFRecord,这个代码是官网带的,我在前面添加了一些注释,以及命令行运行的代码,直接复制后命令行运行。
# Lint as: python2, python3# Copyright 2018 The TensorFlow Authors All Rights Reserved.## Licensed under the Apache License, Version 2.0 (the "License");# you may not use this file except in compliance with the License.# You may obtain a copy of the License at## http://www.apache.org/licenses/LICENSE-2.0## Unless required by applicable law or agreed to in writing, software# distributed under the License is distributed on an "AS IS" BASIS,# WITHOUT WARRANTIES OR CONDITIONS OF ANY KIND, either express or implied.# See the License for the specific language governing permissions and# limitations under the License.# =============================================================================="""Converts PASCAL VOC 2012 data to TFRecord file format with Example protos.PASCAL VOC 2012 dataset is expected to have the following directory structure:+ pascal_voc_seg- build_data.py- build_voc2012_data.py (current working directory).+ VOCdevkit+ VOC2012+ JPEGImages+ SegmentationClass+ ImageSets+ Segmentation+ tfrecordImage folder:./VOCdevkit/VOC2012/JPEGImagesSemantic segmentation annotations:./VOCdevkit/VOC2012/SegmentationClasslist folder:./VOCdevkit/VOC2012/ImageSets/SegmentationThis script converts data into sharded data files and save at tfrecord folder.The Example proto contains the following fields:image/encoded: encoded image content.image/filename: image filename.image/format: image file format.image/height: image height.image/width: image width.image/channels: image channels.image/segmentation/class/encoded: encoded semantic segmentation content.image/segmentation/class/format: semantic segmentation file format."""from __future__ import absolute_importfrom __future__ import divisionfrom __future__ import print_functionimport mathimport os.pathimport sysimport build_datafrom six.moves import rangeimport tensorflow as tf# image_format 这个参数只能在命令行给 ,没有仔细研究,先用命令行吧"""python ./build_voc2012_data.py \--image_folder="/media/neal/neal/deeplab/models/research/deeplab/my_utils/medical/jpg" \--semantic_segmentation_folder="/media/neal/neal/deeplab/models/research/deeplab/my_utils/medical/png" \--list_folder="/media/neal/neal/deeplab/models/research/deeplab/my_utils/medical/index" \--image_format="jpg" \--output_dir="/media/neal/neal/deeplab/models/research/deeplab/my_utils/medical/TFRecord""""FLAGS = tf.app.flags.FLAGStf.app.flags.DEFINE_string('image_folder','/media/neal/neal/deeplab/models/research/deeplab/my_utils/medical/jpg','Folder containing images.')tf.app.flags.DEFINE_string('semantic_segmentation_folder','/media/neal/neal/deeplab/models/research/deeplab/my_utils/medical/png','Folder containing semantic segmentation annotations.')tf.app.flags.DEFINE_string('list_folder','/media/neal/neal/deeplab/models/research/deeplab/my_utils/medical/index','Folder containing lists for training and validation')tf.app.flags.DEFINE_string('output_dir','/media/neal/neal/deeplab/models/research/deeplab/my_utils/medical/TFRecord','Path to save converted SSTable of TensorFlow examples.')_NUM_SHARDS = 4def _convert_dataset(dataset_split):"""Converts the specified dataset split to TFRecord format.Args:dataset_split: The dataset split (e.g., train, test).Raises:RuntimeError: If loaded image and label have different shape."""dataset = os.path.basename(dataset_split)[:-4]sys.stdout.write('Processing ' + dataset)filenames = [x.strip('\n') for x in open(dataset_split, 'r')]num_images = len(filenames)num_per_shard = int(math.ceil(num_images / _NUM_SHARDS))image_reader = build_data.ImageReader('jpeg', channels=3)label_reader = build_data.ImageReader('png', channels=1)for shard_id in range(_NUM_SHARDS):output_filename = os.path.join(FLAGS.output_dir,'%s-%05d-of-%05d.tfrecord' % (dataset, shard_id, _NUM_SHARDS))with tf.python_io.TFRecordWriter(output_filename) as tfrecord_writer:start_idx = shard_id * num_per_shardend_idx = min((shard_id + 1) * num_per_shard, num_images)for i in range(start_idx, end_idx):sys.stdout.write('\r>> Converting image %d/%d shard %d' % (i + 1, len(filenames), shard_id))sys.stdout.flush()# Read the image.image_filename = os.path.join(FLAGS.image_folder, filenames[i] + '.' + FLAGS.image_format)image_data = tf.gfile.GFile(image_filename, 'rb').read()height, width = image_reader.read_image_dims(image_data)# Read the semantic segmentation annotation.seg_filename = os.path.join(FLAGS.semantic_segmentation_folder,filenames[i] + '.' + FLAGS.label_format)seg_data = tf.gfile.GFile(seg_filename, 'rb').read()seg_height, seg_width = label_reader.read_image_dims(seg_data)if height != seg_height or width != seg_width:raise RuntimeError('Shape mismatched between image and label.')# Convert to tf example.example = build_data.image_seg_to_tfexample(image_data, filenames[i], height, width, seg_data)tfrecord_writer.write(example.SerializeToString())sys.stdout.write('\n')sys.stdout.flush()def main(unused_argv):dataset_splits = tf.gfile.Glob(os.path.join(FLAGS.list_folder, '*.txt'))for dataset_split in dataset_splits:_convert_dataset(dataset_split)if __name__ == '__main__':tf.app.run()
注册数据集
data_generator.py
在/models/research/deeplab/datasets 路径的data_generator.py 第93行:
_MYDATA_INFORMATION = DatasetDescriptor(splits_to_sizes={'train':44, # num of samples in images/training train.txt的行数'val':27, # num of samples in images/validation val.txt的行数},num_classes=6, # 我的标签是5类(包括background),加上ignore_label总共六类ignore_label=255,)
然后找到 _DATASETS_INFORMATION ,加上mydata….一行
_DATASETS_INFORMATION = {'cityscapes': _CITYSCAPES_INFORMATION,'pascal_voc_seg': _PASCAL_VOC_SEG_INFORMATION,'ade20k': _ADE20K_INFORMATION,'mydata': _MYDATA_INFORMATION, #注册上面的数据集 加粗部分一致,前面的mydata随意取}
同样在models/research/deeplab/deprecated下的segmentation_dataset.py文件进行同样的操作
train_utils.py
在models/research/deeplab/utils/train_utils.py的213行左右
exclude_list = ['global_step','logits'] #本来只有global_step ,现在加上 logits,表示不加载逻辑层的参数if not initialize_last_layer:exclude_list.extend(last_layers)
train.py
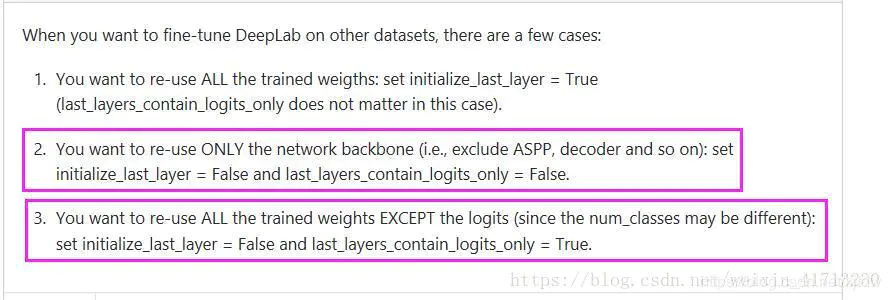
在models/research/deeplab/train.py里 156行左右
# Set to False if one does not want to re-use the trained classifier weights.flags.DEFINE_boolean('initialize_last_layer', False, 'Initialize the last layer.') #这个本来是True设置为Falseflags.DEFINE_boolean('last_layers_contain_logits_only', True, 'Only consider logits as last layers or not.')#这个设置为True
input_preprocess.py
models/research/deeplab/input_preprocess.py 128行左右# Randomly crop the image and label.if is_trainingand labelis not None:processed_image, label = preprocess_utils.random_crop([processed_image, label], crop_height, crop_width)
为这个if加一个else,下面的代码显示得不好,不过在链接里也有
参考链接:https://github.com/tensorflow/models/issues/3695
else:rr = tf.minimum(tf.cast(crop_height, tf.float32) / tf.cast(image_height, tf.float32), \tf.cast(crop_width, tf.float32) / tf.cast(image_width, tf.float32))newh = tf.cast(tf.cast(image_height, tf.float32) * rr, tf.int32)neww = tf.cast((tf.cast(image_width, tf.float32) * rr), tf.int32)processed_image = tf.image.resize_images(processed_image, (newh, neww), method=tf.image.ResizeMethod.BILINEAR, align_corners=True)processed_image = preprocess_utils.pad_to_bounding_box(processed_image, 0, 0, crop_height, crop_width, mean_pixel)
不加这一段在运行vis.py和eval的时候会报错
类似
InvalidArgumentError (see above for traceback): padded_shape[1]=128 is not divisible by block_shape[1]=12
Invalid argument: padded_shape[1]=69 is not divisible by block_shape[1]=2
这种错基本都是这样解决
训练
python train.py \--logtostderr \--training_number_of_steps=100000 \--train_split="train" \--model_variant="xception_65" \--atrous_rates=6 \--atrous_rates=12 \--atrous_rates=18 \--output_stride=16 \--decoder_output_stride=4 \--train_crop_size="513,513" \--train_batch_size=4 \--dataset="mydata" \--tf_initial_checkpoint='/media/neal/neal/deeplab/models/research/deeplab/my_utils/pt/deeplabv3_xception_2018_01_04/xception/model.ckpt' \--train_logdir='/media/neal/neal/deeplab/models/research/deeplab/my_utils/result' \--dataset_dir='/media/neal/neal/deeplab/models/research/deeplab/my_utils/medical/TFRecord'
命令行提示找不到python模块,在python文件中导入包前加入
import syssys.path.append("项目根目录")
可视化
python vis.py \--logtostderr \--vis_split="val" \--model_variant="xception_65" \--atrous_rates=6 \--atrous_rates=12 \--atrous_rates=18 \--output_stride=16 \--decoder_output_stride=4 \--vis_crop_size="513,513" \--dataset="mydata" \--colormap_type="pascal" \--checkpoint_dir='/media/neal/neal/deeplab/models/research/deeplab/my_utils/result' \--vis_logdir='/media/neal/neal/deeplab/models/research/deeplab/my_utils/result_vis' \--dataset_dir='/media/neal/neal/deeplab/models/research/deeplab/my_utils/medical/TFRecord'
验证
python eval.py \--logtostderr \--eval_split="val" \--model_variant="xception_65" \--atrous_rates=6 \--atrous_rates=12 \--atrous_rates=18 \--output_stride=16 \--decoder_output_stride=4 \--eval_crop_size="513,513" \--dataset="mydata" \--checkpoint_dir='/media/neal/neal/deeplab/models/research/deeplab/my_utils/result' \--eval_logdir='/media/neal/neal/deeplab/models/research/deeplab/my_utils/medical/eval' \--dataset_dir='/media/neal/neal/deeplab/models/research/deeplab/my_utils/medical/TFRecord'
Tensorboard
python /home/neal/Python/anaconda/envs/tf115/lib/python3.7/site-packages/tensorboard/main.py \--logdir="/media/neal/neal/deeplab/models/research/deeplab/my_utils/eval"python /home/neal/Python/anaconda/envs/tf115/lib/python3.7/site-packages/tensorboard/main.py \--logdir="/media/neal/neal/deeplab/models/research/deeplab/my_utils/result"http://neal:6006/

若有收获,就点个赞吧
0 人点赞
