有一些QML元素被用于放置元素对象,它们被称作定位器,QtQuick模块提供了Row,Column,Grid,Flow用来作为定位器。你可以在下面的插图中看到它们使用相同内容的显示效果。
- Column(列)元素
- 将它的子对象通过顶部对齐的列方式进行排列。
- spacing属性用来设置每个元素之间的间隔大小。
- Row(行)元素
- 将它的子对象从左到右,或者从右到左依次排列,排列方式取决于
layoutDirection属性。 spacing属性用来设置每个元素之间的间隔大小。
- 将它的子对象从左到右,或者从右到左依次排列,排列方式取决于
- Grid(栅格)元素
- 通过设置
rows(行数)和columns(列数)将子对象排列在一个栅格中。可以只限制行数或者列数。如果没有设置它们中的任意一个,栅格元素会自动计算子项目总数来获得配置。例如,设置rows为3,添加了6个子项目到元素中,那么会自动计算columns为2。 - 属性
flow(流)与layoutDirection(布局方向)用来控制子元素的加入顺序。 spacing属性用来控制所有元素之间的间隔。
- 通过设置
- Flow(流)元素
- 通过flow(流)属性和layoutDirection(布局方向)属性来控制流的方向。它能够从头到底的横向布局,也可以从左到右或者从右到左进行布局。作为加入流中的子对象,它们在需要时可以被包装成新的行或者列。
- 为了让一个流可以工作,必须指定一个宽度或者高度,可以通过属性直接设定,或者通过anchor(锚定)布局设置。
组件
// Color.qmlimport QtQuick 2.15Rectangle {width: 48height: 48border.color: Qt.lighter(color)}
请注意使用了
Qt.lighter(color)来指定了基于填充色的边界高亮色。 颜色在使用该组件的地方设置 我们将会在后面的例子中使用到这些元素,希望后面的代码能够容易读懂。请记住每一个矩形框的初始化大小都是48乘48像素大小。
1.Column 列
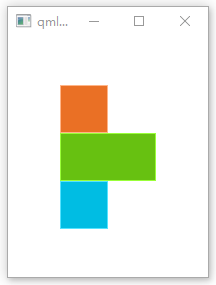
import QtQuick 2.15import QtQuick.Window 2.15Rectangle {id: rootwidth: 200height: 240Column {id: columnanchors.centerIn: parentspacing: 0Color{color: "#ea7025"}Color {color: "#67c111"width: 96}Color {color: "#00bde3"}}}
2.Row 行
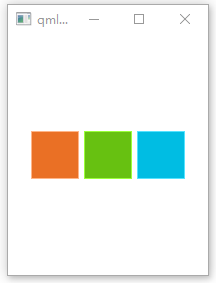
import QtQuick 2.15import QtQuick.Window 2.15Rectangle {id: rootwidth: 200height: 240Row {id: rowanchors.centerIn: parentspacing: 5Color{color: "#ea7025"}Color {color: "#67c111"}Color {color: "#00bde3"}}}
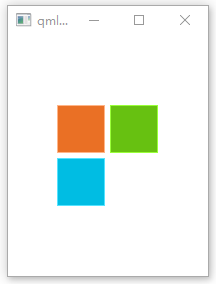
3. Grid 栅格
 ![B{HN8BP~OMG}F@TU)BNNTT.png
import QtQuick 2.15import QtQuick.Window 2.15Rectangle {id: rootwidth: 200height: 240Grid {id: gridrows: 2columns: 2anchors.centerIn: parentspacing: 5// layoutDirection: "RightToLeft" // 从右向走Color{color: "#ea7025"}Color {color: "#67c111"}Color {color: "#00bde3"}// Color {// color: "#ffcc66"// }}}
4. flow 流
![}_J8JG1J0H3T)5]@8GR6708.png](/uploads/projects/manbuyihai@qt/673208e730d5502618777eef4ce8b219.png)
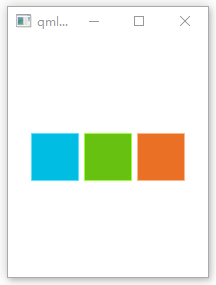
import QtQuick 2.15import QtQuick.Window 2.15Rectangle {id: rootwidth: 200height: 240Flow {id: flowanchors.centerIn: parentanchors.margins: 20spacing: 5// layoutDirection: "RightToLeft" // 效果是右图Color{color: "#ea7025"}Color {color: "#67c111"}Color {color: "#00bde3"}}}
5. Repeat(重复元素)与定位器
![WCRAWG7GUNH5}56VAGPX41.png
import QtQuick 2.15import QtQuick.Window 2.15Rectangle {id: rootwidth: 252height: 252property variant colorArray: ["#00bde3", "#67c111", "#ea7025"]Grid {id: flowanchors.centerIn: parentanchors.margins: 20spacing: 4Repeater {model: 16Rectangle {width: 56; height: 56property int colorIndex: Math.floor(Math.random()*3)color: root.colorArray[colorIndex]border.color: Qt.lighter(color)Text {anchors.centerIn: parentcolor: "#f0f0f0"text: "Cell " + index}}}}}
JavaScript是QtQuick中的一部分,所以这些典型的库函数我们都可以使用。即用JS数学函数
Math.floor(Math.random()*3)来选择颜色 Repeater一次循环时会产生一个index(索引)属性值,0 < index < model注意 高级的大数据模型处理和使用动态代理的动态视图会在模型与视图(model-view)章节中讲解。当有一小部分的静态数据需要显示时,使用重复元素是最好的方式。

若有收获,就点个赞吧
0 人点赞
