1、服务端安装
1.1、必要条件
(1)服务器,用来搭建ngrok的服务器,必须有公网ip,并且可以正常访问(本次测试使用的是Ubuntu 16.04 64位)。
(2)域名,用来生成访问域名。
1.2、安装工具和依赖
cd /usr/localwget https://studygolang.com/dl/golang/go1.11.linux-amd64.tar.gztar -zxvf go1.11.linux-amd64.tar.gzvim /etc/profileexport GOROOT=/usr/local/goexport PATH=$PATH:$GOROOT/binexport GOARCH=amd64 # 注意这个坑source /etc/profile
apt-get install build-essential mercurial git
1.3、下载源码
cd ~
git clone https://github.com/inconshreveable/ngrok.git
1.4、生成证书
注意:NGROK_DOMAIN需要换成自己的域名
cd ngrokmkdir sslcd sslexport NGROK_DOMAIN="limengshuai.top"openssl genrsa -out rootCA.key 2048openssl req -x509 -new -nodes -key rootCA.key -subj "/CN=$NGROK_DOMAIN" -days 5000 -out rootCA.pemopenssl genrsa -out device.key 2048openssl req -new -key device.key -subj "/CN=$NGROK_DOMAIN" -out device.csropenssl x509 -req -in device.csr -CA rootCA.pem -CAkey rootCA.key -CAcreateserial -out device.crt -days 5000cp rootCA.pem ../assets/client/tls/ngrokroot.crtcp device.crt ../assets/server/tls/snakeoil.crtcp device.key ../assets/server/tls/snakeoil.key
1.5、生成服务端和客户端
服务端GOOS=linux GOARCH=amd64 make release-server
window客户端GOOS=windows GOARCH=amd64 make release-client
linux客户端GOOS=linux GOARCH=amd64 make release-client
1.6、启动服务器
nohup ./bin/ngrokd -domain="$NGROK_DOMAIN" -httpAddr=":8000" -httpsAddr=":8443" >log/ngrok.log &
- -httpAddr=”:8000” http服务的访问端口 默认80
- -httpsAddr=”:8443” https服务的访问端口 默认443
- -tunnelAddr=”:4443” 客户端连接服务端的端口 默认4443
注意:上述端口需要通过防火墙
2、客户端使用
2.1、将生成的客户端复制到windows电脑中
2.2、创建一个ngrok.cfg配置文件
在当前目录建一个上述配置文件
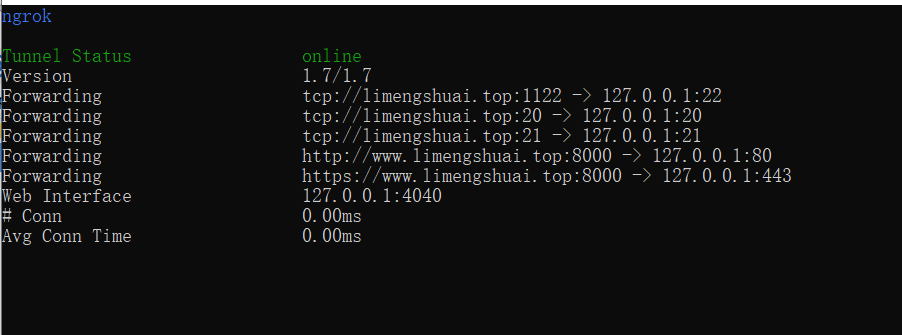
server_addr: "limengshuai.top:4443"trust_host_root_certs: falsetunnels:ssh:remote_port: 1122proto:tcp: 22ftp:remote_port: 20proto:tcp: 20ftp2:remote_port: 21proto:tcp: 21http:subdomain: wwwproto:http: 80https: 443
2.3、启动
启动指定通道
ngrok -config ngrok.cfg start ftp
ngrok -config ngrok.cfg start http
启动所有通道ngrok -config ngrok.cfg start-all
2.4、编写脚本
@echo onngrok -config=ngrok.cfg -proto=tcp 192.100.3.22:22REM ngrok -config=ngrok.cfg -log=ngrok.log -subdomain=yjc 192.100.3.205:8081REM ngrok -config ngrok.cfg start-all
2.5、帮助
Usage: ngrok.exe [OPTIONS] <local port or address>Options:-authtoken stringAuthentication token for identifying an ngrok.com account-config stringPath to ngrok configuration file. (default: $HOME/.ngrok)-hostname stringRequest a custom hostname from the ngrok server. (HTTP only) (requires CNAME of your DNS)-httpauth stringusername:password HTTP basic auth creds protecting the public tunnel endpoint-log stringWrite log messages to this file. 'stdout' and 'none' have special meanings (default "none")-log-level stringThe level of messages to log. One of: DEBUG, INFO, WARNING, ERROR (default "DEBUG")-proto stringThe protocol of the traffic over the tunnel {'http', 'https', 'tcp'} (default: 'http+https') (default "http+https")-subdomain stringRequest a custom subdomain from the ngrok server. (HTTP only)Examples:ngrok 80ngrok -subdomain=example 8080ngrok -proto=tcp 22ngrok -hostname="example.com" -httpauth="user:password" 10.0.0.1Advanced usage: ngrok [OPTIONS] <command> [command args] [...]Commands:ngrok start [tunnel] [...] Start tunnels by name from config filengork start-all Start all tunnels defined in config filengrok list List tunnel names from config filengrok help Print helpngrok version Print ngrok versionExamples:ngrok start www api blog pubsubngrok -log=stdout -config=ngrok.yml start sshngrok start-allngrok version

