更新:最近我发布了一个简化 redux 开发的新框架 booto,大家可以来瞧一瞧 https://github.com/linweiwei123/booto
Node.js 用途很广,常用来开发服务、桌面应用等被开发者熟知,Node.js 还有另外一个非常实用的场景 - 命令行应用(后文统称 CLI)。本文将介绍 CLI 的开发流程、常用的功能,并以 meet-cli 为例实战演练,从零开始一步步开发一个可以在生产中使用(read world)的 CLI 工具。meet-cli现已开源,读者也可以直接下载查看。
Why CLI?
在深入开发之前,我们先了解几个问题。
CLI 是什么?
Command Line Interface,顾名思义是一种通过命令行来交互的工具或者说应用。SPA 应用中常用的如vue-cli, angular-cli, node.js 开发搭建 express-generator,orm 框架 sequelize-cli,还有我们最常用的 webpack,npm 等。他们是 web 开发者的辅助工具,旨在减少低级重复劳动,专注业务提高开发效率,规范 develop workflow。
举比较典型的 angular-cli 为例,读者可以查看它的npm 说明文档, 它可以让 angular 开发者快速创建最佳实践的 angular 应用,快速启动,快速创建 component、directive、pipe、service、module 等,用过的都说很好用,现在各个框架都有配套 CLI。
CLI 的根据不同业务场景有不同的功能,但万变不离其宗,本质都是通过命令行交互的方式在本地电脑运行代码,执行一些任务。
CLI 有什么好处?
我们可以从工作中总结繁杂、有规律可循、或者简单重复劳动的工作用 CLI 来完成,只需一些命令,快速完成简单基础劳动。以下是我对现有工作中的可以用 CLI 工具实现的总结举例:
- 快速生成应用模板,如 vue-cli 等根据与开发者的一些交互式问答生成应用框架
- 创建 module 模板文件,如 angular-cli,创建 component,module;sequelize-cli 创建与 mysql 表映射的 model 等
- 服务启动,如 ng serve
- eslint,代码校验,如 vue,angular,基本都具备此功能
- 自动化测试 如 vue,angular,基本都具备此功能
- 编译 build,如 vue,angular,基本都具备此功能
- *编译分析,利用 webpack 插件进行分析
- *git 操作
- *生成的代码上传 CDN
- *还可以是小工具用途的功能,如 http 请求 api、图片压缩、生成雪碧图等等,只要你想做的都能做
总体而言就是一些快捷的操作替代人工重复劳动,提升开发效率。
与 npm scripts 的对比
npm scripts 也可以实现开发工作流,通过在 package.json 中的 scripts 对象上配置相关 npm 命令,执行相关 js 来达到相同的目的;
但是 cli 工具与 npm scripts 相比有什么优势呢?
- npm scripts 是某个具体项目的,只能在该项目内使用,cli 可以是全局安装的,多个项目使用;
- 使用 npm scripts 在业务工程里面嵌入工作流,耦合太高;使用 cli 可以让业务代码工作流相关代码剥离,业务代码专注业务
- cli 工具可以不断迭代开发,演进,沉淀。
meet-cli 针对项目实际需求,贴合工作实际需求应运而生。接下来看看 meet-cli 的一些功能;
MEET-CLI
本文基于
美柚的 web 开发的工作主要是产品内 hybrid 应用的 h5 部分,以及广告、营销互动类的 h5、往往互相独立,工作中发现有以下一些问题:
- 每个 h5 的创建一些列目录和文件,每个 h5 都有公共的基础代码
- 每次新功能都需要配置相关的 npm watch 和 build 命令,我们需要一个创建模板的功能
- 各个工程之间都有一套自己的 build 代码,上传 CDN 的代码,各不相同,开发人员垮项目开发上手慢
- 每次创建新工程 build 的代码都需要重复做一次(或者通过复制粘贴的办法),我们需要一个公共的上传功能
基于工作中的问题,额外我再加了点小功能,meet-cli 诞生了,下面展示下他的一些功能;
1、meet -help 查看功能列表

一个 cli 工具都具有查看帮助的功能,图中可以看出 meet-cli 具备创建 module、编译、发布(git 提交与资源上传 cdn)、单独指定文件上传 cdn 功能、分析生成文件功能
接下来快速演示上述几个主要功能
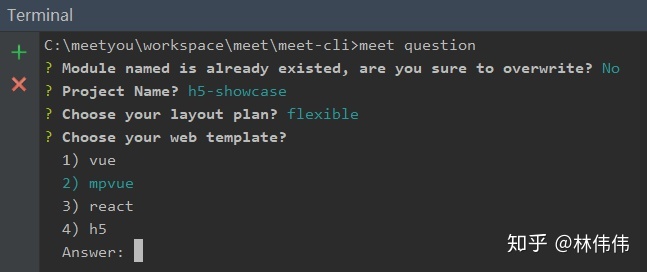
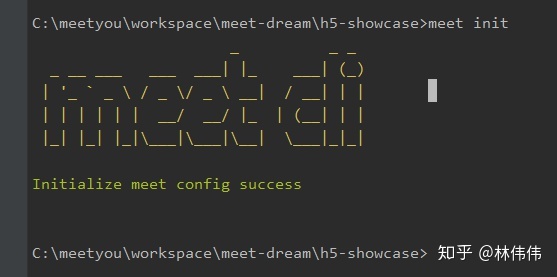
2、meet init
meet init 会在工程根目录下生成 meet.config.js 文件,用以配置 meet 工具的使用
const path = require('path');module.exports = {// module 生成的目标目录modulePath: path.resolve('public'),// module template 目录moduleTemplatePath: path.resolve('meet/templates/module'),// project git urlgitUrl:'http://gitlab.meiyou.com/advertise/ad-activity.git',// module build npm commandnpmBuildCommand:'npm run release:',// upload assets configupload:{// CDN Serverserver:'alioss',// 阿里OSS - 'alioss', 七牛云 - 'qn'// alioss server configconfig:{accessKeyId: "LTAIovxxxx0",accessKeySecret: "5xkXYxxxxf6wlzD8",bucket: "adstatic",region: "oss-cn-beijing",srcDir: path.resolve('public/assets'),// 要上传的dist文件夹ignoreDir: false,deduplication: true,prefix: "ad-activity.meiyou.com",}},// is publish after build?autoPublish: true,// 测试提交文字};
3、meet new [module]
快速创建 h5 模块目录和基础文件,基础 css,html,js,必要依赖,(还可以进行相关 express 路由配置,指定模块编译配置)
4、meet build [module]
build 模块,生成代码,用 webpack-bundle-analyzer 进行分析,可视化显示资源占比,可以一目了然的查看代码体积上是否存在问题,对于性能优化是一个好处

5、meet publish (git 操作 + upload CDN)
还有 meet analysis 、meet upload 等功能都是上述功能的局部。meet upload 可以指定上传某个路径下的资源,作为上传工具单独而存在。
目前实用功能比较少,后面还会增加一些功能
上面这一波操作很酷, 那是怎么实现呢,我们的核心内容现在才登场,如何从零开始开发一个 CLI 呢?
从零开发 CLI
我们将从零开始开发 meet-cli 来实战演示一个完整的 cli 的开发过程;(注:为了不影响我电脑的 meet-cli, 我将后文的 cli demo 命名为 mei-cli ,大家见谅!)
基础模块
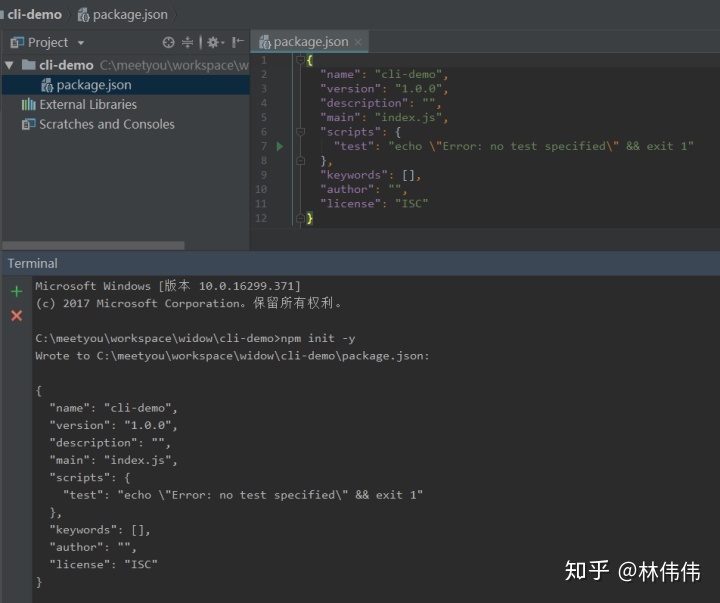
1、创建 npm 模块
执行命令,创建 npm 模块
得到
上面这步骤大家都很熟悉;
2、bin 入口文件
在 package.json 文件增加 bin 的对象
{"name": "cli-demo","version": "1.0.0","description": "","main": "index.js","bin":{"mei": "./bin/index.js"},"scripts": {"test": "echo \"Error: no test specified\" && exit 1"},"keywords": [],"author": "","license": "ISC"}
js 中首行设置如下代码:
上面这句话是用来告诉操作系统用 node 来运行这个文件
可以在 js 中 console.log(‘hello mei’)
3、全局安装
执行 npm install -g ,将 mei-cli 安装到全局。so,最简单的 cli 诞生了,任意找个位置输入 mei 命令,就执行了你的 ./bin/index.js 文件, console.log 了一句话,‘hello mei’。可以将 mei-cli 模块发布到 npm 上,这样就可以给社区使用了。如何发布 npm 模块,这里有一篇我的博客可以查看。
node.js 知识
node.js 具有 filesystem 模块,可以让开发者对文件进行读写、创建、删除等操作;
process、child_process、path、以及 commonjs 模块化知识等
基础掌握了,我们来认识一些常用组件
- commander CLI 常用开发框架
- chalk 终端文字加颜色 js 组件
- clui spinners、sparklines、progress bars 图样显示组件
- shelljs node.js 运行 shell 命令组件
- blessed-contrib 命令行可视化组件
- lnquirer 命令行交互信息收集组件
- figlet FIGlet is a program that creates large characters out of ordinary screen characters
此外,还有游大神开发的 meet-ali-oss 上传模块
上述这些组件足以让你开发酷炫的 cli,如果不够,这里还有 50 个组件 任你挑选;
我们要完成的 cli 主体结构图

文件结构要划分合理,index.js 是主入口文件, commands 专门放主要的命令功能逻辑,根据命令模块划分,比较细的功能实现可以抽成组件放在 lib 文件夹中,剩余的配置,以及模板等放 meet 文件夹中
主入口文件
#!/usr/bin/env nodeconst path = require('path');const fs = require('fs');const program = require('commander');const gmodule = require('../packages/commands/module');// const serve = require('../packages/commands/serve');const question = require('../packages/commands/question');const build = require('../packages/commands/build');const publish = require('../packages/commands/publish');const upload = require('../packages/commands/upload');const analysis = require('../packages/lib/analysis');const initial = require('../packages/commands/initial');let config = {};// 配置文件如果存在则读取if(fs.existsSync(path.resolve('meet.config.js'))){config = require(path.resolve('meet.config.js'));}program.version('1.0.0','-v, --version').command('init').description('initialize your meet config').action(initial);program.command('new [module]').description('generator a new module').action(function(module){gmodule(config,module)});program.command('build [module]').description('git build specify module and assets upload to CDN!').action(function(module){build(config,module)});program.command('publish').description('upload assets to CDN and git commit && push').action(function(){publish(config)});program.command('upload').description('upload your build dist files to CDN server').action(function () {upload(config.upload);});program.command('analysis').description('analysis dist files size and percent').action(function () {analysis(config.upload.config.srcDir);});program.command('question').description('analysis dist files size and percent').action(function(){question()});program.parse(process.argv);
主入口文件利用 commander 监测终端输入命令时,触发相应的模块运行。commander 会自动生成 mei -help 的命令,该命令用来显示支持的命令。命令命名尽可能短、见名知意,不支持的命令有相关提示,运行错误有正确的提示和响应,是 cli 的最佳实践。
这里在主入口文件中读取了 meet.config.js,把相应的的配置信息传递给对应模块。如把 CDN 上传的配置信息传给上传模块,把
用了 commander 发现这 cli 也没有什么技术含量 。
meet new [module] 触发运行的 js
const path = require('path');const fs = require('fs');const chalk = require('chalk');const inquirer = require('inquirer');// 要拷贝的目标所在路径let templatePath;// 目标文件夹根路径let targetRootPath;function deleteFolderRecursive (path) {if (fs.existsSync(path)) {fs.readdirSync(path).forEach(function(file, index){var curPath = path + "/" + file;if (fs.lstatSync(curPath).isDirectory()) {// recursedeleteFolderRecursive(curPath);} else { // delete filefs.unlinkSync(curPath);}});fs.rmdirSync(path);}};function copyTemplates(name){function readAndCopyFile(parentPath,tempPath){let files = fs.readdirSync(parentPath);files.forEach((file)=>{let curPath = `${parentPath}/${file}`;let stat = fs.statSync(curPath);let filePath = `${targetRootPath}/${tempPath}/${file}`;if(stat.isDirectory()){fs.mkdirSync(filePath);readAndCopyFile(`${parentPath}/${file}`,`${tempPath}/${file}`);}else{const contents = fs.readFileSync(curPath,'utf8');fs.writeFileSync(filePath,contents, 'utf8');}});}readAndCopyFile(templatePath,name);}function generateModule(meetConfig,name){templatePath = typeof meetConfig.moduleTemplatePath !== 'undefined'? path.resolve(meetConfig.moduleTemplatePath):path.join(__dirname,'..','meet/module');targetRootPath = meetConfig.modulePath;let targetDir = path.join(targetRootPath,name);if(fs.existsSync(targetDir)){// 如果已存在改模块,提问开发者是否覆盖该模块inquirer.prompt([{name:'module-overwrite',type:'confirm',message:`Module named ${name} is already existed, are you sure to overwrite?`,validate: function(input){if(input.lowerCase !== 'y' && input.lowerCase !== 'n' ){return 'Please input y/n !'}else{return true;}}}]).then(answers=>{console.log('answers',answers);// 如果确定覆盖if(answers['module-overwrite']){// 删除文件夹deleteFolderRecursive(targetDir);console.log(chalk.yellow(`Module already existed , removing!`));//创建新模块文件夹fs.mkdirSync(targetDir);copyTemplates(name);console.log(chalk.green(`Generate new module "${name}" finished!`));}}).catch(err=>{console.log(chalk.red(err));})}else{//创建新模块文件夹fs.mkdirSync(targetDir);copyTemplates(name);console.log(chalk.green(`Generate new module "${name}" finished!`));}}module.exports = generateModule;
主要逻辑是根据用户配置的 templatePath 与 targetRootPath,遍历 templatePath 路径下的所有文件夹与文件,copy 文件到 targetRootPath,如果已经存在则提示是否覆盖。
上面说明 templatePath 是一个灵活的路径,模板可以在 mei-cli 中,也可以在任何一个位置,只要指定了正确的路径,就能实现相同的结果。此功能可以使用任何 web 框架,任何 web 框架都可以准备他的 module 模板,它的作用就是把模板文件 copy 到指定位置,也就是一键生成模板。
看到这里,发现确实没什么技术含量。
meet publish
const chalk = require('chalk');const inquirer = require('inquirer');const shellHelper = require('../lib/shellHelper');const upload = require('./upload');let config = {autoPublish: false};function gitCommit(){// 发布,提示输入commit 信息inquirer.prompt([{name:'message',type:'input',message:`Enter your publish message \n `}]).then(answers=>{let message = answers.message;shellHelper.series(['git pull','git add .',`git commit -m "${message}"`,'git push',], function(err){if(err){console.log(chalk.red(err));process.exit(0);}console.log(chalk.green('Git push finished!'));process.exit(0);});}).catch(err=>{console.log(chalk.red(err));});}function publish(meetConfig){Object.assign(config,meetConfig);upload(config.upload).then(res=>{console.log(chalk.green('Upload To CDN finished!'));if(config.autoPublish === true){gitCommit();}}).catch(err=>{console.log(chalk.red(err));})}module.exports = publish;
meet publish 原理是利用 node.js child_process 顺序执行多个 git 命令进行 git 提交,利用 meet-ali-oss 进行资源文件上传。
剩下的还有 build、initial、upload,analysis 等功能,都是类似的,不再贴代码进行一一阐述了,读者可以下载 meet-cli 进行查看
git clone https://github.com/linweiwei123/meet-cli.git
除此之外,还可以放飞眼界,在你的 cli 中加入更多功能,比如进行与服务器进行通信(用 axios http 模块请求)、实时通信、分享 CLI 命令界面等等(有些很鸡肋),只要是符合实际需要的,大胆设想,大胆实现,让你的 CLI 无比强大。
功能逻辑见仁见智,开发者可以发挥个人的智慧开发适合自己的 CLI。
CLI 开发中还有一些地方需要开发者注意。
注意事项
- .gitignore,.npmignore 跟 npm 模块一样 CLI 也需要注意提交文件内容限制
- package.json 中注意 dependencies 与 devDependencies 的区别
- 良好的文档描述
到此 meet-cli 就开发完成了,还可以发布到 npm 上给社区使用(适合的话)。
未来计划
todolist
- 增加图片处理命令 meet comp [path],用于压缩,生成 webp
- 生成 gitignore 文件命令
- 生成 eslint 配置
- 与multipages-generator合并,形成完整的 h5 开发工作流
- 类似 vue-cli 通过网页操作替代 cli 交互
总结
本文主要介绍了 CLI 的入门,常见的组件以及用法,常见的 CLI 功能。CLI 是 web 开发的辅助工具,旨在提高 web 工作效率,希望本文能给大家的工作带来一些启迪与帮助 !

若有收获,就点个赞吧
0 人点赞
