原文:https://daily.dev/blog/internationalization-i18n-in-nextjs
Would you like your software/website to be used by only English-understanding users? I guess not, you will want your app to adapt to various languages. You don’t want your users to be limited by a language. Language shouldn’t be your barrier in getting to a billion users, so that’s why I will demonstrate here how you can build a Nextjs app to adapt to various languages.
你希望你的软件 / 网站只被懂英语的用户使用吗?我想不会,你会希望你的应用程序能适应各种语言。你不希望你的用户被一种语言所限制。语言不应该成为你获得 10 亿用户的障碍,所以这就是为什么我将在这里演示如何建立一个 Nextjs 应用程序以适应各种语言。
Internationalization 国际化
Internationalization, woah that’s a 20-letter word. Too long to type, and much longer it will be when you have to repeat it various times in your text. That’s why it is usually abbreviated to i18n :). So in most parts of this post, I will use i18n in place of Internationalization.
国际化,哇,这是一个 20 个字母的词。打字太长了,而且当你不得不在文本中多次重复它时,它将更长。这就是为什么它通常被简写为 i18n :)。所以在这篇文章的大部分地方,我将使用 i18n 来代替国际化。
What is i18n? 什么是 i18n?
According to Wikipedia, Internationalization is the process of designing a software application so that it can be adapted to various languages and regions without engineering changes. Developers build software application content in the language they understand. Chinese devs build apps that have Chinese content, English devs build apps that have English, likewise, it is for every language in the world. The application’s content is in the language of the devs. For example, a news blog app built by Spanish developers will have its news content reeled out in the Spanish language.
根据维基百科,国际化是设计一个软件应用程序的过程,以便它可以适应各种语言和地区,而不需要进行工程变更。开发人员用他们理解的语言构建软件应用内容。中国的开发者建立有中文内容的应用程序,英国的开发者建立有英文内容的应用程序,同样,这也是针对世界上的每一种语言。应用程序的内容是以开发者的语言为基础的。例如,一个由西班牙开发者建立的新闻博客应用程序将以西班牙语言演绎其新闻内容。
These days i18n is one of the most popular features in software applications. Most modern softwares support the most popular languages you can find. Supporting i18n raises the bar high for you internationally because your app won’t be only available for a particular region but the whole world. According to the Next.js official page: 72% of consumers are more likely to stay on your site if it’s been translated and 55% of consumers said they only buy from e-commerce sites in their native language.
这些天,i18n 是软件应用程序中最受欢迎的功能之一。大多数现代软件支持你能找到的最流行的语言。支持 i18n 为你在国际上提高了门槛,因为你的应用程序将不只适用于某一地区,而是适用于整个世界。根据 Next.js 的官方页面。72% 的消费者在你的网站上停留的可能性更大,如果你的网站被翻译过,55% 的消费者说他们只从电子商务网站上购买他们的母语版本。
Apps embodying i18n support multi-languages. It can support as many languages as it can. These i18n-enables apps can convert their content from one language to another language. The languages supported are often shown in a dropdown list for the user to select the language of choice. Most apps also do support i18n via domains. For e.g website, lit.com, can support its Spanish version in es.lit.com. That’s another form of i18n.
体现 i18n 的应用程序支持多语言。它可以支持尽可能多的语言。这些支持 i18n 的应用程序可以将其内容从一种语言转换成另一种语言。所支持的语言通常显示在一个下拉列表中,供用户选择语言。大多数应用程序也通过域名支持 i18n。例如,网站 lit.com 可以在 es.lit.com 中支持其西班牙语版本。这是另一种形式的 i18n。
A locale is a particular language supported in i18n-apps. The standard format for defining locales is the UTS Locale Identifiers, the general format for locales is language-region-script. For French in France, it is fr-FR. English in the US is en-US, English in Britain is en-EN.
本地化是指在 i18n-app 中支持的特定语言。定义 locale 的标准格式是 UTS Locale Identifiers,locale 的一般格式是 language-region-script。对于法国的法语,它是 fr-FR。美国的英语是 en-US,英国的英语是 en-EN。
In the next section, we will look at how we can build i18n-apps in Nextjs.
在下一节中,我们将看看如何在 Nextjs 中构建 i18n-apps。
Internationalization and Next.js 国际化和 Next.js
Next.js is an open-source web framework for building server-side rendered web applications and statically generated web apps using React.js. Next.js has supported i18n since v10.0.0, it allows us to set the default language, the current language in use, and the supported languages. To set locales in a Next.js app we first create a next.config.js file in the root of our app. This is where we define our locales:
Next.js 是一个开源的网络框架,用于构建服务器端渲染的网络应用和使用 React.js 静态生成的网络应用。Next.js 从 v10.0.0 开始就支持 i18n,它允许我们设置默认语言、当前使用的语言以及支持的语言。要在 Next.js 应用程序中设置语言,我们首先要在应用程序的根部创建一个 next.config.js 文件。这就是我们定义语言的地方。
module.exports = {i18n: {locales: ["en-US", "fr-FR", "es-ES"],defaultLocale: "en-US",},};
The i18n tells Next.js that we want to activate/user i18n feature in our Next.js app. The locales array property is where we add the locale code of the locales we want to support. The defaultLocale holds the default locale code of the app, this is the locale that will be used when no locale is active. Next.js has two strategies in which it handles i18n in our app. The strategies are: Sub-path routing and Domain routing.
i18n 告诉 Next.js,我们想在 Next.js 应用程序中激活 / 使用 i18n 功能。locales 数组属性是我们添加我们想要支持的地区代码的地方。defaultLocale 是应用程序的默认 locale 代码,这是没有激活 locale 时将使用的 locale。Next.js 有两种策略来处理我们应用程序中的 i18n。这些策略是。Sub-path routing 和 Domain routing。
Sub-path routing 子路径路由
Sub-path routing strategy involves adding the locales as part of the URL paths without affecting the component when they render.
子路径路由策略涉及到将区域划分作为 URL 路径的一部分,而不影响组件的渲染。
Let’s say we have this pages/users.js and we have locales”en-US”,”es-ES”,”fr-FR”, and”en-US” is the default locale.
假设我们有这个 pages/users.js,我们有 locales “en-US”、”es-ES”、”fr-FR”,而 “en-US” 是默认 locale。
Next.js will map the fr-FR and es-ES to the /users path:
Next.js 将把 fr-FR 和 es-ES 映射到 / users 路径中。
- /fr-fr/users/fr-fr/users
- /es-es/users/es-es/users
See the locales is prefixed to the /users path. Both routes will point to pages/users.js. The default locale is not prefixed to the path. We can then access the locale information in the pages/users.js via the Next.js router. With the useRouter() hook we can get the currently active locale in locale, all the locales in locales, and the default locale in defaultLocale. 请看 locales 是以 / users 路径为前缀的。这两条路线都将指向 pages/users.js。
默认的 locale 没有在路径前加上前缀。然后我们可以通过 Next.js 路由器访问 pages/users.js 中的 locale 信息。通过 useRouter() 钩子,我们可以在 locale 中获得当前活动的 locale,在 locales 中获得所有 locale,在 defaultLocale 中获得默认 locale。
import { useRouter } from "next/router";const { locale, locales, defaultLocale } = useRouter();
See we restructured locale, locales and defaultLocale from the useRouter(). We can then use the locale value to know the language version of our content we should render.
看到我们从 useRouter() 中重组了 locale、locales 和 defaultLocale。然后我们可以使用 locale 值来了解我们应该渲染的内容的语言版本。
For statically generated pages or server-side rendered pages we can pass the locale information via the getServerSideProps or getStaticProps. The methods pass props to components from an object containing a props key they return. These getServerSideProps or getStaticProps methods accept a context parameter, this parameter is an object that contains locale, the current active locale, locales all locales in our app, and defaultLocale, the default locale. We then pass this context to the props object the methods return so that we can access it from our component’s props:
对于静态生成的页面或服务器端渲染的页面,我们可以通过 getServerSideProps 或 getStaticProps 传递 locale 信息。这些方法从一个包含它们返回的 props 键的对象中传递 props 给组件。这些 getServerSideProps 或 getStaticProps 方法接受一个上下文参数,这个参数是一个包含 locale 的对象,locale 是当前活动的 locale,locales 是我们应用程序中的所有 locale,defaultLocale 是默认 locale。然后我们把这个上下文传递给方法返回的 props 对象,这样我们就可以从我们组件的 props 中访问它。
export default function Users(props) {const { locale, locales, defaultLocale } = props;console.log(locale, locales, defaultLocale);return (<div><span>Users Component</span></div>);}export const getStaticProps = async (context) => {return {props: { context },};};
So we can get the locale information from the router and from the getServerSideProps or getStaticProps methods. Let’s demonstrate the usage of the two in the below sections.
所以我们可以从路由器和 getServerSideProps 或 getStaticProps 方法中获取 locale 信息。让我们在下面的章节中演示一下这两者的用法。
via useRouter() hook 通过 useRouter() 钩子
Scaffold a Next.js app: 构建一个 Next.js 应用程序的脚手架。
yarn create next-app i18n-next# ORnpx create-next-app i18n-next
Move into the directory: cd i18n-next and run yarn dev. We will create a news page that displays a list of news. The language of the news content will change depending on the locale passed to the URL path. So, we will have the news content in different languages. We will support English(default), French, and Espana(Spanish 😁). First thing first, we create the next.config.js in our root folder, and add the below configuration: 移动到目录中:cd i18n-next 并运行 yarn dev。我们将创建一个新闻页面,显示新闻列表。新闻内容的语言将根据传递给 URL 路径的 locale 而改变。因此,我们将有不同语言的新闻内容。我们将支持英语(默认)、法语和 Espana(西班牙语😁)。首先,我们在根目录下创建 next.config.js,并添加以下配置。
module.exports = {i18n: {locales: ["en-US", "fr-FR", "es-ES"],defaultLocale: "en-US",},};
This activates i18n in our app. Let’s create a news.js file in pages component and paste in the below code: 这将激活我们应用程序中的 i18n。让我们在页面组件中创建一个 news.js 文件,并粘贴以下代码。
import Head from "next/head";import Link from "next/link";import { useRouter } from "next/router";import styles from "../styles/Home.module.css";import NewsCard from "./../components/newscard";const newsContent = {"en-US": {title: "Your News",content: [{title:"Otter.ai’s new assistant can automatically transcribe your Zoom meetings",synopsis:"A.I.-powered voice transcription service Otter.ai wants to make it even easier for its business users to record their meetings. The company is today introducing a new feature, Otter Assistant, whic...",imageUrl: "",},],},"fr-FR": {title: "Vos nouvelles",content: [{title:"Le nouvel assistant d'Otter.ai peut transcrire automatiquement vos réunions Zoom",synopsis:"Le service de transcription vocale alimenté par A.I. Otter.ai veut rendre encore plus facile pour ses utilisateurs professionnels l'enregistrement de leurs réunions. La société présente aujourd'hui une nouvelle fonctionnalité, Otter Assistant, qui ...",imageUrl: "",},],},"es-ES": {title: "Tus noticias",content: [{title:"El nuevo asistente de Otter.ai puede transcribir automáticamente sus reuniones de Zoom",synopsis:"El servicio de transcripción de voz con tecnología de inteligencia artificial Otter.ai quiere facilitar aún más a sus usuarios comerciales la grabación de sus reuniones. La compañía presenta hoy una nueva función, Otter Assistant, que ...",imageUrl: "",},],},};export default function News(props) {const { locale, locales, defaultLocale, asPath } = useRouter();const { title, content } = newsContent[locale];return (<div className={styles.container}><Head><title>TV</title><link rel="icon" href="/favicon.ico" /></Head><main className={styles.main}><div className={styles.breadcrumb}><divstyle={{padding: "4px",marginRight: "4px",}}><span>Current Language: </span><spanstyle={{borderRadius: "3px",backgroundColor: "blue",color: "white",padding: "2px",}}>{locale}</span></div><LinkactiveClassName={locale === "es-ES"}href={asPath}locale="es-ES">es-ES</Link><LinkactiveClassName={locale === "en-US"}href={asPath}locale="en-US">en-US</Link><LinkactiveClassName={locale === "fr-FR"}href={asPath}locale="fr-FR">fr-FR</Link></div><div className={styles.newscontainer}><div className={styles.yournewscasts}><h3>{title}</h3></div><div>{content.map((newsItem, i) => (<NewsCard key={i} news={newsItem} />))}</div></div></main></div>);}
See that we set our news content first. The newsContent object holds our news contents in French, Spanish, and English. It has “en-US”, “es-ES” and “fr-FR” properties, they all have keys “title”, and “content”. The title is what we will display on top of the page, it will display “Your News”, so each locale has its own language version of “Your News”. the content is an array that holds the actual news content of our page.
请看,我们首先设置了我们的新闻内容。newsContent 对象持有我们的法语、西班牙语和英语的新闻内容。它有 “en-US”、”es-ES” 和 “fr-FR” 属性,它们都有键 “标题” 和 “内容”。标题是我们将在页面顶部显示的内容,它将显示 “你的新闻”,所以每个地区都有它自己的语言版本的 “你的新闻”。内容是一个数组,保存我们页面的实际新闻内容。
We will use the locale from the useRouter() hook to get the news content for the particular language. If the locale is fr-Fr, we will reference fr-FR from the newsContent object like this newsContent[“fr-FR]. This is what we did in the News component. We called the useRouter() hook and destructured locale and asPath from it. Like we already know, locale holds the currently active locale. The asPath gives us the route with regards to the current locale. For e.g if the current locale is en-US then the asPath is /en-US/news.
我们将使用来自 useRouter() 钩子的 locale 来获取特定语言的新闻内容。如果 locale 是 fr-FR,我们将从 newsContent 对象中引用 fr-FR,如 newsContent[“fr-FR]。这就是我们在新闻组件中所做的。我们调用了 useRouter() 钩子,并从中解构了 locale 和 asPath。就像我们已经知道的,locale 保存了当前活动的 locale。asPath 给了我们与当前 locale 有关的路由。例如,如果当前的 locale 是 en-US,那么 asPath 就是 / en-US/news。
Next down, we retrieve the particular language object from the newsContent object by doing this: newsContent[locale]. We destructured the title and content from it. Now, we render them on the UI. In the News component UI, we display the current locale:
接下来,我们从 newsContent 对象中检索出特定的语言对象,方法是:newsContent[locale]。我们对它的标题和内容进行解构。现在,我们在用户界面上渲染它们。在新闻组件的用户界面上,我们显示当前的语言。
<divstyle={{}}><span>Current Language: </span><spanstyle={{//...}}>{locale}</span></div>
Next, we set up transition between locales: 接下来,我们要设置不同地区语言的转换。
<LinkactiveClassName={locale === "es-ES"}href={asPath}locale="es-ES">es-ES</Link><LinkactiveClassName={locale === "en-US"}href={asPath}locale="en-US">en-US</Link><LinkactiveClassName={locale === "fr-FR"}href={asPath}locale="fr-FR">fr-FR</Link>
This will display links with text es-ES, en-US and fr-FR with href links to /en-US/news, /news and /fr-FR/news respectively. If you click on es-ES it will load the route es-ES/news, the current locale becomes es-ES and our component will load the news content for es-ES. So the above links serve to change the language of our app. Clicking on any of them will translate the content of the app to the clicked language. Last, the content array is displayed:
这将显示文本为 es-ES、en-US 和 fr-FR 的链接,其 href 链接分别指向 / en-US/news、/news 和 / fr-FR/news。如果你点击 es-ES,它将加载 es-ES/news 路线,当前的 locale 变成 es-ES,我们的组件将加载 es-ES 的新闻内容。所以上述链接的作用是改变我们应用程序的语言。点击其中任何一个,都会将应用程序的内容翻译成被点击的语言。最后,内容阵列被显示出来。
<div>{content.map((newsItem, i) => (<NewsCard key={i} news={newsItem} />))}</div>
The NewsCard component renders the news for each news item. Our app will look like this:NewsCard 组件为每个新闻项目渲染新闻。我们的应用程序将看起来像这样。
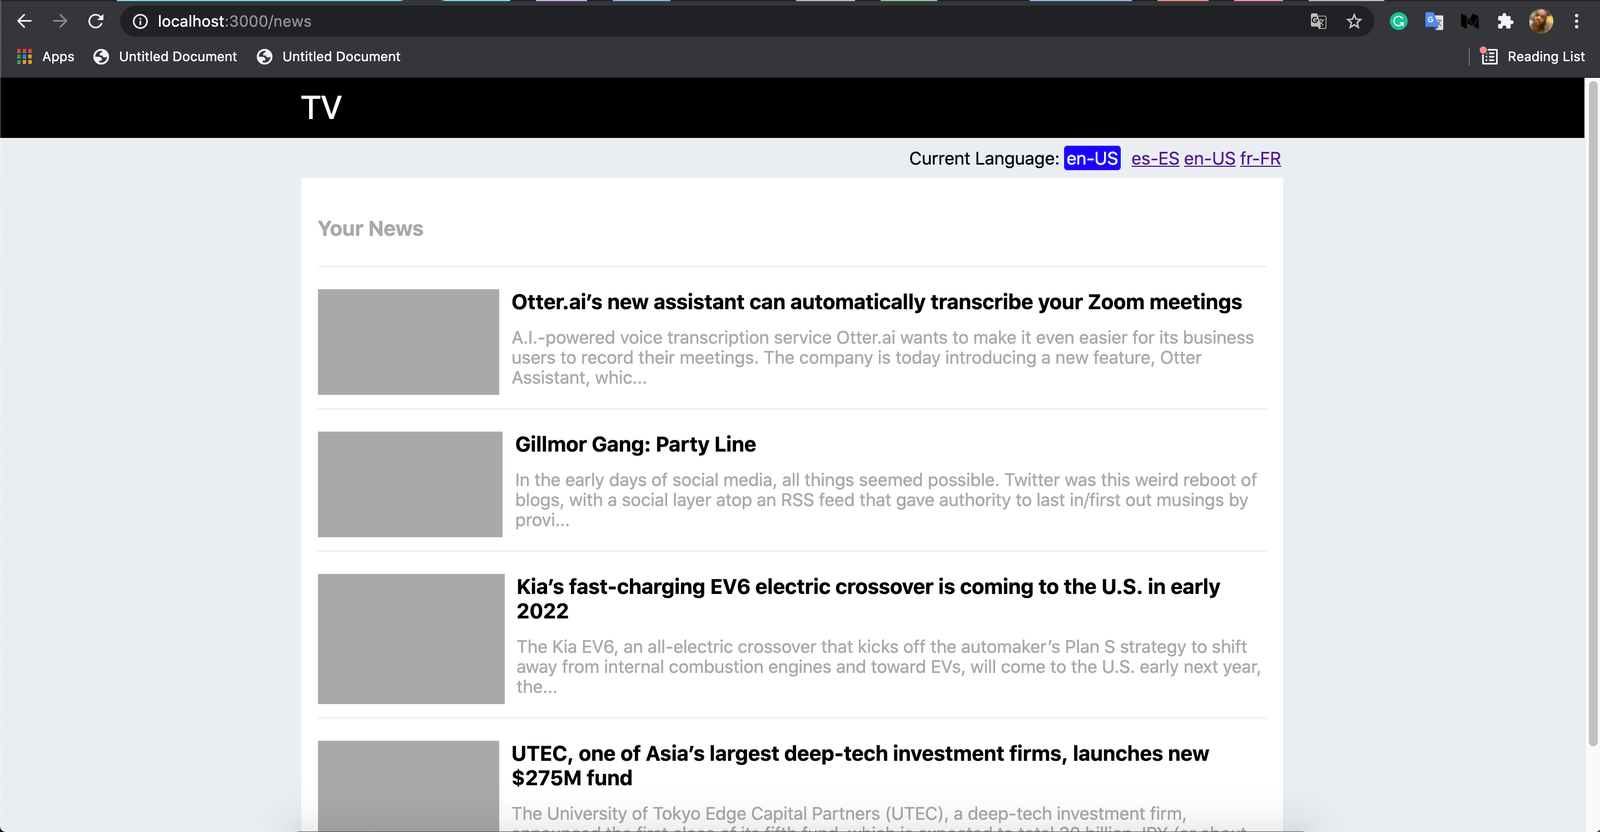
Our News site in English 我们的英文新闻网站
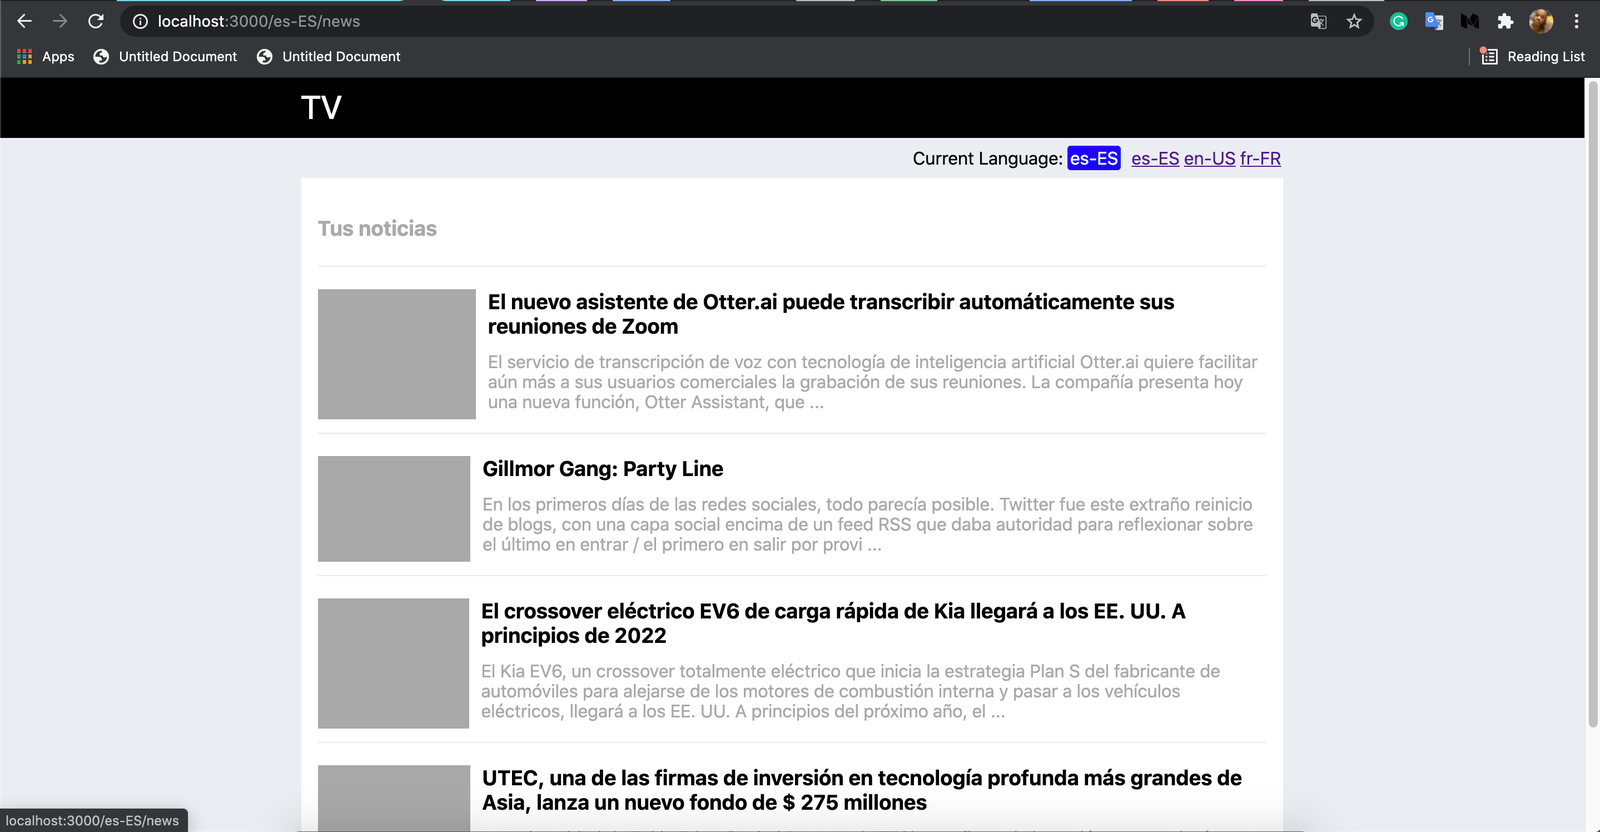
Our News site in Espana(Spanish) 我们的新闻网站在西班牙(西班牙语)。
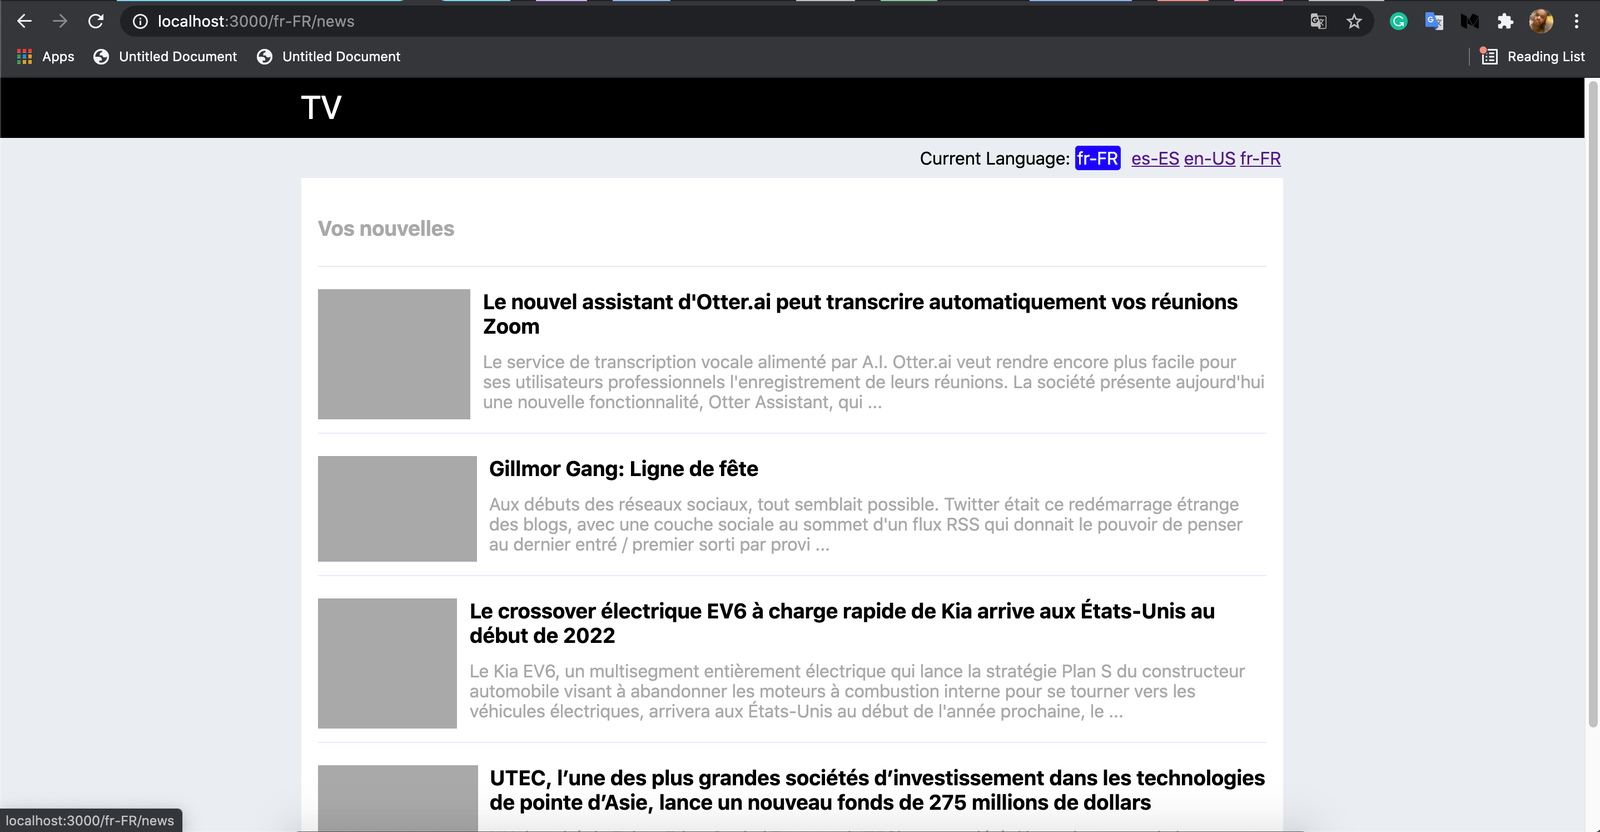
Our News site in French 我们的新闻网站的法语版
We clicked on the links to change the languages. If we decide to navigate our routes using the next/router programmatically: 我们点击链接来改变语言。如果我们决定使用 next/router 程序化地导航我们的路线。
const router = useRouter();router.push("/news", "/news");
We will have to pass a locale option in an object in a third parameter, to navigate to a locale route: 我们将不得不在一个对象的第三个参数中传递一个 locale 选项,以导航到一个 locale 路由。
const router = useRouter();router.push("/news", "/news", { locale: "es-ES" });
This will load the /fr-FR/news route so the locale will be French. 这将加载 / fr-FR/news 路由,所以 locale 将是法语。
via getServerSideProps or getStaticProps 通过 getServerSideProps 或 getStaticProps
Now we demonstrate i18n using either getServerSideProps or getStaticProps. It will be a minor edit in our News component: 现在我们使用 getServerSideProps 或 getStaticProps 来演示 i18n。这将是我们的新闻组件中的一个小编辑。
export default function News(props) {const { locale, locales, defaultLocale } = props.context;const { title, content } = newsContent[locale];return (<div className={styles.container}><Head><title>TV</title><link rel="icon" href="/favicon.ico" /></Head><main className={styles.main}><div className={styles.breadcrumb}><divstyle={{padding: "4px",marginRight: "4px",}}><span>Current Language: </span><spanstyle={{borderRadius: "3px",backgroundColor: "blue",color: "white",padding: "2px",}}>{locale}</span></div><LinkactiveClassName={locale === "es-ES"}href={`/es-ES/news`}locale="es-ES">es-ES</Link><LinkactiveClassName={locale === "en-US"}href={`/en-US/news`}locale="en-US">en-US</Link><LinkactiveClassName={locale === "fr-FR"}href={`/fr-FR/news`}locale="fr-FR">fr-FR</Link></div><div className={styles.newscontainer}><div className={styles.yournewscasts}><h3>{title}</h3></div><div>{content.map((newsItem, i) => (<NewsCard key={i} news={newsItem} />))}</div></div></main></div>);}export async function getStaticProps(context) {return {props: {context,},};}
We exported a getStaticProps method from the news.js file, this will make the News component to be statically generated at build time. If we had used getServerSideProps instead of getStaticProps, the page will be generated from the server. 我们从 news.js 文件中导出了一个 getStaticProps 方法,这将使 News 组件在构建时静态生成。如果我们使用 getServerSideProps 而不是 getStaticProps,页面将从服务器上生成。
The main thing here is that we pass the context argument to the props object and return the object from the getStaticProps method. Now, we can access the context in the News component via its props argument; props.context. Then we destructure the locale from it. Every other thing stands, we just had to refactor our transition links because the pros.context won’t have the asPath so we set them manually. 这里最主要的是,我们将上下文参数传递给 props 对象,并从 getStaticProps 方法中返回该对象。现在,我们可以在新闻组件中通过其 props 参数访问上下文;props.context。然后我们从它那里解构 locale。其他的事情都没有问题,我们只是不得不重构我们的过渡链接,因为 pros.context 不会有 asPath,所以我们要手动设置它们。
We can do this programmatically in an efficient way, I leave it to the reader to make the above better. 😁 So our app runs the same as when we used useRouter(). 我们可以用有效的方式进行编程,我把它留给读者,让他们把上面的内容做得更好。😁所以我们的应用程序的运行和我们使用 useRouter() 时一样。
Domain routing 域路由
Domain routing strategy involves mapping the locales to a top-level domain. For example, we have our locales set: 域路由策略涉及将 locales 映射到一个顶级域。例如,我们有我们的 locales 设置。
module.exports = {i18n: {locales: ["en-US", "fr-FR", "es-ES"],defaultLocale: "en-US",},};
We can set the locales to be served based on domains. 我们可以将 locales 设置为基于域的服务。
module.exports = {i18n: {locales: ["en-US", "fr-FR", "es-ES"],defaultLocale: "en-US",domains: [{domain: "mynews.com",defaultLocale: "en-US",},{domain: "mynews.es",defaultLocale: "es-ES",},{domain: "mynews.fr",defaultLocale: "fr-FR",},],},};
Next.js will create locale URL paths based on the domains we set in the domains array property above. Now, the French version of our site mynews.com/news will be mynews.fr/news. The Spanish version will be mynews.es/news.Next.js 将根据我们在上面的 domains 数组属性中设置的 domains 创建 locale URL 路径。现在,我们网站 mynews.com/news 的法语版将是 mynews.fr/news。西班牙文版本将是 mynews.es/news。
Other i18n implementations 其他 i18n 的实现
There are good libraries that brings i18n to Next.js and also makes it very it easy to use. Check them out below: 有一些很好的库可以把 i18n 带到 Next.js 中,而且还可以让它非常容易使用。请看以下内容。
Conclusion 总结
Next.js made i18n very easy and simple. Al you have to do is set your locales in a next.config.js file and your multi-language data and you are good to go. You only have to get the locale information from useRouter() hook or via getStaticProps or getServerSideProps methods.Next.js 使 i18n 非常容易和简单。你所要做的就是在 next.config.js 文件中设置你的语言和你的多语言数据,你就可以开始了。你只需要从 useRouter() 钩子或通过 getStaticProps 或 getServerSideProps 方法获得 locale 信息。
Source code 源代码
See the full code here点击这里查看完整的代码
References 参考资料

若有收获,就点个赞吧
0 人点赞
