1. RabbitMQ
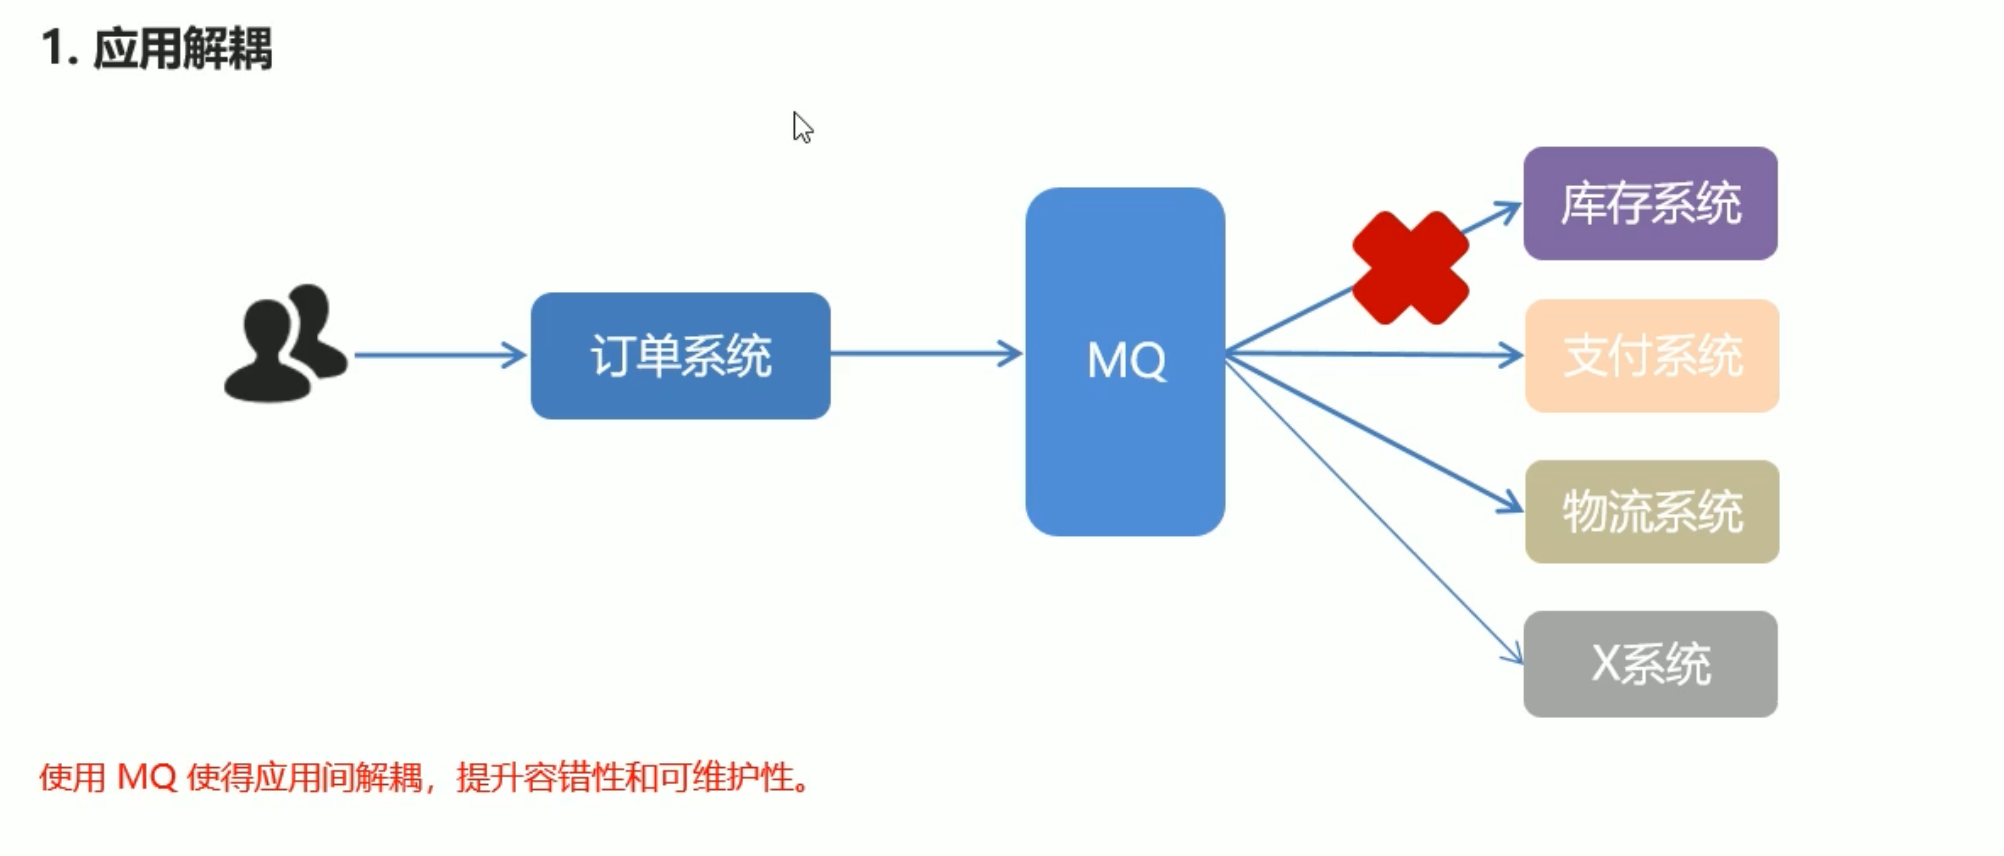
MQ全称 Message Queue(消息队列) 是在消息的传输过程中保存消息的容器 多用于分布式系统之间进行通信

- 优势


- 劣势

2. 常用的MQ产品

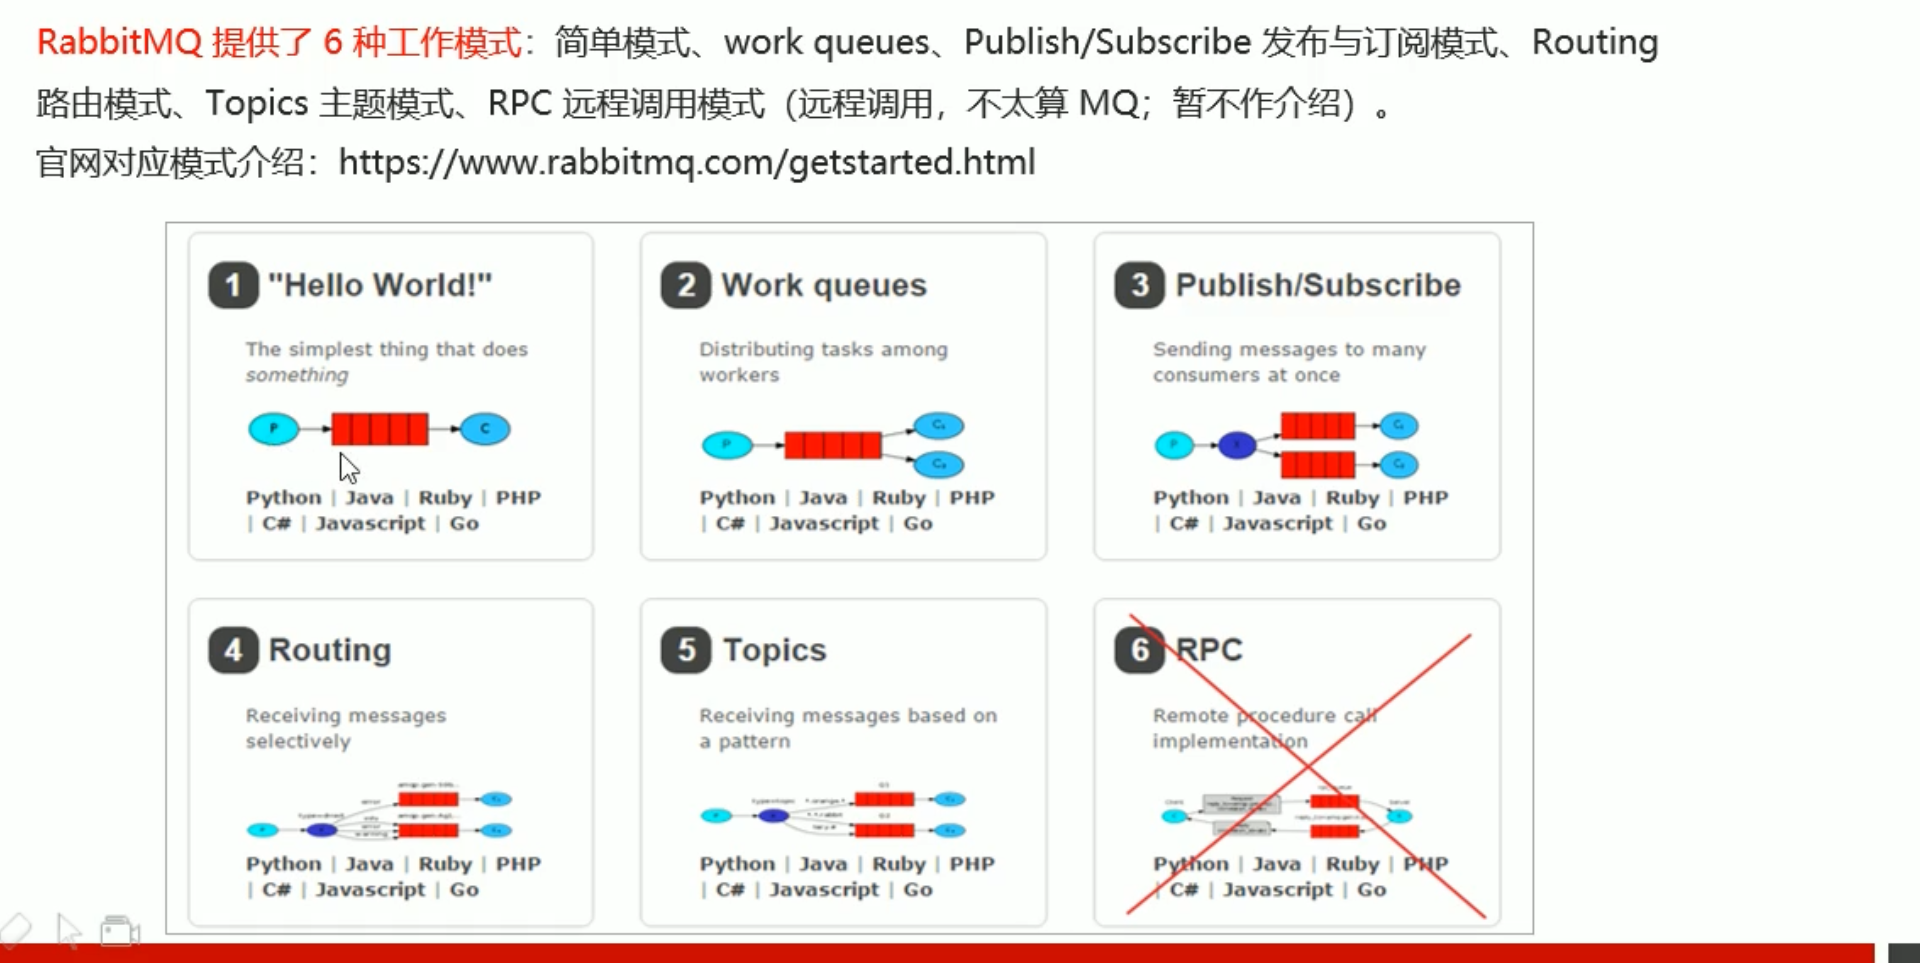
3. RabbitMQ简介
AMQP 即 Advanced Message Queuing Protocol (高级消息队列协议) 是一个网络协议 是应用层协议的一个开放标准 为面向消息的中间件设计

3.1. JMS
JMS 即 Java 消息服务 应用程序接口 一个Java平台中关于面向中间件的API
4. 安装
- 安装erlang
yum -y install gcc glibc-devel make ncurses-devel openssl-devel xmlto perl wget gtk2-devel binutils-develwget http://erlang.org/download/otp_src_22.0.tar.gztar -zxvf otp_src_22.0.tar.gzmv otp_src_22.0 /usr/local/cd /usr/local/otp_src_22.0/mkdir ../erlang./configure --prefix=/usr/local/erlangmake installll /usr/local/erlang/binecho 'export PATH=$PATH:/usr/local/erlang/bin' >> /etc/profilesource /etc/profileerlhalt().
- 安装RabbitMQ
cd /rootwget https://github.com/rabbitmq/rabbitmq-server/releases/download/v3.7.15/rabbitmq-server-generic-unix-3.7.15.tar.xzyum install -y xz/bin/xz -d rabbitmq-server-generic-unix-3.7.15.tar.xztar -xvf rabbitmq-server-generic-unix-3.7.15.tarmv rabbitmq_server-3.7.15/ /usr/local/mv /usr/local/rabbitmq_server-3.7.15 rabbitmqecho 'export PATH=$PATH:/usr/local/rabbitmq/sbin' >> /etc/profilesource /etc/profile
- 启动
rabbitmq-server -detachedrabbitmq-plugins enable rabbitmq_management #开启web插件rabbitmqctl stop #停止rabbitmqctl status #状态
默认账号密码:guest guest(这个账号只允许本机访问)
firewall-cmd --zone=public --add-port=15672/tcp --permanentvim /usr/local/rabbitmq/ebin/rabbit.app #配置
访问http://192.168.130.124:15672/
5. 入门案例
5.1. 生产者
<dependencies><dependency><groupId>com.rabbitmq</groupId><artifactId>amqp-client</artifactId><version>5.6.0</version></dependency></dependencies><build><plugins><plugin><groupId>org.apache.maven.plugins</groupId><artifactId>maven-compiler-plugin</artifactId><version>3.8.0</version><configuration><source>1.8</source><target>1.8</target></configuration></plugin></plugins></build>
//1.创建连接工厂ConnectionFactory factory = new ConnectionFactory();//2.设置参数factory.setHost("192.168.130.124"); //ipfactory.setPort(5672); //端口factory.setVirtualHost("/itcast"); //虚拟机 默认值factory.setUsername("iekr"); //用户名factory.setPassword("iekr"); //密码 默认值为guest//3.创建连接 connectionConnection connection = factory.newConnection();//4.创建channelChannel channel = connection.createChannel();//5.创建队列queue/*** (String queue, boolean durable, boolean exclusive, boolean autoDelete, Map<String, Object> arguments)* queue 队列名称* durable 是否持久化 当mq重启之后还在* exclusive 是否独占,只能有一个消费者监听这个队列 当Connection关闭时是否删除队列* autoDelete 是否自动删除 当没有Consumer时 自动删除* arguments 参数**///如果没有一个叫hello_world的队列 则自动创建channel.queueDeclare("hello_world",true,false,false,null);//6.发送消息/*** String var1, String var2, BasicProperties var3, byte[] var4* var1 交换机名称 简单模式下会使用默认的""* var2 路由名称* var3 配置信息* var4 发送消息数据*/String body = "hello world";channel.basicPublish("","hello_world",null,body.getBytes(StandardCharsets.UTF_8));//7.释放资源channel.close();connection.close();
5.2. 消费者
与生产者坐标一致
//1.创建连接工厂ConnectionFactory factory = new ConnectionFactory();//2.设置参数factory.setHost("192.168.130.124"); //ipfactory.setPort(5672); //端口factory.setVirtualHost("/itcast"); //虚拟机 默认值factory.setUsername("iekr"); //用户名factory.setPassword("iekr"); //密码 默认值为guest//3.创建连接 connectionConnection connection = factory.newConnection();//4.创建channelChannel channel = connection.createChannel();//5.创建队列queue/*** (String queue, boolean durable, boolean exclusive, boolean autoDelete, Map<String, Object> arguments)* queue 队列名称* durable 是否持久化 当mq重启之后还在* exclusive 是否独占,只能有一个消费者监听这个队列 当Connection关闭时是否删除队列* autoDelete 是否自动删除 当没有Consumer时 自动删除* arguments 参数**///如果没有一个叫hello_world的队列 则自动创建channel.queueDeclare("hello_world",true,false,false,null);//6.接受消息Consumer consumer = new DefaultConsumer(channel){//回调方法 当收到消息后 会执行该方法/**** @param consumerTag 标识* @param envelope 获取一些信息 交换机 路由key* @param properties 配置信息* @param body 数据* @throws IOException*/@Overridepublic void handleDelivery(String consumerTag, Envelope envelope, AMQP.BasicProperties properties, byte[] body) throws IOException {System.out.println(consumerTag);System.out.println(envelope.getExchange());System.out.println(envelope.getRoutingKey());System.out.println(properties);System.out.println(new String(body));}};/*** String var1, DeliverCallback var2, CancelCallback var3* queue 队列名称* autoAck 是否自动确认* callback 回调对象*/channel.basicConsume("hello_world",true,consumer);
6. Work queues 工作队列模式

多个消费者共同消费一个队列中的消息
对于任务过重或者任务较多情况使用工作队列可以提高任务处理的速度
生产者生成多条消息 而消费者轮流切换接受
Work queues 代码与生产者 消费者没有太大区别 只是生产者在频道中发送多条 多个消费者轮流接受消息
7. Pub/Sub 订阅模式

X为交换机 生产者发送消息给交换机 而交换机转发消息 有三种模式
- Fanout 广播模式 将消息交给所有绑定到交换机的队列
- Direct 定向 把消息交给符合指定 routing key 的队列
- Topic 通配符 把消息交给符合 routing pattern (路由模式)
生产者
//1.创建连接工厂ConnectionFactory factory = new ConnectionFactory();//2.设置参数factory.setHost("192.168.130.124"); //ipfactory.setPort(5672); //端口factory.setVirtualHost("/itcast"); //虚拟机 默认值factory.setUsername("iekr"); //用户名factory.setPassword("iekr"); //密码 默认值为guest//3.创建连接 connectionConnection connection = factory.newConnection();//4.创建channelChannel channel = connection.createChannel();//5.创建交换机/*** String var1, BuiltinExchangeType var2, boolean var3, boolean var4, boolean var5, Map<String, Object> var6* exchange 交换机名称* type 交换机类型 枚举 DIRECT("direct")定向 FANOUT("fanout")扇形(广播) TOPIC("topic")通配符 HEADERS("headers") 参数匹配* durable 是否持久化* autoDelete 自动删除* internal 内部使用 一般为false* arguments 参数*/String exchangeName = "test_fanout";channel.exchangeDeclare(exchangeName, BuiltinExchangeType.FANOUT, true, false, false, null);//6.创建队列String queue1Name = "test_fanout_queue1";String queue2Name = "test_fanout_queue2";channel.queueDeclare(queue1Name, true, false, false, null);channel.queueDeclare(queue2Name, true, false, false, null);//7.绑定队列和交换机/** String queue, String exchange, String routingKey* queue 队列名称* exchange 交换机名称* routingKey 路由键绑定规则 如果交换机类型为FANOUT 则routingKey为""*/channel.queueBind(queue1Name, exchangeName, "");channel.queueBind(queue2Name, exchangeName, "");//8.发送消息String body = "日志信息:";channel.basicPublish(exchangeName, "", null, body.getBytes(StandardCharsets.UTF_8));//9.释放资源channel.close();connection.close();
多个消费者绑定不同的队列
//1.创建连接工厂ConnectionFactory factory = new ConnectionFactory();//2.设置参数factory.setHost("192.168.130.124"); //ipfactory.setPort(5672); //端口factory.setVirtualHost("/itcast"); //虚拟机 默认值factory.setUsername("iekr"); //用户名factory.setPassword("iekr"); //密码 默认值为guest//3.创建连接 connectionConnection connection = factory.newConnection();//4.创建channelChannel channel = connection.createChannel();//6.接受消息String queue1Name = "test_fanout_queue1";String queue2Name = "test_fanout_queue2";Consumer consumer = new DefaultConsumer(channel){//回调方法 当收到消息后 会执行该方法/**** @param consumerTag 标识* @param envelope 获取一些信息 交换机 路由key* @param properties 配置信息* @param body 数据* @throws IOException*/@Overridepublic void handleDelivery(String consumerTag, Envelope envelope, AMQP.BasicProperties properties, byte[] body) throws IOException {// System.out.println(consumerTag);// System.out.println(envelope.getExchange());// System.out.println(envelope.getRoutingKey());// System.out.println(properties);System.out.println(new String(body));System.out.println("第一个消费者");}};/*** String var1, DeliverCallback var2, CancelCallback var3* queue 队列名称* autoAck 是否自动确认* callback 回调对象*/channel.basicConsume(queue1Name,true,consumer);
8. Routing 路由模式

生产者发送不同key的消息给交换机 而交换机根据队列的key转发消息给有标识的队列
//1.创建连接工厂ConnectionFactory factory = new ConnectionFactory();//2.设置参数factory.setHost("192.168.130.124"); //ipfactory.setPort(5672); //端口factory.setVirtualHost("/itcast"); //虚拟机 默认值factory.setUsername("iekr"); //用户名factory.setPassword("iekr"); //密码 默认值为guest//3.创建连接 connectionConnection connection = factory.newConnection();//4.创建channelChannel channel = connection.createChannel();//5.创建交换机/*** String var1, BuiltinExchangeType var2, boolean var3, boolean var4, boolean var5, Map<String, Object> var6* exchange 交换机名称* type 交换机类型 枚举 DIRECT("direct")定向 FANOUT("fanout")扇形(广播) TOPIC("topic")通配符 HEADERS("headers") 参数匹配* durable 是否持久化* autoDelete 自动删除* internal 内部使用 一般为false* arguments 参数*/String exchangeName = "test_direct";channel.exchangeDeclare(exchangeName, BuiltinExchangeType.DIRECT, true, false, false, null);//6.创建队列String queue1Name = "test_direct_queue1";String queue2Name = "test_direct_queue2";channel.queueDeclare(queue1Name, true, false, false, null);channel.queueDeclare(queue2Name, true, false, false, null);//7.绑定队列和交换机/** String queue, String exchange, String routingKey* queue 队列名称* exchange 交换机名称* routingKey 路由键绑定规则 如果交换机类型为FANOUT 则routingKey为""*///队列1的绑定channel.queueBind(queue1Name, exchangeName, "error");//队列2的绑定channel.queueBind(queue2Name, exchangeName, "info");channel.queueBind(queue2Name, exchangeName, "error");channel.queueBind(queue2Name, exchangeName, "warning");//8.发送消息String body = "日志信息:";//队列1只接受error消息 而队列2所有类型都接受channel.basicPublish(exchangeName, "info", null, body.getBytes(StandardCharsets.UTF_8));//9.释放资源channel.close();connection.close();
消费者
//1.创建连接工厂ConnectionFactory factory = new ConnectionFactory();//2.设置参数factory.setHost("192.168.130.124"); //ipfactory.setPort(5672); //端口factory.setVirtualHost("/itcast"); //虚拟机 默认值factory.setUsername("iekr"); //用户名factory.setPassword("iekr"); //密码 默认值为guest//3.创建连接 connectionConnection connection = factory.newConnection();//4.创建channelChannel channel = connection.createChannel();//6.接受消息String queue1Name = "test_direct_queue1";String queue2Name = "test_direct_queue2";Consumer consumer = new DefaultConsumer(channel){//回调方法 当收到消息后 会执行该方法/**** @param consumerTag 标识* @param envelope 获取一些信息 交换机 路由key* @param properties 配置信息* @param body 数据* @throws IOException*/@Overridepublic void handleDelivery(String consumerTag, Envelope envelope, AMQP.BasicProperties properties, byte[] body) throws IOException {// System.out.println(consumerTag);// System.out.println(envelope.getExchange());// System.out.println(envelope.getRoutingKey());// System.out.println(properties);System.out.println(new String(body));System.out.println("队列1 存储到数据库");}};/*** String var1, DeliverCallback var2, CancelCallback var3* queue 队列名称* autoAck 是否自动确认* callback 回调对象*/channel.basicConsume(queue1Name,true,consumer);
9. Topics 通配符模式

使用通配符和路由器转发 让队列更加灵活的接受对应的消息
*星号代表0个或多个单词
井号代表1个单词
生产者
//1.创建连接工厂ConnectionFactory factory = new ConnectionFactory();//2.设置参数factory.setHost("192.168.130.124"); //ipfactory.setPort(5672); //端口factory.setVirtualHost("/itcast"); //虚拟机 默认值factory.setUsername("iekr"); //用户名factory.setPassword("iekr"); //密码 默认值为guest//3.创建连接 connectionConnection connection = factory.newConnection();//4.创建channelChannel channel = connection.createChannel();//5.创建交换机/*** String var1, BuiltinExchangeType var2, boolean var3, boolean var4, boolean var5, Map<String, Object> var6* exchange 交换机名称* type 交换机类型 枚举 DIRECT("direct")定向 FANOUT("fanout")扇形(广播) TOPIC("topic")通配符 HEADERS("headers") 参数匹配* durable 是否持久化* autoDelete 自动删除* internal 内部使用 一般为false* arguments 参数*/String exchangeName = "test_topics";channel.exchangeDeclare(exchangeName, BuiltinExchangeType.TOPIC, true, false, false, null);//6.创建队列String queue1Name = "test_topics_queue1";String queue2Name = "test_topics_queue2";channel.queueDeclare(queue1Name, true, false, false, null);channel.queueDeclare(queue2Name, true, false, false, null);//7.绑定队列和交换机/** String queue, String exchange, String routingKey* queue 队列名称* exchange 交换机名称* routingKey 路由键绑定规则 如果交换机类型为FANOUT 则routingKey为""*///routing key 系统的名称.日志的级别channel.queueBind(queue1Name, exchangeName, "#.error"); //以.error结尾channel.queueBind(queue1Name, exchangeName, "order.*"); //以order.开头channel.queueBind(queue2Name, exchangeName, "*.*"); //队列2所有消息都可以接受到//8.发送消息String body = "日志信息:";channel.basicPublish(exchangeName, "goods.info", null, body.getBytes(StandardCharsets.UTF_8));//9.释放资源channel.close();connection.close();
消费者
//1.创建连接工厂ConnectionFactory factory = new ConnectionFactory();//2.设置参数factory.setHost("192.168.130.124"); //ipfactory.setPort(5672); //端口factory.setVirtualHost("/itcast"); //虚拟机 默认值factory.setUsername("iekr"); //用户名factory.setPassword("iekr"); //密码 默认值为guest//3.创建连接 connectionConnection connection = factory.newConnection();//4.创建channelChannel channel = connection.createChannel();//6.接受消息String queue1Name = "test_topics_queue1";String queue2Name = "test_topics_queue2";Consumer consumer = new DefaultConsumer(channel){//回调方法 当收到消息后 会执行该方法/**** @param consumerTag 标识* @param envelope 获取一些信息 交换机 路由key* @param properties 配置信息* @param body 数据* @throws IOException*/@Overridepublic void handleDelivery(String consumerTag, Envelope envelope, AMQP.BasicProperties properties, byte[] body) throws IOException {// System.out.println(consumerTag);// System.out.println(envelope.getExchange());// System.out.println(envelope.getRoutingKey());// System.out.println(properties);System.out.println(new String(body));System.out.println("队列1 存储到数据库");}};/*** String var1, DeliverCallback var2, CancelCallback var3* queue 队列名称* autoAck 是否自动确认* callback 回调对象*/channel.basicConsume(queue1Name,true,consumer);
10. Spring 整合 RabbitMQ
坐标
<dependencies><dependency><groupId>org.springframework</groupId><artifactId>spring-context</artifactId><version>5.3.10</version></dependency><dependency><groupId>org.springframework.amqp</groupId><artifactId>spring-rabbit</artifactId><version>2.3.9</version></dependency><dependency><groupId>junit</groupId><artifactId>junit</artifactId><version>4.13</version></dependency><dependency><groupId>org.springframework</groupId><artifactId>spring-test</artifactId><version>5.3.10</version></dependency></dependencies><build><plugins><plugin><groupId>org.apache.maven.plugins</groupId><artifactId>maven-compiler-plugin</artifactId><version>3.8.1</version><configuration><source>1.8</source><target>1.8</target></configuration></plugin></plugins></build>
rabbitmq.properties
rabbitmq.host=192.168.130.124rabbitmq.port=5672rabbitmq.username=iekrrabbitmq.password=iekrrabbitmq.virtual-host=/itcast
5.1. 生产者
spring-rabbitmq-producer.xml
<?xml version="1.0" encoding="UTF-8" ?><beans xmlns="http://www.springframework.org/schema/beans"xmlns:xsi="http://www.w3.org/2001/XMLSchema-instance"xmlns:p="http://www.springframework.org/schema/p"xmlns:context="http://www.springframework.org/schema/context"xmlns:rabbit="http://www.springframework.org/schema/rabbit"xsi:schemaLocation="http://www.springframework.org/schema/beanshttps://www.springframework.org/schema/beans/spring-beans.xsdhttp://www.springframework.org/schema/contexthttps://www.springframework.org/schema/context/spring-context.xsdhttp://www.springframework.org/schema/rabbithttps://www.springframework.org/schema/rabbit/spring-rabbit.xsd"><!-- 加载配置文件--><context:property-placeholder location="classpath:rabbitmq.properties"/><!-- 定义rabbitmq connectionFactory--><rabbit:connection-factory id="connectionFactory" host="${rabbitmq.host}"port="${rabbitmq.port}"username="${rabbitmq.username}"password="${rabbitmq.password}"virtual-host="${rabbitmq.virtual-host}"/><!-- 定义管理交换机 队列--><rabbit:admin connection-factory="connectionFactory"/><!-- 定义持久化队列 不存在则自动创建 不绑定到交换机则绑定到默认交换机 默认交换机为direct 名字为"" 路由键位队列名称--><rabbit:queue id="spring_queue" name="spring_queue" auto-declare="true"/><!-- 定义广播交换机中的持久化队列 不存在则自动创建--><rabbit:queue id="spring_fanout_queue_1" name="spring_fanout_queue_1" auto-declare="true"/><rabbit:queue id="spring_fanout_queue_2" name="spring_fanout_queue_2" auto-declare="true"/><!-- 定义广播类型交换机 绑定上面两个队列--><rabbit:fanout-exchange name="spring_fanout_exchange"id="spring_fanout_exchange"auto-declare="true"><rabbit:bindings><rabbit:binding queue="spring_fanout_queue_1"/><rabbit:binding queue="spring_fanout_queue_2"/></rabbit:bindings></rabbit:fanout-exchange><!-- 通配符队列--><rabbit:queue id="spring_topic_queue_star" name="spring_topic_queue_star" auto-declare="true"/><rabbit:queue id="spring_topic_queue_well" name="spring_topic_queue_well" auto-declare="true"/><rabbit:queue id="spring_topic_queue_well2" name="spring_topic_queue_well2" auto-declare="true"/><!-- 通配符定义--><rabbit:topic-exchange name="spring_topic_exchange" id="spring_topic_exchange" auto-declare="true"><rabbit:bindings><rabbit:binding pattern="heima.*" queue="spring_topic_queue_star"/><rabbit:binding pattern="heima.#" queue="spring_topic_queue_well"/><rabbit:binding pattern="itcast.#" queue="spring_topic_queue_well2"/></rabbit:bindings></rabbit:topic-exchange><!-- 定义rabbitTemplate对象操作可以在代码中方便发送消息--><rabbit:template id="rabbitTemplate" connection-factory="connectionFactory"/></beans>
test
package com.itheima;import org.junit.Test;import org.junit.runner.RunWith;import org.springframework.amqp.rabbit.core.RabbitTemplate;import org.springframework.beans.factory.annotation.Autowired;import org.springframework.test.context.ContextConfiguration;import org.springframework.test.context.junit4.SpringJUnit4ClassRunner;@RunWith(SpringJUnit4ClassRunner.class)@ContextConfiguration(locations = "classpath:spring-rabbitmq-producer.xml")public class ProducerTest {//注入@Autowiredprivate RabbitTemplate rabbitTemplate;//1对1@Testpublic void testHelloWorld() {//发送消息rabbitTemplate.convertAndSend("spring_queue", "hello world spring ...");}//广播@Testpublic void testFanout() {//发送消息rabbitTemplate.convertAndSend("spring_fanout_exchange", "", "spring fanout...");}//topic@Testpublic void testTopic() {//发送消息rabbitTemplate.convertAndSend("spring_topic_exchange", "heima.123.456", "spring topic...");}}
5.2. 消费者
spring-rabbitmq-consumer.xml
<?xml version="1.0" encoding="UTF-8" ?><beans xmlns="http://www.springframework.org/schema/beans"xmlns:xsi="http://www.w3.org/2001/XMLSchema-instance"xmlns:p="http://www.springframework.org/schema/p"xmlns:context="http://www.springframework.org/schema/context"xmlns:rabbit="http://www.springframework.org/schema/rabbit"xsi:schemaLocation="http://www.springframework.org/schema/beanshttps://www.springframework.org/schema/beans/spring-beans.xsdhttp://www.springframework.org/schema/contexthttps://www.springframework.org/schema/context/spring-context.xsdhttp://www.springframework.org/schema/rabbithttps://www.springframework.org/schema/rabbit/spring-rabbit.xsd"><!-- 加载配置文件--><context:property-placeholder location="classpath:rabbitmq.properties"/><!-- 定义rabbitmq connectionFactory--><rabbit:connection-factory id="connectionFactory" host="${rabbitmq.host}"port="${rabbitmq.port}"username="${rabbitmq.username}"password="${rabbitmq.password}"virtual-host="${rabbitmq.virtual-host}"/><bean id="springQueueListener" class="com.itheima.rabbitmq.SpringQueueListener"/><!-- <bean id="fanoutListener1" class="com.itheima.rabbitmq.FanoutListener1"/>--><!-- <bean id="fanoutListener2" class="com.itheima.rabbitmq.FanoutListener2"/>--><!-- <bean id="topicListenerStar" class="com.itheima.rabbitmq.TopicListenerStar"/>--><!-- <bean id="topicListenerWell" class="com.itheima.rabbitmq.TopicListenerWell"/>--><!-- <bean id="topicListenerWell2" class="com.itheima.rabbitmq.TopicListenerWell2"/>--><rabbit:listener-container connection-factory="connectionFactory" auto-declare="true"><rabbit:listener ref="springQueueListener" queue-names="spring_queue"/><!-- <rabbit:listener ref="fanoutListener1" queue-names="spring_fanout_queue1"/>--><!-- <rabbit:listener ref="fanoutListener2" queue-names="spring_fanout_queue2"/>--><!-- <rabbit:listener ref="topicListenerStar" queue-names="spring_topic_queue_star"/>--><!-- <rabbit:listener ref="topicListenerWell" queue-names="spring_topic_queue_well"/>--><!-- <rabbit:listener ref="topicListenerWell2" queue-names="spring_topic_queue_well2"/>--></rabbit:listener-container></beans>
消费者类 根据bean id 编写对应的类名 并 实现 MessageListener 重写 onMessage 方法
package com.itheima.rabbitmq;import org.springframework.amqp.core.Message;import org.springframework.amqp.core.MessageListener;public class SpringQueueListener implements MessageListener {@Overridepublic void onMessage(Message message) {System.out.println(new String(message.getBody()));}}
11. Spring Boot 整合 RabbitMQ

5.1. 生产者
绑定交换机和队列
package com.example.springrabbitmqproducer.rabbitmq.config;import org.springframework.amqp.core.*;import org.springframework.beans.factory.annotation.Qualifier;import org.springframework.context.annotation.Bean;import org.springframework.context.annotation.Configuration;@Configurationpublic class RabbitMQConfig {public static final String EXCHANGE_NAME = "boot_topic_exchange";public static final String QUEUE_NAME = "boot_queue";//1.交换机@Bean("bootExchange")public Exchange bootExchange() {//获取4种类型的交换机return ExchangeBuilder.topicExchange(EXCHANGE_NAME).durable(true).build();}//2.队列@Bean("bootQueue")public Queue bootQueue() {return QueueBuilder.durable(QUEUE_NAME).build();}//3.队列和交换机的绑定@Beanpublic Binding bindQueueExchange(@Qualifier("bootQueue") Queue queue, @Qualifier("bootExchange") Exchange exchange) {return BindingBuilder.bind(queue).to(exchange).with("boot.#").noargs();}}
test
package com.example.springrabbitmqproducer;import com.example.springrabbitmqproducer.rabbitmq.config.RabbitMQConfig;import org.junit.jupiter.api.Test;import org.springframework.amqp.rabbit.core.RabbitTemplate;import org.springframework.beans.factory.annotation.Autowired;import org.springframework.boot.test.context.SpringBootTest;@SpringBootTestclass SpringRabbitmqProducerApplicationTests {//注入RabbitTemplate@Autowiredprivate RabbitTemplate rabbitTemplate;@Testpublic void testSend(){rabbitTemplate.convertAndSend(RabbitMQConfig.EXCHANGE_NAME,"boot.haha","boot mq hello");}}
5.2. 消费者
@Componentpublic class RabbitMQListener {//监听指定队列@RabbitListener(queues = "boot_queue")public void ListenerQueue(Message message) {System.out.println(new String(message.getBody()));}}

若有收获,就点个赞吧
0 人点赞
