对测试管理的支持,可以定义为
- 提供生成测试报告的服务,并自动收集与展示相关内容
- 支持测试步骤的收集与展示
- 支持测试策略的定义、展示与调度
- 支持用户故事、特性的定义、展示与调度
- 支持需求、用例、缺陷的链接关联与展示
- ……..
官方文档 https://docs.qameta.io/allure-report/ 与 pytest集成 https://docs.qameta.io/allure-report/#_python 必要的安装项
$ pip install allure-pytest- 从 git 下载安装 allure-framework 或 官方提供的下载方法https://docs.qameta.io/allure-report/#_installing_a_commandline

allure测试报告生成
文件路径可以是当前命令执行时的相对路径,也可以是绝对路径
$ pytest --alluredir=/tmp/my_allure_results
$ allure serve /tmp/my_allure_results
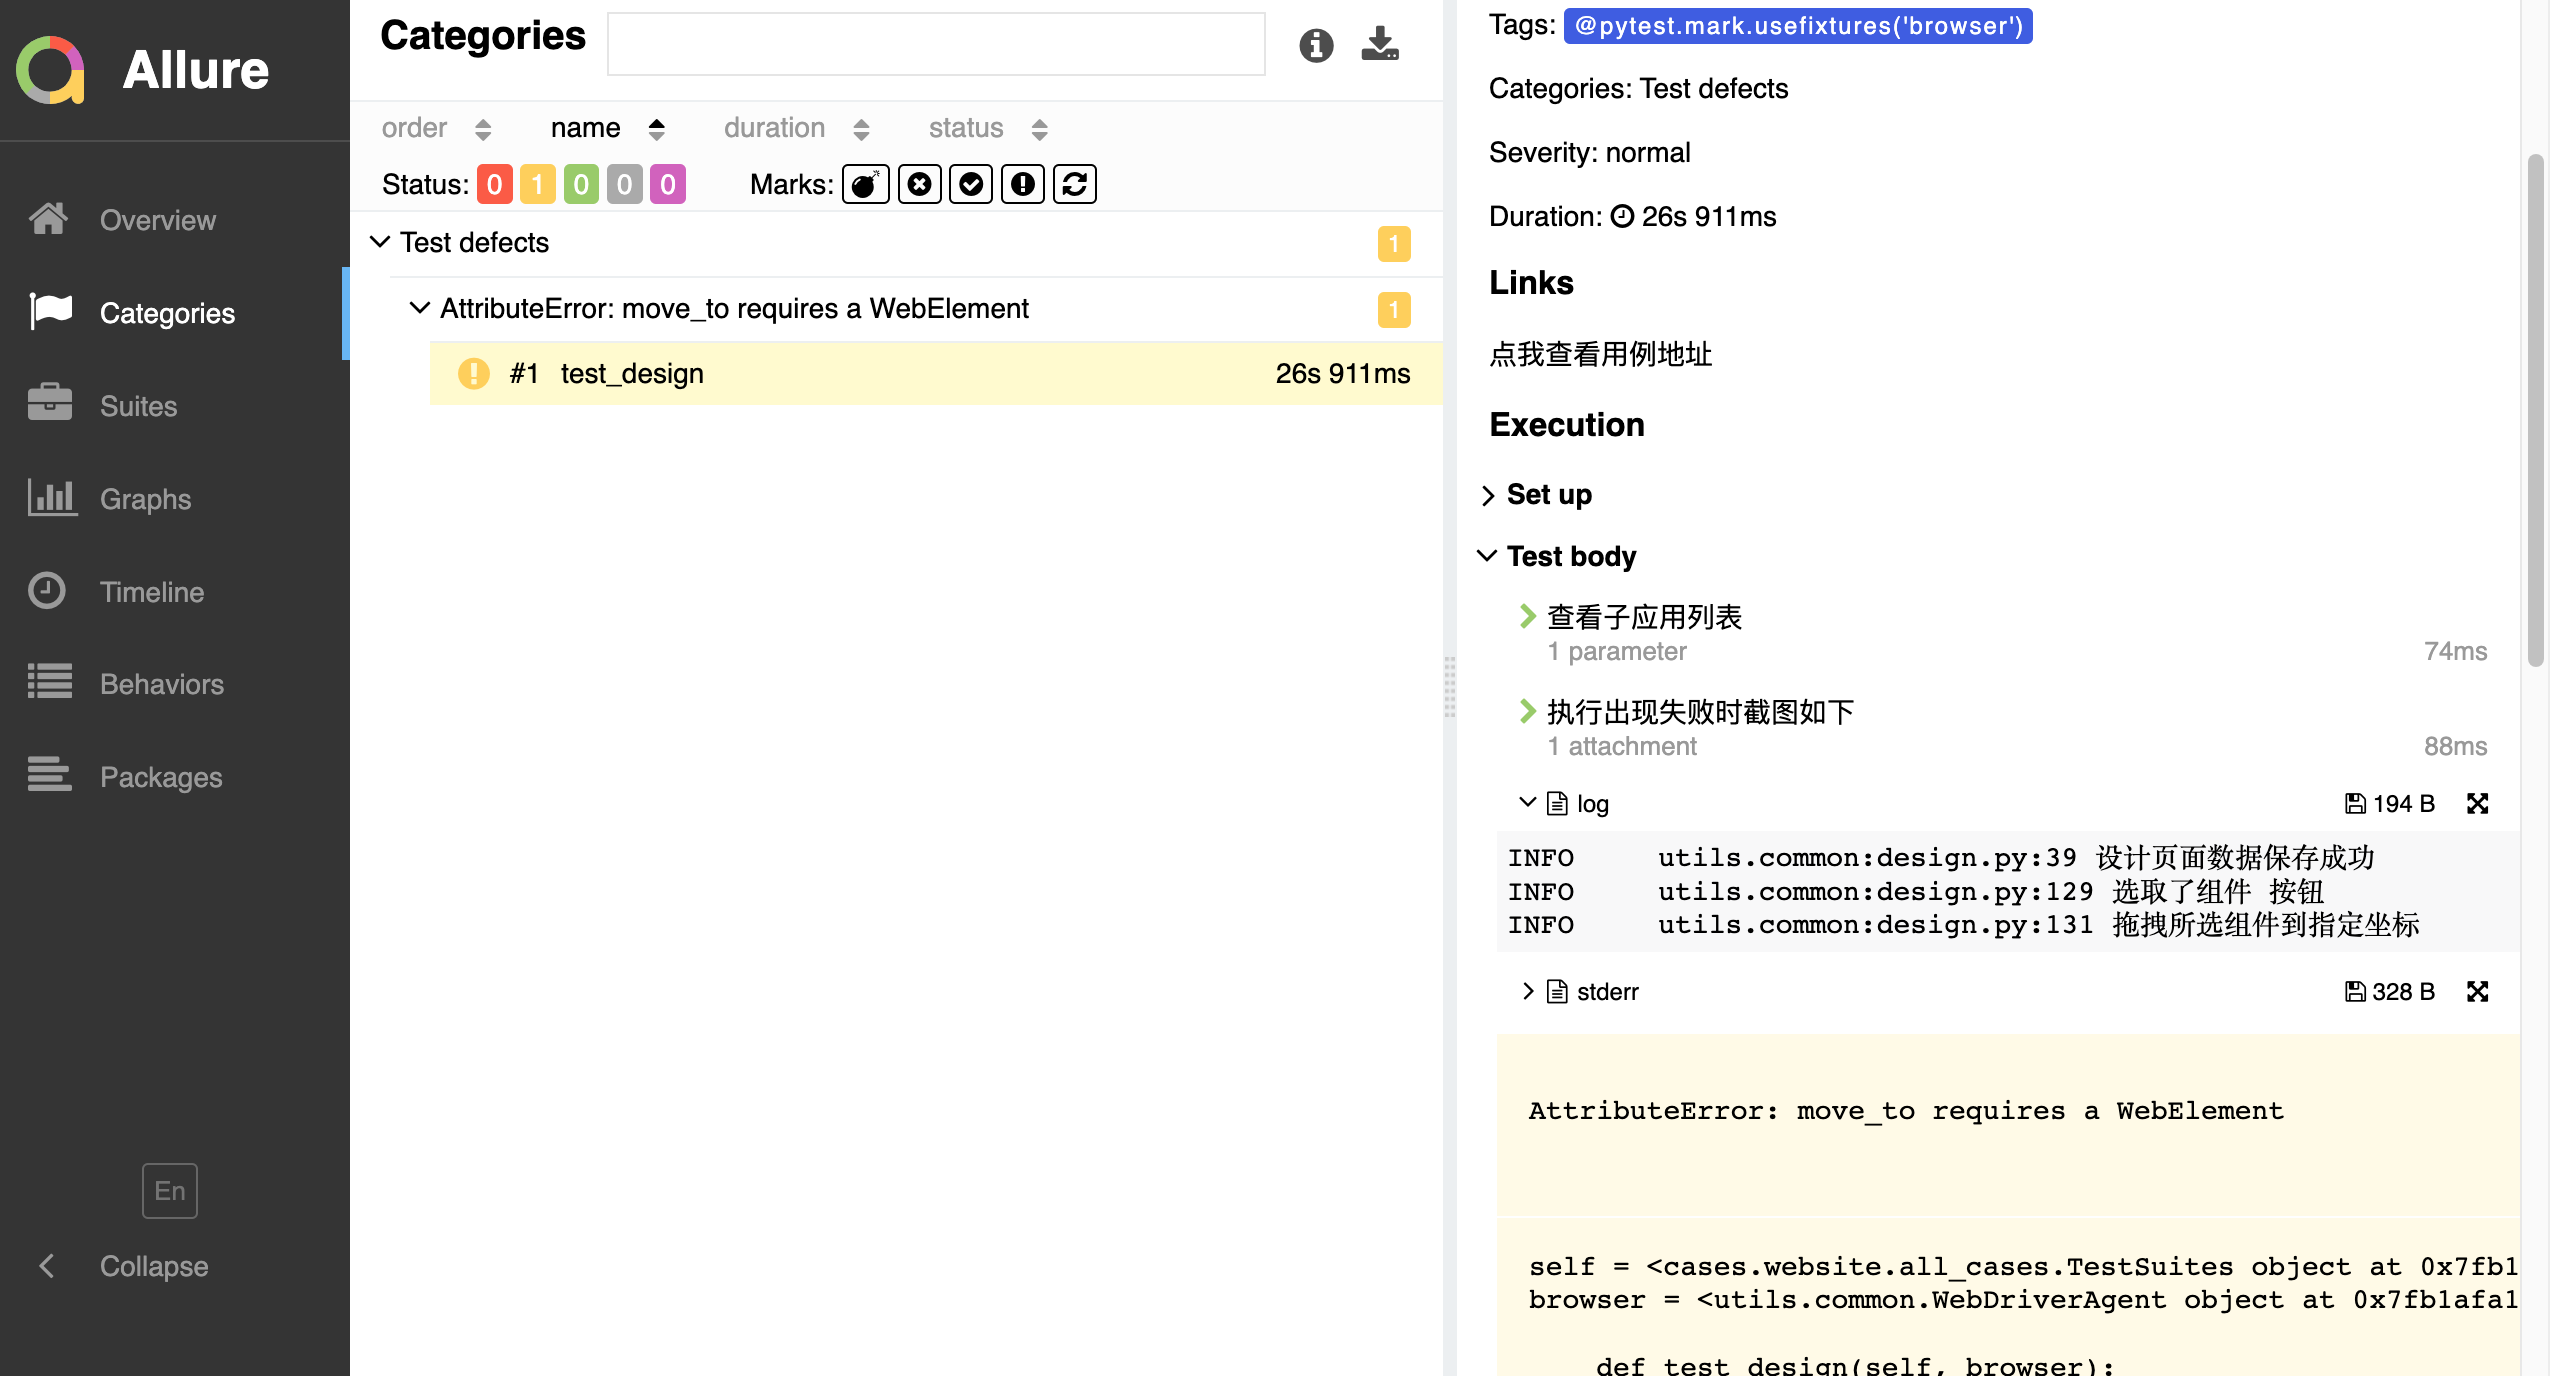
allure报告中插入附件

# allure 获取截图文件with allure.step('执行步骤失败时截图如下'):_png = get_screenshot_as_png()allure.attach(_png, '截图信息', allure.attachment_type.PNG)

常用注解的简单使用
图示的结果,是直接使用的allure注解,并没有以官网的推荐做复杂的实现
装饰为测试步骤
@allure.step('_step in conftest.py_')
装饰用例集(故事/特性)
https://docs.qameta.io/allure-report/#_bdd_markers
@allure.feature('xxxxxxxx'),@allure.story('xxxxxxxx')
虽然是用于 BDD,但即使不以 BDD 来开展,使用这个装饰器的好处也显而易见。比如指定运行域
$ pytest tests.py --allure-stories story_1,story_2
装饰运行的优先级集合
https://docs.qameta.io/allure/#_severity https://docs.qameta.io/allure/#_severity_markers
@allure.severity(allure.severity_level.NORMAL)可以用于测试策略。Pytest 提供了一种方式,相较于 Allure 的
severities要更灵活且 适配管理需要,即@pytest.mark.{name of markers}。pytest 模式下,模块文件命名 须以test_*.py的模式处理 https://docs.pytest.org/en/latest/example/markers.html https://docs.pytest.org/en/stable/how-to/mark.html

def pytest_configure(config):"""通过 @pytest.mark 调用。用于测试用例管理e.g @pyetest.mark.bvt 即定义某用例级别为构建认证测试(金丝雀测试)"""marker_list = ["BVT", "SMOKE"]for markers in marker_list:config.addinivalue_line("markers", markers)


- allure 运行指定级别的用例
通过形如
@allure.severity(allure.severity_level.NORMAL)标记要测试的对象 hint: Allure并没有提供可扩展该级别的方法
$ pytest tests.py --allure-severities normal,critical
装饰测试用例或链接
To integrate report with a bugtracker or test management system Allure has
@allure.link,@allure.issueand@allure.testcasedescriptors
@allure.link('https://zentao.yun-chang.com/testcase-browse-149.html', name="点我查看用例地址")@pytest.mark.usefixtures('browser')class TestSuites:@allure.severity(allure.severity_level.BLOCKER)def test_login(self, browser):"""正常登录"""login(browser)
持续集成
以 jenkins 为例见官方 https://docs.qameta.io/allure-report/#_jenkins
配置示例
只需要用 pytest测试用例生成 --alluredir=xxx../../././allure-results
再由 jenkins 的 allure 插件自动处理并运行 allure 的 netty 服务即可
解析报告(比如用于企业微信机器人通知)
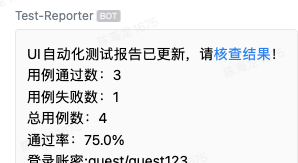

#!/usr/local/bin/py3# -*- coding:utf-8 -*-import jsondef parse_ui_report():target = '/root/.jenkins/workspace/ui-automated/allure-report/widgets/summary.json'#print(f"allure待解析的报告文件为:{target}")with open(target) as f:_datas = json.loads(f.read())failed = _datas['statistic']['failed']broken = _datas['statistic']['broken']passed = _datas['statistic']['passed']total = _datas['statistic']['total']passed_ratio = str(round(int(passed) / int(total), 2) * 100) + '%'print(f"用例通过数:{passed}")print(f"用例失败数:{int(failed)+int(broken)}")print(f"总用例数:{total}")print(f"通过率:{passed_ratio}")if __name__ == '__main__':parse_ui_report()
在自动化工程里,准备的主入口脚本直接在 jenkins 中调用该文件是不行的,会有各种错误。而且处理起来很复杂。
port=`lsof -i:8000 | awk '{print $2}' | sed -n '2,$p'`;if [[ ${port} != "" ]];then `kill -9 ${port}`;fi;#以此解决 allure 命令找不到的错误source /etc/profile;python3 run.py

工程入口函数-快捷启动
除了官方提到的启动方式,还可以:
- 持续集成运行 CLI
- IDE 的测试驱动调度运行
- 如下文中示例,定义入口函数,调用 allure report 提供服务

#!/usr/local/bin/py3# -*- coding:utf-8 -*-"""@Interpreter: Python3.9@File: run_cases.py.py@Description:@Author: hailong.chen@Date: 2022/3/21 14:49@ModifiedBy:"""import osimport sysfrom subprocess import Popen# 核验环境是否异常(比如本地如果安装有anaconda,会导致运行时异常)print(sys.path)# 将运行时环境加入系统,避免找不到依赖模块project_abspath = os.path.split(os.path.abspath(os.path.dirname(os.path.abspath(os.path.dirname(__file__)))))[0]print("工程所属路径:%s" % project_abspath)current_abspath = os.path.abspath(os.path.dirname(__file__))print("入口文件所在的绝对路径为:%s" % current_abspath)sys.path.append(project_abspath)sys.path.append(current_abspath)import pytestfrom utils.common import loggerfrom utils.wx_work_robot import push_allure_result_to_robotdef run_pytest_allure():# 定义要执行的测试文件,如 executed_filesexecuted_files = str(current_abspath) + '/cases_collections/initial_spec.py'# pytest调用指定的测试文件,并生成 allure 的测试结果文件pytest.main(['-v', str(executed_files), '--alluredir', '%s/reports/allure-results' % project_abspath])# 根据结果文件生成HTML报告,并启动Jetty服务os.system(r'allure generate -c %s/reports/allure-results -o %s/reports/allure-report' % (project_abspath, project_abspath))Popen(r'allure open %s/reports/allure-report -p 7710' % project_abspath, shell=True)if __name__ == '__main__':run_pytest_allure()logger.info("调用企业微信机器人通知,本地调试代码时勿调用!")# push_allure_result_to_robot()

若有收获,就点个赞吧
0 人点赞
