- 测试夹具(test fixture)
- pytest 的测试夹具
- 作用域
- 使用方式
- 1. 作为测试函数的参数传入 (接上个示例)
- 2. 放入
conftest.py共享夹具,这样也省去了导入工作 - 3. 共享测试数据(同时,pytest 会缓存这些数据)
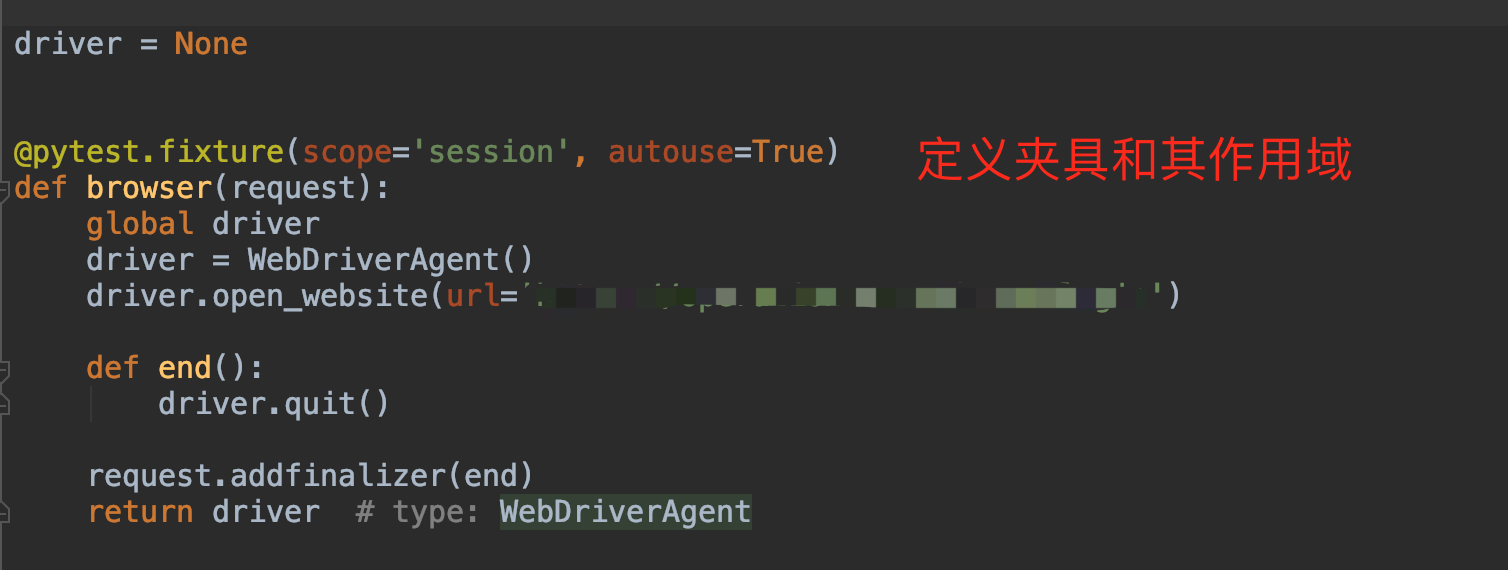
- 4. 作为初始化和销毁。即 AOP 中的Before、After
- 5. 将测试函数的数据传递给夹具
- 模块化实现:从夹具函数使用夹具">6. 模块化实现:从夹具函数使用夹具
- 7. 通过夹具自动将测试函数分组
- 夹具对类和模块的支持 (使用
@pytest.mark.usefixtures)">8. 夹具对类和模块的支持 (使用@pytest.mark.usefixtures)
- 对 xunit 形式的夹具支持
- Pytest 测试文件发现
- 测试跳过与指定失败
- pytest 的测试夹具
- 命令行
测试夹具(test fixture)
测试夹具:适用于所有测试代码的初始化和清理的(代码)方法
在 Pytest 中也进行了阐述:
Software test fixtures initialize test functions. They provide a fixed baseline so that tests execute reliably and produce consistent, repeatable, results. Initialization may setup services, state, or other operating environments. These are accessed by test functions through arguments; for each fixture used by a test function there is typically a parameter (named after the fixture) in the test function’s definition.
")
pytest 的测试夹具
Pytest only caches one instance of a fixture at a time, which means that when using a parametrized fixture, pytest may invoke a fixture more than once in the given scope. https://docs.pytest.org/en/stable/how-to/index.html https://docs.pytest.org/en/stable/reference/fixtures.html
作用域
Pytest 的测试夹具使用是装饰器 @pytest.fixture(scope=) ,与作用域对应。即可以是
session从 Pytest 测试执行开始,直到测试结束后销毁package当前包下的测试结束后销毁module当前模块下的测试结束后销毁class当前类下的测试结束后销毁function当前函数/方法结束后销毁
例如:
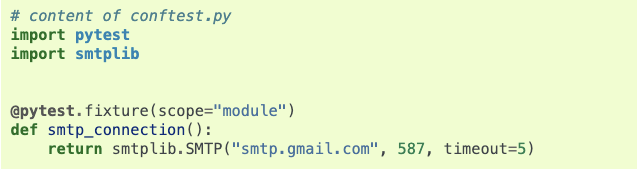
# content of conftest.pyimport pytestimport smtplib@pytest.fixture(scope="module")def smtp_connection():return smtplib.SMTP("smtp.gmail.com", 587, timeout=5)
使用方式
用途诸如参数传递、共享数据和参数化的支持等,比如测试用例执行总会需要”登录”状态,数据库连接的建立等等。因为较为庞大与灵活,这里只提及几个常见且重要的能力,具体的更多的技巧方式见 官方 fixture 的使用。 需要注意的是,fixture 实例化是有顺序/优先级的,且
@pytest.mark.usefixtures与@pytest.fixture叠用有不可预测性
1. 作为测试函数的参数传入 (接上个示例)
def test_ehlo(smtp_connection): #夹具smtp_connection作为参数让函数 test_ehlo 接收。其实这就是 DI 实现response, msg = smtp_connection.ehlo() #调用夹具实例smtp_connectionassert response == 250
2. 放入 conftest.py 共享夹具,这样也省去了导入工作
it automatically gets discovered by pytest. The discovery of fixture functions starts at test classes, then test modules, then
conftest.pyfiles and finally builtin and third party plugins
引用该共享夹具见下文第8项 夹具对类和模块的支持 (使用
@pytest.mark.usefixtures)
3. 共享测试数据(同时,pytest 会缓存这些数据)
4. 作为初始化和销毁。即 AOP 中的Before、After

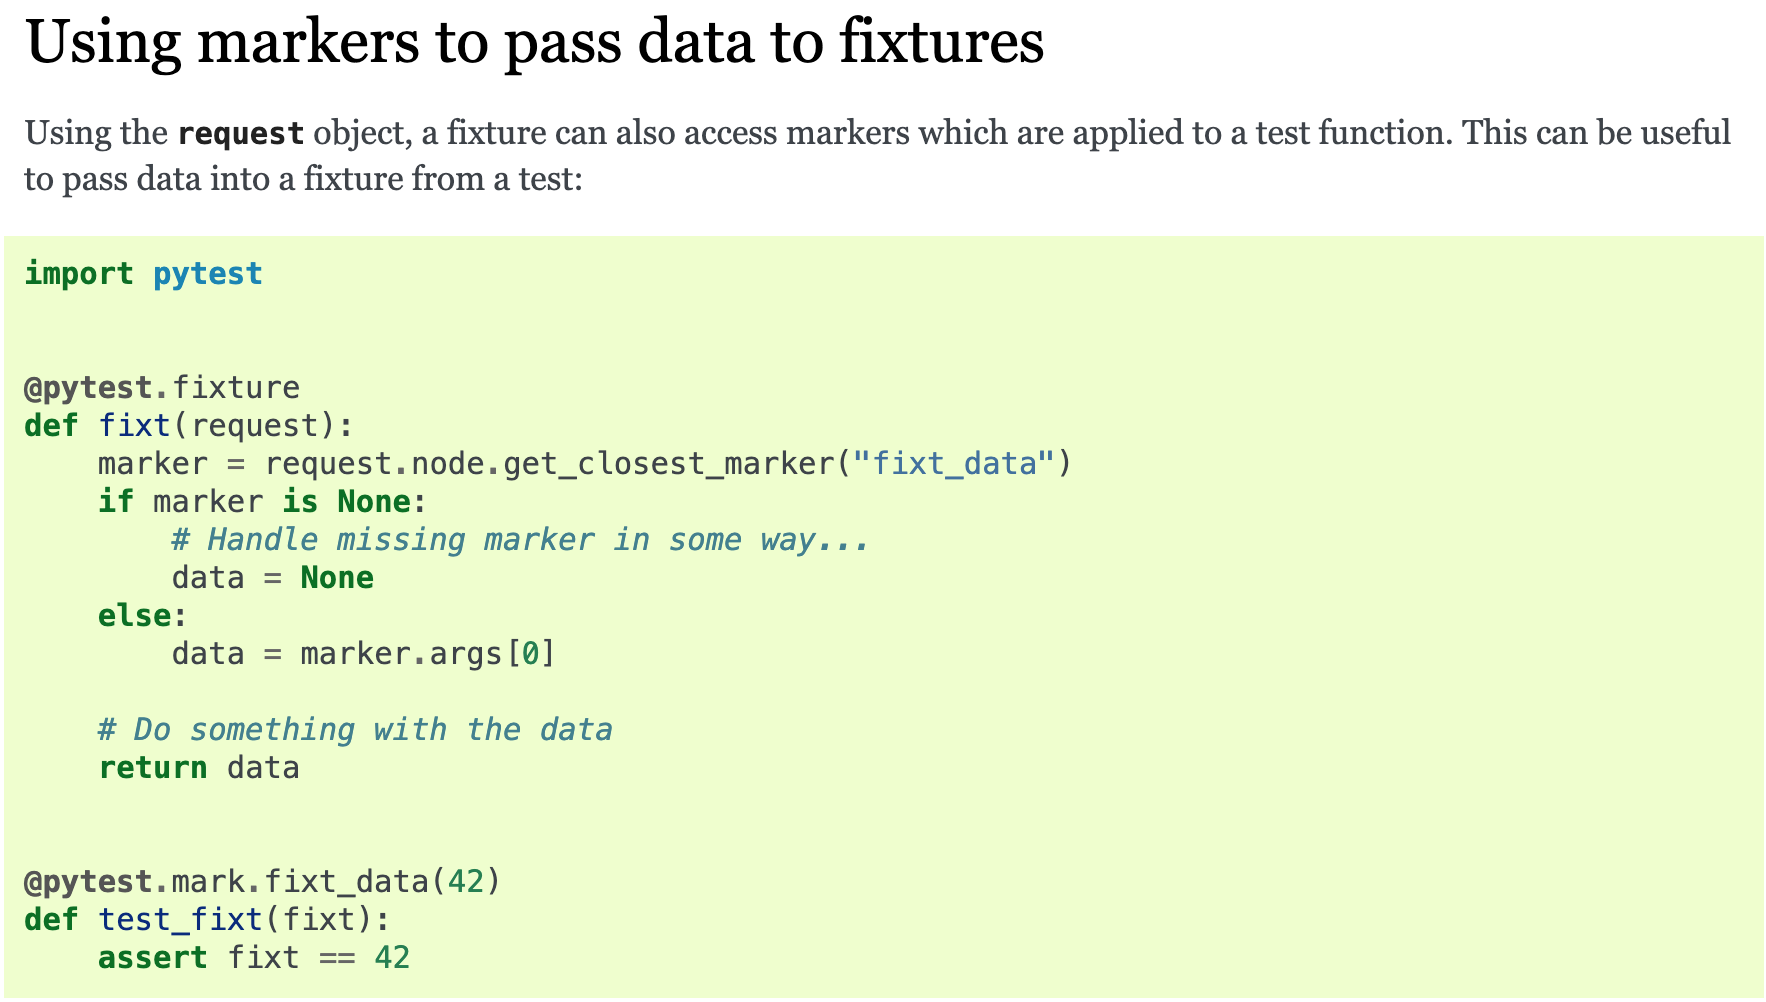
5. 将测试函数的数据传递给夹具
_@pytest.mark.fixt_data()_个人建议:对于此类诉求,不借助夹具参数反转能力,而是使用函数的参数。 那么此类能力的场景适用于什么时候?——数据驱动的模型

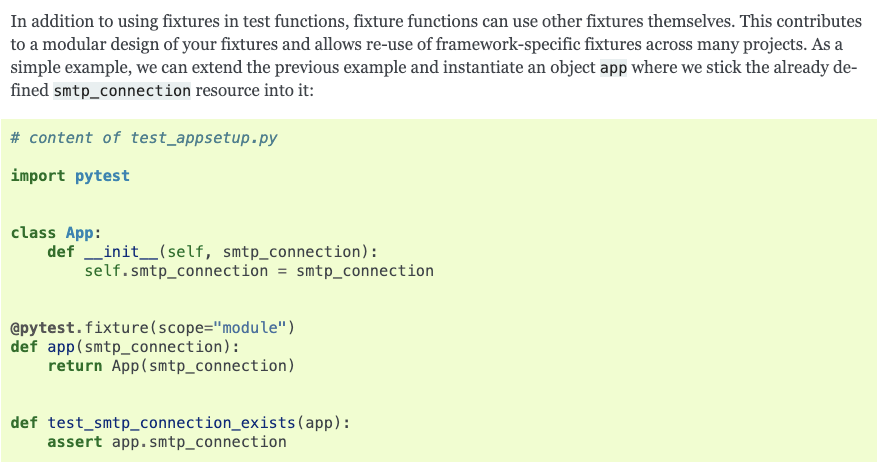
6. 模块化实现:从夹具函数使用夹具
7. 通过夹具自动将测试函数分组
- 可以通过 pytest.mark 的能力
- 可以通过作用域
8. 夹具对类和模块的支持 (使用@pytest.mark.usefixtures )


对 xunit 形式的夹具支持
While these setup/teardown methods are simple and familiar to those coming from a
unittestornosebackground, you may also consider using pytest’s more powerful fixture mechanism which leverages the concept of dependency injection, allowing for a more modular and more scalable approach for managing test state, especially for larger projects and for functional testing. You can mix both fixture mechanisms in the same file but test methods ofunittest.TestCasesubclasses cannot receive fixture arguments.

Pytest 测试文件发现
测试文件发现将默认递归(recurse)查询指定规则的py文件。
- 默认的测试文件发现规则
- 包名
test_*.py或*_test.py以及导入的符合规则的包 - 类名称为
Test前缀。且类不能有__init__()构造方法 - 函数名为
test_前缀。
——对于这类通用默认模式,最好不要做个性化,就像 Python 的 _self_ 
- py包中
__init__.py对测试文件发现的作用与影响
测试跳过与指定失败
命令行
pytest 命令执默认从用户当前所在目录开始执行与测试发现规则匹配的文件,指定了执行地址和文件等规则除外。具体支持的命令见帮助文档

常用的一些参数
-v输出执行的详细信息(可以用于 debug)--pdb调试信息管理器。更多调试的方式与信息见 PDB-s异常捕获的快捷模式。比如显示 print 方法,异常抛出时的简要描述等-m执行指定的测试文件--html=path生成 html 格式测试报告到指定的path路径--full-trace详细的链路追踪--runxfail忽略 xfail 标记,执行测试并生成报告-x测试失败即退出,不再继续执行--lf重执行最近一次失败的用例,没有失败则执行全部--ff执行所有测试用例,失败的优先--maxfail=num限定次数失败后停止测试--ignore=path不执行指定的文件--alluredir=DIR生成 allure 报告到指定路径
命令执行示例:
$ python3 -v -m pytest website_run_test.py --html=../../reports/WebsiteTestReport.html --self-contained-html
Pycharm 配置示例:
一些其他的特性调用补充
如指定执行的类型、范围,或是函数、类等
markers 的使用
def pytest_configure(config):"""通过 @pytest.mark 调用。用于测试用例管理e.g @pyetest.mark.bvt 即定义某用例级别为构建认证测试(金丝雀测试)"""marker_list = ["bvt", "smoke"]for markers in marker_list:config.addinivalue_line("markers", markers)
@pytest.mark.bvt@allure.severity(allure.severity_level.BLOCKER)def test_login(self, browser):"""正常登录"""login(browser)


若有收获,就点个赞吧
0 人点赞
