简介
Express 是一基于Node的一个框架,用来快速创建Web服务的一个工具,为什么要使用Express呢,因为创建Web服务如果从Node开始有很多繁琐的工作要做,而Express为你解放了很多工作,从而让你更加关注于逻辑业务开发。
举个例子,创建一个很简单的网站:
- 使用Node来开发:
var http = require('http');http.createServer(function(req, res) {res.writeHead(200, {'Content-Type': 'text/plain'});res.end('Hello World')}).listen(3000)
这是一个简单的 Hello World,但实际上真正的网站要比这个复杂很多,主要有:
(1) 多个页面的路由功能
(2) 对请求的逻辑处理
那么使用node原生写法就要进行以下处理
var http = require('http')var url = require('url')var app = http.createServer(function (req, rep) {//req.url: 访问路径var urlObj = url.parse(req.url);switch (urlObj.pathname) {case '/'://首页rep.writeHead(200, {'content-type': 'text/html;charset=utf-8'})rep.end('<h1>这是首页</h1>');break;case '/user'://个人中心rep.writeHead(200, {'content-type': 'text/html;charset=utf-8'})rep.end('<h1>这是个人中心</h1>');break;default://处理其他情况rep.writeHead(404, {'content-type': 'text/html;charset=utf-8'})rep.end('<h1>页面不见了</h1>');break;}})app.listen(3000, 'localhost')
代码里在createServer函数里传递一个回调函数用来处理http请求并返回结果,在这个函数里有两个工作要做:
(1)路由分析,对于不同的路径需要进行分别处理
(2)逻辑处理和返回,对某个路径进行特别的逻辑处理
如果一个大型网站拥有海量的页面,每个页面的处理逻辑也是交错复杂,那这里的写法会非常混乱,没法维护,为了解决这个问题,TJ提出了Connect的概念,把Java里面的中间件概念第一次进入到JS的世界,Web请求将一个一个经过中间件,并通过其中一个中间件返回,大大提高了代码的可维护性和开发效率。
// 引入connect模块var connect = require("connect");var http = require("http");// 建立appvar app = connect();// 添加中间件app.use(function(request, response) {response.writeHead(200, { "Content-Type": "text/plain" });response.end("Hello world!");});启动应用 http.createServer(app).listen(3000);
但是TJ认为还应该更好一点,于是Express诞生了,通过Express开发以上的例子:
- 使用Express来开发:
var express = require('express');var app = express();app.get('/', function (req, res) {res.send('Hello World!');});app.get('/about', function (req, res) {res.send('About');});var server = app.listen(3000, function () {var host = server.address().address;var port = server.address().port;console.log('Example app listening at http://%s:%s', host, port);});
从Express例子可以看出,使用Express大大减少了代码,而且逻辑更为简洁,所以使用Express可以提高开发效率并降低项目维护成本。
安装使用
1.手动安装
npm initnpm install express || yarn add express
var express = require('express');var app = express();app.get('/', function (req, res) {res.send('Hello World!');});var server = app.listen(3000, function () {var host = server.address().address;var port = server.address().port;console.log('Example app listening at http://%s:%s', host, port);});
2.通过express-generator生成express项目
npm install express-generator -gexpress --ejs express_demo || . // .代表在当前目录生成项目cd express_demonpm install || yarn#运行项目npm start || node ./bin/www
源码结构
在 Express4.x 的版本中,已经移除了connect模块,Express内部自己实现了connect的模块,并进行了一些增强处理。这里对Express 源码进行一些简单的说明。
首先我们看一下Express的源码结构:
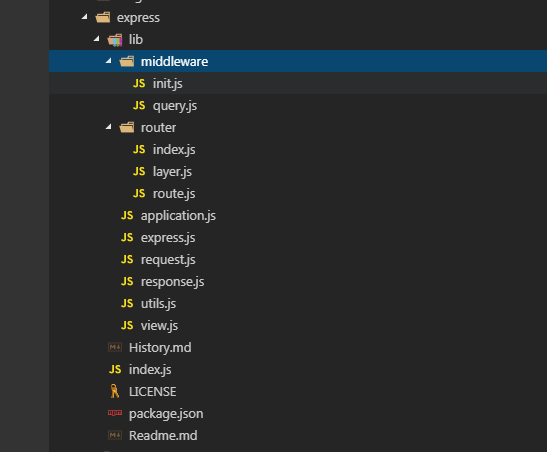
middleware: 中间件init.js 初始化request,responsequery.js 格式化url,将url中的rquest参数剥离, 储存到req.query中router: 路由index.js Router类,用于存储中间件数组layer.js 中间件实体类route.js Route类,用于处理不同Methodapplication.js 对外APIexpress.js 入口request.js 请求增强response.js 返回增强utils.js 工具函数view.js 模版相关
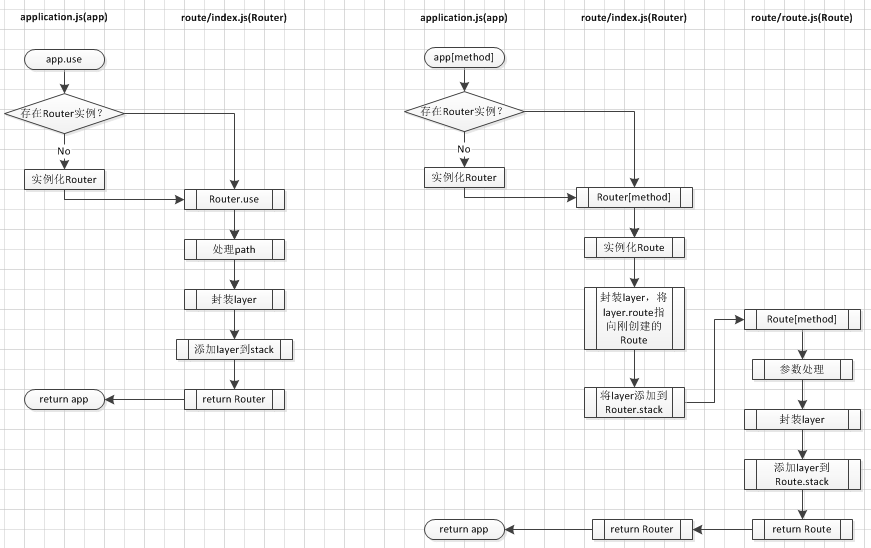
Express中的中间件和connect中不太一样,因为Express有两种中间件,普通中间件、路由中间件。

app初始化时,会push两个中间件(init,query)进router.stack里。我们可以通过app.use往app添加非路由中间件,也可以通过app[METHOD]添加路由中间件。
普通中间件:
使用app.use方法的时候,会通过lazyrouter()方法实例化一个Router对象,在整个app中只有一个Router对象。最终调用router.use()方法,把 Layer 添加到 Router stack 中,且这个 Layer 的 route属性为undefined。
路由中间件:
使用app[METHOD]方法的时候,同样会把这个中间件添加到 Router对象的 stack 中, 但是这个 Layer 的 route属性会指向一个实例化的 Route 对象, 在Route里也有一个实例化的 Layer,且放在stack里,与Router的 Layer不同的是,Route的没有layer.route 且 layer.method 存放了http方法。
总结:
- express 中添加中间件方法有 app.use 和 app[METHOD] ,当然还有内置的 Router 类,app.use 用来添加非路由中间件,app[METHOD] 用来添加路由中间件。
- Layer 类封装中间的 path 和 handle (处理函数)
- Router 和 Route都有对应的 stack,但是 Route 在整个 app 中只有一个,而 Route 可以有多个。放在Router
stack 里的路由中间件,通过Layer.route 指向 Route,与 Route stack 相关联起来。
运行原理
基本使用
示例代码: https://gitee.com/gongyz/blog_express/tree/study/
路由
路由定义了应用程序如何响应客户端的请求,这些请求是由一个 URI + HTTP请求方法 组成,每个路由都可以指定一个或者多个处理函数,处理函数会在匹配路由时执行。
路由的定义采用以下的结构:app.METHOD(PATH, HANDLER)
1、基本使用
// 默认路由,基础路径为 '/'app.get('/', function (req,rep,next) {rep.send('Hello World!')})app.get('/user', function (req,rep,next) {rep.send('user')})// 也可以指定多个处理函数app.get('/user',fn1, fn2, ... function (req,rep,next) {rep.send('user')})app.get('/user/:name/:group', function (req,rep,next) {console.log(rep.params)next()})// 创建子路由,并且对子路由进行配置var router = express.Router({mergeParams: true,caseSensitive: true,strict: true});// 注册子路由,基础路径为 /user/:name/:groupapp.use('/user/:name/:group', router)// /user:name:group 和 /user:name:group/ 都可以匹配router.get('/', function (req, rep, next) {rep.send(req.params)})// /user:name:group/testrouter.get('/test', function (req, rep, next) {rep.send('router test')})
2、路由路径
路由路径可以是字符串、字符串匹配模式或正则表达式,详细的可以查看官方文档关于路由 这一节。
/users/:userId/books/:bookId/abc?d 0次或1次/abc+d 1次或多次/abc\*d c~d之间任意字符/a(bc)?d/a(bc)+d/\/ab[1,2]\/cd/ 正则匹配[/abc?d, /a(bc)?d] // 多个匹配app.get(/\/ab[1,2]\/cd/,function (req,res,next) {res.send('finish')})
3、app.all()
// router.all() 所有匹配到该路由路径的HTTP方法都会执行处理函数router.all(function(req, res, next) {// runs for all HTTP verbs first// think of it as route specific middleware!next();})
4、app.param()
// 普通写法对请求参数进行处理app.get('/user/:id', function (req, res, next) {if (req.params.id !== '1') {res.send(404)} else {res.send('success')}})// 使用app.param添加一个拦截器,对请求参数进行处理,下面的路由用来处理正确的请求app.param('id', function (req, res, next, id) {if (req.params.id !== '1') {res.send(404)} else {next()}})app.get('/user/:id', function (req, res, next) {res.send('success')})// 多个参数时的写法// 回调函数会执行两次,等同于下面的写法,建议采用下面的写法分开写app.param(['id', 'name'], function (req, res, next, value) {console.log(value)next()})// 第一次app.param('id', function (req, res, next, id) {console.log(id)next()})// 第二次app.param('name', function (req, res, next, name) {console.log(name)next()})app.get('/user/:id/:name', function (req, res, next) {res.send('success')})// router.param 用法和 app.param一样,不同的是router.param不支持['id', 'name']接收参数
5、app.route()
// 使用 router.route() 方法避免对同一个路径重复命名router.route('/users/:user_id').all(function(req, res, next) {// runs for all HTTP verbs first// think of it as route specific middleware!next();}).get(function(req, res, next) {res.json(req.user);}).post(function(req, res, next) {next(new Error('not implemented'));}).put(function(req, res, next) {// just an example of maybe updating the userreq.user.name = req.params.name;// save user ... etcres.json(req.user);}).delete(function(req, res, next) {next(new Error('not implemented'));});
静态资源访问
express内部引用了 serve-static 这个库,并且挂载到了express的static方法上。在后面的响应部分也介绍了在不使用 express.static 方法情况下如何实现静态资源访问。
// 基本用法app.use(express.static(path.join(__dirname, 'public')));// 自定义配置app.use(express.static('public', {index: 'index.html', // ['index.html', 'index.htm'] 指定默认的首页dotfiles: 'allow', // 是否.XXXextensions:['html', 'htm'] // 配置扩展名}))
获取客户端请求数据
1、获取URL中的数据
app.get('/index/:id', function (req,res,next) {res.send(`<ul><li>req.methed = ${req.method}</li><li>req.hostnam = ${req.hostname}</li><li>req.originalUrl = ${req.originalUrl}</li><li>req.path = ${req.path}</li><li>req.protocol = ${req.protocol}</li><li>req.query = ${JSON.stringify(req.query)}</li><li>req.params= ${JSON.stringify(req.params)}</li></ul>`)})
2、获取 headers 中的数据
app.get('/index', function (req,res) {res.send(req.headers)})
3、获取 body 中的数据
表单提交编码方式常用的有三种application/x-www-form-urlencoded 默认text/plainmultipart/form-data // 该类型需要使用 Multer 中间件处理,下面会介绍// 引入 body-parse 模块,express支持 json、urlencoded、text 方法// express内部已经引入了 body-parse 模块,并且把两个常用的方法json、urlencoded方法挂载到了express实例上// 处理 Content-Type 为 application/x-www-form-urlencoded 类型的请求app.use(bodyParser.urlencoded());// 处理 Content-Type 为 text/plain 类型的请求app.use(bodyParser.text());// 处理 Content-Type 为 application/json 类型的请求app.use(bodyParser.json());// 使用 Postman测试app.post('/test', function (req,res) {res.send(req.body)})
4、获取上传文件的数据
这里需要用到 Multer 中间件,用于处理 multipart/form-data 类型的表单数据,它主要用于上传文件。
注意: Multer 不会处理任何非 multipart/form-data 类型的表单数据。
安装
$ npm install --save multer
使用
Multer 会添加一个 body 对象 以及 file 或 files 对象 到 express 的 request 对象中。 body 对象包含表单的文本域信息,file 或 files 对象包含对象表单上传的文件信息。
警告: 确保你总是处理了用户的文件上传。永远不要将 multer 作为全局中间件使用,因为恶意用户可以上传文件到一个你没有预料到的路由,应该只在你需要处理上传文件的路由上使用。
基本使用方法:
/*Multer 接受一个 options 对象,其中最基本的是 dest 属性,这将告诉 Multer 将上传文件保存在哪。如果你省略 options对象,这些文件将保存在内存中,永远不会写入磁盘。*/// var upload = multer({ dest: 'uploads/' })// 内存存储// var storage = multer.memoryStorage()// 磁盘存储var storage = multer.diskStorage({destination: function (req, file, cb) {cb(null, 'uploads')},filename: function (req, file, cb) {cb(null, file.originalname + '-' + Date.now())}})// 创建上传中间件对请求进行拦截,处理上传的文件// 设置一个函数来控制什么文件可以上传以及什么文件应该跳过function fileFilter (req, file, cb) {// 这个函数应该调用 cb 用 boolean 值来指示是否应接受该文件if (file.mimetype === 'image/png') {// 接受这个文件,使用`true`cb(null, true)} else {// 拒绝这个文件,使用falsecb(null, false)// 拒绝同时抛出错误给express处理cb(new Error('file type illegal'),false)}}var upload = multer({ storage: storage, fileFilter: fileFilter })// 只接受文本域app.post('/upload', upload.none(), function (req,res) {res.send(req.body)})// 接受文本域和一切上传的文件,文件数组将保存在 req.filesapp.post('/upload', upload.any(), function (req,res) {console.log('req.body', req.body)console.log('req.file', req.file)console.log('req.files', req.files)res.send('请求成功')})// 处理单个以 fieldname 命名的文件,fieldname 由表单指定, 文件的信息保存在 req.fileapp.post('/upload', upload.single('file'), function (req,res) {console.log('req.body', req.body)console.log('req.file', req.file)console.log('req.files', req.files)res.send('请求成功')})// 处理多个以 fieldname 命名的文件,文件 fieldname 相同, 可以配置 maxCount 来限制上传的最大数量,文件的信息保存在 req.filesapp.post('/upload', upload.array('file', 3), function (req,res) {console.log('req.body', req.body)console.log('req.file', req.file)console.log('req.files', req.files)res.send('请求成功')})// 处理不同 fieldname 命名的文件,文件的信息保存在 req.filesfields 应该是一个对象数组,具有 name 和可选的 maxCount 属性let fields = [{ name: 'file', maxCount: 1 },{ name: 'file2', maxCount: 2 }]app.post('/upload', upload.fields(fields), function (req,res) {console.log('req.body', req.body)console.log('req.file', req.file)console.log('req.files', req.files)res.send('请求成功')})
响应
1、基本方式的响应
app.get('/txt',function (req,res) {res.send('my name is gongyz');})app.get('/json',function (req,res) {res.send({name: 'gongyz', age: 23});})app.get('/html', function(req,res) {res.send('<p style="color: red">Hello World</p>')})app.get('/download',function (req,res) {res.download('public/download.txt');})app.get('/redirect',function (req,res) {res.redirect('http://www.baidu.com')})// 静态资源访问app.get('/file/:name', function (req, res, next) {var options = {root: __dirname + '/public/',dotfiles: 'deny',headers: {'x-timestamp': Date.now(),'x-sent': true}}var fileName = req.params.name;res.sendFile(fileName, options, function (err) {if (err) {next(err)} else {console.log('Sent:', fileName)}})})
2、动态页面渲染
// view engine setupapp.set('views', path.join(__dirname, 'views'));app.set('view engine', 'ejs');var indexRouter = require('./routes/index');var usersRouter = require('./routes/users');app.use('/' ,indexRouter)app.use('/user' ,usersRouter)/* GET home page. */// router.get('/', function(req, res, next) {// var arr =[1,2,3,4,5,6,7,8]// res.render('index', { title: 'index', arr });// });// 实际项目中的做法var db = {getData (req,res,next) {var arr =[1,2,3,4,5,6,7,8]res.locals = {title: 'index', arr}next()}}router.get('/',db.getData, function(req, res, next) {res.render('index');});

若有收获,就点个赞吧
0 人点赞
