官方文档:https://projects.spring.io/spring-security-oauth/docs/oauth2.html
- 需要一个Bean对象,并添加@EnableAauthorizationServer注解
- ClientDetailsServiceConfigurer:定义Client信息
- AuthorizationServerSecurityConfigurer: 定义令牌相关端点(访问)的控制
- AuthorizationServerEndpointsConfigurer: 定义令牌的生成、存储规则
看个例子:
@Configuration@EnableAuthorizationServerpublic class AuthServerConfig implements AuthorizationServerConfigurer {@Overridepublic void configure(AuthorizationServerSecurityConfigurer security) throws Exception {}@Overridepublic void configure(ClientDetailsServiceConfigurer clients) throws Exception {}@Overridepublic void configure(AuthorizationServerEndpointsConfigurer endpoints) throws Exception {}}
上面这段代码就是官方所说的一个授权服务器配置的标准架子。接下来就是对三个配置的逐个击破。
1.客户端的配置
这个客户端就是Oauth2.0协议中的客户端概念,比如,你的系统需要接入QQ登录、微信登录或微博登录,你对于QQ、微信和微博就是客户端。
而SpringSecurityOauht2框架中的ClientDetailsServiceConfigurer 就是配置一些客户端信息的。对于信息记录,要么基于内存,要么基于数据库。因此,框架肯定也是提供了基于这两种方式的存储。
除此之外,我们还要了解的就是客户端 信息存储格式。就是一条客户端信息包含哪些内容。
1.1客户端信息数据格式

- clientId: 客户端编号(唯一标识)
- secret:客户端密码
- scope:这个客户端访问范围(一般配置读写权限)
- authorizedGrantTypes:授权类型(Oauth2.0的授权类型+refresh_token)
-
1.2存储方式
1.2.1基于内存
@Overridepublic void configure(ClientDetailsServiceConfigurer clients) throws Exception {// @formatter offclients.inMemory().withClient("gaoxi").secret("{noop}123456").scopes("read","write").authorizedGrantTypes("password","refresh_token","authorization_code","implicit","client_credentials");}
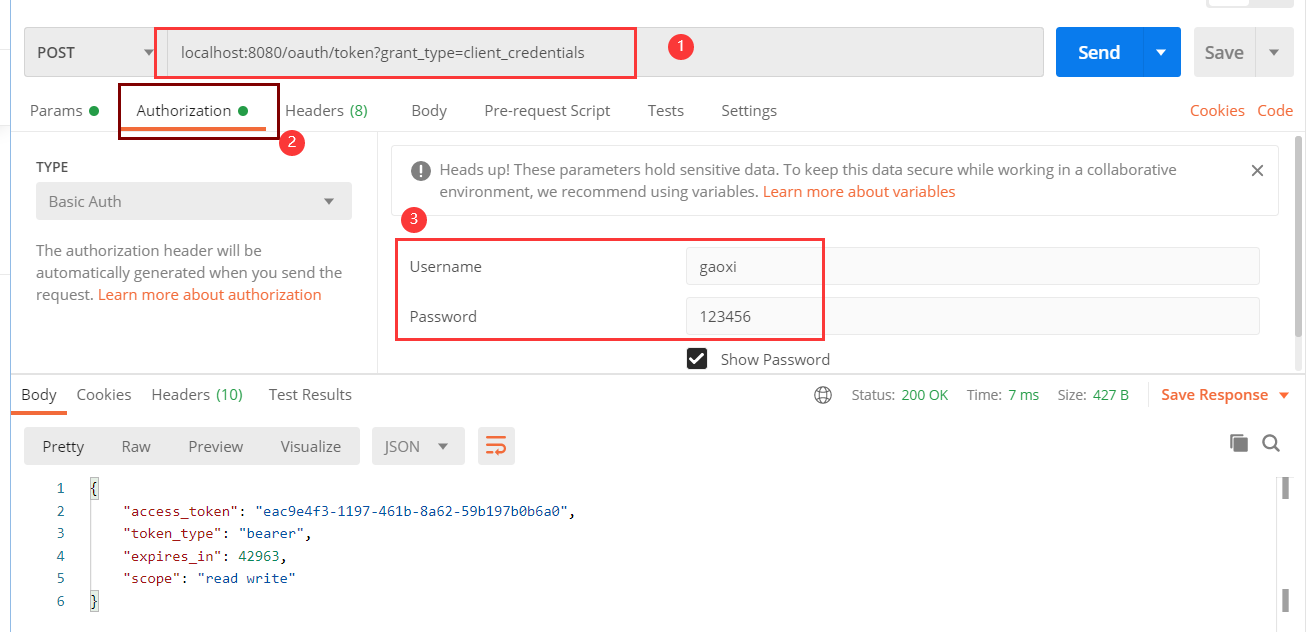
在没有配置其他东西的情况下 ,这段配置只能使用过client_credentials方式(且没有refresh_token)
- secret的那个属性因为没有配置加密器,所以必须加{noop}
- 获取方式通过postman
1.2.2基于数据库
谈到可以使用数据库,第一个想到的就是表sql,在官方文档中提供了建表语句(https://github.com/spring-projects/spring-security-oauth/blob/main/spring-security-oauth2/src/test/resources/schema.sql),
create table oauth_client_details (client_id VARCHAR(256) PRIMARY KEY,resource_ids VARCHAR(256),client_secret VARCHAR(256),scope VARCHAR(256),authorized_grant_types VARCHAR(256),web_server_redirect_uri VARCHAR(256),authorities VARCHAR(256),access_token_validity INTEGER,refresh_token_validity INTEGER,additional_information VARCHAR(4096),autoapprove VARCHAR(256));INSERT INTO `oauth2`.`oauth_client_details`(`client_id`, `resource_ids`, `client_secret`, `scope`, `authorized_grant_types`, `web_server_redirect_uri`, `authorities`, `access_token_validity`, `refresh_token_validity`, `additional_information`, `autoapprove`) VALUES ('gaoxi', NULL, '{noop}123456', 'read', 'refresh_token,client_credentials,password,authorization_code', NULL, NULL, NULL, NULL, NULL, NULL);
配置代码:
@Resourceprivate DataSource dataSource;@Overridepublic void configure(ClientDetailsServiceConfigurer clients) throws Exception {clients.jdbc(dataSource);}
验证:

2.令牌的存储生成方式
在客户端配置完成后,可以生成一个token,那么这个token的存储位置和生成的方式又是什么样的呢?默认的话是基于内存存储。生成的方式基于UUID工具类进行生成的一串字符串。
就存储方式而言:1.基于内存(默认)2.可以基于数据库(SQL、NoSQL)3.不存储(JWT)
就生成方式而言(一般存储方式已经决定的生成方式):1.UUID 2.JWT
管理整个令牌发布和存储的类是 DefaultTokenServices 里面依赖TokenStore对象用于管理token的存储。一般仅仅配置TokenStore。
2.1基于内存
默认的配置就是基于内存,可以不用配置任何东西,对应的TokenStore的实现类(InMemoryTokenStore)
2.2基于关系型数据库(Mysql)
对应的TokenStore实现类是(JdbcTokenStore),对于基于Jdbc方式的存储,无非配置两个东西,表与数据源。建表语句(https://github.com/spring-projects/spring-security-oauth/blob/main/spring-security-oauth2/src/test/resources/schema.sql)。
create table oauth_access_token (token_id VARCHAR(256),token varbinary(2000),authentication_id VARCHAR(256) PRIMARY KEY,user_name VARCHAR(256),client_id VARCHAR(256),authentication varbinary(2000),refresh_token VARCHAR(256));
配置:
@Resourceprivate DataSource dataSource;@Overridepublic void configure(ClientDetailsServiceConfigurer clients) throws Exception {clients.jdbc(dataSource);}@Overridepublic void configure(AuthorizationServerEndpointsConfigurer endpoints) throws Exception {endpoints.tokenServices(defaultTokenServices());}@Beanpublic TokenStore tokenStore(){JdbcTokenStore jdbcTokenStore = new JdbcTokenStore(dataSource);return jdbcTokenStore;}@Beanpublic DefaultTokenServices defaultTokenServices(){DefaultTokenServices defaultTokenServices = new DefaultTokenServices();defaultTokenServices.setTokenStore(tokenStore());return defaultTokenServices;}
2.3基于非关系型数据库(NoSql)
<dependency><groupId>org.springframework.boot</groupId><artifactId>spring-boot-starter-data-redis</artifactId></dependency>
@Overridepublic void configure(AuthorizationServerEndpointsConfigurer endpoints) throws Exception {endpoints.tokenServices(defaultTokenServices());}@Beanpublic TokenStore tokenStore() {RedisTokenStore redisTokenStore = new RedisTokenStore(redisConnectionFactory);return redisTokenStore;}@Beanpublic DefaultTokenServices defaultTokenServices() {DefaultTokenServices defaultTokenServices = new DefaultTokenServices();defaultTokenServices.setTokenStore(tokenStore());return defaultTokenServices;}
2.4基于JWT
jwt这种方式优点是不要服务端提供存储空间,但是缺点是不能够撤销令牌的发布。jwt可以通过密码进行签名或者使用公钥私钥的方式进行签名。因此,如果 使用密码签名的 话,ResourceServer也需要知道这段密码。如果是公私钥签名的话,ResourceSever需要知道公钥。方法有很多,直接在每个ResourceServer配置一下可以。同时也可以通过默认提供的oauth/token_key接口获取。默认这个接口是拒绝所有人的。可以通过最后文章开头提到的AuthorizationServerSecurityConfigurer配置中配置。具体代码如下:
@Overridepublic void configure(AuthorizationServerSecurityConfigurer security) throws Exception {security.tokenKeyAccess("permitAll()").checkTokenAccess("permitAll()");}@Overridepublic void configure(AuthorizationServerEndpointsConfigurer endpoints) throws Exception {endpoints.tokenServices(defaultTokenServices());}@Beanpublic JwtAccessTokenConverter jwtAccessTokenConverter(){JwtAccessTokenConverter jwtAccessTokenConverter = new JwtAccessTokenConverter();jwtAccessTokenConverter.setSigningKey("1234");return jwtAccessTokenConverter;}@Beanpublic TokenStore tokenStore() {JwtTokenStore jwtTokenStore = new JwtTokenStore(jwtAccessTokenConverter());return jwtTokenStore;}@Beanpublic DefaultTokenServices defaultTokenServices() {DefaultTokenServices defaultTokenServices = new DefaultTokenServices();defaultTokenServices.setTokenStore(tokenStore());defaultTokenServices.setTokenEnhancer(jwtAccessTokenConverter());return defaultTokenServices;}
结果:
获取签名密码:
注:这块虽然我设置了permitAll(),但是还是要有客户端认证。
3.令牌端点访问控制
在第2点中的jwt中有个oauth/token_key,通过这个接口可以从授权服务中获得jwt的签名密码或公钥。但是默认这个接口是denyAll(),所以可以通过配置permitAll()来设置来获取。
4.小结
上面的例子中,我简单的进行了各种配置的实践。但是使用的授权模式客户端模式(client_credentials)。但是在我们接QQ、微信登录时,使用的都应该是授权码模式。接下来的文章我会写授权码模式的配置。同时,在本篇文章的 例子中,有许多不用编写代码,通过配置文件就可以配置的内容也将在后续的文章中呈现。

若有收获,就点个赞吧
0 人点赞
