
准备工作
- 满足安装 Docker 项目所需的要求,比如 64 位的 Linux 操作系统、3.10 及以上的内核版本;CentOS 7.8.2003
- x86 或者 ARM 架构均可;
- 机器之间网络互通,这是容器之间网络互通的前提;
能够访问到gcr.io、quay.io这两个 docker registry,或者使用国内镜像源;- 单机可用资源建议 2 核 CPU、8 GB 内存或以上,4核8G内存;
- 30 GB 或以上的可用磁盘空间,这主要是留给 Docker 镜像和日志文件用。
环境预设
master 和 worker 节点
关闭 iptables 和 内核依赖
通过 lsmod | grep br_netfilter 确认 br_netfilter 是否存在。
由于 iptables 被绕过而导致流量无法正确路由的问题。应该确保 在 sysctl 配置中的 net.bridge.bridge-nf-call-iptables 被设置为 1。
cat << EOF | tee /etc/modules-load.d/k8s.confbr_netfilterEOF# 关闭防火墙systemctl stop firewalld && systemctl disable firewalldcat << EOF | tee /etc/sysctl.d/k8s.confnet.bridge.bridge-nf-call-ip6tables = 1net.bridge.bridge-nf-call-iptables = 1net.ipv4.ip_forward = 1EOFsysctl --system
执行sysctl -p 时出现如下报错,应执行 modprobe br_netfilter ,加载相应的模块。
# sysctl -psysctl: cannot stat /proc/sys/net/bridge/bridge-nf-call-ip6tables: No such file or directorysysctl: cannot stat /proc/sys/net/bridge/bridge-nf-call-iptables: No such file or directory
设置selinux
# 将 SELinux 设置为 permissive 模式(相当于将其禁用)setenforce 0sed -i 's/^SELINUX=enforcing$/SELINUX=permissive/' /etc/selinux/config
关闭swap
先通过free查看有无swap
swapoff -ased -i "s/\/dev\/mapper\/centos-swap/\#\/dev\/mapper\/centos-swap/g" /etc/fstab
端口检查
以下端口会用到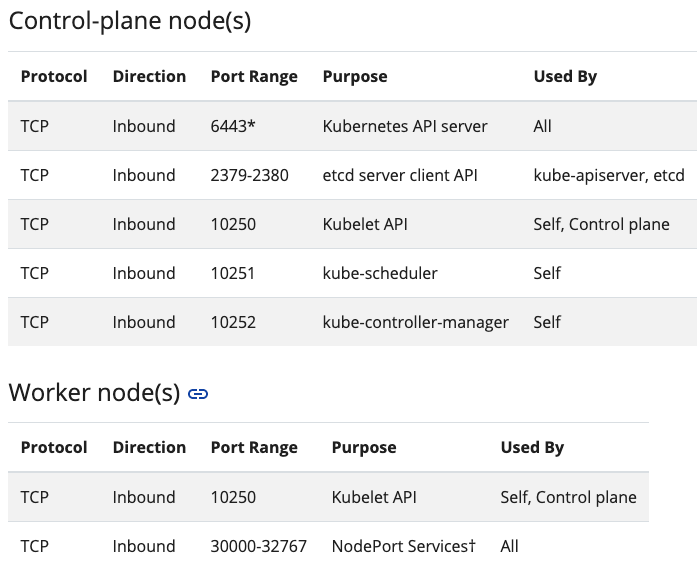
检测命令
netstat -ant | egrep "6433|2379|2380|10250|10251|10252";for port in {30000..32767}; do netstat -antp | grep $port; done
部署docker
master 和 worker 节点
安装docker
# 配置yum源wget -O /etc/yum.repos.d/docker-ce.repo http://mirrors.aliyun.com/docker-ce/linux/centos/docker-ce.repo# 安装yum makecacheyum install docker-ce -y
docker配置更改(更改镜像源)
mkdir -p /etc/dockercat << EOF | tee /etc/docker/daemon.json{"registry-mirrors": ["https://5twf62k1.mirror.aliyuncs.com"],"exec-opts": ["native.cgroupdriver=systemd"]}EOFsystemctl daemon-reloadsystemctl enable docker && systemctl restart docker
检查确认docker的Cgroup Driver信息
docker info | grep CgroupCgroup Driver: systemd
部署kubeadm
master 和 worker 节点
cat << EOF | tee /etc/yum.repos.d/kubernetes.repo[kubernetes]name=Kubernetesbaseurl=https://mirrors.aliyun.com/kubernetes/yum/repos/kubernetes-el7-x86_64/enabled=1gpgcheck=0EOFyum makecacheyum install -y kubeadm kubelet kubectlsystemctl enable kubelet
注意,这里不需要启动kubelet,初始化的过程中会自动启动的,如果此时启动了会出现如下报错,忽略即可。日志在tail -f /var/log/messages
failed to load Kubelet config file /var/lib/kubelet/config.yaml, error failed to read kubelet config file “/var/lib/kubelet/config.yaml”, error: open /var/lib/kubelet/config.yaml: no such file or directory
在master节点初始化集群
master 节点
[root@vm101 ~]# kubeadm init --kubernetes-version v1.23.5 --image-repository registry.aliyuncs.com/google_containers --pod-network-cidr=192.168.0.0/16[init] Using Kubernetes version: v1.23.5[preflight] Running pre-flight checks[preflight] Pulling images required for setting up a Kubernetes cluster[preflight] This might take a minute or two, depending on the speed of your internet connection[preflight] You can also perform this action in beforehand using 'kubeadm config images pull'[certs] Using certificateDir folder "/etc/kubernetes/pki" [certs] Generating "ca" certificate and key[certs] Generating "apiserver" certificate and key[certs] apiserver serving cert is signed for DNS names [kubernetes kubernetes.default kubernetes.default.svc kubernetes.default.svc.cluster.local vm101] and IPs [10.96.0.1 192.168.164.101][certs] Generating "apiserver-kubelet-client" certificate and key[certs] Generating "front-proxy-ca" certificate and key[certs] Generating "front-proxy-client" certificate and key[certs] Generating "etcd/ca" certificate and key[certs] Generating "etcd/server" certificate and key[certs] etcd/server serving cert is signed for DNS names [localhost vm101] and IPs [192.168.164.101 127.0.0.1 ::1][certs] Generating "etcd/peer" certificate and key[certs] etcd/peer serving cert is signed for DNS names [localhost vm101] and IPs [192.168.164.101 127.0.0.1 ::1][certs] Generating "etcd/healthcheck-client" certificate and key[certs] Generating "apiserver-etcd-client" certificate and key[certs] Generating "sa" key and public key[kubeconfig] Using kubeconfig folder "/etc/kubernetes"[kubeconfig] Writing "admin.conf" kubeconfig file[kubeconfig] Writing "kubelet.conf" kubeconfig file[kubeconfig] Writing "controller-manager.conf" kubeconfig file[kubeconfig] Writing "scheduler.conf" kubeconfig file[kubelet-start] Writing kubelet environment file with flags to file "/var/lib/kubelet/kubeadm-flags.env"[kubelet-start] Writing kubelet configuration to file "/var/lib/kubelet/config.yaml"[kubelet-start] Starting the kubelet[control-plane] Using manifest folder "/etc/kubernetes/manifests"[control-plane] Creating static Pod manifest for "kube-apiserver"[control-plane] Creating static Pod manifest for "kube-controller-manager"[control-plane] Creating static Pod manifest for "kube-scheduler"[etcd] Creating static Pod manifest for local etcd in "/etc/kubernetes/manifests"[wait-control-plane] Waiting for the kubelet to boot up the control plane as static Pods from directory "/etc/kubernetes/manifests". This can take up to 4m0s[apiclient] All control plane components are healthy after 8.003873 seconds[upload-config] Storing the configuration used in ConfigMap "kubeadm-config" in the "kube-system" Namespace[kubelet] Creating a ConfigMap "kubelet-config-1.23" in namespace kube-system with the configuration for the kubelets in the clusterNOTE: The "kubelet-config-1.23" naming of the kubelet ConfigMap is deprecated. Once the UnversionedKubeletConfigMap feature gate graduates to Beta the default name will become just "kubelet-config". Kubeadm upgrade will handle this transition transparently.[upload-certs] Skipping phase. Please see --upload-certs[mark-control-plane] Marking the node vm101 as control-plane by adding the labels: [node-role.kubernetes.io/master(deprecated) node-role.kubernetes.io/control-plane node.kubernetes.io/exclude-from-external-load-balancers][mark-control-plane] Marking the node vm101 as control-plane by adding the taints [node-role.kubernetes.io/master:NoSchedule][bootstrap-token] Using token: 33zoxw.pe89zkpj7xxqtkwb[bootstrap-token] Configuring bootstrap tokens, cluster-info ConfigMap, RBAC Roles[bootstrap-token] configured RBAC rules to allow Node Bootstrap tokens to get nodes[bootstrap-token] configured RBAC rules to allow Node Bootstrap tokens to post CSRs in order for nodes to get long term certificate credentials[bootstrap-token] configured RBAC rules to allow the csrapprover controller automatically approve CSRs from a Node Bootstrap Token[bootstrap-token] configured RBAC rules to allow certificate rotation for all node client certificates in the cluster[bootstrap-token] Creating the "cluster-info" ConfigMap in the "kube-public" namespace[kubelet-finalize] Updating "/etc/kubernetes/kubelet.conf" to point to a rotatable kubelet client certificate and key[addons] Applied essential addon: CoreDNS[addons] Applied essential addon: kube-proxyYour Kubernetes control-plane has initialized successfully!To start using your cluster, you need to run the following as a regular user:mkdir -p $HOME/.kubesudo cp -i /etc/kubernetes/admin.conf $HOME/.kube/configsudo chown $(id -u):$(id -g) $HOME/.kube/configAlternatively, if you are the root user, you can run:export KUBECONFIG=/etc/kubernetes/admin.confYou should now deploy a pod network to the cluster.Run "kubectl apply -f [podnetwork].yaml" with one of the options listed at:https://kubernetes.io/docs/concepts/cluster-administration/addons/Then you can join any number of worker nodes by running the following on each as root:kubeadm join 192.168.164.101:6443 --token 33zoxw.pe89zkpj7xxqtkwb \--discovery-token-ca-cert-hash sha256:807c71f97709d1422aed4ca2d6f9f014c9229a74dc5d73b5f1271425a725b000
注意:初始化之后会安装网络插件,这里选择了calico,所以修改 —pod-network-cidr=192.168.0.0/16
以上输出显示初始化成功,并给出了接下来的必要步骤和节点加入集群的命令
mkdir -p $HOME/.kubesudo cp -i /etc/kubernetes/admin.conf $HOME/.kube/configsudo chown $(id -u):$(id -g) $HOME/.kube/config
查看nodes
[root@vm101 ~]# kubectl get nodesNAME STATUS ROLES AGE VERSIONvm101 NotReady control-plane,master 3m21s v1.23.5
查看已经运行的pod
[root@vm101 ~]# kubectl get pod -n kube-system -o wideNAME READY STATUS RESTARTS AGE IP NODE NOMINATED NODE READINESS GATEScoredns-6d8c4cb4d-h5shn 0/1 Pending 0 4m22s <none> <none> <none> <none>coredns-6d8c4cb4d-qkmtk 0/1 Pending 0 4m22s <none> <none> <none> <none>etcd-vm101 1/1 Running 0 4m36s 192.168.164.101 vm101 <none> <none>kube-apiserver-vm101 1/1 Running 0 4m38s 192.168.164.101 vm101 <none> <none>kube-controller-manager-vm101 1/1 Running 0 4m36s 192.168.164.101 vm101 <none> <none>kube-proxy-vm7hh 1/1 Running 0 4m22s 192.168.164.101 vm101 <none> <none>kube-scheduler-vm101 1/1 Running 0 4m36s 192.168.164.101 vm101 <none> <none>
到这里,会发现除了coredns未ready,这是正常的,因为还没有网络插件,接下来安装calico后就变为正常running了。
部署容器网络插件calico
master
wget https://projectcalico.docs.tigera.io/manifests/tigera-operator.yaml --no-check-certificate[root@ty01 k8s_install]# kubectl apply -f tigera-operator.yamlcustomresourcedefinition.apiextensions.k8s.io/bgpconfigurations.crd.projectcalico.org createdcustomresourcedefinition.apiextensions.k8s.io/bgppeers.crd.projectcalico.org createdcustomresourcedefinition.apiextensions.k8s.io/blockaffinities.crd.projectcalico.org createdcustomresourcedefinition.apiextensions.k8s.io/caliconodestatuses.crd.projectcalico.org createdcustomresourcedefinition.apiextensions.k8s.io/clusterinformations.crd.projectcalico.org createdcustomresourcedefinition.apiextensions.k8s.io/felixconfigurations.crd.projectcalico.org createdcustomresourcedefinition.apiextensions.k8s.io/globalnetworkpolicies.crd.projectcalico.org createdcustomresourcedefinition.apiextensions.k8s.io/globalnetworksets.crd.projectcalico.org createdcustomresourcedefinition.apiextensions.k8s.io/hostendpoints.crd.projectcalico.org createdcustomresourcedefinition.apiextensions.k8s.io/ipamblocks.crd.projectcalico.org createdcustomresourcedefinition.apiextensions.k8s.io/ipamconfigs.crd.projectcalico.org createdcustomresourcedefinition.apiextensions.k8s.io/ipamhandles.crd.projectcalico.org createdcustomresourcedefinition.apiextensions.k8s.io/ippools.crd.projectcalico.org createdcustomresourcedefinition.apiextensions.k8s.io/ipreservations.crd.projectcalico.org createdcustomresourcedefinition.apiextensions.k8s.io/kubecontrollersconfigurations.crd.projectcalico.org createdcustomresourcedefinition.apiextensions.k8s.io/networkpolicies.crd.projectcalico.org createdcustomresourcedefinition.apiextensions.k8s.io/networksets.crd.projectcalico.org createdcustomresourcedefinition.apiextensions.k8s.io/apiservers.operator.tigera.io createdcustomresourcedefinition.apiextensions.k8s.io/imagesets.operator.tigera.io createdcustomresourcedefinition.apiextensions.k8s.io/installations.operator.tigera.io createdcustomresourcedefinition.apiextensions.k8s.io/tigerastatuses.operator.tigera.io creatednamespace/tigera-operator createdWarning: policy/v1beta1 PodSecurityPolicy is deprecated in v1.21+, unavailable in v1.25+podsecuritypolicy.policy/tigera-operator createdserviceaccount/tigera-operator createdclusterrole.rbac.authorization.k8s.io/tigera-operator createdclusterrolebinding.rbac.authorization.k8s.io/tigera-operator createddeployment.apps/tigera-operator createdwget https://projectcalico.docs.tigera.io/manifests/custom-resources.yaml --no-check-certificate[root@ty01 k8s_install]# kubectl apply -f custom-resources.yamlinstallation.operator.tigera.io/default createdapiserver.operator.tigera.io/default created
安装后的pod状态
[root@ty01 k8s_install]# watch kubectl get pods -n calico-systemNAME READY STATUS RESTARTS AGEcalico-kube-controllers-67f85d7449-sm576 1/1 Running 0 3m42scalico-node-gtl54 1/1 Running 0 3m42scalico-typha-764b47759b-nv85l 1/1 Running 0 3m42s[root@ty01 k8s_install]# kubectl get pods -n kube-systemNAME READY STATUS RESTARTS AGEcoredns-6d8c4cb4d-fdctj 1/1 Running 0 10mcoredns-6d8c4cb4d-mmncc 1/1 Running 0 10metcd-ty01 1/1 Running 0 10mkube-apiserver-ty01 1/1 Running 0 10mkube-controller-manager-ty01 1/1 Running 1 (2m54s ago) 10mkube-proxy-p9flv 1/1 Running 0 10mkube-scheduler-ty01 1/1 Running 1 (2m54s ago) 10m
需要2到3分钟,等待所有status都是RUNNING状态
部署容器网络插件Weave
网络插件Flannel、Calico、Canal、Romana,Weave 选其一部署即可。
部署 Weave
$ kubectl apply -f https://git.io/weave-kube-1.6
系统 Pod 都成功启动了,刚刚部署的 Weave 网络插件则在 kube-system 下面新建了一个名叫 weave-net-cmk27 的 Pod,一般来说,这些 Pod 就是容器网络插件在每个节点上的控制组件。
将worker节点加进集群
worker 节点
kubeadm join 10.0.2.15:6443 --token 54obu2.g57q3k9l28k14d0h \--discovery-token-ca-cert-hash sha256:fe84d63faa657ce33a9cab759fa2725a257caa3d2f2c3835023330c8aba02d97
token 过期后执行 join会卡主,可在master上重新获取token
# 创建tokenkubeadm token create# 列举tokenkubeadm token list# 获取ca证书sha256编码hash值kubernetes]# openssl x509 -pubkey -in /etc/kubernetes/pki/ca.crt | openssl rsa -pubin -outform der 2>/dev/null | openssl dgst -sha256 -hex | sed 's/^.* //'
更简单的办法
[root@node1 ~]# kubeadm token create --print-join-commandW0715 17:06:52.987996 20390 configset.go:202] WARNING: kubeadm cannot validate component configs for API groups [kubelet.config.k8s.io kubeproxy.config.k8s.io]kubeadm join 10.0.2.15:6443 --token 0uop7i.0tfgtr2qdr92zffn --discovery-token-ca-cert-hash sha256:fe84d63faa657ce33a9cab759fa2725a257caa3d2f2c3835023330c8aba02d97
部署 Dashboard 可视化插件

在 Kubernetes 社区中,有一个很受欢迎的 Dashboard 项目,它可以给用户提供一个可视化的 Web 界面来查看当前集群的各种信息。
wget https://raw.githubusercontent.com/kubernetes/dashboard/v2.0.3/aio/deploy/recommended.yaml
更改两行
containers:- name: kubernetes-dashboardimage: kubernetesui/dashboard:v2.5.1imagePullPolicy: Alwaysports:- containerPort: 8443protocol: TCPargs:- --auto-generate-certificates- --namespace=kubernetes-dashboard- --tls-key-file=apiserver.key # modify- --tls-cert-file=apiserver.crt # modify
kubectl apply -f recommended.yaml
查看Dashboard 对应的 Pod 的状态
kubectl get pods -n kubernetes-dashboardNAME READY STATUS RESTARTS AGEdashboard-metrics-scraper-6b4884c9d5-ch5cp 1/1 Running 0 7m53skubernetes-dashboard-7f99b75bf4-8nwt8 1/1 Running 0 7m53s
1.7 版本之后的 Dashboard 项目部署完成后,默认不能直接访问dashboard。官方提供了多种方式方式。
proxy 的方式在本地访问
在master上启动代理
$ kubectl proxyStarting to serve on 127.0.0.1:8001
访问链接如下
http://localhost:8001/api/v1/namespaces/kubernetes-dashboard/services/https:kubernetes-dashboard:/proxy/
NodePort
在开发环境推荐使用这种方式。
kubectl -n kubernetes-dashboard edit service kubernetes-dashboard
将 type: ClusterIP 改为 type: NodePort
kubectl -n kubernetes-dashboard get service kubernetes-dashboardNAME TYPE CLUSTER-IP EXTERNAL-IP PORT(S) AGEkubernetes-dashboard NodePort 10.110.231.120 <none> 443:30227/TCP 3h1m
访问链接,也可以使用 kubectl cluster-info 查看访问链接。
https://<master_ip>:30227
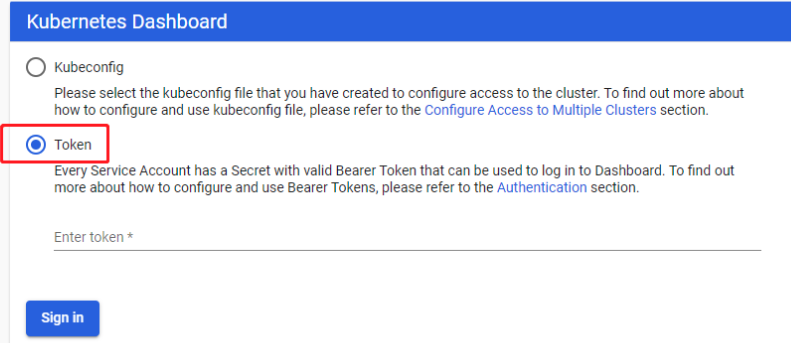
生成访问dashboard的token
创建admin-role.yaml文件
# 创建服务账户[root@ty01 k8s_install]# cat admin-user.yaml---apiVersion: v1kind: ServiceAccountmetadata:name: admin-usernamespace: kubernetes-dashboard[root@ty01 k8s_install]# kubectl apply -f admin-user.yamlserviceaccount/admin-user created# 创建一个ClusterRoleBinding[root@ty01 k8s_install]# cat cluster-role-binding.yaml---apiVersion: rbac.authorization.k8s.io/v1kind: ClusterRoleBindingmetadata:name: admin-userroleRef:apiGroup: rbac.authorization.k8s.iokind: ClusterRolename: cluster-adminsubjects:- kind: ServiceAccountname: admin-usernamespace: kubernetes-dashboard[root@ty01 k8s_install]# kubectl apply -f cluster-role-binding.yamlclusterrolebinding.rbac.authorization.k8s.io/admin-user created
创建完成后获取secret中token的值
# 获取admin-token的secret名字kubectl -n kube-system get secret | grep admin-tokenadmin-token-xcw7m kubernetes.io/service-account-token 3 24m# 获取token的值kubectl -n kube-system describe secret admin-token-xcw7mName: admin-token-xcw7mNamespace: kube-systemLabels: <none>Annotations: kubernetes.io/service-account.name: adminkubernetes.io/service-account.uid: f96e4bfd-0d12-43ff-999f-188ee561d849Type: kubernetes.io/service-account-tokenData====ca.crt: 1025 bytesnamespace: 11 bytestoken: eyJhbGciOiJSUzI1NiIsImtpZCI6IjVxa3BEQWRoQ2JseGZydmVlekNITlAxdVNDRzU0T3RWWEd5SC1KMGZFT2cifQ.eyJpc3MiOiJrdWJlcm5ldGVzL3NlcnZpY2VhY2NvdW50Iiwia3ViZXJuZXRlcy5pby9zZXJ2aWNlYWNjb3VudC9uYW1lc3BhY2UiOiJrdWJlLXN5c3RlbSIsImt1YmVybmV0ZXMuaW8vc2VydmljZWFjY291bnQvc2VjcmV0Lm5hbWUiOiJhZG1pbi10b2tlbi14Y3c3bSIsImt1YmVybmV0ZXMuaW8vc2VydmljZWFjY291bnQvc2VydmljZS1hY2NvdW50Lm5hbWUiOiJhZG1pbiIsImt1YmVybmV0ZXMuaW8vc2VydmljZWFjY291bnQvc2VydmljZS1hY2NvdW50LnVpZCI6ImY5NmU0YmZkLTBkMTItNDNmZi05OTlmLTE4OGVlNTYxZDg0OSIsInN1YiI6InN5c3RlbTpzZXJ2aWNlYWNjb3VudDprdWJlLXN5c3RlbTphZG1pbiJ9.eE3isGA1aq8au0Seuu9cJJyNPm9szrC4rF4dDAtAfu99fKBaYk_aoHEkysbHspOWrHkogG-7NA2w6AC_tx15IRGvv7-W3AGE8yJvd14mjryjgjVKyfBWxdwDpBGtHPUKw2OS7Gy2Q4ZlaUvws2lfkIZCUuP-BJqJjHDsolG7IbvutsKtcdEyX9VoCUsvUn4FFPQTRnAT8ODc4CawuwfVe8KBsKpNfJ-3-dkwIiz-IbbPSAnC_UUAPCx7RCwGFahql6vh-7XbFBgBFcs_snx406FZXj29p0yMo8igvaLj1D-lto8773oDIylcjtm5OK0OcyrnPb1EZT0zPGtVXGczxQ
也可以使用 jsonpath 的方式直接获取 token 的值,如:
kubectl -n kube-system get secret admin-token-xcw7m -o jsonpath={.data.token} | base64 -d
还可以用这个命令
kubectl -n kube-system describe $(kubectl -n kube-system get secret -n kube-system -o name | grep namespace) | grep token
或者
kubectl -n kubernetes-dashboard get secret $(kubectl -n kubernetes-dashboard get sa/admin-user -o jsonpath="{.secrets[0].name}") -o go-template="{{.data.token | base64decode}}"
使用 kubeconfig 或 token 进行用户身份认证 Kubernetes-dashboard的身份认证 创建用户认证授权的kubeconfig文件 create_user K8S dashboard 2.0 安装配置并使用 ingress-nginx 访问 Kubernetes dashboard 通过 Ingress 提供HTTPS访问 kubernetes dashboard 您的连接不是私密连接 问题处理 安装dashboard
参考

若有收获,就点个赞吧
0 人点赞
