
准备工作
- 满足安装 Docker 项目所需的要求,比如 64 位的 Linux 操作系统、3.10 及以上的内核版本;CentOS 7.8.2003
- x86 或者 ARM 架构均可;
- 机器之间网络互通,这是容器之间网络互通的前提;
- 能够访问到gcr.io、quay.io这两个 docker registry,或者使用国内镜像源;
- 单机可用资源建议 2 核 CPU、8 GB 内存或以上,4核8G内存;
- 30 GB 或以上的可用磁盘空间,这主要是留给 Docker 镜像和日志文件用。
环境预设
master 和 worker 节点
关闭 iptables 和 内核依赖
通过 lsmod | grep br_netfilter 确认 br_netfilter 是否存在。
由于 iptables 被绕过而导致流量无法正确路由的问题。应该确保 在 sysctl 配置中的 net.bridge.bridge-nf-call-iptables 被设置为 1。
cat << EOF | tee /etc/modules-load.d/k8s.confbr_netfilterEOF# 关闭防火墙systemctl stop firewalld && systemctl disable firewalldcat << EOF | tee /etc/sysctl.d/k8s.confnet.bridge.bridge-nf-call-ip6tables = 1net.bridge.bridge-nf-call-iptables = 1net.ipv4.ip_forward = 1EOFsysctl --system
执行sysctl -p 时出现如下报错,应执行 modprobe br_netfilter ,加载相应的模块。
# sysctl -psysctl: cannot stat /proc/sys/net/bridge/bridge-nf-call-ip6tables: No such file or directorysysctl: cannot stat /proc/sys/net/bridge/bridge-nf-call-iptables: No such file or directory
设置selinux
# 将 SELinux 设置为 permissive 模式(相当于将其禁用)setenforce 0sed -i 's/^SELINUX=enforcing$/SELINUX=permissive/' /etc/selinux/config
关闭swap
先通过free查看有无swap,有的话再关闭
swapoff -a && sed -i "s/\/dev\/mapper\/centos-swap/\#\/dev\/mapper\/centos-swap/g" /etc/fstab
端口检查
以下端口会用到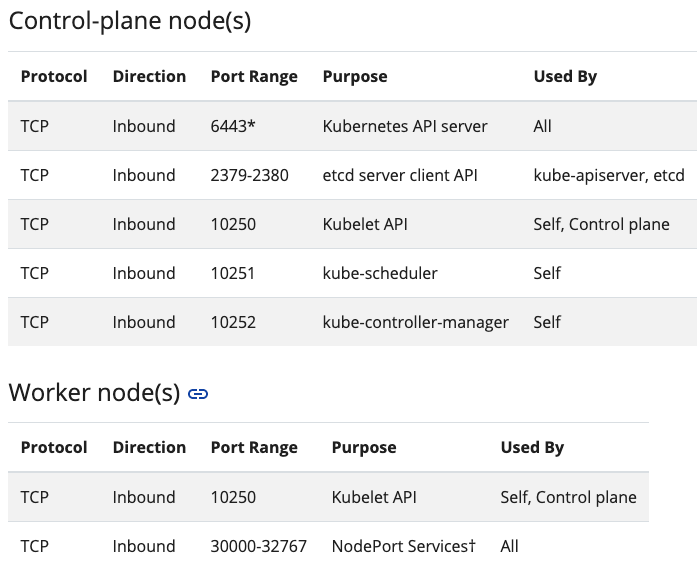
检测命令
netstat -ant | egrep "6433|2379|2380|10250|10251|10252";for port in {30000..32767}; do netstat -antp | grep $port; done
时间同步
yum install -y ntpsystemctl enable ntpdsystemctl start ntpdtimedatectl set-timezone Asia/Shanghaitimedatectl set-ntp yesntpq -p
部署docker
master 和 worker 节点
安装docker
# 配置yum源wget -O /etc/yum.repos.d/docker-ce.repo http://mirrors.aliyun.com/docker-ce/linux/centos/docker-ce.repo# 安装yum makecacheyum install docker-ce -y# 启动并设置开机自启systemctl enable docker && systemctl start docker
docker配置
mkdir -p /etc/dockercat << EOF | tee /etc/docker/daemon.json{"registry-mirrors": ["https://5twf62k1.mirror.aliyuncs.com"],"exec-opts": ["native.cgroupdriver=systemd"]}EOFsystemctl daemon-reloadsystemctl enable docker && systemctl restart docker
检查确认docker的Cgroup Driver信息
docker info | grep CgroupCgroup Driver: systemd
部署kubeadm
master 和 worker 节点
通过阿里源安装kubeadm v1.18.5
cat << EOF | tee /etc/yum.repos.d/kubernetes.repo[kubernetes]name=Kubernetesbaseurl=https://mirrors.aliyun.com/kubernetes/yum/repos/kubernetes-el7-x86_64/enabled=1gpgcheck=0EOFyum makecacheyum install -y kubelet kubeadm kubectlsystemctl enable kubelet
注意,这里不需要启动kubelet,初始化的过程中会自动启动的,如果此时启动了会出现如下报错,忽略即可。日志在tail -f /var/log/messages
failed to load Kubelet config file /var/lib/kubelet/config.yaml, error failed to read kubelet config file “/var/lib/kubelet/config.yaml”, error: open /var/lib/kubelet/config.yaml: no such file or directory
预下载相关镜像
master 和 worker 节点,不同节点pull不同镜像
查看集群初始化所需镜像及对应依赖版本号
通常这个这里list的是最新的版本,阿里云的源里可能没有。通过这个blog找到阿里可以提供的最新版本。
kubeadm config images listW0713 14:53:18.317530 12955 configset.go:202] WARNING: kubeadm cannot validate component configs for API groups [kubelet.config.k8s.io kubeproxy.config.k8s.io]k8s.gcr.io/kube-apiserver:v1.18.5k8s.gcr.io/kube-controller-manager:v1.18.5k8s.gcr.io/kube-scheduler:v1.18.5k8s.gcr.io/kube-proxy:v1.18.5k8s.gcr.io/pause:3.2k8s.gcr.io/etcd:3.4.3-0k8s.gcr.io/coredns:1.6.7
[root@vm101 ~]# kubeadm config images listk8s.gcr.io/kube-apiserver:v1.23.5k8s.gcr.io/kube-controller-manager:v1.23.5k8s.gcr.io/kube-scheduler:v1.23.5k8s.gcr.io/kube-proxy:v1.23.5k8s.gcr.io/pause:3.6k8s.gcr.io/etcd:3.5.1-0k8s.gcr.io/coredns/coredns:v1.8.6
预下载脚本
#!/bin/bash################################################################### Function: pull images from aliyun before installing kubernetes# Usage: bash images_prepull.sh [master|worker]# master:# kube-scheduler# kube-controller-manager# kube-apiserver# kube-proxy# pause# etcd# coredns# node:# kube-proxy# pause# Author: echohelloyang@foxmail.com# Github: https://github.com/PoplarYang# Create Day: 2020-07-12# Modify Time:# Version:##################################################################set -e# 2020-03-20 kubernetes releaseKUBE_VERSION=v1.18.3KUBE_PAUSE_VERSION=3.2ETCD_VERSION=3.4.3-0CORE_DNS_VERSION=1.6.7GCR_URL=k8s.gcr.ioALIYUN_URL=registry.cn-hangzhou.aliyuncs.com/google_containersmaster_images=(kube-proxy:${KUBE_VERSION}kube-scheduler:${KUBE_VERSION}kube-controller-manager:${KUBE_VERSION}kube-apiserver:${KUBE_VERSION}pause:${KUBE_PAUSE_VERSION}etcd:${ETCD_VERSION}coredns:${CORE_DNS_VERSION})worker_images=(kube-proxy:${KUBE_VERSION}pause:${KUBE_PAUSE_VERSION})if [ $# -eq 1 ]; thenif [ $1 == "master" ]; thenfor imageName in ${master_images[@]} ; dodocker pull $ALIYUN_URL/$imageNamedocker tag $ALIYUN_URL/$imageName $GCR_URL/$imageNamedocker rmi $ALIYUN_URL/$imageNamedoneelif [ $1 == "node" ]; thenfor imageName in ${worker_images[@]} ; dodocker pull $ALIYUN_URL/$imageNamedocker tag $ALIYUN_URL/$imageName $GCR_URL/$imageNamedocker rmi $ALIYUN_URL/$imageNamedonefifi
尝试直接修改镜像源
在master节点初始化集群
master 节点
[root@node1 kubernetes]# kubeadm init --kubernetes-version=v1.18.3 --pod-network-cidr=192.168.0.0/16W0712 10:06:51.196805 9869 configset.go:202] WARNING: kubeadm cannot validate component configs for API groups [kubelet.config.k8s.io kubeproxy.config.k8s.io][init] Using Kubernetes version: v1.18.3[preflight] Running pre-flight checks[preflight] Pulling images required for setting up a Kubernetes cluster[preflight] This might take a minute or two, depending on the speed of your internet connection[preflight] You can also perform this action in beforehand using 'kubeadm config images pull'[kubelet-start] Writing kubelet environment file with flags to file "/var/lib/kubelet/kubeadm-flags.env"[kubelet-start] Writing kubelet configuration to file "/var/lib/kubelet/config.yaml"[kubelet-start] Starting the kubelet[certs] Using certificateDir folder "/etc/kubernetes/pki"[certs] Generating "ca" certificate and key[certs] Generating "apiserver" certificate and key[certs] apiserver serving cert is signed for DNS names [node1 kubernetes kubernetes.default kubernetes.default.svc kubernetes.default.svc.cluster.local] and IPs [10.96.0.1 10.0.2.15][certs] Generating "apiserver-kubelet-client" certificate and key[certs] Generating "front-proxy-ca" certificate and key[certs] Generating "front-proxy-client" certificate and key[certs] Generating "etcd/ca" certificate and key[certs] Generating "etcd/server" certificate and key[certs] etcd/server serving cert is signed for DNS names [node1 localhost] and IPs [10.0.2.15 127.0.0.1 ::1][certs] Generating "etcd/peer" certificate and key[certs] etcd/peer serving cert is signed for DNS names [node1 localhost] and IPs [10.0.2.15 127.0.0.1 ::1][certs] Generating "etcd/healthcheck-client" certificate and key[certs] Generating "apiserver-etcd-client" certificate and key[certs] Generating "sa" key and public key[kubeconfig] Using kubeconfig folder "/etc/kubernetes"[kubeconfig] Writing "admin.conf" kubeconfig file[kubeconfig] Writing "kubelet.conf" kubeconfig file[kubeconfig] Writing "controller-manager.conf" kubeconfig file[kubeconfig] Writing "scheduler.conf" kubeconfig file[control-plane] Using manifest folder "/etc/kubernetes/manifests"[control-plane] Creating static Pod manifest for "kube-apiserver"[control-plane] Creating static Pod manifest for "kube-controller-manager"W0712 10:06:58.028010 9869 manifests.go:225] the default kube-apiserver authorization-mode is "Node,RBAC"; using "Node,RBAC"[control-plane] Creating static Pod manifest for "kube-scheduler"W0712 10:06:58.029179 9869 manifests.go:225] the default kube-apiserver authorization-mode is "Node,RBAC"; using "Node,RBAC"[etcd] Creating static Pod manifest for local etcd in "/etc/kubernetes/manifests"[wait-control-plane] Waiting for the kubelet to boot up the control plane as static Pods from directory "/etc/kubernetes/manifests". This can take up to 4m0s[apiclient] All control plane components are healthy after 21.503957 seconds[upload-config] Storing the configuration used in ConfigMap "kubeadm-config" in the "kube-system" Namespace[kubelet] Creating a ConfigMap "kubelet-config-1.18" in namespace kube-system with the configuration for the kubelets in the cluster[upload-certs] Skipping phase. Please see --upload-certs[mark-control-plane] Marking the node node1 as control-plane by adding the label "node-role.kubernetes.io/master=''"[mark-control-plane] Marking the node node1 as control-plane by adding the taints [node-role.kubernetes.io/master:NoSchedule][bootstrap-token] Using token: apldfk.8ozxbgn39m4cnxv5[bootstrap-token] Configuring bootstrap tokens, cluster-info ConfigMap, RBAC Roles[bootstrap-token] configured RBAC rules to allow Node Bootstrap tokens to get nodes[bootstrap-token] configured RBAC rules to allow Node Bootstrap tokens to post CSRs in order for nodes to get long term certificate credentials[bootstrap-token] configured RBAC rules to allow the csrapprover controller automatically approve CSRs from a Node Bootstrap Token[bootstrap-token] configured RBAC rules to allow certificate rotation for all node client certificates in the cluster[bootstrap-token] Creating the "cluster-info" ConfigMap in the "kube-public" namespace[kubelet-finalize] Updating "/etc/kubernetes/kubelet.conf" to point to a rotatable kubelet client certificate and key[addons] Applied essential addon: CoreDNS[addons] Applied essential addon: kube-proxyYour Kubernetes control-plane has initialized successfully!To start using your cluster, you need to run the following as a regular user:mkdir -p $HOME/.kubesudo cp -i /etc/kubernetes/admin.conf $HOME/.kube/configsudo chown $(id -u):$(id -g) $HOME/.kube/configYou should now deploy a pod network to the cluster.Run "kubectl apply -f [podnetwork].yaml" with one of the options listed at:https://kubernetes.io/docs/concepts/cluster-administration/addons/Then you can join any number of worker nodes by running the following on each as root:kubeadm join 10.0.2.15:6443 --token 54obu2.g57q3k9l28k14d0h \--discovery-token-ca-cert-hash sha256:fe84d63faa657ce33a9cab759fa2725a257caa3d2f2c3835023330c8aba02d97[root@node1 kubernetes]#
注意:初始化之后会安装网络插件,这里选择了calico,所以修改 —pod-network-cidr=192.168.0.0/16
[root@vm101 ~]# kubeadm init --kubernetes-version v1.23.5 --image-repository registry.aliyuncs.com/google_containers --pod-network-cidr=192.168.0.0/16[init] Using Kubernetes version: v1.23.5[preflight] Running pre-flight checks[WARNING Service-Kubelet]: kubelet service is not enabled, please run 'systemctl enable kubelet.service'[preflight] Pulling images required for setting up a Kubernetes cluster[preflight] This might take a minute or two, depending on the speed of your internet connection[preflight] You can also perform this action in beforehand using 'kubeadm config images pull'[certs] Using certificateDir folder "/etc/kubernetes/pki"[certs] Generating "ca" certificate and key[certs] Generating "apiserver" certificate and key[certs] apiserver serving cert is signed for DNS names [kubernetes kubernetes.default kubernetes.default.svc kubernetes.default.svc.cluster.local vm101] and IPs [10.96.0.1 192.168.164.101][certs] Generating "apiserver-kubelet-client" certificate and key[certs] Generating "front-proxy-ca" certificate and key[certs] Generating "front-proxy-client" certificate and key[certs] Generating "etcd/ca" certificate and key[certs] Generating "etcd/server" certificate and key[certs] etcd/server serving cert is signed for DNS names [localhost vm101] and IPs [192.168.164.101 127.0.0.1 ::1][certs] Generating "etcd/peer" certificate and key[certs] etcd/peer serving cert is signed for DNS names [localhost vm101] and IPs [192.168.164.101 127.0.0.1 ::1][certs] Generating "etcd/healthcheck-client" certificate and key[certs] Generating "apiserver-etcd-client" certificate and key[certs] Generating "sa" key and public key[kubeconfig] Using kubeconfig folder "/etc/kubernetes"[kubeconfig] Writing "admin.conf" kubeconfig file[kubeconfig] Writing "kubelet.conf" kubeconfig file[kubeconfig] Writing "controller-manager.conf" kubeconfig file[kubeconfig] Writing "scheduler.conf" kubeconfig file[kubelet-start] Writing kubelet environment file with flags to file "/var/lib/kubelet/kubeadm-flags.env"[kubelet-start] Writing kubelet configuration to file "/var/lib/kubelet/config.yaml"[kubelet-start] Starting the kubelet[control-plane] Using manifest folder "/etc/kubernetes/manifests"[control-plane] Creating static Pod manifest for "kube-apiserver"[control-plane] Creating static Pod manifest for "kube-controller-manager"[control-plane] Creating static Pod manifest for "kube-scheduler"[etcd] Creating static Pod manifest for local etcd in "/etc/kubernetes/manifests"[wait-control-plane] Waiting for the kubelet to boot up the control plane as static Pods from directory "/etc/kubernetes/manifests". This can take up to 4m0s[apiclient] All control plane components are healthy after 6.504366 seconds[upload-config] Storing the configuration used in ConfigMap "kubeadm-config" in the "kube-system" Namespace[kubelet] Creating a ConfigMap "kubelet-config-1.23" in namespace kube-system with the configuration for the kubelets in the clusterNOTE: The "kubelet-config-1.23" naming of the kubelet ConfigMap is deprecated. Once the UnversionedKubeletConfigMap feature gate graduates to Beta the default name will become just "kubelet-config". Kubeadm upgrade will handle this transition transparently.[upload-certs] Skipping phase. Please see --upload-certs[mark-control-plane] Marking the node vm101 as control-plane by adding the labels: [node-role.kubernetes.io/master(deprecated) node-role.kubernetes.io/control-plane node.kubernetes.io/exclude-from-external-load-balancers][mark-control-plane] Marking the node vm101 as control-plane by adding the taints [node-role.kubernetes.io/master:NoSchedule][bootstrap-token] Using token: fn32wa.wsx5gnstls4gm6xc[bootstrap-token] Configuring bootstrap tokens, cluster-info ConfigMap, RBAC Roles[bootstrap-token] configured RBAC rules to allow Node Bootstrap tokens to get nodes[bootstrap-token] configured RBAC rules to allow Node Bootstrap tokens to post CSRs in order for nodes to get long term certificate credentials[bootstrap-token] configured RBAC rules to allow the csrapprover controller automatically approve CSRs from a Node Bootstrap Token[bootstrap-token] configured RBAC rules to allow certificate rotation for all node client certificates in the cluster[bootstrap-token] Creating the "cluster-info" ConfigMap in the "kube-public" namespace[kubelet-finalize] Updating "/etc/kubernetes/kubelet.conf" to point to a rotatable kubelet client certificate and key[addons] Applied essential addon: CoreDNS[addons] Applied essential addon: kube-proxyYour Kubernetes control-plane has initialized successfully!To start using your cluster, you need to run the following as a regular user:mkdir -p $HOME/.kubesudo cp -i /etc/kubernetes/admin.conf $HOME/.kube/configsudo chown $(id -u):$(id -g) $HOME/.kube/configAlternatively, if you are the root user, you can run:export KUBECONFIG=/etc/kubernetes/admin.confYou should now deploy a pod network to the cluster.Run "kubectl apply -f [podnetwork].yaml" with one of the options listed at:https://kubernetes.io/docs/concepts/cluster-administration/addons/Then you can join any number of worker nodes by running the following on each as root:kubeadm join 192.168.164.101:6443 --token fn32wa.wsx5gnstls4gm6xc \--discovery-token-ca-cert-hash sha256:2d6d79793e61bcb3cbad14745c30b91f727ba6eb1829dbdde5aa8fe08ead754f
以上输出显示初始化成功,并给出了接下来的必要步骤和节点加入集群的命令
mkdir -p $HOME/.kubesudo cp -i /etc/kubernetes/admin.conf $HOME/.kube/configsudo chown $(id -u):$(id -g) $HOME/.kube/config
查看nodes
kubectl get nodesNAME STATUS ROLES AGE VERSIONnode7 NotReady master 7m26s v1.18.8node8 NotReady <none> 2m39s v1.18.8node9 NotReady <none> 12s v1.18.8
[root@vm101 ~]# kubectl get nodesNAME STATUS ROLES AGE VERSIONvm101 NotReady control-plane,master 2m32s v1.23.5
查看已经运行的pod
[root@node1 kubernetes]# kubectl get pod -n kube-system -owide
NAME                            READY   STATUS    RESTARTS   AGE    IP            NODE     NOMINATED NODE   READINESS GATES
coredns-66bff467f8-kgj8p        0/1     Pending   0          105s   <none>        <none>   <none>           <none>
coredns-66bff467f8-t92jp        0/1     Pending   0          105s   <none>        <none>   <none>           <none>
etcd-node1                      1/1     Running   0          115s   10.10.10.41   node1    <none>           <none>
kube-apiserver-node1            1/1     Running   0          115s   10.10.10.41   node1    <none>           <none>
kube-controller-manager-node1   1/1     Running   0          115s   10.10.10.41   node1    <none>           <none>
kube-proxy-dq82t                1/1     Running   0          105s   10.10.10.41   node1    <none>           <none>
kube-scheduler-node1            1/1     Running   0          115s   10.10.10.41   node1    <none>           <none>
到这里,会发现除了coredns未ready,这是正常的,因为还没有网络插件,接下来安装calico后就变为正常running了。
[root@vm101 ~]# kubectl get pod -n kube-system -owide
NAME                            READY   STATUS    RESTARTS   AGE     IP                NODE     NOMINATED NODE   READINESS GATES
coredns-6d8c4cb4d-dcn2m         0/1     Pending   0          3m21s   <none>            <none>   <none>           <none>
coredns-6d8c4cb4d-rmf7r         0/1     Pending   0          3m21s   <none>            <none>   <none>           <none>
etcd-vm101                      1/1     Running   0          3m34s   192.168.164.101   vm101    <none>           <none>
kube-apiserver-vm101            1/1     Running   0          3m34s   192.168.164.101   vm101    <none>           <none>
kube-controller-manager-vm101   1/1     Running   0          3m34s   192.168.164.101   vm101    <none>           <none>
kube-proxy-q9wft                1/1     Running   0          3m21s   192.168.164.101   vm101    <none>           <none>
kube-scheduler-vm101            1/1     Running   0          3m34s   192.168.164.101   vm101    <none>           <none>
部署容器网络插件calico v3.10
master 和 worker 节点
calico 版本选择
wget http://docs.projectcalico.org/v3.10/manifests/calico.yaml
kubectl apply -f calico.yaml
安装后的pod状态
[root@node1 kubernetes]# kubectl get pod -n kube-system -owide
NAME                                       READY   STATUS    RESTARTS   AGE   IP                NODE    NOMINATED NODE   READINESS GATES
calico-kube-controllers-57546b46d6-nkndq   1/1     Running   0          83s   192.168.166.129   node1   <none>           <none>
calico-node-64vw4                          1/1     Running   0          84s   10.10.10.41       node1   <none>           <none>
coredns-66bff467f8-kgj8p                   1/1     Running   0          22m   192.168.166.130   node1   <none>           <none>
coredns-66bff467f8-t92jp                   1/1     Running   0          22m   192.168.166.131   node1   <none>           <none>
etcd-node1                                 1/1     Running   0          22m   10.10.10.41       node1   <none>           <none>
kube-apiserver-node1                       1/1     Running   0          22m   10.10.10.41       node1   <none>           <none>
kube-controller-manager-node1              1/1     Running   0          22m   10.10.10.41       node1   <none>           <none>
kube-proxy-dq82t                           1/1     Running   0          22m   10.10.10.41       node1   <none>           <none>
kube-scheduler-node1                       1/1     Running   0          22m   10.10.10.41       node1   <none>           <none>
等到全都ready的状态估计需要2到3分钟
查看node状态
[root@node1 kubernetes]# kubectl get node -owide
NAME    STATUS   ROLES    AGE   VERSION   INTERNAL-IP   EXTERNAL-IP   OS-IMAGE                KERNEL-VERSION              CONTAINER-RUNTIME
node1   Ready    master   24m   v1.18.5   10.10.10.41   <none>        CentOS Linux 7 (Core)   3.10.0-957.1.3.el7.x86_64   docker://19.3.12
错误处理
calico lookup localhost on 114.114.114.114:53: no such host , 一直处于这个状态,/etc/hosts文件中缺少下面两行。加上后,
127.0.0.1   localhost localhost.localdomain localhost4 localhost4.localdomain4
::1         localhost localhost.localdomain localhost6 localhost6.localdomain6
部署容器网络插件calico
安装calico
kubectl create -f https://projectcalico.docs.tigera.io/manifests/tigera-operator.yaml
kubectl create -f https://projectcalico.docs.tigera.io/manifests/custom-resources.yaml
查看calico
[root@vm101 ~]# kubectl get pods -n calico-system
NAME                                       READY   STATUS    RESTARTS   AGE
calico-kube-controllers-67f85d7449-p6lps   1/1     Running   0          13m
calico-node-kpdr2                          1/1     Running   0          13m
calico-typha-666b99bbdc-klb9d              1/1     Running   0          13m
下载较慢
查看所有的node
[root@vm101 ~]# kubectl get nodes -o wide
NAME    STATUS   ROLES                  AGE   VERSION   INTERNAL-IP       EXTERNAL-IP   OS-IMAGE                KERNEL-VERSION           CONTAINER-RUNTIME
vm101   Ready    control-plane,master   50m   v1.23.5   192.168.164.101   <none>        CentOS Linux 7 (Core)   3.10.0-1160.el7.x86_64   docker://20.10.14
vm102   Ready    <none>                 26m   v1.23.5   192.168.164.102   <none>        CentOS Linux 7 (Core)   3.10.0-1160.el7.x86_64   docker://20.10.14
vm103   Ready    <none>                 21m   v1.23.5   192.168.164.103   <none>        CentOS Linux 7 (Core)   3.10.0-1160.el7.x86_64   docker://20.10.14
部署容器网络插件Weave
网络插件Flannel、Calico、Canal、Romana,Weave 选其一部署即可。
部署 Weave
$ kubectl apply -f https://git.io/weave-kube-1.6
系统 Pod 都成功启动了,刚刚部署的 Weave 网络插件则在 kube-system 下面新建了一个名叫 weave-net-cmk27 的 Pod,一般来说,这些 Pod 就是容器网络插件在每个节点上的控制组件。
将worker节点加进集群
worker 节点
kubeadm join 10.0.2.15:6443 --token 54obu2.g57q3k9l28k14d0h \
    --discovery-token-ca-cert-hash sha256:fe84d63faa657ce33a9cab759fa2725a257caa3d2f2c3835023330c8aba02d97
[root@vm102 ~]# kubeadm join 192.168.164.101:6443 --token fn32wa.wsx5gnstls4gm6xc --discovery-token-ca-cert-hash sha256:2d6d79793e61bcb3cbad14745c30b91f727ba6eb1829dbdde5aa8fe08ead754f
[preflight] Running pre-flight checks
    [WARNING Service-Kubelet]: kubelet service is not enabled, please run 'systemctl enable kubelet.service'
[preflight] Reading configuration from the cluster...
[preflight] FYI: You can look at this config file with 'kubectl -n kube-system get cm kubeadm-config -o yaml'
[kubelet-start] Writing kubelet configuration to file "/var/lib/kubelet/config.yaml"
[kubelet-start] Writing kubelet environment file with flags to file "/var/lib/kubelet/kubeadm-flags.env"
[kubelet-start] Starting the kubelet
[kubelet-start] Waiting for the kubelet to perform the TLS Bootstrap...

This node has joined the cluster:
* Certificate signing request was sent to apiserver and a response was received.
* The Kubelet was informed of the new secure connection details.

Run 'kubectl get nodes' on the control-plane to see this node join the cluster.
产生容器实例
[root@vm102 ~]# docker ps
CONTAINER ID   IMAGE                                                COMMAND                  CREATED          STATUS          PORTS     NAMES
2af57ac9f8ea   registry.aliyuncs.com/google_containers/pause:3.6    "/pause"                 6 minutes ago    Up 6 minutes              k8s_POD_calico-typha-666b99bbdc-s9rr5_calico-system_e6d3e766-94ed-4066-bc4a-ca1b05b8159c_0
9d162266e773   registry.aliyuncs.com/google_containers/kube-proxy   "/usr/local/bin/kube…"   8 minutes ago    Up 8 minutes              k8s_kube-proxy_kube-proxy-62q8r_kube-system_2e6b2207-3d6a-497d-be48-add8d7482175_0
4e3682786523   registry.aliyuncs.com/google_containers/pause:3.6    "/pause"                 10 minutes ago   Up 10 minutes             k8s_POD_kube-proxy-62q8r_kube-system_2e6b2207-3d6a-497d-be48-add8d7482175_0
ba771c233304   registry.aliyuncs.com/google_containers/pause:3.6    "/pause"                 10 minutes ago   Up 10 minutes             k8s_POD_calico-node-q25gc_calico-system_b3d6ebca-dbb3-4b73-9a81-0be4ff629ddb_0
重新获取token
token 过期后执行 join会卡主,可在master上重新获取token
# 创建token
kubeadm token create
# 列举token
kubeadm token list
# 获取ca证书sha256编码hash值
kubernetes]# openssl x509 -pubkey -in /etc/kubernetes/pki/ca.crt | openssl rsa -pubin -outform der 2>/dev/null | openssl dgst -sha256 -hex | sed 's/^.* //'
更简单的办法
[root@node1 ~]# kubeadm token create --print-join-command
W0715 17:06:52.987996   20390 configset.go:202] WARNING: kubeadm cannot validate component configs for API groups [kubelet.config.k8s.io kubeproxy.config.k8s.io]
kubeadm join 10.0.2.15:6443 --token 0uop7i.0tfgtr2qdr92zffn     --discovery-token-ca-cert-hash sha256:fe84d63faa657ce33a9cab759fa2725a257caa3d2f2c3835023330c8aba02d97
通过 Taint/Toleration 调整 Master 执行 Pod 的策略
给node打上污点
默认情况下 Master 节点是不允许运行用户 Pod 的。而 Kubernetes 做到这一点,依靠的是 Kubernetes 的 Taint/Toleration 机制。
原理:一旦某个节点被加上了一个 Taint,即被“打上了污点”,所有 Pod 就都不能在这个节点上运行,因为 Kubernetes 的 Pod 都有“洁癖”。
除非,有个别的 Pod 声明自己能“容忍”这个“污点”,即声明了 Toleration,它才可以在这个节点上运行。其中,为节点打上“污点”(Taint)的命令是:
kubectl taint nodes node1 foo=bar:NoSchedule
这时,该 node1 节点上就会增加一个键值对格式的 Taint,即: foo=bar:NoSchedule 。其中值里面的 NoSchedule,意味着这个 Taint 只会在调度新 Pod 时产生作用,而不会影响已经在 node1 上运行的 Pod,哪怕没有 Toleration。
删除污点
单节点的 Kubernetes,删除这个 Taint 才是正确的选择。
kubectl taint node node7 node-role.kubernetes.io/master:NoSchedule-
如何容忍污点
在 Pod 的.yaml 文件中的 spec 部分,加入 tolerations 字段即可。
apiVersion: v1
kind: Pod
...
spec:
  tolerations:
  - key: "foo"
    operator: "Equal"
    value: "bar"
    effect: "NoSchedule"
这个 Toleration 的含义是,这个 Pod 能“容忍”所有键值对为 foo=bar 的 Taint( operator: “Equal”,“等于”操作)。
如果你通过 kubectl describe 检查一下 Master 节点的 Taint 字段,就会有所发现了:
[root@node1 tasks]# kubectl describe node node1
Name:               node1
...
Taints:             node-role.kubernetes.io/master:NoSchedule
此时,你就需要像下面这样用“Exists”操作符(operator: “Exists”,“存在”即可)来说明,该 Pod 能够容忍所有以 foo 为键的 Taint,才能让这个 Pod 运行在该 Master 节点上:
apiVersion: v1
kind: Pod
...
spec:
  tolerations:
  - key: "foo"
    operator: "Exists"
    effect: "NoSchedule"
部署 Dashboard 可视化插件

在 Kubernetes 社区中,有一个很受欢迎的 Dashboard 项目,它可以给用户提供一个可视化的 Web 界面来查看当前集群的各种信息。
kubectl apply -f https://raw.githubusercontent.com/kubernetes/dashboard/v2.0.3/aio/deploy/recommended.yaml
查看Dashboard 对应的 Pod 的状态
kubectl get pods -n kubernetes-dashboard
NAME                                         READY   STATUS    RESTARTS   AGE
dashboard-metrics-scraper-6b4884c9d5-ch5cp   1/1     Running   0          7m53s
kubernetes-dashboard-7f99b75bf4-8nwt8        1/1     Running   0          7m53s
1.7 版本之后的 Dashboard 项目部署完成后,默认不能直接访问dashboard。官方提供了多种方式方式。
proxy 的方式在本地访问
在master上启动代理
$ kubectl proxy
Starting to serve on 127.0.0.1:8001
访问链接如下
http://localhost:8001/api/v1/namespaces/kubernetes-dashboard/services/https:kubernetes-dashboard:/proxy/
NodePort
在开发环境推荐使用这种方式。
kubectl -n kubernetes-dashboard edit service kubernetes-dashboard
将 type: ClusterIP 改为 type: NodePort
kubectl -n kubernetes-dashboard get service kubernetes-dashboard
NAME                   TYPE       CLUSTER-IP       EXTERNAL-IP   PORT(S)         AGE
kubernetes-dashboard   NodePort   10.110.231.120   <none>        443:30227/TCP   3h1m
访问链接,也可以使用 cd 查看访问链接。
https://<master_ip>:30227
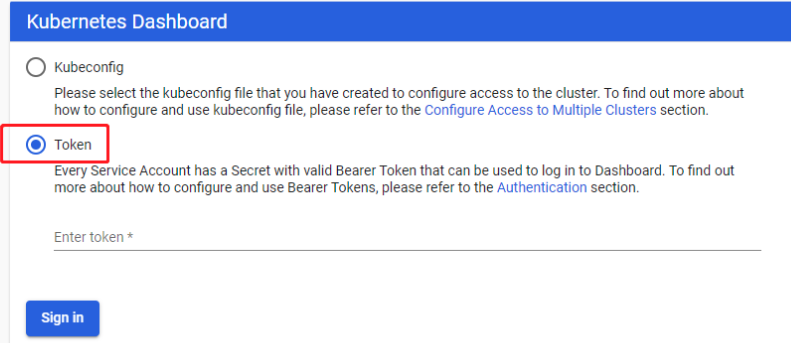
生成访问dashboard的token
创建admin-role.yaml文件
kind: ClusterRoleBinding
apiVersion: rbac.authorization.k8s.io/v1beta1
metadata:
  name: admin
  annotations:
    rbac.authorization.kubernetes.io/autoupdate: "true"
roleRef:
  kind: ClusterRole
  name: cluster-admin
  apiGroup: rbac.authorization.k8s.io
subjects:
- kind: ServiceAccount
  name: admin
  namespace: kube-system
---
apiVersion: v1
kind: ServiceAccount
metadata:
  name: admin
  namespace: kube-system
  labels:
    kubernetes.io/cluster-service: "true"
    addonmanager.kubernetes.io/mode: Reconcile
执行下面的命令创建 serviceaccount 和角色绑定
kubectl create -f admin-role.yaml
创建完成后获取secret中token的值
# 获取admin-token的secret名字
kubectl -n kube-system get secret | grep admin-token
admin-token-xcw7m                                kubernetes.io/service-account-token   3      24m
# 获取token的值
kubectl -n kube-system describe secret admin-token-xcw7m
Name:         admin-token-xcw7m
Namespace:    kube-system
Labels:       <none>
Annotations:  kubernetes.io/service-account.name: admin
              kubernetes.io/service-account.uid: f96e4bfd-0d12-43ff-999f-188ee561d849

Type:  kubernetes.io/service-account-token

Data
====
ca.crt:     1025 bytes
namespace:  11 bytes
token:      eyJhbGciOiJSUzI1NiIsImtpZCI6IjVxa3BEQWRoQ2JseGZydmVlekNITlAxdVNDRzU0T3RWWEd5SC1KMGZFT2cifQ.eyJpc3MiOiJrdWJlcm5ldGVzL3NlcnZpY2VhY2NvdW50Iiwia3ViZXJuZXRlcy5pby9zZXJ2aWNlYWNjb3VudC9uYW1lc3BhY2UiOiJrdWJlLXN5c3RlbSIsImt1YmVybmV0ZXMuaW8vc2VydmljZWFjY291bnQvc2VjcmV0Lm5hbWUiOiJhZG1pbi10b2tlbi14Y3c3bSIsImt1YmVybmV0ZXMuaW8vc2VydmljZWFjY291bnQvc2VydmljZS1hY2NvdW50Lm5hbWUiOiJhZG1pbiIsImt1YmVybmV0ZXMuaW8vc2VydmljZWFjY291bnQvc2VydmljZS1hY2NvdW50LnVpZCI6ImY5NmU0YmZkLTBkMTItNDNmZi05OTlmLTE4OGVlNTYxZDg0OSIsInN1YiI6InN5c3RlbTpzZXJ2aWNlYWNjb3VudDprdWJlLXN5c3RlbTphZG1pbiJ9.eE3isGA1aq8au0Seuu9cJJyNPm9szrC4rF4dDAtAfu99fKBaYk_aoHEkysbHspOWrHkogG-7NA2w6AC_tx15IRGvv7-W3AGE8yJvd14mjryjgjVKyfBWxdwDpBGtHPUKw2OS7Gy2Q4ZlaUvws2lfkIZCUuP-BJqJjHDsolG7IbvutsKtcdEyX9VoCUsvUn4FFPQTRnAT8ODc4CawuwfVe8KBsKpNfJ-3-dkwIiz-IbbPSAnC_UUAPCx7RCwGFahql6vh-7XbFBgBFcs_snx406FZXj29p0yMo8igvaLj1D-lto8773oDIylcjtm5OK0OcyrnPb1EZT0zPGtVXGczxQ
也可以使用 jsonpath 的方式直接获取 token 的值,如:
kubectl -n kube-system get secret admin-token-xcw7m -o jsonpath={.data.token} | base64 -d
还可以用这个命令
kubectl -n kube-system describe $(kubectl -n kube-system get secret -n kube-system -o name | grep namespace) | grep token
使用 kubeconfig 或 token 进行用户身份认证 Kubernetes-dashboard的身份认证 创建用户认证授权的kubeconfig文件 create_user K8S dashboard 2.0 安装配置并使用 ingress-nginx 访问 Kubernetes dashboard 通过 Ingress 提供HTTPS访问 kubernetes dashboard 您的连接不是私密连接 问题处理
部署容器存储插件
在某一台机器上启动的一个容器,显然无法看到其他机器上的容器在它们的数据卷里写入的文件。这是容器最典型的特征之一:无状态
存储插件会在容器里挂载一个基于网络或者其他机制的远程数据卷,使得在容器里创建的文件,实际上是保存在远程存储服务器上,或者以分布式的方式保存在多个节点上,而与当前宿主机没有任何绑定关系。这样,无论在其他哪个宿主机上启动新的容器,都可以请求挂载指定的持久化存储卷,从而访问到数据卷里保存的内容。这就是“持久化”的含义。
Kubernetes 本身的松耦合设计,绝大多数存储项目,比如 Ceph、GlusterFS、NFS 等,都可以为 Kubernetes 提供持久化存储能力。
Rook
ceph-quickstart
Rook 项目是一个基于 Ceph 的 Kubernetes 存储插件(它后期也在加入对更多存储实现的支持)。不过,不同于对 Ceph 的简单封装,Rook 在自己的实现中加入了水平扩展、迁移、灾难备份、监控等大量的企业级功能,使得这个项目变成了一个完整的、生产级别可用的容器存储插件。
kubectl apply -f https://raw.githubusercontent.com/rook/rook/master/cluster/examples/kubernetes/ceph/common.yaml

kubectl apply -f https://raw.githubusercontent.com/rook/rook/master/cluster/examples/kubernetes/ceph/operator.yaml

kubectl apply -f https://raw.githubusercontent.com/rook/rook/master/cluster/examples/kubernetes/ceph/cluster.yaml
namespace - rook-ceph
[root@node1 kubernetes]# kubectl get pods -n rook-ceph -owide
NAME                                              READY   STATUS             RESTARTS   AGE     IP               NODE    NOMINATED NODE   READINESS GATES
csi-cephfsplugin-2r4jq                            2/3     CrashLoopBackOff   18         70m     10.10.10.43      node3   <none>           <none>
csi-cephfsplugin-cbvq6                            2/3     CrashLoopBackOff   18         70m     10.10.10.44      node4   <none>           <none>
csi-cephfsplugin-provisioner-6fc4bfb885-cbh9n     5/5     Running            0          70m     192.168.135.5    node3   <none>           <none>
csi-cephfsplugin-provisioner-6fc4bfb885-dtlh8     5/5     Running            0          70m     192.168.3.68     node4   <none>           <none>
csi-cephfsplugin-sczrk                            2/3     CrashLoopBackOff   5          6m8s    10.10.10.45      node5   <none>           <none>
csi-rbdplugin-c29n7                               3/3     Running            0          70m     10.10.10.43      node3   <none>           <none>
csi-rbdplugin-gg4lr                               3/3     Running            0          6m8s    10.10.10.45      node5   <none>           <none>
csi-rbdplugin-provisioner-f66df55fc-cjrfj         6/6     Running            0          70m     192.168.135.6    node3   <none>           <none>
csi-rbdplugin-provisioner-f66df55fc-p9j4b         6/6     Running            0          70m     192.168.3.69     node4   <none>           <none>
csi-rbdplugin-tv6vz                               3/3     Running            0          70m     10.10.10.44      node4   <none>           <none>
rook-ceph-crashcollector-node3-67ccd6bf94-jgfnp   1/1     Running            0          5m30s   192.168.135.61   node3   <none>           <none>
rook-ceph-crashcollector-node4-b674c97ff-bjg9b    1/1     Running            0          3m8s    192.168.3.93     node4   <none>           <none>
rook-ceph-crashcollector-node5-bc7768684-l67gl    1/1     Running            0          5m      192.168.33.134   node5   <none>           <none>
rook-ceph-mgr-a-66b66845d5-tgvrz                  1/1     Running            0          3m28s   192.168.3.89     node4   <none>           <none>
rook-ceph-mon-a-585d8c9554-2v9zc                  1/1     Running            0          5m30s   192.168.135.59   node3   <none>           <none>
rook-ceph-mon-b-cb459ccf7-wv4w6                   1/1     Running            0          5m20s   192.168.3.88     node4   <none>           <none>
rook-ceph-mon-c-7bf877794d-7cnd4                  1/1     Running            0          5m      192.168.33.130   node5   <none>           <none>
rook-ceph-operator-db86d47f5-swt5g                1/1     Running            0          73m     192.168.3.66     node4   <none>           <none>
rook-ceph-osd-0-7666d9d4bb-xt8xf                  1/1     Running            0          3m11s   192.168.135.62   node3   <none>           <none>
rook-ceph-osd-1-665fbd7b54-s5fvj                  1/1     Running            0          3m12s   192.168.33.133   node5   <none>           <none>
rook-ceph-osd-2-cf7558d47-gh5cr                   1/1     Running            0          3m8s    192.168.3.92     node4   <none>           <none>
rook-ceph-osd-3-b8c9f69df-n7ndf                   1/1     Running            0          3m12s   192.168.33.132   node5   <none>           <none>
rook-ceph-osd-4-7b84f7bb44-7h574                  1/1     Running            0          3m10s   192.168.135.63   node3   <none>           <none>
rook-ceph-osd-5-759d57b8dd-jpnfb                  1/1     Running            0          3m8s    192.168.3.94     node4   <none>           <none>
rook-ceph-osd-prepare-node3-986f7                 0/1     Completed          0          3m27s   192.168.135.60   node3   <none>           <none>
rook-ceph-osd-prepare-node4-6xswb                 0/1     Completed          0          3m27s   192.168.3.91     node4   <none>           <none>
rook-ceph-osd-prepare-node5-cqj78                 0/1     Completed          0          3m26s   192.168.33.131   node5   <none>           <none>
rook-discover-55dfl                               1/1     Running            0          72m     192.168.3.67     node4   <none>           <none>
rook-discover-rdqk4                               1/1     Running            0          72m     192.168.135.2    node3   <none>           <none>
rook-discover-zb62w                               1/1     Running            0          6m8s    192.168.33.129   node5   <none>           <none>
排错
ImagePullBackOff
查看pod状态,发现 ImagePullBackOff ,需要查看详细日志,最终看到是网络问题。
[root@node1 ~]# kubectl get pods --namespace=kube-system
NAME                                       READY   STATUS                  RESTARTS   AGE
calico-kube-controllers-57546b46d6-2mwhm   1/1     Running                 0          10m
calico-node-cpdpb                          0/1     Init:ImagePullBackOff   0          10m
calico-node-ftp2r                          1/1     Running                 0          10m
calico-node-wmnp6                          0/1     Init:ImagePullBackOff   0          10m
[root@node1 ~]# kubectl describe pod calico-node-wmnp6 --namespace=kube-system | tail
  ----     ------     ----                  ----               -------
  Normal   Scheduled  <unknown>             default-scheduler  Successfully assigned kube-system/calico-node-wmnp6 to node4
  Warning  Failed     13m                   kubelet, node4     Failed to pull image "calico/cni:v3.10.4": rpc error: code = Unknown desc = Error response from daemon: Get https://registry-1.docker.io/v2/: dial tcp: lookup registry-1.docker.io on [::1]:53: read udp [::1]:18807->[::1]:53: read: connection refused
  Warning  Failed     12m                   kubelet, node4     Failed to pull image "calico/cni:v3.10.4": rpc error: code = Unknown desc = Error response from daemon: Get https://registry-1.docker.io/v2/: dial tcp: lookup registry-1.docker.io on [::1]:53: read udp [::1]:54163->[::1]:53: read: connection refused
  Warning  Failed     12m                   kubelet, node4     Failed to pull image "calico/cni:v3.10.4": rpc error: code = Unknown desc = Error response from daemon: Get https://registry-1.docker.io/v2/: dial tcp: lookup registry-1.docker.io on [::1]:53: read udp [::1]:63309->[::1]:53: read: connection refused
  Warning  Failed     11m (x4 over 13m)     kubelet, node4     Error: ErrImagePull
  Normal   Pulling    11m (x4 over 13m)     kubelet, node4     Pulling image "calico/cni:v3.10.4"
  Warning  Failed     11m                   kubelet, node4     Failed to pull image "calico/cni:v3.10.4": rpc error: code = Unknown desc = Error response from daemon: Get https://registry-1.docker.io/v2/: dial tcp: lookup registry-1.docker.io on [::1]:53: read udp [::1]:48808->[::1]:53: read: connection refused
  Normal   BackOff    7m56s (x22 over 13m)  kubelet, node4     Back-off pulling image "calico/cni:v3.10.4"
  Warning  Failed     2m59s (x44 over 13m)  kubelet, node4     Error: ImagePullBackOff
(reverse-i-search)`del': cat buckfile^Cl.log-0710171825
参考

若有收获,就点个赞吧
0 人点赞
