数据驱动和组件化是 Vue 最核心的两个功能。
组件化开发给我们带来了可快的开发效率,更好的可维护性。
每个组件都有自己的状态、视图和行为等组成部分。
new Vue({// statedata() {return {count: 0}},// viewtemplate: `<div>{{ count }}</div>`,// actionsmethods: {increment() {this.count++}}
状态管理
状态管理包含以下几部分:
- state,驱动应用的数据源;
- view,以声明方式将 state 映射到视图;
- actions,响应在 view 上的用户输入导致的状态变化。

组件间通信方式回顾
大多数场景下的组件都并不是独立存在的,而是相互协作共同构成了一个复杂的业务功能。在 Vue 中为不同的组件关系提供了不同的通信规则。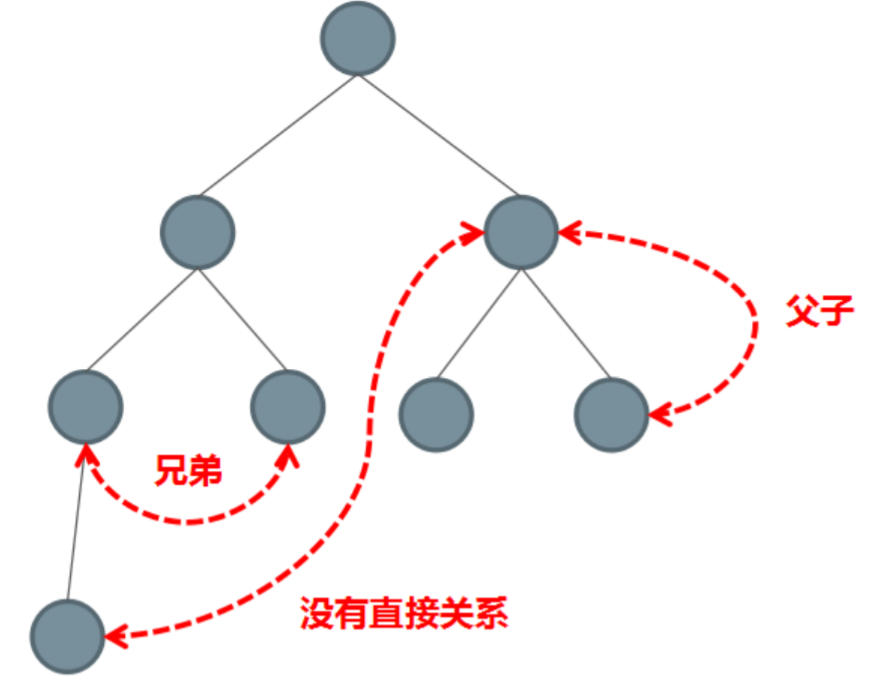
父组件给子组件传值
父组件通过相应属性给子组件传值,子组件通过 props 接收数据。props 可以是数组,也可以是对象。属性可以只规定属性名,也可以加上数据类型限制,还可以规定默认值。
子组件:
<template><div><h1>Props Down Child</h1><h2>{{ title }}</h2></div></template><script>export default {// props: ['title'],props: {title: String// title: {// type: String,// default: ''// }}}</script>
父组件:
<template><div><h1>Props Down Parent</h1><child title="My journey with Vue"></child></div></template><script>import child from './01-Child'export default {components: {child}}</script>
子组件给父组件传值
子组件给父组件传值需要通过自定义事件。
父组件:
<template><div><h1 :style="{ fontSize: hFontSize + 'em'}">Event Up Parent</h1>这里的文字不需要变化<child :fontSize="hFontSize" v-on:enlargeText="enlargeText"></child><child :fontSize="hFontSize" v-on:enlargeText="hFontSize += $event"></child></div></template><script>import child from './02-Child'export default {components: {child},data () {return {hFontSize: 1}},methods: {enlargeText (size) {this.hFontSize += size}}}</script>
子组件:
<template><div><h1 :style="{ fontSize: fontSize + 'em' }">Props Down Child</h1><button @click="handler">文字增大</button></div></template><script>export default {props: {fontSize: Number},methods: {handler () {this.$emit('enlargeText', 0.1)}}}</script>
不相关组件通信
不相关组件通信也是通过自定义事件,但是由于组件不相关,所以需要一个公共的 Vue 实例,来作为事件中心,为组件提供$on和$emit方法。
事件中心很简单,只需要创建一个 Vue 实例并导出。
// eventbus.jsimport Vue from 'vue'export default new Vue()
需要通信的组件导入 Vue 实例,并在上面注册和触发事件。
传值的组件:
<template><div><h1>Event Bus Sibling02</h1><div>{{ msg }}</div></div></template><script>import bus from './eventbus'export default {data () {return {msg: ''}},created () {bus.$on('numchange', (value) => {this.msg = `您选择了${value}件商品`})}}</script>
接收数据的组件:
<template><div><h1>Event Bus Sibling01</h1><div class="number" @click="sub">-</div><input type="text" style="width: 30px; text-align: center" :value="value"><div class="number" @click="add">+</div></div></template><script>import bus from './eventbus'export default {props: {num: Number},created () {this.value = this.num},data () {return {value: -1}},methods: {sub () {if (this.value > 1) {this.value--bus.$emit('numchange', this.value)}},add () {this.value++bus.$emit('numchange', this.value)}}}</script><style>.number {display: inline-block;cursor: pointer;width: 20px;text-align: center;}</style>
$refs 通信
这种方式不推荐使用。
我们可以在 html 标签或组件标签上挂载 ref 属性。挂载在 html 标签上,获取到的是 DOM 元素;挂载在组件标签上,获取到的是组件实例。通过$refs属性可以获取到 ref 属性。被挂载ref的,可以被访问到属性和方法。
子组件:
<template><div><h1>ref Child</h1><input ref="input" type="text" v-model="value"></div></template><script>export default {data () {return {value: ''}},methods: {focus () {this.$refs.input.focus()}}}</script>
父组件:
<template><div><h1>ref Parent</h1><child ref="c"></child></div></template><script>import child from './04-Child'export default {components: {child},mounted () {this.$refs.c.focus()this.$refs.c.value = 'hello input'}}</script>
简易的状态管理方案
如果多个组件之间要共享状态(数据),使用上面的方式虽然可以实现,但是比较麻烦,而且多个组件之间互相传值很难跟踪数据的变化,如果出现问题很难定位问题。
当遇到多个组件需要共享状态的时候,典型的场景:购物车。我们如果使用上述的方案都不合适,我们 会遇到以下的问题:
- 多个视图依赖于同一状态。
- 来自不同视图的行为需要变更同一状态。
对于问题一,传参的方法对于多层嵌套的组件将会非常繁琐,并且对于兄弟组件间的状态传递无能为力。
对于问题二,我们经常会采用父子组件直接引用或者通过事件来变更和同步状态的多份拷贝。以上的这些模式非常脆弱,通常会导致无法维护的代码。
我们可以把多个组件的状态,或者整个程序的状态放到一个集中的位置存储,并且可以检测到数据的更改。
以一种简单的方式来实现:
首先创建一个共享的仓库 store 对象:
// store.jsexport default {debug: true,state: {user: {name: 'xiaomao',age: 18,sex: '男'}},setUserNameAction (name) {if (this.debug) {console.log('setUserNameAction triggered:', name)}this.state.user.name = name}}
把共享的仓库 store 对象,存储到需要共享状态的组件的 data 中:
<template><div><h1>componentA</h1>user name: {{ sharedState.user.name }}<button @click="change">Change Info</button></div></template><script>import store from './store'export default {methods: {change () {store.setUserNameAction('componentA')}},data () {return {privateState: {},sharedState: store.state}}}</script>
接着我们继续延伸约定,组件不允许直接变更属于 store 对象的 state,而应执行 action 来分发 (dispatch) 事件通知 store 去改变,这样最终的样子跟 Vuex 的结构就类似了。这样约定的好处是,我们能够记录所有 store 中发生的 state 变更,同时实现能做到记录变更、保存状态快照、历史回滚/时光旅行的先进的调试工具。

若有收获,就点个赞吧
0 人点赞
