什么是 Vuex
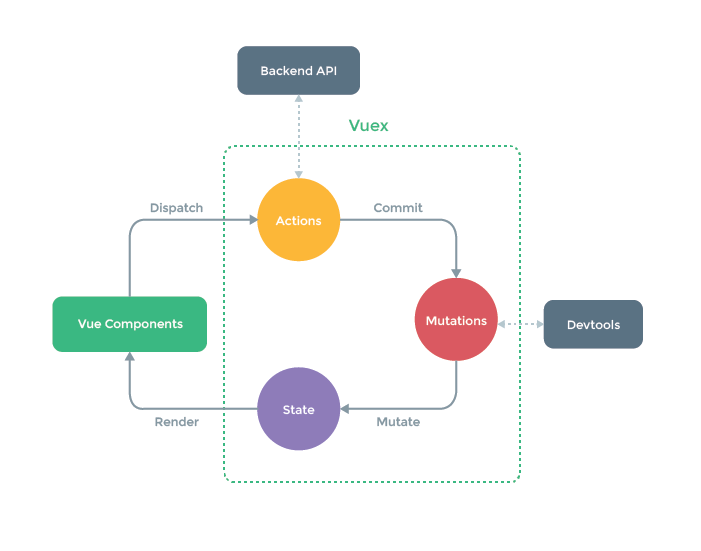
Vuex 是一个专为 Vue.js 应用程序开发的状态管理模式。它采用集中式存储管理应用的所有组件 的状态,并以相应的规则保证状态以一种可预测的方式发生变化。Vuex 也集成到 Vue 的官方调试工具 devtools extension,提供了诸如零配置的 time-travel 调试、状态快照导入导出等高级调试功能。
- Vuex 是专门为 Vue.js 设计的状态管理库
- 它采用集中式的方式存储需要共享的数据
- 从使用角度,它就是一个 JavaScript 库
- 它的作用是进行状态管理,解决复杂组件通信,数据共享
什么情况下使用 Vuex
官方文档:
Vuex 可以帮助我们管理共享状态,并附带了更多的概念和框架。这需要对短期和长期效益进行权衡。
如果您不打算开发大型单页应用,使用 Vuex 可能是繁琐冗余的。确实是如此——如果您的应用够简单,您最好不要使用 Vuex。一个简单的 store 模式就足够您所需了。但是,如果您需要构建一个中大型单页应用,您很可能会考虑如何更好地在组件外部管理状态,Vuex 将会成为自然而然的选择。引用 Redux 的作者 Dan Abramov 的话说就是:Flux 架构就像眼镜:您自会知道什么时候需要它。
当你的应用中具有以下需求场景的时候:
- 多个视图依赖于同一状态
- 来自不同视图的行为需要变更同一状态
建议符合这种场景的业务使用 Vuex 来进行数据管理,例如非常典型的场景:购物车。
基本结构
- 导入 Vuex
- 注册 Vuex
- 注入 $store 到 Vue 实例
State
Vuex 使用单一状态树,用一个对象就包含了全部的应用层级状态。
通过$store.state可以访问到 State 的属性。比如$store.state.count。
使用 mapState 简化 State 在视图中的使用,mapState 返回计算属性。
export default new Vuex.Store({state: {count: 0,msg: 'Hello Vuex'},})
mapState 有两种使用方式:
接收数组参数
// 该方法是 vuex 提供的,所以使用前要先导入import { mapState } from 'vuex'// mapState 返回名称为 count 和 msg 的计算属性// 在模板中直接使用 count 和 msgcomputed: {...mapState(['count', 'msg']),}
接收对象参数
如果当前视图中已经有了 count 和 msg,如果使用上述方式的话会有命名冲突,解决的方式:// 该方法是 vuex 提供的,所以使用前要先导入import { mapState } from 'vuex'// 通过传入对象,可以重命名返回的计算属性// 在模板中直接使用 num 和 messagecomputed: {// ...mapState({ num: 'count', message: 'msg' }),...mapState({num: state => state.count,message: state => state.msg})}
Getters
Getters 就是 store 中的计算属性,通过$store.getters可以在视图中访问到,使用 mapGetters 简化视图中的使用。
export default new Vuex.Store({state: {count: 0,msg: 'Hello Vuex'},getters: {// 反转 msg 字符串reverseMsg (state) {return state.msg.split('').reverse().join('')}}})
import { mapGetters } from 'vuex'computed: {...mapGetters(['reverseMsg']),// 改名,在模板中使用 reverse...mapGetters({reverse: 'reverseMsg'})}
Mutations
更改 Vuex 的 store 中的状态的唯一方法是提交 mutation。Vuex 中的 mutation 非常类似于事件:每 个 mutation 都有一个字符串的 事件类型 (type) 和 一个回调函数 (handler)。这个回调函数就是我们 实际进行状态更改的地方,并且它会接受 state 作为第一个参数。
使用 Mutations 改变状态的好处是,集中的一个位置对状态修改,不管在什么地方修改,都可以追踪到状态的修改。配合官方的 dev tools 可以实现高级的 time-travel 调试功能。
通过$store.commit(mutation_name: string, ...args: [])可以在视图中访问到对应的 mutation,使用 mapMutations 简化在视图中的使用。
export default new Vuex.Store({state: {count: 0,msg: 'Hello Vuex'},mutations: {increate (state, payload) {state.count += payload}}})
<!-- <button @click="$store.commit('increate', 2)">Mutation</button> --><button @click="increate(3)">Mutation</button><script>import { mapMutations } from 'vuex'methods: {...mapMutations(['increate']),// 传对象解决重名的问题...mapMutations({increateMut: 'increate'})}</script>
Actions
Action 类似于 mutation,不同在于:
- Action 提交的是 mutation,而不是直接变更状态。
- Action 可以包含任意异步操作。
修改状态先通过 Actions 进行异步处理,再提交给 Mutations。
通过$store.dispatch(action_name: string, ...args: [])可以在视图中访问到对应的 action,使用 mapActions 可以简化在视图中的使用。
export default new Vuex.Store({state: {count: 0,msg: 'Hello Vuex'},mutations: {increate (state, payload) {state.count += payload}},actions: {increateAsync (context, payload) {setTimeout(() => {context.commit('increate', payload)}, 2000)}}})
<!-- <button @click="$store.dispatch('increateAsync', 5)">Action</button> --><button @click="increateAsync(6)">Action</button><script>import { mapActions } from 'vuex'methods: {.....mapActions(['increateAsync']),// 传对象解决重名的问题...mapActions({increateAction: 'increateAsync'})}</script>
Modules
由于使用单一状态树,应用的所有状态会集中到一个比较大的对象。当应用变得非常复杂时,store 对象就有可能变得相当臃肿。
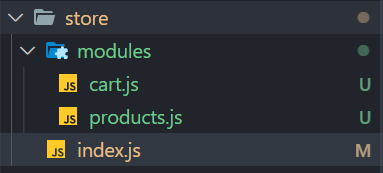
为了解决以上问题,Vuex 允许我们将 store 分割成模块(module)。每个模块拥有自己的 state、 mutation、action、getter、甚至是嵌套子模块。
默认情况下,模块自己的 state、mutation等都会挂载到 store 上。$store.state下会新增一个对象,名字和模块名相同,对象里存放模块的 state。模块的 action、 mutation、getter 则直接挂载到 store 上,如果模块和 store 有相同的 action、 mutation、getter 时,会共存。为了模块有更好的封装性,可以给模块设置命名空间,namespaced: true。
直接访问模块:访问模块的 state 需要加上模块名:$store.state.模块名.name,如果访问像直接挂载在 store 的 mutation,方式和非模块相同。
使用 map 方法访问模块,需要传入模块名。
.\store\modules\products.js:
const state = {products: [{ id: 1, title: 'iPhone 11', price: 8000 },{ id: 2, title: 'iPhone 12', price: 10000 }]}const getters = {}const mutations = {setProducts (state, payload) {state.products = payload}}const actions = {}export default {namespaced: true,state,getters,mutations,actions}
.\src\modules\cart.js
const state = {}const getters = {}const mutations = {}const actions = {}export default {namespaced: true,state,getters,mutations,actions}
import products from './modules/products'import cart from './modules/cart'export default new Vuex.Store({modules: {products,cart}})
<!-- products: {{ $store.state.products.products }} <br><button @click="$store.commit('setProducts', [])">Mutation</button> -->products: {{ products }} <br><button @click="setProducts([])">Mutation</button><script>computed: {...mapState('products', ['products'])},methods: {...mapMutations('products', ['setProducts'])}</script>
严格模式
开启严格模式后,要修改 state 必须经过 mutation。虽然还能直接修改,但会抛出错误。建议在开发环境下开启严格模式,因为严格模式会深度检查状态树,影响性能。
export default new Vuex.Store({strict: process.env.NODE_ENV !== 'production'})
购物车案例
接下来我们通过一个购物车案例来演示 Vuex 在项目中的使用方式,首先把购物车的项目模板下载下来。
地址:https://github.com/goddlts/vuex-cart-demo-template.git
功能列表
- 商品列表组件
- 商品列表中弹出框组件
- 购物车列表组件
商品列表
商品列表功能
- Vuex 中创建两个模块,分别用来记录商品列表和购物车的状态,store 的结构:
products 模块,store/modules/products.js
import axios from 'axios'const state = {products: []}const getters = {}const mutations = {setAllProducts(state, products) {state.products = products}}const actions = {async getAllProducts({ commit }) {const { data } = await axios({method: 'GET',url: 'http://127.0.0.1:3000/products'})commit('setAllProducts', data)}}export default {namespaced: true,state,getters,mutations,actions}
store/index.js 中注册 products.js 模块
- views/products.vue 中实现商品列表的功能
import { mapState, mapActions } from 'vuex'export default {name: 'ProductList',computed: {...mapState('products', ['products'])},methods: {...mapActions('products', ['getAllProducts'])},created() {this.getAllProducts()}}
添加购物车
cart 模块实现添加购物车功能,store/modules/cart.js
const mutations = {addToCart(state, product) {// 判断 cartProducts 中是否已有该商品// 如果有的话,把 product 添加到数组中,设置 count=1, isChecked=true, totalPrice// 否则的话找到购物车中的商品让 count + 1const prod = state.cartProducts.find(item => item.id === product.id)if (prod) {prod.count++prod.isChecked = trueprod.totalPrice = prod.price * prod.count} else {state.cartProducts.push({// { id, title, price }...product,totalPrice: product.price,count: 1,isChecked: true})}}}
store/index.js 中注册 cart 模块
- view/products.vue 中实现添加购物车功能
<!-- 修改模板 --><template slot-scope="scope"><el-button @click="addToCart(scope.row)">加入购物车</el-button></template><!-- 映射 cart 中的 mutations -->...mapMutations('cart', ['addToCart']),
商品列表 - 弹出购物车窗口
购物车列表
- components/pop-cart.vue 中展示购物车列表
import { mapState } from 'vuex'export default {name: 'PopCart',computed: {...mapState('cart', ['cartProducts'])}}
删除
cart 模块实现从购物车删除的功能,store/modules/cart.js
// mutations 中添加deleteFromCart (state, prodId) {const index = state.cartProducts.find(item => item.id === prodId)index !== -1 && state.cartProducts.splice(index, 1)}
components/pop-cart.vue 中实现删除功能
<template slot-scope="scope"><el-button@click="deleteFromCart(scope.row.id)"size="mini">删除</el-button></template>
methods: {...mapMutations('cart', ['deleteFromCart'])}
小计
cart 模块实现统计总数和总价,store/modules/cart.js
const getters = {totalCount(state) {return state.cartProducts.reduce((count, prod) => {return count + prod.count}, 0)},totalPrice(state) {return state.cartProducts.reduce((count, prod) => {return count + prod.totalPrice}, 0).toFixed(2)}}
components/pop-cart.vue 中显示徽章和小计
<div><p>共 {{ totalCount }} 件商品 共计¥{{ totalPrice }}</p><el-button size="mini" type="danger" @click="$router.push({ name: 'cart' })">去购物车</el-button></div><el-badge :value="totalCount" class="item" slot="reference"><el-button type="primary">我的购物车</el-button></el-badge>
computed: {...mapState('cart', ['cartProducts']),...mapGetters('cart', ['totalCount', 'totalPrice'])},
购物车
全选功能
cart 模块实现更新商品的选中状态,store/modules/cart.js
// 更新所有商品的选中状态(点击全选)updateAllProductsChecked(state, checked) {state.cartProducts.forEach(prod => {prod.isChecked = checked})},// 更新某个商品的选中状态(点击单个商品)updateProductChecked(state, {prodId,checked}) {const prod = state.cartProducts.find(prod => prod.id === prodId)prod && (prod.isChecked = checked)}
views/cart.vue,实现全选功能
<el-checkbox slot="header" slot-scope="scope" size="mini" v-model="checkedAll"></el-checkbox><!--@change="updateProductChecked" 默认参数:更新后的值@change="updateProductChecked(productId, $event)" 123, 原来那个默认参数当你传递了自定义参数的时候,还想得到原来那个默认参数,就手动传递一个 $event--><template slot-scope="scope"><el-checkboxsize="mini":value="scope.row.isChecked"@change="updateProductChecked({prodId: scope.row.id,checked: $event})"></el-checkbox></template>
computed: {...mapState('cart', ['cartProducts']),checkedAll: {get() {return this.cartProducts.every(prod => prod.isChecked)},set(value) {this.updateAllProductsChecked(value)}}},methods: {...mapMutations('cart', ['updateAllProductsChecked','updateProductChecked'])}
数字文本框
cart 模块实现更新商品数量,store/modules/cart.js
updateProductCount(state, {prodId,count}) {const prod = state.cartProducts.find(prod => prod.id === prodId)if (prod) {prod.count = countprod.totalPrice = prod.price * count}}
views/cart.vue,实现数字文本框功能
<template slot-scope="scope"><el-input-numbersize="mini":min="1"controls-position="right":value="scope.row.count"@change="updateProductCount({prodId: scope.row.id,count: $event})"></el-input-number></template>
...mapMutations('cart', ['updateAllProductsChecked','updateProductChecked','updateProductCount'])
小计
- cart 模块实现统计选中商品价格和数量,store/modules/cart.js
checkedTotalCount(state) {return state.cartProducts.reduce((count, prod) => {if (prod.isChecked) {count += prod.count}return count}, 0)},checkedTotalPrice(state) {return state.cartProducts.reduce((count, prod) => {if (prod.isChecked) {count += prod.totalPrice}return count}, 0).toFixed(2)}
- views/cart.vue,实现小计
<p>已选 <span>{{ checkedTotalCount }}</span> 件商品,总价:<span>{{checkedTotalPrice }}</span></p>
...mapGetters('cart', ['checkedTotalCount', 'checkedTotalPrice'])
Vuex 模拟实现
实现思路
- 实现 install 方法
- Vuex 是 Vue 的一个插件,所以和模拟 VueRouter 类似,先实现 Vue 插件约定的 install 方法
- 实现 Store 类
- 实现构造函数,接收 options
- state 的响应化处理
- getter 的实现
- commit、dispatch 方法
实现
let _Vue = nullclass Store {constructor (options) {const {state = {},getters = {},mutations = {},actions = {}} = optionsthis.state = _Vue.observable(state)// 此处不直接 this.getters = getters,是因为下面的代码中要方法 getters 中的 key// 如果这么写的话,会导致 this.getters 和 getters 指向同一个对象// 当访问 getters 的 key 的时候,实际上就是访问 this.getters 的 key 会触发 key 属性的 getter// 会产生死递归this.getters = Object.create(null)Object.keys(getters).forEach(key => {Object.defineProperty(this.getters, key, {get: () => getters[key](state)})})this._mutations = mutationsthis._actions = actions}commit (type, payload) {this._mutations[type](this.state, payload)}dispatch (type, payload) {this._actions[type](this, payload)}}function install (Vue) {_Vue = Vue_Vue.mixin({beforeCreate () {if (this.$options.store) {_Vue.prototype.$store = this.$options.store}}})}export default {Store,install}

若有收获,就点个赞吧
0 人点赞
