用 Nuxt.js 实现一个简单的论坛网站。
demo 的 github 地址:https://github.com/gothinkster/realworld
项目初始化
- 新建文件夹
- 初始化
package.json - 添加命令
- 添加
nuxt模块 - 添加
pages文件夹,新建index.vue文件 - 运行项目
下载模板
从 github 复制模板。
app.html
<!DOCTYPE html><html {{ HTML_ATTRS }}><head {{ HEAD_ATTRS }}>{{ HEAD }}<!-- Import Ionicon icons & Google Fonts our Bootstrap theme relies on --><linkhref="https://cdn.jsdelivr.net/npm/ionicons@2.0.1/css/ionicons.min.css"rel="stylesheet"type="text/css"/><linkhref="//fonts.googleapis.com/css?family=Titillium+Web:700|Source+Serif+Pro:400,700|Merriweather+Sans:400,700|Source+Sans+Pro:400,300,600,700,300italic,400italic,600italic,700italic"rel="stylesheet"type="text/css"/><!-- Import the custom Bootstrap 4 theme from our hosted CDN --><!-- <link rel="stylesheet" href="//demo.productionready.io/main.css"> --><link rel="stylesheet" href="/index.css" /></head><body {{ BODY_ATTRS }}>{{ APP }}</body></html>
布局组件
pages/layout/index.vue:
<template><div><nav class="navbar navbar-light"><div class="container"><nuxt-linkclass="navbar-brand"to="/">conduit</nuxt-link><ul class="nav navbar-nav pull-xs-right"><li class="nav-item"><!-- Add "active" class when you're on that page" --><nuxt-linkclass="nav-link"to="/"exact>Home</nuxt-link></li><li class="nav-item"><nuxt-linkclass="nav-link"to="/editor"><i class="ion-compose"></i> New Post</nuxt-link></li><li class="nav-item"><nuxt-linkclass="nav-link"to="/settings"><i class="ion-gear-a"></i> Settings</nuxt-link></li><li class="nav-item"><nuxt-linkclass="nav-link"to="/profile/lpz"><imgclass="user-pic"src="http://toutiao.meiduo.site/FtNcS8sKFSYQbtBbd40eFTL6lAs_"/>LPZ</nuxt-link></li><li class="nav-item"><nuxt-linkclass="nav-link"to="/login">Sign in</nuxt-link></li><li class="nav-item"><nuxt-linkclass="nav-link"to="/register">Sign up</nuxt-link></li></ul></div></nav><nuxt-child /><footer><div class="container"><nuxt-linkclass="logo-font"to="/">conduit</nuxt-link><span class="attribution">An interactive learning project from<a href="https://kaiwu.lagou.com/">lagou</a>. Code & design licensed under MIT.</span></div></footer></div></template>
其中的 Home 链接去掉了原本的active样式 class,新增了exact属性,表示必须严格匹配到路径,这是为了处理 Home 链接的高亮。
页面组件
home
<template><div class="home-page"><div class="banner"><div class="container"><h1 class="logo-font">conduit</h1><p>A place to share your knowledge.</p></div></div><div class="container page"><div class="row"><div class="col-md-9"><div class="feed-toggle"><ul class="nav nav-pills outline-active"><li class="nav-item"><aclass="nav-link disabled"href>Your Feed</a></li><li class="nav-item"><aclass="nav-link active"href>Global Feed</a></li></ul></div><div class="article-preview"><div class="article-meta"><a href="profile.html"><img src="http://i.imgur.com/Qr71crq.jpg" /></a><div class="info"><aclass="author"href>Eric Simons</a><span class="date">January 20th</span></div><button class="btn btn-outline-primary btn-sm pull-xs-right"><i class="ion-heart"></i> 29</button></div><aclass="preview-link"href><h1>How to build webapps that scale</h1><p>This is the description for the post.</p><span>Read more...</span></a></div><div class="article-preview"><div class="article-meta"><a href="profile.html"><img src="http://i.imgur.com/N4VcUeJ.jpg" /></a><div class="info"><aclass="author"href>Albert Pai</a><span class="date">January 20th</span></div><button class="btn btn-outline-primary btn-sm pull-xs-right"><i class="ion-heart"></i> 32</button></div><aclass="preview-link"href><h1>The song you won't ever stop singing. No matter how hard you try.</h1><p>This is the description for the post.</p><span>Read more...</span></a></div></div><div class="col-md-3"><div class="sidebar"><p>Popular Tags</p><div class="tag-list"><aclass="tag-pill tag-default"href>programming</a><aclass="tag-pill tag-default"href>javascript</a><aclass="tag-pill tag-default"href>emberjs</a><aclass="tag-pill tag-default"href>angularjs</a><aclass="tag-pill tag-default"href>react</a><aclass="tag-pill tag-default"href>mean</a><aclass="tag-pill tag-default"href>node</a><aclass="tag-pill tag-default"href>rails</a></div></div></div></div></div></div></template>
login/register
<template><div class="auth-page"><div class="container page"><div class="row"><div class="col-md-6 offset-md-3 col-xs-12"><h1 class="text-xs-center">Sign up</h1><p class="text-xs-center"><a href="">Have an account?</a></p><ul class="error-messages"><li>That email is already taken</li></ul><form><fieldset class="form-group"><input class="form-control form-control-lg" type="text" placeholder="Your Name"></fieldset><fieldset class="form-group"><input class="form-control form-control-lg" type="text" placeholder="Email"></fieldset><fieldset class="form-group"><input class="form-control form-control-lg" type="password" placeholder="Password"></fieldset><button class="btn btn-lg btn-primary pull-xs-right">Sign up</button></form></div></div></div></div></template>
profile
<template><div class="profile-page"><div class="user-info"><div class="container"><div class="row"><div class="col-xs-12 col-md-10 offset-md-1"><imgclass="user-img"src="http://i.imgur.com/Qr71crq.jpg"/><h4>Eric Simons</h4><p>Cofounder @GoThinkster, lived in Aol's HQ for a few months, kinda looks like Peeta from theHunger Games</p><button class="btn btn-sm btn-outline-secondary action-btn"><i class="ion-plus-round"></i> Follow Eric Simons</button></div></div></div></div><div class="container"><div class="row"><div class="col-xs-12 col-md-10 offset-md-1"><div class="articles-toggle"><ul class="nav nav-pills outline-active"><li class="nav-item"><aclass="nav-link active"href>My Articles</a></li><li class="nav-item"><aclass="nav-link"href>Favorited Articles</a></li></ul></div><div class="article-preview"><div class="article-meta"><a href><img src="http://i.imgur.com/Qr71crq.jpg" /></a><div class="info"><aclass="author"href>Eric Simons</a><span class="date">January 20th</span></div><button class="btn btn-outline-primary btn-sm pull-xs-right"><i class="ion-heart"></i> 29</button></div><aclass="preview-link"href><h1>How to build webapps that scale</h1><p>This is the description for the post.</p><span>Read more...</span></a></div><div class="article-preview"><div class="article-meta"><a href><img src="http://i.imgur.com/N4VcUeJ.jpg" /></a><div class="info"><aclass="author"href>Albert Pai</a><span class="date">January 20th</span></div><button class="btn btn-outline-primary btn-sm pull-xs-right"><i class="ion-heart"></i> 32</button></div><aclass="preview-link"href><h1>The song you won't ever stop singing. No matter how hard you try.</h1><p>This is the description for the post.</p><span>Read more...</span><ul class="tag-list"><li class="tag-default tag-pill tag-outline">Music</li><li class="tag-default tag-pill tag-outline">Song</li></ul></a></div></div></div></div></div></template>
settings
<template><div class="settings-page"><div class="container page"><div class="row"><div class="col-md-6 offset-md-3 col-xs-12"><h1 class="text-xs-center">Your Settings</h1><form><fieldset><fieldset class="form-group"><inputclass="form-control"placeholder="URL of profile picture"type="text"/></fieldset><fieldset class="form-group"><inputclass="form-control form-control-lg"placeholder="Your Name"type="text"/></fieldset><fieldset class="form-group"><textareaclass="form-control form-control-lg"placeholder="Short bio about you"rows="8"></textarea></fieldset><fieldset class="form-group"><inputclass="form-control form-control-lg"placeholder="Email"type="text"/></fieldset><fieldset class="form-group"><inputclass="form-control form-control-lg"placeholder="Password"type="password"/></fieldset><button class="btn btn-lg btn-primary pull-xs-right">Update Settings</button></fieldset></form></div></div></div></div></template>
create/edit article
<template><div class="editor-page"><div class="container page"><div class="row"><div class="col-md-10 offset-md-1 col-xs-12"><form><fieldset><fieldset class="form-group"><inputclass="form-control form-control-lg"placeholder="Article Title"type="text"/></fieldset><fieldset class="form-group"><inputclass="form-control"placeholder="What's this article about?"type="text"/></fieldset><fieldset class="form-group"><textareaclass="form-control"placeholder="Write your article (in markdown)"rows="8"></textarea></fieldset><fieldset class="form-group"><inputclass="form-control"placeholder="Enter tags"type="text"/><div class="tag-list"></div></fieldset><buttonclass="btn btn-lg pull-xs-right btn-primary"type="button">Publish Article</button></fieldset></form></div></div></div></div></template>
article
<template><div class="article-page"><div class="banner"><div class="container"><h1>How to build webapps that scale</h1><div class="article-meta"><a href><img src="http://i.imgur.com/Qr71crq.jpg" /></a><div class="info"><aclass="author"href>Eric Simons</a><span class="date">January 20th</span></div><button class="btn btn-sm btn-outline-secondary"><i class="ion-plus-round"></i> Follow Eric Simons<span class="counter">(10)</span></button> <button class="btn btn-sm btn-outline-primary"><i class="ion-heart"></i> Favorite Post<span class="counter">(29)</span></button></div></div></div><div class="container page"><div class="row article-content"><div class="col-md-12"><p>Web development technologies have evolved at an incredible clip over the past few years.</p><h2 id="introducing-ionic">Introducing RealWorld.</h2><p>It's a great solution for learning how other frameworks work.</p></div></div><hr /><div class="article-actions"><div class="article-meta"><a href="profile.html"><img src="http://i.imgur.com/Qr71crq.jpg" /></a><div class="info"><aclass="author"href>Eric Simons</a><span class="date">January 20th</span></div><button class="btn btn-sm btn-outline-secondary"><i class="ion-plus-round"></i> Follow Eric Simons</button> <button class="btn btn-sm btn-outline-primary"><i class="ion-heart"></i> Favorite Post<span class="counter">(29)</span></button></div></div><div class="row"><div class="col-xs-12 col-md-8 offset-md-2"><form class="card comment-form"><div class="card-block"><textareaclass="form-control"placeholder="Write a comment..."rows="3"></textarea></div><div class="card-footer"><imgclass="comment-author-img"src="http://i.imgur.com/Qr71crq.jpg"/><button class="btn btn-sm btn-primary">Post Comment</button></div></form><div class="card"><div class="card-block"><p class="card-text">With supporting text below as a natural lead-in to additional content.</p></div><div class="card-footer"><aclass="comment-author"href><imgclass="comment-author-img"src="http://i.imgur.com/Qr71crq.jpg"/></a> <aclass="comment-author"href>Jacob Schmidt</a><span class="date-posted">Dec 29th</span></div></div><div class="card"><div class="card-block"><p class="card-text">With supporting text below as a natural lead-in to additional content.</p></div><div class="card-footer"><aclass="comment-author"href><imgclass="comment-author-img"src="http://i.imgur.com/Qr71crq.jpg"/></a> <aclass="comment-author"href>Jacob Schmidt</a><span class="date-posted">Dec 29th</span><span class="mod-options"><i class="ion-edit"></i><i class="ion-trash-a"></i></span></div></div></div></div></div></div></template>
导航链接高亮
module.exports = {router: {linkActiveClass: 'active', // 用于精准激活的 RouterLink 的默认类,这里指定激活的link 类是 active}}
exact
<router-link>标签的 exact 属性,用来指示“是否激活”默认类名的依据是包含匹配。 举个例子,如果当前的路径是 /a 开头的,那么
按照这个规则,每个路由都会激活
封装请求模块
新建 utils 文件夹,在文件夹新建request.js,封装 axios 模块。
/*** 基于 axios 封装的请求模块*/import axios from 'axios'const requset = axios.create({baseURL: 'https://api.realworld.io/api',})export default requset
基础登录功能
api
新建 api 文件夹,在文件夹新建user.js,这里封装了用户登录/注册的接口。
import requset from "../utils/request"export const login = data => {return requset({method: 'POST',url: '/users/login',data})}export const register = data => {return requset({method: 'POST',url: '/users',data})}
登录/注册的组件要进行修改。输入框加入表单验证,处理按钮点击事件,登录和注册的功能分开,通过 api 请求登录数据,捕获异常,登录成功后跳转到首页。
<template><div class="auth-page"><div class="container page"><div class="row"><div class="col-md-6 offset-md-3 col-xs-12"><h1 class="text-xs-center">{{ isLogin ? 'Sign in' : 'Sign up'}}</h1><p class="text-xs-center"><!-- <a href>Have an account?</a> --><nuxt-linkto="/register"v-if="isLogin">Need an account?</nuxt-link><nuxt-linkto="/login"v-else>Have an account?</nuxt-link></p><ul class="error-messages"><template v-for="(messages, field) in errors"><li:key="index"v-for="(message, index) in messages">{{ field }}{{ message }}</li></template></ul><form @submit.prevent="onSubmit"><fieldsetclass="form-group"v-if="!isLogin"><inputclass="form-control form-control-lg"placeholder="Your Name"type="text"v-model="user.username"/></fieldset><fieldset class="form-group"><inputclass="form-control form-control-lg"placeholder="Email"requiredtype="email"v-model="user.email"/></fieldset><fieldset class="form-group"><inputclass="form-control form-control-lg"minlength="8"placeholder="Password"requiredtype="password"v-model="user.password"/></fieldset><button class="btn btn-lg btn-primary pull-xs-right">{{ isLogin ? 'Sign in' : 'Sign up'}}</button></form></div></div></div></div></template><script>import { login, register } from '@/api/user'export default {name: 'LoginIndex',computed: {isLogin() {return this.$route.name === 'login'}},data() {return {user: {username: '',email: '',password: ''},errors: {}}},methods: {async onSubmit() {try {const { data } = this.isLogin ?await login({user: this.user}) :await register({user: this.user})console.log(data)this.$router.push('/')} catch (err) {this.errors = err.response.data.errors}}},}</script><style scoped></style>
数据持久化
由于服务端和客户端都需要验证用户信息,所以这里通过操作 cookie 来实现。
新建 store 文件夹,它的功能相当于 Vuex,新建index.js。
const cookieparser = process.server ? require('cookieparser') : undefinedexport const state = () => {return {user: null}}export const mutations = {setUser (state, data) {state.user = data}}export const actions = {nuxtServerInit ({ commit }, { req }) {let user = nullif (req.headers.cookie) {const parsed = cookieparser.parse(req.headers.cookie)try {user = JSON.parse(parsed.user)} catch (err) {// No valid cookie found}}commit('setUser', user)}}
登录按钮事件修改:
// 仅在客户端加载 js-cookieconst Cookie = process.client ? require('js-cookie') : undefinedasync onSubmit() {try {const { data } = this.isLogin ?await login({user: this.user}) :await register({user: this.user})this.$store.commit('setUser', data.user)Cookie.set('user', data.user)this.$router.push('/')} catch (err) {this.errors = err.response.data.errors}}
页面访问权限
一些页面在未登录的状态是不应该被允许访问到的。NuxtJS 通过中间件来实现路由拦截。
新建middleware文件夹,新建一个 js 文件,导出一个函数,该函数接收一个上下文对象作为参数。
写一个未登录就跳到登录页面的中间件authenticated.js:
export default function ({ store, redirect }) {if (!store.state.user) {return redirect('/login')}}
在页面组件中配置 middleware 属性,和中间件的文件名一致,就可以开启拦截。
<script>export default {name: 'EditorIndex',middleware: 'authenticated'}</script>
登录/注册页面在登录之后就不能再被访问到。
写一个登录了就跳转到首页的中间件:
export default function ({ store, redirect }) {if (store.state.user) {return redirect('/')}}
首页
获取公共文章列表
封装 api:
import request from '../utils/request'export const getArticles = params => {return request({method: 'GET',url: '/articles',params})}
home 组件文章部分:
<template><!-- 文章列表部分 --><div:key="article.slug"class="article-preview"v-for="article in articles"><div class="article-meta"><nuxt-link :to="{ name: 'profile', params: { username: article.author.username }}"><img :src="article.author.image" /></nuxt-link><div class="info"><nuxt-link:to="{ name: 'profile', params: { username: article.author.username }}"class="author">{{ article.author.username }}</nuxt-link><span class="date">{{ article.createdAt }}</span></div><button:class="{active: article.favorited}"class="btn btn-outline-primary btn-sm pull-xs-right"><i class="ion-heart"></i>{{ article.favoritesCount }}</button></div><nuxt-link:to="{name: 'article',params: {slug: article.slug}}"class="preview-link"><h1>{{ article.title }}</h1><p>{{ article.description}}</p><span>Read more...</span></nuxt-link></div></template>
分页
<script>import { getArticles } from '@/api/article'export default {name: 'HomeIndex',async asyncData({ query }) {const page = Number.parseInt(query.page || 1)const limit = 1const { data } = await getArticles({limit,offset: (page - 1) * limit,})return {articles: data.articles, // 文章列表articlesCount: data.articlesCount, // 文章总数limit, // 每页大小page, // 页码}},watchQuery: ['page'],computed: {totalPage() {return Math.ceil(this.articlesCount / this.limit)}},}</script>
home 组件分页部分:
<template><div><!-- 分页列表 --><nav><ul class="pagination"><li:class="{active: item === page}":key="item"class="page-item"v-for="item in totalPage"><nuxt-link:to="{name: 'home',query: {page: item,}}"class="page-link">{{ item }}</nuxt-link></li></ul></nav><!-- /分页列表 --></div></template>
标签
获取标签列表 api:
import request from '../utils/request'export const getTags = params => {return request({method: 'GET',url: '/tags',params})}
异步获取数据重构:
<script>export default {name: 'HomeIndex',async asyncData({ query }) {const page = Number.parseInt(query.page || 1)const limit = 1const tag = query.tagconst [articleRes, tagRes] = await Promise.all([getArticles({limit,offset: (page - 1) * limit,tag}),getTags()])const { articles, articlesCount } = articleRes.dataconst { tags } = tagRes.datareturn {articles, // 文章列表articlesCount, // 文章总数tags, // 标签列表limit, // 每页大小page, // 页码tag,}},watchQuery: ['page', 'tag'],computed: {totalPage() {return Math.ceil(this.articlesCount / this.limit)}},}</script>
home 组件标签部分:
<template><div class="col-md-3"><div class="sidebar"><p>Popular Tags</p><div class="tag-list"><nuxt-link:key="tag":to="{name: 'home',query: {tag: tag,}}"class="tag-pill tag-default"v-for="tag in tags">{{ tag }}</nuxt-link></div></div></div></template>
导航栏
导航栏最多有三个标签页,只有登录状态下显示的Your Feed,一直显示的Global Feed,还有点击标签产生的标签页。
home 组件导航栏部分:
<ul class="nav nav-pills outline-active"><li class="nav-item"><nuxt-link:class="{active: tab === 'your_feed'}":to="{name: 'home',query: {tab: 'your_feed'}}"class="nav-link"exactv-if="user">Your Feed</nuxt-link></li><li class="nav-item"><nuxt-link:class="{active: tab === 'global_feed'}":to="{name: 'home',query: {tab: 'global_feed'}}"class="nav-link"exact>Global Feed</nuxt-link></li><li class="nav-item" v-if="tag"><nuxt-link:class="{active: tab === 'tag'}":to="{name: 'home',query: {tab: 'tag',tag: tag}}"class="nav-link">{{ '#' + tag }}</nuxt-link></li></ul>
Token
一些接口需要获取用户信息。所以最好统一给所有接口的请求头设置 Token。
NuxtJS 允许在运行应用程序前执行 js 插件,这在需要使用自己的库或第三方模块时特别有用。
一个典型的例子,使用 axios 发送请求。
<template><h1>{{ title }}</h1></template><script>import axios from 'axios'export default {async asyncData({ params }) {let { data } = await axios.get(`https://my-api/posts/${params.id}`)return { title: data.title }}}</script>
在独立的 js 模块文件中,插件必须作为默认导出成员导出。并且需要在nuxt.config.js的plugins数组选项中声明。
NuxtJS 会为插件注入 context,从 context 中可以解构出 route、store、params、query 等经常需要用到的数据。
基于 NuxtJS 的插件机制和 axios 的请求拦截器,可以实现把用户的 token 设置到请求头。
把案例的请求模块request.js放到plugins文件夹下,从注入插件的 context 对象解构出 store,获取到 user。
/*** 基于 axios 封装的请求模块*/import axios from 'axios'// 创建请求对象export const request = axios.create({baseURL: 'https://conduit.productionready.io'})// 通过插件机制获取到上下文对象(query、params、req、res、app、store...)// 插件导出函数必须作为 default 成员export default ({ store }) => {// 请求拦截器// Add a request interceptor// 任何请求都要经过请求拦截器// 我们可以在请求拦截器中做一些公共的业务处理,例如统一设置 tokenrequest.interceptors.request.use(function (config) {// Do something before request is sent// 请求就会经过这里const { user } = store.stateif (user && user.token) {config.headers.Authorization = `Token ${user.token}`}// 返回 config 请求配置对象return config}, function (error) {// 如果请求失败(此时请求还没有发出去)就会进入这里// Do something with request errorreturn Promise.reject(error)})}
nuxt.config.js 声明插件:
module.exports = {plugins: ['~/plugins/request.js']}
由于request.js默认导出的是插件函数,所有之前导入request的地方需要把request解构出来。当导入request.js的时候,插件函数会自动执行。
import { request } from '../plugins/request'
日期格式化
日期格式化有多种方式,这里通过 NuxtJS 插件和 Vue 的过滤器来实现。
安装dayjs模块,新建一个插件文件,导入Vue和dayjs。
import Vue from 'vue'import dayjs from 'dayjs'Vue.filter('date', (value, format = 'YYYY-MM-DD HH:mm:ss') => {return dayjs(value).format(format)})
在nuxt.config.js中声明插件。
文章发表时间格式化:
// 过滤器用法:{{ 表达式 | 过滤器 }}<span class="date">{{ article.createdAt | date('MMM DD, YYYY') }}</span>
点赞功能
点赞功能实现点击一次心心点赞,再点一次取消点赞。而且把点赞请求传给服务器期间,不允许再点击心心。
<button:class="{active: article.favorited}":disabled="article.favoriteDisabled"class="btn btn-outline-primary btn-sm pull-xs-right"@click="onFavorite(article)"><i class="ion-heart"></i>{{ article.favoritesCount }}</button><script>articles.forEach(article => {article.favoriteDisabled = false})async onFavorite (article) {article.favoriteDisabled = trueif (article.favorited) {await deleteFavorite(article.slug)article.favorited = falsearticle.favoritesCount -= 1} else {await addFavorite(article.slug)article.favorited = truearticle.favoritesCount += 1}article.favoriteDisabled = false}</script>
文章详情页
文章详情页最重要的几个步骤:获取文章的详情展示到页面,把文章的 markdown 形式的内容转成 html,设置页面 meta 优化 seo。
<template><div class="article-page"><div class="banner"><div class="container" v-if="article"><h1>{{ article.title }}</h1><article-meta v-if="article" :article="article"></article-meta></div></div><div class="container page" v-if="article"><div class="row article-content"><divclass="col-md-12"v-html="article.body"></div></div><hr /><div class="article-actions" v-if="article"><article-meta :article="article"></article-meta></div><article-comment v-if="article" :article="article"></article-comment></div></div></template><script>import { getArticle } from '@/api/article'import Markdownit from "markdown-it"import ArticleMeta from './components/article-meta.vue'import ArticleComment from './components/article-comment.vue'export default {name: 'ArticleIndex',components: {ArticleMeta,ArticleComment,},async asyncData({ params }) {try {const { data } = await getArticle(params.slug)const { article } = dataconst md = new Markdownit()article.body = md.render(article.body)return {article: article}} catch (error) {return {article: null}}},head() {return {title: `${this.article ? this.article.title + '-' : ''}RealWord`,meta: [{hid: 'description',name: 'description',content: this.article ? this.article.description : ''}]}}}</script><style scoped></style>
自动部署
使用 Github Actions 来实现项目在提交到 GitHub 仓库后自动打包,部署到服务器。
生成 token
打开个人 settings,选择 Developer settings -> Personal access tokens,点击Generate new token,选择 token,输入信息,选择 token 的使用期限,使用范围。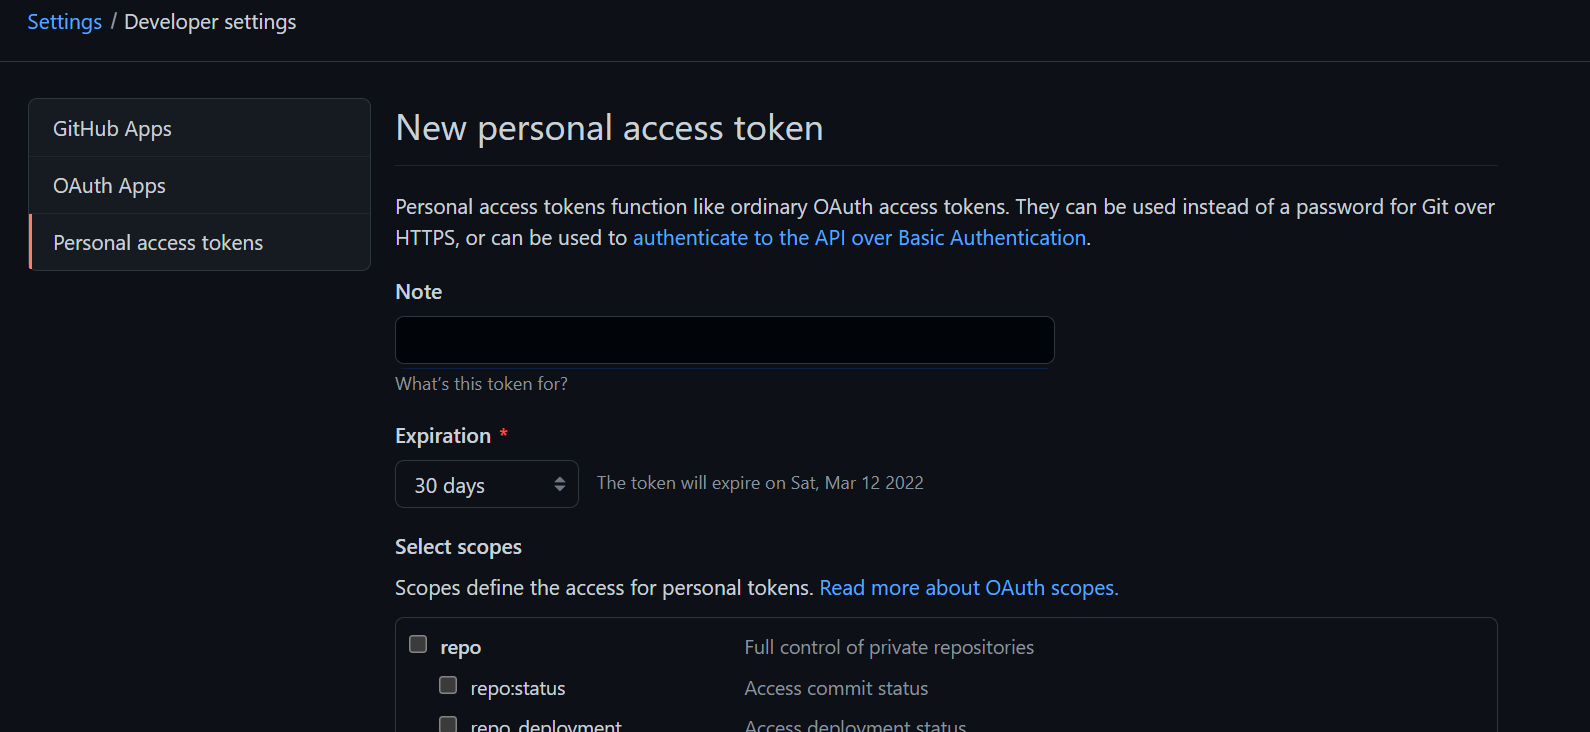
Actions secrets
打开项目仓库,选择仓库的 Settings,点击 Secrets -> Actions,生成一些仓库秘密,包括服务器地址,远程端口,登录的用户密码,以及生成的 token。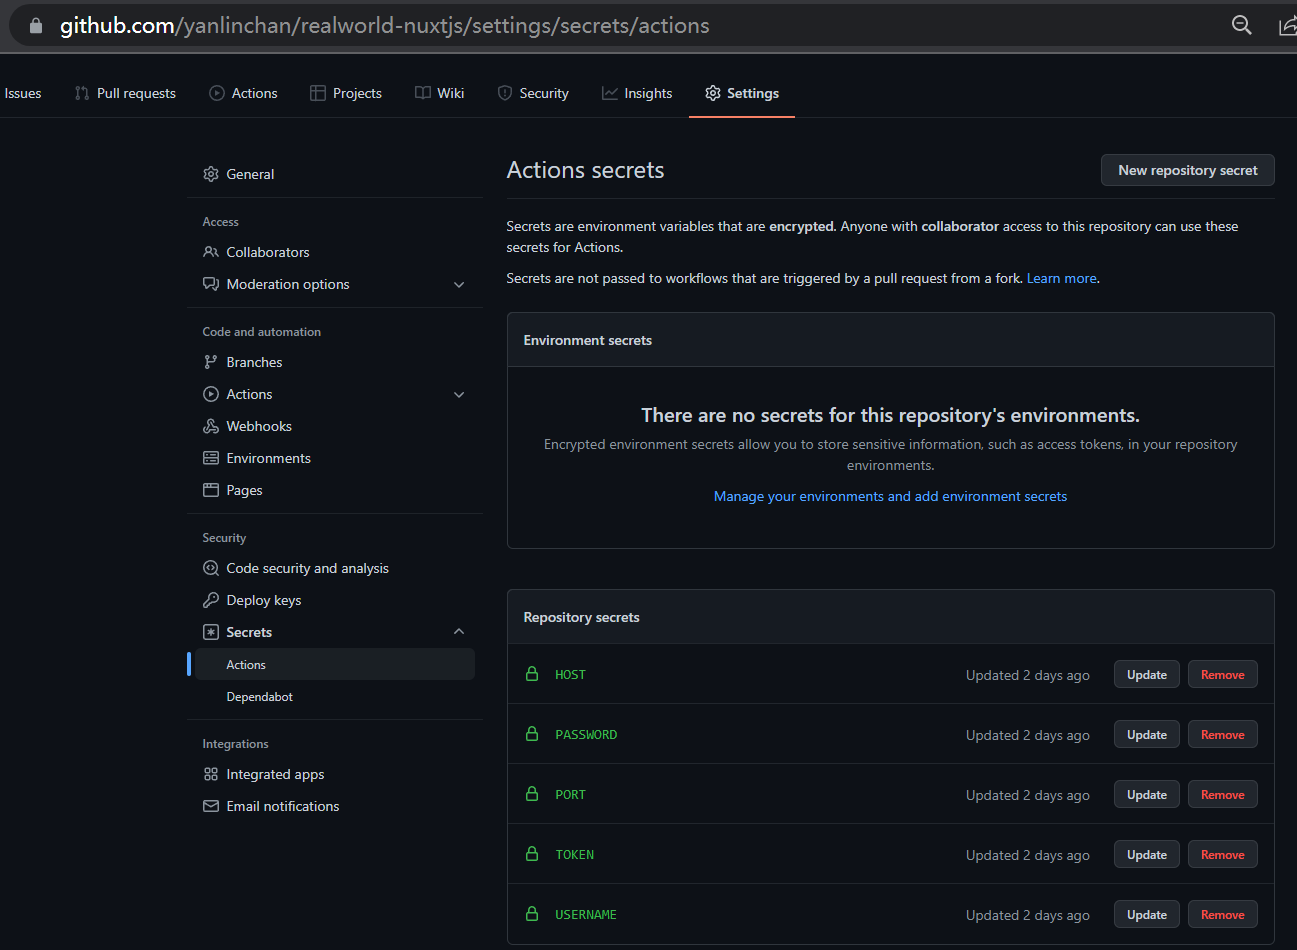
配置脚本
在项目根目录下,新建 ./github/workflows/main.yml 文件。
name: Publish And Deploy Demoon:push:tags:- 'v*'jobs:build-and-deploy:runs-on: ubuntu-lateststeps:# 下载源码- name: Checkoutuses: actions/checkout@master# 打包构建- name: Builduses: actions/setup-node@master- run: npm install- run: npm run build- run: tar -zcvf release.tgz .nuxt static nuxt.config.js package.json package-lock.json pm2.config.json# 发布 Release- name: Create Releaseid: create_releaseuses: actions/create-release@masterenv:GITHUB_TOKEN: ${{ secrets.token }}with:tag_name: ${{ github.ref }}release_name: Release ${{ github.ref }}draft: falseprerelease: false# 上传构建结果到 Release- name: Upload Release Assetid: upload-release-assetuses: actions/upload-release-asset@masterenv:GITHUB_TOKEN: ${{ secrets.token }}with:upload_url: ${{ steps.create_release.outputs.upload_url }}asset_path: ./release.tgzasset_name: release.tgzasset_content_type: application/x-tgz# 部署到服务器- name: Deployuses: appleboy/ssh-action@masterwith:host: ${{ secrets.HOST }}username: ${{ secrets.USERNAME }}password: ${{ secrets.PASSWORD }}port: ${{ secrets.PORT }}script: |cd /root/realworld-nuxtjswget https://github.com/yanlinchan/realworld-nuxtjs/releases/latest/download/release.tgz -O release.tgztar zxvf release.tgznpm install --productionpm2 reload pm2.config.json
推送标签
上面的文件中,编写了一个推送以 v 开头的标签到 GitHub 仓库,就会触发自动部署的任务。
所以在本地先用git tag创建一个标签,比如git tag v0.1.0,之后把这个标签推送到 GitHub,git push origin v0.1.0,就会触发 GitHub 自动部署到服务器的任务。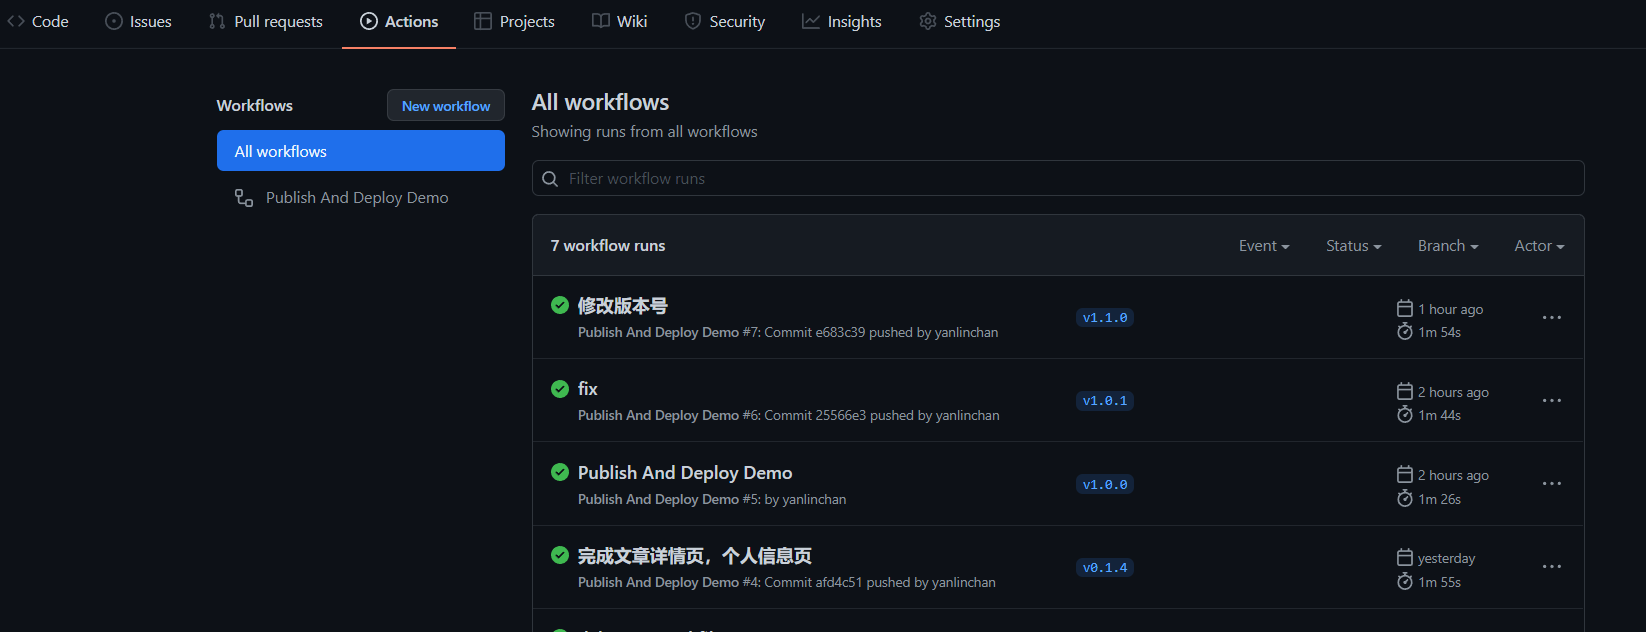

若有收获,就点个赞吧
0 人点赞
