概述
在正式分析 Spring 源码之前,我们有必要先来回顾一下 Spring 中最简单的用法。尽管我相信您已经对下面例子非常熟悉了。Bean 是 Spring 中最核心的概念,因为 Spring 就像是个大水桶,而 Bean 就像是水桶中的水,水桶脱离了水也就没什么用处了。
搭建基础框架
XML方案搭建Spring容器
引入jar包
<properties><java.version>1.8</java.version><spring.version>5.1.5.RELEASE</spring.version></properties><dependencies><dependency><groupId>org.springframework</groupId><artifactId>spring-context</artifactId><version>${spring.version}</version></dependency></dependencies>
引入 spring-context jar,它会自动帮我引入aop、beans、core、expression、jcl 如下图: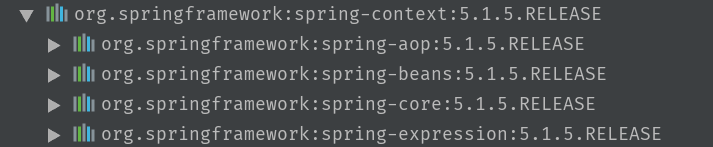
User 实体类
/*** User实体类* @date: 2021/2/24 17:47*/public class User {private String userName;private Integer age;public void setUserName(String userName) {this.userName = userName;}public void setAge(Integer age) {this.age = age;}@Overridepublic String toString() {return "User{" +"userName='" + userName + '\'' +", age=" + age +'}';}}
spring-config.xml 配置文件
在项目resources目录下创建 spring-config.xml,把User实体类注入到Spring容器中
<?xml version="1.0" encoding="UTF-8"?><beans xmlns="http://www.springframework.org/schema/beans"xmlns:xsi="http://www.w3.org/2001/XMLSchema-instance"xsi:schemaLocation="http://www.springframework.org/schema/beanshttp://www.springframework.org/schema/beans/spring-beans.xsd"><bean id="user" class="com.zlp.spring.v1.entity.User"><property name="age" value="10" /><property name="userName" value="smile" /></bean></beans>
XmlUserTest 测试类
/*** XML容器测试类* @author Zou.LiPing* @date: 2021/2/24 17:13*/public class XmlUserTest {public static void main(String[] args) {ClassPathXmlApplicationContext ac = new ClassPathXmlApplicationContext("spring-config.xml");User user = ac.getBean("user", User.class);System.out.println(user.toString());}}
控制打印输出
User{userName='smile', age=10}
Annotation方案搭建 Spring容器
UserEntity 实体类
@Componentpublic class UserEntity {private String userName = "change";private Integer age = 28;@Overridepublic String toString() {return "User{" +"userName='" + userName + '\'' +", age=" + age +'}';}}
SpringConfig 配置类
@Configuration@ComponentScan("com.zlp.spring.v2")public class SpringConfig {}
AnnotationUserTest 测试类
/*** 注解测试类* @author Zou.LiPing* @date: 2021/2/24 17:13*/public class AnnotationUserTest {private static AnnotationConfigApplicationContext applicationContext;public static void main(String[] args) {applicationContext = new AnnotationConfigApplicationContext(SpringConfig.class);UserEntity user = applicationContext.getBean("userEntity", UserEntity.class);System.out.println(user.toString());// 打印注入Spring有哪些对象String[] beanDefinitionNames = applicationContext.getBeanDefinitionNames();for (String beanDefinitionName : beanDefinitionNames) {System.out.println(beanDefinitionName);}}}
控制打印输出
User{userName='change', age=28}
Spring 启动流程详解
执行流程图
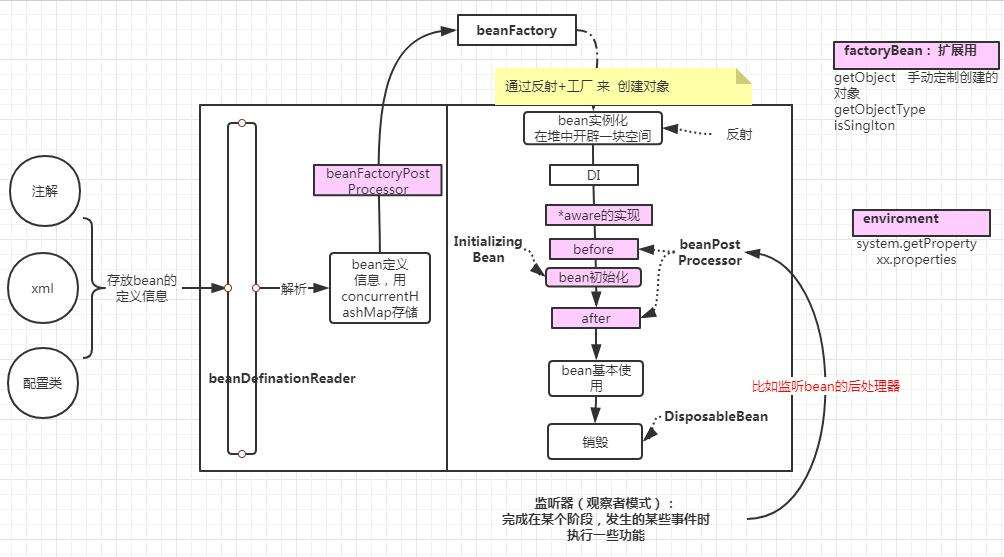 执行流程详解
- 加载 Bean 定义信息(xml 配置、注解、配置类);
- 解析 Bean 信息(BeanDefinitionReader 读取器 Bean 信息);
- 读取 Bean 定义信息,用 ConcurrentHashMap 存储(BeanDefinition 存放Bean 实例、作用域等);
- BeanFactoryPostProcessor 扩展接口(BeanDefinition 属性增强器,如 @Value(“${xxxx}”)替换);
- 通过反射来创建 Bean 对象信);
- 初始化对象(在堆中开辟新的空间→属性都是默认值);
- 如果该方法依赖其它的接口(@Autowired),通过 DI 注入(填充属性);
- *aware接口实现(设置aware接口属性);
- 如果实现了 BeanPostProcessor 接口(增强器,可以对方法前置和后置进行扩展);
- 前置增强器(postProcessBeforeInitialization 方法);
- Bean 初始化[init-method];
- 后置增强器(postProcessAfterInitialization 方法);
- Bean基本使用;
- 销毁(DisposableBean);

若有收获,就点个赞吧
0 人点赞
