- 1. 服务器架构图
- 2. 基础环境准备
- CN 浏览器使用该字段验证网站是否合法,一般写域名
- C: Country 国家
- ST State 州,省
- L Locality 地区 城市
- O Oraganizetion Name 组织名称 公司名称
- OU Oraganizetion Unit Name 组织单位名称 公司部门
- expiry 过期时间
- 2.4. 安装docker环境
- 2.5. 安装私有仓库harbor
- 2.6. 配置yaml文件目录树
- 3. master节点组件部署
- 需要修改的参数:
- 3.3. 安装apiserver组件
- hosts中将所有可能作为apiserver的ip添加进去,VIP 10.4.7.10 也要加入
- 3.3.3. 配置apiserver日志审计
- 3.3.4. 配置apiserver启动脚本
- 3.3.5. apiserver配置supervisor启动
- 3.3.6. apiserver配置四层代理
- 3.4. 安装controller-manager组件
- 3.5. 安装kube-scheduler组件
- 3.6. 检查节点组件的健康
- 4. node节点组件部署
- —hostname-override 需修改
- 4.2. 安装kube-proxy组件
- 可以用iptables-restore重新应用iptables规则,也可以直接再删
- 5.2.2. 交付coredns到k8s
- 5.2.3. 集群内测试DNS
- 5.3. Ingress-Controller
- ——-Deployment————————
- ———service———————-
- 5.4. dashboard图形化
1. 服务器架构图


| 主机名 | IP地址 | 角色 |
|---|---|---|
| hdss-11.host.com | 10.4.7.11 | LB,DNS |
| hdss-12.host.com | 10.4.7.12 | LB, ETCD |
| hdss-21.host.com | 10.4.7.21 | K8s Master, K8s Node, ETCD |
| hdss-22.host.com | 10.4.7.22 | K8s Master, K8s Node, ETCD |
| hdss-200.host.com | 10.4.7.200 | Harbor, NFS |
2. 基础环境准备
2.1. 基础安装
所有节点配置
# 关闭selinuxsed -i 's/SELINUX=.*/SELINUX=disabled/g' /etc/selinux/config# 关闭firewalld防火墙systemctl stop firewalld ;systemctl disable firewalld# 关闭NetworkManager服务systemctl stop NetworkManager ;systemctl disable NetworkManager# 删除基础yum源 新增阿里云yum源rm -f /etc/yum.repos.d/*curl -o /etc/yum.repos.d/CentOS-Base.repo http://mirrors.aliyun.com/repo/Centos-7.repoyum -y install epel-releaseyum clean all ; yum makecache# 安装基础yum -y install vim wget net-tools telnet tree nmap sysstat lrzsz dos2unix bind-utils# kubectl命令行自动补全(bash-completion) (可选)yum install bash-completion -y
2.2. 安装bind9 (DNS)
在节点hdss7-11.host.com安装bind9
2.2.1. 安装bind9
[root@hdss7-11 ~]# yum install -y bind[root@hdss7-11 ~]# rpm -qa bindbind-9.11.4-16.P2.el7_8.6.x86_64
2.2.2. 配置主配置文件
# 新增或修改以下配置信息[root@hdss7-11 ~]# vim /etc/named.confoptions {listen-on port 53 { 10.4.7.11; };# listen-on-v6 port 53 { ::1; };allow-query { any; };forwarders { 10.4.7.254; };recursion yes;dnssec-enable no;dnssec-validation no;};# 检查配置是否错误[root@hdss7-11 ~]# named-checkconf
2.2.3. 配置区域文件
增加两个zone配置, odl.com 为业务域 host,com.zone 为主机域
cat > /etc/named.rfc1912.zones <<EOFzone "host.com" IN {type master;file "host.com.zone";allow-update { 10.4.7.11; };};zone "odl.com" IN{type master;file "odl.com.zone";allow-update { 10.4.7.11; };};EOF
2.2.4. 配置主机域文件
配置文件中分号后面都是注释, 其中 serial的2020091701, 当有新的A记录添加,需要增加一位值,即2020091702
cat > /var/named/host.com.zone <<EOF$ORIGIN host.com.$TTL 600 ; 10 minutes@ IN SOA dns.host.com. dnsadmin.host.com. (2020091701 ; serial10800 ; refresh (3 hours)900 ; retry (15 minutes)604800 ; expire (1 week)86400 ; minimum (1 day))NS dns.host.com.$TTL 60 ; 1 minutedns A 10.4.7.11HDSS7-11 A 10.4.7.11HDSS7-12 A 10.4.7.12HDSS7-21 A 10.4.7.21HDSS7-22 A 10.4.7.22HDSS7-200 A 10.4.7.200EOF
2.2.5. 配置业务域文件
cat >/var/named/odl.com.zone<<EOF$ORIGIN odl.com.$TTL 600 ; 10 minutes@ IN SOA dns.odl.com. dnsadmin.odl.com. (2020091701 ; serial10800 ; refresh (3 hours)900 ; retry (15 minutes)604800 ; expire (1 week)86400 ; minimum (1 day))NS dns.odl.com.$TTL 60 ; 1 minutedns A 10.4.7.11EOF# 检查配置是否正常[root@hdss7-11 ~]# named-checkconf
2.2.6. 启动bind并检查是否解析成功
[root@hdss7-11 ~]# systemctl start named ; systemctl enable named# 检查是否解析成功[root@hdss7-11 !]# dig -t A hdss7-200.host.com @10.4.7.11 +short10.4.7.200[root@hdss7-11 !]# dig -t A hdss7-11.host.com @10.4.7.11 +short10.4.7.11
2.2.7. 修改各个主机DNS指向DNS
所有节点的操作
search 的设置可以将访问的后缀省略 即 访问hdss-7-200.host.com 可直接访问hdss-7-200
[root@hdss7-12 ~]# cat /etc/resolv.conf# Generated by NetworkManagersearch host.comnameserver 10.4.7.11# 测试是否成功测试[root@hdss7-12 ~]# ping hdss7-200PING HDSS7-200.host.com (10.4.7.200) 56(84) bytes of data.64 bytes from 10.4.7.200 (10.4.7.200): icmp_seq=1 ttl=64 time=0.578 ms64 bytes from 10.4.7.200 (10.4.7.200): icmp_seq=2 ttl=64 time=0.327 ms64 bytes from 10.4.7.200 (10.4.7.200): icmp_seq=3 ttl=64 time=0.345 ms
2.3 准备签发证书环境
在运维主机hdss7-200.host.com中部署
2.3.1 安装cfssl
[root@hdss7-200 ~]# wget https://pkg.cfssl.org/R1.2/cfssl_linux-amd64 -O /usr/local/bin/cfssl[root@hdss7-200 ~]# wget https://pkg.cfssl.org/R1.2/cfssljson_linux-amd64 -O /usr/local/bin/cfssl-json[root@hdss7-200 ~]# wget https://pkg.cfssl.org/R1.2/cfssl-certinfo_linux-amd64 -O /usr/local/bin/cfssl-certinfo[root@hdss7-200 ~]# chmod u+x /usr/local/bin/cfssl*[root@hdss7-200 ~]# ll /usr/local/bin/总用量 18808-rwxr--r--. 1 root root 10376657 3月 30 2016 cfssl-rwxr--r--. 1 root root 6595195 3月 30 2016 cfssl-certinfo-rwxr--r--. 1 root root 2277873 3月 30 2016 cfssl-json
2.3.2. 创建CA证书请求文件(csr)的JSON配置文件
[root@hdss7-200 ~]# mkdir /opt/certs ; cd /opt/certs[root@hdss7-200 certs]# vim ca-csr.json{"CN": "OldboyEdu","hosts": [],"key": {"algo": "rsa","size": 2048},"names": [{"C": "CN","ST": "beijing","L": "beijing","O": "odl","OU": "ops"}],"ca": {"expiry": "175200h"}}
CN 浏览器使用该字段验证网站是否合法,一般写域名
C: Country 国家
ST State 州,省
L Locality 地区 城市
O Oraganizetion Name 组织名称 公司名称
OU Oraganizetion Unit Name 组织单位名称 公司部门
expiry 过期时间
2.3.3. 生成CA证书和私钥
[root@hdss7-200 certs]# cfssl gencert -initca ca-csr.json | cfssl-json -bare ca2020/09/17 20:51:52 [INFO] generating a new CA key and certificate from CSR2020/09/17 20:51:52 [INFO] generate received request2020/09/17 20:51:52 [INFO] received CSR2020/09/17 20:51:52 [INFO] generating key: rsa-20482020/09/17 20:51:52 [INFO] encoded CSR2020/09/17 20:51:52 [INFO] signed certificate with serial number 295886028821387664475820071483087242159712639122[root@hdss7-200 certs]# ll总用量 16-rw-r--r--. 1 root root 993 9月 17 20:51 ca.csr-rw-r--r--. 1 root root 328 9月 17 20:51 ca-csr.json-rw-------. 1 root root 1679 9月 17 20:51 ca-key.pem #根证书私钥-rw-r--r--. 1 root root 1346 9月 17 20:51 ca.pem # 根证书
2.3.4. 查看证书时间
当接触一套新的K8s集群时候,使用cfssl-certinfo查看证书有效期还有多久,以免过期
[root@hdss7-200 certs]# cfssl-certinfo -cert ca.pem"serial_number": "174577544452067437880255882036172381106489948922","not_before": "2020-09-18T01:23:00Z","not_after": "2040-09-13T01:23:00Z",
2.4. 安装docker环境
hdss-200.host.com hdss-21.host.com hdss-22.host.com 注意一些配置上的不同
# 通过脚本下载yum源,安装docker[root@hdss7-200 ~]# curl -fsSL https://get.docker.com | bash -s docker --mirror Aliyun[root@hdss7-21 ~]# mkdir /etc/docker/# 不安全的registry中增加了harbor地址# 各个机器上bip网段不一致,bip中间两段与宿主机最后两段相同,目的是方便定位问题# 不同主机需要修改bip# 比如 hdss-200.host.com 为 172.7.200.1/24 方便问题出现可以排查问题[root@hdss7-21 ~]# vim /etc/docker/daemon.json{"graph": "/data/docker","storage-driver": "overlay2","insecure-registries": ["registry.access.redhat.com","quay.io","harbor.odl.com"],"registry-mirrors": ["https://4nxg9p7s.mirror.aliyuncs.com"],"bip": "172.7.21.1/24","exec-opts": ["native.cgroupdriver=systemd"],"live-restore": true}[root@hdss7-21 ~]# mkdir -p /data/docker[root@hdss7-21 ~]# systemctl start docker ; systemctl enable docker
2.5. 安装私有仓库harbor
hdss-200.host.com
2.5.1 准备harbor环境
[root@hdss7-200 ~]# tar -xf harbor-offline-installer-v2.0.2-rc1.tgz -C /opt/[root@hdss7-200 ~]# cd /opt# 做软链接方便以后进行升级[root@hdss7-200 opt]# mv harbor harbor-v2.0.2[root@hdss7-200 opt]# ln -s harbor-v2.0.2 harbor[root@hdss7-200 opt]# cd harbor[root@hdss7-200 harbor]# cp harbor.yml.tmpl harbor.yml# 注释https相关配置,否则安装时候报错# external_url必须,因为后面使用nginx反向代理harbor,需要配置该参数,否则在访问时候报错[root@hdss7-200 harbor]# vim harbor.ymlhostname: harbor.odl.comhttp:port: 180external_url: http://harbor.odl.com:80harbor_admin_password: Harbor12345data_volume: /data/harborlog:location: /data/harbor/logs# 创建harbor数据目录和日志目录[root@hdss7-200 harbor]# mkdir -p /data/harbor /data/harbor/logs
2.5.2. 安装docker-compose并安装harbor
在安装harbor的时候可—with-chartmuseum参数, 该参数会添加Helm-Charts仓库,详情可查看Helm章节 ./install.sh —with-chartmuseum
# daocloud 安装源[root@hdss7-200 harbor]# curl -L https://get.daocloud.io/docker/compose/releases/download/1.25.0/docker-compose-`uname -s`-`uname -m` > /usr/local/bin/docker-compose# 查看是否正常安装并赋予执行权限[root@hdss7-200 harbor]# ls -l /usr/local/bin/docker-compose-rw-r--r-- 1 root root 17031320 8月 2 16:25 /usr/local/bin/docker-compose[root@real-server-2 harbor]# chmod +x /usr/local/bin/docker-compose[root@hdss7-200 harbor]# docker-compose versiondocker-compose version 1.25.0, build 0a186604docker-py version: 4.1.0CPython version: 3.7.4OpenSSL version: OpenSSL 1.1.0l 10 Sep 2019[root@hdss7-200 harbor]# ./install.sh[Step 0]: checking if docker is installed ...Note: docker version: 19.03.12[Step 1]: checking docker-compose is installed ...Note: docker-compose version: 1.25.0[Step 2]: loading Harbor images ...Loaded image: goharbor/prepare:v2.0.2Loaded image: goharbor/harbor-jobservice:v2.0.2Loaded image: goharbor/harbor-registryctl:v2.0.2Loaded image: goharbor/registry-photon:v2.0.2Loaded image: goharbor/harbor-core:v2.0.2Loaded image: goharbor/notary-signer-photon:v2.0.2Loaded image: goharbor/clair-photon:v2.0.2Loaded image: goharbor/trivy-adapter-photon:v2.0.2Loaded image: goharbor/harbor-log:v2.0.2Loaded image: goharbor/nginx-photon:v2.0.2Loaded image: goharbor/clair-adapter-photon:v2.0.2Loaded image: goharbor/chartmuseum-photon:v2.0.2Loaded image: goharbor/harbor-portal:v2.0.2Loaded image: goharbor/harbor-db:v2.0.2Loaded image: goharbor/redis-photon:v2.0.2Loaded image: goharbor/notary-server-photon:v2.0.2[Step 3]: preparing environment ...[Step 4]: preparing harbor configs ...prepare base dir is set to /opt/harbor-v2.0.2WARNING:root:WARNING: HTTP protocol is insecure. Harbor will deprecate http protocol in the future. Please make sure to upgrade to httpsGenerated configuration file: /config/log/logrotate.confGenerated configuration file: /config/log/rsyslog_docker.confGenerated configuration file: /config/nginx/nginx.confGenerated configuration file: /config/core/envGenerated configuration file: /config/core/app.confGenerated configuration file: /config/registry/config.ymlGenerated configuration file: /config/registryctl/envGenerated configuration file: /config/registryctl/config.ymlGenerated configuration file: /config/db/envGenerated configuration file: /config/jobservice/envGenerated configuration file: /config/jobservice/config.ymlGenerated and saved secret to file: /data/secret/keys/secretkeySuccessfully called func: create_root_certGenerated configuration file: /compose_location/docker-compose.ymlClean up the input dir[Step 5]: starting Harbor ...Creating network "harbor-v202_harbor" with the default driverCreating harbor-log ... doneCreating registry ... doneCreating harbor-db ... doneCreating redis ... doneCreating harbor-portal ... doneCreating registryctl ... doneCreating harbor-core ... doneCreating harbor-jobservice ... doneCreating nginx ... done✔ ----Harbor has been installed and started successfully.----[root@hdss7-200 harbor]# docker-compose psName Command State Ports---------------------------------------------------------------------------------------------harbor-core /harbor/entrypoint.sh Up (healthy)harbor-db /docker-entrypoint.sh Up (healthy) 5432/tcpharbor-jobservice /harbor/entrypoint.sh Up (healthy)harbor-log /bin/sh -c /usr/local/bin/ ... Up (healthy) 127.0.0.1:1514->10514/tcpharbor-portal nginx -g daemon off; Up (healthy) 8080/tcpnginx nginx -g daemon off; Up (healthy) 0.0.0.0:180->8080/tcpredis redis-server /etc/redis.conf Up (healthy) 6379/tcpregistry /home/harbor/entrypoint.sh Up (healthy) 5000/tcpregistryctl /home/harbor/start.sh Up (healthy)# 设置开机启动[root@hdss7-200 ~]# vim /etc/rc.d/rc.local# start harborcd /opt/harbor//usr/bin/docker-compose stop/usr/bin/docker-compose start
2.5.3. 安装nginx
[root@hdss7-200 ~]# yum install nginx -y# 或者使用源码安装.当前源码安装[root@hdss7-200 ~]# vim /opt/nginx/conf/conf.d/harbor.odl.com.confserver {listen 80;server_name harbor.odl.com;# 避免出现上传失败的情况client_max_body_size 1000m;location / {proxy_pass http://127.0.0.1:180;}}[root@hdss7-200 ~]# /opt/nginx/sbin/nginx -t[root@hdss7-200 ~]# /opt/nginx/sbin/nginx
不添加client_max_body_size参数, 上传镜像时候会报错 error parsing HTTP 413 response body: invalid character ‘<’ looking for beginning of value: “\r\n\r\n\r\n
\r\n 413 Request Entity Too Large
nginx/1.16.1 \r\n\r\n\r\n”
2.5.4. 配置hdss7-11的DNS配置
serial 序列号需要滚动一位,即 2020091701 —> 2020091702 新增harbor.odl.com 的A记录
[root@hdss7-11 ~]# vim /var/named/odl.com.zone$ORIGIN odl.com.$TTL 600 ; 10 minutes@ IN SOA dns.odl.com. dnsadmin.odl.com. (2020091702 ; serial10800 ; refresh (3 hours)900 ; retry (15 minutes)604800 ; expire (1 week)86400 ; minimum (1 day))NS dns.odl.com.$TTL 60 ; 1 minutedns A 10.4.7.11harbor A 10.4.7.200[root@hdss7-11 ~]# systemctl restart named[root@hdss7-11 ~]# dig -t A harbor.odl.com +short10.4.7.200
2.5.5. 下载nginx镜像上传至harbor
前提需要: 需要在harbor目录上创建public创建项目, 否则上传会失败 harbor初始登录账号 admin Harbor12345
[root@hdss7-200 ~]# docker pull nginx:1.7.9[root@hdss7-200 ~]# docker tag nginx:1.7.9 harbor.odl.com/public/nginx:v1.7.9[root@hdss7-200 ~]# docker login harbor.odl.comUsername: adminPassword: Harbor12345[root@hdss7-200 ~]# docker push harbor.odl.com/public/nginx:v1.7.9

2.6. 配置yaml文件目录树
在hdss7-200的nginx中配置yaml数目录, 后期通过http方式去使用yaml清单文件
2.6.1. 配置nginx虚拟主机
[root@hdss7-200 ~]# vim /etc/nginx/conf.d/k8s-yaml.odl.com.comfserver {listen 80;server_name k8s-yaml.odl.com;location / {autoindex on;default_type text/plain;root /data/k8s-yaml;}}[root@hdss7-200 ~]# mkdir /data/k8s-yaml
2.6.2. 配置DNS解析
[root@hdss7-11 ~]# vim /var/named/odl.com.zone$ORIGIN odl.com.$TTL 600 ; 10 minutes@ IN SOA dns.odl.com. dnsadmin.odl.com. (2020091705 ; serial10800 ; refresh (3 hours)900 ; retry (15 minutes)604800 ; expire (1 week)86400 ; minimum (1 day))NS dns.odl.com.$TTL 60 ; 1 minutedns A 10.4.7.11harbor A 10.4.7.200k8s-yaml A 10.4.7.200[root@hdss7-11 ~]# systemctl restart named

3. master节点组件部署
| 主机名 | 角色 | IP |
|---|---|---|
| hdss7-12.host.com | etcd lead | 10.4.7.12 |
| hdss7-21.host.com | etcd follow | 10.4.7.21 |
| hdss7-22.host.com | etcd follow | 10.4.7.22 |
- server 表示服务端连接客户端时携带的证书,用于客户端验证服务端身份
- client 表示客户端连接服务端时携带的证书,用于服务端验证客户端身份
- peer 表示相互之间连接时使用的证书,如etcd节点之间验证
3.1 创建所需证书
3.1.1. 创建基于根证书的config配置文件
在hdss7-200 操作
[root@hdss7-200 ~]# vim /opt/certs/ca-config.json{"signing": {"default": {"expiry": "175200h"},"profiles": {"server": {"expiry": "175200h","usages": ["signing","key encipherment","server auth"]},"client": {"expiry": "175200h","usages": ["signing","key encipherment","client auth"]},"peer": {"expiry": "175200h","usages": ["signing","key encipherment","server auth","client auth"]}}}}
3.1.2. 创建etcd证书配置:/opt/certs/etcd-peer-csr.json
[root@hdss7-200 ~]# vim /opt/certs/etcd-peer-csr.json{"CN": "k8s-etcd","hosts": ["10.4.7.11","10.4.7.12","10.4.7.21","10.4.7.22"],"key": {"algo": "rsa","size": 2048},"names": [{"C": "CN","ST": "beijing","L": "beijing","O": "odl","OU": "ops"}]}
3.1.3. 签发证书
[root@hdss7-200 ~]# cd /opt/certs/[root@hdss7-200 certs]# cfssl gencert -ca=ca.pem -ca-key=ca-key.pem -config=ca-config.json -profile=peer etcd-peer-csr.json |cfssl-json -bare etcd-peer2020/09/18 21:35:54 [INFO] generate received request2020/09/18 21:35:54 [INFO] received CSR2020/09/18 21:35:54 [INFO] generating key: rsa-20482020/09/18 21:35:54 [INFO] encoded CSR2020/09/18 21:35:54 [INFO] signed certificate with serial number 3373869945414401795941562634150595358135029484332020/09/18 21:35:54 [WARNING] This certificate lacks a "hosts" field. This makes it unsuitable forwebsites. For more information see the Baseline Requirements for the Issuance and Managementof Publicly-Trusted Certificates, v.1.1.6, from the CA/Browser Forum (https://cabforum.org);specifically, section 10.2.3 ("Information Requirements").[root@hdss7-200 certs]# ll总用量 36-rw-r--r--. 1 root root 836 9月 18 17:59 ca-config.json-rw-r--r--. 1 root root 997 9月 18 09:28 ca.csr-rw-r--r--. 1 root root 329 9月 18 09:28 ca-csr.json-rw-------. 1 root root 1679 9月 18 09:28 ca-key.pem-rw-r--r--. 1 root root 1346 9月 18 09:28 ca.pem-rw-r--r--. 1 root root 1066 9月 18 21:35 etcd-peer.csr-rw-r--r--. 1 root root 364 9月 18 21:34 etcd-peer-csr.json-rw-------. 1 root root 1675 9月 18 21:35 etcd-peer-key.pem-rw-r--r--. 1 root root 1432 9月 18 21:35 etcd-peer.pem
3.2. 安装etcd组件
涉及:hdss7-12,hdss7-21,hdss7-22 , etcd启动
下载地址: https://github.com/etcd-io/etcd/releases/tag/v3.1.20
当前ectd版本: etcd-v3.1.20-linux-amd64.tar.gz
3.2.1. 准备etcd组件
# 创建etcd用户[root@hdss7-12 ~]# useradd -M -s /sbin/nologin etcd# 解压etcd[root@hdss7-12 ~]# cd /opt; tar -xf etcd-v3.1.20-linux-amd64.tar.gz[root@hdss7-12 opt]# mv etcd-v3.1.20-linux-amd64 etcd-v3.1.20[root@hdss7-12 opt]# ln -s etcd-v3.1.20 etcd[root@hdss7-12 opt]# mkdir -p /opt/etcd/certs /data/etcd /data/logs/etcd-server[root@hdss7-12 opt]# scp hdss7-200:/opt/certs/{ca.pem,etcd-peer.pem,etcd-peer-key.pem} /opt/etcd/certs/[root@hdss7-12 opt]# ll /opt/etcd/certs/总用量 12-rw-r--r--. 1 root root 1346 9月 18 21:49 ca.pem-rw-------. 1 root root 1675 9月 18 21:49 etcd-peer-key.pem-rw-r--r--. 1 root root 1432 9月 18 21:49 etcd-peer.pem
3.2.2. 设置etcd启动脚本
需要修改的参数:
name listen-peer-urls listen-client-urls initial-advertise-peer-urls advertise-client-urls
[root@hdss7-12 ~ ]# vim /opt/etcd/etcd-server-startup.sh#!/bin/sh# listen-peer-urls etcd节点之间通信端口# listen-client-urls 客户端与etcd通信端口# quota-backend-bytes 配额大小WORK_DIR=$(dirname $(readlink -f $0))[ $? -eq 0 ] && cd $WORK_DIR || exit/opt/etcd/etcd --name etcd-server-7-12 \--data-dir /data/etcd/etcd-server \--listen-peer-urls https://10.4.7.12:2380 \--listen-client-urls https://10.4.7.12:2379,http://127.0.0.1:2379 \--quota-backend-bytes 8000000000 \--initial-advertise-peer-urls https://10.4.7.12:2380 \--advertise-client-urls https://10.4.7.12:2379,http://127.0.0.1:2379 \--initial-cluster etcd-server-7-12=https://10.4.7.12:2380,etcd-server-7-21=https://10.4.7.21:2380,etcd-server-7-22=https://10.4.7.22:2380 \--ca-file ./certs/ca.pem \--cert-file ./certs/etcd-peer.pem \--key-file ./certs/etcd-peer-key.pem \--client-cert-auth \--trusted-ca-file ./certs/ca.pem \--peer-ca-file ./certs/ca.pem \--peer-cert-file ./certs/etcd-peer.pem \--peer-key-file ./certs/etcd-peer-key.pem \--peer-client-cert-auth \--peer-trusted-ca-file ./certs/ca.pem \--log-output stdout
3.2.3. 启动etcd
采用后台管理工具 supervisor
当没指定下列两个参数,在停止服务的时候并不会杀死子进程,只会杀死父进程
stopasgroup=true ; 停止父进程和子进程
killasgroup=true ; 杀死父进程和子进程
# 修改目录权限[root@hdss7-12 ~]# chmod u+x /opt/etcd/etcd-server-startup.sh[root@hdss7-12 ~]# chown -R etcd:etcd /opt/etcd /opt/etcd-v3.1.20 /data/etcd/ /data/logs/etcd-server/[root@hdss7-12 ~]# yum install -y supervisor[root@hdss7-12 ~]# systemctl start supervisord ; systemctl enable supervisord[root@hdss7-12 ~]# vim /etc/supervisord.d/etcd-server.ini[program:etcd-server-7-12]command=/opt/etcd/etcd-server-startup.sh ; the program (relative uses PATH, can take args)numprocs=1 ; number of processes copies to start (def 1)directory=/opt/etcd ; directory to cwd to before exec (def no cwd)autostart=true ; start at supervisord start (default: true)autorestart=true ; retstart at unexpected quit (default: true)startsecs=30 ; number of secs prog must stay running (def. 1)startretries=3 ; max # of serial start failures (default 3)exitcodes=0,2 ; 'expected' exit codes for process (default 0,2)stopsignal=QUIT ; signal used to kill process (default TERM)stopwaitsecs=10 ; max num secs to wait b4 SIGKILL (default 10)user=etcd ; setuid to this UNIX account to run the programredirect_stderr=true ; redirect proc stderr to stdout (default false)stdout_logfile=/data/logs/etcd-server/etcd.stdout.log ; stdout log path, NONE for none; default AUTOstdout_logfile_maxbytes=64MB ; max # logfile bytes b4 rotation (default 50MB)stdout_logfile_backups=5 ; # of stdout logfile backups (default 10)stdout_capture_maxbytes=1MB ; number of bytes in 'capturemode' (default 0)stdout_events_enabled=false ; emit events on stdout writes (default false)stopasgroup=truekillasgroup=true# 加入到supervisorctl后会自动启动[root@hdss7-12 ~]# supervisorctl updateetcd-server-7-12: added process group[root@hdss7-12 ~]# supervisorctl start etcd-server-7-12[root@hdss7-12 ~]# supervisorctl statusetcd-server-7-12 RUNNING pid 30305, uptime 0:00:41
3.2.4. 检查etcd集群情况
当只部署了一个etcd节点的时候会报错,因无法连接其他节点
# 查看节点成员[root@hdss7-12 ~]# /opt/etcd/etcdctl member listclient: etcd cluster is unavailable or misconfigured; error #0: client: endpoint http://127.0.0.1:2379 exceeded header timeout; error #1: dial tcp 127.0.0.1:4001: getsockopt: connection refused# 查看集群健康[root@hdss7-12 ~]# /opt/etcd/etcdctl cluster-healthcluster may be unhealthy: failed to list membersError: client: etcd cluster is unavailable or misconfigured; error #0: dial tcp 127.0.0.1:4001: getsockopt: connection refused; error #1: client: endpoint http://127.0.0.1:2379 exceeded header timeouterror #0: dial tcp 127.0.0.1:4001: getsockopt: connection refusederror #1: client: endpoint http://127.0.0.1:2379 exceeded header timeout
当正常部署两台以上节点时,(此处已将hdss7-12 hdss7-21 hdss-22 的etcd部署完毕)
# 查看节点成员[root@hdss7-12 ~]# /opt/etcd/etcdctl member list988139385f78284: name=etcd-server-7-22 peerURLs=https://10.4.7.22:2380 clientURLs=http://127.0.0.1:2379,https://10.4.7.22:2379 isLeader=false5a0ef2a004fc4349: name=etcd-server-7-21 peerURLs=https://10.4.7.21:2380 clientURLs=http://127.0.0.1:2379,https://10.4.7.21:2379 isLeader=falsef4a0cb0a765574a8: name=etcd-server-7-12 peerURLs=https://10.4.7.12:2380 clientURLs=http://127.0.0.1:2379,https://10.4.7.12:2379 isLeader=true# 查看集群健康[root@hdss7-12 ~]# /opt/etcd/etcdctl cluster-healthmember 988139385f78284 is healthy: got healthy result from http://127.0.0.1:2379member 5a0ef2a004fc4349 is healthy: got healthy result from http://127.0.0.1:2379member f4a0cb0a765574a8 is healthy: got healthy result from http://127.0.0.1:2379cluster is healthy
关停一个节点,但无法显示正确的健康状态,可使用以下命令
- 当关停10.4.7.12后, 常用命令还是显示healthy# ./etcdctl cluster-healthmember 988139385f78284 is healthy: got healthy result from http://127.0.0.1:2379member 5a0ef2a004fc4349 is healthy: got healthy result from http://127.0.0.1:2379member f4a0cb0a765574a8 is healthy: got healthy result from http://127.0.0.1:2379cluster is healthy- 解决办法# ETCDCTL_API=3 /opt/etcd/etcdctl --endpoints=https://10.4.7.12:2379,https://10.4.7.21:2379,https://10.4.7.22:2379 --cacert=/opt/etcd/certs/ca.pem --cert=/opt/etcd/certs/etcd-peer.pem --key=/opt/etcd/certs/etcd-peer-key.pem endpoint health --write-out=table2020-11-16 09:45:07.452263 I | warning: ignoring ServerName for user-provided CA for backwards compatibility is deprecated2020-11-16 09:45:07.452773 I | warning: ignoring ServerName for user-provided CA for backwards compatibility is deprecated2020-11-16 09:45:07.453196 I | warning: ignoring ServerName for user-provided CA for backwards compatibility is deprecatedhttps://10.4.7.21:2379 is healthy: successfully committed proposal: took = 2.849422mshttps://10.4.7.22:2379 is healthy: successfully committed proposal: took = 3.636646mshttps://10.4.7.12:2379 is unhealthy: failed to connect: grpc: timed out when dialing- 警告信息warning将在 etcd 3.2版本取消, 但在apiserver日志中显示
3.3. 安装apiserver组件
涉及到主机 hdss-21 hdss-22 root启动
kubernetes当前版本为1.15.3
科学上网下载: https://dl.k8s.io/v1.15.3/kubernetes-server-linux-amd64.tar.gz
当前压缩包包含了kubernetes集群所需的所有必要组件
3.3.1. 准备apiserver环境
创建kubernetes目录,方便升级
[root@hdss7-21 opt]# tar -xf kubernetes-server-linux-amd64.tar.gz -C /opt/[root@hdss7-21 opt]# mv kubernetes/ kubernetes-1.15.3[root@hdss7-21 opt]# ln -s kubernetes-1.15.3 kubernetes
解压后kubernetes目录下有kubernetes的源码包和docker的压缩包,可删除 ```bash [root@hdss7-21 opt]# rm -f /opt/kubernetes/kubernetes-src.tar.gz [root@hdss7-21 opt]# rm -f /opt/kubernetes/server/bin/.tar /opt/kubernetes/server/bin/_tag
[root@hdss7-21 opt]# ll /opt/kubernetes/server/bin/ 总用量 884764 -rwxr-xr-x. 1 root root 43534816 8月 19 2019 apiextensions-apiserver -rwxr-xr-x. 1 root root 100569120 8月 19 2019 cloud-controller-manager -rwxr-xr-x. 1 root root 200681104 8月 19 2019 hyperkube -rwxr-xr-x. 1 root root 40186304 8月 19 2019 kubeadm -rwxr-xr-x. 1 root root 164522400 8月 19 2019 kube-apiserver -rwxr-xr-x. 1 root root 116421664 8月 19 2019 kube-controller-manager -rwxr-xr-x. 1 root root 42985504 8月 19 2019 kubectl -rwxr-xr-x. 1 root root 119645232 8月 19 2019 kubelet -rwxr-xr-x. 1 root root 36987488 8月 19 2019 kube-proxy -rwxr-xr-x. 1 root root 38786144 8月 19 2019 kube-scheduler -rwxr-xr-x. 1 root root 1648224 8月 19 2019 mounter
<a name="96JUl"></a>### 3.3.2. 签发证书> 签发证书涉及的服务器: hdss7-200<a name="7dlwu"></a>#### 3.3.2.1. 签发client证书(apiserver和etcd通信证书)```bash[root@hdss7-200 ~]# cd /opt/certs/[root@hdss7-200 certs]# vim /opt/certs/client-csr.json{"CN": "k8s-node","hosts": [],"key": {"algo": "rsa","size": 2048},"names": [{"C": "CN","ST": "beijing","L": "beijing","O": "od","OU": "ops"}]}[root@hdss7-200 certs]# cfssl gencert -ca=ca.pem -ca-key=ca-key.pem -config=ca-config.json -profile=client client-csr.json |cfssl-json -bare client2020/01/06 13:42:47 [INFO] generate received request2020/01/06 13:42:47 [INFO] received CSR2020/01/06 13:42:47 [INFO] generating key: rsa-20482020/01/06 13:42:47 [INFO] encoded CSR2020/01/06 13:42:47 [INFO] signed certificate with serial number 2682763809834420216560202689269319736843132605432020/01/06 13:42:47 [WARNING] This certificate lacks a "hosts" field. This makes it unsuitable forwebsites. For more information see the Baseline Requirements for the Issuance and Managementof Publicly-Trusted Certificates, v.1.1.6, from the CA/Browser Forum (https://cabforum.org);specifically, section 10.2.3 ("Information Requirements").[root@hdss7-200 certs]# ls client* -l-rw-r--r-- 1 root root 993 Jan 6 13:42 client.csr-rw-r--r-- 1 root root 280 Jan 6 13:42 client-csr.json-rw------- 1 root root 1679 Jan 6 13:42 client-key.pem-rw-r--r-- 1 root root 1363 Jan 6 13:42 client.pem
3.3.2.2. 签发server证书(apiserver和其他k8s组件通信使用)
hosts中将所有可能作为apiserver的ip添加进去,VIP 10.4.7.10 也要加入
[root@hdss7-200 certs]# vim /opt/certs/apiserver-csr.json{"CN": "k8s-apiserver","hosts": ["127.0.0.1","192.168.0.1","kubernetes.default","kubernetes.default.svc","kubernetes.default.svc.cluster","kubernetes.default.svc.cluster.local","10.4.7.10","10.4.7.21","10.4.7.22","10.4.7.23"],"key": {"algo": "rsa","size": 2048},"names": [{"C": "CN","ST": "beijing","L": "beijing","O": "od","OU": "ops"}]}[root@hdss7-200 certs]# cfssl gencert -ca=ca.pem -ca-key=ca-key.pem -config=ca-config.json -profile=server apiserver-csr.json |cfssl-json -bare apiserver2020/01/06 13:46:56 [INFO] generate received request2020/01/06 13:46:56 [INFO] received CSR2020/01/06 13:46:56 [INFO] generating key: rsa-20482020/01/06 13:46:56 [INFO] encoded CSR2020/01/06 13:46:56 [INFO] signed certificate with serial number 5730766913863758930937275548612955292190044738722020/01/06 13:46:56 [WARNING] This certificate lacks a "hosts" field. This makes it unsuitable forwebsites. For more information see the Baseline Requirements for the Issuance and Managementof Publicly-Trusted Certificates, v.1.1.6, from the CA/Browser Forum (https://cabforum.org);specifically, section 10.2.3 ("Information Requirements").[root@hdss7-200 certs]# ls apiserver* -l-rw-r--r-- 1 root root 1249 Jan 6 13:46 apiserver.csr-rw-r--r-- 1 root root 566 Jan 6 13:45 apiserver-csr.json-rw------- 1 root root 1675 Jan 6 13:46 apiserver-key.pem-rw-r--r-- 1 root root 1598 Jan 6 13:46 apiserver.pem
3.3.2.3. 证书下发至对应主机目录
前提已免密钥登录, 涉及到hdss7-21 hdss7-22 hdss7-200
[root@hdss7-21 ~]# mkdir /opt/kubernetes/server/bin/certs[root@hdss7-21 ~]# scp hdss7-200:/opt/certs/{apiserver-key.pem,apiserver.pem,ca-key.pem,ca.pem,client-key.pem,client.pem} /opt/kubernetes/server/bin/certs/[root@hdss7-22 ~]# mkdir /opt/kubernetes/server/bin/certs[root@hdss7-22 ~]# scp hdss7-200:/opt/certs/{apiserver-key.pem,apiserver.pem,ca-key.pem,ca.pem,client-key.pem,client.pem} /opt/kubernetes/server/bin/certs/
3.3.3. 配置apiserver日志审计
aipserver 涉及的服务器:hdss7-21,hdss7-22
[root@hdss7-21 bin]# mkdir /opt/kubernetes/conf[root@hdss7-21 bin]# vi /opt/kubernetes/conf/audit.yaml # 打开文件后,设置 :set paste,避免自动缩进apiVersion: audit.k8s.io/v1beta1 # This is required.kind: Policy# Don't generate audit events for all requests in RequestReceived stage.omitStages:- "RequestReceived"rules:# Log pod changes at RequestResponse level- level: RequestResponseresources:- group: ""# Resource "pods" doesn't match requests to any subresource of pods,# which is consistent with the RBAC policy.resources: ["pods"]# Log "pods/log", "pods/status" at Metadata level- level: Metadataresources:- group: ""resources: ["pods/log", "pods/status"]# Don't log requests to a configmap called "controller-leader"- level: Noneresources:- group: ""resources: ["configmaps"]resourceNames: ["controller-leader"]# Don't log watch requests by the "system:kube-proxy" on endpoints or services- level: Noneusers: ["system:kube-proxy"]verbs: ["watch"]resources:- group: "" # core API groupresources: ["endpoints", "services"]# Don't log authenticated requests to certain non-resource URL paths.- level: NoneuserGroups: ["system:authenticated"]nonResourceURLs:- "/api*" # Wildcard matching.- "/version"# Log the request body of configmap changes in kube-system.- level: Requestresources:- group: "" # core API groupresources: ["configmaps"]# This rule only applies to resources in the "kube-system" namespace.# The empty string "" can be used to select non-namespaced resources.namespaces: ["kube-system"]# Log configmap and secret changes in all other namespaces at the Metadata level.- level: Metadataresources:- group: "" # core API groupresources: ["secrets", "configmaps"]# Log all other resources in core and extensions at the Request level.- level: Requestresources:- group: "" # core API group- group: "extensions" # Version of group should NOT be included.# A catch-all rule to log all other requests at the Metadata level.- level: Metadata# Long-running requests like watches that fall under this rule will not# generate an audit event in RequestReceived.omitStages:- "RequestReceived"
3.3.4. 配置apiserver启动脚本
aipserver 涉及的服务器:hdss7-21,hdss7-22
配置解析 https://kubernetes.io/zh/docs/reference/command-line-tools-reference/kube-apiserver/
[root@hdss7-21 bin]# vim /opt/kubernetes/server/bin/kube-apiserver-startup.sh#!/bin/bashWORK_DIR=$(dirname $(readlink -f $0))[ $? -eq 0 ] && cd $WORK_DIR || exit/opt/kubernetes/server/bin/kube-apiserver \--apiserver-count 2 \--audit-log-path /data/logs/kubernetes/kube-apiserver/audit-log \--audit-policy-file ../../conf/audit.yaml \--authorization-mode RBAC \--client-ca-file ./certs/ca.pem \--requestheader-client-ca-file ./certs/ca.pem \--enable-admission-plugins NamespaceLifecycle,LimitRanger,ServiceAccount,DefaultStorageClass,DefaultTolerationSeconds,MutatingAdmissionWebhook,ValidatingAdmissionWebhook,ResourceQuota \--etcd-cafile ./certs/ca.pem \--etcd-certfile ./certs/client.pem \--etcd-keyfile ./certs/client-key.pem \--etcd-servers https://10.4.7.12:2379,https://10.4.7.21:2379,https://10.4.7.22:2379 \--service-account-key-file ./certs/ca-key.pem \--service-cluster-ip-range 192.168.0.0/16 \--service-node-port-range 3000-29999 \--target-ram-mb=1024 \--kubelet-client-certificate ./certs/client.pem \--kubelet-client-key ./certs/client-key.pem \--log-dir /data/logs/kubernetes/kube-apiserver \--tls-cert-file ./certs/apiserver.pem \--tls-private-key-file ./certs/apiserver-key.pem \--v 2# 创建apiserver日志目录[root@hdss7-21 bin]# mkdir -p /data/logs/kubernetes/kube-apiserver/[root@hdss7-21 bin]# chmod u+x /opt/kubernetes/server/bin/kube-apiserver-startup.sh
3.3.5. apiserver配置supervisor启动
涉及的服务器:hdss7-21,hdss7-22
- 注意名称需要变更
[root@hdss7-21 bin]# vim /etc/supervisord.d/kube-apiserver.ini[program:kube-apiserver-7-21]command=/opt/kubernetes/server/bin/kube-apiserver-startup.shnumprocs=1directory=/opt/kubernetes/server/binautostart=trueautorestart=truestartsecs=30startretries=3exitcodes=0,2stopsignal=QUITstopwaitsecs=10user=rootredirect_stderr=truestdout_logfile=/data/logs/kubernetes/kube-apiserver/apiserver.stdout.logstdout_logfile_maxbytes=64MBstdout_logfile_backups=5stdout_capture_maxbytes=1MBstdout_events_enabled=falsestopasgroup=truekillasgroup=true[root@hdss7-21 bin]# supervisorctl update[root@hdss7-21 bin]# supervisorctl statusetcd-server-7-21 RUNNING pid 35582, uptime 1 day, 0:57:12kube-apiserver-7-21 RUNNING pid 37301, uptime 0:00:34tcp 0 0 127.0.0.1:8080 0.0.0.0:* LISTEN 37305/kube-apiservetcp6 0 0 :::6443 :::* LISTEN 37305/kube-apiserve
3.3.6. apiserver配置四层代理
代理涉及的服务器:hdss7-11,hdss7-12
3.3.6.1. 安装nginx并配置
- 可以yum安装nginx, 也可以源码安装nginx (需要添加—with-stream模块)
[root@hdss7-11 ~]# yum install -y nginx[root@hdss7-11 ~]# vim /etc/nginx/nginx.conf# 末尾加上以下内容,stream 只能加在 main 中# 此处只是简单配置下nginx,实际生产中,建议进行更合理的配置# 配置时候可修改log地址stream {log_format proxy '$time_local|$remote_addr|$upstream_addr|$protocol|$status|''$session_time|$upstream_connect_time|$bytes_sent|$bytes_received|''$upstream_bytes_sent|$upstream_bytes_received' ;upstream kube-apiserver {server 10.4.7.21:6443 max_fails=3 fail_timeout=30s;server 10.4.7.22:6443 max_fails=3 fail_timeout=30s;}server {listen 7443;proxy_connect_timeout 2s;proxy_timeout 900s;proxy_pass kube-apiserver;access_log /var/log/nginx/proxy.log proxy;}}[root@hdss7-11 ~]# systemctl start nginx; systemctl enable nginx[root@hdss7-11 ~]# curl 127.0.0.1:7443 # 测试几次Client sent an HTTP request to an HTTPS server.[root@hdss7-11 ~]# cat /var/log/nginx/proxy.log20/Sep/2020:18:43:03 +0800|127.0.0.1|10.4.7.21:6443|TCP|200|0.002|0.001|76|78|78|7620/Sep/2020:18:43:04 +0800|127.0.0.1|10.4.7.22:6443|TCP|200|0.001|0.000|76|78|78|7620/Sep/2020:18:43:05 +0800|127.0.0.1|10.4.7.21:6443|TCP|200|0.003|0.001|76|78|78|7620/Sep/2020:18:43:05 +0800|127.0.0.1|10.4.7.22:6443|TCP|200|0.001|0.001|76|78|78|7620/Sep/2020:18:43:05 +0800|127.0.0.1|10.4.7.21:6443|TCP|200|0.001|0.001|76|78|78|76
3.3.6.2. 安装keepalived保证nginx高可用
涉及的服务器:hdss7-11,hdss7-12
安装keepalived,并配置nginx高可用脚本
[root@hdss7-11 ~]# yum install -y keepalived[root@hdss7-11 ~]# vim /etc/keepalived/check_port.sh # 配置检查脚本#!/bin/bashif [ $# -eq 1 ] && [[ $1 =~ ^[0-9]+ ]];then[ $(netstat -lntp|grep ":$1 " |wc -l) -eq 0 ] && echo "[ERROR] nginx may be not running!" && exit 1 || exit 0elseecho "[ERROR] need one port!"exit 1fi[root@hdss7-11 ~]# chmod +x /etc/keepalived/check_port.sh
配置主节点
该主节点必须加入nopreempt参数, 不能让VIP飘逸
[root@hdss7-11 ~]# vim /etc/keepalived/keepalived.conf! Configuration File for keepalivedglobal_defs {router_id 10.4.7.11}vrrp_script chk_nginx {script "/etc/keepalived/check_port.sh 7443"interval 2weight -20}vrrp_instance VI_1 {state MASTERinterface ens33virtual_router_id 251priority 100advert_int 1mcast_src_ip 10.4.7.11nopreemptauthentication {auth_type PASSauth_pass 11111111}track_script {chk_nginx}virtual_ipaddress {10.4.7.10}}
配置备用节点
[root@hdss7-12 ~]# vim /etc/keepalived/keepalived.conf! Configuration File for keepalivedglobal_defs {router_id 10.4.7.12}vrrp_script chk_nginx {script "/etc/keepalived/check_port.sh 7443"interval 2weight -20}vrrp_instance VI_1 {state BACKUPinterface ens33virtual_router_id 251mcast_src_ip 10.4.7.12priority 90advert_int 1authentication {auth_type PASSauth_pass 11111111}track_script {chk_nginx}virtual_ipaddress {10.4.7.10}}
-
3.4. 安装controller-manager组件
涉及的服务器:hdss7-21,hdss7-2
只要有一个节点存活, controller-manager的状态仍然为”OK”, 仍然会为集群提供服务
controller-manager 设置为只调用当前机器的 apiserver,走127.0.0.1网卡,因此不配制SSL证书
3.4.1. 配置controller-manager启动脚本
[root@hdss7-21 ~]# vim /opt/kubernetes/server/bin/kube-controller-manager-startup.sh#!/bin/shWORK_DIR=$(dirname $(readlink -f $0))[ $? -eq 0 ] && cd $WORK_DIR || exit/opt/kubernetes/server/bin/kube-controller-manager \--cluster-cidr 172.7.0.0/16 \--leader-elect true \--log-dir /data/logs/kubernetes/kube-controller-manager \--master http://127.0.0.1:8080 \--service-account-private-key-file ./certs/ca-key.pem \--service-cluster-ip-range 192.168.0.0/16 \--root-ca-file ./certs/ca.pem \--v 2[root@hdss7-21 ~]# mkdir -p /data/logs/kubernetes/kube-controller-manager[root@hdss7-21 ~]# chmod u+x /opt/kubernetes/server/bin/kube-controller-manager-startup.sh
3.4.2. 配置supervisor启动
注意名字的修改
[root@hdss7-21 ~]# vim /etc/supervisord.d/kube-controller-manager.ini[program:kube-controller-manager-7-21]command=/opt/kubernetes/server/bin/kube-controller-manager-startup.sh ; the program (relative uses PATH, can take args)numprocs=1 ; number of processes copies to start (def 1)directory=/opt/kubernetes/server/bin ; directory to cwd to before exec (def no cwd)autostart=true ; start at supervisord start (default: true)autorestart=true ; retstart at unexpected quit (default: true)startsecs=30 ; number of secs prog must stay running (def. 1)startretries=3 ; max # of serial start failures (default 3)exitcodes=0,2 ; 'expected' exit codes for process (default 0,2)stopsignal=QUIT ; signal used to kill process (default TERM)stopwaitsecs=10 ; max num secs to wait b4 SIGKILL (default 10)user=root ; setuid to this UNIX account to run the programredirect_stderr=true ; redirect proc stderr to stdout (default false)stdout_logfile=/data/logs/kubernetes/kube-controller-manager/controller.stdout.log ; stderr log path, NONE for none; default AUTOstdout_logfile_maxbytes=64MB ; max # logfile bytes b4 rotation (default 50MB)stdout_logfile_backups=4 ; # of stdout logfile backups (default 10)stdout_capture_maxbytes=1MB ; number of bytes in 'capturemode' (default 0)stdout_events_enabled=false ; emit events on stdout writes (default false)stopasgroup=truekillasgroup=true
[root@hdss7-21 ~]# supervisorctl update[root@hdss7-21 ~]# supervisorctl statusetcd-server-7-21 RUNNING pid 35582, uptime 1 day, 3:45:02kube-apiserver-7-21 RUNNING pid 37301, uptime 2:48:24kube-controller-manager-7-21 RUNNING pid 37496, uptime 0:01:06
3.5. 安装kube-scheduler组件
kube-scheduler 涉及的服务器:hdss7-21,hdss7-22
kube-scheduler 设置为只调用当前机器的 apiserver,走127.0.0.1网卡,因此不配制SSL证书
3.5.1. 配置kube-scheduler启动脚本
[root@hdss7-21 ~]# vim /opt/kubernetes/server/bin/kube-scheduler-startup.sh#!/bin/shWORK_DIR=$(dirname $(readlink -f $0))[ $? -eq 0 ] && cd $WORK_DIR || exit/opt/kubernetes/server/bin/kube-scheduler \--leader-elect \--log-dir /data/logs/kubernetes/kube-scheduler \--master http://127.0.0.1:8080 \--v 2[root@hdss7-21 ~]# chmod u+x /opt/kubernetes/server/bin/kube-scheduler-startup.sh[root@hdss7-21 ~]# mkdir -p /data/logs/kubernetes/kube-scheduler
3.5.2. 配置supervisor启动配置
注意名字的修改
[root@hdss7-21 ~]# vim /etc/supervisord.d/kube-scheduler.ini[program:kube-scheduler-7-21]command=/opt/kubernetes/server/bin/kube-scheduler-startup.shnumprocs=1directory=/opt/kubernetes/server/binautostart=trueautorestart=truestartsecs=30startretries=3exitcodes=0,2stopsignal=QUITstopwaitsecs=10user=rootredirect_stderr=truestdout_logfile=/data/logs/kubernetes/kube-scheduler/scheduler.stdout.logstdout_logfile_maxbytes=64MBstdout_logfile_backups=4stdout_capture_maxbytes=1MBstdout_events_enabled=falsestopasgroup=truekillasgroup=true
[root@hdss7-21 ~]# supervisorctl update[root@hdss7-21 ~]# supervisorctl statusetcd-server-7-21 RUNNING pid 35582, uptime 1 day, 3:46:44kube-apiserver-7-21 RUNNING pid 37301, uptime 2:50:06kube-controller-manager-7-21 RUNNING pid 37496, uptime 0:02:48kube-scheduler-7-21 RUNNING pid 37522, uptime 0:00:43
3.6. 检查节点组件的健康
[root@hdss7-21 ~]# ln -s /opt/kubernetes/server/bin/kubectl /usr/local/bin/[root@hdss7-21 ~]# kubectl get csNAME STATUS MESSAGE ERRORcontroller-manager Healthy okscheduler Healthy oketcd-0 Healthy {"health": "true"}etcd-1 Healthy {"health": "true"}etcd-2 Healthy {"health": "true"}
4. node节点组件部署
4.1. kubelet组件安装
4.1.1. 签发证书
证书签发在 hdss7-200 操作
[root@hdss7-200 ~]# cd /opt/certs/[root@hdss7-200 certs]# vim kubelet-csr.json # 将所有可能的kubelet机器IP添加到hosts中{"CN": "k8s-kubelet","hosts": ["127.0.0.1","10.4.7.10","10.4.7.21","10.4.7.22","10.4.7.23","10.4.7.24","10.4.7.25","10.4.7.26","10.4.7.27","10.4.7.28"],"key": {"algo": "rsa","size": 2048},"names": [{"C": "CN","ST": "beijing","L": "beijing","O": "odl","OU": "ops"}]}[root@hdss7-200 certs]# cfssl gencert -ca=ca.pem -ca-key=ca-key.pem -config=ca-config.json -profile=server kubelet-csr.json | cfssl-json -bare kubelet2020/01/06 23:10:56 [INFO] generate received request2020/01/06 23:10:56 [INFO] received CSR2020/01/06 23:10:56 [INFO] generating key: rsa-20482020/01/06 23:10:56 [INFO] encoded CSR2020/01/06 23:10:56 [INFO] signed certificate with serial number 612219427848569697387713705315595557671018203792020/01/06 23:10:56 [WARNING] This certificate lacks a "hosts" field. This makes it unsuitable forwebsites. For more information see the Baseline Requirements for the Issuance and Managementof Publicly-Trusted Certificates, v.1.1.6, from the CA/Browser Forum (https://cabforum.org);specifically, section 10.2.3 ("Information Requirements").[root@hdss7-200 certs]# ls kubelet* -l-rw-r--r-- 1 root root 1115 Jan 6 23:10 kubelet.csr-rw-r--r-- 1 root root 452 Jan 6 23:10 kubelet-csr.json-rw------- 1 root root 1675 Jan 6 23:10 kubelet-key.pem-rw-r--r-- 1 root root 1468 Jan 6 23:10 kubelet.pem[root@hdss7-200 certs]# scp kubelet.pem kubelet-key.pem hdss7-21:/opt/kubernetes/server/bin/certs/[root@hdss7-200 certs]# scp kubelet.pem kubelet-key.pem hdss7-22:/opt/kubernetes/server/bin/certs/
4.1.2. 创建kubelet配置
配置在 hdss7-21 hdss7-22 操作
set-cluster # 创建需要连接的集群信息,可以创建多个k8s集群信息
[root@hdss7-21 ~]# kubectl config set-cluster myk8s \--certificate-authority=/opt/kubernetes/server/bin/certs/ca.pem \--embed-certs=true \--server=https://10.4.7.10:7443 \--kubeconfig=/opt/kubernetes/conf/kubelet.kubeconfig#-----------------------Cluster "myk8s" set.
set-credentials # 创建用户账号,即用户登陆使用的客户端私有和证书,可以创建多个证书
[root@hdss7-21 ~]# kubectl config set-credentials k8s-node \--client-certificate=/opt/kubernetes/server/bin/certs/client.pem \--client-key=/opt/kubernetes/server/bin/certs/client-key.pem \--embed-certs=true \--kubeconfig=/opt/kubernetes/conf/kubelet.kubeconfig#--------User "k8s-node" set.
set-context # 设置context,即确定账号和集群对应关系
use-context # 设置当前使用哪个context
[root@hdss7-21 ~]# kubectl config use-context myk8s-context --kubeconfig=/opt/kubernetes/conf/kubelet.kubeconfig#------------------------Switched to context "myk8s-context".[root@hdss7-21 ~]# ll /opt/kubernetes/conf/kubelet.kubeconfig-rw-------. 1 root root 6203 9月 20 20:57 /opt/kubernetes/conf/kubelet.kubeconfig
hdss7-22节点可复制hdss-21的kubelet.kubeconfig文件至对应目录,无需重复执行上门面的操作
[root@hdss7-22 ~]# scp hdss7-21:/opt/kubernetes/conf/kubelet.kubeconfig /opt/kubernetes/conf/
4.1.3. 授权k8s-node用户
此步骤只需要在一台master节点执行 hdss7-21
授权 k8s-node 用户绑定集群角色 system:node ,让 k8s-node 成为具备运算节点的权限
k8s-node 为 用户账户
[root@hdss7-21 ~]# vim k8s-node.yamlapiVersion: rbac.authorization.k8s.io/v1kind: ClusterRoleBindingmetadata:name: k8s-noderoleRef:apiGroup: rbac.authorization.k8s.iokind: ClusterRolename: system:nodesubjects:- apiGroup: rbac.authorization.k8s.iokind: Username: k8s-node[root@hdss7-21 ~]# kubectl create -f k8s-node.yamlclusterrolebinding.rbac.authorization.k8s.io/k8s-node created[root@hdss7-21 ~]# kubectl get clusterrolebinding k8s-nodeNAME AGEk8s-node 36s
4.1.4. 准备pause镜像
将pause镜像放入到harbor私有仓库中,仅在 hdss7-200 操作
[root@hdss7-200 ~]# docker image pull kubernetes/pause[root@hdss7-200 ~]# docker image tag kubernetes/pause:latest harbor.odl.com/public/pause:latest[root@hdss7-200 ~]# docker login -u admin harbor.odl.com[root@hdss7-200 ~]# docker push harbor.odl.com/public/pause:latestThe push refers to repository [harbor.odl.com/public/pause]5f70bf18a086: Mounted from public/nginxe16a89738269: Pushedlatest: digest: sha256:b31bfb4d0213f254d361e0079deaaebefa4f82ba7aa76ef82e90b4935ad5b105 size: 93
4.1.5. 创建kubelet启动脚本
在node节点创建脚本并启动kubelet,涉及服务器: hdss7-21 hdss7-22
—hostname-override 需修改
[root@hdss7-21 ~]# vim /opt/kubernetes/server/bin/kubelet-startup.sh#!/bin/shWORK_DIR=$(dirname $(readlink -f $0))[ $? -eq 0 ] && cd $WORK_DIR || exit/opt/kubernetes/server/bin/kubelet \--anonymous-auth=false \--cgroup-driver systemd \--cluster-dns 192.168.0.2 \--cluster-domain cluster.local \--runtime-cgroups=/systemd/system.slice \--kubelet-cgroups=/systemd/system.slice \--fail-swap-on="false" \--client-ca-file ./certs/ca.pem \--tls-cert-file ./certs/kubelet.pem \--tls-private-key-file ./certs/kubelet-key.pem \--hostname-override hdss7-21.host.com \--image-gc-high-threshold 20 \--image-gc-low-threshold 10 \--kubeconfig ../../conf/kubelet.kubeconfig \--log-dir /data/logs/kubernetes/kube-kubelet \--pod-infra-container-image harbor.odl.com/public/pause:latest \--root-dir /data/kubelet[root@hdss7-21 ~]# chmod u+x /opt/kubernetes/server/bin/kubelet-startup.sh[root@hdss7-21 ~]# mkdir -p /data/logs/kubernetes/kube-kubelet /data/kubelet# 注意名字[root@hdss7-21 ~]# vim /etc/supervisord.d/kube-kubelet.ini[program:kube-kubelet-7-21]command=/opt/kubernetes/server/bin/kubelet-startup.shnumprocs=1directory=/opt/kubernetes/server/binautostart=trueautorestart=truestartsecs=30startretries=3exitcodes=0,2stopsignal=QUITstopwaitsecs=10user=rootredirect_stderr=truestdout_logfile=/data/logs/kubernetes/kube-kubelet/kubelet.stdout.logstdout_logfile_maxbytes=64MBstdout_logfile_backups=5stdout_capture_maxbytes=1MBstdout_events_enabled=falsestopasgroup=truekillasgroup=true[root@hdss7-21 ~]# supervisorctl update[root@hdss7-21 ~]# supervisorctl statusetcd-server-7-21 RUNNING pid 35582, uptime 1 day, 4:02:17kube-apiserver-7-21 RUNNING pid 37301, uptime 3:05:39kube-controller-manager-7-21 RUNNING pid 37496, uptime 0:18:21kube-kubelet-7-21 RUNNING pid 37650, uptime 0:00:32kube-scheduler-7-21 RUNNING pid 37522, uptime 0:16:16
4.1.6. 修改节点角色
[root@hdss7-21 ~]# kubectl get nodeNAME STATUS ROLES AGE VERSIONhdss7-21.host.com Ready <none> 2m9s v1.15.3hdss7-22.host.com Ready <none> 13s v1.15.3[root@hdss7-21 ~]# kubectl label node hdss7-21.host.com node-role.kubernetes.io/node=node/hdss7-21.host.com labeled[root@hdss7-21 ~]# kubectl label node hdss7-21.host.com node-role.kubernetes.io/master=node/hdss7-21.host.com labeled[root@hdss7-21 ~]# kubectl label node hdss7-22.host.com node-role.kubernetes.io/master=node/hdss7-22.host.com labeled[root@hdss7-21 ~]# kubectl label node hdss7-22.host.com node-role.kubernetes.io/node=node/hdss7-22.host.com labeled[root@hdss7-21 ~]# kubectl get nodeNAME STATUS ROLES AGE VERSIONhdss7-21.host.com Ready master,node 3m8s v1.15.3hdss7-22.host.com Ready master,node 72s v1.15.3
4.2. 安装kube-proxy组件
4.2.1. 签发证书
签发证书在hdss7-200操作
[root@hdss7-200 ~]# cd /opt/certs/[root@hdss7-200 certs]# vim kube-proxy-csr.json # CN 其实是k8s中的角色{"CN": "system:kube-proxy","key": {"algo": "rsa","size": 2048},"names": [{"C": "CN","ST": "beijing","L": "beijing","O": "odl","OU": "ops"}]}[root@hdss7-200 certs]# cfssl gencert -ca=ca.pem -ca-key=ca-key.pem -config=ca-config.json -profile=client kube-proxy-csr.json |cfssl-json -bare kube-proxy-client2020/01/07 21:45:53 [INFO] generate received request2020/01/07 21:45:53 [INFO] received CSR2020/01/07 21:45:53 [INFO] generating key: rsa-20482020/01/07 21:45:53 [INFO] encoded CSR2020/01/07 21:45:53 [INFO] signed certificate with serial number 6201916859689170360754631744239992969076931042262020/01/07 21:45:53 [WARNING] This certificate lacks a "hosts" field. This makes it unsuitable forwebsites. For more information see the Baseline Requirements for the Issuance and Managementof Publicly-Trusted Certificates, v.1.1.6, from the CA/Browser Forum (https://cabforum.org);[root@hdss7-200 certs]# ls kube-proxy-c* -l # 因为kube-proxy使用的用户是kube-proxy,不能使用client证书,必须要重新签发自己的证书-rw-r--r-- 1 root root 1005 Jan 7 21:45 kube-proxy-client.csr-rw------- 1 root root 1675 Jan 7 21:45 kube-proxy-client-key.pem-rw-r--r-- 1 root root 1375 Jan 7 21:45 kube-proxy-client.pem-rw-r--r-- 1 root root 267 Jan 7 21:45 kube-proxy-csr.json[root@hdss7-200 certs]# scp kube-proxy-client-key.pem kube-proxy-client.pem hdss7-21:/opt/kubernetes/server/bin/certs/[root@hdss7-200 certs]# scp kube-proxy-client-key.pem kube-proxy-client.pem hdss7-22:/opt/kubernetes/server/bin/certs/
4.2.2. 创建kube-proxy配置
在所有node节点创建,涉及服务器:hdss7-21 ,hdss7-22
[root@hdss7-21 ~]# kubectl config set-cluster myk8s \--certificate-authority=/opt/kubernetes/server/bin/certs/ca.pem \--embed-certs=true \--server=https://10.4.7.10:7443 \--kubeconfig=/opt/kubernetes/conf/kube-proxy.kubeconfig[root@hdss7-21 ~]# kubectl config set-credentials kube-proxy \--client-certificate=/opt/kubernetes/server/bin/certs/kube-proxy-client.pem \--client-key=/opt/kubernetes/server/bin/certs/kube-proxy-client-key.pem \--embed-certs=true \--kubeconfig=/opt/kubernetes/conf/kube-proxy.kubeconfig[root@hdss7-21 ~]# kubectl config set-context myk8s-context \--cluster=myk8s \--user=kube-proxy \--kubeconfig=/opt/kubernetes/conf/kube-proxy.kubeconfig[root@hdss7-21 ~]# kubectl config use-context myk8s-context --kubeconfig=/opt/kubernetes/conf/kube-proxy.kubeconfig[root@hdss7-21 ~]# ll /opt/kubernetes/conf/kube-proxy.kubeconfig-rw-------. 1 root root 6219 9月 20 21:14 /opt/kubernetes/conf/kube-proxy.kubeconfig
- hdss7-22节点可复制hdss-21的kube-proxy.kubeconfig 文件至对应目录,无需重复执行上门面的操作
[root@hdss7-22 ~]# scp hdss7-21:/opt/kubernetes/conf/kube-proxy.kubeconfig /opt/kubernetes/conf/
4.2.3. 加载jpvs模块
kube-proxy 共有3种流量调度模式,分别是 namespace,iptables,ipvs,其中ipvs性能最好。
[root@hdss7-21 ~]# for i in $(ls /usr/lib/modules/$(uname -r)/kernel/net/netfilter/ipvs|grep -o "^[^.]*");do echo $i; /sbin/modinfo -F filename $i >/dev/null 2>&1 && /sbin/modprobe $i;done[root@hdss7-21 ~]# lsmod | grep ip_vs # 查看ipvs模块
4.2.4. 创建启动脚本
# 修改--hostname-override[root@hdss7-21 ~]# vim /opt/kubernetes/server/bin/kube-proxy-startup.sh#!/bin/shWORK_DIR=$(dirname $(readlink -f $0))[ $? -eq 0 ] && cd $WORK_DIR || exit/opt/kubernetes/server/bin/kube-proxy \--cluster-cidr 172.7.0.0/16 \--hostname-override hdss7-21.host.com \--proxy-mode=ipvs \--ipvs-scheduler=nq \--kubeconfig ../../conf/kube-proxy.kubeconfig[root@hdss7-21 ~]# chmod u+x /opt/kubernetes/server/bin/kube-proxy-startup.sh[root@hdss7-21 ~]# mkdir -p /data/logs/kubernetes/kube-proxy[root@hdss7-21 ~]# vim /etc/supervisord.d/kube-proxy.ini[program:kube-proxy-7-21]command=/opt/kubernetes/server/bin/kube-proxy-startup.shnumprocs=1directory=/opt/kubernetes/server/binautostart=trueautorestart=truestartsecs=30startretries=3exitcodes=0,2stopsignal=QUITstopwaitsecs=10user=rootredirect_stderr=truestdout_logfile=/data/logs/kubernetes/kube-proxy/proxy.stdout.logstdout_logfile_maxbytes=64MBstdout_logfile_backups=5stdout_capture_maxbytes=1MBstdout_events_enabled=falsestopasgroup=truekillasgroup=true[root@hdss7-21 ~]# supervisorctl update[root@hdss7-21 ~]# supervisorctl statusetcd-server-7-21 RUNNING pid 35582, uptime 1 day, 4:14:19kube-apiserver-7-21 RUNNING pid 37301, uptime 3:17:41kube-controller-manager-7-21 RUNNING pid 37496, uptime 0:30:23kube-kubelet-7-21 RUNNING pid 37650, uptime 0:12:34kube-proxy-7-21 RUNNING pid 40526, uptime 0:00:30kube-scheduler-7-21 RUNNING pid 37522, uptime 0:28:18
3.2.5. 验证集群
[root@hdss7-21 ~]# supervisorctl statusetcd-server-7-21 RUNNING pid 23637, uptime 2 days, 0:27:18kube-apiserver-7-21 RUNNING pid 32591, uptime 1 day, 2:06:47kube-controller-manager-7-21 RUNNING pid 33357, uptime 1 day, 0:11:02kube-kubelet-7-21 RUNNING pid 37232, uptime 9:32:01kube-proxy-7-21 RUNNING pid 47088, uptime 0:06:19kube-scheduler-7-21 RUNNING pid 33450, uptime 1 day, 0:01:43[root@hdss7-21 ~]# yum install -y ipvsadm[root@hdss7-21 ~]# ipvsadm -LnIP Virtual Server version 1.2.1 (size=4096)Prot LocalAddress:Port Scheduler Flags-> RemoteAddress:Port Forward Weight ActiveConn InActConnTCP 192.168.0.1:443 nq-> 10.4.7.21:6443 Masq 1 0 0-> 10.4.7.22:6443 Masq 1 0 0
- 创建一个nginx的deployment资源验证
```bash
[root@hdss7-21 ~]# vim nginx-ds.yaml
apiVersion: extensions/v1beta1
kind: DaemonSet
metadata:
name: nginx-ds
spec:
template:
metadata:
spec:labels:app: nginx-ds
containers:- name: my-nginximage: harbor.odl.com/public/nginx:v1.7.9ports:- containerPort: 80
[root@hdss7-21 ~]# kubectl create -f nginx-ds.yaml
daemonset.extensions/nginx-ds created
[root@hdss7-21 ~]# kubectl get pods -o wide
NAME READY STATUS RESTARTS AGE IP NODE NOMINATED NODE READINESS GATES
nginx-ds-8flhn 1/1 Running 0 2m1s 172.7.22.2 hdss7-22.host.com
[root@hdss7-21 ~]# curl -I 172.7.21.2 HTTP/1.1 200 OK Server: nginx/1.7.9 Date: Sun, 20 Sep 2020 13:29:51 GMT Content-Type: text/html Content-Length: 612 Last-Modified: Tue, 23 Dec 2014 16:25:09 GMT Connection: keep-alive ETag: “54999765-264” Accept-Ranges: bytes
[root@hdss7-21 ~]# curl -I 172.7.22.2 # 缺少网络插件,无法跨节点通信
<a name="nNX83"></a># 5. kubernetes插件安装<a name="HEIjv"></a>## 5.1. flannel插件<a name="aZllG"></a>### 5.1.1. flannel作用和模型kubernetes设计了网络模型,但是pod之间通信的具体实现交给了CNI往插件。 常用的CNI网络插件有:Flannel 、Calico、Canal、Contiv等,其中Flannel和Calico占比接近80%,Flannel占比略多于Calico<br /> Flannel的设计目的就是为集群中的所有节点重新规划IP地址的使用规则,从而使得不同节点上的容器能够获得“同属一个内网”且”不重复的”IP地址,并让属于不同节点上的容器能够直接通过内网IP通信。<a name="e518cd2a"></a>#### 5.1.1.1. host-gw模型 (当前教程使用)只在节点中添加了一条路由规则实现pod之间的通信<br />节点需要在二层网络中, 指向同一个网关地址<br />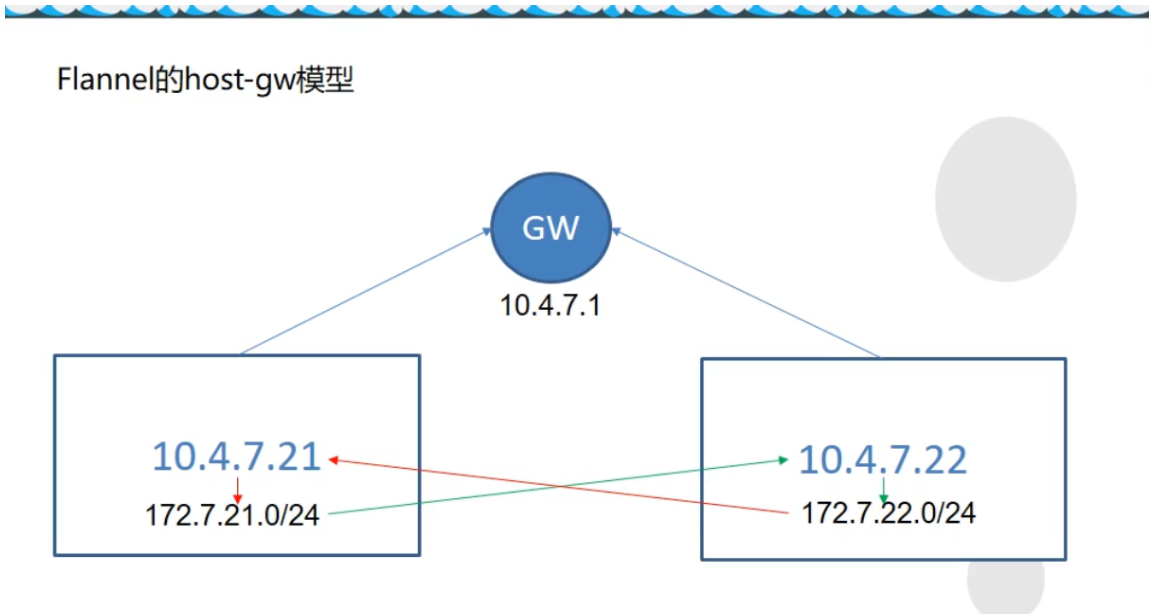<a name="8wFWI"></a>#### 5.1.1.2. VxLAN模型通过虚拟的网络隧道通信,会在节点中添加flannel.1虚拟网卡```bash./etcdctl set /coreos.com/network/config/ '{"Network": "172.7.0.0/16", "Backend": {"Type": "VxLAN"}}''

5.1.1.3. 直接路由模型
host-gw和VxLAN结合模型, flannel自动判断互相通信的节点所需模型路由设置
5.1.2. 准备flannel文件
在 hdss7-21 hdss7-22 操作
[root@hdss7-21 ~]# wget https://github.com/coreos/flannel/releases/download/v0.11.0/flannel-v0.11.0-linux-amd64.tar.gz# flannel压缩包没有目录 需要创建一个主目录[root@hdss7-21 ~]# mkdir /opt/flannel-v0.11.0[root@hdss7-21 ~]# tar-xf flannel-v0.11.0-linux-amd64.tar.gz -C /opt/flannel-v0.11.0[root@hdss7-21 ~]# cd /opt/ ; ln -s flannel-v0.11.0 flannel# 设置ip_forward,ip_forward等于0,则在重启的时候会网络不通echo "net.ipv4.ip_forward=1" >> /etc/sysctl.confsysctl -p
5.1.3. 拷贝证书
# flannel需要以客户端的身份访问etcd, 需要相关的证书[root@hdss7-21 opt]# mkdir /opt/flannel-v0.11.0/certs# 切换至hdss7-200节点[root@hdss7-200 ~]# cd /opt/certs[root@hdss7-200 certs]# scp ca.pem client-key.pem client.pem hdss7-21:/opt/flannel/certs/
5.1.4. 配置文件
# 创建子网信息[root@hdss7-21 ~]# cat /opt/flannel/subnet.envFLANNEL_NETWORK=172.7.0.0/16FLANNEL_SUBNET=172.7.21.1/24FLANNEL_MTU=1500FLANNEL_IPMASQ=false# etcd配置, 只需要一台etcd节点运行即可[root@hdss7-21 ~]# /opt/etcd/etcdctl set /coreos.com/network/config '{"Network": "172.7.0.0/16", "Backend": {"Type": "host-gw"}}'# 查看配置是否成功[root@hdss7-21 ~]# /opt/etcd/etcdctl get /coreos.com/network/config{"Network": "172.7.0.0/16", "Backend": {"Type": "host-gw"}}
[root@hdss7-21 ~]# /opt/etcd/etcdctl get /coreos.com/network/config Error: 100: Key not found (/coreos.com) [10] 该报错为etcd没有记录到flannel信息 该报错在etcd恢复集群数据时候丢失了配置信息
5.1.5. 创建flannel启动脚本
在 hdss7-21 hdss7-22 操作 —public-ip 为本机IP —iface 为当前宿主机的对外网卡
[root@hdss7-21 ~]# vim /opt/flannel/flannel-startup.sh#!/bin/shWORK_DIR=$(dirname $(readlink -f $0))[ $? -eq 0 ] && cd $WORK_DIR || exit/opt/flannel/flanneld \--public-ip=10.4.7.21 \--etcd-endpoints=https://10.4.7.12:2379,https://10.4.7.21:2379,https://10.4.7.22:2379 \--etcd-keyfile=./certs/client-key.pem \--etcd-certfile=./certs/client.pem \--etcd-cafile=./certs/ca.pem \--iface=ens33 \--subnet-file=./subnet.env \--healthz-port=2401[root@hdss7-21 ~]# chmod u+x /opt/flannel/flannel-startup.sh
5.1.6. 编写flannel supervisord启动文件
[root@hdss7-21 ~]# vim /etc/supervisord.d/flannel.ini[program:flanneld-7-21]command=/opt/flannel/flannel-startup.shnumprocs=1directory=/opt/apps/flannelautostart=trueautorestart=truestartsecs=30startretries=3exitcodes=0,2stopsignal=QUITstopwaitsecs=10user=rootredirect_stderr=truestdout_logfile=/data/logs/flanneld/flanneld.stdout.logstdout_logfile_maxbytes=64MBstdout_logfile_backups=5stdout_capture_maxbytes=1MBstdout_events_enabled=falsestopasgroup=truekillasgroup=true[root@hdss7-21 ~]# mkdir -p /data/logs/flanneld/[root@hdss7-21 ~]# supervisorctl updateflanneld-7-21: added process group[root@hdss7-21 ~]# supervisorctl status

5.1.7. 验证网络访问情况
[root@hdss7-21 ~]# kubectl get pods -o wideNAME READY STATUS RESTARTS AGE IP NODE NOMINATED NODE READINESS GATESnginx-ds-br65n 1/1 Running 0 42h 172.7.21.2 hdss7-21.host.com <none> <none>nginx-ds-hpbbt 1/1 Running 0 42h 172.7.22.2 hdss7-22.host.com <none> <none>[root@hdss7-21 ~]# curl -I 172.7.22.2HTTP/1.1 200 OKServer: nginx/1.18.0Date: Mon, 16 Nov 2020 06:47:48 GMTContent-Type: text/htmlContent-Length: 988Last-Modified: Sat, 14 Nov 2020 12:09:29 GMTConnection: keep-aliveETag: "5fafc8f9-3dc"Accept-Ranges: byte
5.1.8. 解决pod之间IP透传问题
需所有node节点都要执行,优化NAT网络<br /> 在nginx pod A跨宿主机访问 nginx pod b时候, 在pod b看到的地址为pod a的宿主机地址<br /> 问题: 宿主机重启后, 当前节点无效<br /> 报错 Applying firewall rules: iptables-restore v1.4.21: Set KUBE-CLUSTER-IP doesn't exist.
# 多次执行,[root@hdss7-21 ~]# kubectl exec -it nginx-ds-br65n -- /usr/bin/curl -I 172.7.22.2[root@hdss7-21 ~]# kubectl exec -it nginx-ds-hpbbt -- tail -f /config/log/nginx/access.log10.4.7.21 - - [18/Nov/2020:01:49:39 +0000] "GET / HTTP/1.1" 200 988 "-" "curl/7.69.1"10.4.7.21 - - [18/Nov/2020:01:52:47 +0000] "HEAD / HTTP/1.1" 200 0 "-" "curl/7.69.1"10.4.7.21 - - [18/Nov/2020:01:56:18 +0000] "HEAD / HTTP/1.1" 200 0 "-" "curl/7.69.1"10.4.7.21 - - [18/Nov/2020:02:00:28 +0000] "HEAD / HTTP/1.1" 200 0 "-" "curl/7.69.1"[root@hdss7-21 ~]# iptables-save |grep POSTROUTING|grep docker # 引发问题的规则-A POSTROUTING -s 172.7.21.0/24 ! -o docker0 -j MASQUERADE
- 需所有node节点都要执行,优化NAT网络
[root@hdss7-21 ~]# yum install -y iptables-services# 启动[root@hdss7-21 ~]# systemctl start iptables.service ; systemctl enable iptables.service# 需要处理的规则:[root@hdss7-21 ~]# iptables-save |grep POSTROUTING|grep docker-A POSTROUTING -s 172.7.21.0/24 ! -o docker0 -j MASQUERADE[root@hdss7-21 ~]# iptables-save | grep -i reject-A INPUT -j REJECT --reject-with icmp-host-prohibited-A FORWARD -j REJECT --reject-with icmp-host-prohibited# 处理方式:# 删除, 该规则在docker服务重启后会重新加入 注意-s参数IP[root@hdss7-21 ~]# iptables -t nat -D POSTROUTING -s 172.7.21.0/24 ! -o docker0 -j MASQUERADE# 新增,在10.4.7.21主机上,来源是172.7.21.0/24段的docker的IP,目标IP不是172.7.0.0/16段的,# 网络发包不是从docker0设备出站的, 才进行SNAT转换# 注意此处 host7-22节点 为 -s 172.7.22.0/24[root@hdss7-21 ~]# iptables -t nat -I POSTROUTING -s 172.7.21.0/24 ! -d 172.7.0.0/16 ! -o docker0 -j MASQUERADE# 删除规则,否则通信会失败[root@hdss7-21 ~]# iptables -t filter -D INPUT -j REJECT --reject-with icmp-host-prohibited[root@hdss7-21 ~]# iptables -t filter -D FORWARD -j REJECT --reject-with icmp-host-prohibited[root@hdss7-21 ~]# iptables-save > /etc/sysconfig/iptables
多次执行, 此时显示的是pod的IP
[root@hdss7-21 ~]# kubectl exec -it nginx-ds-br65n -- /usr/bin/curl -I 172.7.22.2[root@hdss7-21 ~]# kubectl exec -it nginx-ds-hpbbt -- tail -f /config/log/nginx/access.log172.7.21.2 - - [18/Nov/2020:02:21:09 +0000] "HEAD / HTTP/1.1" 200 0 "-" "curl/7.69.1"172.7.21.2 - - [18/Nov/2020:02:37:47 +0000] "HEAD / HTTP/1.1" 200 0 "-" "curl/7.69.1"172.7.21.2 - - [18/Nov/2020:02:37:50 +0000] "HEAD / HTTP/1.1" 200 0 "-" "curl/7.69.1"172.7.21.2 - - [18/Nov/2020:02:37:52 +0000] "HEAD / HTTP/1.1" 200 0 "-" "curl/7.69.1"172.7.21.2 - - [18/Nov/2020:02:38:37 +0000] "HEAD / HTTP/1.1" 200 0 "-" "curl/7.69.1"
docker重启后会重新出现规则,需重新配置,或者删除 ```bash [root@hdss7-21 ~]# systemctl restart docker [root@hdss7-21 ~]# iptables-save |grep -i postrouting|grep docker0 -A POSTROUTING -s 172.7.22.0/24 ! -o docker0 -j MASQUERADE
可以用iptables-restore重新应用iptables规则,也可以直接再删
[root@hdss7-21 ~]# iptables-save |grep -i postrouting|grep docker0 -A POSTROUTING -s 172.7.22.0/24 ! -d 172.7.0.0/16 ! -o docker0 -j MASQUERADE
<a name="Wo4an"></a>## 5.2. CoreDnsk8s-coredns 实现了集群内部通过服务名进行互相定位的过程。<br /> Coredns从kubernetes-v1.11版本后取代了kube-dns<br /> 应用场景:- 服务(应用)的动态性强<br />- 服务(应用)更新发布频繁<br />- 服务(应用)支持自动伸缩<br />Pod的IP在不断的变化,就需要<br />- 抽象出service资源, 通过标签选择器,关联一组Pod<br />- 抽象出了集群网络, 通过相对固定的"集群IP",使服务接入点固定<br />Kubernetes内部域名解析原理、弊端及优化方式<br />[http://ccnuo.com/2019/08/25/CoreDNS%EF%BC%9AKubernetes%E5%86%85%E9%83%A8%E5%9F%9F%E5%90%8D%E8%A7%A3%E6%9E%90%E5%8E%9F%E7%90%86%E3%80%81%E5%BC%8A%E7%AB%AF%E5%8F%8A%E4%BC%98%E5%8C%96%E6%96%B9%E5%BC%8F/](http://ccnuo.com/2019/08/25/CoreDNS%EF%BC%9AKubernetes%E5%86%85%E9%83%A8%E5%9F%9F%E5%90%8D%E8%A7%A3%E6%9E%90%E5%8E%9F%E7%90%86%E3%80%81%E5%BC%8A%E7%AB%AF%E5%8F%8A%E4%BC%98%E5%8C%96%E6%96%B9%E5%BC%8F/)<a name="8Cafz"></a>### 5.2.1. 准备资源配置清单将清单文件放置在hdss7-200:/data/k8s-yaml/coredns_1.6.1中<br />文件参考地址: [https://github.com/kubernetes/kubernetes/blob/master/cluster/addons/dns/coredns/coredns.yaml.base](https://github.com/kubernetes/kubernetes/blob/master/cluster/addons/dns/coredns/coredns.yaml.base)<a name="NWQtk"></a>#### 5.2.1.1. rbac.yaml```yamlapiVersion: v1kind: ServiceAccountmetadata:name: corednsnamespace: kube-systemlabels:kubernetes.io/cluster-service: "true"addonmanager.kubernetes.io/mode: Reconcile---apiVersion: rbac.authorization.k8s.io/v1kind: ClusterRolemetadata:labels:kubernetes.io/bootstrapping: rbac-defaultsaddonmanager.kubernetes.io/mode: Reconcilename: system:corednsrules:- apiGroups:- ""resources:- endpoints- services- pods- namespacesverbs:- list- watch---apiVersion: rbac.authorization.k8s.io/v1kind: ClusterRoleBindingmetadata:annotations:rbac.authorization.kubernetes.io/autoupdate: "true"labels:kubernetes.io/bootstrapping: rbac-defaultsaddonmanager.kubernetes.io/mode: EnsureExistsname: system:corednsroleRef:apiGroup: rbac.authorization.k8s.iokind: ClusterRolename: system:corednssubjects:- kind: ServiceAccountname: corednsnamespace: kube-system
5.2.1.2. configmap.yaml
apiVersion: v1kind: ConfigMapmetadata:name: corednsnamespace: kube-systemdata:Corefile: |.:53 {errorsloghealthreadykubernetes cluster.local 192.168.0.0/16forward . 10.4.7.11cache 30loopreloadloadbalance}
- errors : 将错误记录到stdout
- health : CoreDNS的运行状况报告为http://localhost:8080/health
- ready: 全部插件已经加载完成时,将通过 endpoints 在 8081 端口返回 HTTP 状态 200。
- kubernetes : coreDNS将根据kubernetes服务和pod的IP回复DNS查询
- forward : 转发上游DNS
- cache 启动前端缓存
- loop : 检测简单的转发循环,如果找到循环则停止CoreDNS进程
- reload : 允许自动重新加载已更改的CoreFile, 编辑ConfigMap配置后,请等待两分钟以使更改生效
- loadbalance : 这是一个循环DNS负载均衡器,可在答案中随机化A,AAAA和MX记录的顺序
- prometheus:是否开启 CoreDNS Metrics 信息接口,如果配置则开启,接口地址为 http://localhost:9153/metrics
5.2.1.3. deployment.yaml
apiVersion: apps/v1kind: Deploymentmetadata:name: corednsnamespace: kube-systemlabels:k8s-app: corednskubernetes.io/name: "CoreDNS"spec:replicas: 1selector:matchLabels:k8s-app: corednstemplate:metadata:labels:k8s-app: corednsspec:priorityClassName: system-cluster-criticalserviceAccountName: corednscontainers:- name: corednsimage: harbor.odl.com/public/coredns:v1.6.1args:- -conf- /etc/coredns/CorefilevolumeMounts:- name: config-volumemountPath: /etc/corednsports:- containerPort: 53name: dnsprotocol: UDP- containerPort: 53name: dns-tcpprotocol: TCP- containerPort: 9153name: metricsprotocol: TCPlivenessProbe:httpGet:path: /healthport: 8080scheme: HTTPinitialDelaySeconds: 60timeoutSeconds: 5successThreshold: 1failureThreshold: 5dnsPolicy: Defaultvolumes:- name: config-volumeconfigMap:name: corednsitems:- key: Corefilepath: Corefile
5.2.1.4. service.yaml
apiVersion: v1kind: Servicemetadata:name: corednsnamespace: kube-systemlabels:k8s-app: corednskubernetes.io/cluster-service: "true"kubernetes.io/name: "CoreDNS"spec:selector:k8s-app: corednsclusterIP: 192.168.0.2ports:- name: dnsport: 53protocol: UDP- name: dns-tcpport: 53- name: metricsport: 9153protocol: TCP
5.2.2. 交付coredns到k8s
准备镜像
[root@hdss7-200 ~]# docker pull coredns/coredns:1.6.1[root@hdss7-200 ~]# docker image tag coredns/coredns:1.6.1 harbor.odl.com/public/coredns:v1.6.1[root@hdss7-200 ~]# docker image push harbor.odl.com/public/coredns:v1.6.1
交付coredns
Coredns的cluster-ip为192.168.0.2, 在kubelet启动的时候参数cluster-dns 192.168.0.2
[root@hdss7-21 ~]# kubectl apply -f http://k8s-yaml.odl.com/coredns/coredns_1.6.1/rbac.yaml[root@hdss7-21 ~]# kubectl apply -f http://k8s-yaml.odl.com/coredns/coredns_1.6.1/configmap.yaml[root@hdss7-21 ~]# kubectl apply -f http://k8s-yaml.odl.com/coredns/coredns_1.6.1/deployment.yaml[root@hdss7-21 ~]# kubectl apply -f http://k8s-yaml.odl.com/coredns/coredns_1.6.1/service.yaml[root@hdss7-21 ~]# kubectl get all -n kube-systemNAME READY STATUS RESTARTS AGEpod/coredns-7674f74c44-9n298 1/1 Running 0 23hNAME TYPE CLUSTER-IP EXTERNAL-IP PORT(S) AGEservice/coredns ClusterIP 192.168.0.2 <none> 53/UDP,53/TCP,9153/TCP 27dNAME READY UP-TO-DATE AVAILABLE AGEdeployment.apps/coredns 1/1 1 1 27dNAME DESIRED CURRENT READY AGEreplicaset.apps/coredns-7674f74c44 1 1 1 27d
5.2.3. 集群内测试DNS
- FQDN格式为
service服务名 . + 命名空间 . + 服务 . + cluster.local
nginx-dp.kube-public.svc.cluster.local
Pod内 可以使用短域名 nginx-dp.kube-public , 为什么?
查看Pod容器里面的/etc/resolv.conf文件定义了
nameserver 192.168.0.2
search default.svc.cluster.local svc.cluster.local cluster.local host.com
# 创建service[root@hdss7-21 ~]# kubectl create deployment nginx-web --image=harbor.od.com/public/nginx:v1.18.0[root@hdss7-21 ~]# kubectl expose deployment nginx-web --port=80 --target-port=80[root@hdss7-21 ~]# kubectl get svcNAME TYPE CLUSTER-IP EXTERNAL-IP PORT(S) AGEkubernetes ClusterIP 192.168.0.1 <none> 443/TCP 44hnginx-web ClusterIP 192.168.126.189 <none> 80/TCP 42h# 测试DNS,集群外必须使用FQDN(Fully Qualified Domain Name),全域名[root@hdss7-21 ~]# dig -t A nginx-web.default.svc.cluster.local @192.168.0.2 +short # 内网解析OK192.168.164.230# # 外网解析OK[root@hdss7-21 ~]# dig -t A www.baidu.com @192.168.0.2 +shortwww.a.shifen.com.180.101.49.11180.101.49.12
5.3. Ingress-Controller
5.3.1. 描述
将services服务暴露至外部访问
service是将一组pod管理起来,提供了一个cluster ip和service name的统一访问入口,屏蔽了pod的ip变化。
ingress是K8s API的标准资源类型之一, 也是一种核心资源, 它其实就是一组基于域名和URL路径,,吧用户的请求转发至指定Service资源的规则
可以将集群外部的请求流量,转发至集群内部,从而实现”服务暴露”
ingress-controller 是一个代理服务器,将ingress的规则能真正实现的方式,常用的有 nginx,traefik,haproxy。但是在k8s集群中,建议使用traefik,性能比haroxy强大,更新配置不需要重载服务,是首选的ingress-controller。
注意:
- 设置成ipvs就需要此ingress插件 (不推荐代理https,证书要设置在集群内比较麻烦)
5.3.2. 配置traefik资源清单
清单存放到hdss7-200:/data/k8s-yaml/traefik_1.7.2 中
参考文件: https://github.com/traefik/traefik/blob/v1.7/examples/k8s/
5.3.2.1. rbac.yaml
# 创建了一个服务用户apiVersion: v1kind: ServiceAccountmetadata:name: traefik-ingress-controllernamespace: kube-system---# 绑定角色的集群权限apiVersion: rbac.authorization.k8s.io/v1beta1kind: ClusterRolemetadata:name: traefik-ingress-controllerrules:- apiGroups:- ""resources:- services- endpoints- secretsverbs:- get- list- watch- apiGroups:- extensionsresources:- ingressesverbs:- get- list- watch---# 绑定服务角色(ServiceAccount)和 集群权限 (ClusterRole)kind: ClusterRoleBindingapiVersion: rbac.authorization.k8s.io/v1beta1metadata:name: traefik-ingress-controllerroleRef:apiGroup: rbac.authorization.k8s.iokind: ClusterRolename: traefik-ingress-controllersubjects:- kind: ServiceAccountname: traefik-ingress-controllernamespace: kube-system
5.3.2.2. daemonset.yaml
暴露了两个端口 controller( 80-->81对外端口) 和 admin-web(8080 traefik管理页面 serivce服务端口)<br /> name: controller 名字指定不能超过15个字符,否则报错<br /> --kubernetes.endpoint
apiVersion: extensions/v1beta1kind: DaemonSetmetadata:name: traefik-ingressnamespace: kube-systemlabels:k8s-app: traefik-ingressspec:template:metadata:labels:k8s-app: traefik-ingressname: traefik-ingressspec:serviceAccountName: traefik-ingress-controllerterminationGracePeriodSeconds: 60containers:- image: harbor.odl.com/public/traefik:v1.7.2name: traefik-ingressports:- name: controllercontainerPort: 80hostPort: 81- name: admin-webcontainerPort: 8080securityContext:capabilities:drop:- ALLadd:- NET_BIND_SERVICEargs:- --api- --kubernetes- --logLevel=INFO- --insecureskipverify=true- --kubernetes.endpoint=https://10.4.7.10:7443- --accesslog- --accesslog.filepath=/var/log/traefik_access.log- --traefiklog- --traefiklog.filepath=/var/log/traefik.log- --metrics.prometheus
5.3.2.3. service.yaml
kind: ServiceapiVersion: v1metadata:name: traefik-ingress-servicenamespace: kube-systemspec:selector:k8s-app: traefik-ingressports:- protocol: TCPport: 80name: controller- protocol: TCPport: 8080name: admin-web
5.3.2.4. ingress.yaml
修改
- host: traefik.odl.com 指定域名
- host: traefik.odl.com 指定域名
- path: / 指定uri
- path: / 指定uri
- erviceName: traefik-ingress-service Service服务名
- servicePort: 8080 Service服务对外提供服务端口
apiVersion: extensions/v1beta1kind: Ingressmetadata:name: traefik-web-uinamespace: kube-systemannotations:kubernetes.io/ingress.class: traefikspec:rules:- host: traefik.odl.comhttp:paths:- path: /backend:serviceName: traefik-ingress-serviceservicePort: 8080
5.3.3. 准备镜像并交付
[root@hdss7-200 ~]# docker pull traefik:v1.7.2-alpine[root@hdss7-200 ~]# docker image tag traefik:v1.7.2-alpine harbor.odl.com/public/traefik:v1.7.2[root@hdss7-200 ~]# docker push harbor.odl.com/public/traefik:v1.7.2
5.3.4. 交付traefik到k8s
[root@hdss7-21 ~]# kubectl apply -f http://k8s-yaml.odl.com/traefik/traefik_1.7.2/rbac.yaml[root@hdss7-21 ~]# kubectl apply -f http://k8s-yaml.odl.com/traefik/traefik_1.7.2/daemonset.yaml[root@hdss7-21 ~]# kubectl apply -f http://k8s-yaml.odl.com/traefik/traefik_1.7.2/service.yaml[root@hdss7-21 ~]# kubectl apply -f http://k8s-yaml.odl.com/traefik/traefik_1.7.2/ingress.yaml[root@hdss7-21 ~]# kubectl get pods -n kube-system -o wideNAME READY STATUS RESTARTS AGE IP NODE NOMINATED NODE READINESS GATEScoredns-7674f74c44-4jvm7 1/1 Running 1 2d14h 172.7.21.2 hdss7-21.host.com <none> <none>traefik-ingress-56n56 1/1 Running 1 2d13h 172.7.22.7 hdss7-22.host.com <none> <none>traefik-ingress-lz4cv 1/1 Running 1 2d13h 172.7.21.3 hdss7-21.host.com <none> <none>
5.3.5. 配置外部nginx负载均衡
在hdss7-11,hdss7-12 配置nginx L7转发, 将服务暴露给外部客户端访问
- 注意
当K8s一个节点需要维护的时候,需要提前在配置文件中剔除,避免流量转发至该维护的节点
[root@hdss7-11 ~]# vim /etc/nginx/conf.d/odl.conf.confserver {server_name *.odl.com;location / {proxy_pass http://default_backend_traefik;proxy_set_header Host $http_host;proxy_set_header x-forwarded-for $proxy_add_x_forwarded_for;}}upstream default_backend_traefik {# 所有的nodes都放到upstream中server 10.4.7.21:81 max_fails=3 fail_timeout=10s;server 10.4.7.22:81 max_fails=3 fail_timeout=10s;}
5.3.6. 配置DNS解析
[root@hdss7-11 ~]# vim /var/named/od.com.zone$ORIGIN od.com.$TTL 600 ; 10 minutes@ IN SOA dns.od.com. dnsadmin.od.com. (2020011302 ; serial10800 ; refresh (3 hours)900 ; retry (15 minutes)604800 ; expire (1 week)86400 ; minimum (1 day))NS dns.od.com.$TTL 60 ; 1 minutedns A 10.4.7.11harbor A 10.4.7.200k8s-yaml A 10.4.7.200traefik A 10.4.7.10[root@hdss7-11 ~]# systemctl restart named
5.3.7. 查看traefik页面
网页地址: http://traefik.odl.com
5.3.8. 新建一个deployment测试是否能暴露端口
- tomcat-test1.yaml
```yaml
——-Deployment————————
apiVersion: apps/v1 kind: Deployment metadata: name: tomcat-test1 labels: app: tomcat-test1 spec: replicas: 1 selector: matchLabels:
template: metadata:app: tomcat-test1
spec:labels:app: tomcat-test1
containers:- name: tomcat-test1image: harbor.odl.com/public/tomcat:v1.0imagePullPolicy: IfNotPresentports:- containerPort: 8443- containerPort: 8080
———service———————-
apiVersion: v1 kind: Service metadata: name: tomcat-test1 labels: name: tomcat-test1 spec: ports:
- port: 8443 targetPort: 8443 selector: app: tomcat-test1 ports:
- port: 8080 targetPort: 8080 selector: app: tomcat-test1 ```
ingress-tomcat1.yaml
apiVersion: extensions/v1beta1kind: Ingressmetadata:name: tomcat-test1-webnamespace: defaultannotations:kubernetes.io/ingress.class: traefikspec:rules:- host: tomcat.odl.comhttp:paths:- path: /backend:serviceName: tomcat-test1servicePort: 8080
交付至k8s
[root@hdss7-21 ~]# kubectl apply -f tomcat-test1.yaml[root@hdss7-21 ~]# kubectl apply -f ingress-tomcat1.yaml
配置DNS解析
因hdss7-11和12配置了负载均衡,反向代理traefik,且两台主机为高可用, 需配置浮动IP
[root@hdss7-11 ~]# vim /var/named/odl.com.zone$ORIGIN odl.com.$TTL 600 ; 10 minutes@ IN SOA dns.odl.com. dnsadmin.odl.com. (2020091709 ; serial10800 ; refresh (3 hours)900 ; retry (15 minutes)604800 ; expire (1 week)86400 ; minimum (1 day))NS dns.odl.com.$TTL 60 ; 1 minutedns A 10.4.7.11harbor A 10.4.7.200k8s-yaml A 10.4.7.200traefik A 10.4.7.10tomcat A 10.4.7.10[root@hdss7-11 ~]# systemctl restart named
需要修改nginx的日志配置信息 其中$http_x_forwarded_for显示了客户端的IP地址和代理IP
log_format access '$remote_addr - $remote_user [$time_local] "$request" ''$status $body_bytes_sent "$http_referer" ''"$http_user_agent" $http_x_forwarded_for ''"$upstream_addr" "$upstream_status" "$upstream_response_time" "$request_time"';access_log /config/log/nginx/access.log access;
172.7.21.3 - - [25/Dec/2020:16:30:51 +0800] "GET / HTTP/1.1" 304 0 "-" "Mozilla/5.0 (Windows NT 6.1; Win64; x64) AppleWebKit/537.36 (KHTML, like Gecko) Chrome/87.0.4280.88 Safari/537.36" 192.168.1.147, 10.4.7.200 "-" "-" "-" "0.000"
5.4. dashboard图形化
当前dashboard为2.0.1版本, 从1.9.0+版本开始集成了metrics-scraper来获取metrics-server采集的数据展示在dashboard的UI界面中
- dashboard创建普通用户,只能修改指定的命名空间: https://www.yuque.com/zijun-ntlfp/sfxash/fopzz0
- dashboard安装metrics-server采集的数据展示在dashboard的UI界面: https://www.yuque.com/zijun-ntlfp/sfxash/ba5sqz
- dashboard使用用户密码登录: https://www.yuque.com/zijun-ntlfp/sfxash/vumzbu
dashboard使用kubeconfig登录: https://www.yuque.com/zijun-ntlfp/sfxash/gpcakn
5.4.1. 配置资源清单
清单文件放置在hdss7-200/data/k8s-yaml/dashboard_2.0.1/中
准备镜像 ```bash [root@hdss7-200 ~]# docker pull kubernetesui/dashboard:v2.0.1 [root@hdss7-200 ~]# docker tag kubernetesui/dashboard:v2.0.1 harbor.odl.com/public/kubernetes-dashboard:v2.0.1 [root@hdss7-200 ~]# docker push harbor.odl.com/public/kubernetes-dashboard:v2.0.1
[root@hdss7-200 ~]# docker pull kubernetesui/metrics-scraper:v1.0.4 [root@hdss7-200 ~]# docker tag kubernetesui/metrics-scraper:v1.0.4 harbor.odl.com/public/metrics-scraper:v1.0.4 [root@hdss7-200 ~]# docker push harbor.odl.com/public/metrics-scraper:v1.0.4
<a name="nO5Qw"></a>#### 5.4.1.1. dashboard.yaml```yamlapiVersion: v1kind: Namespacemetadata:name: kubernetes-dashboardlabels:k8s-app: kubernetes-dashboardaddonmanager.kubernetes.io/mode: Reconcile---apiVersion: v1kind: ServiceAccountmetadata:labels:k8s-app: kubernetes-dashboardaddonmanager.kubernetes.io/mode: Reconcilename: kubernetes-dashboardnamespace: kubernetes-dashboard---kind: ServiceapiVersion: v1metadata:labels:k8s-app: kubernetes-dashboardkubernetes.io/cluster-service: "true"addonmanager.kubernetes.io/mode: Reconcilename: kubernetes-dashboardnamespace: kubernetes-dashboardspec:ports:- port: 443targetPort: 8443selector:k8s-app: kubernetes-dashboard---apiVersion: v1kind: Secretmetadata:labels:k8s-app: kubernetes-dashboardaddonmanager.kubernetes.io/mode: EnsureExistsname: kubernetes-dashboard-certsnamespace: kubernetes-dashboardtype: Opaque---apiVersion: v1kind: Secretmetadata:labels:k8s-app: kubernetes-dashboardaddonmanager.kubernetes.io/mode: EnsureExistsname: kubernetes-dashboard-csrfnamespace: kubernetes-dashboardtype: Opaquedata:csrf: ""---apiVersion: v1kind: Secretmetadata:labels:k8s-app: kubernetes-dashboardaddonmanager.kubernetes.io/mode: EnsureExistsname: kubernetes-dashboard-key-holdernamespace: kubernetes-dashboardtype: Opaque---kind: ConfigMapapiVersion: v1metadata:labels:k8s-app: kubernetes-dashboardaddonmanager.kubernetes.io/mode: EnsureExistsname: kubernetes-dashboard-settingsnamespace: kubernetes-dashboard---kind: RoleapiVersion: rbac.authorization.k8s.io/v1metadata:labels:k8s-app: kubernetes-dashboardaddonmanager.kubernetes.io/mode: Reconcilename: kubernetes-dashboardnamespace: kubernetes-dashboardrules:- apiGroups: [""]resources: ["secrets"]resourceNames: ["kubernetes-dashboard-key-holder", "kubernetes-dashboard-certs", "kubernetes-dashboard-csrf"]verbs: ["get", "update", "delete"]- apiGroups: [""]resources: ["configmaps"]resourceNames: ["kubernetes-dashboard-settings"]verbs: ["get", "update"]- apiGroups: [""]resources: ["services"]resourceNames: ["heapster", "dashboard-metrics-scraper"]verbs: ["proxy"]- apiGroups: [""]resources: ["services/proxy"]resourceNames: ["heapster", "http:heapster:", "https:heapster:", "dashboard-metrics-scraper", "http:dashboard-metrics-scraper"]verbs: ["get"]---kind: ClusterRoleapiVersion: rbac.authorization.k8s.io/v1metadata:labels:k8s-app: kubernetes-dashboardaddonmanager.kubernetes.io/mode: Reconcilename: kubernetes-dashboardrules:- apiGroups: ["metrics.k8s.io"]resources: ["pods", "nodes"]verbs: ["get", "list", "watch"]---apiVersion: rbac.authorization.k8s.io/v1kind: RoleBindingmetadata:labels:k8s-app: kubernetes-dashboardaddonmanager.kubernetes.io/mode: Reconcilename: kubernetes-dashboardnamespace: kubernetes-dashboardroleRef:apiGroup: rbac.authorization.k8s.iokind: Rolename: kubernetes-dashboardsubjects:- kind: ServiceAccountname: kubernetes-dashboardnamespace: kubernetes-dashboard---apiVersion: rbac.authorization.k8s.io/v1kind: ClusterRoleBindingmetadata:name: kubernetes-dashboardlabels:k8s-app: kubernetes-dashboardaddonmanager.kubernetes.io/mode: ReconcileroleRef:apiGroup: rbac.authorization.k8s.iokind: ClusterRolename: kubernetes-dashboardsubjects:- kind: ServiceAccountname: kubernetes-dashboardnamespace: kubernetes-dashboard---kind: DeploymentapiVersion: apps/v1metadata:labels:k8s-app: kubernetes-dashboardname: kubernetes-dashboardnamespace: kubernetes-dashboardspec:replicas: 1revisionHistoryLimit: 10selector:matchLabels:k8s-app: kubernetes-dashboardtemplate:metadata:labels:k8s-app: kubernetes-dashboardspec:containers:- name: kubernetes-dashboardimage: harbor.odl.com/public/kubernetes-dashboard:v2.0.1imagePullPolicy: Alwaysports:- containerPort: 8443protocol: TCPargs:- --auto-generate-certificates- --namespace=kubernetes-dashboardvolumeMounts:- name: kubernetes-dashboard-certsmountPath: /certs- mountPath: /tmpname: tmp-volumelivenessProbe:httpGet:scheme: HTTPSpath: /port: 8443initialDelaySeconds: 30timeoutSeconds: 30securityContext:allowPrivilegeEscalation: falsereadOnlyRootFilesystem: truerunAsUser: 1001runAsGroup: 2001volumes:- name: kubernetes-dashboard-certssecret:secretName: kubernetes-dashboard-certs- name: tmp-volumeemptyDir: {}serviceAccountName: kubernetes-dashboardnodeSelector:"kubernetes.io/os": linuxtolerations:- key: "CriticalAddonsOnly"operator: "Exists"- key: node-role.kubernetes.io/mastereffect: NoSchedule---kind: ServiceapiVersion: v1metadata:labels:k8s-app: dashboard-metrics-scrapername: dashboard-metrics-scrapernamespace: kubernetes-dashboardspec:ports:- port: 8000targetPort: 8000selector:k8s-app: dashboard-metrics-scraper---kind: DeploymentapiVersion: apps/v1metadata:labels:k8s-app: dashboard-metrics-scrapername: dashboard-metrics-scrapernamespace: kubernetes-dashboardspec:replicas: 1revisionHistoryLimit: 10selector:matchLabels:k8s-app: dashboard-metrics-scrapertemplate:metadata:labels:k8s-app: dashboard-metrics-scraperannotations:seccomp.security.alpha.kubernetes.io/pod: 'runtime/default'spec:containers:- name: dashboard-metrics-scraperimage: harbor.odl.com/public/metrics-scraper:v1.0.4ports:- containerPort: 8000protocol: TCPlivenessProbe:httpGet:scheme: HTTPpath: /port: 8000initialDelaySeconds: 30timeoutSeconds: 30volumeMounts:- mountPath: /tmpname: tmp-volumesecurityContext:allowPrivilegeEscalation: falsereadOnlyRootFilesystem: truerunAsUser: 1001runAsGroup: 2001serviceAccountName: kubernetes-dashboardnodeSelector:"kubernetes.io/os": linuxtolerations:- key: node-role.kubernetes.io/mastereffect: NoSchedulevolumes:- name: tmp-volumeemptyDir: {}
5.4.1.2. rbac.yaml
创建管理员用户资源, 官方创建的用户没有权限
---apiVersion: v1kind: ServiceAccountmetadata:name: dashboard-admin-sanamespace: kubernetes-dashboardlabels:kubernetes.io/cluster-service: "true"addonmanager.kubernetes.io/mode: Reconcile---apiVersion: rbac.authorization.k8s.io/v1kind: ClusterRoleBindingmetadata:name: dashboard-admin-sanamespace: kubernetes-dashboardannotations:rbac.authorization.kubernetes.io/autoupdate: "true"roleRef:apiGroup: rbac.authorization.k8s.iokind: ClusterRolename: cluster-adminsubjects:- kind: ServiceAccountname: dashboard-admin-sanamespace: kubernetes-dashboard
5.4.1.3. ingress.yaml
如果当前没有使用ingress来提供服务, 可在dashboard的资源清单service资源指定NodePort提供服务
apiVersion: extensions/v1beta1kind: Ingressmetadata:name: kubernetes-dashboardnamespace: kubernetes-dashboardannotations:kubernetes.io/ingress.class: traefikspec:rules:- host: dashboard.odl.comhttp:paths:- backend:serviceName: kubernetes-dashboardservicePort: 443
apiVersion: extensions/v1beta1kind: Ingressmetadata:name: kubernetes-dashboardnamespace: kubernetes-dashboardannotations:kubernetes.io/ingress.class: traefikspec:rules:- host: dashboard.odl.comhttp:paths:- backend:serviceName: kubernetes-dashboardservicePort: 443
5.4.2. dashboard交付至k8s
[root@hdss7-21 ~]# kubectl apply -f http://k8s-yaml.odl.com/dashboard_2.0.1/dashboard.yaml[root@hdss7-21 ~]# kubectl apply -f http://k8s-yaml.odl.com/dashboard_2.0.1/rbac.yaml[root@hdss7-21 ~]# kubectl apply -f http://k8s-yaml.odl.com/dashboard_2.0.1/ingress.yaml
5.4.3. 配置 DNS
操作在hdss7-11 如果使用NodePort映射端口, 可忽略此步骤
[root@hdss7-11 ~]# vim /var/named/odl.com.zone$ORIGIN odl.com.$TTL 600 ; 10 minutes@ IN SOA dns.odl.com. dnsadmin.odl.com. (2020091712 ; serial10800 ; refresh (3 hours)900 ; retry (15 minutes)604800 ; expire (1 week)86400 ; minimum (1 day))NS dns.odl.com.$TTL 60 ; 1 minutedns A 10.4.7.11harbor A 10.4.7.200k8s-yaml A 10.4.7.200traefik A 10.4.7.10dashboard A 10.4.7.10[root@hdss7-11 ~]# systemctl restart named
5.4.4. 登录dashboard界面
查看用户token
[root@hdss7-21 ~]# kubectl get secret -n kubernetes-dashboardNAME TYPE DATA AGEdashboard-admin-sa-token-qrkdl kubernetes.io/service-account-token 3 30mdefault-token-h4p79 kubernetes.io/service-account-token 3 37mkubernetes-dashboard-certs Opaque 0 37mkubernetes-dashboard-csrf Opaque 1 37mkubernetes-dashboard-key-holder Opaque 2 37mkubernetes-dashboard-token-n8t4c kubernetes.io/service-account-token 3 37m[root@hdss7-21 ~]# kubectl describe secret dashboard-admin-sa-token-qrkdl -n kubernetes-dashboardName: dashboard-admin-sa-token-qrkdlNamespace: kubernetes-dashboardLabels: <none>Annotations: kubernetes.io/service-account.name: dashboard-admin-sakubernetes.io/service-account.uid: 661f4adb-b51b-46d5-b9f8-966c91161f20Type: kubernetes.io/service-account-tokenData====ca.crt: 1346 bytesnamespace: 20 bytestoken: eyJhbGciOiJSUzI1NiIsImtpZCI6IiJ9......(省略)
使用token登录


若有收获,就点个赞吧
0 人点赞
