前言:写shader的时候,一旦参数多起来,就感觉一大串超级长超级难看,所以在此学习一下别的大佬些的GUI。
1:模仿目标是熊猫的shaderGUI
看了一下GUI文件,5000多行。。超级长,加上不是特别熟练,很多都看不太懂,看来是不能一下子全部实现,,,没办法,先定个小目标,只实现基础设置这一个模块。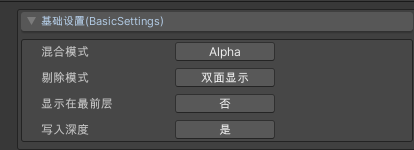
第一段,自定义下拉菜单的形状属性
//自定义下拉菜单的形状属性static bool Foldout(bool display, string title){var style = new GUIStyle("ShurikenModuleTitle");style.font = new GUIStyle(EditorStyles.boldLabel).font;style.border = new RectOffset(15, 7, 4, 4);style.fixedHeight = 22;style.contentOffset = new Vector2(20f, -2f);style.fontSize = 11;style.normal.textColor = new Color(0.7f, 0.8f, 0.9f);var rect = GUILayoutUtility.GetRect(16f, 25f, style);GUI.Box(rect, title, style);var e = Event.current;var toggleRect = new Rect(rect.x + 4f, rect.y + 2f, 13f, 13f);if (e.type == EventType.Repaint){EditorStyles.foldout.Draw(toggleRect, false, false, display, false);}if (e.type == EventType.MouseDown && rect.Contains(e.mousePosition)){display = !display;e.Use();}return display;}
好了,一开始就遇到不懂的问题了(不愧是我)
看到第一行定义了style,这里有一个GUIStyle不是很清楚是干嘛的,看起来像是新建一个什么东东。这时候就到百度上场了!
var style = new GUIStyle("ShurikenModuleTitle");
上链接!
https://blog.csdn.net/u011428080/article/details/106676213
GUIStyle可以new一个全新的实例,这样,需要自己处理所有自己需要的效果。
GUIStyle还可以基于已经存在的实例new一个新的实例,这样,只需对原有的效果中不符合自己需求的进行修改(省事省力,这类情况是我们最常用的),譬如:
GUIStyle btnStyle = new GUIStyle("Command");btnStyle.fontSize = 12;btnStyle.alignment = TextAnchor.MiddleCenter;btnStyle.imagePosition = ImagePosition.ImageAbove;btnStyle.fontStyle = FontStyle.Normal;btnStyle.fixedWidth = 60;//等同于:GUIStyle btnStyle_1 = new GUIStyle("Command"){fontSize = 12,alignment = TextAnchor.MiddleCenter,imagePosition = ImagePosition.ImageAbove,fontStyle = FontStyle.Normal,fixedWidth = 60};
那么到底怎么从内置的GUIStyle中找到自己想要的呢?
AssetStore里曾经有一个名为“Edior Style Viewer”的插件可以预览内置的所有GUIStyle,但是该插件已经下架。其实我们可以自己写一个脚本去查看,因为遍历 GUI.skin.customStyles 可以取到所有的内置GUIStyle,先上效果图: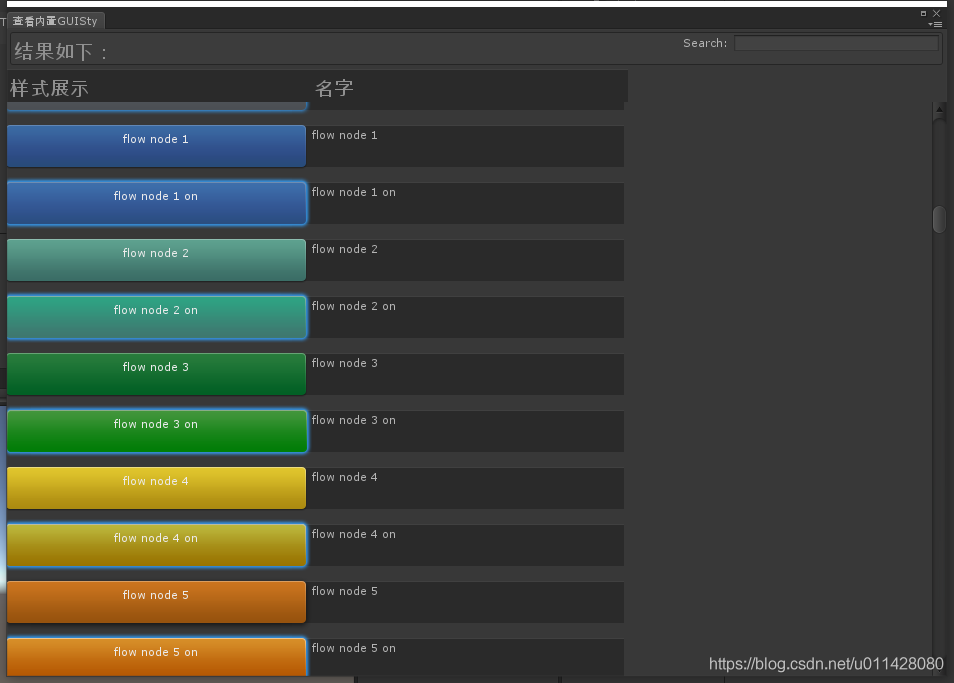
(名字这一列是可以被选中复制的)
话不多说,Editor下的代码如下:
using UnityEngine;using UnityEditor;public class GUIStyleViewer : EditorWindow {Vector2 scrollPosition = new Vector2(0,0);string search = "";GUIStyle textStyle;private static GUIStyleViewer window;[MenuItem("Tool/GUIStyleViewer", false, 10)]private static void OpenStyleViewer(){window = GetWindow<GUIStyleViewer>(false, "内置GUIStyle");}void OnGUI(){if (textStyle == null){textStyle = new GUIStyle("HeaderLabel");textStyle.fontSize = 25;}GUILayout.BeginHorizontal("HelpBox");GUILayout.Label("结果如下:", textStyle);GUILayout.FlexibleSpace();GUILayout.Label("Search:");search = EditorGUILayout.TextField(search);GUILayout.EndHorizontal();GUILayout.BeginHorizontal("PopupCurveSwatchBackground");GUILayout.Label("样式展示", textStyle, GUILayout.Width(300));GUILayout.Label("名字", textStyle, GUILayout.Width(300));GUILayout.EndHorizontal();scrollPosition = GUILayout.BeginScrollView(scrollPosition);foreach (var style in GUI.skin.customStyles){if (style.name.ToLower().Contains(search.ToLower())){GUILayout.Space(15);GUILayout.BeginHorizontal("PopupCurveSwatchBackground");if (GUILayout.Button(style.name, style, GUILayout.Width(300))){EditorGUIUtility.systemCopyBuffer = style.name ;Debug.LogError(style.name);}EditorGUILayout.SelectableLabel(style.name, GUILayout.Width(300));GUILayout.EndHorizontal();}}GUILayout.EndScrollView();}}
感觉这也算是一个标准的GUI文件了,可以参考这个格式。
using System.Collections.Generic;using UnityEngine;using UnityEditor;using System.Linq;public class CustomShaderGUI : ShaderGUI{override public void OnGUI(MaterialEditor materialEditor, MaterialProperty[] properties){// 使用默认GUI渲染着色器属性base.OnGUI(materialEditor, properties);// 从材料中获取当前的关键字Material targetMat = materialEditor.target as Material;string[] keyWords = targetMat.shaderKeywords;// 查看是否设置了重新设置,然后显示一个复选框bool redify = keyWords.Contains("REDIFY_ON");EditorGUI.BeginChangeCheck();redify = EditorGUILayout.Toggle("Redify material", redify);if (EditorGUI.EndChangeCheck()){// 如果复选框更改,请重置着色器关键字var keywords = new List<string> { redify ? "REDIFY_ON" : "REDIFY_OFF" };targetMat.shaderKeywords = keywords.ToArray();EditorUtility.SetDirty(targetMat);}}}
在官网翻到ShaderGUI的介绍,感觉这个才是常规操作?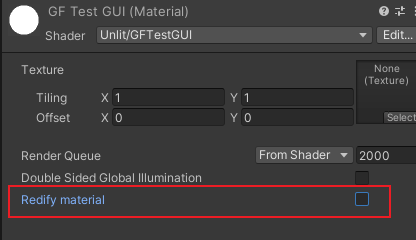
直接套用,在shader面板上多了Redify material,看来这个是可以使用的,但是使用方法还需要研究一下。
现在还是先回到熊猫的GUI上面来。
直接在官方API可以查到GUIStyle这个函数的作用。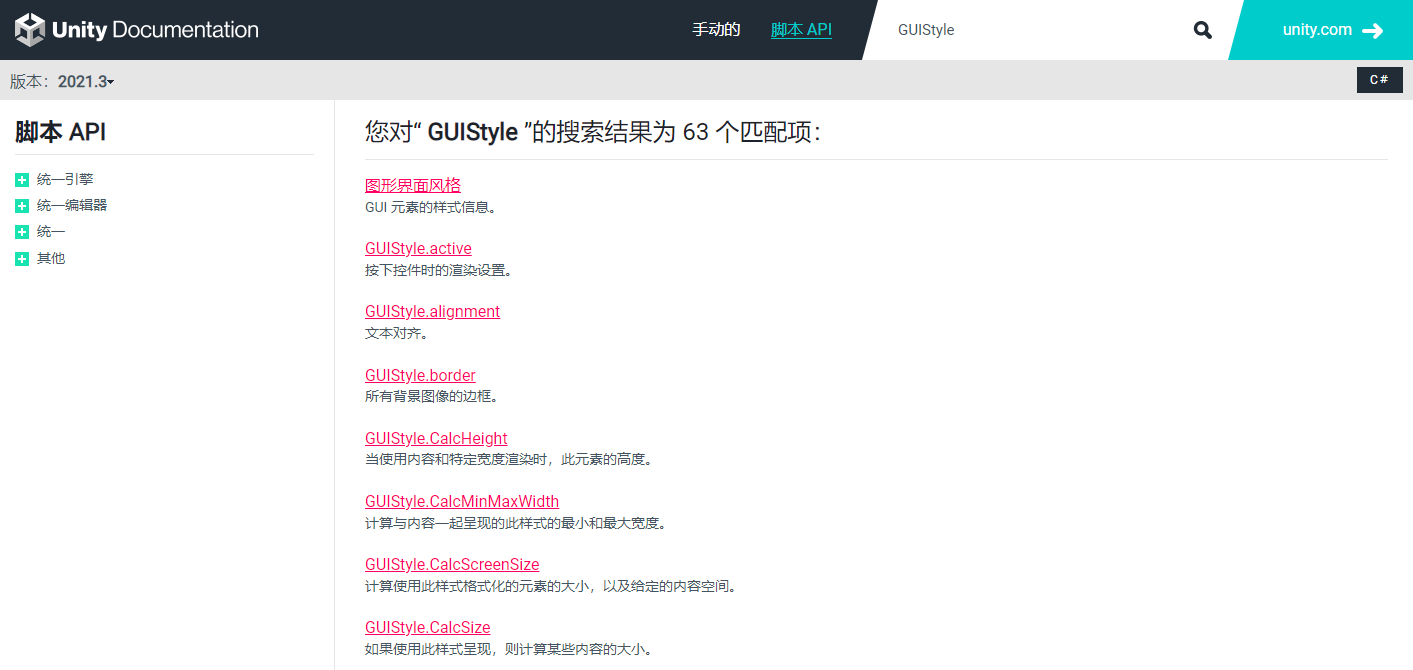
好!现在局势明朗起来了!实现之后可以尝试diy一下这些属性~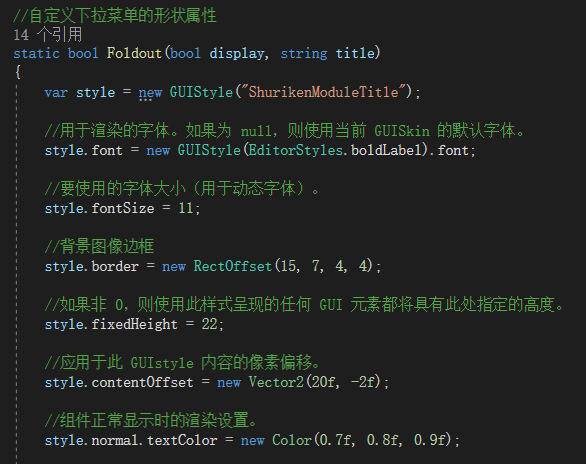
有一段感觉是比较重要的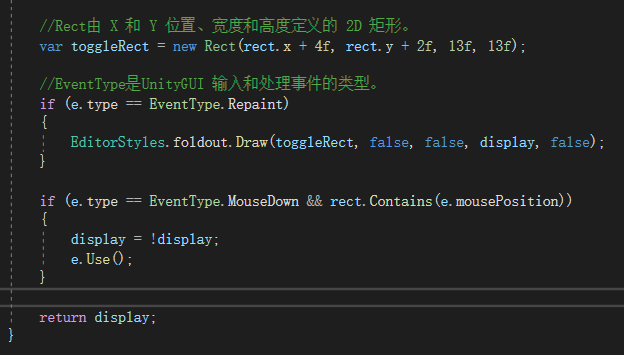
EventType.Repaint
UnityGui输入和处理事件的类型。
用它来判断GUI中发生了哪种类型的事件。事件的类型包括鼠标单击,鼠标拖动,按钮按下,鼠标进入或退出窗口以及滚动轮以及下面提到的其他事件。
下面是官方给出的代码,看起来是根据我们鼠标的点击,输出不同的结果
//将此脚本附加到游戏对象//该脚本是一些可用的事件类型的基本概述。它根据当前事件类型输出消息。using UnityEngine;public class Example : MonoBehaviour{void OnGUI(){Event m_Event = Event.current;if (m_Event.type == EventType.MouseDown){Debug.Log("Mouse Down.");}if (m_Event.type == EventType.MouseDrag){Debug.Log("Mouse Dragged.");}if (m_Event.type == EventType.MouseUp){Debug.Log("Mouse Up.");}}}
在熊猫GUI的里还有2个下拉菜单的形状属性,这里就不贴出来了。
下一步、跳过跳过~跳了几百行代码…因为我们只实现“基础设置下拉菜单”,所以跳过了非常多的代码~
然后基本到最后阶段了,在脚本里加上这个方法之后,就可以在shader面板里面看到我们想要的结果了。接下来就是详细的解析一遍这些代码。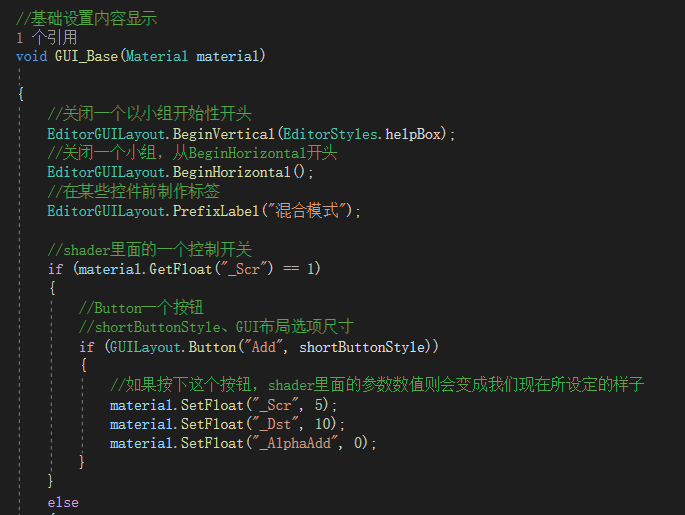
这一步之后基本就是重复的结构了。
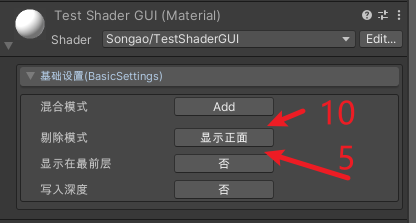
有个小问题:
不知道为什么熊猫的shader里面,他的主帖图会有Tilling和Offset
其实就是少了这一句,芜湖~
贴一下复刻的最终效果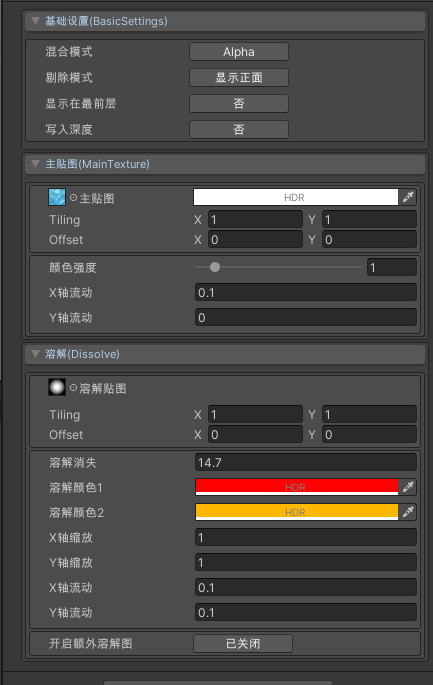
Shader "Songao/FlowMaskGUITest"{Properties{[Enum(UnityEngine.Rendering.CullMode)]_Cullmode("Cullmode", Float) = 0[Enum(UnityEngine.Rendering.CompareFunction)]_Ztest("Ztest", Float) = 4[Enum(UnityEngine.Rendering.BlendMode)]_Scr("Scr", Float) = 5[Enum(UnityEngine.Rendering.BlendMode)]_Dst("Dst", Float) = 10_Zwrite("Zwrite", Float) = 0_MainTex("_MainTex" , 2D)= "white"{}//主贴图[HideInInspector]_MainTex_ST("MainTex_ST", Vector) = (1,1,0,0)[HDR]_TintColor("_TintColor",Color) = (1,1,1,1)//主颜色_Intensity( "_Intensity", Range(0,10) ) = 1//颜色强度_MainFlowX("_MainFlowX",float) = 0//主贴图x轴流动_MainFlowY("_MainFlowY",float) = 0//主贴图y轴流动_NoiseTex("_NoiseTex",2D) = "white" {}//噪音贴图_NoiseScaleX( "_NoiseScaleX", float ) = 2//噪音贴图x轴缩放_NoiseScaleY( "_NoiseScaleY", float ) = 2//噪音贴图y轴缩放_NoiseFlowX( "_NoiseFlowX", float ) = 2//噪音贴图x轴流动_NoiseFlowY( "_NoiseFlowY", float ) = 2//噪音贴图x轴流动[Toggle(ADD_NO_ISECTRL)]_AddNoiseCtrl("_AddNoiseCtrl",float) = 0_NoiseCtrl("_NoiseCtrl",2D) = "Gray" {}//噪声边缘贴图_NoiseCtrlIntensity( "_NoiseCtrlIntensity", float ) = 1//噪声边缘强度_LineWidth("_LineWidth",Range(0.0,0.2)) = 0.1//边缘宽度_LineRange("_LineRange",Range(0.0,0.2)) = 0.05//边缘范围_LineChange("_LineChange",float) = 30//边缘变化_Amount("_Amount",Range(0.0,2.0)) = 0.0//边缘量_DissolveFade( "_DissolveFade", float ) = 20//溶解消失[HDR]_DissolveColor1("_DissolveColor1",Color) = (1,0,0,1)//溶解颜色1[HDR]_DissolveColor2("_DissolveColor2",Color) = (1,0,0,1)//溶解颜色2//_Smooth("Smooth" , Range(0,4)) = 2//_FloorY("FloorY" , float ) = 0}SubShader{LOD 300Tags{"Queue" = "Transparent""IgnoreProjector" = "True"}Pass{Cull [_Cullmode]ZWrite [_Zwrite]ZTest [_Ztest]Lighting OffFog {Mode Off}Blend [_Scr] [_Dst]CGPROGRAM//#pragma shader_feature _AddNoiseCtrl_ON#pragma multi_compile __ ADD_NO_ISECTRL#pragma vertex vert#pragma fragment frag#pragma multi_compile_fog#pragma fragmentoption APB_precision_hint_faster#include "UnityCG.cginc"sampler2D _MainTex;half4 _MainTex_ST;sampler2D _NoiseTex;sampler2D _NoiseCtrl;half _NoiseCtrlIntensity;half4 _NoiseTex_ST;fixed _Amount;fixed4 _DissolveColor1;fixed4 _DissolveColor2;fixed _LineWidth;half _NoiseScaleX,_NoiseScaleY;half _Intensity;half4 _TintColor;half _LineRange;half _LineChange;half _NoiseFlowX,_NoiseFlowY;half _MainFlowX,_MainFlowY;half _DissolveFade;struct v2f{float4 pos : POSITION;half2 uv : TEXCOORD0;half4 color : COLOR;float4 customData1:TEXCOORD1;half4 dissolveUV:TEXCOORD2;float3 worldPos : TEXCOORD3;};v2f vert(appdata_full v){v2f o;o.pos = UnityObjectToClipPos(v.vertex);o.uv = v.texcoord.xy * _MainTex_ST.xy + _MainTex_ST.zw;o.uv += half2(_MainFlowX,_MainFlowY) * _Time.y;o.color = v.color;o.customData1 = v.texcoord1;o.dissolveUV.xy = v.texcoord.xy * half2(_NoiseScaleX,_NoiseScaleY) + ( half2(_NoiseFlowX,_NoiseFlowY) + half2(o.customData1.y, 0) ) * _Time.y + _NoiseTex_ST.zw;o.dissolveUV.zw = v.texcoord.xy;o.worldPos = mul(unity_ObjectToWorld , v.vertex);return o;};fixed4 frag(v2f i):COLOR{fixed3 dissolve = tex2D(_NoiseTex,i.dissolveUV.xy).rgb;fixed3 dissolveCtrl = tex2D(_NoiseCtrl,i.dissolveUV.zw).rgb * 2 - 1;float vertexAlpha = 1.5 - i.customData1.x * 2;//选择是否添加额外noise#ifdef ADD_NO_ISECTRLvertexAlpha -= dissolveCtrl.g * _NoiseCtrlIntensity;#endifclip( dissolve.g - vertexAlpha);half2 customUV = i.uv + i.customData1.zw;half4 color = tex2D(_MainTex,customUV);//return color;color.rgb *= _Intensity * _TintColor.rgb * i.color.rgb;fixed t = 1 - smoothstep(0.0,_LineWidth,dissolve.r - _Amount);fixed3 dissolveColor = lerp(_DissolveColor1,_DissolveColor2,t);dissolveColor = pow(dissolveColor,5);half t2 = saturate( ( dissolve.g - vertexAlpha - _LineRange ) * _LineChange );color.rgb = lerp( dissolveColor, color.rgb, t2 );half fade = smoothstep( 0, 1 , saturate( ( dissolve.g - vertexAlpha ) * _DissolveFade ) );color.a *= _TintColor.a * i.color.a * fade;return color;//float worldY = i.worldPos.y;//_FloorY = _GlobalFloorHeight + _FloorY;//float ramp = smoothstep(_FloorY - _Smooth , _FloorY + _Smooth , worldY) ;//color.a *= _TintColor.a * i.color.a * fade ;//return color;};ENDCG}}CustomEditor "FlowMaskGUITest"}
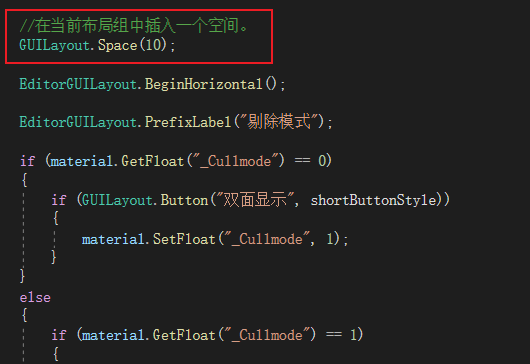
using UnityEngine;using UnityEditor;using System;public class FlowMaskGUITest : ShaderGUI{//自定义一个小按钮public GUILayoutOption[] shortButtonStyle = new GUILayoutOption[] { GUILayout.Width(100) };//自定义字体public GUIStyle style = new GUIStyle();//自定义下拉菜单的形状属性static bool Foldout(bool display, string title){//GUIStyle可以new一个全新的实例,这样,需要自己处理所有自己需要的效果。//还可以基于已经存在的实例new一个新的实例,这样,只需对原有的效果中不符合自己需求的进行修改(省事省力,这类情况是我们最常用的)var style = new GUIStyle("ShurikenModuleTitle");//用于渲染的字体。如果为 null,则使用当前 GUISkin 的默认字体。style.font = new GUIStyle(EditorStyles.boldLabel).font;//要使用的字体大小(用于动态字体)。style.fontSize = 11;//背景图像边框style.border = new RectOffset(15, 7, 4, 4);//如果非 0,则使用此样式呈现的任何 GUI 元素都将具有此处指定的高度。style.fixedHeight = 22;//应用于此 GUIstyle 内容的像素偏移。style.contentOffset = new Vector2(20f, -2f);//组件正常显示时的渲染设置。style.normal.textColor = new Color(0.7f, 0.8f, 0.9f);//为矩形保留布局空间,用于显示具有特定样式的一些内容。var rect = GUILayoutUtility.GetRect(16f, 25f, style);//在 GUI 层上创建一个框。GUI.Box(rect, title, style);//当前正在处理的当前事件。var e = Event.current;//Rect由 X 和 Y 位置、宽度和高度定义的 2D 矩形。var toggleRect = new Rect(rect.x + 4f, rect.y + 2f, 13f, 13f);//EventType是UnityGUI 输入和处理事件的类型。//绘制下拉窗口if (e.type == EventType.Repaint){EditorStyles.foldout.Draw(toggleRect, false, false, display, false);}if (e.type == EventType.MouseDown && rect.Contains(e.mousePosition)){display = !display;e.Use();}return display;}//自定义下拉菜单2的形状属性static bool Foldout2(bool display, string title){var style = new GUIStyle("ShurikenModuleTitle");style.font = new GUIStyle(EditorStyles.boldLabel).font;style.border = new RectOffset(15, 7, 4, 4);style.fixedHeight = 22;style.contentOffset = new Vector2(20f, -2f);style.fontSize = 11;style.normal.textColor = new Color(0.65f, 0.55f, 0.55f);var rect = GUILayoutUtility.GetRect(16f, 25f, style);GUI.Box(rect, title, style);var e = Event.current;var toggleRect = new Rect(rect.x + 4f, rect.y + 2f, 13f, 13f);if (e.type == EventType.Repaint){EditorStyles.foldout.Draw(toggleRect, false, false, display, false);}if (e.type == EventType.MouseDown && rect.Contains(e.mousePosition)){display = !display;e.Use();}return display;}//自定义变量static bool _Base_Foldout = true;//基础设置下拉菜单,下拉列表判断static bool _Maintextures_Foldout = true;//主贴图窗口下拉菜单static bool _Disslovetextures_Foldout = true;//溶解窗口下拉菜单static bool _NoiseTexAdd = false;//额外的溶解图开关MaterialEditor m_MaterialEditor;//shader属性MaterialProperty mainTex = null;MaterialProperty NoiseTex = null;MaterialProperty NoiseCtrl = null;MaterialProperty NoiseCtrlIntensity = null;MaterialProperty Amount = null;MaterialProperty DissolveColor1 = null;MaterialProperty DissolveColor2 = null;MaterialProperty NoiseScaleX = null;MaterialProperty NoiseScaleY = null;MaterialProperty Intensity = null;MaterialProperty TintColor = null;MaterialProperty LineWidth = null;MaterialProperty LineRange = null;MaterialProperty LineChange = null;MaterialProperty NoiseFlowX = null;MaterialProperty NoiseFlowY = null;MaterialProperty MainFlowX = null;MaterialProperty MainFlowY = null;MaterialProperty DissolveFade = null;MaterialProperty AddNoiseCtrl = null;//将自定义的需要显示的属性指向shader里的相应变量public void FindProperties(MaterialProperty[] props){//主帖图属性指向mainTex = FindProperty("_MainTex", props);NoiseTex = FindProperty("_NoiseTex", props);NoiseCtrl = FindProperty("_NoiseCtrl", props);NoiseCtrlIntensity = FindProperty("_NoiseCtrlIntensity", props);Amount = FindProperty("_Amount", props);DissolveColor1 = FindProperty("_DissolveColor1", props);DissolveColor2 = FindProperty("_DissolveColor2", props);NoiseScaleX = FindProperty("_NoiseScaleX", props);NoiseScaleY = FindProperty("_NoiseScaleY", props);Intensity = FindProperty("_Intensity", props);TintColor = FindProperty("_TintColor", props);LineWidth = FindProperty("_LineWidth", props);LineChange = FindProperty("_LineChange", props);LineRange = FindProperty("_LineRange", props);NoiseFlowX = FindProperty("_NoiseFlowX", props);NoiseFlowY = FindProperty("_NoiseFlowY", props);MainFlowX = FindProperty("_MainFlowX", props);MainFlowY = FindProperty("_MainFlowY", props);DissolveFade = FindProperty("_DissolveFade", props);AddNoiseCtrl = FindProperty("_AddNoiseCtrl", props);}//将上面定义的属性显示在面板上public override void OnGUI(MaterialEditor materialEditor, MaterialProperty[] props){FindProperties(props);m_MaterialEditor = materialEditor;Material material = materialEditor.target as Material;//基础设置下拉菜单EditorGUILayout.BeginVertical(EditorStyles.helpBox);_Base_Foldout = Foldout(_Base_Foldout, "基础设置(BasicSettings)");if (_Base_Foldout){EditorGUI.indentLevel++;GUI_Base(material);EditorGUI.indentLevel--;}EditorGUILayout.EndVertical();//主帖图下拉菜单if (mainTex.textureValue != null){EditorGUILayout.BeginVertical(EditorStyles.helpBox);_Maintextures_Foldout = Foldout(_Maintextures_Foldout, "主贴图(MainTexture)");if (_Maintextures_Foldout){EditorGUI.indentLevel++;GUI_Maintextures(material);EditorGUI.indentLevel--;}EditorGUILayout.EndVertical();}//溶解下拉菜单if (mainTex.textureValue != null){EditorGUILayout.BeginVertical(EditorStyles.helpBox);_Disslovetextures_Foldout = Foldout(_Disslovetextures_Foldout, "溶解(Dissolve)");if (_Disslovetextures_Foldout){EditorGUI.indentLevel++;GUI_Dissolve(material);EditorGUI.indentLevel--;}EditorGUILayout.EndVertical();}}//主帖图具体显示内容void GUI_Maintextures(Material material){EditorGUILayout.BeginVertical(EditorStyles.helpBox);EditorGUILayout.BeginVertical(EditorStyles.helpBox);m_MaterialEditor.TexturePropertySingleLine(new GUIContent("主贴图"), mainTex, TintColor);m_MaterialEditor.TextureScaleOffsetProperty(mainTex);EditorGUILayout.EndVertical();EditorGUILayout.BeginVertical(EditorStyles.helpBox);m_MaterialEditor.ShaderProperty(Intensity, "颜色强度");GUILayout.Space(5);m_MaterialEditor.ShaderProperty(MainFlowX, "X轴流动");GUILayout.Space(5);m_MaterialEditor.ShaderProperty(MainFlowY, "Y轴流动");GUILayout.Space(5);EditorGUILayout.EndVertical();EditorGUILayout.EndVertical();}void GUI_Dissolve(Material material){EditorGUILayout.BeginVertical(EditorStyles.helpBox);//划分一个框包裹EditorGUILayout.BeginVertical(EditorStyles.helpBox);m_MaterialEditor.TexturePropertySingleLine(new GUIContent("溶解贴图"), NoiseTex);GUILayout.Space(5);m_MaterialEditor.TextureScaleOffsetProperty(NoiseTex);EditorGUILayout.EndVertical();EditorGUILayout.BeginVertical(EditorStyles.helpBox);m_MaterialEditor.ShaderProperty(DissolveFade, "溶解消失");GUILayout.Space(5);m_MaterialEditor.ShaderProperty(DissolveColor1, "溶解颜色1");GUILayout.Space(5);m_MaterialEditor.ShaderProperty(DissolveColor2, "溶解颜色2");GUILayout.Space(5);m_MaterialEditor.ShaderProperty(NoiseScaleX, "X轴缩放");GUILayout.Space(5);m_MaterialEditor.ShaderProperty(NoiseScaleY, "Y轴缩放");GUILayout.Space(5);m_MaterialEditor.ShaderProperty(NoiseFlowX, "X轴流动");GUILayout.Space(5);m_MaterialEditor.ShaderProperty(NoiseFlowY, "Y轴流动");GUILayout.Space(5);EditorGUILayout.EndVertical();//开关判断EditorGUILayout.BeginVertical(EditorStyles.helpBox);EditorGUILayout.BeginHorizontal();EditorGUILayout.PrefixLabel("开启额外溶解图");//_NoiseTexAdd = Foldout(_NoiseTexAdd, "额外溶解图");if (material.GetFloat("_AddNoiseCtrl") == 0){if (GUILayout.Button("已关闭", shortButtonStyle)){material.SetFloat("_AddNoiseCtrl", 1);}}else{if (GUILayout.Button("已开启", shortButtonStyle)){material.SetFloat("_AddNoiseCtrl", 0);}}EditorGUILayout.EndHorizontal();if (material.GetFloat("_AddNoiseCtrl") == 1){m_MaterialEditor.TexturePropertySingleLine(new GUIContent("溶解边缘贴图"), NoiseCtrl);m_MaterialEditor.TextureScaleOffsetProperty(NoiseCtrl);if (NoiseCtrl.textureValue ){m_MaterialEditor.ShaderProperty(NoiseCtrlIntensity, "边缘强度");GUILayout.Space(5);m_MaterialEditor.ShaderProperty(LineWidth, "边缘宽度");GUILayout.Space(5);m_MaterialEditor.ShaderProperty(LineRange, "边缘范围");GUILayout.Space(5);m_MaterialEditor.ShaderProperty(LineChange, "边缘变化");GUILayout.Space(5);m_MaterialEditor.ShaderProperty(Amount, "边缘量");GUILayout.Space(5);}}EditorGUILayout.EndVertical();//if (_NoiseTexAdd)//{// EditorGUI.indentLevel++;// EditorGUILayout.BeginVertical(EditorStyles.helpBox);// m_MaterialEditor.TexturePropertySingleLine(new GUIContent("溶解边缘贴图"), NoiseCtrl);// m_MaterialEditor.TextureScaleOffsetProperty(NoiseCtrl);// GUILayout.Space(5);// m_MaterialEditor.ShaderProperty(NoiseCtrlIntensity, "边缘强度");// GUILayout.Space(5);// m_MaterialEditor.ShaderProperty(LineWidth, "边缘宽度");// GUILayout.Space(5);// m_MaterialEditor.ShaderProperty(LineRange, "边缘范围");// GUILayout.Space(5);// EditorGUI.indentLevel--;// EditorGUILayout.EndVertical();//}EditorGUILayout.EndVertical();}//基础设置内容显示void GUI_Base(Material material){EditorGUILayout.BeginVertical(EditorStyles.helpBox);EditorGUILayout.BeginHorizontal();EditorGUILayout.PrefixLabel("混合模式");//shader里面的一个控制开关if (material.GetFloat("_Scr") == 1){//Button一个按钮//shortButtonStyle、GUI布局选项尺寸if (GUILayout.Button("Add", shortButtonStyle)){//如果按下这个按钮,shader里面的参数数值则会变成我们现在所设定的样子material.SetFloat("_Scr", 5);material.SetFloat("_Dst", 10);material.SetFloat("_AlphaAdd", 0);}}else{if (GUILayout.Button("Alpha", shortButtonStyle)){material.SetFloat("_Scr", 1);material.SetFloat("_Dst", 1);material.SetFloat("_AlphaAdd", 1);}}EditorGUILayout.EndHorizontal();//在当前布局组中插入一个空间。GUILayout.Space(5);//需要搭配EditorGUILayout.EndHorizontal();//意思差不多就是在里面一段UI中加上边框背景EditorGUILayout.BeginHorizontal();EditorGUILayout.PrefixLabel("剔除模式");if (material.GetFloat("_Cullmode") == 0){if (GUILayout.Button("双面显示", shortButtonStyle)){material.SetFloat("_Cullmode", 1);}}else{if (material.GetFloat("_Cullmode") == 1){if (GUILayout.Button("显示背面", shortButtonStyle)){material.SetFloat("_Cullmode", 2);}}else{if (GUILayout.Button("显示正面", shortButtonStyle)){material.SetFloat("_Cullmode", 0);}}}EditorGUILayout.EndHorizontal();//if (_tips == true)//{// EditorGUILayout.BeginVertical(EditorStyles.helpBox);// style.fontSize = 10;// style.normal.textColor = new Color(0.5f, 0.5f, 0.5f);// GUILayout.Label("*包含显示正面,显示背面,双面显示三种模式", style);// EditorGUILayout.EndVertical();//}GUILayout.Space(5);EditorGUILayout.BeginHorizontal();EditorGUILayout.PrefixLabel("显示在最前层");if (material.GetFloat("_Ztest") == 4){if (GUILayout.Button("否", shortButtonStyle)){material.SetFloat("_Ztest", 8);}}else{if (GUILayout.Button("是", shortButtonStyle)){material.SetFloat("_Ztest", 4);}}EditorGUILayout.EndHorizontal();//if (_tips == true)//{// EditorGUILayout.BeginVertical(EditorStyles.helpBox);// style.fontSize = 10;// style.normal.textColor = new Color(0.5f, 0.5f, 0.5f);// GUILayout.Label("*开启后深度测试ZTest设置为always,可以让特效显示在角色之前,避免穿模", style);// EditorGUILayout.EndVertical();//}GUILayout.Space(5);EditorGUILayout.BeginHorizontal();EditorGUILayout.PrefixLabel("写入深度");if (material.GetFloat("_Zwrite") == 0){if (GUILayout.Button("否", shortButtonStyle)){material.SetFloat("_Zwrite", 1);}}else{if (GUILayout.Button("是", shortButtonStyle)){material.SetFloat("_Zwrite", 0);}}EditorGUILayout.EndHorizontal();EditorGUILayout.EndVertical();GUILayout.Space(5);}}

若有收获,就点个赞吧
0 人点赞
