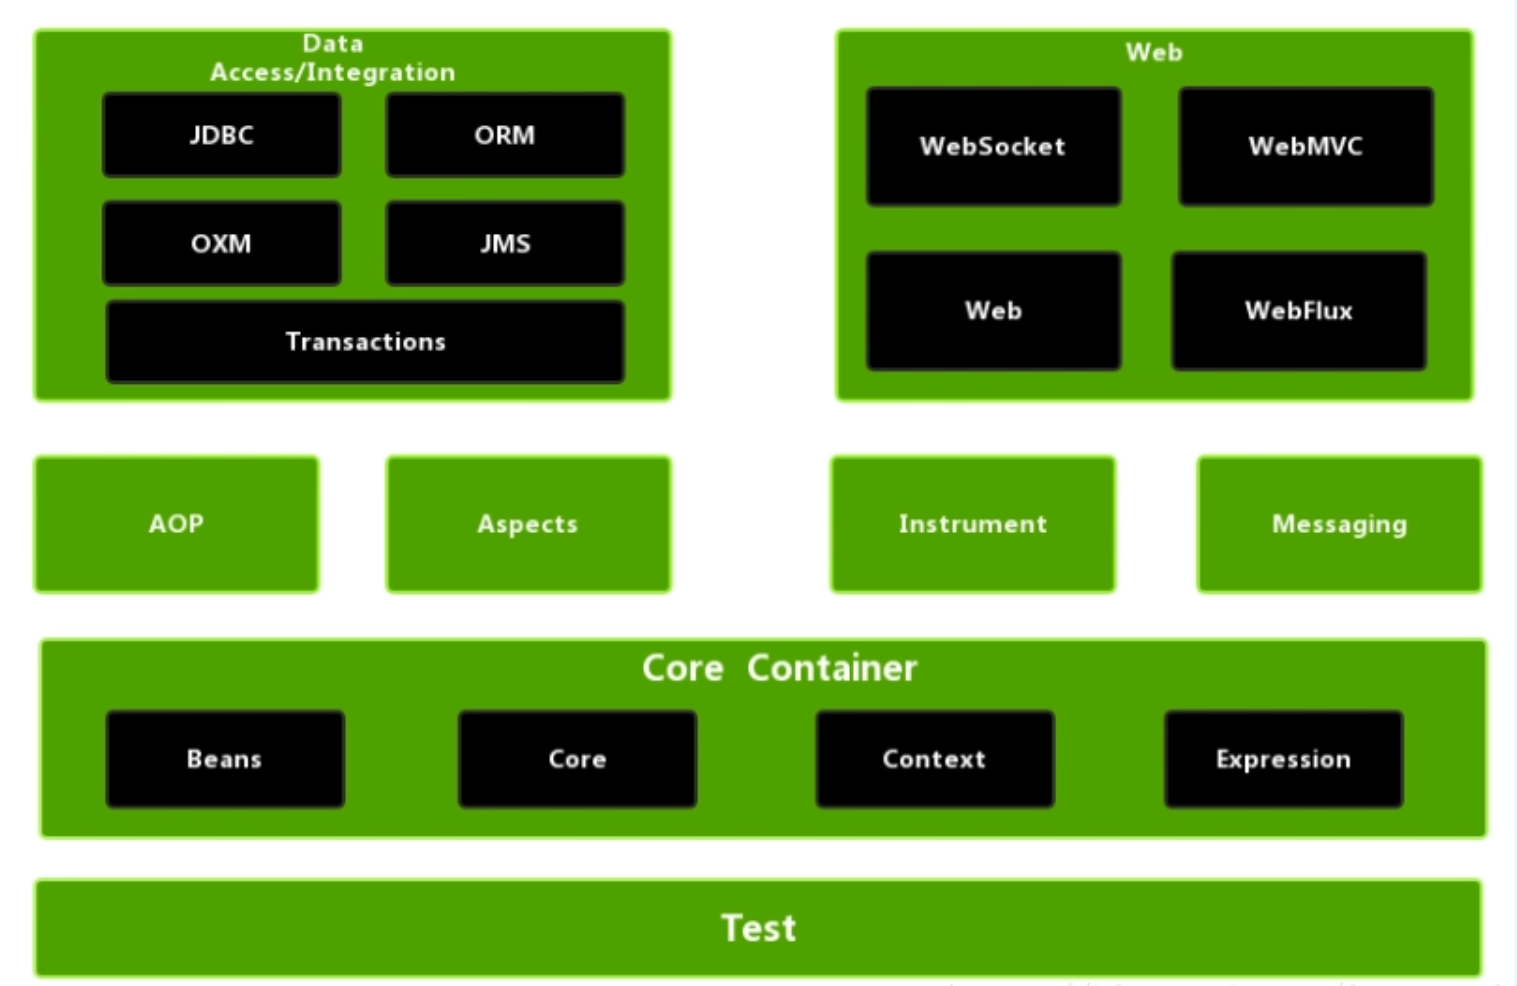
Core Container核心jar包、ioc基本包
IOC容器
控制反转,依赖注入
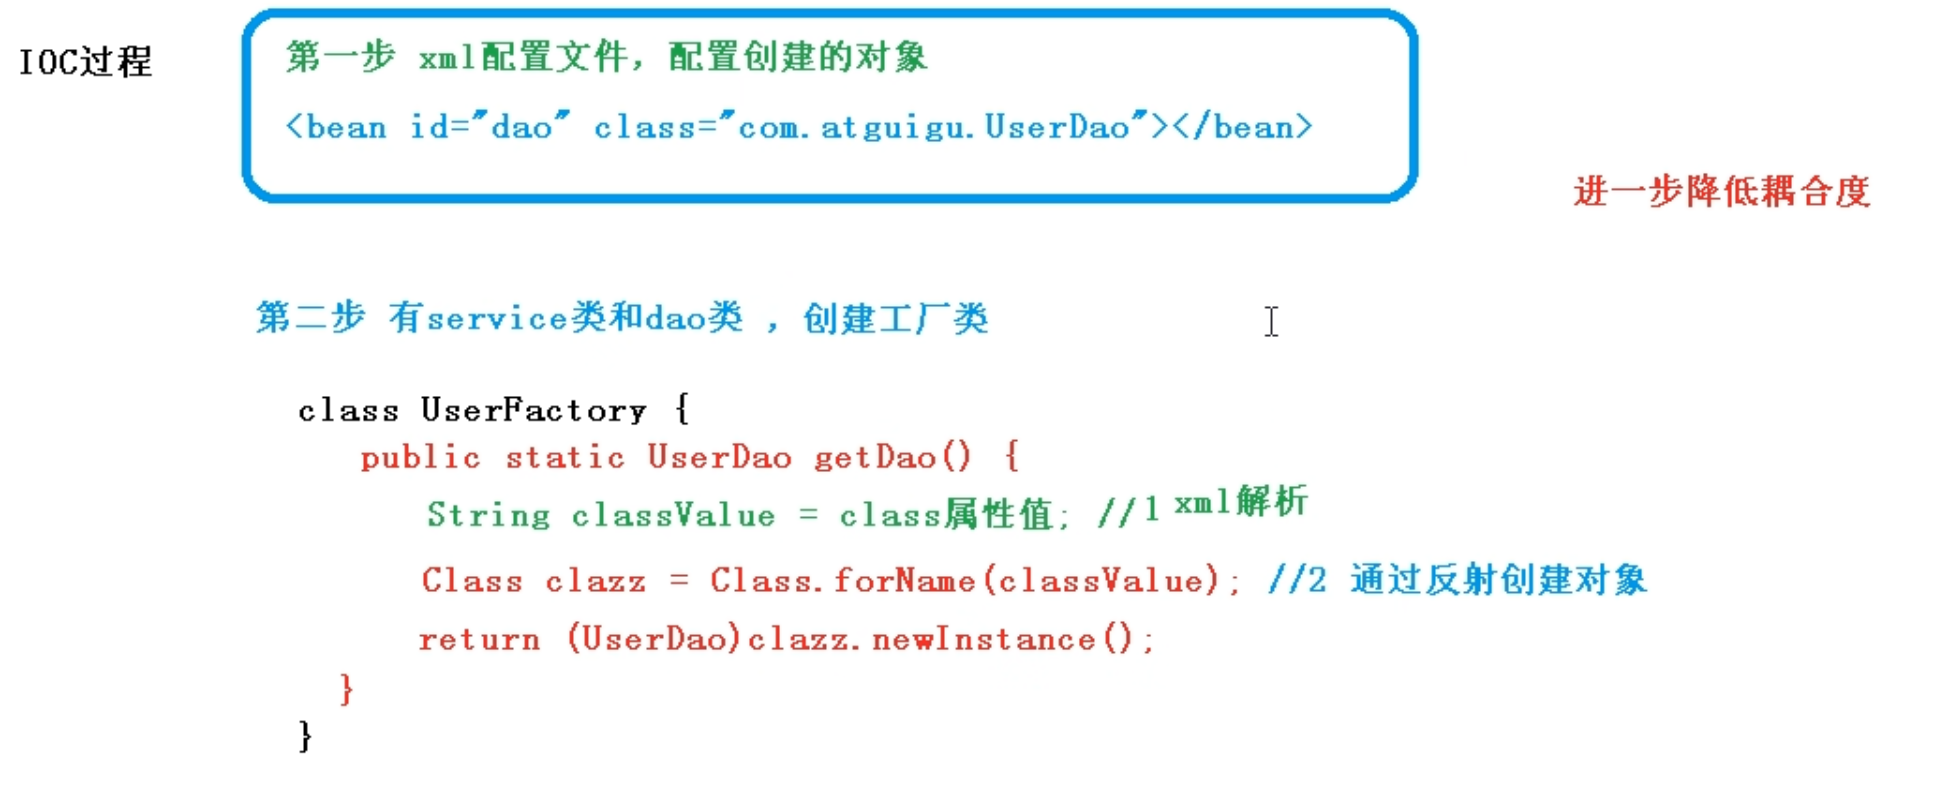
把对象的创建和调用交给spring容器进行管理
目的:降低耦合度
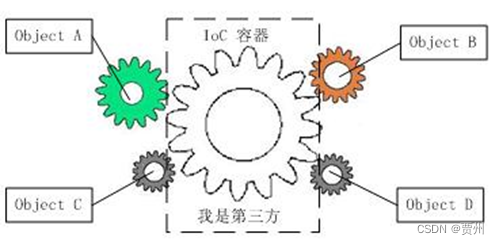
ioc过程
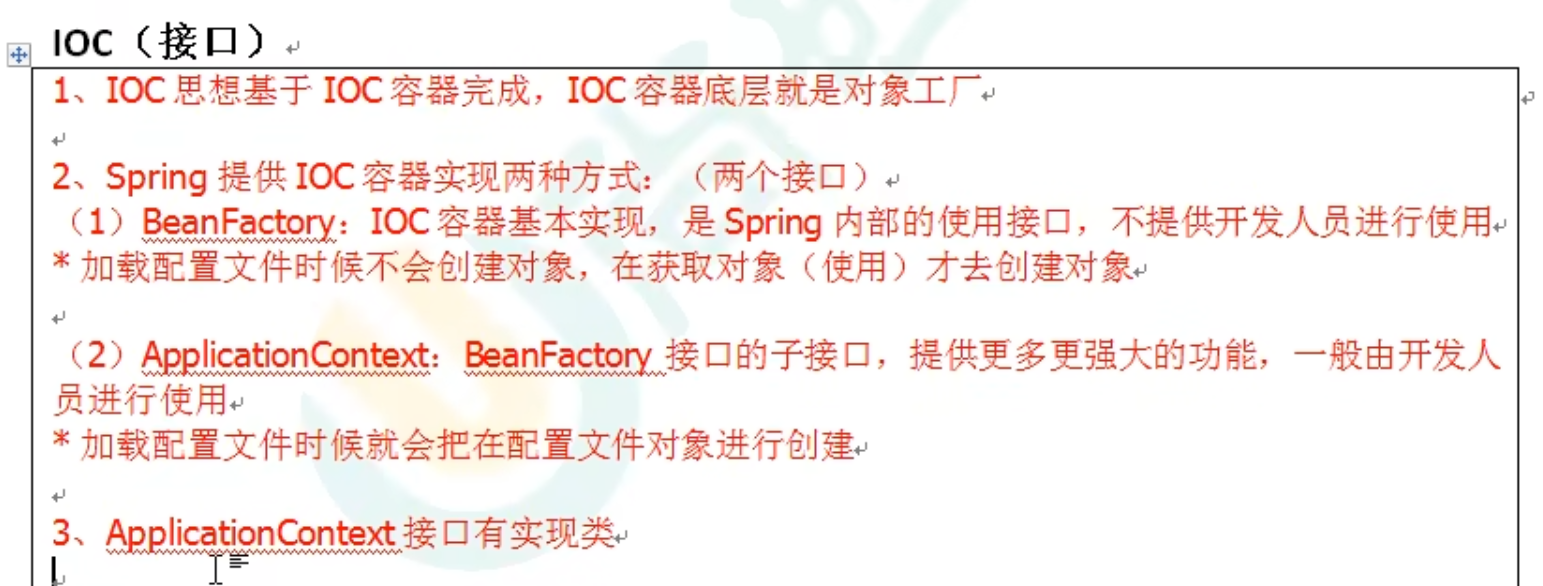
IOC接口
主要实现类
 外部属性文件配置数据库连接池
jdbc.driver=com.mysql.jdbc.Driverjdbc.url=jdbc:mysql://localhost:3306/k2502?useUnicode=yes&characterEncoding=utf-8&rewriteBatchedStatements=truejdbc.username=rootjdbc.password=zax#初始化连接数jdbc.initialSize=10#空闲时间最小连接数jdbc.minIdle=5#活动最大连接数jdbc.maxActive=50#等待队列最长等待时间jdbc.maxWait=5000
<?xml version="1.0" encoding="UTF-8"?><!--Spring配置文件(AOP容器)--><beans xmlns="http://www.springframework.org/schema/beans"xmlns:xsi="http://www.w3.org/2001/XMLSchema-instance"xmlns:p="http://www.springframework.org/schema/p"xmlns:context="http://www.springframework.org/schema/context"xmlns:aop="http://www.springframework.org/schema/aop"xmlns:tx="http://www.springframework.org/schema/tx"xsi:schemaLocation="http://www.springframework.org/schema/beanshttp://www.springframework.org/schema/beans/spring-beans-4.3.xsdhttp://www.springframework.org/schema/contexthttp://www.springframework.org/schema/context/spring-context-4.3.xsdhttp://www.springframework.org/schema/aophttp://www.springframework.org/schema/aop/spring-aop-4.3.xsdhttp://www.springframework.org/schema/txhttp://www.springframework.org/schema/tx/spring-tx-4.3.xsd"><!-- 基于注解的事务控制--><!-- 导入命名空间,扫描支持注解组件--><!-- 自动扫描,该包下的所有都支持注解--><context:component-scan base-package="com.kgc.service.impl"/><!-- 1.将mybatis配置环境集成到spring中,交由Spring托管 --><!--引用配置文件里的数据源信息--><context:property-placeholder location="classpath:jdbc.properties"/><!--获取数据源的操作--><bean id="dataSource" class="com.alibaba.druid.pool.DruidDataSource"><property name="driverClassName" value="${jdbc.driver}"/><property name="url" value="${jdbc.url}"/><property name="username" value="${jdbc.username}"/><property name="password" value="${jdbc.password}"/><!-- 配置初始化大小、最小、最大 --><!-- 通常来说,只需要修改initialSize、minIdle、maxActive --><property name="initialSize" value="${jdbc.initialSize}"/><property name="minIdle" value="${jdbc.minIdle}"/><property name="maxActive" value="${jdbc.maxActive}"/><property name="testWhileIdle" value="false"/><!-- 配置获取连接等待超时的时间 --><property name="maxWait" value="${jdbc.maxWait}"/><!-- 配置一个连接在池中最小生存的时间,单位是毫秒 --><property name="minEvictableIdleTimeMillis" value="30000"/><!-- 配置间隔多久才进行一次检测,检测需要关闭的空闲连接,单位是毫秒 --><property name="timeBetweenEvictionRunsMillis" value="60000"/></bean><!--2.定义sqlSessionFactory工厂组件--><!--基于mybatis的配置文件进行整合--><bean id="sqlSessionFactory" class="org.mybatis.spring.SqlSessionFactoryBean"><!--2.1指定数据源--> <!--引用上面的数据源对象--><property name="dataSource" ref="dataSource"/><!--2.2指定mybatis的配置文件--><property name="configLocation" value="classpath:mybatis-config.xml"/></bean><!--3.spring接管dao层组件 (理解为创建dao层实现类的对象)--><!--MapperScannerConfigurer 就等同于 sqlSession.getMapper(接口的名称.class)--><!--注意:一. sql映射的命名空间必需是接口的限定名,持久化操作的id值必需和接口方法中相同--><!-- 二. 动态生成实现类的bean对象id值,就是接口名称首字母小写--><bean class="org.mybatis.spring.mapper.MapperScannerConfigurer"><!--原本是生成一个接口实现类,封装后生成所有的实现类--><!--3.1指定sqlSessionFactory对象--><!--引用上面的工厂组件--><property name="sqlSessionFactoryBeanName" value="sqlSessionFactory"/><!--3.2扫描dao层接口,动态生成实现类的对象(value放接口的包名)--><property name="basePackage" value="com.kgc.mapper"/><!--<bean>相当于就是在容器里生成一个个dao接口实现类对象,id(对象)名是接口名首字母小写</bean>--></bean><!--配置Spring的事务管理器 --><bean id="transactionManager" class="org.springframework.jdbc.datasource.DataSourceTransactionManager"><constructor-arg ref="dataSource"/></bean><!-- 下面为配置事务注解驱动,需要绑定上述的事务配置--><!--扫描贴有@Transactional注解的方法,底层执行增强类,让方法基于事务执行--><tx:annotation-driven transaction-manager="transactionManager"/><!-- 启动@AspectJ支持 --><aop:aspectj-autoproxy/></beans>
注解实现IOC操作Bean管理
什么是注解
(1)注解是代码特殊标记,格式:@注解名称(属性名称=属性值, 属性名称=属性值..)
(2)使用注解,注解作用在类上面,方法上面,属性上面
(3)使用注解目的:简化xml配置
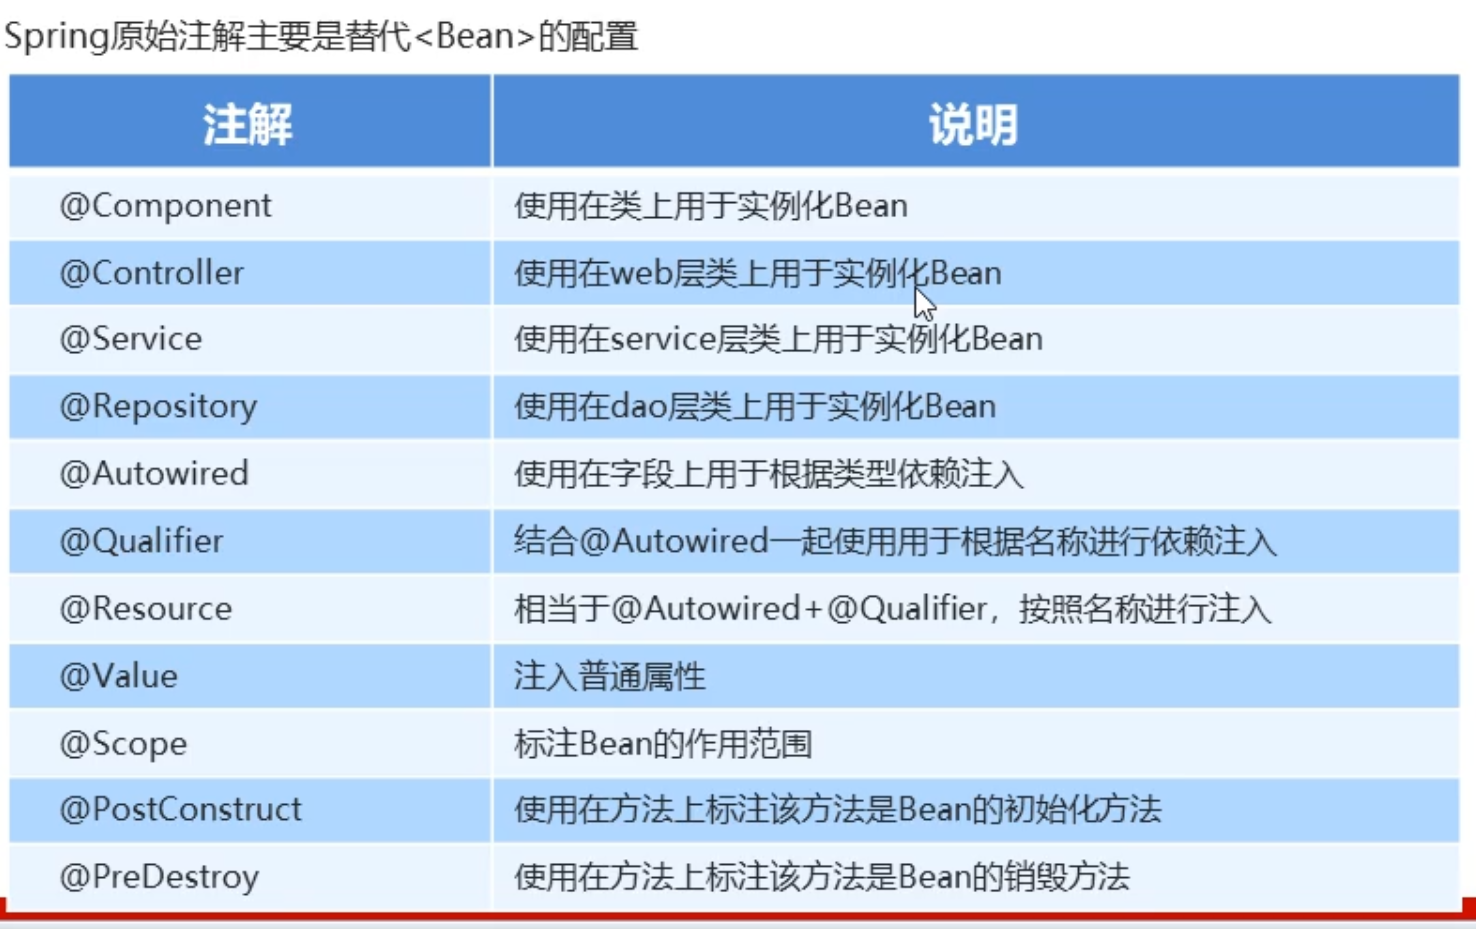
创建对象注解
Spring针对Bean管理中创建对象提供注解
(1)@Component
(2)@Service
(3)@Controller
(4)@Repository
* 上面四个注解功能是一样的,都可以用来创建bean实例 、
属性注入注解
1、普通属性
@Value :用于注入普通类型.
2、对象属性
@Autowired :默认根据属性类型进行自动装配,如果存在两个相同Bean类型相同,则按照名称注入
@Qualifier:根据属性名称注入,要和@Autowired 一起使用
@Resource 相当于:
@Autowired 和@Qualifier 一起使用
@scope值:
singleton:单实例,加载spring配置文件就会创建单例对象
prototype:多实例,调用getBean方法创建多实例对象
@Lazy注解标识单例bean 是否需要懒加载
与xml中bean标签lazy-init属性一样设置
true:bean对象在第一次调用getBean方法时才会实例化
false:bean对象在加载配置文件即Spring启动时会实例化
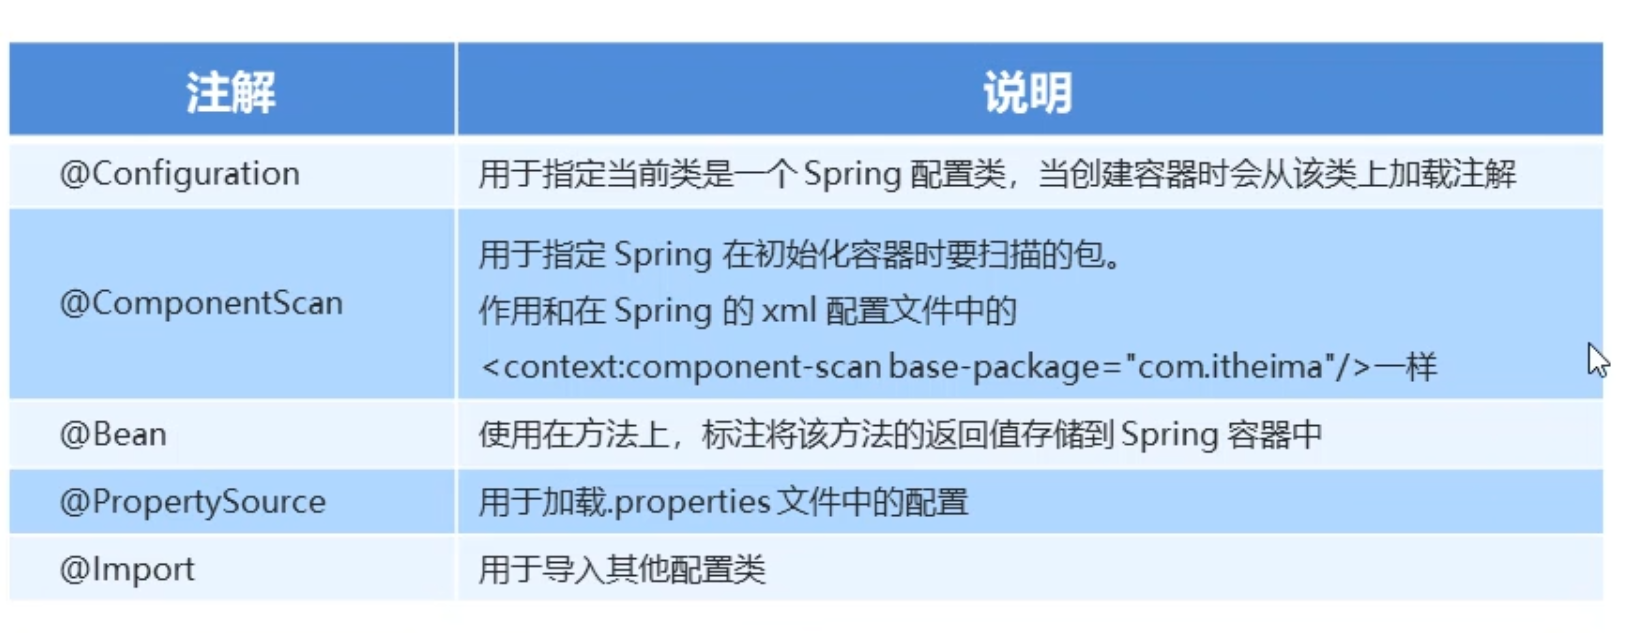
完全注解开发
创建配置类加上@Configuration替代xml配置文件
@ComponentScan(basePackages={“包名”,。。。})扫描指定包下组件
AnnotationConfigApplicationContext(类名.class)加载配置类
AOP

AOP操作
通知类型:
- [@Before: 前置通知注解](https://blog.csdn.net/weixin_45978397/article/details/124479669#Before__2)- [@AfterReturning:后置通知](https://blog.csdn.net/weixin_45978397/article/details/124479669#AfterReturning_43)- [@Around: 环绕通知](https://blog.csdn.net/weixin_45978397/article/details/124479669#Around__88)- [@AfterThrowing:异常通知](https://blog.csdn.net/weixin_45978397/article/details/124479669#AfterThrowing_145)- [@After :最终通知](https://blog.csdn.net/weixin_45978397/article/details/124479669#After__181)
在增强类上添加注解@Aspect
在增强类里,在作为通知方法上面添加通知类型注解,使用切入点表达式
切入点表达式
切入点表达式的格式如下:
execution([修饰符] [返回值类型] [类全路径] [方法名 ( [参数列表] )])
修饰符可以省略不写,不是必须要出现的。
返回值类型是不能省略不写的,根据你的方法来编写返回值,可以使用 代替。
包名,类名,方法名,参数的规则如下:
例如:com.qcby.demo3.BookDaoImpl.save()
首先包名,类名,方法名是不能省略不写的,但是可以使用 代替
中间的包名可以使用 号代替
类名也可以使用 号代替,也有类似的写法:DaoImpl
方法也可以使用 号代替
参数如果是一个参数可以使用 号代替,如果想代表任意参数使用 ..
比较通用的表达式:execution( com.qcby.*.ServiceImpl.save(..))
@Before("customerJoinPointerExpression()")public void beforeMethod(ProceedingJoinPoint proceedingJoinPoint,JoinPoint joinPoint){proceedingJoinPoint.proceed();//执行被增强的方法joinPoint.getSignature().getName(); // 获取目标方法名joinPoint.getSignature().getDeclaringType().getSimpleName(); // 获取目标方法所属类的简单类名joinPoint.getSignature().getDeclaringTypeName(); // 获取目标方法所属类的类名joinPoint.getSignature().getModifiers(); // 获取目标方法声明类型(public、private、protected)Object[] args = joinPoint.getArgs(); // 获取传入目标方法的参数,返回一个数组joinPoint.getTarget(); // 获取被代理的对象joinPoint.getThis(); // 获取代理对象自己}// 获取目标方法上的注解private <T extends Annotation> T getMethodAnnotation(ProceedingJoinPoint joinPoint, Class<T> clazz) {MethodSignature methodSignature = (MethodSignature) joinPoint.getSignature();Method method = methodSignature.getMethod();return method.getAnnotation(clazz);}
AOP动态代理
有接口时,使用jdk动态代理
创建接口实现类代理对象,用代理对象增强功能
jdk动态代理是利用反射机制生成一个实现代理接口的匿名类,在调用具体方法前调用InvokeHandler来处理。 
无接口时,使用CGLIB动态代理
创建当前类子类的代理对象,用代理对象增强功能
cglib动态代理是利用asm开源包,对代理对象类的class文件加载进来,通过修改其字节码生成子类来处理。 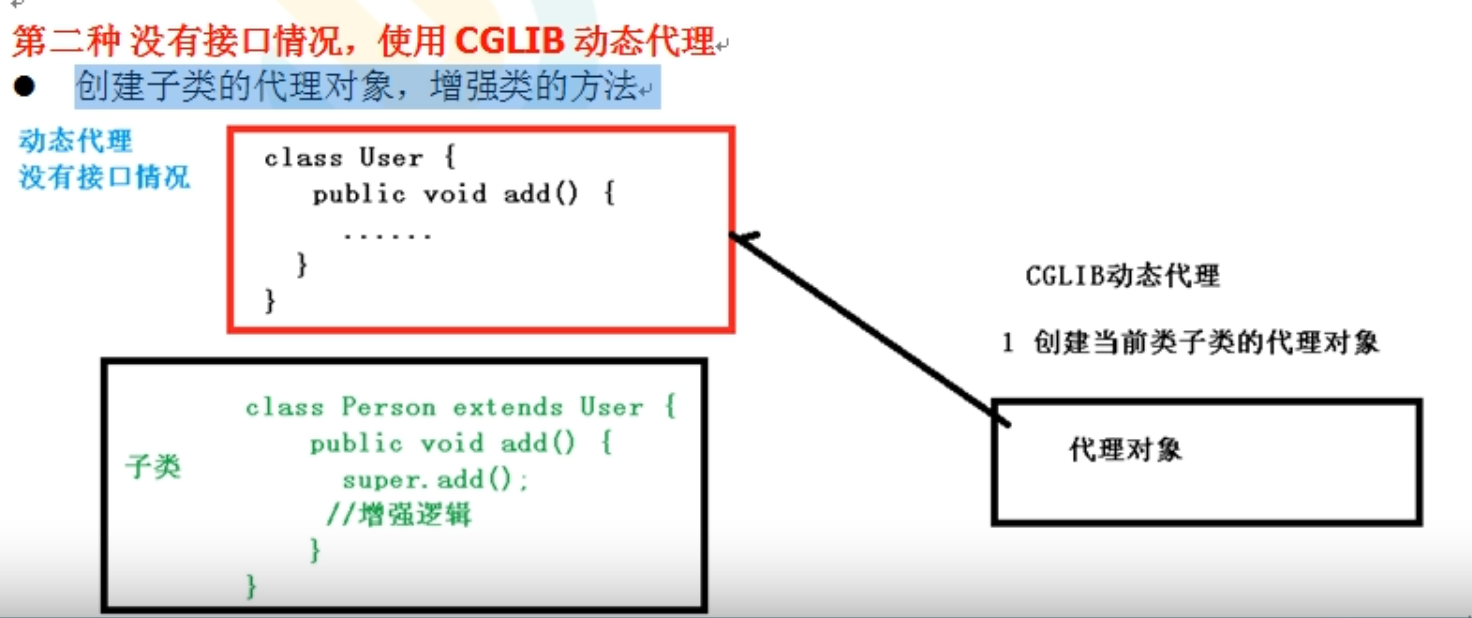

CGLib创建的动态代理对象性能比JDK创建的动态代理对象的性能高不少,但是CGLib在创建代理对象时所花费的时间却比JDK多得多,所以对于单例的对象,因为无需频繁创建对象,用CGLib合适,反之,使用JDK方式要更为合适一些。同时,由于CGLib由于是采用动态创建子类的方法,对于final方法,无法进行代理。
事务
编程式事务控制相关对象
平台事务管理器
根据dao层技术有不同的实现类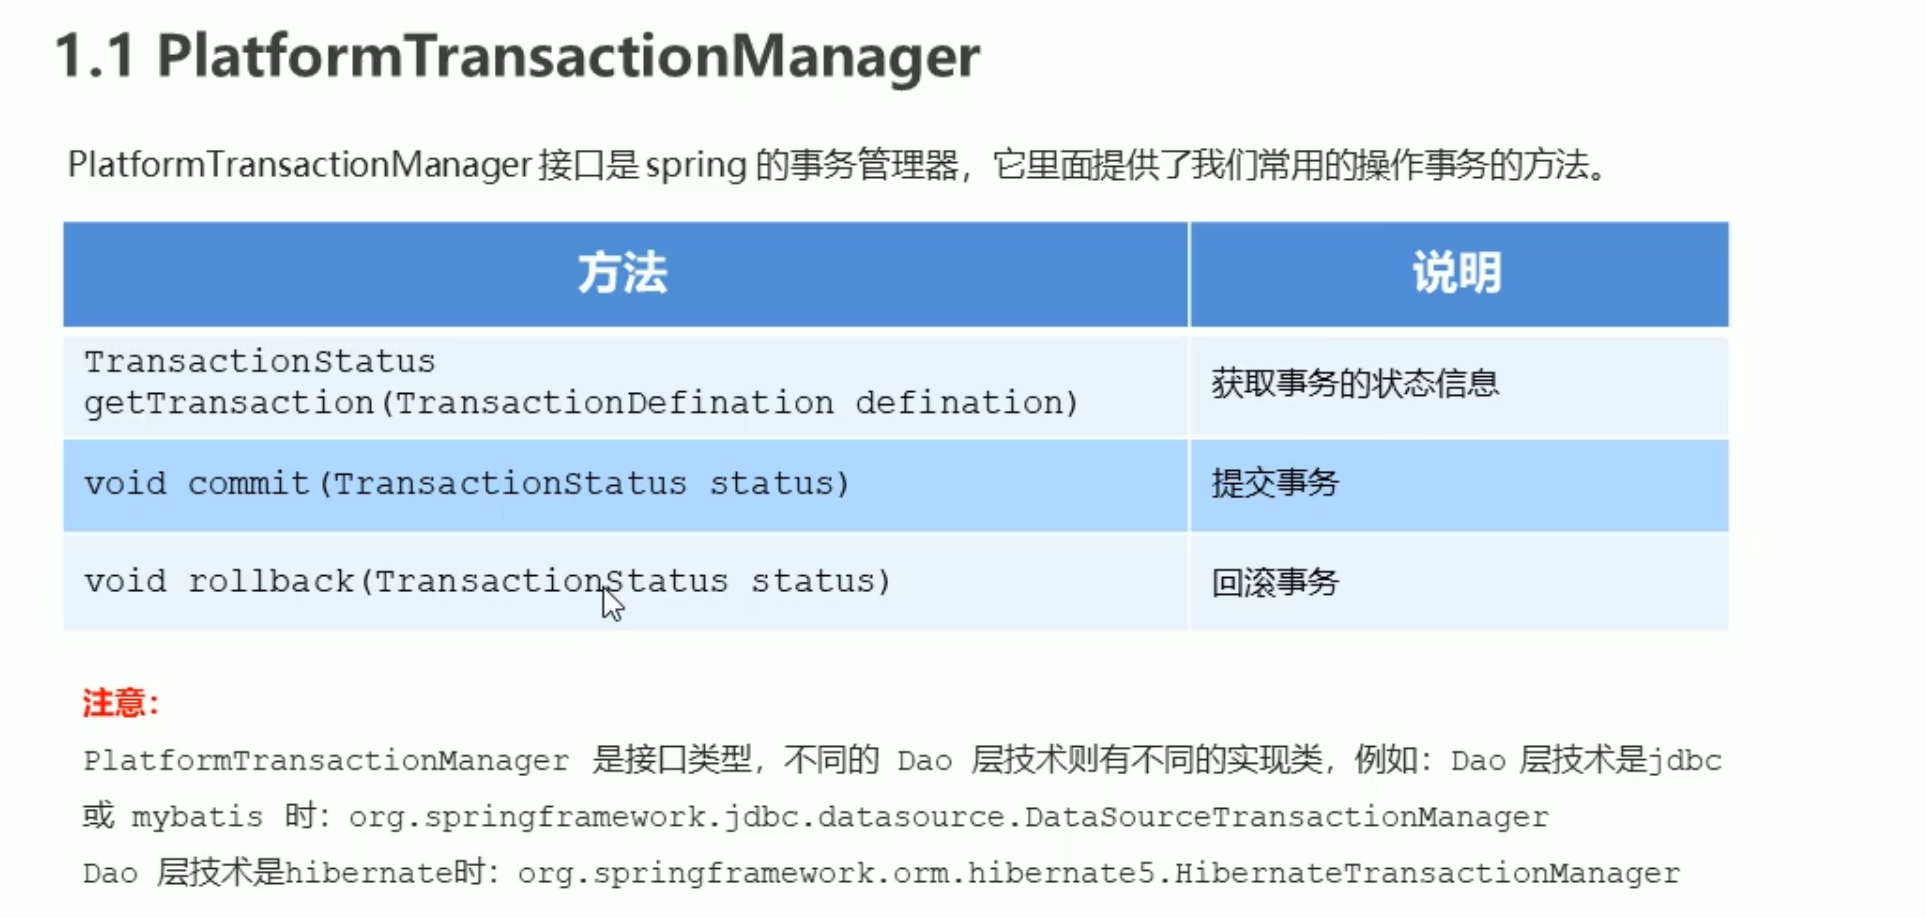
事务定义对象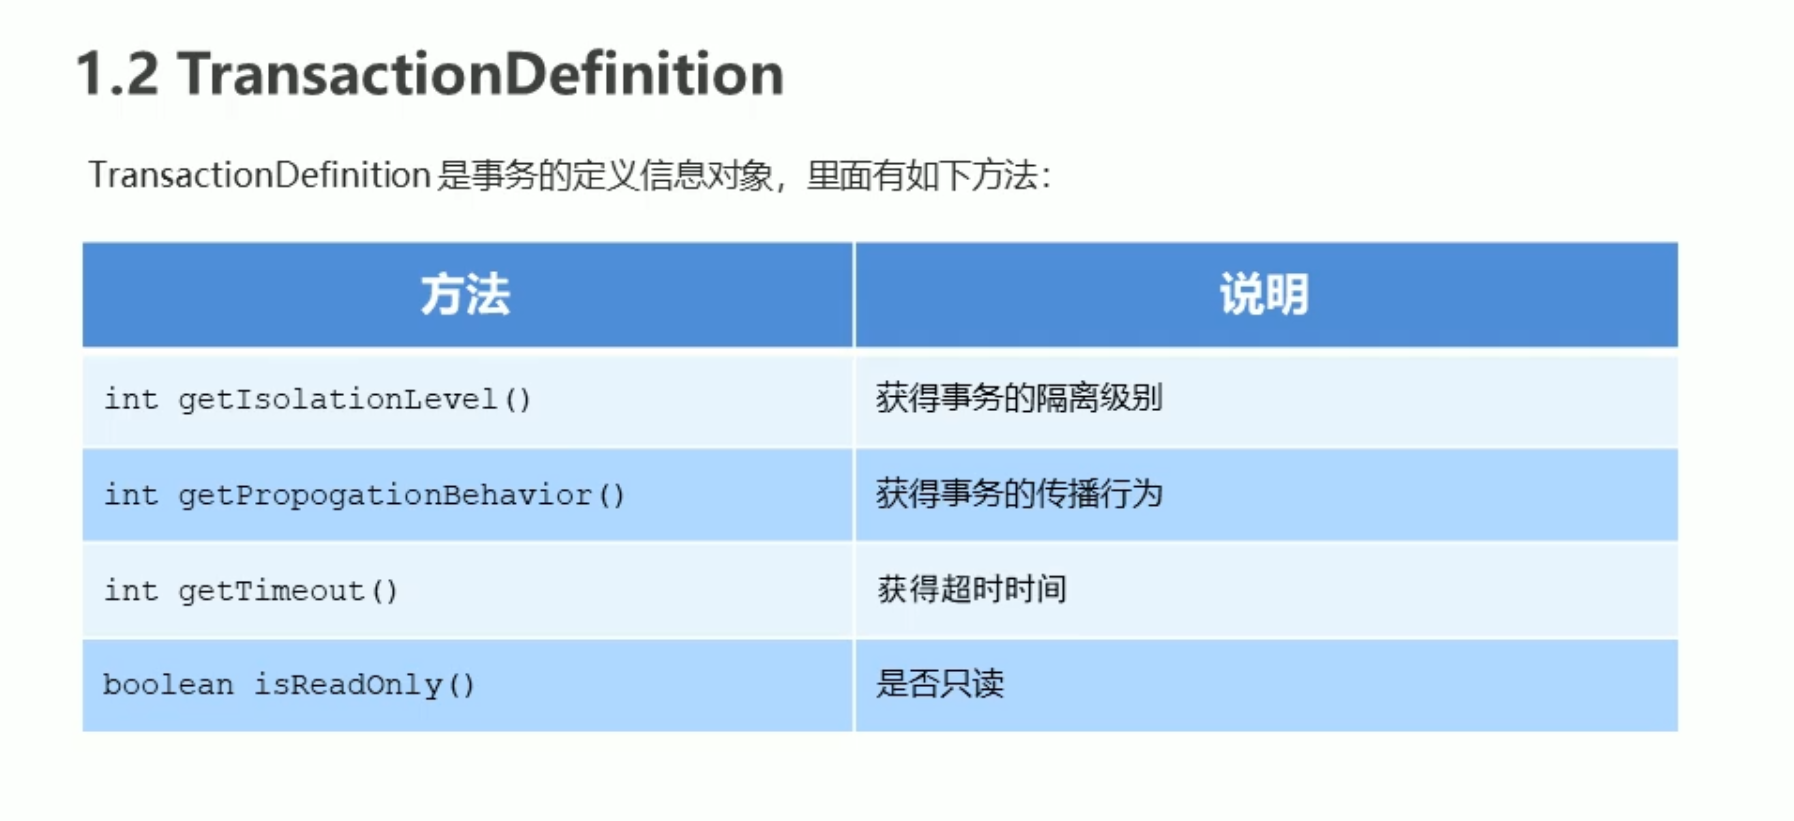
事务状态对象
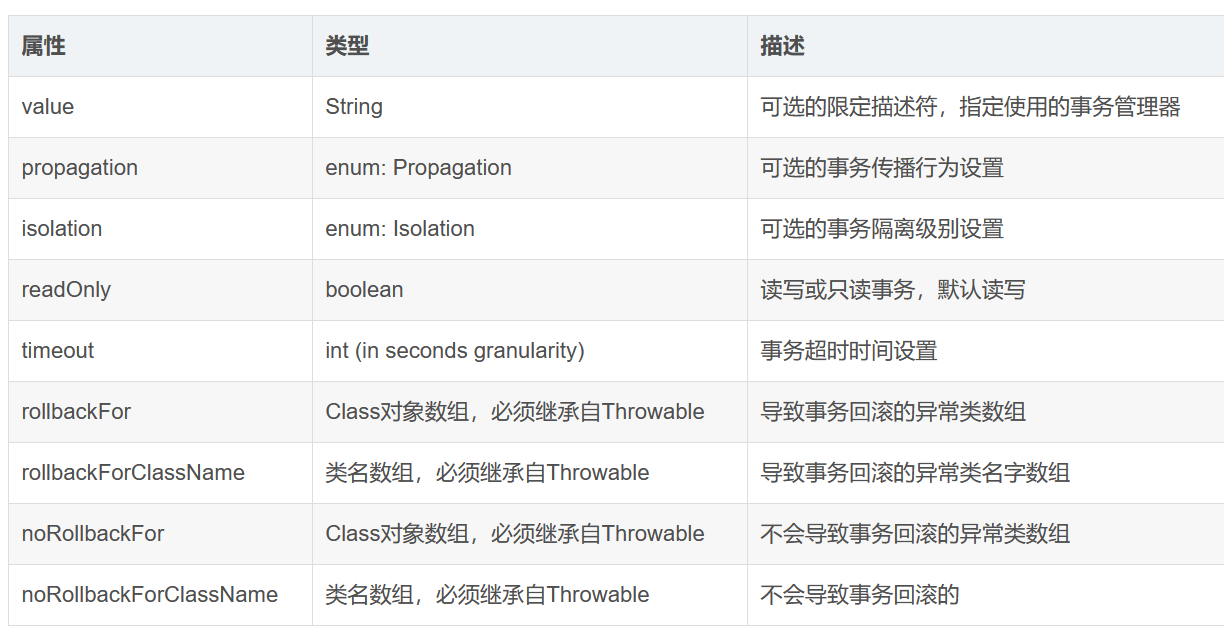
@Transactional事务注解属性
事务的隔离级别(isolation)
是指若干个并发的事务之间的隔离程度
@Transactional(isolation = Isolation.READ_UNCOMMITTED):读取未提交数据(会出现脏读, 不可重复读) 基本不使用@Transactional(isolation = Isolation.READ_COMMITTED):读取已提交数据(会出现不可重复读和幻读)@Transactional(isolation = Isolation.REPEATABLE_READ):可重复读(会出现幻读)@Transactional(isolation = Isolation.SERIALIZABLE):串行化
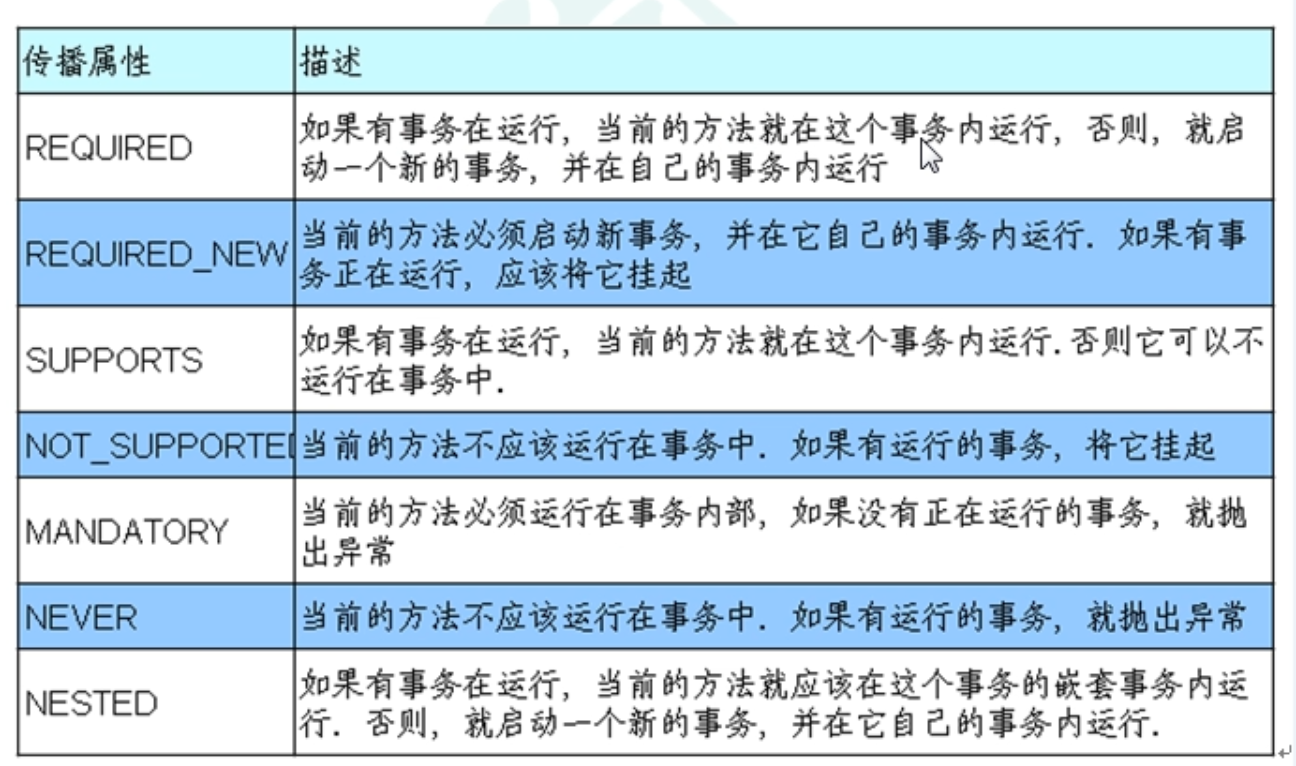
事务的传播行为(propagation)
两种状况:融入、创建
REQUIRED:如果当前存在事务,则加入该事务;如果当前没有事务,则创建一个新的事务。这是默认值。REQUIRES_NEW:创建一个新的事务,如果当前存在事务,则把当前事务挂起。SUPPORTS:如果当前存在事务,则加入该事务;如果当前没有事务,则以非事务的方式继续运行。NOT_SUPPORTED:以非事务方式运行,如果当前存在事务,则把当前事务挂起。NEVER:以非事务方式运行,如果当前存在事务,则抛出异常。MANDATORY:如果当前存在事务,则加入该事务;如果当前没有事务,则抛出异常。NESTED:如果当前存在事务,则创建一个事务作为当前事务的嵌套事务来运行;如果当前没有事务,则该取值等价于TransactionDefinition.PROPAGATION_REQUIRED。
声明式事务控制
Spring和mybatis整合
SqlSessionFactoryBean的内部属性
private static final Log LOGGER = LogFactory.getLog(SqlSessionFactoryBean.class);//mybatis核心配置文件路径private Resource configLocation;private Configuration configuration;//指定mybatis的mapper映射文件private Resource[] mapperLocations;//数据源private DataSource dataSource;private TransactionFactory transactionFactory;private Properties configurationProperties;private SqlSessionFactoryBuilder sqlSessionFactoryBuilder = new SqlSessionFactoryBuilder();private SqlSessionFactory sqlSessionFactory;//EnvironmentAware requires spring 3.1private String environment = SqlSessionFactoryBean.class.getSimpleName();private boolean failFast;private Interceptor[] plugins;private TypeHandler<?>[] typeHandlers;private String typeHandlersPackage;private Class<?>[] typeAliases;//指定model层类名的别名扫描包//这与mapper配置中的parameterType和resultType搭配使用private String typeAliasesPackage;private Class<?> typeAliasesSuperType;//issue #19. No default provider.private DatabaseIdProvider databaseIdProvider;private Class<? extends VFS> vfs;private Cache cache;private ObjectFactory objectFactory;private ObjectWrapperFactory objectWrapperFactory;
常用属性:
configLocation mybatis主配置文件路径,支持classpath语法
mapperLocations 指定mybatis的mapper配置文件,支持classpath语法
dataSource 数据源
typeAliasesPackage 指定model层类名的别名扫描包,这与mapper配置中的parameterType和resultType搭配使用
MapperScannerConfigurer类
一般在项目中使用MyBatis时,都会和Spring整合一起使用,通过注入一个Mapper接口来操纵数据库。其中的原理就是使用了MyBatis-Spring MapperScannerConfigurer类,此类会将指定包下的接口生成代理类注册到Spring容器中。
<bean class="org.mybatis.spring.mapper.MapperScannerConfigurer"><property name="basePackage" value="com.wangtao.mapper"/><property name="sqlSessionFactoryBeanName" value="sqlSessionFactory"/></bean>
public class MapperScannerConfigurer implements BeanDefinitionRegistryPostProcessor, InitializingBean, ApplicationContextAware, BeanNameAware {/** 需要扫描的包,多个包名可以使用逗号分割 **/private String basePackage;/** 同MapperFactoryBean **/private boolean addToConfig = true;/*** 被sqlSessionFactoryBeanName取代* 被取代的原因放在总结里,如果好奇可以看下*/private SqlSessionFactory sqlSessionFactory;/** 被sqlSessionTemplateBeanName取代 **/private SqlSessionTemplate sqlSessionTemplate;/** SqlSessionFactory的名字 **/private String sqlSessionFactoryBeanName;/*** sqlSessionTemplate的名字,创建MapperFactoryBean时需要依赖* 一个SqlSessionFactory或者sqlSessionTemplate实例。*/private String sqlSessionTemplateBeanName;/** 扫描条件,只有接口被此注解标注才会被注册,默认为null **/private Class<? extends Annotation> annotationClass;/** 扫描条件,只有接口继承了指定的这个接口才会被注册,默认为null **/private Class<?> markerInterface;private ApplicationContext applicationContext;/** 代表MapperScannerConfigurer这个bean的名字 **/private String beanName;/*** 如果为true, 代表MapperScannerConfigurer配置使用了${}表达式* 需要先解析${}表达式* 因此如果配置MapperScannerConfigurer时有使用${}表达式,需要将这个值设置成true*/private boolean processPropertyPlaceHolders;/*** 注册接口时使用这个字段来生成bean的名字*/private BeanNameGenerator nameGenerator;}
MapperFactoryBean
public class MapperFactoryBean<T> extends SqlSessionDaoSupport implements FactoryBean<T> {/*** 需要代理的接口*/private Class<T> mapperInterface;/*** 此字段的作用: 如果为true,指定的接口还没有被MyBatis解析过,也就是说MyBatis* 还没有对这个接口做绑定时,那么会去解析这个接口,并绑定该接口。* 这个接口可以采用MyBatis注解的方式书写SQL,也可以采用XML的经典方式。当然* 这个XML映射文件必须和Mapper接口同名并且在同一个包中。这点由addMapper方法决定的** 对于SqlSessionFactoryBean配置的映射文件或者主配置文件中的<Mappers>节点配置的映射文件* 会在构造SqlSessioinFactory时就会根据映射文件的名称空间绑定好。*/private boolean addToConfig = true;public MapperFactoryBean(Class<T> mapperInterface) {this.mapperInterface = mapperInterface;}/*** 此方法在afterPropertiesSet调用* SqlSessionDaoSupport继承了DaoSupport,而DaoSupport实现了InitializingBean接口*/@Overrideprotected void checkDaoConfig() {// 父类SqlSessionDaoSupport会检查SqlSession是不是nullsuper.checkDaoConfig();// 检查接口notNull(this.mapperInterface, "Property 'mapperInterface' is required");Configuration configuration = getSqlSession().getConfiguration();// 如果这个接口还没有被MyBatis解析过, 那么解析这个接口// addMapper会解析MyBatis注解方式,同时还会搜寻同包同名的XML映射文件完成绑定if (this.addToConfig && !configuration.hasMapper(this.mapperInterface)) {try {configuration.addMapper(this.mapperInterface);} catch (Exception e) {logger.error("Error while adding the mapper '" +this.mapperInterface + "' to configuration.", e);throw new IllegalArgumentException(e);} finally {ErrorContext.instance().reset();}}}/*** 返回一个接口的代理实现*/@Overridepublic T getObject() throws Exception {return getSqlSession().getMapper(this.mapperInterface);}@Overridepublic Class<T> getObjectType() {return this.mapperInterface;}@Overridepublic boolean isSingleton() {return true;}}
此类继承了SqlSessionDaoSupport类并且实现了FactoryBean接口,我们可以知道MapperFactoryBean其实就是一个创建Mapper接口代理的工厂。其中SqlSessionDaoSupport需要传一个SqlSessionFactory实例来创建SqlSession或者直接从外部传入一个SqlSessionTemplate。
我们从容器中拿到的就是MapperFactoryBean中getObject方法返回的接口代理实现。
开发环境
<build><plugins><!--使用jdk1.8版本编译代码--><plugin><groupId>org.apache.maven.plugins</groupId><artifactId>maven-compiler-plugin</artifactId><version>3.1</version><configuration><source>1.8</source><target>1.8</target><encoding>UTF-8</encoding></configuration></plugin><!--添加tomcat插件--><plugin><groupId>org.apache.tomcat.maven</groupId><artifactId>tomcat7-maven-plugin</artifactId><version>2.2</version><configuration> <!--如果configuration不加,默认端口为8080--><uriEncoding>UTF-8</uriEncoding> <!--配置编码方式为UTF-8--><path>/</path> <!--path 项目名称--><port>8080</port> <!--port 表示端口--><server>tomcat7</server> <!--server 表示服务器名称tomcat7--></configuration></plugin><!--mybatis逆向工程插件--><plugin><groupId>org.mybatis.generator</groupId><artifactId>mybatis-generator-maven-plugin</artifactId><version>1.3.2</version><!--逆向工程插件的依赖--><dependencies><!--逆向工程的核心依赖--><dependency><groupId>org.mybatis.generator</groupId><artifactId>mybatis-generator-core</artifactId><version>1.3.2</version></dependency><!--mysql驱动依赖--><dependency><groupId>mysql</groupId><artifactId>mysql-connector-java</artifactId><version>5.1.3</version></dependency></dependencies><configuration><!--允许移动生成的文件 --><verbose>true</verbose><!-- 覆盖生成文件 --><overwrite>false</overwrite><!-- 定义配置文件 --><configurationFile>src/main/resources/generatorConfig.xml</configurationFile></configuration></plugin></plugins><!--配置相关的资源进行打包--><resources><resource><directory>src/main/java</directory><includes><include>**/*.xml</include></includes></resource><resource><directory>src/main/resources</directory><includes><include>**/*.*</include></includes></resource></resources></build><dependencies><!--上传文件依赖--><dependency><groupId>commons-fileupload</groupId><artifactId>commons-fileupload</artifactId><version>1.3.1</version></dependency><!--mybatis核心jar包--><dependency><groupId>org.mybatis</groupId><artifactId>mybatis</artifactId><version>3.5.7</version></dependency><!--MySQL提供的JDBC驱动包--><dependency><groupId>mysql</groupId><artifactId>mysql-connector-java</artifactId><version>5.1.3</version></dependency><!-- jackson依赖处理json格式--><dependency><groupId>com.fasterxml.jackson.core</groupId><artifactId>jackson-databind</artifactId><version>2.12.1</version></dependency><!--单元测试需要的jar包--><dependency><groupId>junit</groupId><artifactId>junit</artifactId><version>4.12</version><scope>test</scope></dependency><!--添加Servlet,监听器,过滤器依赖--><dependency><groupId>javax.servlet</groupId><artifactId>javax.servlet-api</artifactId><version>3.1.0</version><scope>provided</scope></dependency><!-- springMVC--><dependency><groupId>org.springframework</groupId><artifactId>spring-webmvc</artifactId><version>5.3.1</version></dependency><!-- Spring-thymeleaf整合包--><dependency><groupId>org.thymeleaf</groupId><artifactId>thymeleaf-spring5</artifactId><version>3.0.12.RELEASE</version></dependency><!-- 分页依赖--><dependency><groupId>com.github.pagehelper</groupId><artifactId>pagehelper</artifactId><version>5.2.0</version></dependency><!-- 德鲁伊数据库连接池组件 --><dependency><groupId>com.alibaba</groupId><artifactId>druid</artifactId><version>1.1.10</version></dependency><!--AspectJ实现aop操作--><dependency><groupId>org.aspectj</groupId><artifactId>aspectjweaver</artifactId><version>1.9.8</version></dependency><!-- jdbcTemplate--><dependency><groupId>.org.springframework</groupId><artifactId>spring-jdbc</artifactId><version>4.3.8.RELEASE</version></dependency><!-- mybatis-spring整合包--><dependency><groupId>org.mybatis</groupId><artifactId>mybatis-spring</artifactId><version>2.0.4</version></dependency></dependencies>
spring源码篇
SpringIOC加载流程
https://www.processon.com/view/link/5f15341b07912906d9ae8642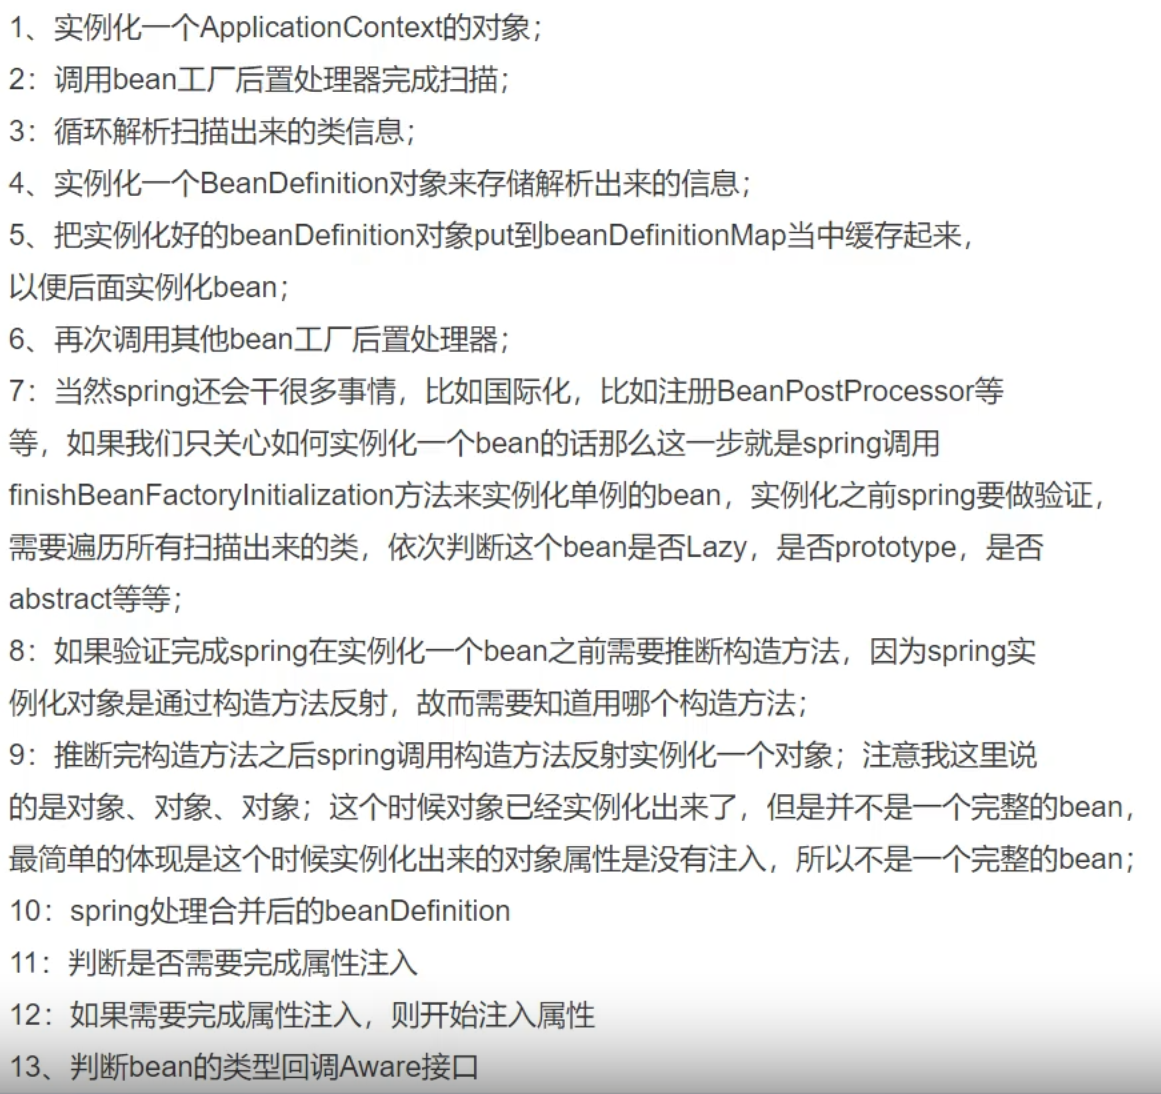
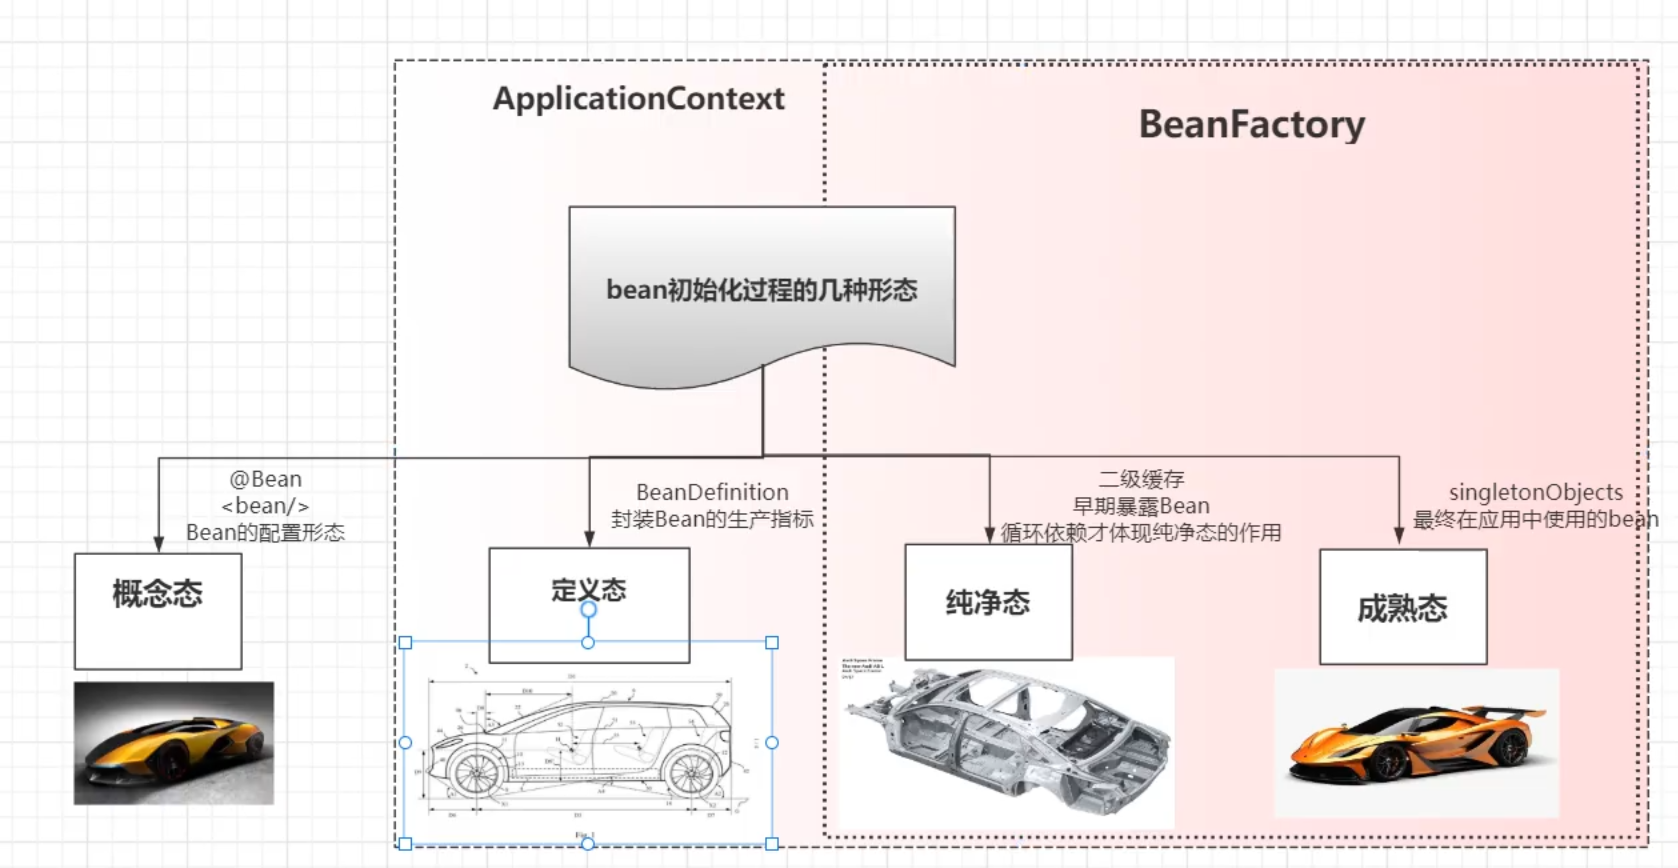
BeanFactory
BeanFactory,以Factory结尾,表示它是一个工厂类(接口), 它负责生产和管理bean的一个工厂。在Spring中,BeanFactory是IOC容器的核心接口,它的职责包括:实例化、定位、配置应用程序中的对象及建立这些对象间的依赖。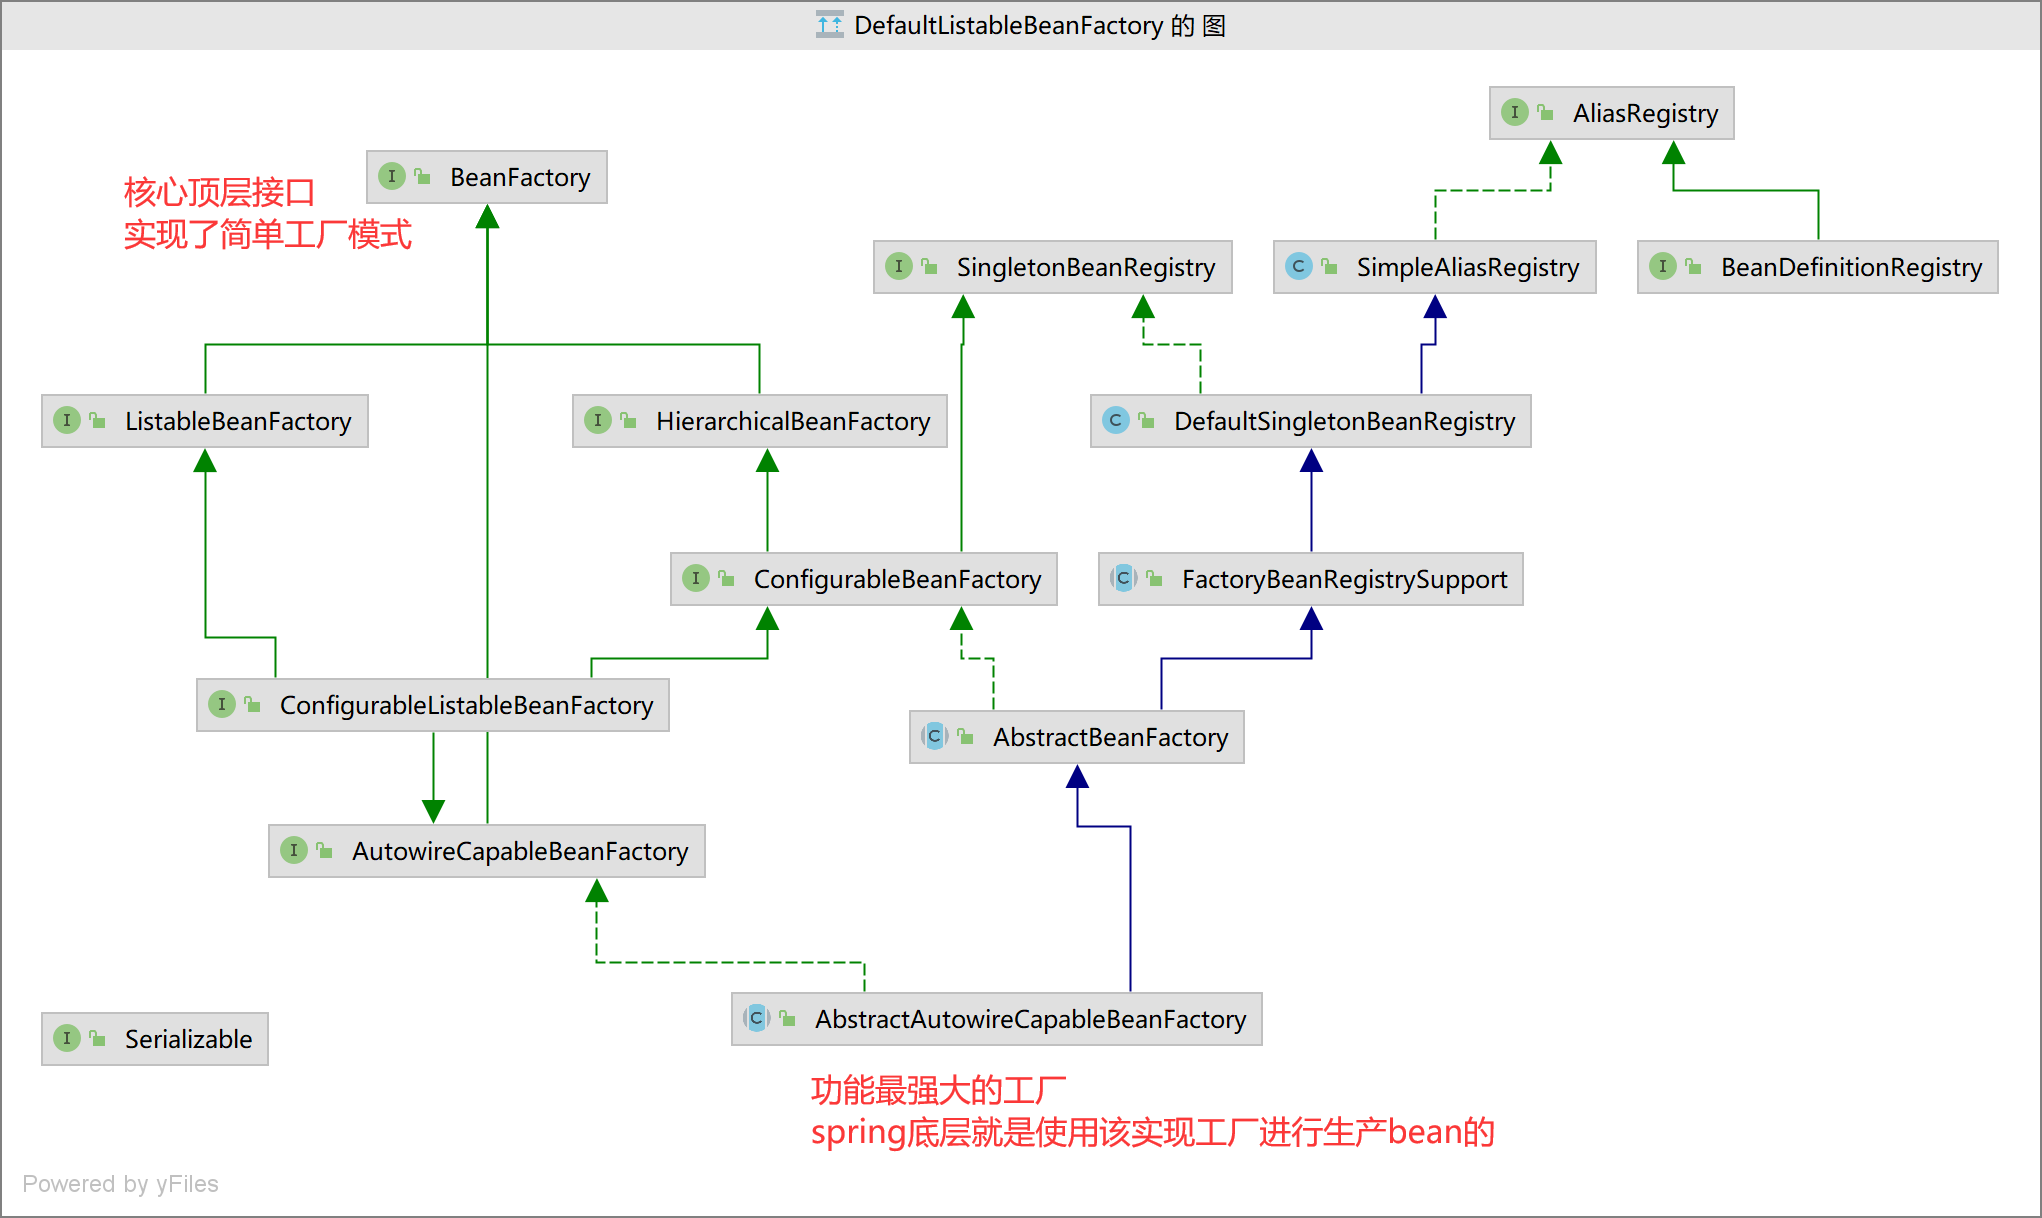
BeanDefinition
BeanDefinition 是定义 Bean 的生产配置元信息接口,包含:
- Bean 的类名
- 设置父 bean 名称、是否为 primary、
- Bean 行为配置信息,作用域、自动绑定模式、生命周期回调、延迟加载、初始 方法、销毁方法等
- Bean 之间的依赖设置,dependencies
- 构造参数、属性设置
具体方法
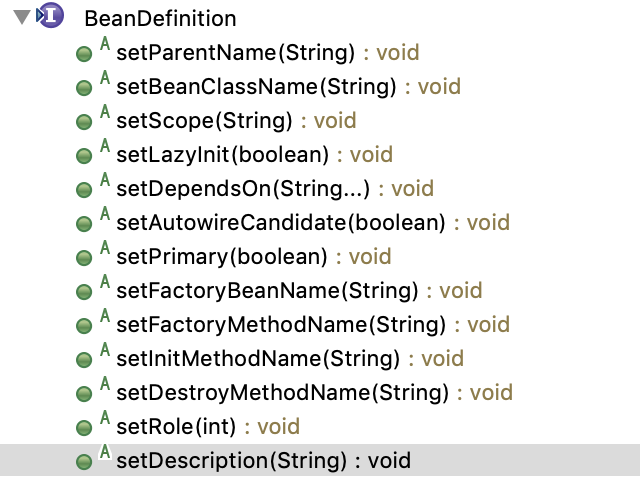
作用
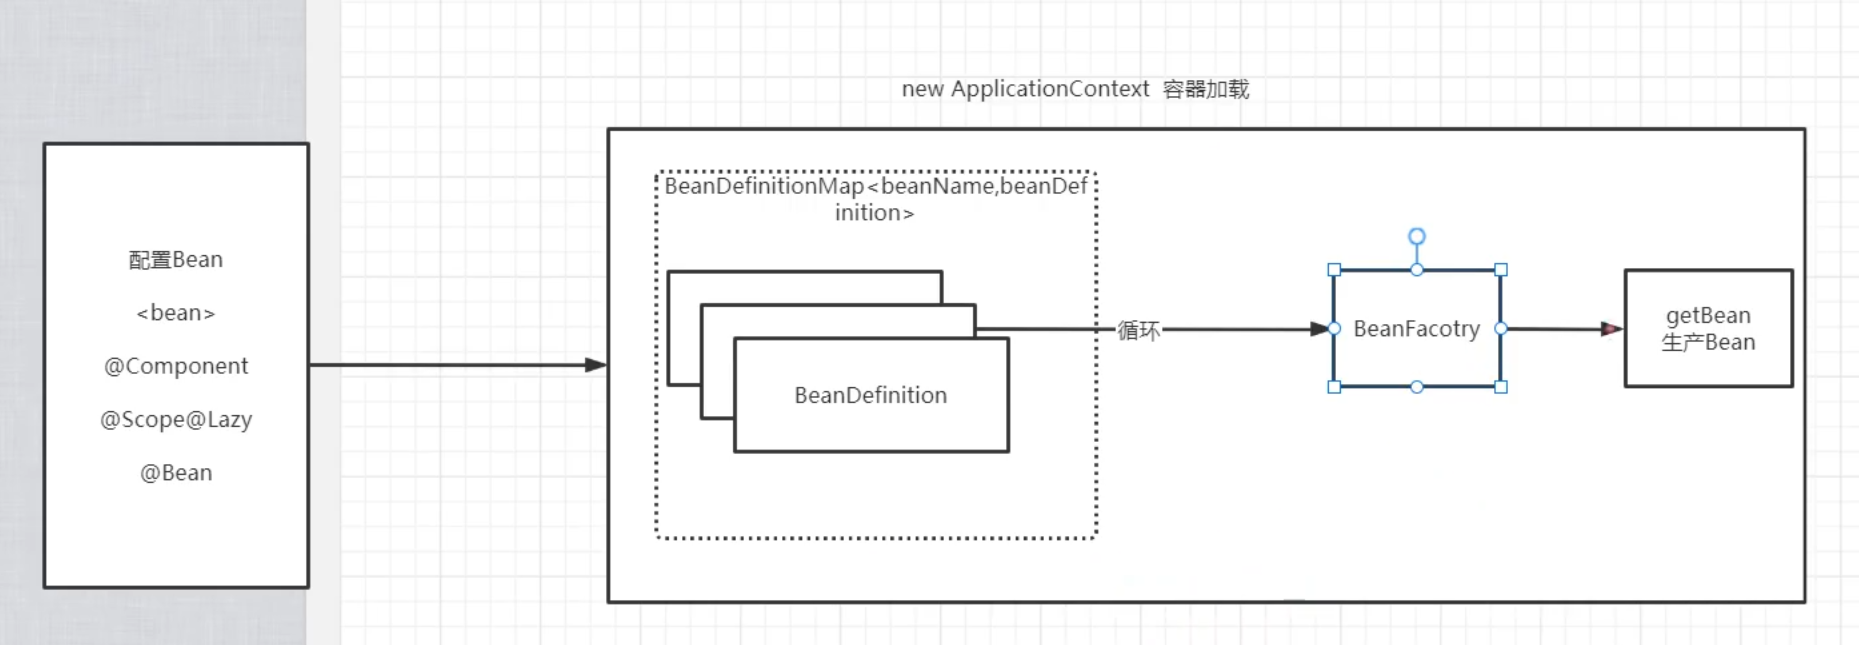
AbstractBeanDefinition实现类相关源码
```java public abstract class AbstractBeanDefinition extends BeanMetadataAttributeAccessor implements BeanDefinition, Cloneable { //默认的SCOPE,默认是单例 public static final String SCOPE_DEFAULT = “”;
//不进行自动装配 public static final int AUTOWIRE_NO = AutowireCapableBeanFactory.AUTOWIRE_NO;
//根据Bean的名字进行自动装配,即autowired属性的值为byname public static final int AUTOWIRE_BY_NAME = AutowireCapableBeanFactory.AUTOWIRE_BY_NAME;
//根据Bean的类型进行自动装配,调用setter函数装配属性,即autowired属性的值为byType public static final int AUTOWIRE_BY_TYPE = AutowireCapableBeanFactory.AUTOWIRE_BY_TYPE;
//自动装配构造函数的形参,完成对应属性的自动装配,即autowired属性的值为byConstructor public static final int AUTOWIRE_CONSTRUCTOR = AutowireCapableBeanFactory.AUTOWIRE_CONSTRUCTOR;
//通过Bean的class推断适当的自动装配策略(autowired=autodetect),如果Bean定义有有参构造函数,则通过自动装配构造函数形参,完成对应属性的自动装配(AUTOWIRE_CONSTRUCTOR),否则,使用setter函数(AUTOWIRE_BY_TYPE) @Deprecated public static final int AUTOWIRE_AUTODETECT = AutowireCapableBeanFactory.AUTOWIRE_AUTODETECT;
// 不进行依赖检查 public static final int DEPENDENCY_CHECK_NONE = 0;
// 如果依赖类型为对象引用,则需要检查 public static final int DEPENDENCY_CHECK_OBJECTS = 1;
// 对简单属性的依赖进行检查 public static final int DEPENDENCY_CHECK_SIMPLE = 2; // 对所有属性的依赖进行检查 public static final int DEPENDENCY_CHECK_ALL = 3;
//若Bean未指定销毁方法,容器应该尝试推断Bean的销毁方法的名字 public static final String INFER_METHOD = “(inferred)”;
// Bean的class对象或是类的全限定名 @Nullable private volatile Object beanClass;
//bean的作用范围,对应bean属性scope是单例 @Nullable private String scope = SCOPE_DEFAULT;
//是否是抽象,对应bean属性abstract 默认不为抽象类 private boolean abstractFlag = false;
//是否延迟加载,对应bean属性lazy-init @Nullable private Boolean lazyInit; // 默认不进行自动装配 private int autowireMode = AUTOWIRE_NO; // 默认不进行依赖检查 private int dependencyCheck = DEPENDENCY_CHECK_NONE;
//用来表示一个bean的实例化依靠另一个bean先实例化
//这里只会存放
//autowire-candidate属性设置为false,这样容器在查找自动装配对象时, //将不考虑该bean,即它不会被考虑作为其他bean自动装配的候选者, //但是该bean本身还是可以使用自动装配来注入其他bean的 private boolean autowireCandidate = true;
//自动装配时出现多个bean候选者时,将作为首选者,对应bean属性primary private boolean primary = false;
//用于记录Qualifier,对应子元素qualifier
private final Map
@Nullable private Supplier<?> instanceSupplier;
//允许访问非公开的构造器和方法,程序设置 private boolean nonPublicAccessAllowed = true;
//是否以一种宽松的模式解析构造函数,默认为true private boolean lenientConstructorResolution = true;
//对应bean属性factory-bean 工厂类名 @Nullable private String factoryBeanName;
//对应bean属性factory-method 工厂方法名 @Nullable private String factoryMethodName;
//记录构造函数注入属性,对应bean属性constructor-arg @Nullable private ConstructorArgumentValues constructorArgumentValues;
//普通属性集合 @Nullable private MutablePropertyValues propertyValues;
//方法重写的持有者,记录lookup-method、replaced-method元素 private MethodOverrides methodOverrides = new MethodOverrides();
//初始化方法,对应bean属性init-method @Nullable private String initMethodName;
//销毁方法,对应bean属性destroy-method @Nullable private String destroyMethodName;
//是否执行init-method,程序设置 private boolean enforceInitMethod = true;
//是否执行destroy-method,程序设置 private boolean enforceDestroyMethod = true; //是否是用户定义的而不是应用程序本身定义的,创建AOP时候为true,程序设置 private boolean synthetic = false; //定义这个bean的应用,APPLICATION:用户,INFRASTRUCTURE:完全内部使用,与用户无关 private int role = BeanDefinition.ROLE_APPLICATION;
//bean的描述信息 @Nullable private String description; //bean的资源 @Nullable private Resource resource;
Applicationcontext
Applicationcontext和BeanFactory
共同点:都可以作为容器,管理bean的生命周期
区别:
FactoryBean getBean 用于生产bean
需要手动注册BeanDefinition,再getBean()
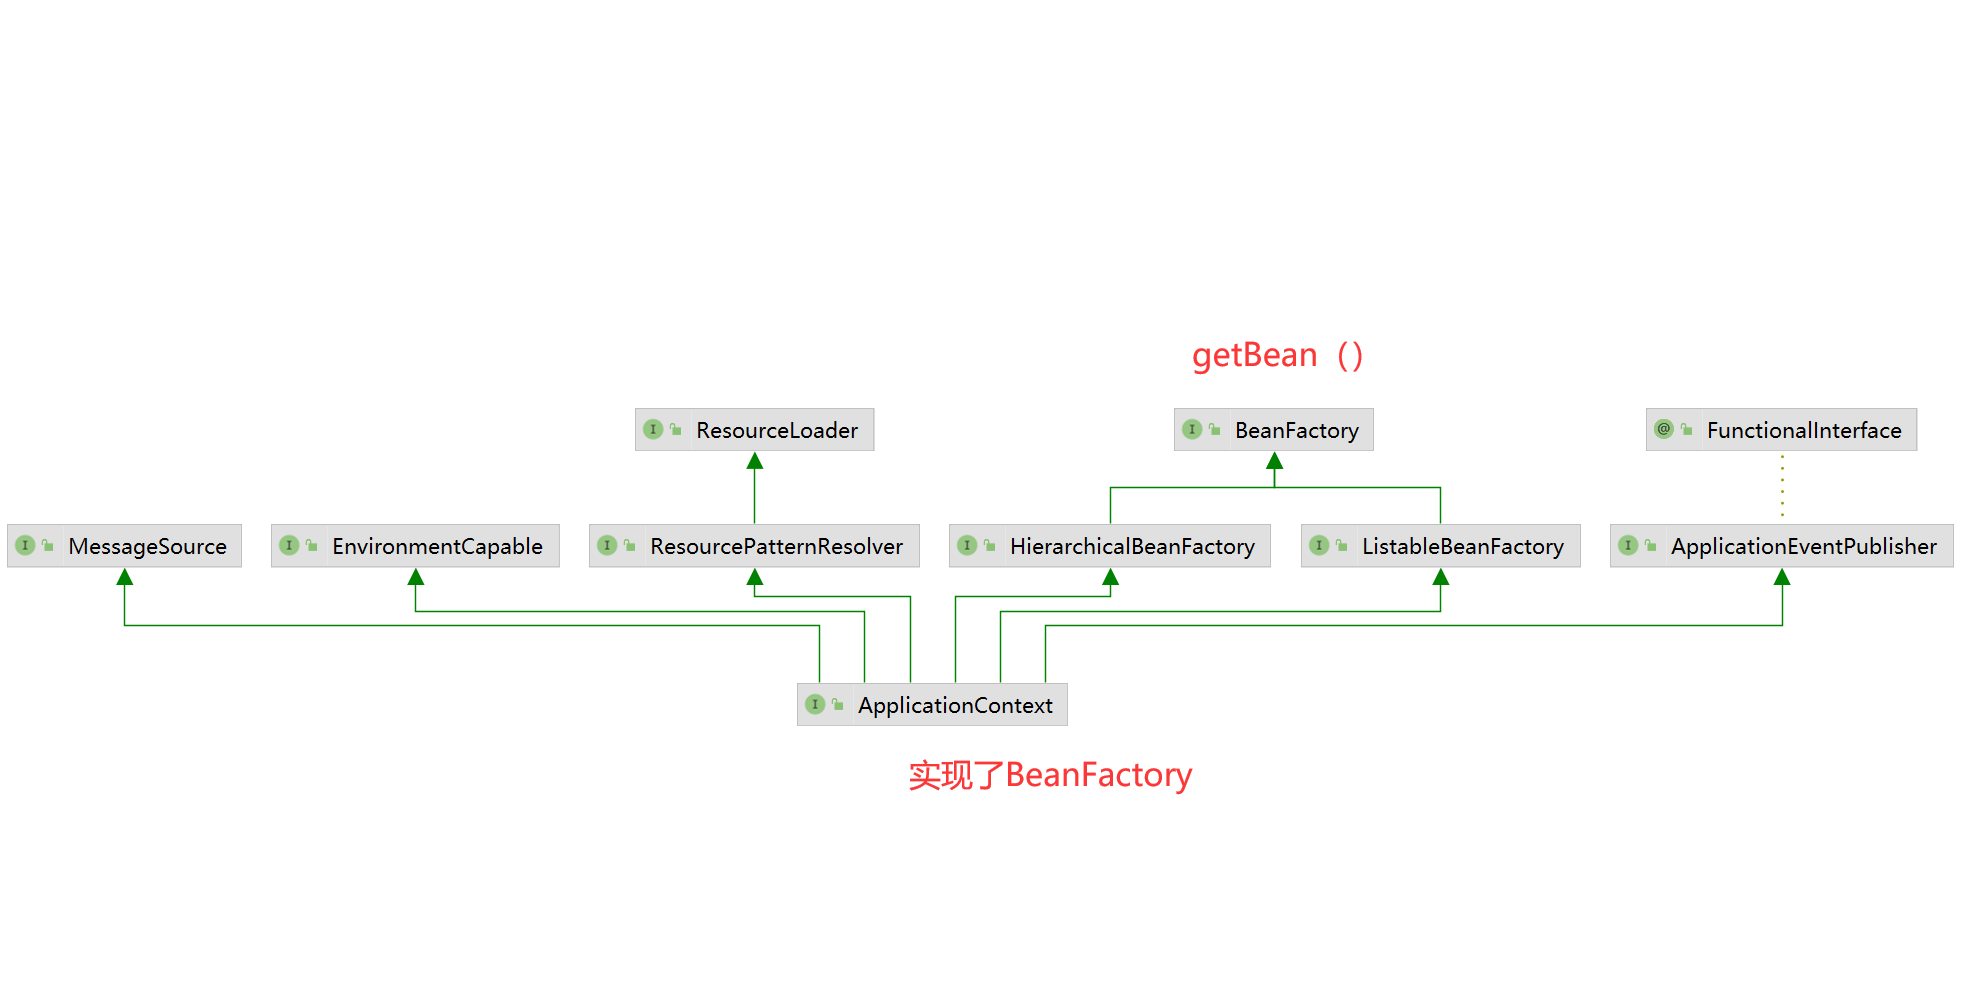
ApplicationContext 实现了BeanFactory。
它不生产Bean 而是通知BeanFactory来进行生产,getBean是 一个门面方法
做的事情更多:
- 会自动帮我们把我们配置的bean,注册到BeanDefinition
- 加载环境变量
- 支持多语言
- 实现事件监听
- 注册很多对外扩展点
ApplicationContext相当于4S店,BeanFactory相当于汽车工厂
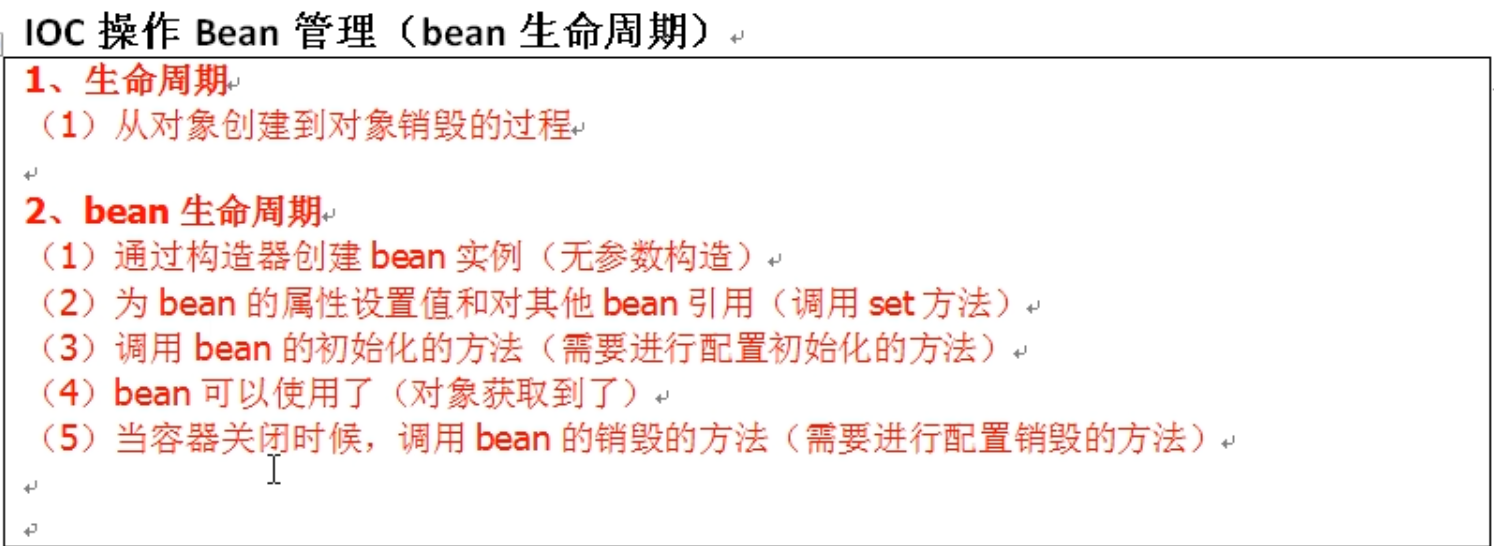
Bean对象创建方式
单例Bean线程安全问题
Spring实例化bean方式的四种方式
1.构造器方式(反射) spring自动创建
2.静态工厂方式 factory-method
3.实例工厂方式(@Bean) factory-bean+factory-method
4.FactoryBean方式 需要实现FactoryBean接口重写方法
Spring中常用注解汇总
@Configuration把一个类作为一个IoC容器,它的某个方法头上如果注册了@Bean,就会作为这个Spring容器中的Bean。
@Scope注解 作用域
@Lazy(true) 表示延迟初始化
@Service用于标注业务层组件、
@Controller用于标注控制层组件(如struts中的action)
@Repository用于标注数据访问组件,即DAO组件。
@Component泛指组件,当组件不好归类的时候,我们可以使用这个注解进行标注。
@Scope用于指定scope作用域的(用在类上)
@PostConstruct用于指定初始化方法(用在方法上)
@PreDestory用于指定销毁方法(用在方法上)
@DependsOn:定义Bean初始化及销毁时的顺序
@Primary:自动装配时当出现多个Bean候选者时,被注解为@Primary的Bean将作为首选者,否则将抛出异常
@Qualifier(指定注入Bean的名称)
@Autowired 默认按类型装配,如果我们想使用按名称装配,可以结合@Qualifier注解一起使用。如下:
@Autowired @Qualifier(“personDaoBean”) 存在多个实例配合使用
@Resource默认按名称装配,当找不到与名称匹配的bean才会按类型装配。
@PostConstruct 初始化注解
@PreDestroy 摧毁注解 默认 单例 启动就加载
@Async异步方法调用
@Resource详解
@Resource注解与@Autowired注解作用非常相似
@Resource的装配顺序:
(1)、@Resource后面没有任何内容,默认通过name属性去匹配bean,找不到再按type去匹配
(2)、指定了name或者type则根据指定的类型去匹配bean
(3)、指定了name和type则根据指定的name和type去匹配bean,任何一个不匹配都将报错
@Autowired和@Resource两个注解的区别:
(1)、@Autowired默认按照byType方式进行bean匹配,@Resource默认按照byName方式进行bean匹配
(2)、@Autowired是Spring的注解,@Resource是J2EE的注解,这个看一下导入注解的时候这两个注解的包名就一清二楚了
Spring属于第三方的,J2EE是Java自己的东西,因此,建议使用@Resource注解,以减少代码和Spring之间的耦合。
