一个轻量级的安全框架,它确保基于Spring的应用程序提供身份验证和授权支持,基于Spring的企业应用系统提供声明式的安全访问控制解决方案的安全框架;
安全管理包含两个部分:认证和授权
<dependency>
<groupId>org.springframework.boot</groupId>
<artifactId>spring-boot-starter-security</artifactId>
</dependency>
Spring Security本质是一个过滤器链,无论鉴权通过或是不通后,Spring Security 框架均使用了观察者模式,来通知其它Bean,当前请求的鉴权结果。
三个主要过滤器
FilterSecurityInterceptor 方法级的权限过滤器
作为 Spring Security Filter Chain 的最后一个 Filter,承担着非常重要的作用。如获取当前 request 对应的权限配置,调用访问控制器进行鉴权操作等,都是核心功能。 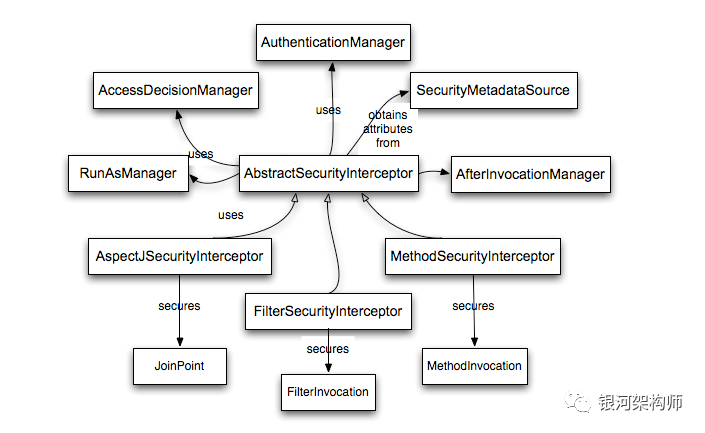
ExceptionTranslationFilter 异常过滤器
如果鉴权不通过,则会抛出 AccessDeniedException 异常,即访问受限,然后会被 ExceptionTranslationFilter 捕获,最终解析后调转到对应的鉴权失败页面。
UsernamePasswordAuthenticationFilter 表单验证过滤器
对/login中Post请求做拦截,校验表单中的用户名和密码
DelegatingFilterProxy 代理Filter
DelegatingFilterProxy就是一个对于servletFilter的代理,用这个类的好处主要是通过Spring容器来管理servlet filter的生命周期,
- 还有就是如果filter中需要一些Spring容器的实例,可以通过spring直接注入,
- 另外读取一些配置文件这些便利的操作都可以通过Spring来配置实现。
UserDetailsService 自定义逻辑校验
查询数据库和接收表单信息进行校验过程

自定义设置
https://www.jb51.net/article/252040.htm//【注意事项】放行资源要放在前面,认证的放在后面http.authorizeRequests().antMatchers("/hello").hasAuthority("admins")//拥有admins权限的用户才能访问此页面.mvcMatchers("/login").permitAll() //放行loginHtml请求.anyRequest().authenticated()//代表其他请求需要认证.and().formLogin()//表示其他需要认证的请求通过表单认证//loginPage 一旦你自定义了这个登录页面,那你必须要明确告诉SpringSecurity日后哪个url处理你的登录请求.loginPage("/login")//用来指定自定义登录界面,不使用SpringSecurity默认登录界面 注意:一旦自定义登录页面,必须指定登录url//loginProcessingUrl 这个doLogin请求本身是没有的,因为我们只需要明确告诉SpringSecurity,日后只要前端发起的是一个doLogin这样的请求,//那SpringSecurity应该把你username和password给捕获到.loginProcessingUrl("/doLogin")//指定处理登录的请求url.usernameParameter("userName") //指定登录界面用户名文本框的name值,如果没有指定,默认属性名必须为username.passwordParameter("password")//指定登录界面密码密码框的name值,如果没有指定,默认属性名必须为password// .successForwardUrl("/index")//认证成功 forward 跳转路径.defaultSuccessUrl("/index")//认证成功 之后跳转,重定向 redirect 跳转后,地址会发生改变 根据上一保存请求进行成功跳转.and().csrf().disable(); //禁止csrf 跨站请求保护
授权操作
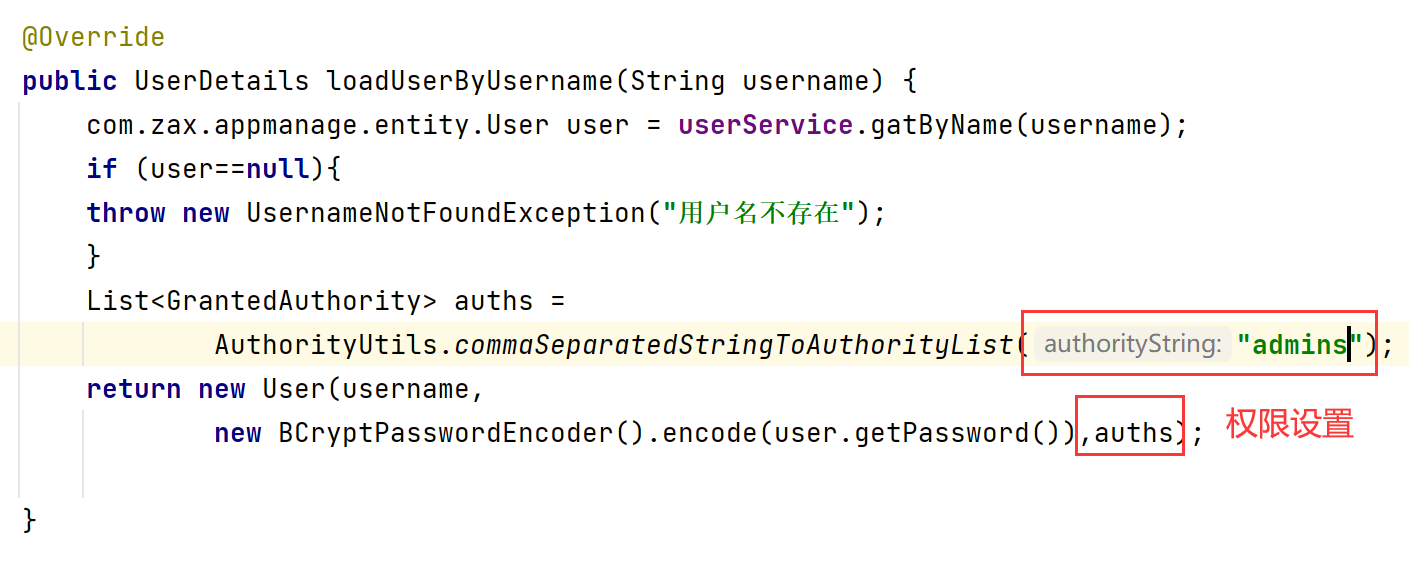
hasAuthority方法
路径访问,单个权限设置
.authorizeRequests()
.antMatchers(“/hello”).hasAuthority(“admins”)
//拥有admins权限的用户才能访问此页面
如果当前的主体具有指定的权限,则返回true,否则返回falsehasAnyAuthority
设置多个权限级别
.authorizeRequests()
.antMatchers(“/hello”).hasAnyAuthority(“admins”,“manager”)
//拥有admins和manager权限的用户可以访问hasRole
会在权限名前+ROLE_
例如:
ROLE_admins,ROLE_managerhasAnyRole
设置多个权限自定义403没有访问权限的页面
http.exceptionHandling().accessDeniedPage("/unauth");//需要先放行403的页面再设置跳转
常用注解使用
加在控制器方法上
@Secured(“ROLE_admin”)
这里匹配的字符串前缀需要加上ROLE_
判断用户是否具有某个角色,身份,权限,如果有可以访问,如果没有则访问不了
使用此注解需要在启动类中加上下面注解
@EnableGlobalMethodSecurity(securedEnabled = true)
加在控制器方法上
@PreAuthorize(“hasAnyRole(‘hello’,’xxx’)”)
注解内方法:方法用“”双引号引起来
方法中的权限名称用‘’单引号引起来
hasRole()
hasAnyRole()
hasAuthority()
hasAnyAuthority()
用户注销
//退出功能,第一个是退出功能herf的请求地址,第二个是退出后跳转的页面请求http.logout().logoutUrl("/logout").logoutSuccessUrl("/login").permitAll();
基于数据库实现自动登录
实现原理
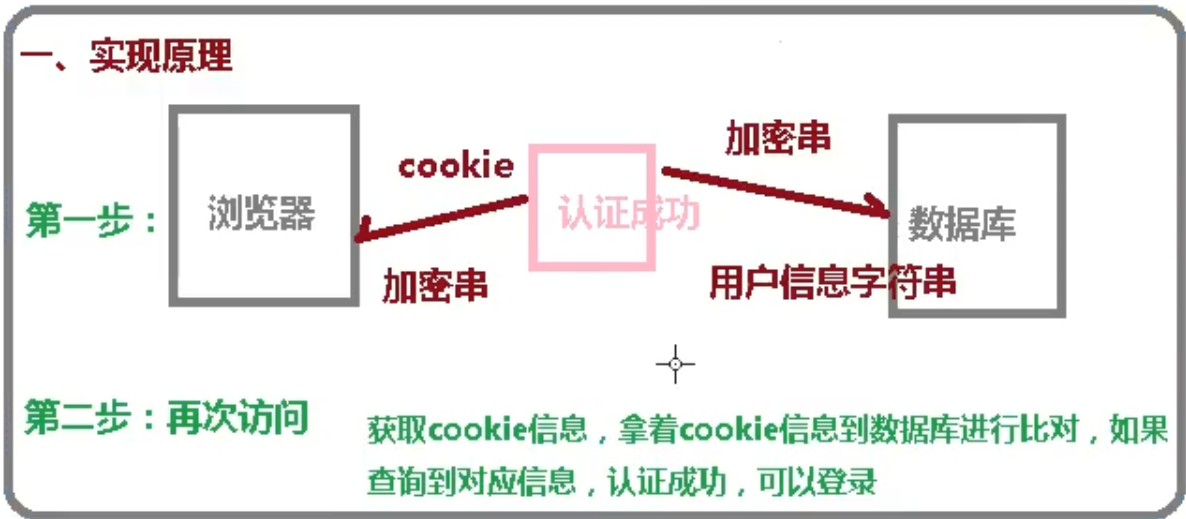
具体实现
在配置类中添加
@Autowired//注入数据源private DataSource dataSource;@Bean//配置操作数据库类public PersistentTokenRepository persistentTokenRepository(){JdbcTokenRepositoryImpl jdbcTokenRepository = new JdbcTokenRepositoryImpl();jdbcTokenRepository.setDataSource(this.dataSource);jdbcTokenRepository.setCreateTableOnStartup(true);//启动时把表创建return jdbcTokenRepository;}
//配置自动登录操作.and().rememberMe().tokenRepository(persistentTokenRepository()).tokenValiditySeconds(100)//设置有效时长,单位秒.userDetailsService(userDetailsService)
<input type=”checkbox” name=”remember-me”>自动登录
表单name必须叫remember-me
CSRF:跨域请求伪造
跨站请求攻击,简单地说,是攻击者通过一些技术手段欺骗用户的浏览器去访问一个自己曾经认证过的网站并运行一些操作(如发邮件,发消息,甚至财产操作如转账和购买商品)。由于浏览器曾经认证过,所以被访问的网站会认为是真正的用户操作而去运行。这利用了 web 中用户身份验证的一个漏洞:简单的身份验证只能保证请求发自某个用户的浏览器,却不能保证请求本身是用户自愿发出的。
从 Spring Security 4.0 开始,默认情况下会启用 CSRF 保护,以防止 CSRF 攻击应用
程序,Spring Security CSRF 会针对 PATCH,POST,PUT 和 DELETE 方法进行防护。
表单提交设置一个隐藏域,配置类开启csrf防护
<input type=”hidden” th:name=”${_csrf.parameterName}” th:value=”${_csrf.token}”/>
页面标签设置权限
<!--添加thymeleaf为SpringSecurity提供的标签 依赖 --><dependency><groupId>org.thymeleaf.extras</groupId><artifactId>thymeleaf-extras-springsecurity5</artifactId><version>3.0.4.RELEASE</version></dependency>
xmlns:sec=”http://www.thymeleaf.org/extras/spring-security“
//判断用户是否已经登陆认证,引号内的参数必须是isAuthenticated()。sec:authorize="isAuthenticated()"//获得当前用户的用户名,引号内的参数必须是name。sec:authentication=“name”//判断当前用户是否拥有指定的权限。引号内的参数为权限的名称。sec:authorize=“hasRole(‘role’)”//获得当前用户的全部角色,引号内的参数必须是principal.authorities。sec:authentication="principal.authorities"
配合登录页面图片验证
生成图片验证码的工具类
package com.zax.appmanage.security;import javax.imageio.ImageIO;import java.awt.*;import java.awt.image.BufferedImage;import java.io.IOException;import java.io.OutputStream;import java.util.Random;public class VerificationCode {/*** 生成验证码图片的宽度*/private final int width = 100;/*** 生成验证码图片的高度*/private final int height = 30;private final String[] fontNames = {"宋体", "楷体", "隶书", "微软雅黑"};/*** 定义验证码图片的背景颜色为白色*/private final Color bgColor = new Color(255, 255, 255);private final Random random = new Random();private final String codes = "0123456789abcdefghijklmnopqrstuvwxyzABCDEFGHIJKLMNOPQRSTUVWXYZ";/*** 记录随机字符串*/private String text;/*** 获取一个随意颜色** @return*/private Color randomColor() {int red = random.nextInt(150);int green = random.nextInt(150);int blue = random.nextInt(150);return new Color(red, green, blue);}/*** 获取一个随机字体** @return*/private Font randomFont() {String name = fontNames[random.nextInt(fontNames.length)];int style = random.nextInt(4);int size = random.nextInt(5) + 24;return new Font(name, style, size);}/*** 获取一个随机字符** @return*/private char randomChar() {return codes.charAt(random.nextInt(codes.length()));}/*** 创建一个空白的BufferedImage对象** @return*/private BufferedImage createImage() {BufferedImage image = new BufferedImage(width, height, BufferedImage.TYPE_INT_RGB);Graphics2D g2 = (Graphics2D) image.getGraphics();g2.setColor(bgColor);// 设置验证码图片的背景颜色g2.fillRect(0, 0, width, height);return image;}public BufferedImage getImage() {BufferedImage image = createImage();Graphics2D g2 = (Graphics2D) image.getGraphics();StringBuffer sb = new StringBuffer();for (int i = 0; i < 4; i++) {String s = randomChar() + "";sb.append(s);g2.setColor(randomColor());g2.setFont(randomFont());float x = i * width * 1.0f / 4;g2.drawString(s, x, height - 8);}this.text = sb.toString();drawLine(image);return image;}/*** 绘制干扰线** @param image*/private void drawLine(BufferedImage image) {Graphics2D g2 = (Graphics2D) image.getGraphics();int num = 5;for (int i = 0; i < num; i++) {int x1 = random.nextInt(width);int y1 = random.nextInt(height);int x2 = random.nextInt(width);int y2 = random.nextInt(height);g2.setColor(randomColor());g2.setStroke(new BasicStroke(1.5f));g2.drawLine(x1, y1, x2, y2);}}public String getText() {return text;}public static void output(BufferedImage image, OutputStream out) throws IOException {ImageIO.write(image, "JPEG", out);}}
写一个加载图片到登录页面的控制器
@ResponseBody@GetMapping("/verifyCode")public void verifyCode(HttpSession session, HttpServletResponse resp) throws IOException {VerificationCode code = new VerificationCode();BufferedImage image = code.getImage();String text = code.getText();session.setAttribute("verify_code", text);VerificationCode.output(image,resp.getOutputStream());}
创建一个验证码过滤器类
package com.zax.appmanage.security;import com.baomidou.mybatisplus.core.toolkit.StringUtils;import com.fasterxml.jackson.databind.ObjectMapper;import org.springframework.stereotype.Component;import javax.servlet.*;import javax.servlet.http.HttpServletRequest;import javax.servlet.http.HttpServletResponse;import java.io.IOException;@Componentpublic class VerificationCodeFilter extends GenericFilter {@Overridepublic void doFilter(ServletRequest servletRequest, ServletResponse servletResponse, FilterChain filterChain) throws IOException, ServletException {HttpServletRequest request=(HttpServletRequest)servletRequest;HttpServletResponse response=(HttpServletResponse)servletResponse;//拦截登录请求if ("POST".equals(request.getMethod())&&"/doLogin".equals(request.getServletPath())){String code = request.getParameter("code");String verify_code =(String) request.getSession().getAttribute("verify_code");if (StringUtils.isBlank(code) || !verify_code.equalsIgnoreCase(code)){//重定向到登录页面response.sendRedirect("/login");return;}else {filterChain.doFilter(request,response);}}else {filterChain.doFilter(request,response);}}}
在配置类中加上验证码过滤器属性
并将过滤器插入到用户名密码过滤器前
package com.zax.appmanage.config;import com.zax.appmanage.security.VerificationCodeFilter;import org.springframework.beans.factory.annotation.Autowired;import org.springframework.context.annotation.Bean;import org.springframework.context.annotation.Configuration;import org.springframework.security.config.annotation.authentication.builders.AuthenticationManagerBuilder;import org.springframework.security.config.annotation.method.configuration.EnableGlobalMethodSecurity;import org.springframework.security.config.annotation.web.builders.HttpSecurity;import org.springframework.security.config.annotation.web.builders.WebSecurity;import org.springframework.security.config.annotation.web.configuration.WebSecurityConfigurerAdapter;import org.springframework.security.core.userdetails.UserDetailsService;import org.springframework.security.crypto.bcrypt.BCryptPasswordEncoder;import org.springframework.security.crypto.password.PasswordEncoder;import org.springframework.security.web.authentication.UsernamePasswordAuthenticationFilter;import org.springframework.security.web.authentication.rememberme.JdbcTokenRepositoryImpl;import org.springframework.security.web.authentication.rememberme.PersistentTokenRepository;import org.springframework.security.web.util.matcher.AntPathRequestMatcher;import javax.sql.DataSource;/*** TODO.** @author meizhaowei* @since 2021/7/28*/@Configurationpublic class TokenWebSecurityConfig extends WebSecurityConfigurerAdapter {@Autowiredprivate UserDetailsService userDetailsService;@Autowired//注入数据源private DataSource dataSource;@Autowired//自定义验证码过滤器private VerificationCodeFilter verificationCodeFilter;@Bean//配置操作数据库类public PersistentTokenRepository persistentTokenRepository(){JdbcTokenRepositoryImpl jdbcTokenRepository = new JdbcTokenRepositoryImpl();jdbcTokenRepository.setDataSource(this.dataSource);// jdbcTokenRepository.setCreateTableOnStartup(true);//启动时把表创建return jdbcTokenRepository;}@Bean //加密PasswordEncoder passwordEncoder() {return new BCryptPasswordEncoder();}@Overrideprotected void configure(HttpSecurity http) throws Exception {//验证验证码功能,将验证码过滤器加在账号密码过滤器前http.addFilterBefore(verificationCodeFilter, UsernamePasswordAuthenticationFilter.class);//退出功能http.logout().logoutRequestMatcher(new AntPathRequestMatcher("/logout")).logoutSuccessUrl("/login").permitAll();//权限错误403跳转页面http.exceptionHandling().accessDeniedPage("/unauth");//【注意事项】放行资源要放在前面,认证的放在后面http.authorizeRequests()//无需认证的为static下的静态资源,以及/index请求// .antMatchers()// .antMatchers("/hello").hasAuthority("admin")//拥有admin权限的用户才能访问此页面.mvcMatchers("/favicon.ico","/login","/unauth","/verifyCode","/images/**","/fonts/**","/css/**","/js/**","/static/**").permitAll() //放行loginHtml请求.anyRequest().authenticated()//代表其他请求需要认证.and().formLogin()//表示其他需要认证的请求通过表单认证//loginPage 一旦你自定义了这个登录页面,那你必须要明确告诉SpringSecurity日后哪个url处理你的登录请求.loginPage("/login")//用来指定自定义登录界面,不使用SpringSecurity默认登录界面 注意:一旦自定义登录页面,必须指定登录url//loginProcessingUrl 这个doLogin请求本身是没有的,因为我们只需要明确告诉SpringSecurity,日后只要前端发起的是一个doLogin这样的请求,//那SpringSecurity应该把你username和password给捕获到.loginProcessingUrl("/doLogin")//指定处理登录的请求url.usernameParameter("userName") //指定登录界面用户名文本框的name值,如果没有指定,默认属性名必须为username.passwordParameter("password")//指定登录界面密码密码框的name值,如果没有指定,默认属性名必须为password// .successForwardUrl("/index")//认证成功 forward 跳转路径.defaultSuccessUrl("/")//认证成功 之后跳转,重定向 redirect 跳转后,地址会发生改变 根据上一保存请求进行成功跳转//配置自动登录操作.and().rememberMe().tokenRepository(persistentTokenRepository()).tokenValiditySeconds(600)//设置有效时长,单位秒.userDetailsService(userDetailsService);// .and().csrf().disable(); //禁止csrf 跨站请求保护}@Overrideprotected void configure(AuthenticationManagerBuilder auth) throws Exception {auth.userDetailsService(userDetailsService).passwordEncoder(passwordEncoder());}}
前端页面
在验证码上加上点击事件再加上一个随机数,验证码name为code
<div class="form-group has-feedback feedback-left row"><div class="col-xs-7"><input type="text" name="code" class="form-control" placeholder="验证码"><span class="mdi mdi-check-all form-control-feedback" aria-hidden="true"></span></div><div class="col-xs-5"><img th:src="@{/verifyCode}" class="pull-right" id="captcha" style="cursor: pointer;" onclick="this.src=this.src+'?d='+Math.random();" title="点击刷新" alt="captcha"></div></div>

若有收获,就点个赞吧
0 人点赞
