参考:
https://blog.csdn.net/df0128/article/details/83043457
https://gitee.com/duanchaojie/java-code
https://blog.csdn.net/qq_34581161/article/details/117071185
一、概述
HttpClient相比传统JDK自带的URLConnection,增加了易用性和灵活性,它不仅使客户端发送Http请求变得容易,而且也方便开发人员测试接口(基于Http协议的),提高了开发的效率,也方便提高代码的健壮性。
org.apache.commons.httpclient.HttpClient与org.apache.http.client.HttpClient的区别
Commons的HttpClient项目现在是生命的尽头,不再被开发, 已被Apache HttpComponents项目HttpClient和HttpCore 模组取代,提供更好的性能和更大的灵活性。
特性
- 基于标准、纯净的java语言。实现了Http1.0和Http1.1
2. 以可扩展的面向对象的结构实现了Http全部的方法(GET, POST, PUT, DELETE, HEAD, OPTIONS, and TRACE)。
3. 支持HTTPS协议。
4. 通过Http代理建立透明的连接。
5. 利用CONNECT方法通过Http代理建立隧道的https连接。
6. Basic, Digest, NTLMv1, NTLMv2, NTLM2 Session, SNPNEGO/Kerberos认证方案。
7. 插件式的自定义认证方案。
8. 便携可靠的套接字工厂使它更容易的使用第三方解决方案。
9. 连接管理器支持多线程应用。支持设置最大连接数,同时支持设置每个主机的最大连接数,发现并关闭过期的连接。
10. 自动处理Set-Cookie中的Cookie。
11. 插件式的自定义Cookie策略。
12. Request的输出流可以避免流中内容直接缓冲到socket服务器。
13. Response的输入流可以有效的从socket服务器直接读取相应内容。
14. 在http1.0和http1.1中利用KeepAlive保持持久连接。
15. 直接获取服务器发送的response code和 headers。
16. 设置连接超时的能力。
17. 实验性的支持http1.1 response caching。.使用场景
下面是一个get请求的demo```javapublic static void main(String[] args) {CloseableHttpClient httpClient = null;HttpGet httpGet = null;CloseableHttpResponse response = null;String result = "";try {//1、创建HttpClient对象httpClient = HttpClientBuilder.create().build();//2、创建HttpGet对象String url = "http://www.baidu.com";httpGet = new HttpGet(url);//3、执行get请求response = httpClient.execute(httpGet);//4、得到响应结果result = EntityUtils.toString(response.getEntity());} catch (IOException e) {e.printStackTrace();}finally {try {if (response != null) {response.close();}if (httpRequestBase!= null){httpRequestBase.releaseConnection();}if (httpClient != null){httpClient.close();}} catch (IOException e) {e.printStackTrace();}}}
二、实例和配置
原文链接:https://blog.csdn.net/df0128/article/details/83043457
httpClient 初始化
查看org.apache.http.impl.client.HttpClients.java源码可以看到httpClient 的创建有如下几种方式:
Factory methods for {@link CloseableHttpClient} instances.
最常用就是 createDefault() 方法和 custom() 方法;
下面分别对这几种方式做说明:
//创建HttpClient对象的几种方式CloseableHttpClient httpClient = HttpClientBuilder.create().build();CloseableHttpClient httpClient = HttpClients.createDefault();CloseableHttpClient httpClient = HttpClients.createDefault();//此方法较为常用,为自定义的配置,可以附加各种配置CloseableHttpClient client = HttpClients.custom().setConnectionManager(new PoolingHttpClientConnectionManager()).build();
连接配置
自定义初始化HttpClient的时候需要设置连接管理,即上面代码的 .setConnectionManager(new PoolingHttpClientConnectionManager()) 部分,
此方法需要添加的实例为 HttpClientConnectionManager,这个接口有两个实现类,
为PoolingHttpClientConnectionManager和BasicHttpClientConnectionManager;
BasicHttpClientConnectionManager 是一个简单连接管理器,一次只保持一条连接,即便这个类是线程安全的,它也只应该被一个执行线程使用,BasicHttpClientConnectionManager对相同路由的连续请求将重用连接,如果新的连接跟已经持久化保持的连接不同,那么它会关闭已有的连接,根据所给的路由重新开启一个新的连接来使用,如果连接已经被分配出去了,那么java.lang.IllegalStateException异常会被抛出。
该连接管理器的实现应该在EJB容器内使用。一个例子如下:
HttpClientContext context = HttpClientContext.create();HttpClientConnectionManager connMrg = new BasicHttpClientConnectionManager();HttpRoute route = new HttpRoute(new HttpHost("localhost", 80));// Request new connection. This can be a long processConnectionRequest connRequest = connMrg.requestConnection(route, null);// Wait for connection up to 10 secHttpClientConnection conn = connRequest.get(10, TimeUnit.SECONDS);try {// If not openif (!conn.isOpen()) {// establish connection based on its route infoconnMrg.connect(conn, route, 1000, context);// and mark it as route completeconnMrg.routeComplete(conn, route, context);}// Do useful things with the connection.} finally {connMrg.releaseConnection(conn, null, 1, TimeUnit.MINUTES);}
PoolingHttpClientConnectionManager 是一个更加复杂的实现,其管理了一个连接池,能够为多个执行线程提供连接,连接依据路由归类放入到池中,当一个请求在连接池中有对应路由的连接时,连接管理器会从池中租借出一个持久化连接而不是创建一个带有标记的连接。
PoolingHttpClientConnectionManager 在总的和每条路由上都会保持最大数量限制的连接,默认该实现会为每个路由保持2个并行连接,总的数量上不超过20个连接,在现实使用中,这是限制可能太过于苛刻,尤其对于那些将HTTP作为传输协议的服务来说。
下面是一个如何调整连接池参数的例子:
PoolingHttpClientConnectionManager cm = new PoolingHttpClientConnectionManager();// Increase max total connection to 200cm.setMaxTotal(200);// Increase default max connection per route to 20cm.setDefaultMaxPerRoute(20);// Increase max connections for localhost:80 to 50HttpHost localhost = new HttpHost("locahost", 80);cm.setMaxPerRoute(new HttpRoute(localhost), 50);CloseableHttpClient httpClient = HttpClients.custom().setConnectionManager(cm).build();
请求配置
此部分配置其实可以附加在HttpClient上,也可以附加在请求的实例上,代码如下所示:
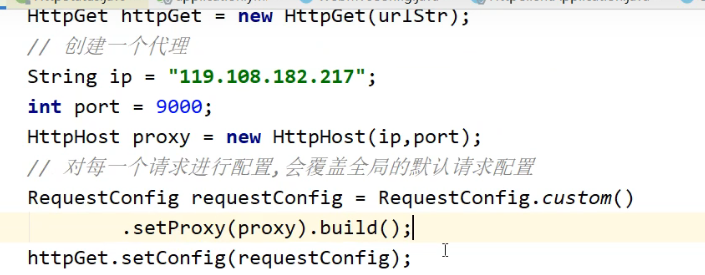
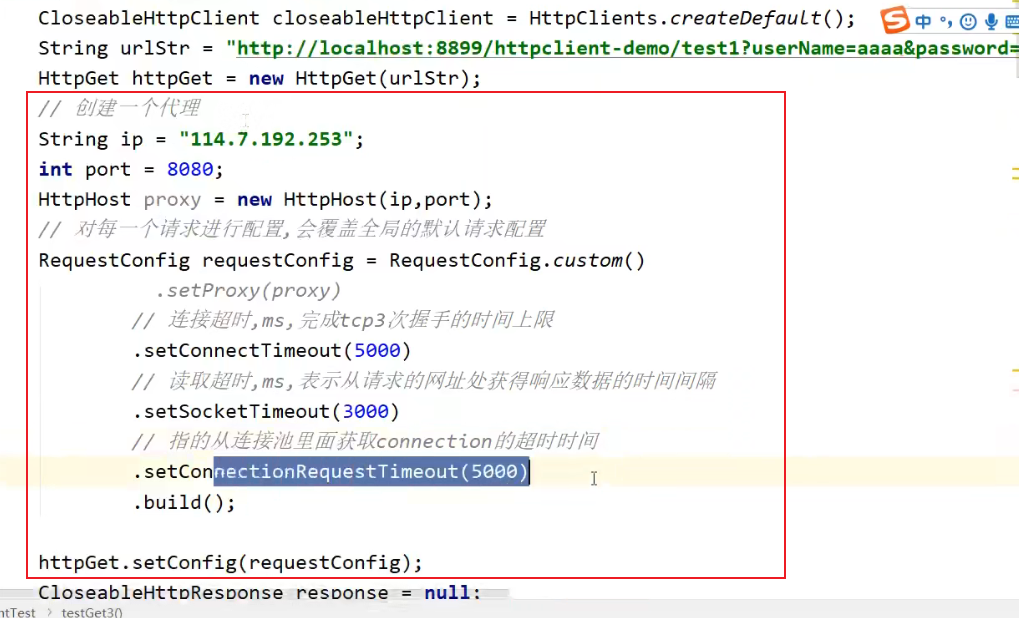
RequestConfig.Builder configBuilder = RequestConfig.custom();// 设置连接超时configBuilder.setConnectTimeout(MAX_TIMEOUT);// 设置读取超时configBuilder.setSocketTimeout(MAX_TIMEOUT);// 设置从连接池获取连接实例的超时configBuilder.setConnectionRequestTimeout(MAX_TIMEOUT);// 在提交请求之前 测试连接是否可用configBuilder.setStaleConnectionCheckEnabled(true);//cookie管理规范设定,此处有多种可以设置,按需要设置configBuilder.setCookieSpec(CookieSpecs.BROWSER_COMPATIBILITY);RequestConfig requestConfig = configBuilder.build();CloseableHttpClient client = HttpClients.custom().setConnectionManager(new PoolingHttpClientConnectionManager()).setDefaultRequestConfig(requestConfig).build();
上面代码中cookie策略的设定,CookieSpecs有多种实现,说明如下:
Standard strict(严格):状态管理策略行为完全符合RFC6265第四章的行为定义。
Standard(标准):状态管理策略较为符合RFC6265第四章定义的行为,以期望在不是完全遵守该行为之间的服务器之间进行交互。
Netscape 草案:该策略遵守Netscape公司公布最初的规范草案,除非确实需要与旧代码兼容,否则尽量避免使用它。
BEST_MATCH : 最佳匹配,不建议使用。
浏览器兼容性Browser compatibility(已过时):该策略尝试尽量去模拟老旧的浏览器版本如微软IE和Mozilla FireFox,请不要在新应用中使用。
Default:默认cookie策略是一种综合性的策略,其基于HTTP response返回的cookie属性如version信息,过期信息,与RFC2965,RFC2109或者Netscape草案兼容,该策略将会在下一个HttpClient小版本(基于RFC6265)中废弃。
Ignore cookies:所有的cookie都被忽略
强烈建议在新应用中使用Standard或者Standard strict策略,过时规范应该仅仅是在与旧系统兼容时使用。下一个HttpClient版本将会停止对过时规范的支持。
定制cookie策略
如果要定制cookie策略,则需要创建一个自定义的CookieSpec接口的实现,创建一个CookieSpecProvider的实现类,然后用该实现类去创建和初始化自定义规范的实例,然后使用HttpClient进行注册,一旦自定义规范被注册,它就会如同标准cookie规范一样被触发。
如下为一个实现自定义cookie策略的范例:
PublicSuffixMatcher publicSuffixMatcher = PublicSuffixMatcherLoader.getDefault();Registry<CookieSpecProvider> r = RegistryBuilder.<CookieSpecProvider>create().register(CookieSpecs.DEFAULT,new DefaultCookieSpecProvider(publicSuffixMatcher)).register(CookieSpecs.STANDARD,new RFC6265CookieSpecProvider(publicSuffixMatcher)).register("easy", new EasySpecProvider()).build();RequestConfig requestConfig = RequestConfig.custom().setCookieSpec("easy").build();CloseableHttpClient httpclient = HttpClients.custom().setDefaultCookieSpecRegistry(r).setDefaultRequestConfig(requestConfig).build();
cookie持久化
有时候有些cookie内容我们并不想每次执行就发送一次,比如登录等,那么我们可以直接把定制好的cookie附加到HttpClient上,这样就可以避免重复动作了,代码如下所示:
// Create a local instance of cookie storeCookieStore cookieStore = new BasicCookieStore();// Populate cookies if neededBasicClientCookie cookie = new BasicClientCookie("name", "value");cookie.setDomain(".mycompany.com");cookie.setPath("/");cookieStore.addCookie(cookie);CloseableHttpClient httpclient = HttpClients.custom().setDefaultCookieStore(cookieStore).build();
三、请求和响应
HttpClient支持开箱即用的,所有定义在HTTP/1.1规范中的方法:
GET、POST、HEAD、PUT、DELETE、TRACE、OPTIONS。
每个方法类型都有一个指定的类:HttpGet、HttpPost、HttpHead、HttpPut、HttpDelete、HttpTrace、HttpOptions。
譬如一个get请求如下:
HttpGet httpget = new HttpGet("http://www.google.com/search?hl=en&q=httpclient&btnG=Google+Search&aq=f&oq=");
参数为请求的地址,? 号后边的部分是参数;当然也可以用URIBuilder 构建一个URI的完整路径,譬如上面例子中的请求用URI方式的话代码如下:
URI uri = new URIBuilder().setScheme("http").setHost("www.google.com").setPath("/search").setParameter("q", "httpclient").setParameter("btnG", "Google Search").setParameter("aq", "f").setParameter("oq", "").build();HttpGet httpget = new HttpGet(uri);System.out.println(httpget.getURI());
get请求(无参)
客户端:
@Testpublic void doGetTestOne() {// 1、获得Http客户端(可以理解为:你得先有一个浏览器;注意:实际上HttpClient与浏览器是不一样的)CloseableHttpClient httpClient = HttpClientBuilder.create().build();// 2、创建Get请求HttpGet httpGet = new HttpGet("https://www.baidu.com/");// 响应模型CloseableHttpResponse response = null;try {// 3、由客户端执行(发送)Get请求response = httpClient.execute(httpGet);//4、加入请求头httpGet.setHeader("User-Agent","Mozilla/5.0 (Windows NT 10.0; Win64; x64) AppleWebKit/537.36 (KHTML, like Gecko) Chrome/101.0.4951.54 Safari/537.36");httpGet.setHeader("Referer","https://www.baidu.com/");/*** 5、解析响应获取数据* 判断状态码是否是 200*/if (response.getStatusLine().getStatusCode() == 200) {HttpEntity entity = response.getEntity();//将响应对象转化为字符串String content = EntityUtils.toString(entity, "utf-8");System.out.println(content);}} catch (ClientProtocolException e) {e.printStackTrace();} catch (ParseException e) {e.printStackTrace();} catch (IOException e) {e.printStackTrace();} finally {try {// 释放资源if (httpClient != null) {httpClient.close();}if (response != null) {response.close();}} catch (IOException e) {e.printStackTrace();}}}
响应内容:
可以看到请求的结果为百度源代码:
<!DOCTYPE html><!--STATUS OK--><html> <head><meta http-equiv=content-type content=text/html;charset=utf-8><meta http-equiv=X-UA-Compatible content=IE=Edge><meta content=always name=referrer><link rel=stylesheet type=text/css href=https://ss1.bdstatic.com/5eN1bjq8AAUYm2zgoY3K/r/www/cache/bdorz/baidu.min.css><title>百度一下,你就知道</title></head> <body link=#0000cc> <div id=wrapper> <div id=head> <div class=head_wrapper> <div class=s_form> <div class=s_form_wrapper> <div id=lg> <img hidefocus=true src=//www.baidu.com/img/bd_logo1.png width=270 height=129> </div> <form id=form name=f action=//www.baidu.com/s class=fm> <input type=hidden name=bdorz_come value=1> <input type=hidden name=ie value=utf-8> <input type=hidden name=f value=8> <input type=hidden name=rsv_bp value=1> <input type=hidden name=rsv_idx value=1> <input type=hidden name=tn value=baidu><span class="bg s_ipt_wr"><input id=kw name=wd class=s_ipt value maxlength=255 autocomplete=off autofocus=autofocus></span><span class="bg s_btn_wr"><input type=submit id=su value=百度一下 class="bg s_btn" autofocus></span> </form> </div> </div> <div id=u1> <a href=http://news.baidu.com name=tj_trnews class=mnav>新闻</a> <a href=https://www.hao123.com name=tj_trhao123 class=mnav>hao123</a> <a href=http://map.baidu.com name=tj_trmap class=mnav>地图</a> <a href=http://v.baidu.com name=tj_trvideo class=mnav>视频</a> <a href=http://tieba.baidu.com name=tj_trtieba class=mnav>贴吧</a> <noscript> <a href=http://www.baidu.com/bdorz/login.gif?login&tpl=mn&u=http%3A%2F%2Fwww.baidu.com%2f%3fbdorz_come%3d1 name=tj_login class=lb>登录</a> </noscript> <script>document.write('<a href="http://www.baidu.com/bdorz/login.gif?login&tpl=mn&u='+ encodeURIComponent(window.location.href+ (window.location.search === "" ? "?" : "&")+ "bdorz_come=1")+ '" name="tj_login" class="lb">登录</a>');</script> <a href=//www.baidu.com/more/ name=tj_briicon class=bri style="display: block;">更多产品</a> </div> </div> </div> <div id=ftCon> <div id=ftConw> <p id=lh> <a href=http://home.baidu.com>关于百度</a> <a href=http://ir.baidu.com>About Baidu</a> </p> <p id=cp>©2017 Baidu <a href=http://www.baidu.com/duty/>使用百度前必读</a> <a href=http://jianyi.baidu.com/ class=cp-feedback>意见反馈</a> 京ICP证030173号 <img src=//www.baidu.com/img/gs.gif> </p> </div> </div> </div> </body> </html>
get请求(有参)
1、直接使用Java字符串拼接(推荐)
2、uriBuilder 构建get请求参数
public static void main(String[] args) throws Exception {// 1.HttpClients工具类创建HttpClient对象CloseableHttpClient httpClient = HttpClients.createDefault();// 设置请求地址是: http://yun.itheima.com/search?keys=Java// 使用uriBuilder 构建get请求参数URIBuilder uriBuilder = new URIBuilder("http://yun.itheima.com/search");// 多个参数,使用连式编程uriBuilder.setParameter("keys","Java");// 2.创建HttpGet对象, 设置url访问地址☆HttpGet httpGet = new HttpGet(uriBuilder.build());System.out.println("发送请求的信息:");// 3.使用 HttpClient 发起请求, 获取 responseCloseableHttpResponse response = httpClient.execute(httpGet);// 4.解析响应if (response.getStatusLine().getStatusCode() == 200){String content = EntityUtils.toString(response.getEntity(), "utf-8");System.out.println(content.length());System.out.println(content);}}
3、UrlEncodedFormEntity + List 构建get请求参数
UrlEncodedFormEntity 将List
@Testvoid sendGet(){CloseableHttpClient client = null;HttpGet httpGet = null;CloseableHttpResponse response = null;try {client = HttpClientBuilder.create().build();// 构建参数列表【BasicNameValuePair】List<BasicNameValuePair> pairs = new ArrayList<>();pairs.add(new BasicNameValuePair("page","1"));pairs.add(new BasicNameValuePair("limit","5"));// 设置参数的编码UrlEncodedFormEntity urlEncodedFormEntity = new UrlEncodedFormEntity(pairs,"utf-8");String params = EntityUtils.toString(urlEncodedFormEntity, "utf-8");System.out.println(params); // 将参数转成page=1&limit=5格式httpGet = new HttpGet("http://localhost:8080/user/queryUserList?"+params);// 发送请求response = client.execute(httpGet);String result = EntityUtils.toString(response.getEntity(), "utf-8");System.out.println(result);} catch (IOException e) {e.printStackTrace();}finally {try {if (response != null) {response.close();}if (httpGet != null){httpGet.releaseConnection();}if (client != null){client.close();}} catch (IOException e) {e.printStackTrace();}}}
服务端:
@GetMapping("queryUserList")public PageBean queryUserList(UserVO vo){return userService.queryUserList(vo);}
post请求
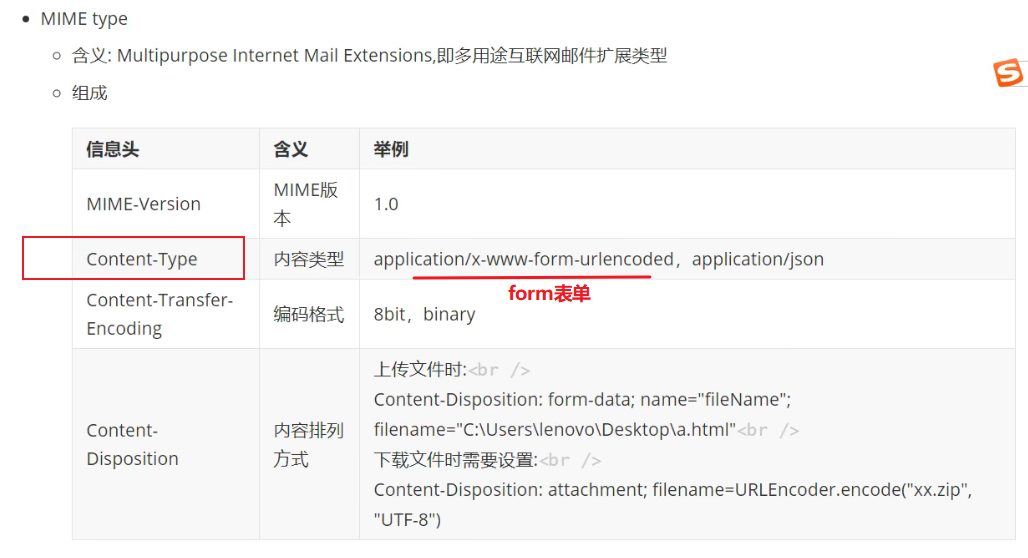
从网上下载一个png图片时,响应到达服务器如tomcat 后 获取文件后缀名在 tomcat服务器的 conf/web.xml 文件中找到对应的mime-mapping,设置响应头 Content-Type 为 mime-type
form表单enctype 可用的MIME类型有(Content-Type类型):
- application/x-www-form-urlencode (默认)
- multipart/form-data
- application/json
- text/plain
示例1:application/x-www-form-urlencode 
示例2:post发送json类型的数据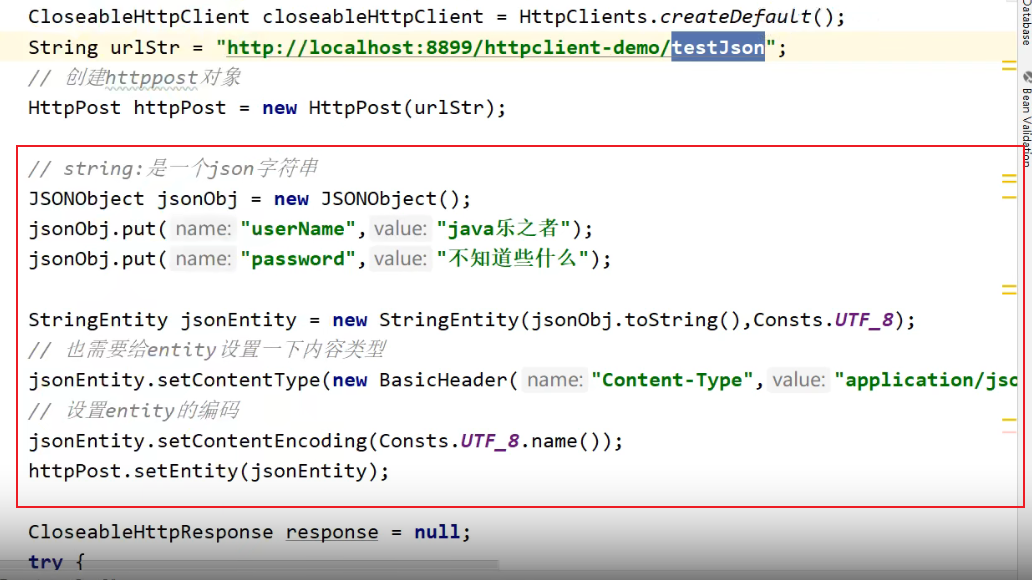
示例2:文件
服务端: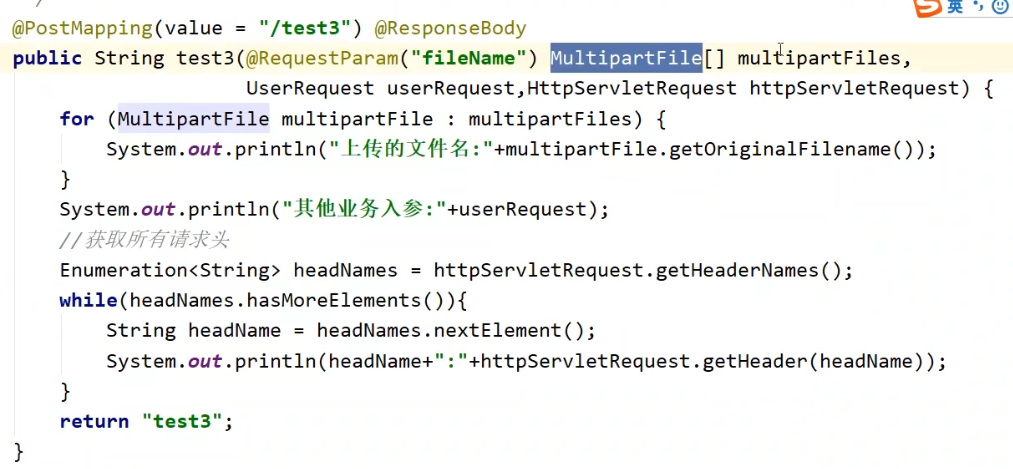
客户端:
@Testvoid sendPost(){CloseableHttpClient httpClient = null;HttpPost httpPost = null;CloseableHttpResponse response = null;try {httpClient = HttpClientBuilder.create().build();httpPost = new HttpPost("http://localhost:8080/user/addUser");// 构建参数列表【BasicNameValuePair】List<BasicNameValuePair> pairs = new ArrayList<>();pairs.add(new BasicNameValuePair("name","张三"));pairs.add(new BasicNameValuePair("sex","1"));// 设置参数编码UrlEncodedFormEntity urlEncodedFormEntity = new UrlEncodedFormEntity(pairs,"utf-8");// 发送请求之前给httpPost设置参数httpPost.setEntity(urlEncodedFormEntity);response = httpClient.execute(httpPost);String result = EntityUtils.toString(response.getEntity(), "utf-8");System.out.println(result);} catch (IOException e) {e.printStackTrace();}finally {try {if (response != null) {response.close();}if (httpPost != null){httpPost.releaseConnection();}if (httpClient != null){httpClient.close();}} catch (IOException e) {e.printStackTrace();}}}
服务端:
@PostMapping("addUser")public ResultObj addUser(User user){try {String salt = IdUtil.simpleUUID().toUpperCase();user.setSalt(salt);user.setPwd(new Md5Hash(Constant.USER_PASSWORD,salt,2).toString());userService.addUser(user);return ResultObj.ADD_SUCCESS;} catch (Exception e) {e.printStackTrace();return ResultObj.ADD_ERROR;}}
post请求(json)
// params传入的对象public static String sendPostJson(String url, Map<String,String> params){CloseableHttpClient httpClient = null;HttpPost httpPost = null;CloseableHttpResponse response = null;String result = "";try {httpClient = HttpClientBuilder.create().build();httpPost = new HttpPost(url);// 设置参数if (null != params && params.size() > 0){String paramJson = JSONObject.toJSONString(params);StringEntity stringEntity = new StringEntity(paramJson,"utf-8");stringEntity.setContentType("application/json;charset=utf-8");httpPost.setEntity(stringEntity);}response = httpClient.execute(httpPost);result = EntityUtils.toString(response.getEntity());} catch (IOException e) {e.printStackTrace();}finally {close(response,httpPost,httpClient);}return result;}
服务端:
@PostMapping("addUser")public ResultObj addUser(@RequestBody User user){try {String salt = IdUtil.simpleUUID().toUpperCase();user.setSalt(salt);user.setPwd(new Md5Hash(Constant.USER_PASSWORD,salt,2).toString());userService.addUser(user);return ResultObj.ADD_SUCCESS;} catch (Exception e) {e.printStackTrace();return ResultObj.ADD_ERROR;}}
post请求(文件)
请求添加cookie
这里cookie的添加只能是通过HttpClient实例添加或者在执行的时候添加;
方法一、通过HttpClient实例添加:
BasicCookieStore cookieStore = new BasicCookieStore();BasicClientCookie cookie = new BasicClientCookie("aaa", "bbb");cookie.setDomain(".mycompany.com");cookie.setPath("/");cookieStore.addCookie(cookie);CloseableHttpClient client = HttpClients.custom().setDefaultCookieStore(cookieStore).build();
方法二、通过HttpContext添加,代码如下:
//实例化一个cookieStore并添加cookieBasicCookieStore cookieStore = new BasicCookieStore();BasicClientCookie cookie = new BasicClientCookie("aaa", "bbb");cookie.setDomain(".mycompany.com");cookie.setPath("/");cookieStore.addCookie(cookie);CloseableHttpClient client = HttpClients.createDefault();HttpGet get = new HttpGet("http://www.baidu.com");HttpClientContext context = new HttpClientContext(); //实例化一个HttpContextcontext.setCookieStore(cookieStore); //添加cookieStoreCloseableHttpResponse response = null;try {response = client.execute(get, context);System.out.println(response.getStatusLine().getStatusCode());} catch (ClientProtocolException e) {e.printStackTrace();} catch (IOException e) {e.printStackTrace();}finally{try {response.close();client.close();} catch (IOException e) {e.printStackTrace();}}
请求体
CloseableHttpClient httpClient = HttpClientBuilder.create().build();HttpGet httpGet = new HttpGet("https://www.baidu.com/");//1、加入请求头httpGet.setHeader("User-Agent","Mozilla/5.0 (Windows NT 10.0; Win64; x64) AppleWebKit/537.36 (KHTML, like Gecko) Chrome/101.0.4951.54 Safari/537.36");httpGet.setHeader("Referer","https://www.baidu.com/");//请求参数之间以 & 连接 如 https://www.baidu.com/s?ie=utf-8&f=8&wd=htttpclient// Map<String,String> params 参数是MapList<BasicNameValuePair> pairList = new ArrayList<>();params.forEach((x,y) -> pairList.add(new BasicNameValuePair(x,y)));UrlEncodedFormEntity urlEncodedFormEntity = new UrlEncodedFormEntity(pairList,"utf-8");// 将参数转成page=1&limit=5格式String param = EntityUtils.toString(urlEncodedFormEntity, "utf-8");httpGet = new HttpGet(url+"?"+param);CloseableHttpResponse response = httpClient.execute(httpGet);
HttpGet 请求对象的一些常用方法
//获取请求方法public abstract String getMethod();//请求URIpublic URI getURI()public void setURI()//请求行public RequestLine getRequestLine() {final String method = getMethod();final ProtocolVersion ver = getProtocolVersion();final URI uriCopy = getURI(); // avoids possible window where URI could be changedString uritext = null;if (uriCopy != null) {uritext = uriCopy.toASCIIString();}if (uritext == null || uritext.isEmpty()) {uritext = "/";}return new BasicRequestLine(method, uritext, ver);}//请求配置public void setConfig(final RequestConfig config)
响应体
响应即是执行请求的返回,为 CloseableHttpResponse ,这个对象中含有我们所需要的所有的返回,譬如 header,cookie和 响应内容等,其基本内容如下代码所示:
CloseableHttpClient httpClient = HttpClientBuilder.create().build();HttpGet httpGet = new HttpGet("https://www.baidu.com/");CloseableHttpResponse response = httpClient.execute(httpGet);//获取响应状态//将响应体转化为字符串response = httpClient.execute(httpGet);if(response.getStatusLine().getStatusCode() == HttpStatus.SC_OK){HttpEntity entity = response.getEntity();result = EntityUtils.toString(entity,"utf-8");}- public HttpEntity getEntity() 获取请求体- public StatusLine getStatusLine() 获取请求状态- public HttpParams getParams() 获取参数- public Header[] getAllHeaders() 获取所有请求头
再来看一个示例:
public static void main(String[] args) {BasicCookieStore cookieStore = new BasicCookieStore();BasicClientCookie cookie = new BasicClientCookie("aaa", "bbb");cookie.setDomain(".mycompany.com");cookie.setPath("/");cookieStore.addCookie(cookie);CloseableHttpClient client = HttpClients.createDefault();HttpGet get = new HttpGet("http://www.baidu.com");HttpClientContext context = new HttpClientContext();context.setCookieStore(cookieStore);CloseableHttpResponse response = null;try {response = client.execute(get, context);System.out.println(response.getStatusLine().getStatusCode());//返回状态值Header[] headers = response.getAllHeaders();//获取所有的header信息boolean isContains = response.containsHeader("name");//是否包含ke为name的headerProtocolVersion version = response.getProtocolVersion();//获取协议版本// 使用响应对象获取响应实体HttpEntity entity = httpResponse.getEntity();//将响应实体转为字符串,此部分即为内容try {String response = EntityUtils.toString(entity,"utf-8");} catch (ParseException e) {log.error("获取响应内容转码失败,转码类型为:{}", "utf-8", e);} catch (IOException e) {log.error("获取响应内容转码失败,转码类型为:{}", "utf-8", e);}//获取cookieList<Cookie> returnCookie = context.getCookieStore().getCookies();} catch (ClientProtocolException e) {e.printStackTrace();} catch (IOException e) {e.printStackTrace();}finally{try {response.close();client.close();} catch (IOException e) {// TODO Auto-generated catch blocke.printStackTrace();}}}
EntityUtils.java 响应体工具类的几个重要方法
//确保请求体被完全消费(使用),如果还存在就关闭public static void consume(final HttpEntity entity)//返回请求体的二进制数组public static byte[] toByteArray(final HttpEntity entity) throws IOException//获取请求体内容的字符串表示 默认编码是 ISO-8859-1public static String toString(final HttpEntity entity, final Charset defaultCharset)
发送https请求
有部分网站为https开头,这样的话就需要特别一点的操作了,如下范例为一个发送https请求的例子:
/*** 发送 SSL POST请(HTTPS),K-V形式* @param url* @param params* @author Charlie.chen*/public static CloseableHttpResponse httpPostWithSSL(String url, Map<String, Object> params){CloseableHttpClient httpClient = HttpClients.custom().setSSLSocketFactory(createSSLConn()).setConnectionManager(connMgr).setDefaultRequestConfig(requestConfig).build();HttpPost httpPost = new HttpPost(url);CloseableHttpResponse response = null;try {httpPost.setConfig(requestConfig);if(params != null && !params.isEmpty()){List<NameValuePair> pairList = new ArrayList<NameValuePair>(params.size());for (Map.Entry<String, Object> entry : params.entrySet()) {NameValuePair pair = new BasicNameValuePair(entry.getKey(), entry.getValue().toString());pairList.add(pair);}httpPost.setEntity(new UrlEncodedFormEntity(pairList, Charset.forName("utf-8")));}response = httpClient.execute(httpPost);} catch (Exception e){log.error("下发接口失败", e);return null;}return response;}/*** 创建SSL安全连接* @param url* @param params* @return*/private static SSLConnectionSocketFactory createSSLConn() {SSLConnectionSocketFactory sslsf = null;try{SSLContext sslContext = new SSLContextBuilder().loadTrustMaterial(null, new TrustStrategy() {public boolean isTrusted(X509Certificate[] chain, String authType) throws CertificateException {return true;}}).build();sslsf = new SSLConnectionSocketFactory(sslContext);} catch (GeneralSecurityException e){e.printStackTrace();}return sslsf;}
四、实操演练
1)二进制文件下载
其实就是对响应对象进行处理:
public static boolean downLoadFile(String url, String targetFilePath) {CloseableHttpClient httpclient = getHttpClient();HttpPost post = new HttpPost(url);CloseableHttpResponse httpResponse = null;try {httpResponse = httpclient.execute(post);FileOutputStream output = new FileOutputStream(targetFilePath);// 得到网络资源的字节数组,并写入文件HttpEntity entity = httpResponse.getEntity();if (entity != null) {InputStream instream = entity.getContent();byte b[] = new byte[1024];int j = 0;while( (j = instream.read(b))!=-1){output.write(b,0,j);}output.flush();output.close();instream.close();}} catch (ClientProtocolException e) {e.printStackTrace();return false;} catch (IOException e) {e.printStackTrace();return false;}finally{try {httpResponse.close();httpclient.close();} catch (IOException e) {e.printStackTrace();}}return true;}
2)文件上传和Json数据获取
需求:通过SM.MS图床提供的token API,完成向图床上传图片 、删除图片和获取上传历史 三个功能
https://sm.ms/home/picture
下图是上传到图床的图片数据(需要先登录用户)
完整代码:
springboot项目的pom依赖:
<dependency><groupId>org.apache.httpcomponents</groupId><artifactId>httpclient</artifactId><version>4.5.13</version></dependency><!--上传文件时用到--><dependency><groupId>org.apache.httpcomponents</groupId><artifactId>httpmime</artifactId><version>4.5.13</version></dependency>
Controller层:
@Controller@RequestMapping("/smms")public class ApiRequestController {//创建连接池管理器PoolingHttpClientConnectionManager cm = null;CloseableHttpClient httpClient = null;{//创建连接池管理器cm = new PoolingHttpClientConnectionManager();//设置最大的连接数cm.setMaxTotal(200);//设置每个主机的最大连接数,访问每一个网站指定的连接数,不会影响其他网站的访问cm.setDefaultMaxPerRoute(20);//使用连接池管理器获取连接并发起请求httpClient = HttpClients.custom().setConnectionManager(cm).build();}@PostMapping("/upload")@ResponseBodypublic String uploadImg(@RequestParam("smfile") List<MultipartFile> multipartFiles) throws IOException {//CloseableHttpClient httpClient = HttpClientBuilder.create().build();HttpPost httpPost = new HttpPost("https://sm.ms/api/v2/upload");CloseableHttpResponse response = null;String responseStr = "";try {httpPost.setHeader("User-Agent","Mozilla/5.0 (Windows NT 10.0; Win64; x64) AppleWebKit/537.36 (KHTML, like Gecko) Chrome/101.0.4951.54 Safari/537.36");httpPost.setHeader("referer","https://sm.ms/");httpPost.setHeader("Authorization","CWQjdeMixpUUeSeu4f0tg98OeaTZuToD");MultipartEntityBuilder multipartEntityBuilder = MultipartEntityBuilder.create();for (MultipartFile multipartFile : multipartFiles) {multipartEntityBuilder.addBinaryBody("smfile", multipartFile.getInputStream(), ContentType.MULTIPART_FORM_DATA, URLEncoder.encode(multipartFile.getOriginalFilename(), StandardCharsets.UTF_8));}HttpEntity httpEntity = multipartEntityBuilder.build();httpPost.setEntity(httpEntity);response = httpClient.execute(httpPost);HttpEntity responseEntity = response.getEntity();responseStr = EntityUtils.toString(responseEntity, StandardCharsets.UTF_8);System.out.println(responseStr);} catch (ParseException | IOException e) {e.printStackTrace();} finally {HttpClientUtils.closeQuietly(response);}return responseStr;}@GetMapping("/upload_history")@ResponseBodypublic Object getImgUploadHistory(){System.out.println("httpClient----------->");System.out.println(httpClient);//CloseableHttpClient httpClient = HttpClientBuilder.create().build();;HttpGet httpGet = new HttpGet("https://sm.ms/api/v2/upload_history");CloseableHttpResponse response = null;String ret = "";try {httpGet.setHeader("User-Agent","Mozilla/5.0 (Windows NT 10.0; Win64; x64) AppleWebKit/537.36 (KHTML, like Gecko) Chrome/101.0.4951.54 Safari/537.36");httpGet.setHeader("referer","https://sm.ms/");httpGet.setHeader("Authorization","CWQjdeMixpUUeSeu4f0tg98OeaTZuToD");httpGet.setHeader("Content-Type","multipart/form-data");// 设置配置请求参数RequestConfig requestConfig = RequestConfig.custom().setConnectTimeout(35000)// 连接主机服务超时时间.setConnectionRequestTimeout(35000)// 请求超时时间.setSocketTimeout(60000)// 数据读取超时时间.build();// 为httpGet实例设置配置httpGet.setConfig(requestConfig);response = httpClient.execute(httpGet);ret = EntityUtils.toString(response.getEntity(),"utf-8");System.out.println(ret);System.out.println(JSONObject.parse(ret));} catch (IOException e) {e.printStackTrace();}finally {HttpClientUtils.closeQuietly(response);}return ret;}@GetMapping("/delete")@ResponseBodypublic Object deleteImage(@RequestParam("imghash") String imghash){//CloseableHttpClient httpClient = HttpClientBuilder.create().build();;HttpGet httpGet = new HttpGet("https://sm.ms/api/v2/delete/" + imghash);CloseableHttpResponse response = null;String ret = "";try {httpGet.setHeader("User-Agent","Mozilla/5.0 (Windows NT 10.0; Win64; x64) AppleWebKit/537.36 (KHTML, like Gecko) Chrome/101.0.4951.54 Safari/537.36");httpGet.setHeader("referer","https://sm.ms/");httpGet.setHeader("Authorization","CWQjdeMixpUUeSeu4f0tg98OeaTZuToD");response = httpClient.execute(httpGet);ret = EntityUtils.toString(response.getEntity(),"utf-8");System.out.println(ret);} catch (IOException e) {e.printStackTrace();}finally {HttpClientUtils.closeQuietly(response);}return ret;}}
前端页面效果: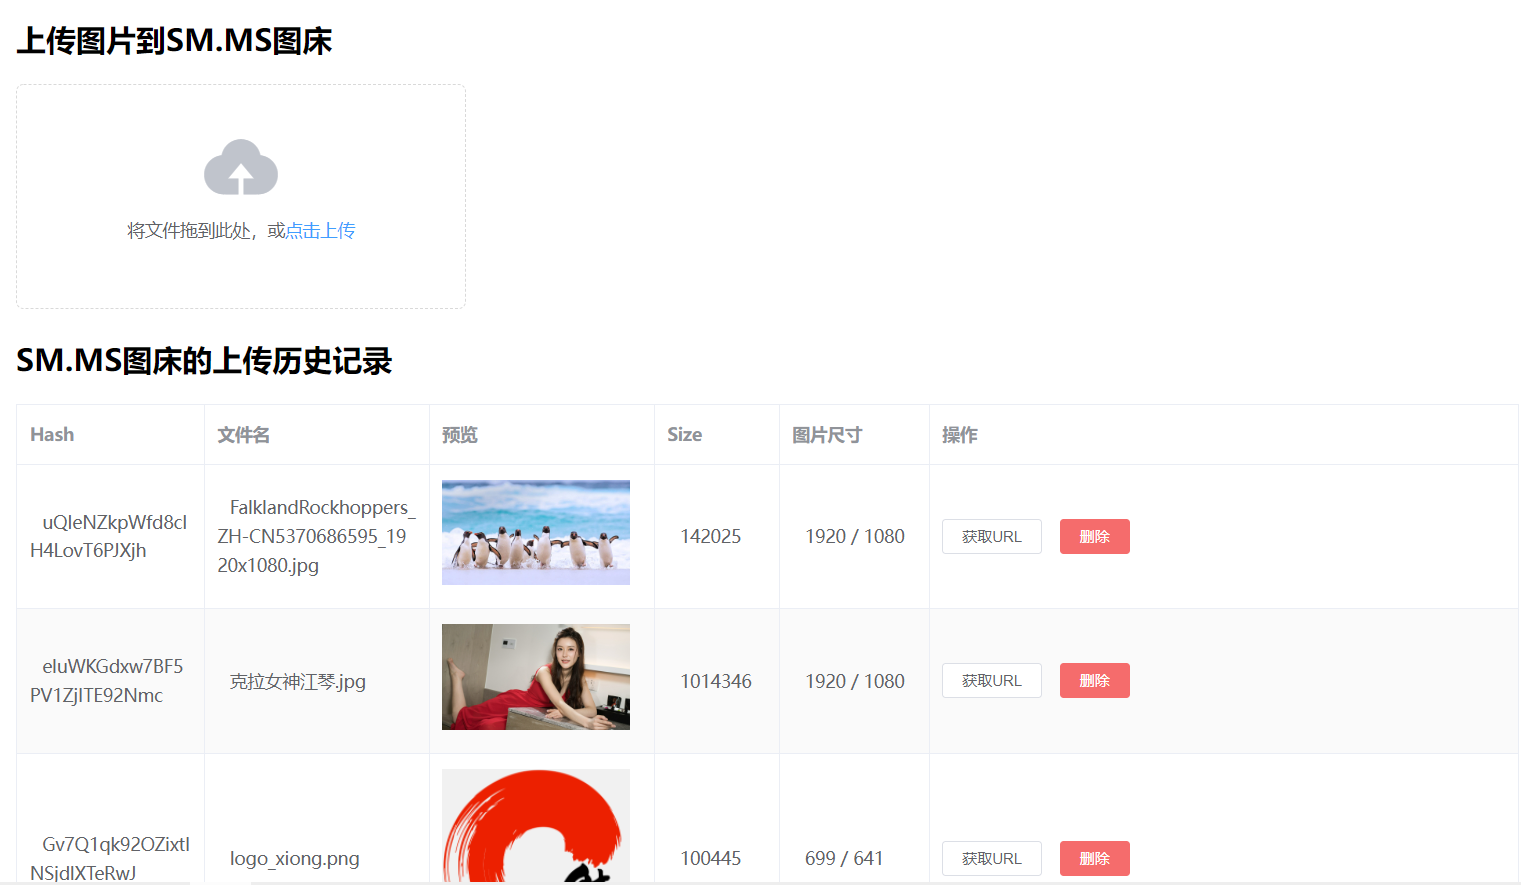
前端代码:
<!DOCTYPE html><html lang="en" xmlns:th="http://www.thymeleaf.org"><head><meta charset="UTF-8"><title>Title</title><!-- 引入vue --><script src="https://cdn.jsdelivr.net/npm/vue/dist/vue.js"></script><!-- 引入element-ui --><link rel="stylesheet" href="https://unpkg.com/element-ui/lib/theme-chalk/index.css"><script src="https://unpkg.com/element-ui/lib/index.js"></script><!-- 引入axios --><script src="https://unpkg.com/axios/dist/axios.min.js"></script><style>#app{margin: 0 auto;width: 80%;border: 1px solid red;padding: 15px;}</style></head><body><div id="app"><h2>上传图片到SM.MS图床</h2><el-uploadclass="upload-demo"action="/smms/upload"multipledragname="smfile":on-success="handleImagesSuccess"><i class="el-icon-upload"></i><div class="el-upload__text">将文件拖到此处,或<em>点击上传</em></div></el-upload><h2>SM.MS图床的上传历史记录</h2><el-table:data="imagesTableData"borderstripestyle="width: 100%"><el-table-columnlabel="Hash"width="150"><template slot-scope="scope"><span style="margin-left: 10px">{{ scope.row.hash }}</span></template></el-table-column><el-table-columnlabel="文件名"width="180"><template slot-scope="scope"><span style="margin-left: 10px">{{ scope.row.filename }}</span></template></el-table-column><el-table-columnlabel="预览"width="180"><template slot-scope="scope"><el-imagestyle="width: 150px; height: auto":src="scope.row.url"fit="fill"></el-image></template></el-table-column><el-table-columnlabel="Size"width="100"><template slot-scope="scope"><span style="margin-left: 10px">{{ scope.row.size }}</span></template></el-table-column><el-table-columnlabel="图片尺寸"width="120"><template slot-scope="scope"><span style="margin-left: 10px">{{ scope.row.width}} / {{scope.row.height}}</span></template></el-table-column><el-table-column label="操作"><template slot-scope="scope"><el-buttonsize="mini"@click="handleCopyUrl(scope.$index, scope.row)">获取URL</el-button><el-buttonsize="mini"type="danger"@click="handleDelete(scope.$index, scope.row)">删除</el-button></template></el-table-column></el-table></div><script>const app = new Vue({el: '#app',data:{imagesTableData:[]},methods:{//处理:图片上传成功handleImagesSuccess(res, file){if(res.success == true){this.imagesTableData.push(res.data);this.$message({message: "图片:" + row.data.filename + " 上传成功",type:"success"});}},handleCopyUrl(index, row){this.$message({message:'图片的URL地址为:'+row.url,type:"success"});},handleDelete(index, row){console.log(index);axios.get("/smms/delete?imghash=" + row.hash).then(res =>{console.log(res);if(res.status === 200){this.imagesTableData.splice(index,1);this.$message({message: '图片删除成功',type: 'success'});}})},//请求上传历史_getHistoryUpload() {console.log("获取历史上传记录...");axios({"method": 'get',"url": "/smms/upload_history",}).then(res =>{console.log(res);if(res.status === 200){this.imagesTableData.splice(0);this.imagesTableData.push(...res.data.data);}})}},mounted(){},created(){this.$nextTick(() =>{this._getHistoryUpload();})}})</script></body></html>
