官网:
一、JSX 使用
JSX 是 JavaScript 的语法扩展,描述 UI 呈现出它应有交互的本质形式。可拆分为多行,内容包裹在括号中。
- JSX 表示对象:Babel 会把 JSX 转译成
React.createElement(component, props, ...children)函数调用,创建对象被称为 “React 元素”。 - JSX 是一个表达式:if 语句、for 循环不是表达式不能在 JSX 中直接使用。可使用 conditional (三元运算) 表达式来替代 ```javascript import React from ‘react’
class JSXBaseDemo extends React.Component { constructor(props) { super(props) this.state = { name: ‘咕噜噜’, flag: true, imgUrl: ‘https://cdn.nlark.com/yuque/0/2019/jpeg/anonymous/1574041777259-ab793e4f-3fe2-413c-bbc8-81db193932da.jpeg?x-oss-process=image%2Fresize%2Cm_fill%2Cw_320%2Ch_320%2Fformat%2Cpng‘ } }
render() { // // 变量 // const ele =
{this.state.name}
// // // 表达式 // const exp ={this.state.flag ? ‘yes’ : ‘no’}
// const imgEle = ( //我的头像
// //
//
// // class// const classEle = <p className="title">title</p>//// // style// const styleData = { fontSize: '30px', color: 'blue' }// const styleEle = <p style={styleData}>style</p>// // 内联写法// const styleEle = <p style={{ fontSize: '30px', color: 'blue' }}>style</p>return <div>hello world</div>
} }
export default JSXBaseDemo
<a name="uz69B"></a>### 1、变量、表达式```javascriptrender() {// 变量const ele = <p>{this.state.name}</p>// 表达式const exp = <p>{this.state.flag ? 'yes' : 'no'}</p>const imgEle = (<div><p>我的头像</p><img src={this.state.imgUrl} /></div>)}
2、class、style
render() {// classconst classEle = <p className="title">title</p>// styleconst styleData = { fontSize: '30px', color: 'blue' }const styleEle = <p style={styleData}>style</p>// 内联写法const styleEle = <p style={{ fontSize: '30px', color: 'blue' }}>style</p>}
3、子元素和组件
render() {const imgEle = (<div><p>我的头像</p><img src={this.state.imgUrl} /><MyComponent /></div>)}
二、组件、props、state
1、基本概念
| 组件 | Vue | React |
|---|---|---|
| 定义 | 可复用的 Vue 实例 | Props 作为参数返回 React 元素的 JavaScript 函数 |
| 命名 | 推荐使用 kebab-case | 必须以大写字母开头 |
| VirtualDOM 挂载 | 实例 render 函数创建虚拟节点 VNode,如render: h => h(App),el 选项或 vm.$mount() 再将其挂载在 DOM 节点 |
函数 render 方法返回 React 元素,再由 ReactDOM 的 render 方法将其挂载到 DOM 节点 |
2、组件分类
2.1 class 组件
- 定义:作为 React.Component 子类,通过 props 从父组件向子组件传递数据
- 渲染方法:render()方法是类组件中唯一需要的方法,用于渲染DOM节点
- 构造函数:初始化 state 或进行方法绑定,一定需要调用 super(props)
- 通过给
this.state赋值对象来初始化内部 state。 - 为事件处理函数绑定实例
- 通过给
- 状态维护:state 用于组件状态维护,被视为一个组件的私有属性
- 每次定义子类的构造函数时,都需要调用 super 方法。即 super(props) 开头
- 每次在组件中调用 setState 时,React 都会自动更新其子组件
- 状态提升:需共享 state 向上移动到最近共同父组件中的 state 中用作“数据源”,即“状态提升”。任何可变数据应当只有一个相对应的唯一“数据源”。
- 受控组件:由 React 控制并且所有的表单数据统一存放的组件。响应数据改变时,子组件调用 this.props.onChange() 而非 this.setState()。
- 不可变性:不直接修改原数据/底层数据以便跟踪数据的改变,确定在 React 中何时重新渲染
class Square extends React.Component {render() {return (<button className="square" onClick={() => this.props.onClick()}>{this.props.value}</button>);}}class Board extends React.Component {constructor(props) {super(props);this.state = {squares: Array(9).fill(null)};}handleClick(i) {const squares = this.state.squares.slice();squares[i] = "X";this.setState({ squares: squares });}renderSquare(i) {return (<Squarevalue={this.state.squares[i]}onClick={() => this.handleClick(i)}/>);}render() {return (<div>{this.renderSquare(0)}{this.renderSquare(1)}{this.renderSquare(2)}</div>);}}
2.2 函数组件
- 定义:不需定义一个继承于 React.Component 的类,可定义一个接收 props 作为参数的函数,然后返回需要渲染的元素
- 使用场景:只包含一个 render 方法,不包含 state
//把两个 this.props 都替换成了 props,注意两侧括号不再有,不需要再处理 thisfunction Square(props){render(){return (<button className="square" onClick={props.onClick}>{props.value}</button>)}}
3、Props 的只读性
组件无论是使用函数声明还是通过 class 声明,都决不能修改自身的 props。所有 React 组件都必须像纯函数一样保护其 props 不被更改。但状态 state 允许组件随时间更改其输出以响应用户操作,网络响应以及其他任何情况。
4、State
State 与 props 类似,但是 state 是私有的,并且完全受控于当前组件。
- 不要直接修改 State,应该拷贝一份再使用 setState()
- this.props 和 this.state 可能会异步更新,不要依赖他的值来更新下一个状态。可以让 setState() 接收一个函数而不是一个对象,setTimeout 和自定义 DOM 事件中是同步更新
- State 的更新会被合并。调用 setState() 的时候,React 会把你提供的对象合并到当前的 state
- 自上而下数据流:任何状态始终归某个特定组件所有,且从该状态派生的任何数据或UI都只影响树中“下方”的组件
- 如果某些数据可以由 props 或 state 推导得出,那么它就不应该存在于 state 中
// 场景一:setState 接收函数// 函数中第一个参数为上一个 state,第二个为此次更新被应用时的 propsthis.setState((prevState, nextprops) => ({counter: prevState.counter + nextprops.increment}));// 场景二:setState 回调函数this.setState({count: this.state.count + 1}, () => {console.log('callback:', this.state.count) // 回调函数获取的是更新后的值})console.log('count:' this.state.count) // 异步的,拿不到最新值// 场景三:setTimeout 或自定义 DOM 事件中的 setState 是同步的// setTimeoutsetTimeout(() => {this.setState({count: this.state.count + 1})console.log('count:' this.state.count) // 可获取最新值}, 0)// 自定义 DOM 事件document.body.addEventListener('click', () => {this.setState({count: this.state.count + 1})console.log(this.state.count)})
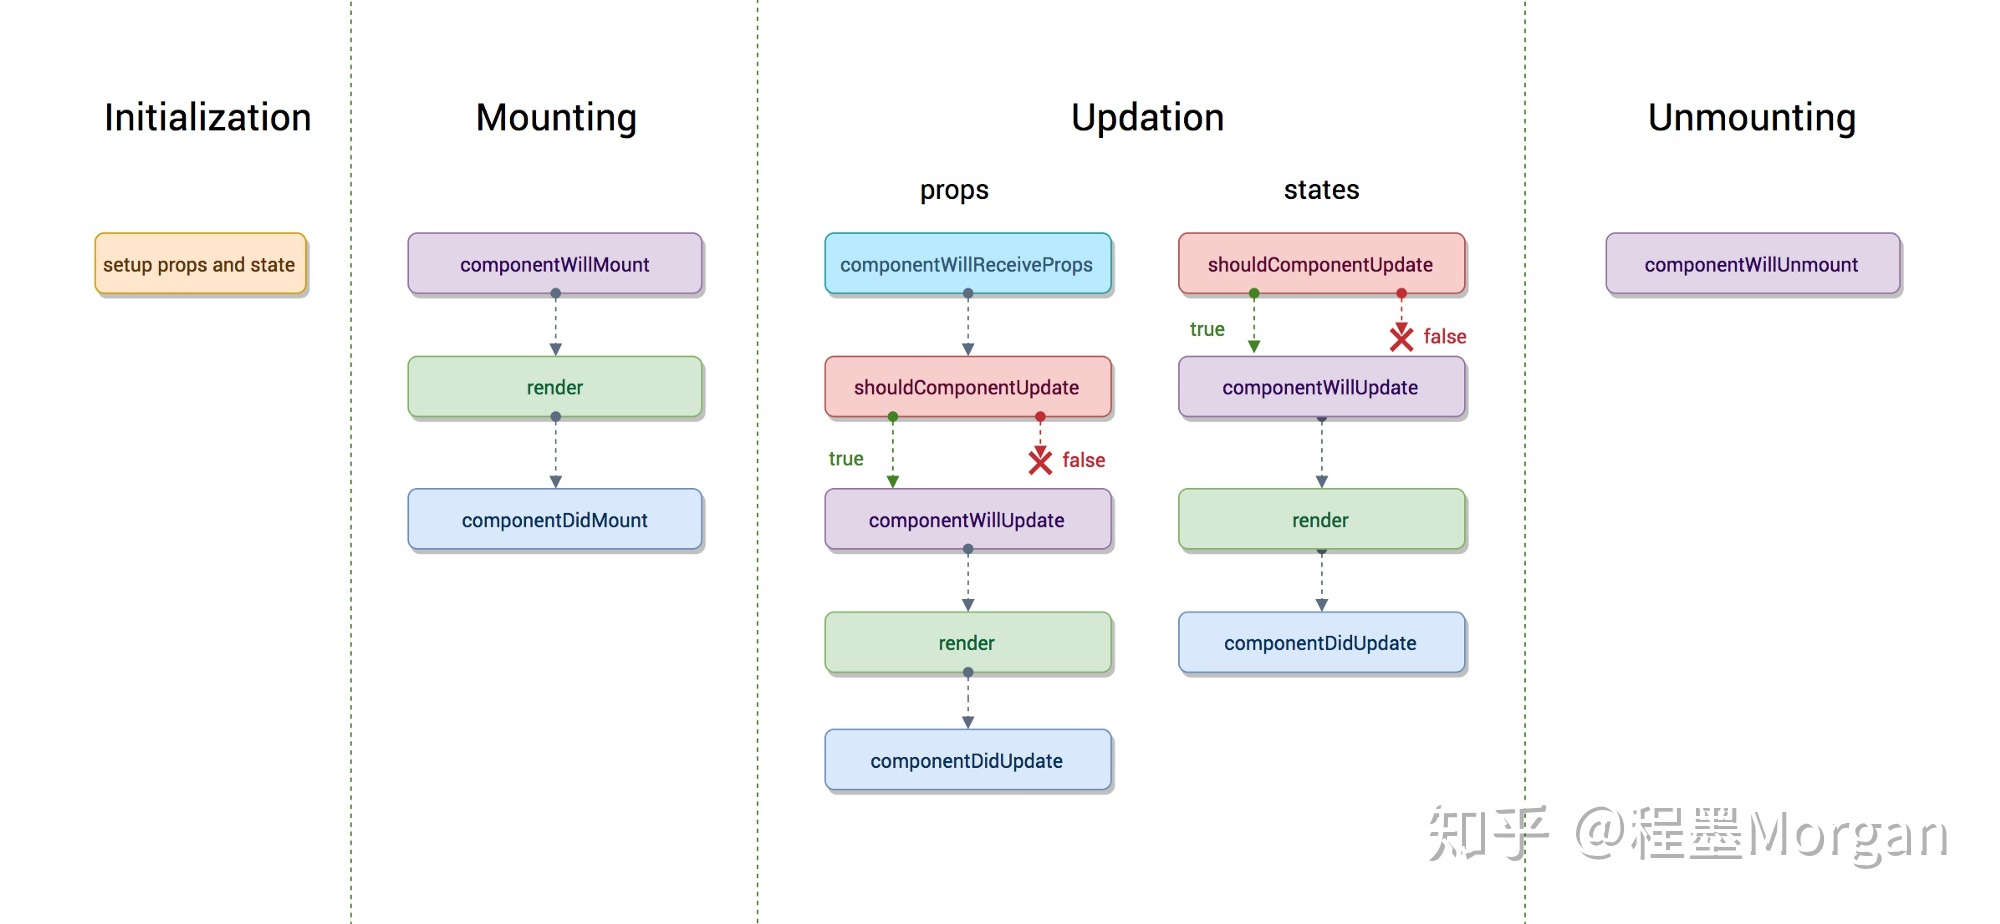
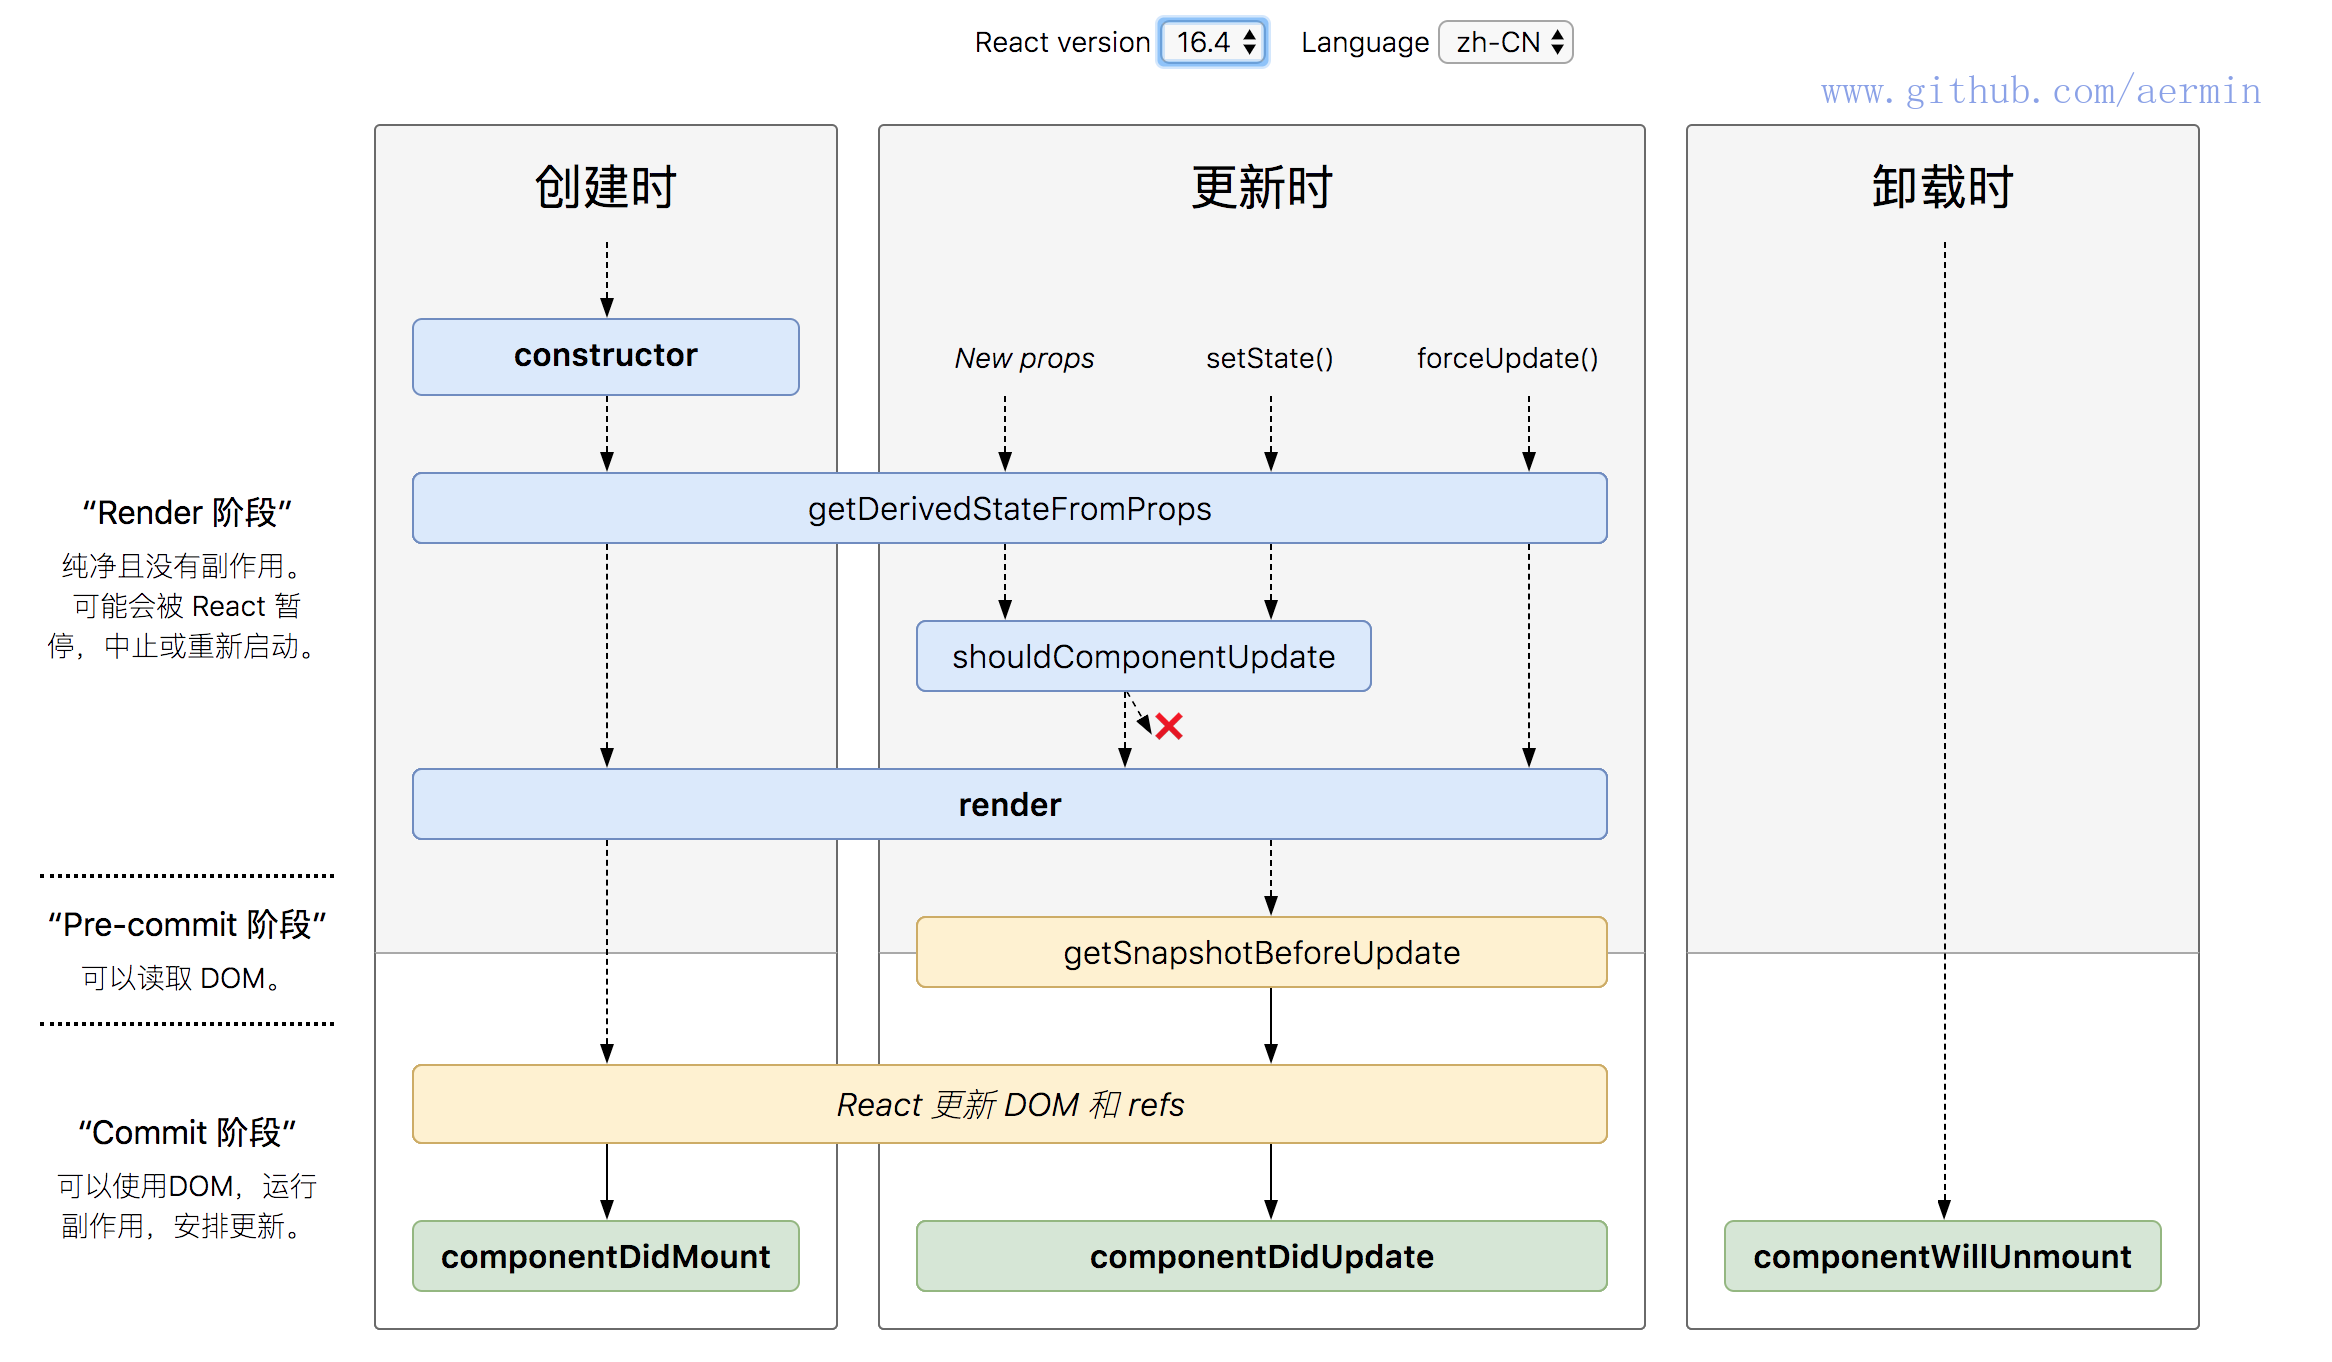
5、生命周期
三、条件
1、if else
render() {if (this.state.theme === 'black') {return <div>black</div>} else {return <div>white</div>}}
2、三元表达式
render() {return (<div>{this.state.theme === 'black' ? <div>black</div> : <div>white</div>}</div>)}
3、逻辑运算符( &&、|| )
render() {return (<div>{this.state.theme === 'black' && <div>black</div>}</div>)}
四、列表渲染
1、map
render() {return (<ul>{this.state.list.map(item => <li key={item.id}>{item.title}</li>)}</ul>)}
2、key
key 属性必须保证其在同级中是唯一的,建议不要用 index 和 random
五、事件
- 需使用小驼峰命名,如:onClick、onChange
- 需要在构造函数中绑定 this 指向(或使用箭头函数)
- 只能显示阻止默认行为:
handleClick(e){ e.preventDefault() } - react 中的事件是 SyntheticBaseEvent 合成事件,所有事件都挂载在 document 上(和 DOM 事件不同) ```javascript import React from ‘react’
class JSXBaseDemo extends React.Component { constructor(props) { super(props) this.state = { name: ‘hello’ } // 修改方法的 this 指向 this.handleClick = this.handleClick.bind(this) }
handleClick(event) { this.setState({ name: ‘world’ }) console.log(event.target) // 指向当前元素,即当前元素触发 console.log(event.currentTarget) // 指向当前元素,假象,并非绑定在当前元素,react 合成事件特殊处理 console.log(event.nativeEvent) // 原生事件对象 console.log(event.nativeEvent.target) // 指向当前元素,即当前元素触发 console.log(event.nativeEvent.currentTarget) // 指向 document,即绑定在 document 上 }
// 箭头函数写法 // handleClick = () => { // this.setState({ // name: ‘world’ // }) // }
render() { return
export default JSXBaseDemo
<a name="GDNhw"></a>## 六、表单React 中,表单状态通常保存在组件的 state 属性中,且只能通过 setState() 来更新<a name="6PV03"></a>### 1、受控组件React 中 state 是数据源,被 React **控制取值**的表单输入元素叫做“受控组件”,如 input 的 value 属性由 state 控制```javascriptimport React from 'react'class JSXBaseDemo extends React.Component {constructor(props) {super(props)this.state = {name: 'hello'}}handleChange = (e) => {this.setState({name: e.target.value})}render() {return (<div><p>{this.state.name}</p><label htmlFor="inputName">姓名:</label> {/* htmlFor 代替 for */}<input id="inputName" value={this.state.name} onChange={this.handleChange} /></div>)}}export default JSXBaseDemo
2、常用表单标签
- input textarea select 用 value 控制值
checkbox radio 用 checked 控制值
render() {return (<div><input value={this.state.name} onChange={this.handleChange} /><textarea value={this.state.name} onChange={this.handleChange} /><select value={this.state.name} onChange={this.handleChange}><option value="beijing">北京</option><option value="guangzhou">广州</option></select><input type="checkbox" checked={this.state.name} onChange={this.handleChange} /></div>)}
七、高级用法
1、非受控组件
在一个受控组件中,表单数据是由 React 组件来管理的。使用非受控组件时表单数据将交由 DOM 节点来处理
使用场景:必须手动操作 DOM 元素,setState 实现不了要编写一个非受控组件,而不是为每个状态更新都编写数据处理函数,你可以 使用 ref 来从 DOM 节点中获取表单数据
- 非受控组件将真实数据储存在 DOM 节点中,所以在使用非受控组件时,有时候反而更容易同时集成 React 和非 React 代码
- 默认值:非受控组件中赋予组件一个初始值,但是不去控制后续的更新。 可指定一个 defaultValue 属性,而不是 value。
- 文件输入:在 React 中,
<input type="file" />始终是一个非受控组件,因为它的值只能由用户设置,而不能通过代码控制 ```javascript import React from ‘react’
class App extends React.Component { constructor(props) { super(props) this.state = { name: ‘123’, flag: true, } this.nameInputRef = React.createRef() // 创建 ref } render() { // input defaultValue return
}alertName = () => {const elem = this.nameInputRef.current // 通过 ref 获取 DOM 节点alert(elem.value) // 不是 this.state.name}
}
export default App
<a name="5w54b"></a>### 2、PortalsPortal 提供了一种将子节点渲染到存在于父组件以外的 DOM 节点的优秀的方案`ReactDOM.createPortal(child, container)`- 一个 portal 的典型用例是当父组件有 overflow: hidden 或 z-index 样式时,但你需要子组件能够在视觉上“跳出”其容器。例如,对话框、悬浮卡以及提示框- 当在使用 portal 时, 管理键盘焦点尤为重要- 通过 Portal 进行事件冒泡:一个从 portal 内部触发的事件会一直冒泡至包含 React 树的祖先```javascriptrender() {// React 并没有创建一个新的 div。它只是把子元素渲染到 domNode 中// domNode 是一个可以在任何位置的有效 DOM 节点。return ReactDOM.createPortal(this.props.children,domNode);}
3、Context
将数据向组件树下所有组件“广播”,共享组件树全局数据以便不同层级的组件访问
import React from 'react'// 创建 Context 填入默认值(任何一个 js 变量)const ThemeContext = React.createContext('light')// 底层组件 - 函数是组件function ThemeLink (props) {// const theme = this.context // 会报错。函数式组件没有实例,即没有 this// 函数式组件可以使用 Consumerreturn <ThemeContext.Consumer>{ value => <p>link's theme is {value}</p> }</ThemeContext.Consumer>}// 底层组件 - class 组件class ThemedButton extends React.Component {// 指定 contextType 读取当前的 theme context。// static contextType = ThemeContext // 也可以用 ThemedButton.contextType = ThemeContextrender() {const theme = this.context // React 会往上找到最近的 theme Provider,然后使用它的值。return <div><p>button's theme is {theme}</p></div>}}ThemedButton.contextType = ThemeContext // 指定 contextType 读取当前的 theme context。// 中间的组件再也不必指明往下传递 theme 了。function Toolbar(props) {return (<div><ThemedButton /><ThemeLink /></div>)}class App extends React.Component {constructor(props) {super(props)this.state = {theme: 'light'}}render() {return <ThemeContext.Provider value={this.state.theme}><Toolbar /><hr/><button onClick={this.changeTheme}>change theme</button></ThemeContext.Provider>}changeTheme = () => {this.setState({theme: this.state.theme === 'light' ? 'dark' : 'light'})}}export default App
4、异步组件(懒加载)
- import()
- React.lazy
- React.Suspense ```javascript import React from ‘react’
const ContextDemo = React.lazy(() => import(‘./ContextDemo’))
class App extends React.Component { constructor(props) { super(props) } render() { return
引入一个动态组件
export default App
<a name="W3plt"></a>### 5、性能优化<a name="Acjn8"></a>#### 5.1 shouldComponentUpdate(简称 SCU)- SCU 默认返回 true,即 React 默认重新渲染所有子组件- 必须配合**不可变值**一起使用- 可先不用 SCU,有性能问题时再做考虑```javascriptshouldComponentUpdate(nextProps, nextState) {if (nextState.count !== this.state.count) {return true // 可以渲染}return false // 不重复渲染}
5.2 PureComponent 和 React.memo
- PureComponents(纯组件),SCU 中实现了浅比较 ```javascript // 以下两种方式效果相同 class App extends React.PureComponent { // … }
class App extends React.Component { shouldComponentUpdate(nextProps, nextState) { // 浅比较 } // … }
- memo 是函数组件中的 PureComponents```javascriptfunction MyComponent(props) {// 使用 props 渲染}function shouldUpdate(prevProps, nextProps) {// 返回结果为 true,则重新渲染;返回 false,则不渲染}export default React.memo(MyComponent, shouldUpdate)
- 浅比较可在大部分情况使用
5.3 不可变值 immutable.js
- 彻底拥抱不可变
- 基于共享数据(不是深拷贝),速度好 ```javascript import { Map } from ‘immutable’; const map1 = Map({ a: 1, b: 2, c: 3 }) const map2 = map1.set(‘b’, 50)
// map1 和 map2 共享了没有变化的 a 和 c 节点 map1 === map2 // false map1.get(‘b’) // 2 map2.get(‘b’) // 50 map1.get(‘a’) // 1 map2.get(‘a’) // 1
<a name="S5SSI"></a>### 6、高阶组件高阶组件(HOC)是一种复用状态逻辑的技巧,它参数为组件,返回值为新组件的函数。编写一个创建组件函数。该函数将接受一个子组件作为它的其中一个参数,该子组件将订阅数据作为 prop<a name="sX0RS"></a>#### 6.1 基本用法```javascript// 高阶组件不是一种功能,而是一种模式const HOCFactory = (Component) => {class HOC extends React.Component {// 在此定义多个组件的公共逻辑render() {return <Component {...this.props} /> // 返回拼装的结果}}return HOC}const EnhancedComponent1 = HOCFactory(WrappedComponent1)const EnhancedComponent2 = HOCFactory(WrappedComponent2)
6.2 实际举例
通过高阶组件增加通用逻辑——获取鼠标位置
// 高阶组件const withMouse = (Component) => {class withMouseComponent extends React.Component {constructor(props) {super(props)this.state = { x: 0, y: 0 }}handleMouseMove = (event) => {this.setState({x: event.clientX,y: event.clientY})}render() {return (<div style={{ height: '500px' }} onMouseMove={this.handleMouseMove}>// 1. 透传所有 props// 2. 增加 mouse 属性<Component {...this.props} mouse={this.state}/></div>)}}return withMouseComponent}const App = (props) => {const a = props.aconst { x, y } = props.mouse // 接收 mouse 属性return (<div style={{ height: '500px' }}><h1>The mouse position is ({x}, {y})</h1><p>{a}</p></div>)}export default withMouse(App) // 返回高阶函数
7、Render Props
术语 “render prop” 是指一种在 React 组件之间使用一个值为函数的 prop 共享代码的简单技术;它的作用是分享一个组件封装到其他需要相同 state 组件的状态或行为,也是一种复用状态逻辑的方式
具有 render prop 的组件接受一个函数,该函数返回一个 React 元素并调用它而不是实现自己的渲染逻辑
import React from 'react'class Mouse extends React.Component {constructor(props) {super(props)this.state = { x: 0, y: 0 }}handleMouseMove = (event) => {this.setState({x: event.clientX,y: event.clientY})}render() {return (<div style={{ height: '500px' }} onMouseMove={this.handleMouseMove}>{/* 将当前 state 作为 props ,传递给 render (render 是一个函数组件) */}{this.props.render(this.state)}</div>)}}const App = (props) => (<div style={{ height: '500px' }}><Mouse render={/* render 是一个函数组件 */({ x, y }) => <h1>The mouse position is ({x}, {y})</h1>}/></div>)/*** 即,定义了 Mouse 组件,只有获取 x y 的能力。* 至于 Mouse 组件如何渲染,App 说了算,通过 render prop 的方式告诉 Mouse 。*/export default App
8、Refs 及其转发
- Refs 提供一种方式,允许访问 DOM 节点或在 render 方法中创建的 React 元素
- Ref 转发是将 ref 自动地通过组件传递到其一子组件,常用于可重用的组件库
8.1 使用 Refs
- 何时使用:管理焦点,文本选择或媒体播放;触发强制动画;集成第三方
DOM库 创建 refs:React.createRef() 创建并通过 ref 属性附加到 React 元素
class MyComponent extends React.Component {constructor(props) {super(props);this.myRef = React.createRef();}render() {return <div ref={this.myRef} />;}}//构造组件时,通常将 Refs 分配给实例属性,以便在整个组件中引用它们
访问 refs:ref 被传递给 render 中的元素时,由
this.myRef.current引用- ref 属性用于 HTML 元素时,ref 接收底层 DOM 元素为其
current属性 - ref 属性用于自定义 class 组件时,ref 接收组件挂载实例为其
current属性 - 不能在函数组件上使用 ref 属性,因为他们没有实例
- 可以在函数组件内部使用 ref 属性,只要它指向 DOM 元素或 class 组件
- ref 属性用于 HTML 元素时,ref 接收底层 DOM 元素为其
- 回调 Refs:传递接受 React 组件实例或 HTML DOM 元素作为参数的函数。
function CustomTextInput(props) {return (<div><input ref={props.inputRef} /></div>);}class Parent extends React.Component {render() {return (<CustomTextInputinputRef={el => this.inputElement = el}/>);}}//Parent 中的 this.inputElement 会被设置为与 input 元素相对应的 DOM 节点
8.2 转发 refs 到 DOM 组件
Ref 转发是可选特性,其允许某些组件接收 ref,并将其向下传递给子组件。FancyButton 使用 React.forwardRef 来获取传递给它的 ref,然后转发到它渲染的 DOM button
- 调用 React.createRef 创建一个 React ref 并将其赋值给 ref 变量。
- 指定 ref 为 JSX 属性,将其向下传递给
<FancyButton ref={ref}>。 - React 传递 ref 给 forwardRef 内函数 (props, ref) => …,作为其第二个参数。
- 向下转发该 ref 参数到
<button ref={ref} />,将其指定为 JSX 属性。 - ref 挂载完成,ref.current 将指向
<button>DOM 节点
const FancyButton = React.forwardRef((props, ref) => (<button ref={ref} className="FancyButton">{props.children}</button>));// 你可以直接获取 DOM button 的 ref:const ref = React.createRef();<FancyButton ref={ref}>Click me!</FancyButton>;
八、Redux
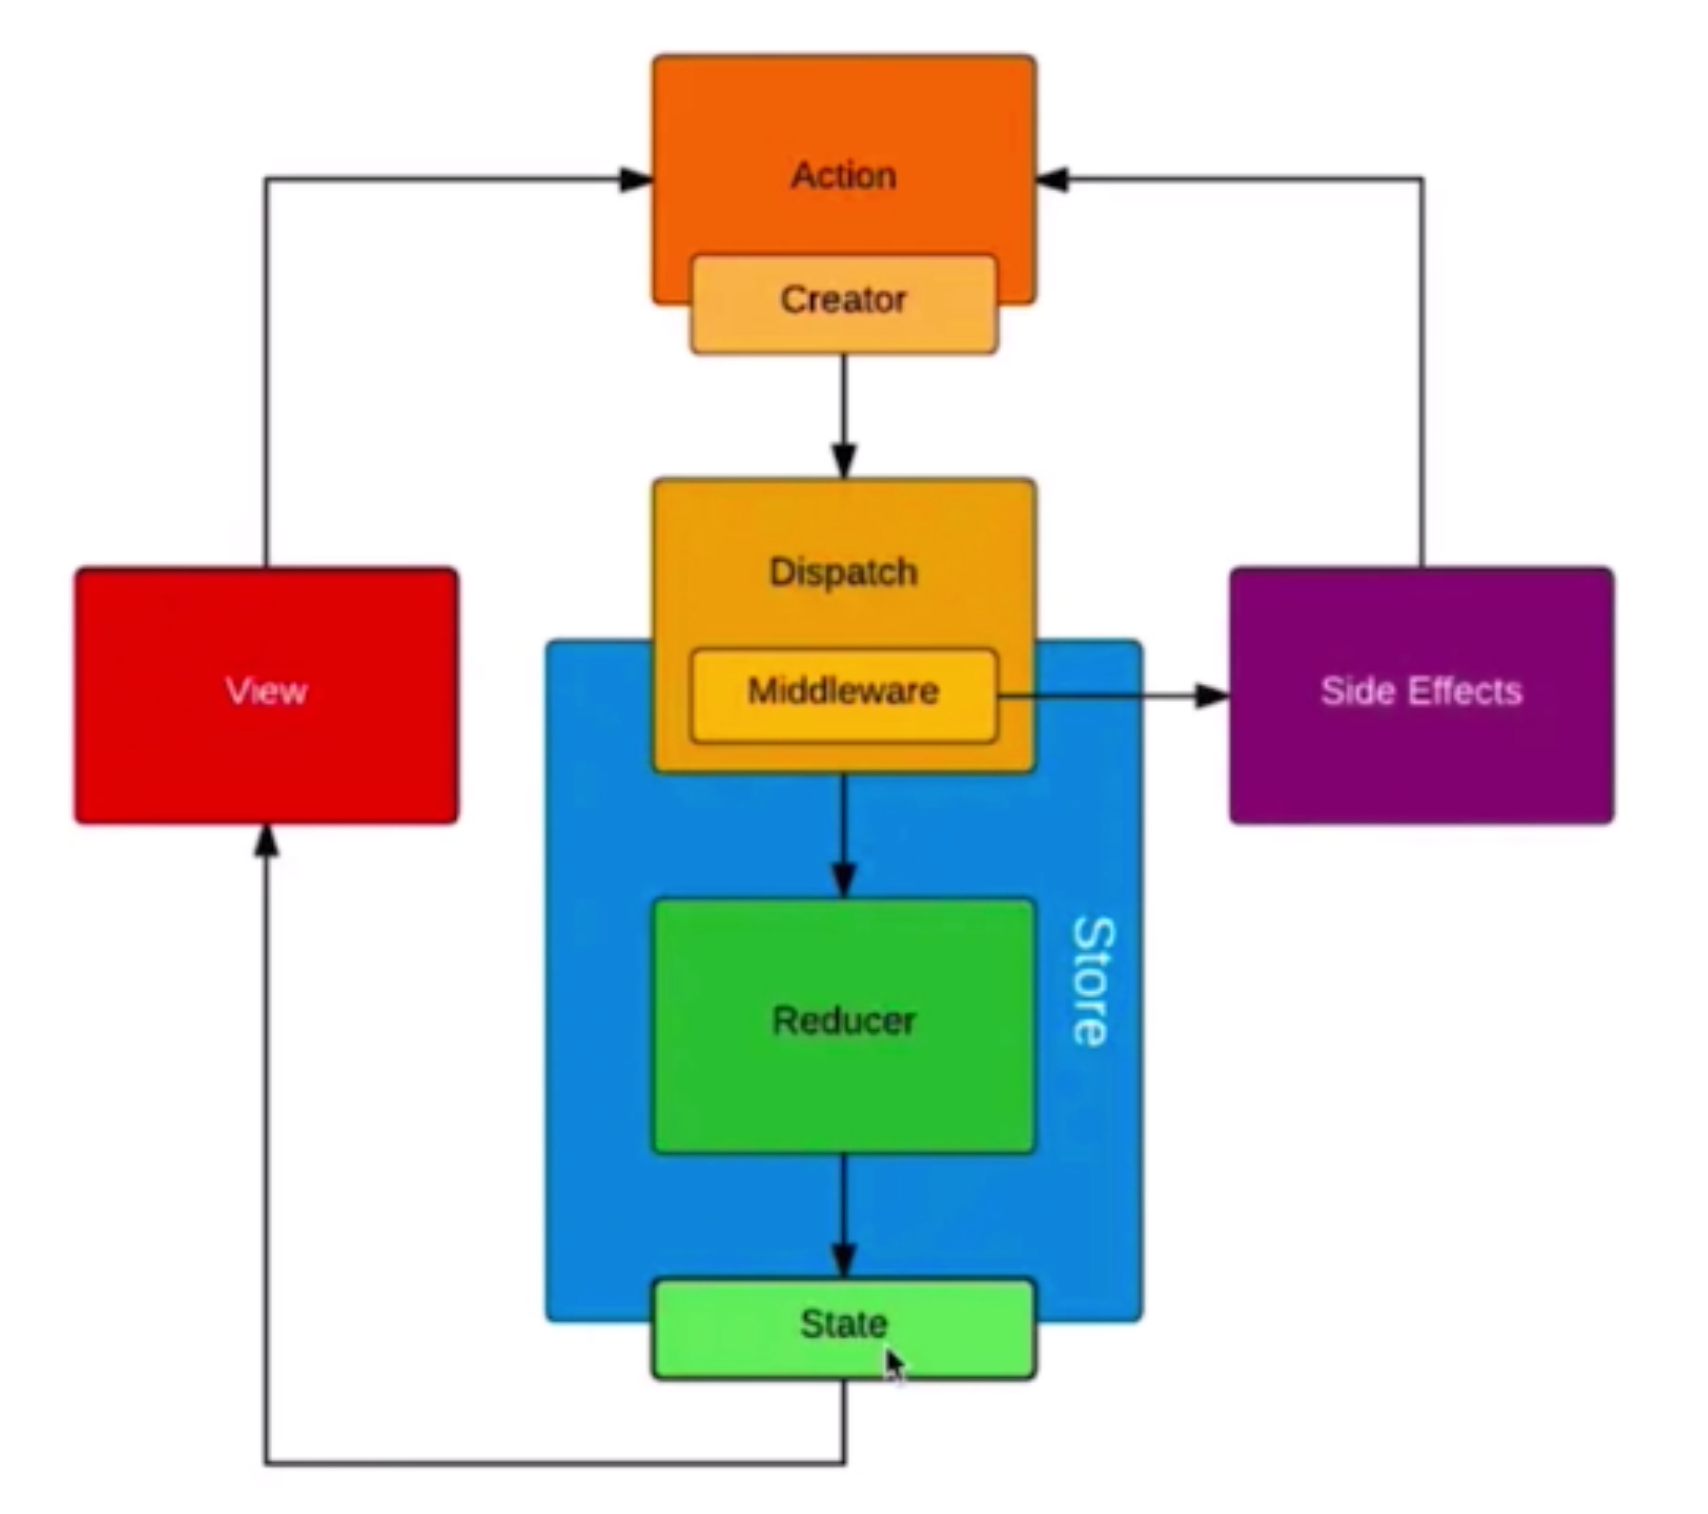
1、单向数据流图


