1. Vuex 引言
Vuex 是一个专为 Vue.js 应用程序开发的状态管理模式。它采用集中式存储管理应用的所有组件的状态,并以相应的规则保证状态以一种可预测的方式发生变化。那到底什么是状态管理模式呢?
1.1 基本状态管理模式
以下是一个简单的计数应用:
new Vue({// statedata () {return {count: 0}},// viewtemplate: `<div>{{ count }}</div>`,// actionsmethods: {increment () {this.count++}}})
其中:
- state: 驱动应用的数据源
- view: 以声明方式将 state 映射到视图
- actions: 响应在 view 上的用户输入导致的状态变化
基本的状态管理模式是一个单向数据流,但是,当我们的应用遇到多个组件共享状态时,单向数据流的简洁性很容易被破坏:
- 多个视图依赖于同一状态
- 来自不同视图的行为需要变更同一状态
这时候,可以把组件的共享状态抽取出来,在一个全局的单例模式下进行管理,这便是 vuex 背后的思想
1.2 Vuex 简介及结构
每一个 Vuex 应用的核心就是 store(仓库)。“store”基本上就是一个容器,它包含着你的应用中大部分的状态 (state)。Vuex 和单纯的全局对象有以下两点不同:
- Vuex 的状态存储是响应式的。当 Vue 组件从 store 中读取状态的时候,若 store 中的状态发生变化,那么相应的组件也会相应地得到高效更新
- 你不能直接改变 store 中的状态。改变 store 中的状态的唯一途径就是显式地提交 (commit) mutation。这样使得我们可以方便地跟踪每一个状态的变化,从而让我们能够实现一些工具帮助我们更好地了解我们的应用
下面是 Vuex 常用方式的结构及运行机制: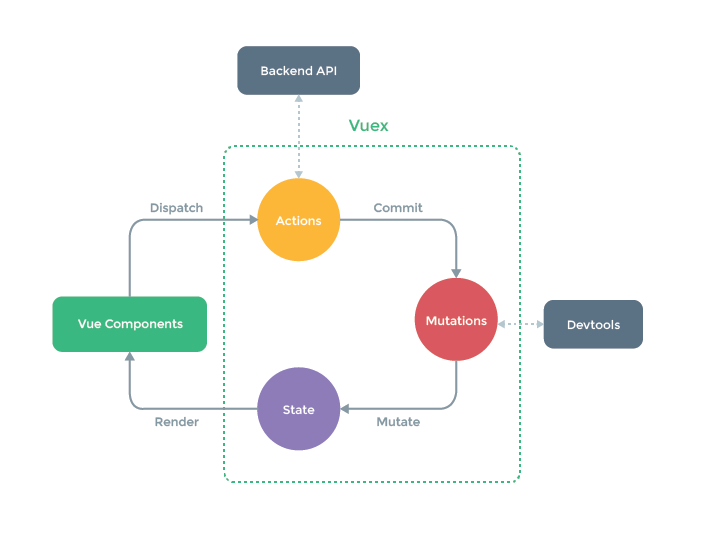
// ChildMod.js// stateconst state = {}// gettersconst getters = {}// actionsconst actions = {}// mutationsconst mutations = {}export default {namespaced: false,state,getters,actions,mutations}
接着统一在 index.js 中进行管理
import Vue from 'vue'import Vuex from 'vuex'import ChildMod from './modules/ChildMod'Vue.use(Vuex)const debug = process.env.NODE_ENV !== 'production'export default new Vuex.Store({modules: {ChildMod,},strict: debug,})
2. Vuex 源码解析(建议结合源码阅读)
下面将对 Vuex 的源码进行一些解读,主要包括:
- Vuex 引入及使用
- Vuex 实例化过程(建立一个仓库)
2.1 Vuex 引入及使用
首先我们要使用 Vuex ,第一件要做的事便是
import Vuex from 'vuex'Vue.use(Vuex)
在源码的 /src/index.js 中可以看到,导出的是这么一个对象
export default {Store,install,version: '__VERSION__',mapState,mapMutations,mapGetters,mapActions,createNamespacedHelpers}
根据官网对于 Vue.use() 方法的介绍,导入 Vuex 后会执行其导出的 install 方法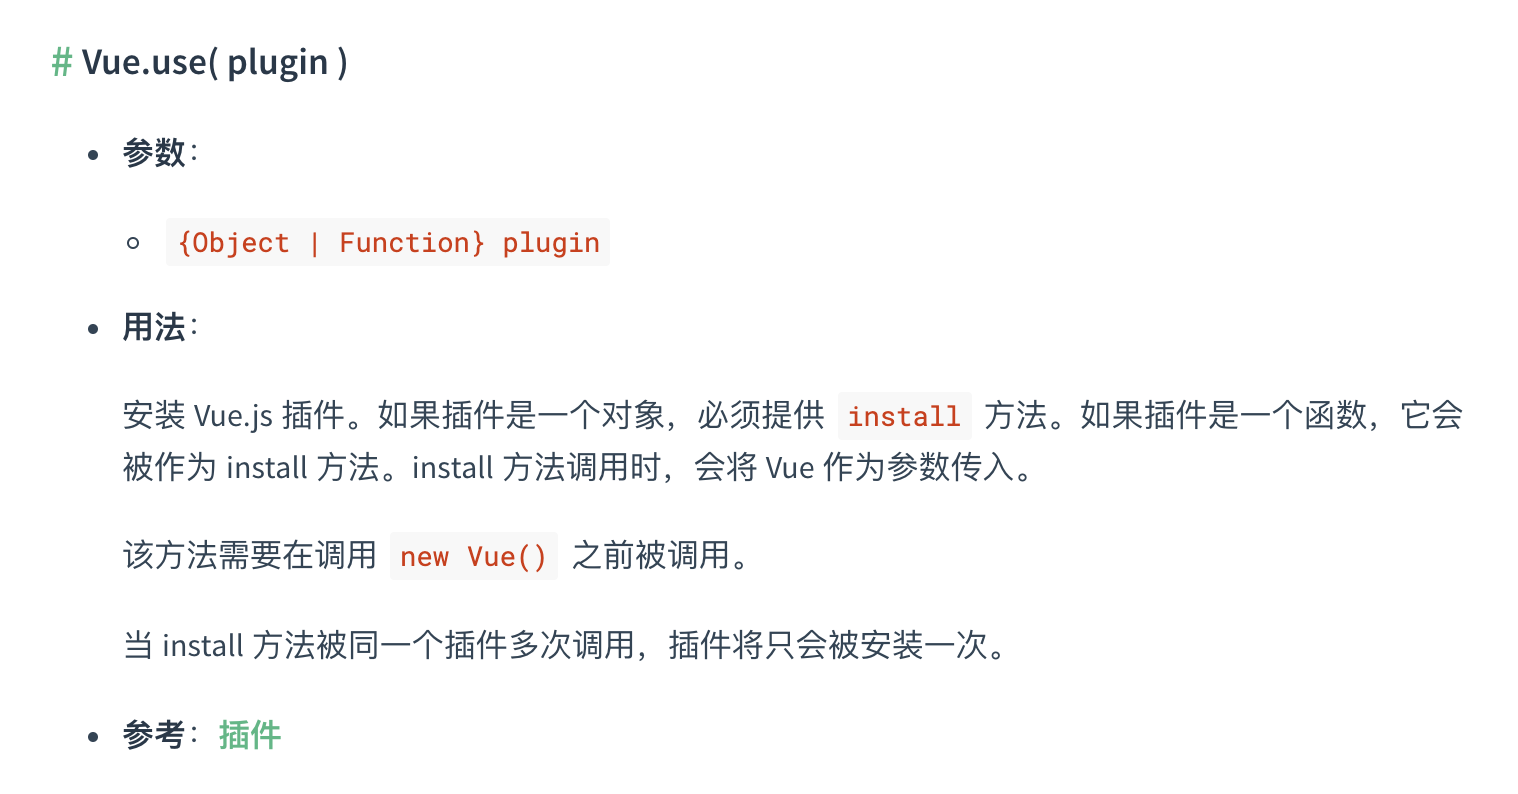
我们来看看 install 方法的具体实现:
// /src/store.jsexport function install (_Vue) {if (Vue && _Vue === Vue) { // 保证了只会进行一次安装if (__DEV__) {console.error('[vuex] already installed. Vue.use(Vuex) should be called only once.')}return}Vue = _VueapplyMixin(Vue) // 见下方}
其中 applyMixin() 方法的具体实现如下,实现了在每个 Vue 实例中可以通过 this.$store 的方式获取 store:
// /src/mixin.jsexport default function (Vue) {const version = Number(Vue.version.split('.')[0])if (version >= 2) {Vue.mixin({ beforeCreate: vuexInit }) // 在每个 Vue 实例的 beforeCreate 生命周期前执行 vuexInit 方法} else {// 覆盖旧的用法,向后兼容 1.x 版本const _init = Vue.prototype._initVue.prototype._init = function (options = {}) {options.init = options.init? [vuexInit].concat(options.init): vuexInit_init.call(this, options)}}// 给每个 vue 实例注入 $storefunction vuexInit () {const options = this.$options// store injectionif (options.store) {this.$store = typeof options.store === 'function'? options.store(): options.store} else if (options.parent && options.parent.$store) { // 寻找父级的 storethis.$store = options.parent.$store}}}
这里首先通过 Vue.mixin() 方法对每个 Vue 实例进行初始化
接着,可以看出每个组件均可以从其父级组件获取 store ,并且由于根组件在创建时,即:
new Vue({router,store,render: h => h(App)}).$mount('#app')
在 new Vue() 过程中,便会在根组件上的 $options 中注入 store ,因此便能实现在每个 Vue 实例上注入 $store 参数
2.2 实例化过程(建立一个仓库)
我们是通过以下方式新建一个仓库(store):
const store = new Vuex.Store(options)
这里的 Store 方法定义在 /src/store.js 中,Store 是一个 class ,这里重点看其构造函数:
// /src/store.jsexport class Store {constructor (options = {}) {// 当通过外链式引入 vue 时手动对其进行 installif (!Vue && typeof window !== 'undefined' && window.Vue) {install(window.Vue)}// 开发环境时的一些断言// 未执行 Vue.use()// 不支持 promise 时// 是否使用 new 的方式来执行if (__DEV__) {assert(Vue, `must call Vue.use(Vuex) before creating a store instance.`)assert(typeof Promise !== 'undefined', `vuex requires a Promise polyfill in this browser.`)assert(this instanceof Store, `store must be called with the new operator.`)}const {plugins = [],strict = false} = options// store 中一些内部状态的初始化this._committing = falsethis._actions = Object.create(null)this._actionSubscribers = []this._mutations = Object.create(null)this._wrappedGetters = Object.create(null)this._modules = new ModuleCollection(options) // 初始化modulethis._modulesNamespaceMap = Object.create(null)this._subscribers = []this._watcherVM = new Vue()this._makeLocalGettersCache = Object.create(null)// 改变 dispatch 和 commit 中 this 的上下文,指向当前 new 的 Store 对象const store = thisconst { dispatch, commit } = thisthis.dispatch = function boundDispatch (type, payload) {return dispatch.call(store, type, payload)}this.commit = function boundCommit (type, payload, options) {return commit.call(store, type, payload, options)}// 严格模式this.strict = strictconst state = this._modules.root.state// 递归安装整个模块,包括 actions、mutations、wrappedGettersinstallModule(this, state, [], this._modules.root)// 将 state 建立响应式关系,以及 wrappedGetters 与 state 的依赖关系resetStoreVM(this, state)// 遍历 plugins ,执行对应逻辑plugins.forEach(plugin => plugin(this))// 是否使用 devtoolconst useDevtools = options.devtools !== undefined ? options.devtools : Vue.config.devtoolsif (useDevtools) {devtoolPlugin(this)}}}
构造函数中较为繁琐的几个地方如下:
- 初始化 module,即 (this._modules = new ModuleCollection(options))
- 递归安装整个模块,包括actions、mutations、wrappedGetters,即(installModule(this, state, [], this._modules.root))
2.2.1 初始化 module
我们知道,Vuex 在使用时,在工程逐渐庞大后,必然会进行多层 module 的嵌套来进行解耦使用。具体如何实现,让我们一起看看构造函数中的 new ModuleCollection(options) 方法。
import ChildMod from './modules/ChildMod'export default new Vuex.Store({modules: {ChildMod,},state: {},getters: {},mutations: {},actions: {},strict: debug,})
首先 options 便是该函数中的这个对象,接着 ModuleCollection 的构造函数中,主要调用的是以下几个方法:
// /src/module/module-collection.jsexport default class ModuleCollection {constructor (rawRootModule) {// 递归注册 modules, 建立一个树状结构的 modulesthis.register([], rawRootModule, false)}// 注册方法register (path, rawModule, runtime = true) {if (__DEV__) {assertRawModule(path, rawModule)}// 实例化 module 对象const newModule = new Module(rawModule, runtime)if (path.length === 0) {// 建立根 modulethis.root = newModule} else {// 获取当前 module 的父级 moduleconst parent = this.get(path.slice(0, -1))// 下级,即 _children 对象增加对应的 key-module 键值对parent.addChild(path[path.length - 1], newModule)}// 注册嵌套的 modulesif (rawModule.modules) {// 遍历当前对象中的 modules 对象,进行逐个注册,forEachValue(rawModule.modules, (rawChildModule, key) => {this.register(path.concat(key), rawChildModule, runtime)})}}get (path) {return path.reduce((module, key) => {return module.getChild(key)}, this.root)}}
以下为 Module 类中的方法
// /src/module/module.jsexport default class Module {constructor (rawModule, runtime) {this.runtime = runtime// 用于保存子 modulethis._children = Object.create(null)this._rawModule = rawModuleconst rawState = rawModule.statethis.state = (typeof rawState === 'function' ? rawState() : rawState) || {}}addChild (key, module) {this._children[key] = module}getChild (key) {return this._children[key]}getNamespace (path) {let module = this.rootreturn path.reduce((namespace, key) => {module = module.getChild(key)return namespace + (module.namespaced ? key + '/' : '')}, '')}}
到此为止,我们 Store 类中的 this._module 便完成了树状结构的初始化构建
2.2.2 递归安装整个模块
上一节完成了对 module 的初始化,接着我们需要继续对 Vuex 的actions、mutations、wrappedGetters来进行初始化,让我们一起来看一下 installModule(this, state, [], this._modules.root) 方法
// /src/store.jsfunction installModule (store, rootState, path, module, hot) {const isRoot = !path.length// 获取拼接好的 namespace,若模块的 namespace 设为 true 则进行拼接const namespace = store._modules.getNamespace(path)// 注册 namespace 集合if (module.namespaced) {store._modulesNamespaceMap[namespace] = module}// set stateif (!isRoot && !hot) {const parentState = getNestedState(rootState, path.slice(0, -1))const moduleName = path[path.length - 1]store._withCommit(() => {Vue.set(parentState, moduleName, module.state)})}// 获取当前模块上下文 context,具体下面即进行说明const local = module.context = makeLocalContext(store, namespace, path)module.forEachMutation((mutation, key) => {const namespacedType = namespace + keyregisterMutation(store, namespacedType, mutation, local)})module.forEachAction((action, key) => {const type = action.root ? key : namespace + keyconst handler = action.handler || actionregisterAction(store, type, handler, local)})module.forEachGetter((getter, key) => {const namespacedType = namespace + keyregisterGetter(store, namespacedType, getter, local)})module.forEachChild((child, key) => {installModule(store, rootState, path.concat(key), child, hot)})}
以上有一个非常重要的 local 参数,来帮助我们在使用 context 时,获取的是当前 module 的 context,即在 namespace 设为 true 时,调用 dispatch, commit, getters 和 state 等,调用的均为当前模块的方法或变量。具体实现我们一起看看 makeLocalContext(store, namespace, path) 函数
function makeLocalContext (store, namespace, path) {const noNamespace = namespace === ''const local = {dispatch: noNamespace ? store.dispatch : (_type, _payload, _options) => {// 处理使用 dispatch 时,采用对象方式分发情况const args = unifyObjectStyle(_type, _payload, _options)const { payload, options } = argslet { type } = args// 解决调用方法模块化的重点即在此// 使用 dispatch 调用方法时,vuex 对 namespace 进行了拼接,使用者无需再手动写上 namespace 路径if (!options || !options.root) {type = namespace + type}return store.dispatch(type, payload)},// commit 处理方式与以上 dispatch 同理commit: noNamespace ? store.commit : (_type, _payload, _options) => {const args = unifyObjectStyle(_type, _payload, _options)const { payload, options } = argslet { type } = argsif (!options || !options.root) {type = namespace + type}store.commit(type, payload, options)}}// getters 和 state 的获取也与 dispatch 和 commit 有异曲同工之妙,这里不做多述// 区别在于 getters 和 state 需要调用 Object.defineProperty 方法对值进行绑定Object.defineProperties(local, {getters: {get: noNamespace? () => store.getters: () => makeLocalGetters(store, namespace)},state: {get: () => getNestedState(store.state, path)}})return local}

若有收获,就点个赞吧
0 人点赞
