Webpack 插件
webpack就像是一条生产线,经过一些列的流程才能将 源文件(入口文件) 转换为 输出结果(出口文件),下图可以简单了解这个过程: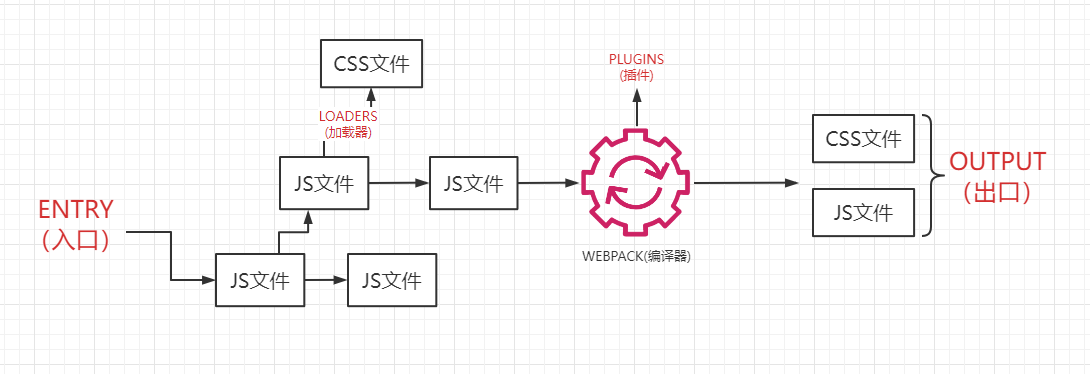
我们的 入口文件 可以依赖于 JS文件,JS文件也可以依赖其他的 JS/CSS文件,(webpack开箱即用的能力只支持解析 JS和JSON文件,因此其他文件我们需要通过 loaders 来转换),webpack将所有文件的依赖关系记录下来,交给 编译器 进行加工,加工以后生成的各种产物就是 出口文件 。编译器编译过程需要借助一些 plugins插件 来完成,这些插件可以帮助webpack实现如:打包优化,资源管理,注入环境变量等。
HtmlWebpackPlugin
我们可以借助 HtmlWebpackPlugin 插件来实现自动引入资源。
安装
npm install html-webpack-plugin -D
使用
我们先将dist文件夹删掉,然后在 webpack.config.js 中进行配置。
const path = require('path')const HtmlWebpackPlugin = require('html-webpack-plugin'); // 引入 html-webpack-plugin 插件module.exports = {entry: './src/index.js', // 入口文件路径output: { // 出口文件filename: 'bundle.js', // 出口文件名path: path.resolve(__dirname, './dist') // 出口文件路径},mode: 'none', // 设置模式 'none' | 'development' | 'production'plugins: [new HtmlWebpackPlugin() // 实例化 HtmlWebpackPlugin,它将帮我们生成一个 dist/index.html 文件],}
配置好后我们再来运行 npx webpack,我们发现 dist 文件夹自动生成了,在dist下还有一个 index.html 文件,我们在浏览器打开 index.html 发现可以正常执行,说明 HtmlWebpackPlugin 帮我们自动引入了所需资源。
// dist/index.html<!DOCTYPE html><html><head><meta charset="utf-8"><title>Webpack App</title><meta name="viewport" content="width=device-width, initial-scale=1"><script defer src="bundle.js"></script></head><body></body></html>
那么这个自动生成的 dist/index.html 和我们自己编写的 index.html 有什么关系吗?
通过比较两个文件的 title 我们发现两个文件并不存在联系,那么我们应该怎样让 HtmlWebpackPlugin 生成的index.html 和我们自己编写的 index.html 产生关系呢?
这里我们需要增加配置。
const path = require('path')const HtmlWebpackPlugin = require('html-webpack-plugin'); // 引入 html-webpack-plugin 插件module.exports = {entry: './src/index.js', // 入口文件路径output: { // 出口文件filename: 'bundle.js', // 出口文件名path: path.resolve(__dirname, './dist') // 出口文件路径},mode: 'none', // 设置模式 'none' | 'development' | 'production'plugins: [new HtmlWebpackPlugin({ // 实例化 HtmlWebpackPlugin,它将帮我们生成一个 dist/index.html 文件template: './index.html', // 指定模板filename: 'app.html', // 生成的文件名inject: 'body' // script标签的生成位置})],}
配置完成后我们删除原来的 dist文件夹,然后运行 npx webpack,我们看到效果和我们期望的一样,如下: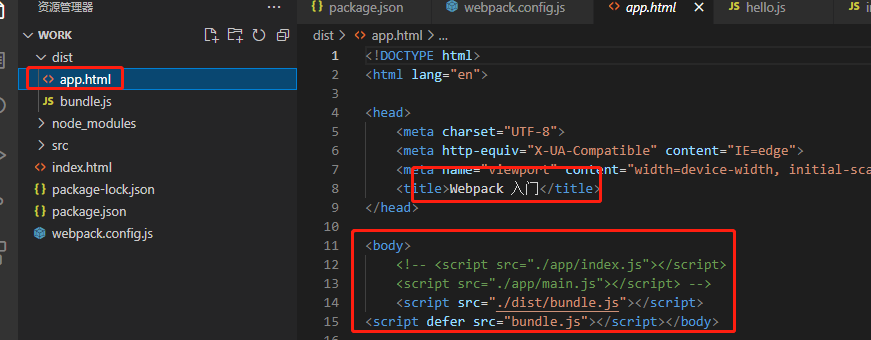
清理dist
上面我们手动删除了原有的dist,这样也是比较麻烦的,那么有没有什么方法是可以在自动生成新的dist文件的同时删除旧的文件呢?
答案是肯定的,我们来配置一下。
const path = require('path')const HtmlWebpackPlugin = require('html-webpack-plugin'); // 引入 html-webpack-plugin 插件module.exports = {entry: './src/index.js', // 入口文件路径output: { // 出口文件filename: 'bundle.js', // 出口文件名path: path.resolve(__dirname, './dist'), // 出口文件路径clean: true // 生成新文件的同时是否删除旧文件},mode: 'none', // 设置模式 'none' | 'development' | 'production'plugins: [new HtmlWebpackPlugin({ // 实例化 HtmlWebpackPlugin,它将帮我们生成一个 dist/index.html 文件template: './index.html', // 指定模板filename: 'index.html', // 生成的文件名inject: 'body' // script标签的生成位置})],}
这里我们将生成文件的名字改为 index.html ,在output 中增加一个 clean 参数。然后执行 npx webpack,发现原来的 app.html 确实被删除了。
思考:我们每次想要运行文件都要手动的将路径复制到浏览器然后运行,有没有什么方法可以让它自动帮我们执行呢?

若有收获,就点个赞吧
0 人点赞
