微信相关文档:
官方文档:https://developers.weixin.qq.com/doc/offiaccount/OA_Web_Apps/JS-SDK.html
以下使用测试号的地方都需要去测试号网址登陆,获取相关信息
测试号申请地址-https://mp.weixin.qq.com/debug/cgi-bin/sandbox?t=sandbox/login
微信 JS 接口签名校验工具:https://mp.weixin.qq.com/debug/cgi-bin/sandbox?t=jsapisign
微信支付课程相关问题梳理: https://www.imooc.com/article/301820
导学
1. 为什么要学支付/分享
- 涉及业务比较广

- 应用场景多

- 支付链条长,少- -端都无法完成
- 纯前端有局限,不利于我们职业发展和个人成长
-
3. 课程主要讲什么
4. 可以学到什么
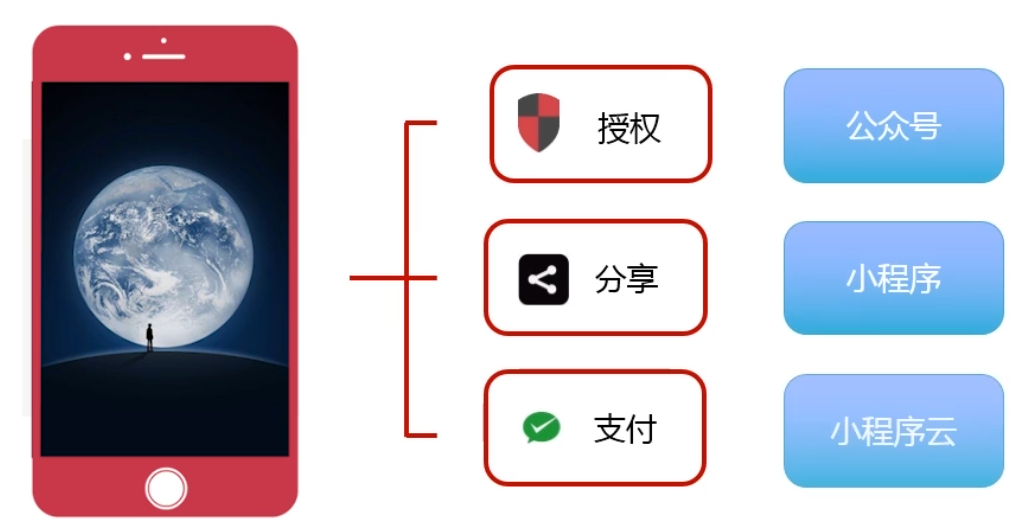
掌握微信SDK的各种技能(授权、分享、支付)
- 掌握前后端整体的支付闭环
- 对项目架构、模块设计、开发规范、公共机制等多角度学习和掌握.
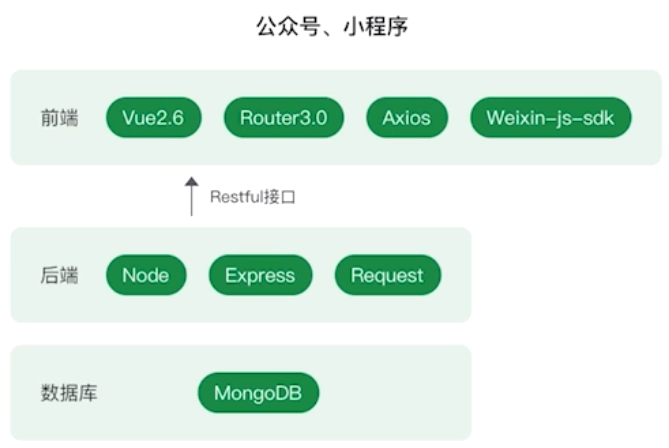
- 掌握Vue2.6、 Node、小程序以及小程序云等前端技术栈
-
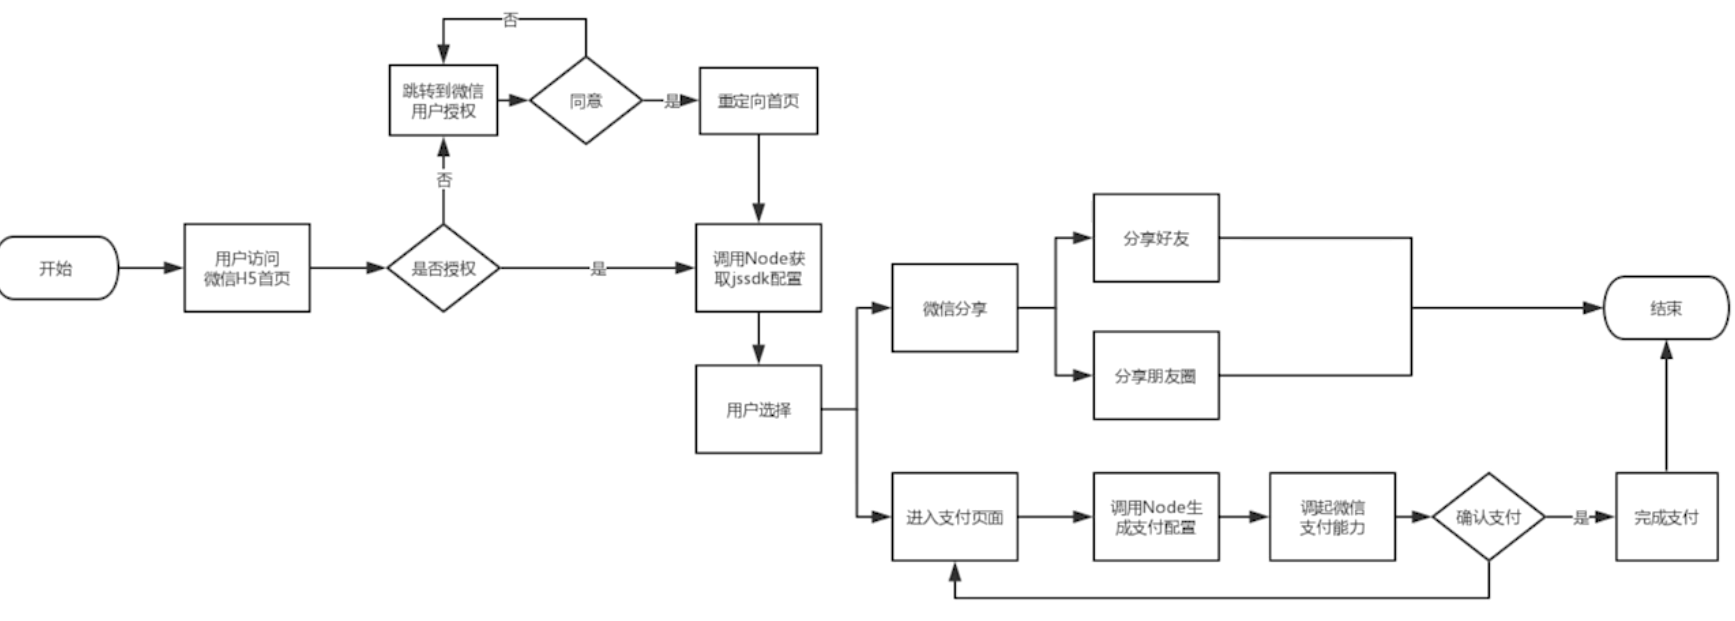
5. 分享支付流程
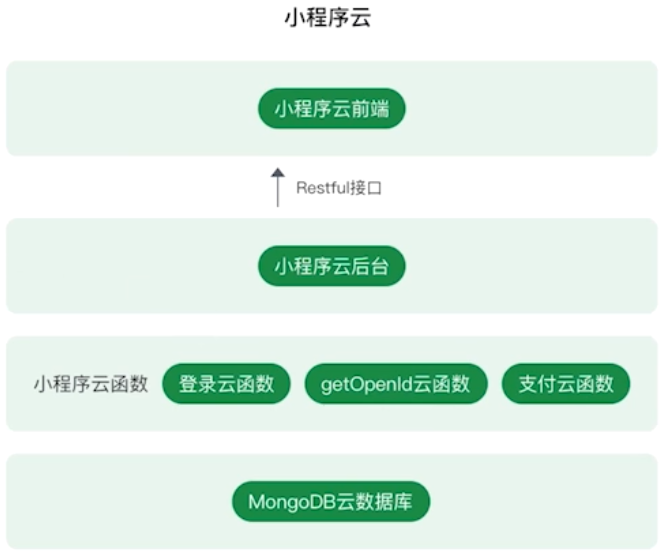
6. 整体架构设计
7. 公共机制
目录结构
- 工具函数
- 开发规范
- H5代理
- log4.js
- H5自适应
- api封装
- 路由封装
- 支付封装
- 。。。
8. 目录:
- H5开发,接入微信公众号
- Express后台实现
- MongoDB使用
- 小程序授权分享
- 小程序云授权分享
- 小程序支付
- 小程序云支付
- 公众号H5支付
- 项目部署
源码github:https://github.com/ynzy/wx_pay_share.git
一、H5开发
1. vue前端架构设计
- 目录结构定义
- 公共函数编写
- 开发规范定义
- 环境配置、统一请求处理、错误机制、Loading机制
- 组件封装
axios二次封装
```javascript import axios from ‘axios’ import { storage, sessionStorage } from ‘@/utils/storage’ // import { Message } from ‘element-ui’ //引入nprogress // import NProgress from ‘nprogress’ // import ‘nprogress/nprogress.css’
import router from ‘../router/index’
// NProgress.inc(0.2) // NProgress.configure({ easing: ‘ease’, speed: 500, showSpinner: false })
const service = axios.create({ baseURL: process.env.VUE_APP_BASE_URL, timeout: 5000, // 设置超时时间 headers: { ‘Content-Type’: ‘application/json; charset=utf-8’ } })
// http请求拦截器 service.interceptors.request.use( config => { // NProgress.start() config.headers[‘Authorization’] = sessionStorage.get(‘token’) config.contentType && (config.headers[‘Content-Type’] = config.contentType) return config }, error => { return Promise.reject(error) } ) //http 200 状态码下的异常map const erorrMap = { 0: ‘请求成功’, 200: ‘请求成功’, 201: ‘创建成功’, 204: ‘删除成功’, 400: ‘请求的地址不存在或者包含不支持的参数’, 401: ‘未授权’, 403: ‘被禁止访问’, 404: ‘请求的资源不存在’, 422: ‘[POST/PUT/PATCH] 当创建一个对象时,发生一个验证错误’, 500: ‘内部错误’ } // http响应拦截器 service.interceptors.response.use( res => { // NProgress.done() //可以根据后端的系统而相应的做调整 // console.log(res.data) if (res.data.code == 0) { return res.data } return Promise.reject(res.data) }, async error => { if (error.request) { if (error.request.status === 0) { //超时 } } else if (error.response) { if (error.response.status === 400) { //请求参数有问题 // Message.error(error) } else if (error.response.status === 404) { //未找到资源 console.log(‘未找到资源’) } else if (error.response.status === 401) { //请先登录 console.log(‘请先登录’) } else if (error.response.status === 500) { //服务器异常 console.log(‘服务器异常’) } } return Promise.reject(error) } )
export default service
<a name="aVuNt"></a>### api请求封装:后面涉及到前台的请求就不一一写入,都放在这里了,```javascript// api/auth.jsimport request from '@/utils/http'import { awaitWrap } from '@/utils/util'/*** 获取微信配置* @param {*} href 路由地址 后台根据当前url地址进行签名*/export const wechatConfig = href => {return awaitWrap(request({url: `/api/wechat/jssdk?url=${href}`,method: 'get'}))}/*** 获取用户信息* @param {*} href* @returns*/export const getUserInfo = () => {return awaitWrap(request({url: `/api/wechat/getUserInfo`,method: 'get'}))}/*** 获取微信支付信息* @param {*} href* @returns*/export const payWallet = () => {return awaitWrap(request({url: `/api/wechat/pay/payWallet`,method: 'get'}))}/*** 微信重定向* @param {*} url 重定向地址* encodeURIComponent('http://m.imooc.com/#/index')* http%3A%2F%2Fm.51purse.com%2F%23%2Findex* @returns*/export const wechatRedirect = url => {url = window.encodeURIComponent(url)return `/api/wechat/redirect?url=${url}&scope=snsapi_userinfo`}/*** 获取当前地理位置信息* @param {*} href* @returns*/export const getLocation = ({ ...params }) => {return awaitWrap(request({url: `/api/qqMap/getLocation`,method: 'get',params}))}
公共工具库
// /utils/util/*** 处理await成功失败信息* @param {*} promise*/export const awaitWrap = promise => {return promise.then(data => [null, data]).catch(err => [err, null])}/*** 处理空的参数* @param obj* @returns*/export const cleanParams = function(obj) {return Object.keys(obj).map(key => (obj[key] = ''))}/*** 获取浏览器地址栏参数值* @param {*} name 参数名* @returns*/export const getUrlParam = function(name) {let reg = new RegExp('(^|&)' + name + '=([^&]*)')let r = window.location.search.substr(1).match(reg)if (r != null) return decodeURIComponent(r[2])}
2. 微信授权流程讲解
2.1 概念:
- 业务域名、JS接口安全域名、网页授权域名
- 开发者工具(添加开发者微信号)、人员设置(添加运营者微信号)
- 网页授权access_token和普通access_toekn
-
2.2 授权流程
配置授权回调地址,跳转微信授权页面
- 用户同意授权,获取code
- 通过code换取网页授权access_token
拉去用户信息(需scope为snsapi_userinfo)
2. 配置
2.3 JSSDK调用流程
绑定域名
- 引入js文件
- 通过config接口注入权限验证配置(接口签名)
- 通过ready接口处理成功验证
3. h5添加接口代理、域名解析
3.1 接口代理
- 配置主机
- 设置端口
拦截请求
// vue.config.jsmodule.exports = {devServer: {// 设置主机地址host: 'm.51purse.com',// 设置默认端口port: 80,// 设置代理proxy: {/*** changeOrigin:true* /api/test* http://localhost:5000/test* changeOrigin:false* /api/test* http://localhost:5000/api/test*/'/api': {// 设置目标API地址target: 'http://localhost:3000',// 如果要代理 websocketsws: false,// 将主机标头的原点改为目标URLchangeOrigin: false}}}}
3.2 Host域名解析
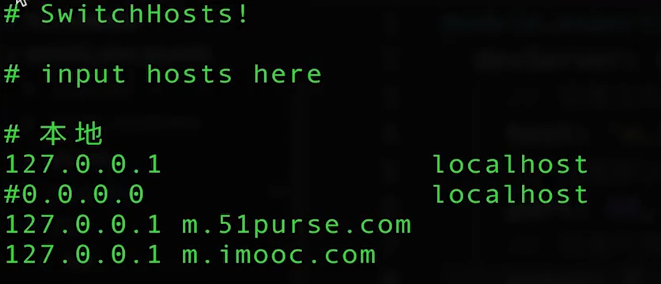
修改本地host文件
window: C:Windows\System32\drivers\etc\HOSTSMAC: vi /etc/hosts
在host文件中添加如下
127.0.0.1 m.51purse.com127.0.0.1 m.imooc.com
-
1. mac设置本地映射域名
我在win上,按照上面的讲解配置是没有问题的,但是在mac上遇到了坑,具体说一下这里
mac上不要用软件去进行修改,也不要用vscode,可能是我vscode配置有问题,修改了hosts文件之后,由于格式不正确,没法做到域名映射
直接使用vim编辑器修改hosts文件,修改之前最好保存一份源本放到桌面保留cd /etcvim hosts
### Host Database## localhost is used to configure the loopback interface# when the system is booting. Do not change this entry.##127.0.0.1 localhost255.255.255.255 broadcasthost::1 localhost127.0.0.1 api.example.com127.0.0.1 m.imooc.com
这里我配置了两个域名映射,开始win上用的也是m.imooc.com,但是这个是一个已经有的慕课网移动端地址,为了避免出现问题,配置了一个自定义域名api.example.com,后面都改用这个了
2. 内网穿透设置外网访问
除了本地映射域名以外,我们可以采用内网穿透达到本地开发使用域名访问的目的。并且可以在真机上进行调试
参考文章: - https://www.jianshu.com/p/6b31605c0d91
实例代码:
// vue.config.jsconst path = require('path') // 引入path模块const process = require('process')function resolve(dir) {return path.join(__dirname, dir) // path.join(__dirname)设置绝对路径}let host = nullif (process.env.VUE_APP_BASE_URL) {host = process.env.VUE_APP_BASE_URL.split('//')[1]}module.exports = {lintOnSave: false, // 是否开启eslintoutputDir: process.env.outputDir, // build输出目录chainWebpack: config => {config.resolve.alias// set第一个参数:设置的别名,第二个参数:设置的路径.set('@', resolve('./src'))// 发布模式config.when(process.env.NODE_ENV === 'production', config => {config.plugin('html').tap(args => {args[0].isProd = truereturn args})})// 开发模式config.when(process.env.NODE_ENV === 'development', config => {config.plugin('html').tap(args => {args[0].isProd = falsereturn args})})},css: {extract: false},devServer: {host: host || '',disableHostCheck: true, // 绕过主机检查,解决Invalid Host header问题open: false, // 是否自动弹出浏览器页面port: '80',https: false, // 是否使用https协议hotOnly: true, // 是否开启热更新proxy: {/*** changeOrigin:true* /api/test* http://localhost:5000/test* changeOrigin:false* /api/test* http://localhost:5000/api/test*/'/api': {// 设置目标API地址target: 'http://localhost:3000',// 如果要代理 websocketsws: false,// 将主机标头的原点改为目标URLchangeOrigin: false}/* '/qqMap': {// 设置目标API地址target: 'http://localhost:3000',// 如果要代理 websocketsws: false,secure: true, // 使用的是http协议则设置为false,https协议则设置为true// 将主机标头的原点改为目标URLchangeOrigin: false} */}}}
内网穿透时,host设置为空,我们将host设置成动态之后,这里就不需要改动了,我们只需要改动env环境里的base_url,
如果我们还是使用本地映射,env中配置为
# 环境名NODE_ENV="dev"# 服务器地址VUE_APP_BASE_URL="http://api.example.com"# VUE_APP_BASE_URL=""
如果使用内网穿透配置为,url为空
# 环境名NODE_ENV="dev"# 服务器地址# VUE_APP_BASE_URL="http://api.example.com"VUE_APP_BASE_URL=""
如果不这样设置会出现api调用请求接口地址加了两遍URL的错误,目前还不知道原因
3.3 以测试号为例完成2.2的微信授权流程
1. 配置授权回调页面域名:
在测试号页面找到设置网页账号-修改
填写回调页面域名:此域名可以是服务端域名,或者在添加的本地域名解析地址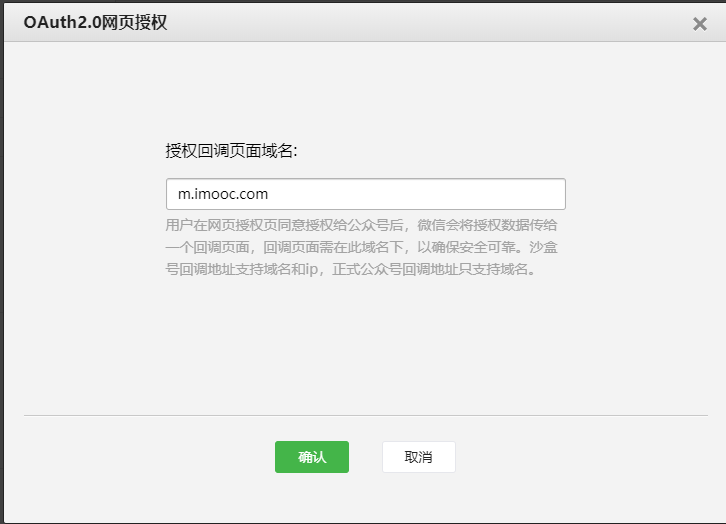
2. 配置vue.config.js
以上已经配置过了,这里就不做配置了
重新启动项目,80端口可能启动不了,
win端使用管理员命令行启动
mac授权管理员启动
sudo yarn serve
3. 页面中填写回调地址
在vue的mounted函数中可以直接测试
为了方便查看,使用变量把需要填写的参数进行定义,也可以直接把以上参数拼接到href上
let appid = 'wx9790364d20b47d95'let url = window.encodeURIComponent('http://m.imooc.com')let scope = 'snsapi_userinfo'window.location.href = `https://open.weixin.qq.com/connect/oauth2/authorize?appid=${appid}&redirect_uri=${url}&response_type=code&scope=${scope}&state=STATE#wechat_redirect`
- appid: 公众号的appid

- url:回调地址,也就是要跳转回你要显示的网页路径,使用
encodeURIComponent进行编码 - scope: 只需要设定为snsapi_userinfo,用来获取用户基本信息
设置好之后会跳转到一下页面路径https://open.weixin.qq.com/connect/oauth2/authorize?appid=wx9790364d20b47d95&redirect_uri=http%3A%2F%2Fm.imooc.com&response_type=code&scope=snsapi_userinfo&state=STATE&uin=MTMwNTU4MzAzMA%3D%3D&key=4e8265c6a6df76ae82d0f21c8cb070f7e5b78c942db23c8b97f19b4245c61fe4aae158fa1ddfced7417d80e75a240697&pass_ticket=UyCd4WPsXsQM4l+/IVspaqIe3dRSfIpO9QD2RaNU3OiETR9uL9ec2meiZ4U0wzZEZjwRb5AcQ1jLPgkx1oWt5g==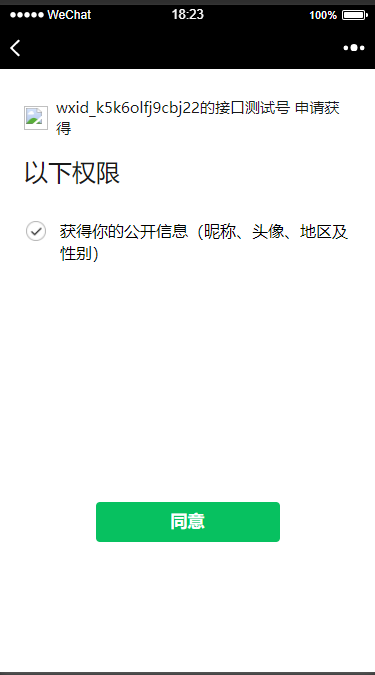
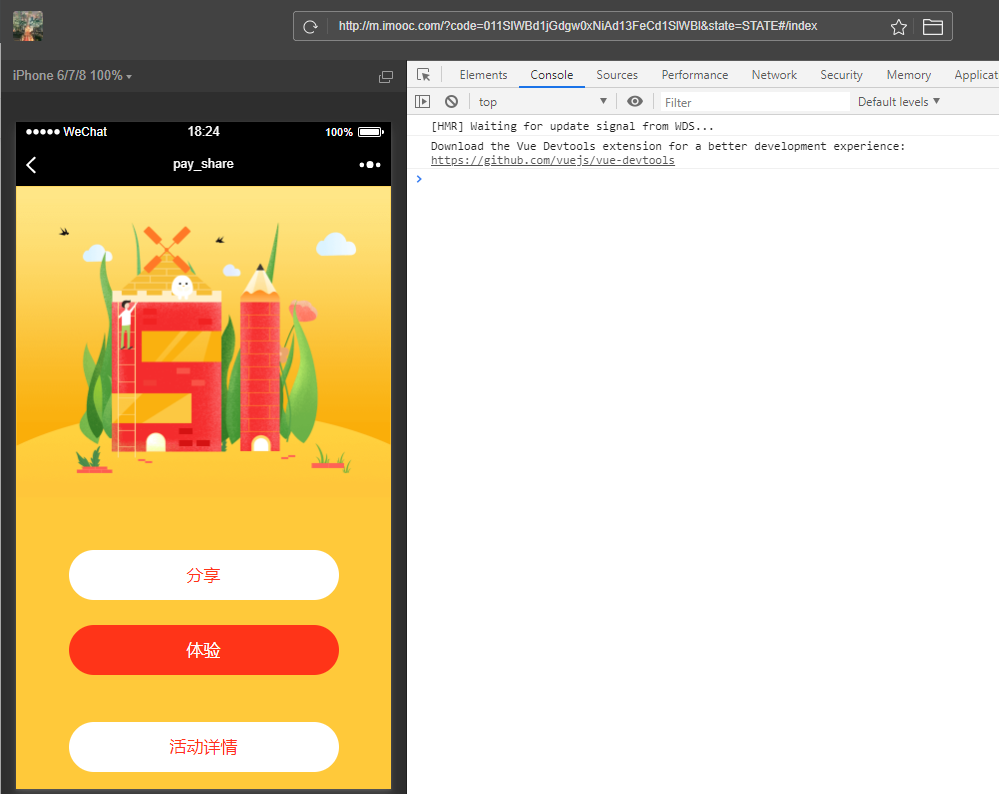
点击同意会跳回我们的回调页面,跳回之后可以拿到code值
http://m.imooc.com/?code=011SlWBd1jGdgw0xNiAd13FeCd1SlWBl&state=STATE#/index
4. H5接入微信分享
- 定义请求地址 ```javascript import request from ‘@/utils/http’ import { awaitWrap } from ‘@/utils/util’
/**
- 获取微信配置
- @param {} href 路由地址 后台根据当前url地址进行签名
/
export const wechatConfig = href => {
return awaitWrap(
request({
url:
/api/wechat/jssdk?url=${href}, method: ‘get’ }) ) } ```
- 微信授权、注入openId
前台通过cookie获取openId
后台通过授权回调链接获取openId设置token
获取签名信息配置config
let [err, res] = await wxchatConfig(location.href.split('#')[0])if (err) {console.log(err)// return this.$message.error(err.message || '获取微信配置失败')}console.log(res)let data = res.datawx.config({debug: true, // 开启调试模式,调用的所有api的返回值会在客户端alert出来,若要查看传入的参数,可以在pc端打开,参数信息会通过log打出,仅在pc端时才会打印。appId: data.appId, // 必填,公众号的唯一标识timestamp: data.timestamp, // 必填,生成签名的时间戳nonceStr: data.nonceStr, // 必填,生成签名的随机串signature: data.signature, // 必填,签名jsApiList: data.jsApiList // 必填,需要使用的JS接口列表})wx.ready(() => {// initShareInfo(wx)})
定义分享公共信息 ```javascript // tuils/wx.js export const initShareInfo = function(wx) { let shareInfo = { title: ‘慕课支付分享专项课程’, // 分享标题 desc: ‘欢迎学习慕课支付分享专项课程’, // 分享描述 link: ‘http://m.imooc.com/#/index‘, // 分享链接,该链接域名或路径必须与当前页面对应的公众号JS安全域名一致 imgUrl: ‘’ // 分享图标 } // wx.onMenuShareAppMessage(shareInfo) // wx.onMenuShareTimeline(shareInfo) // wx.onMenuShareQQ(shareInfo) // wx.onMenuShareQZone(shareInfo) wx.updateAppMessageShareData(shareInfo) wx.updateTimelineShareData(shareInfo) }
<a name="kmck1"></a># 二、Express后台实现<a name="a7Ufn"></a>## 1. 初始化Express项目```javascriptNpm Install express-generator-gexpress - hexpress Imooc-pay_servernpm i & node bin/www || pm2 start bin/www
生成项目之后,修改运行项目命令
先全局安装nodemon: npm install -g nodemon,此插件可以监听文件改动,自动重启服务
"scripts": {"start": "node ./bin/www","serve": "nodemon ./bin/www"},
在bin/www执行文件中输入我们的项目地址可以方便我们查看我们的服务器地址
function onListening() {//note: 输出项目地址console.log(`启动服务,地址:http://localhost:${port}/`);var addr = server.address();var bind = typeof addr === 'string'? 'pipe ' + addr: 'port ' + addr.port;debug('Listening on ' + bind);}
2. 微信用户授权
Request, memory-cache
Request是后台用来请求接口用的,相当于前台的ajaxmemory-cache是后台简单的缓存管理模块,相当于Redisyarn add request memory-cache --save--dev
Vue 调用 Node, Node 调用微信
- vue通过调用node接口,完成授权获取code
- node通过授权的code调取微信接口,获取用户信息(主要是openid)
- 微信授权跳转
- 授权成功之后,跳转到前端的回调页面地址
- 根据 code 获取 openid 信息向客户端写入 Cookie
- 前端通过cookie里有没有openid来判断用户是否有授权
vue端:
// app.vue<template><div id="app"><router-view /></div></template><script>import { wechatRedirect, wechatConfig } from '@/api/auth'import wx from 'weixin-js-sdk'import { initShareInfo } from '@/utils/wx'export default {data() {return {}},methods: {// 检查用户是否授权过checkUserAuth() {let openId = this.$cookie.get('openId')if (!openId) {// location.origin 是我们的回调地址 http://api.example.comconsole.log(wechatRedirect(location.origin))// 请求后台接口进行授权回调window.location.href = wechatRedirect(location.origin)return// 前台模拟微信授权回调let appid = 'wx9790364d20b47d95'let url = window.encodeURIComponent('http://m.imooc.com')let scope = 'snsapi_userinfo'// window.location.href = `https://open.weixin.qq.com/connect/oauth2/authorize?appid=${appid}&redirect_uri=${url}&response_type=code&scope=${scope}&state=STATE#wechat_redirect`} else {this.getWechatConfig()}},// 获取微信配置信息async getWechatConfig() {let [err, res] = await wechatConfig(location.href.split('#')[0])if (err) {console.log(err)// return this.$message.error(err.message || '获取微信配置失败')}console.log(res)returnlet data = res.datawx.config({debug: true, // 开启调试模式,调用的所有api的返回值会在客户端alert出来,若要查看传入的参数,可以在pc端打开,参数信息会通过log打出,仅在pc端时才会打印。appId: data.appId, // 必填,公众号的唯一标识timestamp: data.timestamp, // 必填,生成签名的时间戳nonceStr: data.nonceStr, // 必填,生成签名的随机串signature: data.signature, // 必填,签名jsApiList: data.jsApiList // 必填,需要使用的JS接口列表})wx.ready(() => {// initShareInfo(wx)})// this.$message.success(res.message || '获取成功')}},mounted() {this.checkUserAuth()var url = window.encodeURIComponent('http://m.imooc.com')},components: {}}</script><style lang="less" scoped>/* @import url(); 引入css类 */</style>
node端:
// routes/pay/config.js/*** 微信相关配置参数*/module.exports = {mch:{mch_id: '',key:''},// 微信公众号wx:{appId:'wx9790364d20b47d95',appSecret:'efc5c7ef02bd193ed130c79c13e99e3b'},mp:{appId:'wxc447e673378bdd41',appSecret:''}}
// routes/pay/wx.js/*** 微信开发*/let express = require('express')let router = express.Router()let cache = require('memory-cache');let {wx:config} = require('./config');let request = require('request');router.get('/test', function (req, res) {res.json({code: 0,data: 'test',message: ''})})/*** 用户授权重定向* @query url* @query scope* @return*/router.get('/redirect', function (req, res, next) {let redirectUrl = req.query.url // 最终重定向的地址->跳转回前端的页面let scope = req.query.scope // 作用域// console.log(redirectUrl);let callback = `${redirectUrl}/api/wechat/getOpenId`; // 授权回调地址,用来获取openIdcache.put('redirectUrl', redirectUrl); // 通过cache 缓存重定向地址let authorizeUrl = `https://open.weixin.qq.com/connect/oauth2/authorize?appid=${config.appId}&redirect_uri=${callback}&response_type=code&scope=${scope}&state=STATE#wechat_redirect`;res.redirect(authorizeUrl) //服务端重定向});/*** 根据code获取用户的OpenId* @query code 用户授权之后获取到的code*/router.get('/getOpenId', async function (req, res) {let code = req.query.code;console.log("code:" + code);if (!code) {res.json({code: 1001,data: '',message: '当前未获取授权code码'})return}let access_token_url = `https://api.weixin.qq.com/sns/oauth2/access_token?appid=${config.appId}&secret=${config.appSecret}&code=${code}&grant_type=authorization_code`request.get(access_token_url, function (err,response,body) {// 这里的response参数命名不要和router中的res冲突,不然会覆盖resif (err || response.statusCode != '200') {// 请求失败return}console.log('body:',body);let data = JSON.parse(body)// console.log(data);// 请求成功,将openid存储到cookielet expire_time = 1000 * 60 * 1 // 过期时间console.log(data.openid);res.cookie('openId', data.openid, { maxAge: expire_time });let redirectUrl = cache.get('redirectUrl') //获取缓存中的重定向地址res.redirect(redirectUrl) // 重定向跳回前端页面})})module.exports = router
重构微信用户授权node端代码
目前为止我们完成了微信授权从前台->后台->微信服务器->后台->前台的整个授权流程,但是这样把代码全都放在router里面显得很臃肿也不清晰,我们需要重构
代码分为
- router
- 调取微信的部分抽离成微信公共方法
- 请求返回值封装为公共方法
处理请求成功失败的封装:
// utils/util.jsmodule.exports = {/*** 处理微信请求返回信息统一处理* @param {*} err* @param {*} response* @param {*} body*/handleResponse(err, response, body) {if (err || response.statusCode != '200') {// 微信服务器请求失败this.handleFail(err, 10009)return}// console.log('body:', body)let data = JSON.parse(body)if (data && data.errcode) {// 请求失败console.log(`请求微信服务失败:errcode:${data.errcode},errmsg:${data.errmsg}`)this.handleFail(data.errmsg, data.errcode)return}// 请求成功return this.handleSuccess(data)},/*** 处理成功的信息** @param {string} [data='']* @returns*/handleSuccess(data = '') {return {code: 0,data,message: '成功'}},/*** 处理失败的信息** @param {string} [message='']* @param {number} [code=10001]* 10009 微信服务器请求失败* 10001 处理错误* @returns*/handleFail(message = '', code = 10001) {return {code,data: '',message}}}
处理微信接口的统一封装
// routers/common/index.js/*** @author* @description 微信接口统一封装处理*/let request = require('request')let config = require('./../pay/config')let util = require('../../utils/util')config = config.wx/*** 获取accessToken* https://developers.weixin.qq.com/doc/offiaccount/OA_Web_Apps/Wechat_webpage_authorization.html*/exports.getAccessToken = function (code) {let access_token_url = `https://api.weixin.qq.com/sns/oauth2/access_token?appid=${config.appId}&secret=${config.appSecret}&code=${code}&grant_type=authorization_code`return new Promise((resolve, reject) => {request.get(access_token_url, function (err, response, body) {let result = util.handleResponse(err, response, body)// console.log(result)resolve(result)// 这里都使用resolve是因为封装了处理请求,最后都是返回成功了信息,只是code码不一样/* if (result.code != 0) {// 请求失败resolve(result)return}resolve(util.handleSuccess({openId: result.openid})) */})})}
重构router
// routers/pay/wx.js/*** 微信开发*/let express = require('express')let router = express.Router()let cache = require('memory-cache')let { wx: config } = require('./config')let common = require('./../common/index.js')let util = require('../../utils/util')router.get('/test', function (req, res) {res.json({code: 0,data: 'test',message: ''})})/*** 用户授权重定向* @query url* @query scope* @return*/router.get('/redirect', function (req, res, next) {let redirectUrl = req.query.url // 最终重定向的地址->跳转回前端的页面let scope = req.query.scope // 作用域// console.log(redirectUrl)let callback = `${redirectUrl}/api/wechat/getOpenId` // 授权回调地址,用来获取openIdcache.put('redirectUrl', redirectUrl) // 通过cache 缓存重定向地址let authorizeUrl = `https://open.weixin.qq.com/connect/oauth2/authorize?appid=${config.appId}&redirect_uri=${callback}&response_type=code&scope=${scope}&state=STATE#wechat_redirect`// console.log(authorizeUrl)res.redirect(authorizeUrl) //服务端重定向})/*** 根据code获取用户的OpenId* @query code 用户授权之后获取到的code*/router.get('/getOpenId', async function (req, res) {let code = req.query.code// console.log('请求code成功')// console.log('code:' + code)if (!code) {res.json(util.handleFail('当前未获取到授权的code码'))return}let result = await common.getAccessToken(code)if (result.code != 0) {console.log(result)// 请求失败res.json(result)return}let data = result.data// 请求成功,将openid存储到cookielet expire_time = 1000 * 60 * 1 // 过期时间// console.log(data.openid)res.cookie('openId', data.openid, { maxAge: expire_time })let redirectUrl = cache.get('redirectUrl') //获取缓存中的重定向地址res.redirect(redirectUrl)})module.exports = router
我们把请求成功失败的信息进行封装,减少重复代码工作,也更好维护,
将微信api的请求单独封装,这个router结构只处理接口请求信息,显得更简洁。
3. 获取用户信息
- 确保 scope 为 scope_userinfo
- 根据 access_token/ openid 拉取用户的信息
前端:
// views/index.vue<template><div class="index"><img class="header" src="../assets/image/header.png" /><div class="user_info"><div class="avator_img"><img :src="userInfo.headimgurl" alt="" /></div><div class="nickname">{{ userInfo.nickname }}</div></div><div class="btn-group"><button class="btn">分享</button><button class="btn btn-primary btn-pay">体验</button><button class="btn">活动详情</button></div><!--<div class="share"><img src="./../assets/images/share_guide.png" alt=""><img src="./../assets/images/share.png" alt=""></div>--></div></template><script>import { getUserInfo } from '@/api/auth'export default {name: 'index',data() {return {userInfo: {},showShare: false}},methods: {// 获取用户信息async getUser() {let [err, res] = await getUserInfo()if (err) {console.log(err)return}console.log(res)this.userInfo = res.data}},mounted() {if (this.$cookie.get('openId')) {this.getUser()}}}</script><style lang="less">.index {background-color: #ffc93a;height: 100vh;}.btn-group {padding-top: 0.34rem;text-align: center;}.btn-group .btn-pay {margin-top: 0.5rem;margin-bottom: 0.5rem;}.share {position: fixed;top: 0;left: 0;right: 0;bottom: 0;background-color: rgba(0, 0, 0, 0.75);}.share img {width: 100%;}.user_info {position: absolute;top: 10px;right: 20px;// transform: translate(-50%, 0);// width: 100%;height: 80px;}.avator_img {width: 40px;height: 40px;img {width: 100%;height: 100%;}}.nickname {margin-top: 10px;text-align: center;font-size: 15px;}</style>
node端:
// common/index.js/*** 拉取用户信息(需scope为 snsapi_userinfo)* https://developers.weixin.qq.com/doc/offiaccount/OA_Web_Apps/Wechat_webpage_authorization.html#3* @param access_token* @param openId*/exports.getUserInfo = function (access_token, openId) {let userInfo_url = `https://api.weixin.qq.com/sns/userinfo?access_token=${access_token}&openid=${openId}&lang=zh_CN`return new Promise((resolve, reject) => {request.get(userInfo_url, function (err, response, body) {let result = util.handleResponse(err, response, body)// console.log(result)resolve(result)})})}
/*** 根据code获取用户的OpenId* @query code 用户授权之后获取到的code*/router.get('/getOpenId', async function (req, res) {let code = req.query.code// console.log('请求code成功')// console.log('code:' + code)if (!code) {res.json(util.handleFail('当前未获取到授权的code码'))return}let result = await common.getAccessToken(code)if (result.code != 0) {console.log(result)// 请求失败res.json(result)return}let data = result.datalet expire_time = 1000 * 60 * 60 * 2 // 过期时间 2个小时// 将openId,taccess_token存储到缓存里cache.put('access_token', data.access_token, expire_time)cache.put('openId', data.openid, expire_time)// console.log(data.openid)// 请求成功,将openid存储到cookieres.cookie('openId', data.openid, { maxAge: expire_time })let redirectUrl = cache.get('redirectUrl') //获取缓存中的重定向地址res.redirect(redirectUrl)})/*** 获取用户信息*/router.get('/getUserInfo', async function (req, res) {let access_token = cache.get('access_token')let openId = cache.get('openId')let result = await common.getUserInfo(access_token, openId)res.json(result)})
4. 生成JS-SDK签名算法
https://developers.weixin.qq.com/doc/offiaccount/OA_Web_Apps/JS-SDK.html#62
- 什么是签名算法?
- 为什么需要生成 js-sdk 的签名算法?
-
1. 获取通用的access_token
https://developers.weixin.qq.com/doc/offiaccount/Basic_Information/Get_access_token.html
注意:这里的access_token和我们之前获取用户信息的access_token不一样// common/index.js/*** 获取普通access_token* https://developers.weixin.qq.com/doc/offiaccount/Basic_Information/Get_access_token.html* @param access_token* @param openId*/exports.getToken = function () {let token_url = `https://api.weixin.qq.com/cgi-bin/token?grant_type=client_credential&appid=${config.appId}&secret=${config.appSecret}`return new Promise((resolve, reject) => {request.get(token_url, function (err, response, body) {let result = util.handleResponse(err, response, body)resolve(result)})})}
2. 根据access_token获取jsapi_ticket
// common/index.js/*** 根据普通access_token获取jsapi_ticket* https://developers.weixin.qq.com/doc/offiaccount/OA_Web_Apps/JS-SDK.html#62* @param token 普通access_token*/exports.getToken = function (token) {let jsapi_ticket_url = `https://api.weixin.qq.com/cgi-bin/ticket/getticket?access_token=${token}&type=jsapi`return new Promise((resolve, reject) => {request.get(jsapi_ticket_url, function (err, response, body) {let result = util.handleResponse(err, response, body)resolve(result)})})}
3. 生成签名(签名算法)
签名算法包括4个字段:随机字符串、jsapi_ticket、时间戳、url(前台传过来的,当前网页的URL,不包含#及其后面部分)
location.href.split('#')[0]```javascript // utils/util
// 生成随机数 createNonceStr() { // 生成随机数转化成36进制,截取2-15位 return Math.random().toString(36).substr(2, 15); }, // 生成随机戳 creatTimeStamp() { return parseInt(new Date().getTime()/1000) + ‘’ },
- 有了以上字段之后需要对所有待签名参数按照字段名的ASCII 码从小到大排序(字典序)- 然后使用URL键值对的格式(即key1=value1&key2=value2…)拼接成字符串string1- 注意的是所有参数名均为小写字符- 对string1作sha1加密,字段名和字段值都采用原始值,不进行URL 转义即signature=sha1(string1)- 示例代码:```javascriptnoncestr=Wm3WZYTPz0wzccnWjsapi_ticket=sM4AOVdWfPE4DxkXGEs8VMCPGGVi4C3VM0P37wVUCFvkVAy_90u5h9nbSlYy3-Sl-HhTdfl2fzFy1AOcHKP7qgtimestamp=1414587457url=http://mp.weixin.qq.com?params=value
排序转化后:
jsapi_ticket=sM4AOVdWfPE4DxkXGEs8VMCPGGVi4C3VM0P37wVUCFvkVAy_90u5h9nbSlYy3-Sl-HhTdfl2fzFy1AOcHKP7qg&noncestr=Wm3WZYTPz0wzccnW×tamp=1414587457&url=http://mp.weixin.qq.com?params=value
// utils/util.js/*** Object 转换成json 并排序*/raw(args) {// 对对象中的key值进行排序let keys = Object.keys(args).sort()let obj = {}// 遍历key值赋值给新的对象keys.forEach(key => {obj[key] = args[key]})// 将对象转换为&分割的参数 {a:1,b:2} => a=1&b=2var val = ''for (let k in obj) {val += `&${k}=${obj[k]}` // &a=1&b=2}// 从字符串1的位置截取,去掉最开始的&符号return val.substring(1)},
/*** 获取jssdk配置*/router.get('/jssdk', async function (req, res) {let url = req.query.urllet result = await common.getToken()if (result.code != 0) {console.log(result)return}// 有效期7200秒,开发者必须在自己的服务全局缓存access_tokenlet token = result.data.access_tokencache.put('token', token)let ticketRes = await common.getTicket(token)if (ticketRes != 0) {console.log(ticketRes)return}let ticket = ticketRes.data.ticket// 签名算法需要的值let params = {noncestr: util.createNonceStr(),jsapi_ticket: ticket,timestamp: util.creatTimeStamp(),url}// 排序转成字符串let str = util.raw(params)})
- 对生成的字符串进行sha1签名
安装插件create-hash加密算法插件
yarn add create-hash --save-dev
// 排序转成字符串let str = util.raw(params)// 签名,进行sha1加密 最好加一个hex参数let sign = createHash('sha1').update(str).digest('hex')
完整的获取jssdk配置接口:
// routers/pay/wx.jslet express = require('express')let createHash = require('create-hash')let router = express.Router()let cache = require('memory-cache')let { wx: config } = require('./config')let common = require('./../common/index.js')let util = require('../../utils/util')/*** 获取jssdk配置*/router.get('/jssdk', async function (req, res) {let url = req.query.url// 获取普通access_tokenlet result = await common.getToken()if (result.code != 0) {console.log(result)return}// 有效期7200秒,开发者必须在自己的服务全局缓存access_tokenlet token = result.data.access_tokencache.put('token', token)// 获取ticket临时票据let ticketRes = await common.getTicket(token)if (ticketRes.code != 0) {console.log(ticketRes)return}let ticket = ticketRes.data.ticket// 签名算法需要的值let params = {noncestr: util.createNonceStr(),jsapi_ticket: ticket,timestamp: util.creatTimeStamp(),url}// 排序转成字符串let str = util.raw(params)// 进行sha1加密,生成签名 最好加一个hex参数let sign = createHash('sha1').update(str).digest('hex')res.json(util.handleSuccess({appId: config.appId, // 必填,公众号的唯一标识timestamp: params.timestamp, // 必填,生成签名的时间戳nonceStr: params.noncestr, // 必填,生成签名的随机串signature: sign, // 必填,签名jsApiList: ['updateAppMessageShareData', 'updateTimelineShareData', 'chooseWXPay'] // 必填,需要使用的JS接口列表}))})
5. 前端vue获取JS-SDK配置
这里需要配置js接口安全域名,也就是告诉微信我们当前域名下可以使用jssdk的权限
否则会报以下错误:
errMsg: "config:fail,Error: 系统错误,错误码:40048,invalid url domain [20200627 13:18:37][]"
// 获取微信配置信息async getWechatConfig() {let [err, res] = await wechatConfig(location.href.split('#')[0])if (err) {console.log('configErr:', err)// return this.$message.error(err.message || '获取微信配置失败')}// console.log(res)let data = res.datawx.config({debug: true, // 开启调试模式,调用的所有api的返回值会在客户端alert出来,若要查看传入的参数,可以在pc端打开,参数信息会通过log打出,仅在pc端时才会打印。appId: data.appId, // 必填,公众号的唯一标识timestamp: data.timestamp, // 必填,生成签名的时间戳nonceStr: data.nonceStr, // 必填,生成签名的随机串signature: data.signature, // 必填,签名jsApiList: data.jsApiList // 必填,需要使用的JS接口列表})wx.ready(() => {initShareInfo(wx)})// this.$message.success(res.message || '获取成功')}
配置成功以后,因为开启了debug模式,会返回成功的提醒,并返回可以使用jssdk的api名字(目前是在后台设置,也可以前台设置)
调取jssdk接口成功也会返回相应信息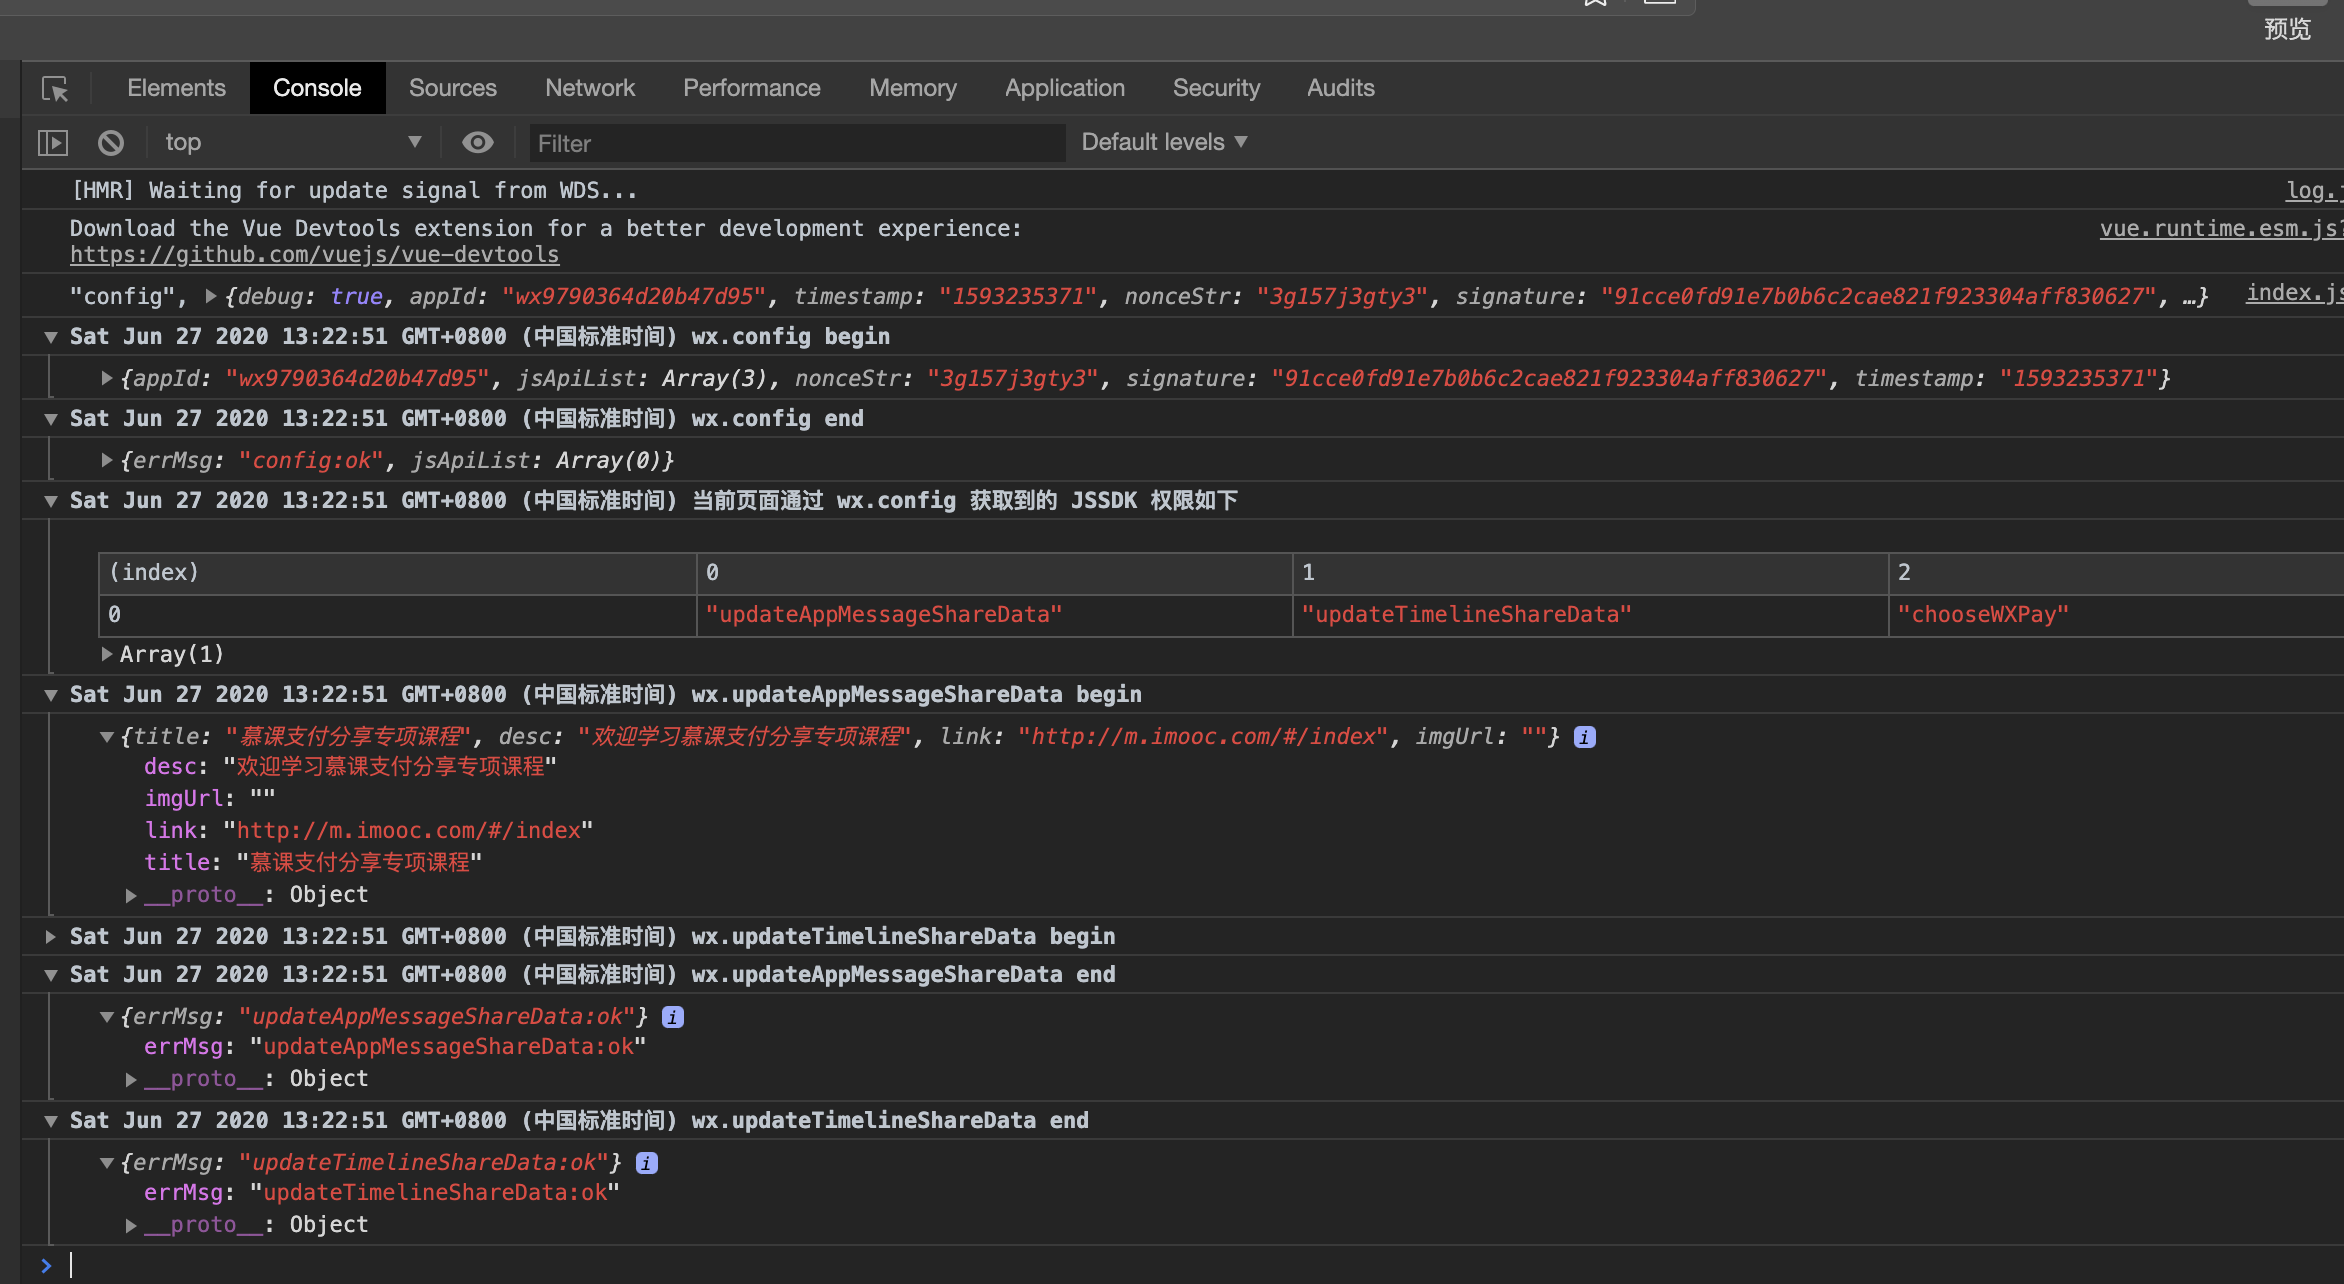
1. 我们可以通过微信 JS 接口签名校验工具进行签名校验
// node端let params = {noncestr: util.createNonceStr(),jsapi_ticket: ticket,timestamp: util.creatTimeStamp(),url}console.log(params)//{noncestr: 'tvac6n2a2tm',jsapi_ticket: 'kgt8ON7yVITDhtdwci0qeTgB9ayI_2GiO6HU65PuFVz9upj8sUZQCjJwQS-0j_w7Qml4M-r1J46OfFg2AENaQQ',timestamp: '1593246702',url: 'http://api.example.com/'}
将上面输出的信息放到签名网址生成签名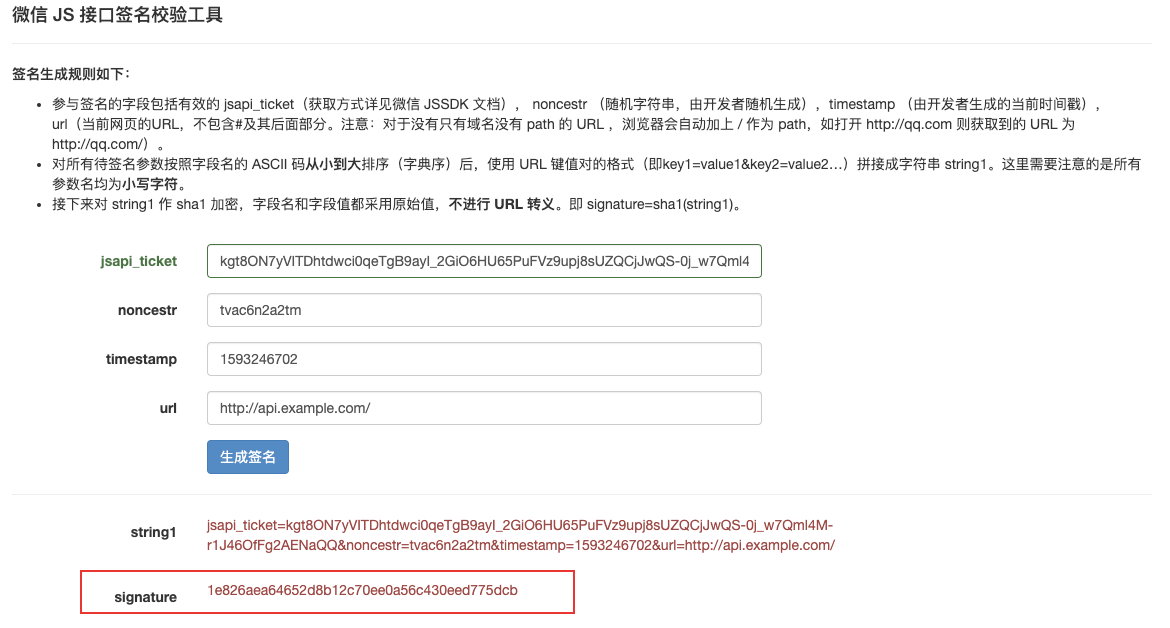
比对我们自己生成的签名是否一致
2. 自定义vue插件,全局配置jssdk
我们获取jssdk配置成功之后,如果想要在组件中调取微信api的话要在组件中引入jssdk,很麻烦,而且会造成资源重复加载,
一种方式:可以在main中引入,挂载到vue原型上,就可以全局使用了
第二种方式:自定义vue插件进行引用
官方网址:https://cn.vuejs.org/v2/guide/plugins.html#%E5%BC%80%E5%8F%91%E6%8F%92%E4%BB%B6
// utils/WechatPlugin.jsimport wx from 'weixin-js-sdk'const plugin = {install(Vue) {Vue.prototype.$wx = wxVue.wx = wx},$wx: wx}export default pluginexport const install = plugin.install
// main.jsimport WechatPlugin from '@/utils/WechatPlugin'// 全局注册微信jsdkVue.use(WechatPlugin)
这样我们在vue的实例上就能拿到$wx代替的jssdk,api了
调用:
this.$wx.config({...})
3. 添加vconsole进行真机调试
真机调试的方式有很多,我们可以通过旧版(1.7以前的版本)微信开发者工具进行网页真机调试,
还可以通过vconsole进行真机调试
参考地址:https://blog.csdn.net/weixin_43232488/article/details/83014086
安装vconsole
yarn add --save--dev vconsole
// utils/vconsole.jsimport Vconsole from 'vconsole'const vConsole = new Vconsole()export default vConsole
//main.jsimport '@/utils/vconsole.js'
引入之后,在开发网页时会多一个按钮
点击之后就可以看到控制台的输出日志了
6. 接入腾讯地图
6.1. 获取经纬度
我们通过jssdk获取经纬度:
wx.getLocation({type: 'gcj02', // 默认为'wgs84'的gps坐标,如果要返回直接给openLocation用的火星坐标,可传入'gcj02'success: res => {console.log(res)var latitude = res.latitude // 纬度,浮点数,范围为90 ~ -90var longitude = res.longitude // 经度,浮点数,范围为180 ~ -180。var speed = res.speed // 速度,以米/每秒计var accuracy = res.accuracy // 位置精度console.log(`jssdk经纬度:纬度-${latitude},经度-${longitude}`)}})
jssdk通过经纬度显示地图
wx.openLocation({latitude: latitude, // 纬度,浮点数,范围为90 ~ -90longitude: longitude, // 经度,浮点数,范围为180 ~ -180。name: '', // 位置名address: '', // 地址详情说明scale: 1, // 地图缩放级别,整形值,范围从1~28。默认为最大infoUrl: '' // 在查看位置界面底部显示的超链接,可点击跳转})
6.2. 坐标系
在开始之前,我们需要先了解一下地图坐标系
参考地址:https://www.jianshu.com/p/c39a2c72dc65?from=singlemessage
国内各地图API坐标系统比较
| API | 坐标系 |
|---|---|
| 百度地图API | 百度坐标 |
| 腾讯搜搜地图API | 火星坐标 |
| 搜狐搜狗地图API | 搜狗坐标 |
| 阿里云地图API | 火星坐标 |
| 图吧MapBar地图API | 图吧坐标 |
| 高德MapABC地图API | 火星坐标 |
| 灵图51ditu地图API | 火星坐标 |
6.3 转化经纬度供为腾讯地图坐标
腾讯地图也提供了相应的转化方法:
https://lbs.qq.com/service/webService/webServiceGuide/webServiceTranslate
有人可能也看到jssdk通过改变type类型为gcj02就是火星坐标,但是这里还是有一定的差距,我们往下看
后端node实现:后面用到的腾讯api也都封装在了这里
// common/qqMapApi.js/*** 腾讯公共API统一封装*/const request = require('request')const { qqMap: config } = require('../../config')const util = require('../../utils/util')/*** 实现从其它地图供应商坐标系或标准GPS坐标系,批量转换到腾讯地图坐标系。* https://lbs.qq.com/service/webService/webServiceGuide/webServiceTranslate* @param location 经纬度字符串 纬度,经度* @param type 输入的locations的坐标类型*/exports.getLocationTranslate = function (location, type) {let translate_url = `https://apis.map.qq.com/ws/coord/v1/translate?locations=${location}&key=${config.key}&type=${type}`return new Promise((resolve, reject) => {request.get(translate_url, function (err, response, body) {let result = util.handleResponse(err, response, body)resolve(result)})})}/*** 根据经纬度获取地理位置信息* https://lbs.qq.com/service/webService/webServiceGuide/webServiceGcoder* @param location 经纬度字符串 纬度,经度*/exports.getLocation = function (location) {let location_url = `https://apis.map.qq.com/ws/geocoder/v1/?location=${location}&key=${config.key}`return new Promise((resolve, reject) => {request.get(location_url, function (err, response, body) {let result = util.handleResponse(err, response, body)resolve(result)})})}/*** 根据描述位置获取位置信息* https://lbs.qq.com/service/webService/webServiceGuide/webServiceGcoder* @param address 位置信息*/exports.getAddress = function (address) {let address_url = `https://apis.map.qq.com/ws/geocoder/v1/?address=${address}&key=${config.key}`return new Promise((resolve, reject) => {request.get(address_url, function (err, response, body) {let result = util.handleResponse(err, response, body)resolve(result)})})}
/*** 腾讯地图开发*/let express = require('express')const { getLocation, getLocationTranslate, getAddress } = require('../common/qqMapApi')let router = express.Router()router.get('/getLocation', async function (req, res) {// console.log(req.query)//中文需要转译// let addressRes = await getAddress('%E6%B2%B3%E5%8C%97%E7%9C%81%E4%BF%9D%E5%AE%9A%E5%B8%82%E7%AB%9E%E7%A7%80%E5%8C%BA%E4%B8%9C%E9%A3%8E%E4%B8%AD%E8%B7%AF9%E5%8F%B7')// console.log('地理位置信息:', addressRes.data.result.location)let { latitude, longitude } = req.querylet location = `${latitude},${longitude}`// 将jssdk的经纬度转化为腾讯地图经纬度let translateRes = await getLocationTranslate(location, 1)console.log(translateRes.data.locations)let { lng, lat } = translateRes.data.locations[0]location = `${lat},${lng}`// 通过转化后的经纬度获取位置信息let result = await getLocation(location)// console.log(result)res.json(result)})module.exports = router
我们通过前台传过来的经纬度,先转化为腾讯坐标,然后获取此坐标的位置信息
前台实现:
通过jssdk经纬度调取后台接口获取转换后的经纬度
// 获取 当前位置async getCuttentLoaction(latitude, longitude) {let [err, res] = await getLocation({ latitude, longitude })if (err) {console.log(err)return}// console.log(res)let location = res.data.result.locationlet address = res.data.result.addressconsole.log(`转换后的经纬度:纬度-${location.lat},经度-${location.lng}`)console.log(address)// this.init(location.lat, location.lng)// this.init(38.87317, 115.48525)},
看下实际效果
转换后经纬度确实不一样了,如何确定转换后的经纬度是对的呢?
我们可以直接使用腾讯地图api获取当前经纬度
参考地址:https://www.jianshu.com/p/87429518c596
需要在index中引入对应的js
// publie/index.html<script src="https://3gimg.qq.com/lightmap/components/geolocation/geolocation.min.js"></script>
qqMapGeolocation() {var geolocation = new qq.maps.Geolocation('3NOBZ-YNLK6-AZHS5-EWI5D-OXS26-OWF4A', '达达-移动端')geolocation.getIpLocation(showPosition, showErr)// geolocation.getLocation(showPosition, showErr) //或者用getLocation精确度比较高function showPosition(position) {console.log('腾讯地图获取当前位置')console.log(position)}function showErr() {console.log('定位失败')this.qqMapGeolocation() //定位失败再请求定位,测试使用}},
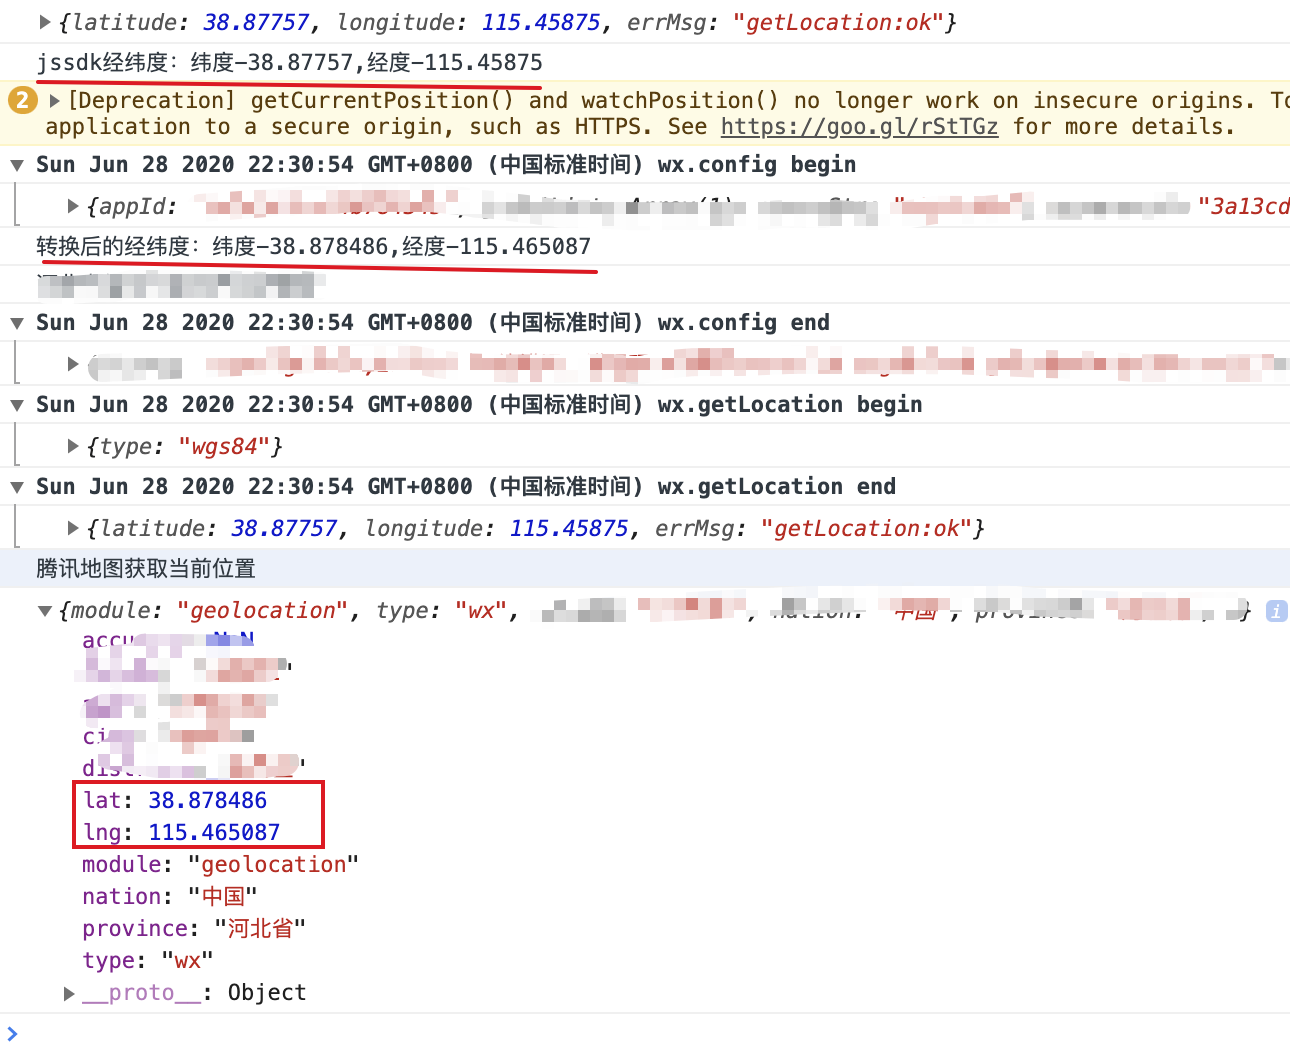
转化后的经纬度和我们用腾讯地图获取到的当前位置的经纬度是一样的,转化成功。
也就是说,我们现在有两种方式来获取经纬度:
- 通过jssdk获取经纬度之后转化为腾讯地图坐标
- 直接通过腾讯地图api获取当前位置信息
但是这里有一个问题,我通过我的物理地址获取到的经纬度,和上面两种方式获取到的当前位置经纬度又不一样
后台通过调取腾讯地图接口获取到的信息
根据描述位置获取位置信息
https://lbs.qq.com/service/webService/webServiceGuide/webServiceGcoder
//中文需要转译let addressRes = await getAddress('%E6%B2%B3%E5%8C%97%E7%9C%81%E4%BF%9D%E5%AE%9A%E5%B8%82%E7%AB%9E%E7%A7%80%E5%8C%BA%E4%B8%9C%E9%A3%8E%E4%B8%AD%E8%B7%AF9%E5%8F%B7')console.log('物理地址获取的位置信息:', addressRes.data.result.location)

经纬度查询:https://jingweidu.51240.com/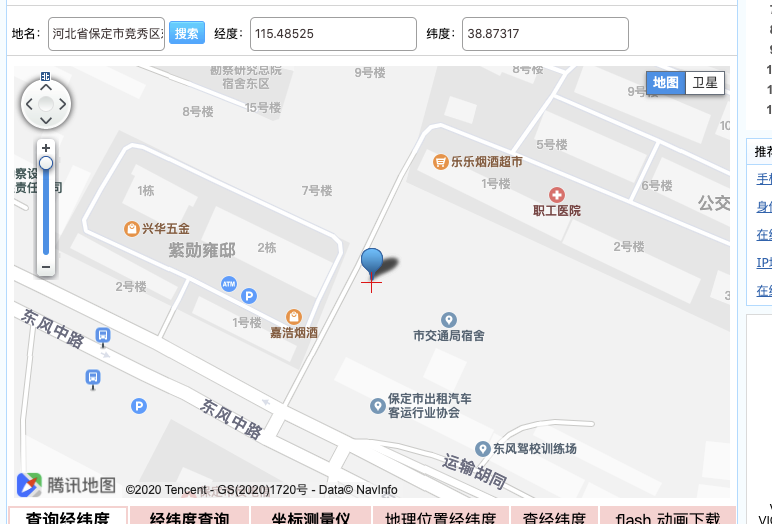
上面获取的当前位置信息通过地图显示的时候,实际上是不正确的,后面显示地图就可以看出来,目前不明白为什么。
6.4 显示地图
首先我们需要引入qqmap,来调取腾讯地图api
参考地址:https://www.cnblogs.com/Glant/p/12092866.html
这里还不完善,暂时先不写
vue接入腾讯、高德地图,https://github.com/ynzy/vue_map_demo
三、MongoDB使用
1. 安装MongoDB:
参考地址:
win: https://www.imooc.com/article/18438
mac: https://www.imooc.com/article/22733
1.1 windows安装:
- 安装包: 百度链接:https://pan.baidu.com/s/1M7HhtTRW8fE1Oknb0o4TgA 提取码:kz8x
- win版MongoDB安装教程
MongoDB配置环境变量里面写的不清楚,我在这里重写下,
MONGO_HOME = C:\Program Files\MongoDB\Server\3.4\binPath = %MONGO_HOME%
推荐使用可视化工具管理数据库,清晰明了,我现找了一个,全是英文看不懂,但也能凑活用了,如果有更好的希望推荐下。
-
1.2 mac安装
2. Mongo连接
mongo操作方式,这里使用原生api
mongo原生API
- mongoose框架
安装:
yarn add mongodb --save-dev
创建一个imooc_pay数据库,创建users表,添加一条数据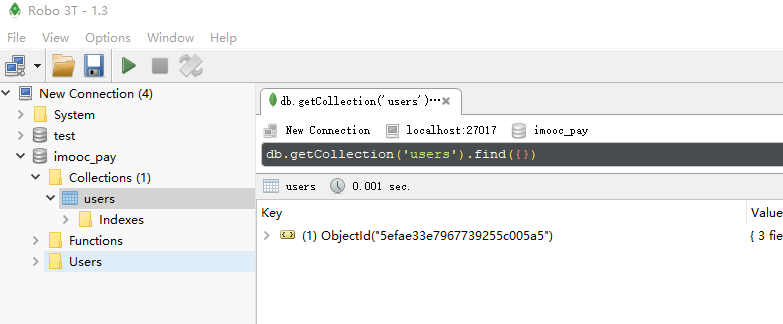
// routers/common/db.js/*** Mongodb公共文件,统一操作数据库*/const MongoClient = require('mongodb').MongoClient;const util = require('./../../utils/util');const url = "mongodb://127.0.0.1:27017/imooc_pay";/*** 连接数据库* @params callbackdbase 操作数据库的表db 关闭打开数据库*/function connect(callback) {MongoClient.connect(url, function (err, db) {if (err) throw err;let dbase = db.db('imooc_pay');callback(dbase,db)})}/*** 查询数据* @param data 查询的条件* @param table 要查询的表*/exports.query = function (data,table) {return new Promise((resolve, reject) => {connect(function (dbase, db) {// 连接数据库,根据data条件,查询table中符合条件的数据,返回一个数组,查询错误抛出错误dbase.collection(table).find(data).toArray(function (err, res) {if (err) throw err// 关闭数据库db.close()resolve(util.handleSuccess(res || []))})})})}/*** 插入数据* @param data 插入的数据* @param table 要操作的表*/exports.insert = function (data,table) {return new Promise((resolve, reject) => {connect(function (dbase, db) {// 连接数据库,将data数据插入table中,返回一个数组,查询错误抛出错误dbase.collection(table).insertOne(data).toArray(function (err, res) {if (err) throw err// 关闭数据库db.close()resolve(util.handleSuccess(res || []))})})})}
// routers/index.js// 模拟数据库查询操作router.get('/query', async function (req, res, next) {let result = await dao.query({ id: 1 }, 'users')console.log(result);res.json(result)})
3. 用户授权保存用户信息
在我们的’/getOpenId’接口添加保存用户信息操作
/*** 根据code获取用户的OpenId* @query code 用户授权之后获取到的code*/router.get('/getOpenId', async function (req, res) {let code = req.query.code// console.log('请求code成功')// console.log('code:' + code)if (!code) {res.json(util.handleFail('当前未获取到授权的code码'))return}let result = await common.getAccessToken(code)if (result.code != 0) {console.log(result)// 请求失败res.json('授权失败accessToken:', result)return}let data = result.datalet openId = data.openidlet expire_time = 1000 * 60 * 60 * 2 // 过期时间 2个小时// 将openId,taccess_token存储到缓存里cache.put('access_token', data.access_token, expire_time)cache.put('openId', openId, expire_time)// console.log(openId)// 请求成功,将openid存储到cookieres.cookie('openId', openId, { maxAge: expire_time })// 根据openId判断用户是否有注册let userRes = await dao.query({ 'openid': openId }, 'users')console.log(userRes);// 查询失败if (userRes.code !== 0) {res.json(userRes)return}// 没有此用户if (!userRes.data.length) {console.log('没有此用户');let userData = await common.getUserInfo(data.access_token,openId)let insertData = await dao.insert(userData.data, 'users')if (insertData.code != 0) {// 操作失败console.log(insertData);return}}// console.log('有此用户');// 有此用户let redirectUrl = cache.get('redirectUrl') //获取缓存中的重定向地址res.redirect(redirectUrl)})
四、小程序
1. 介绍
小程序分享优缺点:
- 体验友好
- 利于传播
- 只能分享好友
- 不能分享第三方应用 | 网页开发 | 小程序开发 | | —- | —- | | 运行浏览器中 | 运行JSCore | | 通过nginx等服务器访问 | 依托微信App | | 拥有DOM/BOM API | 没有DOM/BOM API | | 使用前端jquery,Vue等框架 | 无法使用前端框架库 |
2. 小程序注册和框架介绍
- 官网通过邮箱进行注册
- 每个邮箱只能注册一个小程序
- 每个人只能注册6个小程序管理员
- 通过公众号进行快速注册
- 服务号
- 订阅号
- 小程序开发
- 小程序入门
- 小程序框架构成和原理
- 小程序组件使用
- 小程序API概念
- 小程序服务端理解
项目结构:
>wx_pay_mini -- UI主目录├── assets -- 静态资源├ ├── images -- 图片├ └── wxss -- css├── env -- 环境配置├ └── index.js -- 环境配置├── http -- ajax请求├ ├── api.js -- 前后台交互接口├ ├──├ └── request.js -- 微信请求方法封装├── page -- 页面├── utils -- 工具库├ ├── router.js -- 页面路由管理├ ├── store.js -- 数据存储管理├ └── util.js -- 工具库├── app.js -- 项目入口文件├── app.js -- 项目总配置├── app.wxss -- 项目公共css├── project.config.json --└── sitemap.json --
3. 小程序公共机制
1. app.js - 入口配置文件
/*** 小程序的入口*/const Api = require('./http/api')const request = require('./http/request.js')let config = require('./env/index.js')const router = require('./utils/router.js')let env = 'Prod'App.version = '1.0.0' // 开发版本 后期做埋点统计,后台打印日志看目前处于哪个版本App.config = config[env] // 根据环境变量获取对应的配置信息App.config.env = envApp.config.mockApi = config.mockApiApp({config: config[env],Api, //全局注册api,供全局使用router,// 全局注册请求方法,get: request.fetch,post: (url, data, option) => {option.method = 'post'return request.fetch(url, data, option)},globalData: {userInfo: null},onLaunch: function () {}})
2. store.js - 通用的存储文件
/*** Storage通用存储文件定义*/const STORAGE_KEY = 'imooc-pay';module.exports = {/*** 存储数据** @param {*} key* @param {*} value* @param {*} module_name 模块名称* {userInfo : { userId: 123, userName: 'jack' }}*/setItem(key, value,module_name) {if (module_name) {let module_name_info = this.getItem(module_name);module_name_info[key] = valuewx.setStorageSync(module_name, module_name_info);} else {wx.setStorageSync(key, value);}},/*** 获取数据** @param {*} key* @param {*} module_name 模块名称*/getItem(key,module_name) {if (module_name) {// 获取模块对象let val = this.getItem(module_name)// 如果有对应的key,取值if (val) return val[key]return ''} else {return wx.getStorageSync(key);}},/*** 清除指定数据 或 清除所有数据** @param {*} key 删除对应key值数据*/clear(key) {name?wx.removeStorageSync(key):wx.clearStorageSync();}}
3. router.js - 通用的路由文件
/*** 通用的路由跳转文件*/const routerPath = {'index': "/pages/index/index",'pay': "/pages/pay/index",'activity': "/pages/activity/index"}module.exports = {/*** 页面跳转* push('index')* push({* path: '/index',* query: {* userId:123* }* })* @param {*} path* @param {*} option* query 传递参数* openType 跳转类型* duration 持续时间* backNum openType='back'时使用,返回上级页面(多级)*/push(path, option = {}) {// 通过 push('index') 这种方式跳转if (typeof path == 'string') {option.path = path} else {option = path}let url = routerPath[option.path]// 传递参数 跳转类型 持续时间let { query = {}, openType, duration,backNum } = optionlet params = this.parse(query)url += `?${params}`duration ? setTimeout(() => {this.to(openType,url,backNum)}, duration) : this.to(openType,url,backNum)},/*** 路由跳转** @param {*} openType 跳转类型* redirect,reLaunch,switchTab,back,navigateTo* @param {*} url 路由地址* @param {Number} backNum openType='back'时使用,返回上级页面(多级)*/to(openType, url,backNum) {let obj = { url }switch (openType) {case 'redirect':wx.redirectTo(obj);break;case 'reLaunch':wx.reLaunch(obj);break;case 'switchTab':wx.switchTab(obj);break;case 'back':wx.navigateBack({delta: backNum || 1});break;default:wx.navigateTo(obj);break;}},/*** 对象转换为 & 符连接* @param {Object} data* @returns*/parse(data) {let arr = []// let data = {a:1,b:2,c:3} a=1&b=2&c=3for (const key in data) {arr.push(`${key}=${data[key]}`)}return arr.join('&')}}
4. 小程序自适应
- 尺寸单位
rpx(responsive pixel): 可以根据屏幕宽度进行自适应。规定屏幕宽为750rpx。如在 iPhone6 上,屏幕宽度为375px,共有750个物理像素,则750rpx = 375px = 750物理像素,1rpx = 0.5px = 1物理像素。
| 设备 | rpx换算px (屏幕宽度/750) | px换算rpx (750/屏幕宽度) |
|---|---|---|
| iPhone5 | 1rpx = 0.42px | 1px = 2.34rpx |
| iPhone6 | 1rpx = 0.5px | 1px = 2rpx |
| iPhone6 Plus | 1rpx = 0.552px | 1px = 1.81rpx |
5. env - 通用的环境设置文件
module.exports = {mockApi: '',Dev: {baseApi: 'http://localhost:3000'},Test: {baseApi: 'http://test-node.51purse.com'},Slave: {baseApi: 'http://slave-node.51purse.com'},Prod: {baseApi: 'http://node.51purse.com'}}
6. request.js - 通用的请求文件
let store = require('../utils/store')let system = store.getSystemInfo()// 客户端信息const clientInfo = {'clientType': 'mp', // 客户端类型'appnm': 'imoocpay', //项目名'model': system.model, // 设备型号'os': system.system, // 操作系统及版本'screen': system.screenWidth + '*' + system.screenHeight, // 屏幕尺寸'version': App.version, // 小程序版本'channel': 'miniprogram' // 渠道}const errMsg = '服务异常,请稍后重试'module.exports = {fetch: (url, data = {}, { loading = true, toast = true, isMock = false, method = 'get' }) => {let env = isMock ? App.config.mockApi : App.config.baseApi;return new Promise((resolve, reject) => {loading && wx.showLoading({title: '加载中...',mask: true,});wx.request({url: env + url,data,header: {'content-type': 'application/json','clientInfo': JSON.stringify(clientInfo)},method,dataType: 'json',responseType: 'text',success: (result) => {let res = result.data // {code:0,data:'',message:''}if (res.code == 0) {loading && wx.hideLoading();resolve(res.data)} else {// 如果有toast提示会直接结束loadingtoast ? wx.showToast({title: res.message,icon: 'none',mask: true}) : wx.hideLoading();// loading && wx.hideLoading();reject(res)}},fail: (e = { code: -1, msg: errMsg, errMsg }) => {let msg = e.errMsgif (msg == 'request:fail timeout') {msg = '服务请求超时,请稍后处理';}wx.showToast({title: msg,icon: 'none'})reject(e)},complete: () => {}});})}}
4. 小程序授权登录
https://developers.weixin.qq.com/miniprogram/dev/framework/open-ability/login.html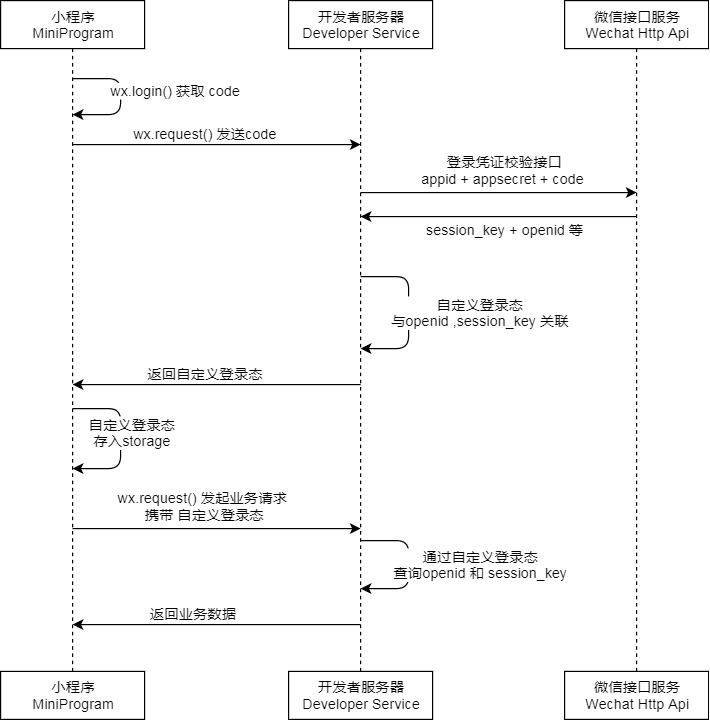
- 小程序通过
wx.login获取code,请求后端接口 - 后端通过
code请求微信服务器 获取session_key+openid返回给前端 - 前端通过同意授权获取用户信息(userInfo),请求后端接口userInfo+openid
- 后端查询是否有此用户信息,如果没有则存储到数据库中,最后返回用户id给前端
小程序端
```javascript // pages/index/index.wxml
// pages/index/index.js onLoad: function () { // 判断用户是否登录 if (!this.data.userId) { this.getSession(); } }, // 获取登录的code getSession() { wx.login({ success: (res) => { if (res.code) { app.get(Api.getSession, { code: res.code }).then((res) => { console.log(res); store.setItem(‘openId’, res.openid); }).catch((res) => { console.log(‘error:’ + res.message) }) } } }) }, getUserInfo(e) { let userInfo = e.detail.userInfo; // 携带openId传给后端 userInfo.openid = store.getItem(‘openId’); app.get(Api.login, { userInfo }).then((res) => { store.setItem(‘userId’, res.userId); this.setData({ userId: res.userId }) }) },
<a name="IAjgN"></a>### 后端```javascript/*** 小程序开发*/let express = require('express');let router = express.Router();let request = require('request');let { mp: config } = require('../../config');let util = require('../../utils/util')let dao = require('../common/db')/*** 获取session接口* @param {*} code 小程序登陆code*/router.get('/getSession', function (req, res) {let code = req.query.code// 获取code失败if (!code) {res.json(util.handleFail('code不能为空', 10001));return}// 获取code成功let sessionUrl = `https://api.weixin.qq.com/sns/jscode2session?appid=${config.appId}&secret=${config.appSecret}&js_code=${code}&grant_type=authorization_code`;request(sessionUrl, function (err, response, body) {let result = util.handleResponse(err, response, body);// console.log(result);// 返回openid给前端res.json(result);})})router.get('/login', async function (req, res) {let userInfo = JSON.parse(req.query.userInfo) // 字符串转对象// console.log(userInfo);// 获取用户信息失败if (!userInfo) {res.json(util.handleFail('用户信息不能为空', 10002))return}// 获取成功// 查询当前用户是否已经注册let userRes = await dao.query({ openid: userInfo.openid }, 'users_mp')console.log(userRes);// 查询数据库失败if (userRes.code != 0) {res.json(userRes)return}// 有此用户信息if (userRes.data.length > 0) {res.json(util.handleSuccess({userId: userRes.data[0]._id}))return}// 没有此用户信息,添加到数据库中let insertData = await dao.insert(userInfo, 'users_mp')// 添加失败if (insertData.code != 0) {res.json(insertData)return}// 添加成功res.json(util.handleSuccess({userId: insertData.data.insertedId}))})module.exports = router
五、小程序云
1. 介绍:
小程序云开发特点:
- 节约开发和运维成本
- 关注核心功能开发
- 和普通的小程序开发一致
拥有微信更多的能力
什么是小程序云开发
- 无需要搭建后台、无需购买域名和服务器,所有api通过云实现
- 小程序云开发可以做什么
- 独立开发小程序、小游戏,无需关注服务器,直接调用云能力
- 小程序云开发都有哪些能力
- 云函数:在云端运行的代码,微信私有协议天然鉴权,开发者只需编写自身业务逻辑代码
- 数据库:一个既可以在小程序前端操作,也能在云函数中读写JSON数据库
- 存储:在小程序前端直接上传/下载云端文件,在云开发控制台可视化管理
- 小程序云和普通小程序对比 | 普通小程序 | 小程序云 | | —- | —- | | 需要开发后台 | 需要开发云函数 | | 需要服务器 | 无需关注 | | 需要证书 | 无需关注 | | 需要通过api鉴权 | 无需关注 | | 有测试号 | 无测试号 |
2. 小程序云创建
- 通过邮箱注册小程序
- 完善小程序资料并获取appId
- 通过开发者工具创建项目
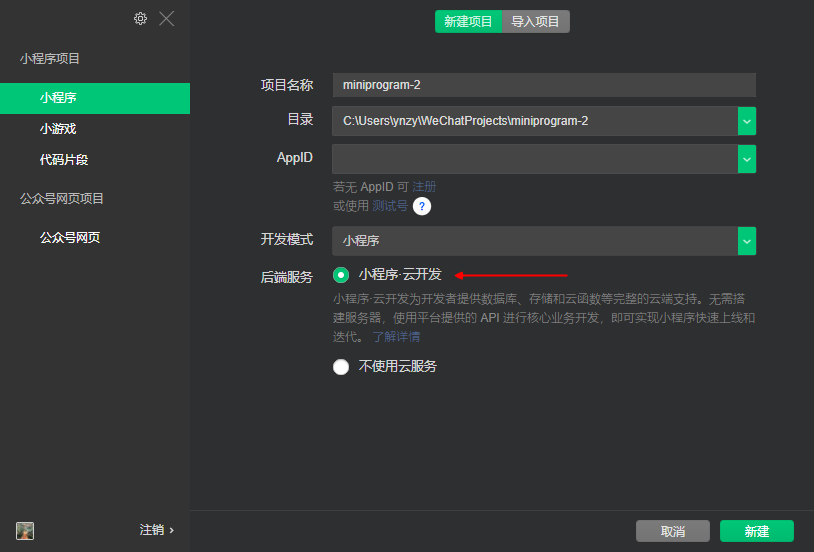
创建项目时我们要选择使用小程序云开发
- 开通云服务
第一次创建的项目,需要先点击云开发,并开通云服务
https://developers.weixin.qq.com/miniprogram/dev/wxcloud/basis/quickstart.html#_2-%E5%BC%80%E9%80%9A%E4%BA%91%E5%BC%80%E5%8F%91%E3%80%81%E5%88%9B%E5%BB%BA%E7%8E%AF%E5%A2%83
- 完善静态页面
- 创建云函数
创建一个云函数有两种方式:
- 本地创建云函数:
- 右键云项目文件夹->新建一个node.js云函数->输入函数名字->自动创建云函数所需要的文件
- 右键选择云函数文件夹->选择上传并部署->在云开发平台进行查看
- 云端创建云函数
- 点击云开发->选择云函数->新建云函数->输入函数名称->此时创建的云函数是一个空的云函数,
- 右键选择云项目文件夹->选择同步云函数列表
- 注意:执行方法->执行方法目前不可更改,调用的时候调用云函数名称->index.js->main方法
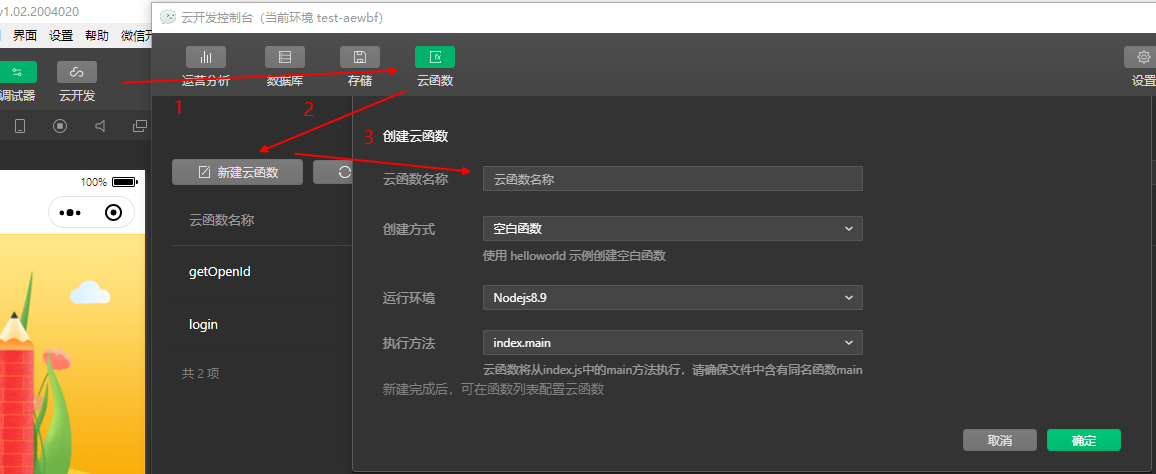
- 小程序调用云函数
wx.cloud.init初始化云函数:
// app.jswx.cloud.init({// env 参数说明:// env 参数决定接下来小程序发起的云开发调用(wx.cloud.xxx)会默认请求到哪个云环境的资源// 此处请填入环境 ID, 环境 ID 可打开云控制台查看// 如不填则使用默认环境(第一个创建的环境)env: 'test-aewbf', //traceUser: true, // 是否在将用户访问记录到用户管理中,在控制台中可见})
// pages/index/index// 小程序调用云函数wx.cloud.callFunction({name: 'getOpenId',data: {name:'jack'},success: res=>{console.log('云函数getOpenId调用成功');console.log(res);},fail: err =>{console.log('云函数调用失败');console.log(err);}})
3. 小程序云用户授权登录
小程序云:
// login/index.js// 云函数入口文件const cloud = require('wx-server-sdk')cloud.init({// API 调用都保持和云函数当前所在环境一致env: cloud.DYNAMIC_CURRENT_ENV})// 云函数入口函数exports.main = async (event, context) => {// 获取上下文const wxContext = cloud.getWXContext()// 连接数据库const db = cloud.database({env: cloud.DYNAMIC_CURRENT_ENV})// 判断用户是否存在const result = await db.collection('users').where({openid: wxContext.OPENID}).limit(1).get()console.log('user:'+ JSON.stringify(result));if(result.data.length != 0){// 用户存在return {userId: result.data[0]._id}}// 用户不存在let params = {...event.user,openid: wxContext.OPENID}// 添加用户到数据库const userData = await db.collection('users').add({data: params})console.log('添加用户成功:',userData);// 添加成功返回用户id,返回到前端return {userId: userData._id}}
小程序端:
// pages/index/index.jsgetUserInfo(e){// 1. 获取用户信息let user = e.detail.userInfo// 2. 调取小程序云函数wx.cloud.callFunction({name: 'login',data: {user}}).then(res=>{console.log(res);let userId = res.result.userIdstore.setItem('userId',userId)this.setData({userId})}).catch(err=>{console.log(err);})}
六、支付介绍
1. 支付认证
- 微信认证
- 微信认证的特权:链接
- 订阅号微信认证特权
- 自定义菜单(可设置跳转外部链接,设置纯文本信息)
- 可使用部分开发接口
- 可以申请广告主功能
- 可以申请卡券功能
- 可以申请多客服功能
- 公众号头像及详细资料会显示加“V”标识
- 服务号微信认证特权
- 全部高级开发接口
- 可申请开通微信支付功能
- 可申请开通微信小店
- 可以申请广告主功能
- 可以申请卡券功能
- 可以申请多客服功能
- 公众号头像及详细资料会显示加“V”标识
- 微信支付认证
- 注册商户号/关联商户号
- H5-配置支付授权目录
- 非H5-授权AppID
- 设置API密钥
- https证书
2. 微信支付流程
2.1 小程序端支付流程
前端支付接入方式对比:
| 对比栏目 | JSAPI | JSSDK | 小程序 |
|---|---|---|---|
| 统一下单 | 都需要先获取到OpenId,调用相同的API | ||
| 调起数据签名 | 五个字段参与签名(区分大小写):appId,nonceStr,package,signType,timeStamp | ||
| 调起支付页面协议 | HTTP或HTTPS | HTTP或HTTPS | HTTPS |
| 支付目录 | 有 | 有 | 无 |
| 授权域名 | 有 | 有 | 无 |
| 回调函数 | 有 | seccess回调 | success,fail,complete回调函数 |
- wx.requestPayment
https://developers.weixin.qq.com/miniprogram/dev/api/open-api/payment/wx.requestPayment.html
2.2 后端支付流程
https://pay.weixin.qq.com/wiki/doc/api/wxa/wxa_api.php?chapter=9_1
- 拼接常规参数
- 生成签名
- 拼接xml数据
- 调用统一下单接口
- 获取预支付ID:prepay_id
- 生成SDK
- 定义回调接口,接收微信支付消息
```javascript // routers/common/wxpay.js /**// utils/util.jsconst createHash = require('create-hash')module.exports = {/*** 生成随机字符串*/createNonceStr() {// 生成随机数转化成36进制,截取2-15位return Math.random().toString(36).substr(2, 15)},/*** 生成随机时间戳*/creatTimeStamp() {return parseInt(new Date().getTime() / 1000) + ''},/*** 生成签名*/getSign(params, key) {let str = this.raw(params) + '&key=' + key// 进行 md5 加密,生成签名 最好加一个hex参数let sign = createHash('md5').update(str).digest('hex')return sign.toUpperCase()},/*** 生成系统的交易订单号* @param type wx:微信 mp:小程序*/getTradeId(type = 'wx') {let date = new Date().getTime().toString()let text = '';let possible = '0123456789'// 生成5位随机数for (let i = 0; i < 5; i++) {text += possible.charAt(Math.floor(Math.random() * possible.length))}return type == ('wx' ? 'Wx' : 'Mp') + date + text},/*** Object 转换成json 并排序*/raw(args) {// 对对象中的key值进行排序let keys = Object.keys(args).sort()let obj = {}// 遍历key值赋值给新的对象keys.forEach(key => {obj[key] = args[key]})// 将对象转换为&分割的参数 {a:1,b:2} => a=1&b=2var val = ''for (let k in obj) {val += `&${k}=${obj[k]}` // &a=1&b=2}// 从字符串1的位置截取,去掉最开始的&符号return val.substring(1)},/*** 处理微信请求返回信息统一处理* @param {*} err* @param {*} response* @param {*} body*/handleResponse(err, response, body) {if (err || response.statusCode != '200') {// 微信服务器请求失败this.handleFail(err, 10009)return}// console.log('body:', body)let data = JSON.parse(body)if (data && data.errcode) {// 请求失败console.log(`请求微信服务失败:errcode:${data.errcode},errmsg:${data.errmsg}`)this.handleFail(data.errmsg, data.errcode)return}// 请求成功return this.handleSuccess(data)},/*** 处理成功的信息** @param {string} [data='']* @returns*/handleSuccess(data = '') {return {code: 0,data,message: '成功'}},/*** 处理失败的信息** @param {string} [message='']* @param {number} [code=10001]* 10009 微信服务器请求失败* 10001 处理错误* @returns*/handleFail(message = '', code = 10001) {return {code,data: '',message}}}
- 微信支付通用封装 */ const request = require(‘request’) const createHash = require(‘create-hash’) const xml = require(‘xml2js’) const util = require(‘../../utils/util’) const { mch: config } = require(‘../../config’)
module.exports = { /**
- 微信统一下单
- https://pay.weixin.qq.com/wiki/doc/api/wxa/wxa_api.php?chapter=9_1
- @param {*} appid 应用id
- @param {*} attach 附加数据
- @param {*} body 主题内容
- @param {*} mch_id 商户号
- @param {*} out_trade_no 商户订单号
- @param {*} nonce_str 随机数
- @param {*} openid openid
- @param {*} total_fee 支付金额(分)
- @param {*} notify_url 回调地址
- @param {} spbill_create_ip: ip 地址ip
/
order: function ({ appid, attach, body, openid, total_fee, notify_url, ip }) {
return new Promise((resolve, reject) => {
let _that = this;
let nonce_str = util.createNonceStr()
let out_trade_no = util.getTradeId(‘mp’)
let mch_id = config.mch_id
// 支付前需要先获取支付签名
let sign = this.getPrePaySign({ appid, attach, body, mch_id, nonce_str, out_trade_no, openid, total_fee, notify_url, ip })
// 通过参数和签名组装xml数据,用以调用统一下单接口
let sendData = this.wxSendData({ appid, attach, body, mch_id, nonce_str, out_trade_no, openid, total_fee, notify_url, ip, sign })
console.log(sendData);
// 请求微信服务器统一下单接口
let url =
https://api.mch.weixin.qq.com/pay/unifiedorderrequest({ url, method: ‘POST’, body: sendData }, function (err, response, body) { if (err || response.statusCode != 200) {
} // 请求成功 // 将xml文件转化为js xml.parseString(body.toString(‘utf-8’), function (error, res) {// 请求错误console.log(err);resolve(util.handleFail(err))return
}) }) }) }, /**if (error) {console.log('解析xml失败');console.log(error);return}let data = res.xmlif (data.return_code[0] == 'SUCCESS' && data.result_code[0] == 'SUCCESS') {// 获取预支付的IDlet prepay_id = data.prepay_id || []let payResult = _that.getPayParams(appid, prepay_id[0])resolve(payResult)}
- 生成预支付签名
- https://pay.weixin.qq.com/wiki/doc/api/wxa/wxa_api.php?chapter=4_3
- @param {*} appid 应用id
- @param {*} attach 附加数据
- @param {*} body 主题内容
- @param {*} mch_id 商户号
- @param {*} out_trade_no 商户订单号
- @param {*} nonce_str 随机数
- @param {*} openid openid
- @param {*} total_fee 支付金额(分)
- @param {*} notify_url 回调地址
- @param {*} spbill_create_ip: ip 地址ip
- @param {} trade_type 交易类型 ‘JSAPI’ / getPrePaySign: function ({ appid, attach, body, mch_id, nonce_str, out_trade_no, openid, total_fee, notify_url, ip }) { let params = { appid, attach, body, mch_id, nonce_str, out_trade_no, notify_url, openid, spbill_create_ip: ip, total_fee, trade_type: ‘JSAPI’ } // 排序拼接字符串 // stringSignTemp=stringA+”&key=192006250b4c09247ec02edce69f6a2d” //注:key为商户平台设置的密钥key return util.getSign(params, config.key) / let str = util.raw(params) + ‘&key=’ + config.key // 进行 md5 加密,生成签名 最好加一个hex参数 let sign = createHash(‘md5’).update(str).digest(‘hex’) return sign.toUpperCase() / }, /**
- 签名成功之后,根据参数拼接组装XML格式的数据,调用下单接口
/
wxSendData: function ({ appid, attach, body, mch_id, nonce_str, out_trade_no, openid, total_fee, notify_url, ip, sign }) {
let data =
<xml>
 <appid><![CDATA[${appid}]]></appid>
 <attach><![CDATA[${attach}]]></attach>
 <body><![CDATA[${body}]]></body>
 <mch_id><![CDATA[${mch_id}]]></mch_id>
 <nonce_str><![CDATA[${nonce_str}]]></nonce_str>
 <notify_url><![CDATA[${notify_url}]]></notify_url>
 <openid><![CDATA[${openid}]]></openid>
 <out_trade_no><![CDATA[${out_trade_no}]]></out_trade_no>
 <spbill_create_ip><![CDATA[${ip}]]></spbill_create_ip>
 <total_fee><![CDATA[${total_fee}]]></total_fee>
 <trade_type><![CDATA[JSAPI]]></trade_type>
 <sign><![CDATA[${sign}]]></sign>
</xml>
return data }, /* - 生成微信支付参数
- https://developers.weixin.qq.com/miniprogram/dev/api/open-api/payment/wx.requestPayment.html
- @param appId 应用id
- @param prepay_id 预支付id
*/
getPayParams: function (appId, prepay_id) {
let params = {
appId,
timeStamp: util.creatTimeStamp(),
nonceStr: util.createNonceStr(),
package:
prepay_id=${prepay_id}, signType: ‘MD5’, } let paySign = util.getSign(params, config.key) params.paySign = paySign return params } }
/**
- 小程序开发 */
let express = require(‘express’); let router = express.Router(); let request = require(‘request’); let { mp: config } = require(‘../../config’); let util = require(‘../../utils/util’) let dao = require(‘../common/db’); const { order } = require(‘../common/wxpay’); /**
- 获取session接口
- @param {} code 小程序登陆code
/
router.get(‘/getSession’, function (req, res) {
let code = req.query.code
// 获取code失败
if (!code) {
res.json(util.handleFail(‘code不能为空’, 10001));
return
}
// 获取code成功
let sessionUrl =
https://api.weixin.qq.com/sns/jscode2session?appid=${config.appId}&secret=${config.appSecret}&js_code=${code}&grant_type=authorization_code; request(sessionUrl, function (err, response, body) { let result = util.handleResponse(err, response, body); // console.log(result); // 返回openid给前端 res.json(result); }) }) /** - 授权登录
- @param userInfo 用户信息+openid */ router.get(‘/login’, async function (req, res) { let userInfo = JSON.parse(req.query.userInfo) // 字符串转对象 // console.log(userInfo); // 获取用户信息失败 if (!userInfo) { res.json(util.handleFail(‘用户信息不能为空’, 10002)) return } // 获取成功 // 查询当前用户是否已经注册 let userRes = await dao.query({ openid: userInfo.openid }, ‘users_mp’) console.log(userRes); // 查询数据库失败 if (userRes.code != 0) { res.json(userRes) return } // 有此用户信息 if (userRes.data.length > 0) { res.json(util.handleSuccess({ userId: userRes.data[0]._id })) return } // 没有此用户信息,添加到数据库中 let insertData = await dao.insert(userInfo, ‘users_mp’) // 添加失败 if (insertData.code != 0) { res.json(insertData) return } // 添加成功 res.json(util.handleSuccess({ userId: insertData.data.insertedId })) })
/**
- 支付回调通知 */ router.get(‘/pay/callback’, function (req, res) { res.json(util.handleSuccess()) })
/**
- 小程序支付
- @param {} openId
/
router.get(‘/pay/payWallet’, function (req, res) {
let appid = config.appId //小程序id
let openid = req.query.openId; // 用户的openid
let attach = ‘小程序支付附加数据’ // 附加数据
let body = ‘小程序支付’ // 主体内容
let total_fee = req.query.money // 支付金额(分)
let ontify_url = ‘http://localhost:3000/api/map/pay/callback‘ // 微信回调接口
let ip = ‘123.57.2.144’ // 终端ip
let orderRes = order({ appid, attach, body, openid, total_fee, ontify_url, ip }).then(result => {
res.json(util.handleSuccess(result))
}).catch((result) => {
res.json(util.handleFail(result))
})
})
module.exports = router
```
3. 小程序云函数本地调试
3.1 小程序云函数使用
- 云函数打印日志、本地日志
- 创建本地云函数
- 同步本地云函数到远程
- 安装云函数插件
和node安装环境一样,在终端打开当前文件夹,使用npm安装想要安装的node包,比如:
- 本地调试云函数
选择云函数文件->右键选择开启云函数本地调试
右侧的红框勾选开启本地调试,请求方式选择手动,即可调试代码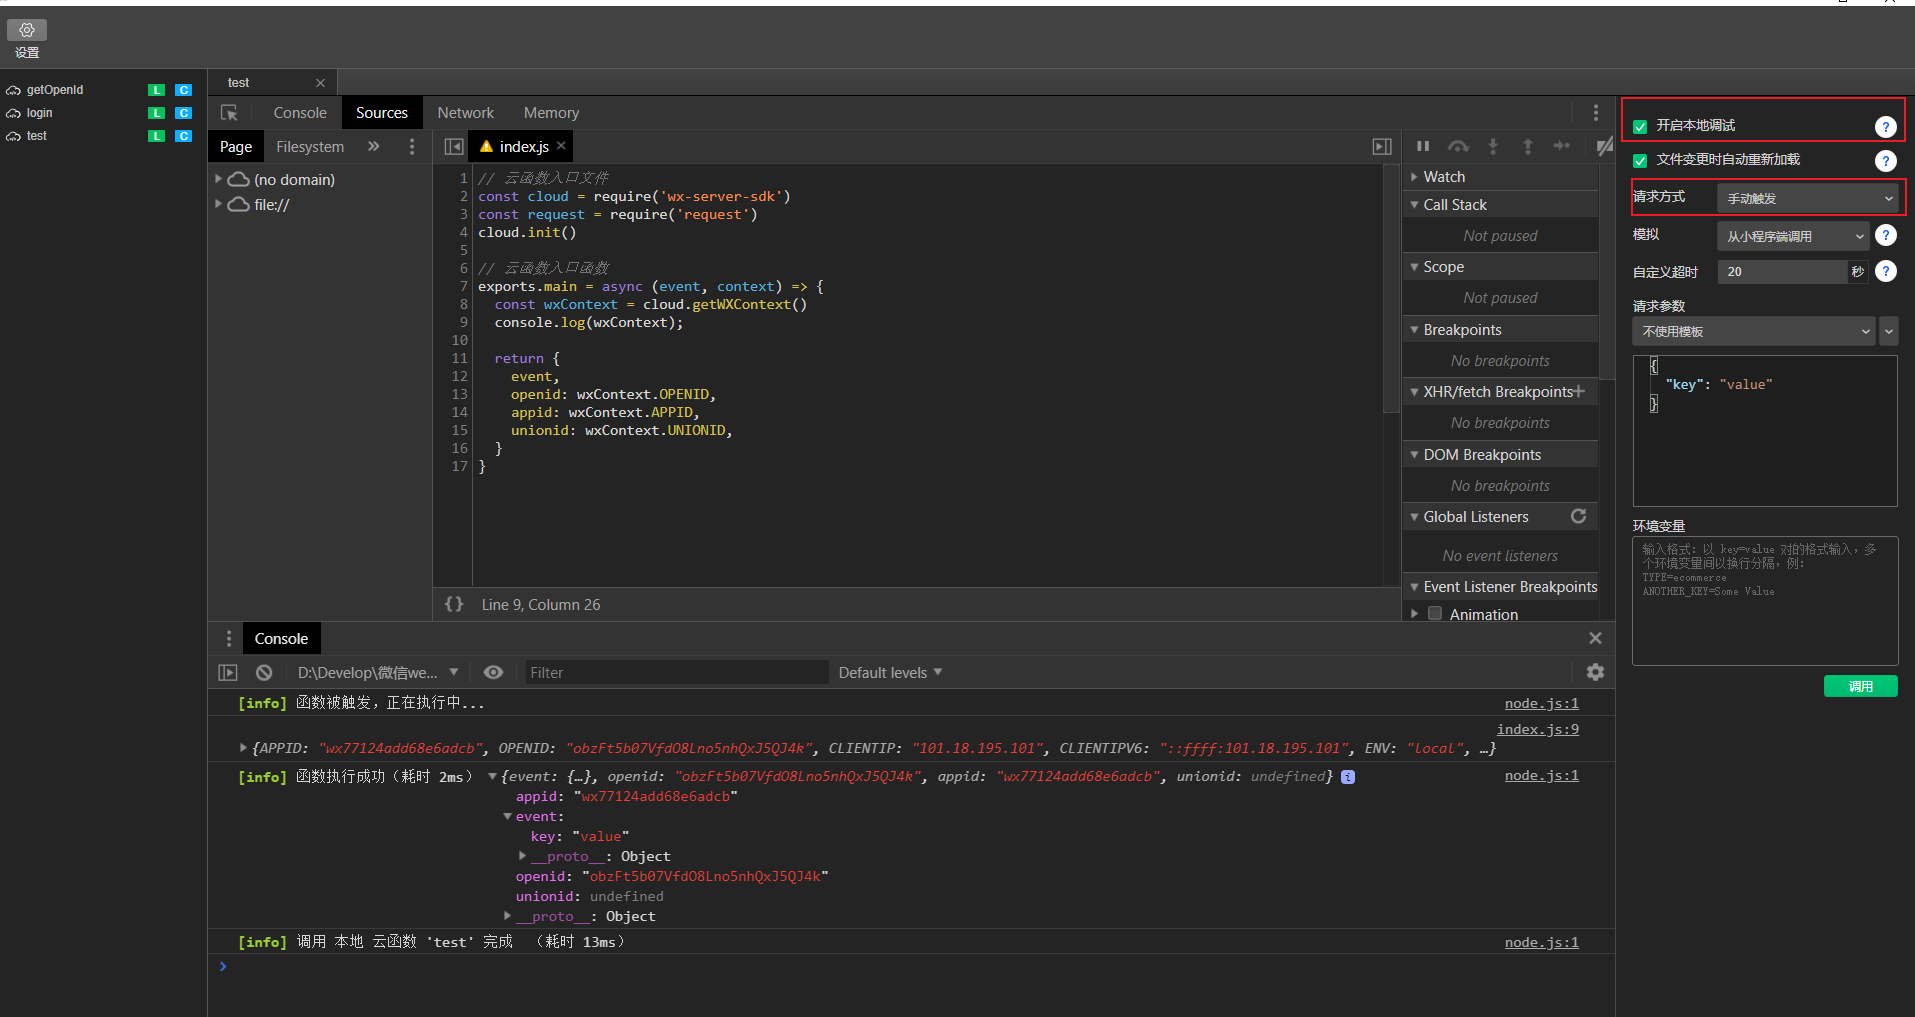
3.2 小程序云支付流程实现
安装依赖包
"xml2js": "^0.4.23","create-hash": "^1.2.0","request": "^2.88.2",
// order/config.jsmodule.exports = {mchId: '',key: '',appId: 'wx77124add68e6adcb',appSecret: '',body:"欢迎学习慕课首门小程序云开发支付专项课程。",notifyUrl:"http://m.51purse.com/api/wechat/pay/callback",attach:"微信支付课程体验",ip:'127.0.0.1'}
// order/util.js/*** 工具函数*/let createHash = require('create-hash');module.exports = {// 生成随机数createNonceStr() {// 此处将0-1的随机数转换为36进制return Math.random().toString(36).substr(2, 15)},// 生成时间戳createTimeStamp() {return parseInt(new Date().getTime() / 1000) + ''},// Object转换为JSON并排序raw(args) {// key按字母排序let keys = Object.keys(args).sort();let obj = {};// 获取排序后的对象keys.forEach(function (key) {obj[key] = args[key]})// 将对象转换为&分割的参数let val = ''for (let k in obj) {val += '&' + k + '=' + obj[k]}return val.substr(1);},// 生成交易IdgetTradeId() {var date = new Date().getTime().toString()var text = ""var possible = "0123456789"for (var i = 0; i < 5; i++) {text += possible.charAt(Math.floor(Math.random() * possible.length))}return 'ImoocMpCloud' + date + text;},// 根据对象生成签名getSign(params, key) {var string = this.raw(params);string = string + '&key=' + keyvar sign = createHash('md5').update(string).digest('hex')return sign.toUpperCase();},// 对请求结果统一处理handleResponse(err, response, body) {if (!err && response.statusCode === 200) {let data = JSON.parse(body);return this.handleSuc(data);} else {return this.handleFail(err, 1009);}},// 请求成功封装handleSuc(data = '') {console.log(JSON.stringify(data))return {code: 0,data,message: ''}},// 请求失败封装handleFail(message = '', code = 1006) {console.log(message);return {code,data: '',message}}}
// order/index.js// 云函数入口文件let cloud = require('wx-server-sdk')cloud.init()//微信小程序支付封装,暂支持md5加密,不支持sha1/*****create order by jianchep 2016/11/22**/let config = require('./config.js')let request = require("request");let util = require('./util');let xml = require('xml2js');// 支付前先获取预支付签名signlet getPrePaySign = function (appId, attach, body, mchId, nonceStr, notifyUrl, openId, tradeId, ip, totalFee) {var params = {appid: appId,attach: attach,body: body,mch_id: mchId,nonce_str: nonceStr,notify_url: notifyUrl,openid: openId,out_trade_no: tradeId,spbill_create_ip: ip,total_fee: totalFee,trade_type: 'JSAPI'}return util.getSign(params, config.key);};// 签名成功后,将数据拼接成功xml格式一起发送给微信下单接口let wxSendData = function (appId, attach, body, mchId, nonceStr, notifyUrl, openId, tradeId, ip, totalFee, sign) {let sendData = '<xml>' +'<appid><![CDATA[' + appId + ']]></appid>' +'<attach><![CDATA[' + attach + ']]></attach>' +'<body><![CDATA[' + body + ']]></body>' +'<mch_id><![CDATA[' + mchId + ']]></mch_id>' +'<nonce_str><![CDATA[' + nonceStr + ']]></nonce_str>' +'<notify_url><![CDATA[' + notifyUrl + ']]></notify_url>' +'<openid><![CDATA[' + openId + ']]></openid>' +'<out_trade_no><![CDATA[' + tradeId + ']]></out_trade_no>' +'<spbill_create_ip><![CDATA[' + ip + ']]></spbill_create_ip>' +'<total_fee><![CDATA[' + totalFee + ']]></total_fee>' +'<trade_type><![CDATA[JSAPI]]></trade_type>' +'<sign><![CDATA[' + sign + ']]></sign>' +'</xml>'return sendData};// 用生成的预支付ID再次签名,拼接对应的前端需要的字段let getPayParams = function (appId, prepayId) {let nonceStr = util.createNonceStr();let timeStamp = util.createTimeStamp();let package = 'prepay_id=' + prepayId;let params = {appId: appId,nonceStr: nonceStr,package: package,signType: 'MD5',timeStamp: timeStamp}let paySign = util.getSign(params, config.key);// 前端需要的所有数据, 都从这里返回过去params.paySign = paySign;return params;}exports.main = function (event, context) {const wxContext = cloud.getWXContext()console.log('event:' + JSON.stringify(event));let {appId, attach, body, mchId, notifyUrl, ip} = config;let openId = wxContext.OPENID;let totalFee = event.totalFee;let nonceStr = util.createNonceStr();let tradeId = util.getTradeId();// 支付前需要先获取签名let sign = getPrePaySign(appId, attach, body, mchId, nonceStr, notifyUrl, openId, tradeId, ip, totalFee);// 将签名一起组装成post数据,通过xml的格式发送给微信let sendData = wxSendData(appId, attach, body, mchId, nonceStr, notifyUrl, openId, tradeId, ip, totalFee, sign);console.log("sendData:::" + sendData);return new Promise((resolve,reject)=>{let url = "https://api.mch.weixin.qq.com/pay/unifiedorder";request({url: url,method: 'POST',body: sendData}, function (err, response, body) {// 先将返回数据转换成json,否则handle方法会报错if (!err && response.statusCode === 200) {xml.parseString(body.toString('utf-8'), (error, res) => {// 获取xml根对象let data = res.xml;if (data.return_code[0] == 'SUCCESS' && data.result_code[0] == 'SUCCESS') {// 获取预支付IDvar prepay_id = data.prepay_id[0];// 从新签名,获取前端支付SDK所需要的字段let payResult = getPayParams(appId, prepay_id);resolve(payResult);} else {let msg = data.return_msg || data.err_code_des;reject(msg);}});} else {reject(err);}})})}
4. H5支付流程
4.1. 资源准备
支付条件:
- H5支付后台可以是http/https,需要配置支付授权目录
- 小程序所有的接口都必须是https,无需配置授权目录
- 小程序云开发只有云函数,无需配置授权目录
支付准备:
- 域名、服务器、证书准备
- 微信认证,企业/个人主体认证
- 支付认证,开通商户平台
- 公众号、小程序、小程序云绑定商户号
域名:
| 访问域名 | 服务器 | https证书 |
|---|---|---|
| 域名筛选、注册 | 选择类型、购买 | 选择类型、购买 |
| 域名提交、备案 | 安装环境和软件 | 安装、nginx配置 |
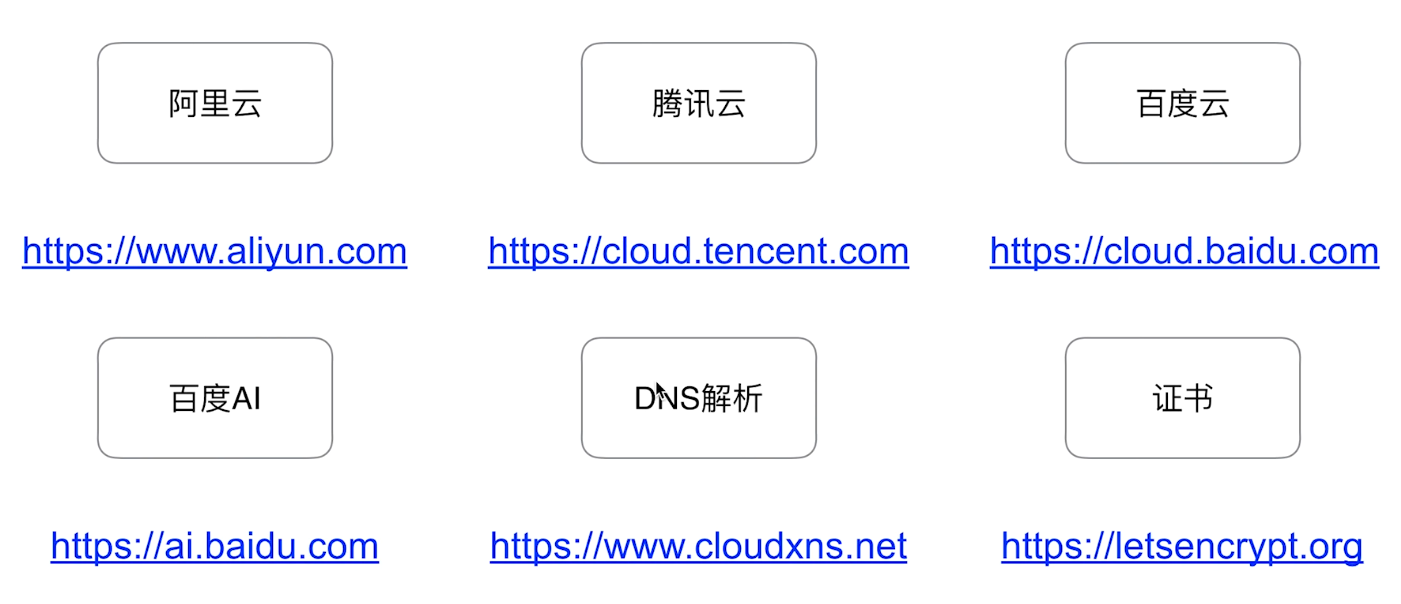
服务器配置:
- 系统: Ubuntu/CentOs/WindowServer
- 宽带: >1M
- 内存:>1G
- 磁盘:>50G
微信认证:
- 微信认证申请流程(企业类型)https://www.imooc.com/article/281154
- 微信公众号申请开通微信支付 https://www.imooc.com/article/280958
微信商户绑定公众号: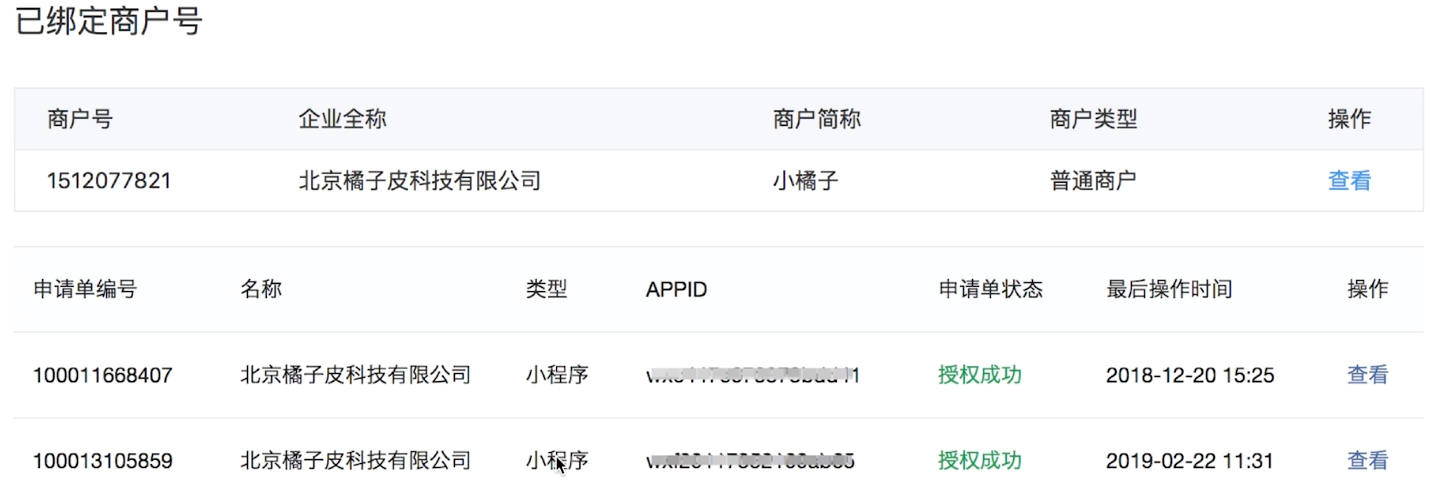
4.2 H5支付实现
前端:
<template><div class="recharge"><div class="recharge-box"><h2 class="title">充值金额</h2><div class="input-box"><input class="input" type="number" placeholder="请输入充值金额" v-model="money" /></div><div class="item-num"><span class="num" :class="index == 1 ? 'checked' : ''" @click="choose(1)">1分</span><span class="num" :class="index == 20 ? 'checked' : 'default'" @click="choose(20)">2毛</span></div><div class="item-num"><span class="num" :class="index == 100 ? 'checked' : 'default'" @click="choose(100)">1元</span><span class="num" :class="index == 500 ? 'checked' : 'default'" @click="choose(500)">5元</span></div><button class="btn btn-primary btn-recharge" @click="pay">充值</button><p class="tip">点击充值即表示已阅读并同意<a class="protocol" href="javascript:;">充值协议</a></p></div></div></template><script>import wx from 'weixin-js-sdk'import { payWallet } from '../api/auth'export default {name: 'pay',data() {return {index: 1,money: ''}},methods: {choose(index) {this.index = index},async pay() {let _this = thisif (this.money && !/^\d*$/g.test(this.money)) {alert('输入非法金额')return}/* this.$http.get(API.payWallet,{params:{money:this.money*100 || this.index}}).then((response) => {let result = response.data;if(result.code == 0){let res = result.data;}}); */let params = {money: this.money * 100 || this.index}let [err, res] = await payWallet(params)if (err) {console.log(err)return}let payInfo = res.data// 支付wx.chooseWXPay({timestamp: payInfo.timeStamp,nonceStr: payInfo.nonceStr,package: payInfo.package,signType: payInfo.signType,paySign: payInfo.paySign,success: function(res) {if (res.errMsg == 'chooseWXPay:ok') {_this.$route.push('/index')} else if (res.errMsg == 'chooseWXPay:fail') {alert('支付取消')}}.bind(this),cancel: function() {alert('支付取消')}.bind(this),fail: function(res) {alert(res.message || '支付失败')}.bind(this)})}}}</script><style>.recharge {background: #ffffff;}.recharge-box {padding: 0 0.3rem;}.recharge-box .title {font-size: 0.34rem;color: #333333;margin-top: 0.69rem;}.recharge-box .input-box {text-align: center;margin-top: 0.5rem;margin-bottom: 0.3rem;}.recharge-box .input-box .input {display: block;width: 6.9rem;height: 1rem;border: 1px solid #d7d7d7;border-radius: 5px;font-size: 0.3rem;color: #333333;text-align: center;}.item-num {display: flex;justify-content: space-between;margin-bottom: 0.31rem;}.item-num .num {height: 1.3rem;background-color: #f1f3f5;color: #333333;font-size: 0.32rem;width: 3.35rem;text-align: center;line-height: 1.3rem;border-radius: 0.08rem;}.item-num .num.checked {background-color: #ffebe8;color: #ff3418;}.recharge-box .btn-recharge {/*此处3.9改成3,保证一屏可以看到,因为距离太大了*/display: block;margin: 3rem auto 0.48rem;color: #ffffff;font-weight: 400;box-shadow: 0px 10px 18px 0px rgba(255, 106, 106, 0.57);}.recharge-box .tip {font-size: 0.28rem;color: #999999;text-align: center;}.recharge-box .tip .protocol {color: #ff3418;}</style>
后端:
// routes/pay/wx.jsconst { order } = require('../common/wxpay');/*** 微信支付*/router.get('/pay/payWallet', function (req, res) {let appid = config.appId //小程序idlet openid = req.cookies.openId; // 用户的openidlet attach = '微信h5支付附加数据' // 附加数据let body = '小程序支付' // 主体内容let total_fee = req.query.money // 支付金额(分)let ontify_url = 'http://localhost:3000/api/wechat/pay/callback' // 微信回调接口let ip = '123.57.2.144' // 终端iplet orderRes = order({ appid, attach, body, openid, total_fee, ontify_url, ip }).then(result => {res.json(util.handleSuccess(result))}).catch((result) => {res.json(util.handleFail(result))})})/*** 此接口主要用于支付成功后的回掉,用于统计数据* 此处需要再app.js中设置请求头的接收数据格式*/router.post('/pay/callback', function (req, res) {xml.parseString(req.rawBody.toString('utf-8'), async (error, xmlData) => {if (error) {logger.error(error);res.send('fail')return;}let data = xmlData.xml;let order = {openId: data.openid[0],totalFee: data.total_fee[0],isSubscribe: data.is_subscribe[0],orderId: data.out_trade_no[0],transactionId: data.transaction_id[0],tradeType: data.trade_type[0],timeEnd: data.time_end[0]}// 插入订单数据let result = await dao.insert(order, 'orders');if (result.code == 0) {// 向微信发送成功数据let data = '<xml><return_code><![CDATA[SUCCESS]]></return_code><return_msg><![CDATA[OK]]></return_msg></xml>';res.send(data);} else {res.send('FAIl');}});})
