概述
Spring MVC基于MVC设计模式,保证程序间的低耦合。
Spring MVC作用:
- 接受请求(解析请求参数)
- 做出响应
MVC继续演化可分为持久层DAO,业务层Service,控制层Controller。持久层用来和数据库读写ORM,业务层用来处理复杂的业务逻辑,控制层用来处理MVC的控制。
MVC模型
即Model—-模型层(数据)、View—-视图层、Controller—-控制层,将软件进行分层。
Model:Model模型(用于封装数据)
View:视图层(用于展示数据)
Controller:控制器,用于控制浏览器返回请求,做出响应。
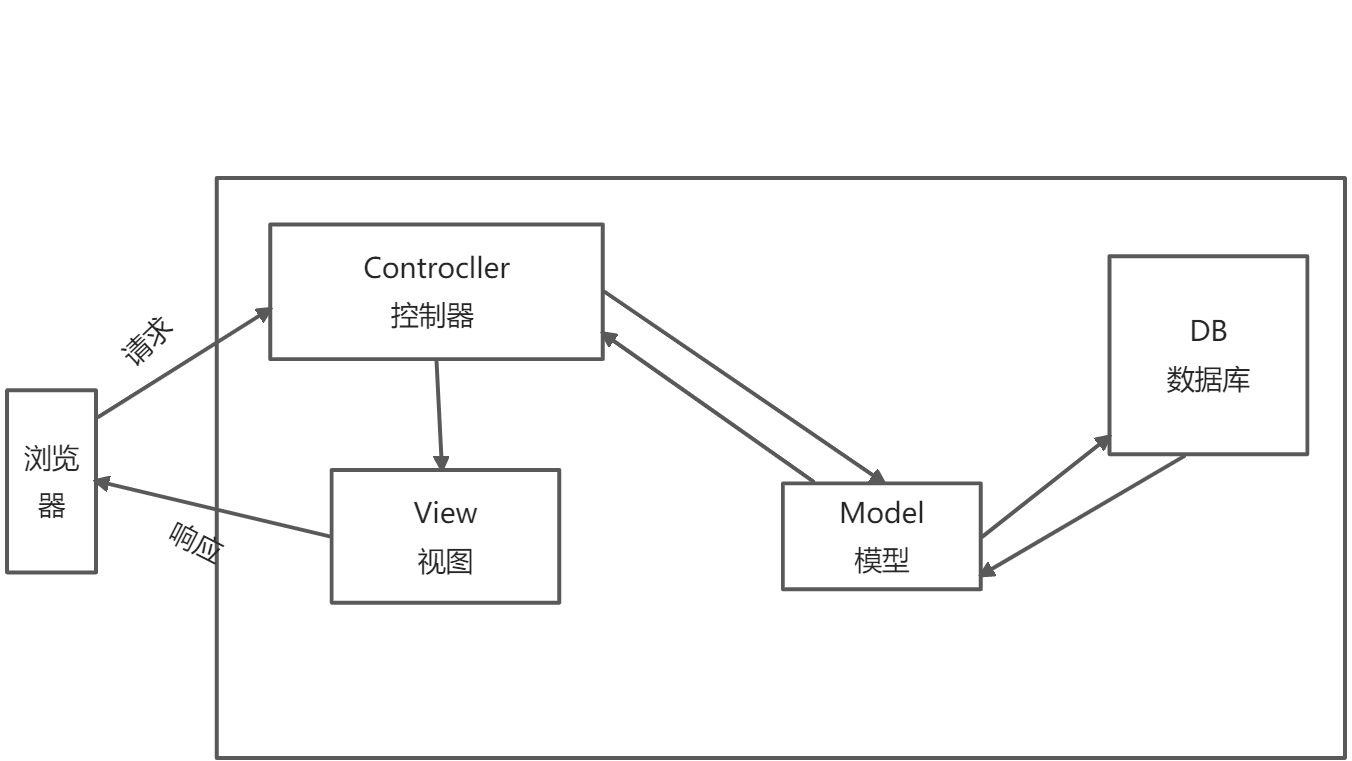
原理
- 浏览器发送请求,由前端控制器(Dispatcher Servlet)接受处理,前端处理器负责调度每个组件。
- 前端控制器接受请求调用处理器映射器(Handler Mapping),根据请求的URL路径,找到处理请求的类名与方法名,并返回给前端控制器。
- 前端控制器调用处理器适配器(Handeler Adapter),处理器适配器调用具体的处理器即Controller(后端控制器)。
- 后端控制器执行完成后返回至Model和View,处理器适配器将后端控制器返回的结果传递给前端控制器。
- 前端控制器将接受的数据传递给视图解析器(ViewReslover),视图解析器解析后返回具体View。
- 前端控制器对视图(View)进行视图渲染(将Model中数据填充至视图中)。
- 前端控制器将响应返回至浏览器
案例
创建启动类
package cn.tedu.mvc;import org.springframework.boot.SpringApplication;import org.springframework.boot.autoconfigure.SpringBootApplication;import org.springframework.stereotype.Controller;@SpringBootApplication//标记表示本类springboot启动类@Controllerpublic class RunApp {public static void main(String[] args) {SpringApplication.run(RunApp.class);//运行当前类}}
创建测试类
package cn.tedu.mvc;import org.springframework.stereotype.Controller;import org.springframework.web.bind.annotation.RequestMapping;import org.springframework.web.bind.annotation.RestController;@RestController//标记此类为Controller的一个控制器@RequestMapping("/car")public class HelloController {@RequestMapping("/get")//public String show() {return "<h1>Hello,World!</h1>";}@RequestMapping("hello")public Double hello(){return 12.3;}@RequestMappingpublic Car car(){return new Car(110,"马钊","马钊","马钊");}@RequestMapping("arr")public int[] arr(){int[] a = {1,2,3,4,5};return a;}}@Controllerclass Register{@RequestMapping("register")public String register(){return "test";}}
创建测试类
package cn.tedu.mvc;public class Car {private Integer id;private String name;private String type;private String color;public Car(Integer id, String name, String type, String color) {this.id = id;this.name = name;this.type = type;this.color = color;}public Integer getId() {return id;}public void setId(Integer id) {this.id = id;}public String getName() {return name;}public void setName(String name) {this.name = name;}public String getType() {return type;}public void setType(String type) {this.type = type;}public String getColor() {return color;}public void setColor(String color) {this.color = color;}@Overridepublic String toString() {return "Car{" +"id=" + id +", name='" + name + '\'' +", type='" + type + '\'' +", color='" + color + '\'' +'}';}}
请求与响应
请求共有8种,主要的为GET和POST。
传递参数时,将参数设为引用类型,不要设为基本类型,基本类型在没有传递参数时会报错,引用类型显示为null。
GET请求
将参数在地址栏中的url传递至方法中。如下例:
http://localhost:8080/car/insert?id=1&name=张三&age=18
向特定的资源发出请求,并返回实体.有固定的写法.而且数据有最大长度,超出就不行
package cn.tedu.mvc;import org.junit.Test;import org.springframework.web.bind.annotation.RequestMapping;import org.springframework.web.bind.annotation.RestController;@RestController//接受请求做出响应@RequestMapping("get")//浏览器访问地址//解析请求参数public class GetController {@RequestMapping("param")public String param(int id, String name, double price) {return "<h1>id=" + id + "<br/>"+ "name=" + name + "<br/>"+ "price=" + price + "</h1>";}@RequestMapping("param1")public void param1(int a, String b) {/*参数名必须与url中的请求名相同*/System.out.println(a);System.out.println(b);}@RequestMapping("param2")public String param2(int id, String name, String type, String color, double price) {return id+name+type+color+price;}/*直接使用对象作为参数,Springboot会自动封装数据*/@RequestMapping("param3")public Car param3(Car c){return c;}@Testpublic void get() {String url = "http://localhost:8080/car?id=100&name=马钊&age=12";String[] a = url.split("\\?")[1].split("&");for (String s : a) {String data = s.split("=")[1];System.out.println(data);}}}
GET请求优化后的方式RESTFul
- 需要在请求路径中加入变量
- 需要使用@PathVariable获取请求路径中的变量
- 以前GET的访问方式即将被简化成:
http://localhost:8080/car/insert/1/张三/18
示例代码:
/*解析RESTFul的请求*/@RequestMapping("get2/{id}/{name}")public String get2(@PathVariable Integer id, @PathVariable String name) {return "id=" + id + "name=" + name;}
POST请求
创建HTML表单
<!DOCTYPE html><html lang="en"><head><meta charset="UTF-8"><title>学生信息管理</title></head><style>table {margin: 0 auto;}h2 {text-align: center;}input[type="text"], input[type="number"] {width: 300px;height: 50px;font-size: 20px;}input[type="date"] {width: 300px;height: 40px;font-size: 20px;}p {text-align: center;}input[type="submit"] {background-color: #3A92EF;border: none;color: white;height: 50px;width: 50px;}input[type="reset"] {background-color: #ff0900;border: none;color: white;height: 50px;width: 50px;margin: 0 40px;}</style><body><div><form action="http://localhost:8080/stu/add" method="get"><table><tr><td><h2>学生信息管理系统MIS</h2></td></tr><tr><td>姓名:</td></tr><tr><td><input type="text" name="name" placeholder="请输入姓名:"></td></tr><tr><td>年龄:</td></tr><tr><td><input type="number" name="age" placeholder="请输入年龄:"></td></tr><tr><td>性别:<input type="radio" name="sex" value="1" checked="checked">男<input type="radio" name="sex" value="0">女</td></tr><tr><td>爱好:<input type="checkbox" name="hobby" value="乒乓球" checked="checked">乒乓球<input type="checkbox" name="hobby" value="唱歌">唱歌<input type="checkbox" name="hobby" value="爬山">爬山</td></tr><tr><td>学历:<select name="edu"><option value="0">请选择你的学历</option><option value="1">专科</option><option value="2">本科</option><option value="3">硕士</option><option value="4">博士</option></select></td></tr><tr><td>入学日期:</td></tr><tr><td><input type="date" name="time"></td></tr><tr><td><p><input type="submit" value="提交" ><input type="reset" value="重置"></p></td></tr></table></form></div></body></html>
进行响应并将接受的数据传入数据库 ```java package cn.tedu.controller;
import cn.tedu.pojo.Student; import org.springframework.web.bind.annotation.RequestMapping; import org.springframework.web.bind.annotation.RestController;
import java.sql.Connection; import java.sql.DriverManager; import java.sql.PreparedStatement; import java.util.Arrays;
@RestController @RequestMapping(“stu”) public class StudentController { @RequestMapping(“add”) public Object add(Student s) { try { Class.forName(“com.mysql.cj.jdbc.Driver”); String url = “jdbc:mysql://localhost:3306/cgb2106?characterEncoding=utf8”; Connection conn = DriverManager.getConnection(url, “root”, “root”); String sql = “insert into tb_student values(null,?,?,?,?,?,?)”; PreparedStatement stat = conn.prepareStatement(sql); stat.setObject(1,s.getName()); stat.setObject(2,s.getAge()); stat.setObject(3,s.getSex()); stat.setObject(4, Arrays.toString(s.getHobby())); stat.setObject(5,s.getEdu()); stat.setObject(6,s.getTime());
//执行语句执行增删改得方法stat.executeUpdate();stat.close();conn.close();} catch (Exception e) {System.out.println("插入失败");e.printStackTrace();}return s;}
}
<a name="wEH97"></a>## Spring MVC中的控制器在Spring MVC中,控制器 是指 类或者类的方法上 添加了`**@RequestMapping**`注解的类,并不是 使用了 `**@Controller**`注解的类 就是 控制器类。<br />`**@Controller**`注解的类 和`**@Component**`注解的类 在功能上是一样的,都是在 辅助`**@ComponentScan**`实现组件扫描。<br />只是在表意上,在用`**@Controller**` 注解控制器类比用`**@Component**`注解控制器类 更清楚一些。<a name="cxbjv"></a>### `@GetMapping`用于处理请求方法的_GET_类型,是`@RequestMapping(method = RequestMethod.GET)`的缩写对比:<br />`@RequestMapping()````java@RequestMapping(value = "/get/{id}", method = RequestMethod.GET)
@GetMapping()
@GetMapping("/get/{id}")
@PostMapping
用于处理请求方法的POST类型,是@RequestMapping(method = RequestMethod.POST)的缩写
对比:@RequeatMapping()
@RequestMapping(value = "/get/{id}", method = RequestMethod.POST)
@PostMapping()
@PostMapping("/get/{id}")
@PutMapping
PostMapping作用等同,都是用来向服务器提交信息。如果是添加信息,倾向于用@PostMapping,如果是更新信息,倾向于用@PutMapping。两者差别不是很明显。
@DeleteMapping
关于SpringMVC接收JS数组的问题

若有收获,就点个赞吧
0 人点赞
