SpringBoot 1.x 基于 Spring 4.x开发的SpringBoot 2.x 基于 Spring 5.x开发的spring全称:spring framework弹性:可变形、多功能性阅读文档一定要结合代码笔记解析的SpringBoot版本: 2.0.2.RELEASE,没有特殊说明都是默认该版本
1. 走向自动装配
1.1 spring的手动装配
1.1.1 模式注解装配
1.1.1.1 举例了解模式注解
定义:模式注解是一种用于声明在应用中扮演“组件”角色的注解
| Spring Framework 模式注解 | 场景说明 | 启始版本 |
|---|---|---|
| @Component | 将类交给spring管理 | 2.0 |
| @Controller | Web控制器模式注解 | 2.5 |
| @Service | 服务模式注解 | 2.5 |
| @Repository | 数据仓储模式注解 | 2.5 |
| @Configuration | 配置类模式注解 | 3.0 |
1.1.1.2 扫描方式、装配方式
<?xml version="1.0" encoding="UTF-8"?><beans xmlns="http://www.springframework.org/schema/beans"xmlns:mvc="http://www.springframework.org/schema/mvc"xmlns:context="http://www.springframework.org/schema/context"xmlns:xsi="http://www.w3.org/2001/XMLSchema-instance"xmlns:mv="http://www.springframework.org/schema/mvc"xsi:schemaLocation="http://www.springframework.org/schema/beanshttp://www.springframework.org/schema/beans/spring-beans.xsdhttp://www.springframework.org/schema/contexthttp://www.springframework.org/schema/context/spring-context.xsdhttp://www.springframework.org/schema/mvchttp://www.springframework.org/schema/mvc/spring-mvc.xsd"><!-- 激活注解驱动特性 --><context:annotation-config/><!--context:component-scan: 标签作用,在Spring IOC初始化过程中,自动创建并管理com.imooc.springmvc及子包中,拥有以下注解的对象: @Repository、@Service、@Controller、@Component、以及包含这些注解的派生注解,将它们注册为Spring Bean--><context:component-scan base-package="com.yihua.mvc"/>
@ComponentScan(basePackages = "com.yihua.repository")public class RepositoryBootstrap {......}1.这个在SpringBoot中一般放在启动类上
1.1.1.3 注解的派生性
派生性也可以称继承性、层次性,@Component作为一种由 Spring 容器托管的通用模式组件,任何被 @Component标准的组件均为组件扫描的候选对象。类似地,凡是被@Component元标注(meta-annotated)的注解,如 @Service,当任何组件标注它时,也被视作组件扫描的候选对象,结果举例:@Service和@Component其实是没有区别的,前者继承了后者所有的特性
满足条件:
- 注解需要继承需要的注解
- 父注解的字段,子注解必须重写,并且使用
@AliasFor标识
既然功能一样,为什么要使用?
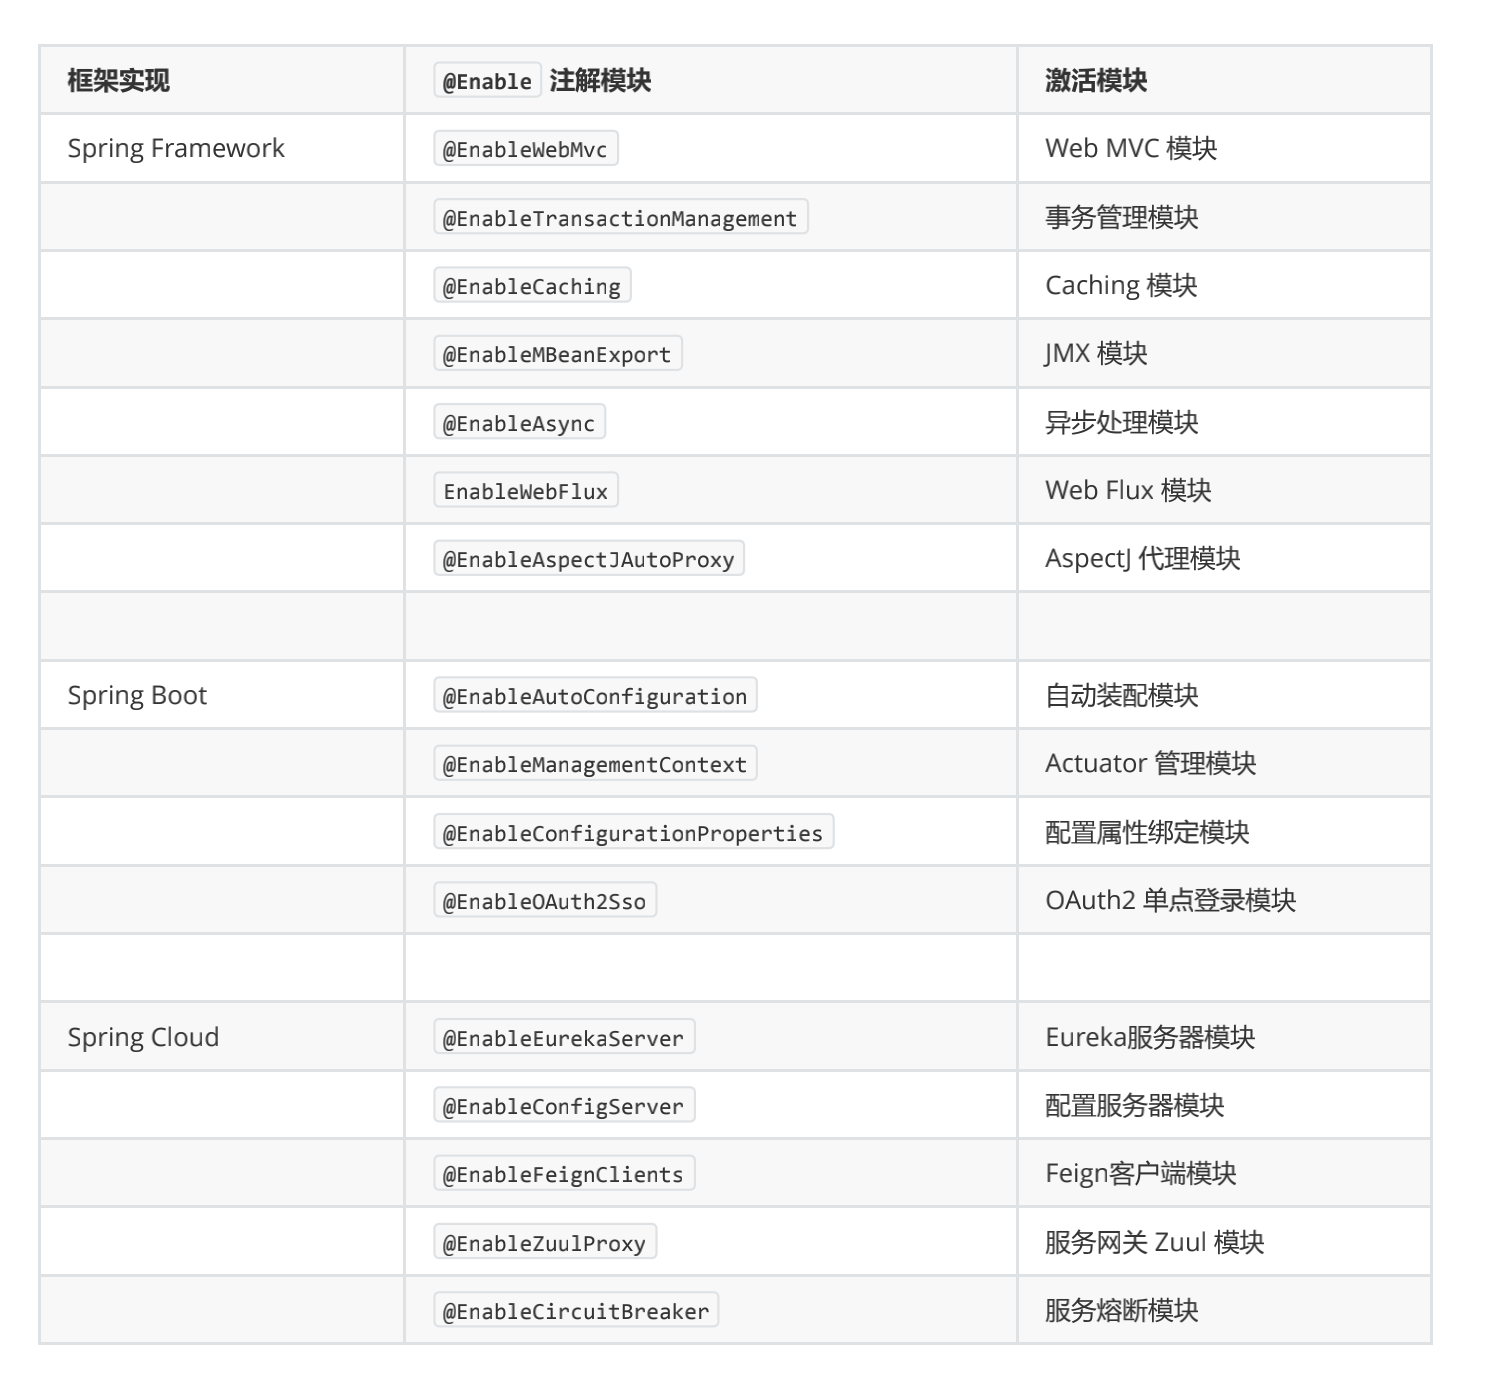
从Spring Framework 3.1开始支持@Enable 模块驱动。所谓“模块”是指具备相同领域的功能组件集合, 组合所形成一个独立的单元比如Web MVC模块、AspectJ代理模块、Caching缓存模块、Java管理扩展模块、Async(异步处 理)模块等。这样就可以简化一些配置,不用一个一个配置的写。@Import注解是可以导入多个配置的,参数是一个数组
| 框架实现 | @Enable注解模块 | 激活模块 |
|---|---|---|
| Spring Framework | @EnableWebMvc | Web MVC模块 |
1.1.2.2 注解驱动的方式
@Retention(RetentionPolicy.RUNTIME)@Target(ElementType.TYPE)@Documented@Import(DelegatingWebMvcConfiguration.class)public @interface EnableWebMvc {}@Configurationpublic class DelegatingWebMvcConfiguration extends WebMvcConfigurationSupport{...}@EnableWebMvcpublic class AutoconfigApplication {// 我是启动类}1.观察mvc的实现方式,通过@Import导入一个实现了很多bean模块的类完成的2.自己仿写的查看项目"dive-sprong-boot"的自动配置章节
1.1.2.3 接口驱动的方式
@Target(ElementType.TYPE)@Retention(RetentionPolicy.RUNTIME)@Documented@Import(CachingConfigurationSelector.class)public @interface EnableCaching {......}public class CachingConfigurationSelector extends AdviceModeImportSelector<EnableCaching> {......}public abstract class AdviceModeImportSelector<A extends Annotation> implements ImportSelector {......,这里返回的都是一个一个bean的名称}@EnableCachingpublic class AutoconfigApplication {// 我是启动类}1.这种方式更灵活,可以在返回bean的前提上做很多操作2.接口装配只是对于注解装配进行了一个增强操作,或者说就是增加条件来判断装配哪一个已经被注解的bean去装配,而不是脱离注解进行装配3.这种方式最终都是实现ImportSelector接口4.自己仿写的查看项目"dive-sprong-boot"的自动配置章节
1.1.3 条件装配
1.1.3.1 了解条件配置
从Spring Framework 3.1开始,允许在 Bean 装配时增加前置条件判断,这就可以理解为,需要用户输入条件装配哪些内容,这样是更灵活的
| Spring Framework 注解 | 场景说明 | 启开版本 |
|---|---|---|
| @Profile | 配置话条件装配 | 3.1 |
| @Conditional | 编程条件装配 | 4.0 |
1.1.3.2 配置方式实现
是通过@profile注解实现的,可以指定条件,然后实例化那个对象;项目中实现的计算服务查看源码即可
1.1.3.3 编程方式实现
是基于@Conditional注解实现的,需要实现Condition接口ConditionalOnClass:当前类是否存在ConditionalOnProperty:仿写的是它@profile
1.2 SpringBoot的自动装配置
1.2.1 了解自动装配
- 一些经典的类:
WebMvcAutoConfiguration - 定义:基于约定大于配置的原则,实现Spring组件自动装配的目的
- 底层装配技术
Spring的模式注解Spring的@Enable模块装配Spring的条件装配Spring的工厂加载机制- 实现类:
SpringFactoriesLoader,重要的loadFactories方法不断遍历配置文件 - 配置资源:
MATE-INF/spring.factorise,这个文件可以在jar包里面,可以在项目文件中SpringBoot中这个文件的路径是:spring-boot-autoconfig:版本号
- 实现类:
实现方式
实现
HelloWorldAutoConfiguration配置类- 条件判断:
user.name == "Mercy" - 模式注解:
@Configuration - 模块
@Enable:@EnableYihua-YihuaSelector-YihuaConfiguration-yihuaSay
- 条件判断:
- 定义工厂配置文件
spring.factories
- 定义启动类
@EnableAutoConfiguration,其实这一步不用写,因为你如果做组件或者写依赖包,人家引用你的时候自然有,一般都是使用@SpringBootApplication包装1.2.3 自动装配源码分析
2. 理解SpringApplication
2.1 准备阶段
2.1.1 配置SpringBootBean源
2.1.2 推断web应用类型
为什么SpringBoot要去推断类型,因为它希望你少去配置,定义好了类型,可以直接去加载定义好的配置
根据当前应用ClassPath是否存在相关实现类来推断Web应用类型
public class demo {// Web Reactive: WebApplicationType.REACTIVE// Web Servlet: WebApplicationType.SERVLET// 非 Web: WebApplicationType.NONEprivate static final String REACTIVE_WEB_ENVIRONMENT_CLASS = "org.springframework."+ "web.reactive.DispatcherHandler";private static final String MVC_WEB_ENVIRONMENT_CLASS = "org.springframework."+ "web.servlet.DispatcherServlet";private static final String[] WEB_ENVIRONMENT_CLASSES = { "javax.servlet.Servlet","org.springframework.web.context.ConfigurableWebApplicationContext" };// 这个就是推断web应用类型的方法,org.springframework.boot.SpringApplicationprivate WebApplicationType deduceWebApplicationType() {// 当reactive类存在的时候,mvc不存在的时候,选择reactive方式if (ClassUtils.isPresent(REACTIVE_WEB_ENVIRONMENT_CLASS, null)&& !ClassUtils.isPresent(MVC_WEB_ENVIRONMENT_CLASS, null)) {return WebApplicationType.REACTIVE;}// 走到这里说明reactive类不存在,或者reactive/mvc都存在// 遍历Servlet、ConfigurableWebApplicationContext是否存在,不存在则定义为nonefor (String className : WEB_ENVIRONMENT_CLASSES) {if (!ClassUtils.isPresent(className, null)) {return WebApplicationType.NONE;}}// 否则返回的是Servletreturn WebApplicationType.SERVLET;}// 开发者也可以强制设置成哪一种类型,在启动类中设置springApplication.setWebApplicationType(WebApplicationType.NONE)}
新版本已经修改了实现,方法也是类似的,org.springframework.boot.WebApplicationType#deduceFromClasspath通过ClassPath加载类名来判断
2.1.3 推断引导类
为什么需要推导引导类?常规的执行run方法的时候已经传递的了引导类,但是SpringBoot支持多种启动方式,像如下的方式就没有传递引导类,那么SpringBoot就需要知道引导类
public class demo {// 是根据main线程执行的堆栈判断实际的引导类private Class<?> deduceMainApplicationClass() {try {// StackTraceElement这个是一个线程的栈信元素// 获取正在执行的线程的栈元素StackTraceElement[] stackTrace =new RuntimeException().getStackTrace();// 遍历所有线程的栈元素for (StackTraceElement stackTraceElement : stackTrace) {// 如果methodName = main,则说明是引导类if ("main".equals(stackTraceElement.getMethodName())) {return Class.forName(stackTraceElement.getClassName());}}}catch (ClassNotFoundException ex) {// Swallow and continue}return null;}}
2.1.4 加载应用上下文初始器
- 流程:是利用
Spring的工厂加载机制,实例化ApplicationContextInitializer,并排序对象集合 - 技术
- 实现类:
org.springframework.core.io.support.SpringFactoriesLoader - 资源配置:
MATE-INF/spring.factories - 排序:
AnnotationAwareOrderComparator.sort();public class demo {/*** 获取Spring的工厂实例* 解释一下:为什么下面的代码看起来和上下文初始化器毫无关系,* 因为下面的代码是加载所有的工厂实例* 上下文初始器只是其中一部分,并且排在最前面,* 查看"MATE-INF/spring.factories"文件发现第一个* 需要加载的就是ApplicationContextInitializer** @param type* @param parameterTypes* @param args* @param <T>* @return*/private <T> Collection<T> getSpringFactoriesInstances(Class<T> type, Class<?>[] parameterTypes, Object... args) {// 获取当前线程的上下文类加载器ClassLoader classLoader = Thread.currentThread().getContextClassLoader();// 使用名称并确保唯一以防止重复// 这里就是使用Spring工厂机制的实现类SpringFactoriesLoader加载工厂Set<String> names =new LinkedHashSet<>(SpringFactoriesLoader.loadFactoryNames(type, classLoader));// 创建Spring的工厂实例List<T> instances =createSpringFactoriesInstances(type, parameterTypes, classLoader, args, names);// 对实例进行排序AnnotationAwareOrderComparator.sort(instances);// 返回所有的工厂实例return instances;}}
- 实现类:
注解:org.springframework.core.annotation.Order
接口:org.springframework.core.Ordered
控制加载顺序的
个人理解:加载加载,肯定是分先后顺序的
2.1.5 加载应用事件监听器
2.2 运行阶段
2.2.1 运行事件监听器编程模型
2.2.2 运行监听器

若有收获,就点个赞吧
0 人点赞
