CSS3 学习
CSS3 是 CSS2. 1 的一个升级版 , 它是对CSS的一个扩展
CSS3 的 新特性
- 选择器
- 阴影
- 形状转化 ( 2d <-> 3D)
- 变形
- 动画
- 过渡动画
- 帧动画
- 边框
- 多重背景
- 反射
- 文字
- 颜色 (不透明度 rgba / hsla / hsl )
- 滤镜 ( fillter )
- 弹性布局
- 多列布局
- 合模型
- Web字体
- 媒体查询
CSS3 与浏览器
CSS3不是属于浏览器或者同一浏览器的不同版本都支持,所以需要做兼容处理, 通常的做法就是加厂商前缀
面试点
主流的浏览器内核
- Trident : IE 内核
- Webkit : Chrome 和 Safari 内核
- Gecko : FireFox 内核
- Blink (是Webkit的一个分支) : Chrome 和 Opera 内核
Tips : 目前国内的浏览器大多数都是双核的,(IE内核 和 Chrome 内核)
-webkit-background:
厂商前缀
- IE : -ms-
- Chrome & Safari : -webkit-
- FireFox : -moz-
- Opear : -o-
Blink 不需要做兼容处理,它是完全兼容CSS3 的
CSS3 选择器
丰富选择的目的:在标签中
1. 属性选择器
- 直接以属性选择 [属性名]
- 属性值等于什么选择内容 [ 属性名 = 属性值]
- 属性值 ^= 以什么开头 [属性名 ^= 属性值]
- 属性值 $ $= 以什么结尾 [属性名 $=属性值]
- 属性值中 = 什么 , 表示属性值中有什么 [ 属性名 = 属性值]
<div class="container"><p class="content p1 ">内容段落 01</p><p class="p2 content">内容段落 02</p><p class="content">内容段落 03</p><p class="content">内容段落 04</p><p class="content p5">内容段落 05</p></div>
/* 1 , 以属性直接选择 */p[class] {/* 在p标签中,匹配所有的class属性 */color: #f00;}/* 2. - 属性值等于什么选择内容 */p[class="content"] {/* 在p标签中,匹配所有 class="content" 的标签 */color: #0f0;}/* 3, - 属性值 ^= 以什么开头 */p[class^="content"] {/* p标签中,匹配以content 开头的标签 */color: #00f;}/* 4. 属性值 $= 以什么结尾 */p[class$="content"] {/* 在p标签中,匹配以content结尾的标签 */color: aqua;}/* 5. 属性值中 *= 什么 , 表示属性值中有什么 */p[class*="p"] {/* 在p标签中,class中具有 p 字符的标签 */color: brown;}
2. 结构性伪类
伪类的特点 : 具有: 号
1, :root 匹配html标签,和 body 选择器的效果一样
:root {background-color: #0f0;}body {background-color: #0f0;}
2, 子元素选择 , 匹配父元素中连续的子元素 ,如果没有连续, 使用nth-of-type
- :first-child : 第一个子元素
- :last-child : 最后一个子元素
- :nth-last-child(n) : 倒数第n个子元素
- nth-child(n) : 第n个子元素
/* 2. 子元素选择 *//*- :first-child : 第一个子元素- :last-child : 最后一个子元素- :nth-last-child(n) : 倒数第n个子元素- nth-child(n) : 第n个子元素*/p:first-child {/* 第一个子元素 */color: chartreuse;}p:last-child {/* 最后一个子元素 */color: yellow;}p:nth-last-child(3) {/* 倒数第n个子元素 */color: blue;}p:nth-child(2n) {/* 2n 表示2的倍数 *//* 第n个子元素 */color: aquamarine;}
3, nth-of-type类 : 用于匹配父元素中兄弟子元素, 可以用于元素非连续的情况 , 不连续的
nth-of-type(n): 找的是标签中的第n个元素, 如果第n个不是该标签, 将跳过,继续向下找, 直到找到为止nth-last-of-type(n): 找的是标签中的倒数第n个元素, 如果倒数第n个不是该标签, 将跳过,继续向下找, 直到找到为止
/* 3, `nth-of-type `类 : 用于匹配父元素中兄弟子元素, 可以用于元素非连续的情况- nth-of-type(n) :- nth-last-of-type(n) : */p:nth-of-type(3) {/* nth-of-type(n) : 找的是p标签中的第三个兄弟p标签,如果第3个不是p标签, 将跳过,继续向下找, 直到找到为止 */color: #f0f;}p:nth-child(3) {/* 找第三个子元素,如果是p标签, 就找到了,如果不是, 就没有找到 ,而且不再继续查找 */color: #f00;}p:nth-last-of-type(4) {/*找的是p标签中的倒数第4个兄弟p标签,如果倒数第4个不是p标签, 将跳过,继续向下找, 直到找到为止 */color: #ff0;}
4, 其他
- :only-child : 父元素中仅有一个子元素
- :only-of-type : 父元素中仅有一个兄弟元素
- :empty : 没有元素, 包含文本元素,即查找空元素
/* 4. 其他结构伪类 */p:only-child {/* 查找父级元素中只有 一个标签为p的标签 ,p标签必须是唯一个标签 , 不允许有其他的标签存在,但可以p标签中有子标签 */width: 200px;border: 1px solid #ccc;background-color: #00f;color: #ff0;}p:only-of-type {/* 查找父级元素中只有 p标签是一个唯一的元素 , 可以有多个标签的存在 ,p标签中可以有子标签 */width: 200px;border: 1px solid #ccc;background-color: #00f;color: #ff0;}div:empty {/* 查找 div 是空元素, 不能有元素, 和文本 */width: 200px;height: 200px;background-color: #f00;}
3. 目标伪类
:target : 匹配相关URL指向的元素
<!-- # 页内跳转 --><a href="#jump1">跳转1</a><a href="#jump2">跳转2</a><a href="#jump3">跳转3</a><p id="jump1">这是段落1的内容</p><div id="jump2">这是段落2的内容</div><p id="jump3">这是段落3的内容</p>
p,div {height: 600px;}/* 目标伪类 */p:target {/* 匹配相关URL指向的元素, 点击跳转后该元素的的样式, */color: red;}div:target {color: blue;}
4. UI元素状态伪类 ( 表单元素 )
用于表单元素 form 表单
enabled: 表单中处于可用状态的元素disabled: 选中表单中处于不可用状态的元素checked: 表单中处于被选中的元素 ( 只在Opera 浏览器中有效)::selection: 元素中被用户选中或处于高亮的部分
<form action="#"><!-- disable 无效 --><input type="text" name="test" id="test" disabled> <br><input type="email" name="email" id="email"> <br><input type="text" checked placeholder="被选中状态"> <br></form><div>test</div><select name="select" id="1"><option >1</option><!-- --><option checked selected">2</option><option>UI </option></select>
input:enabled {/* 表单中 可用状态的元素 */background-color: #f00;}input:disabled {/* 表单中 不可用状态的元素 */background-color: #ff0;}input:checked {/* 表单中 被选中的状态 *//* checked 只在 Opera 中有效 */background-color: #0ff;}select::selection {/* 选中部分处于高亮状态 */color: #0ff;}::selection {/* 被选中的文本 */background-color: #0ff;}
5. 否定伪类
not(p) : 匹配所有不是 p标签的元素
.content not(div) {/* 在 content 元素中, 匹配所有不是 div 的标签*/color: blue;}
6. 通用兄弟元素选择器
~
div1~.div3 : 找div1的兄弟元素 div3
div1~.div3 {color: red;}
CSS3 文本
文本阴影
主流浏览器都支持文本阴影
text-shadow : 设置文本阴影
text-shadow: h-shadow v-shadow blur color
h-shadow: {number}: 必须 . 水平阴影的位置 , 允许负值.x-shadow : {number}: 必须值 , 垂直阴影的位置 , 允许负值 .blur {number}: 可选 . 模糊度color: 可选 . 阴影的颜色
body {background-color: #000;}h1 {/* text-shadow : 横向(水平)偏移度 纵向(垂直)偏移度 模糊度 颜色 */text-shadow: 10px 5px 3px #ff0;}
<h1>这是测试文本阴影</h1>
文本自动换行
word-wrap
normal: 只在允许的断字点换行 (浏览器保存默认处理)break-word: 在长单词或 URL地址内部进行换行 , 一般用这个
div {width: 200px;height: 200px;border: 1px solid #000;/* word-wrap: normal; *//* 加上 -ms- 表示兼容 IE 浏览器 *//* -ms-word-wrap: break-word; */word-wrap: break-word;}
单词拆分
word-break : normal | break-all | keep-all
normal: 浏览器默认换行break-all: 允许单词内换行keep-all: 只能在 半角 空格 或 连 - 字符 英文 , 处换行
div {width: 200px;height: 200px;border: 1px solid #000;/* 允许单词内换行,一般用这个 */word-break: break-all;}
文本拆分
所有主流浏览器都不支持
text-wrap : normal | none | unrestricted | suppress
p {/* 用在单词的拆分,增加美观性*/text-wrap: 5px;}
文本溢出( 重要)
- 单行溢出
text-overflowclip: 多出的部分 修建掉ellipsis: 用省略号表示多出的文本, 一般用这个string: 给定字符串来代替多出的文本
处理文字溢出样式 : 宽度 , 不允许折行 white-space:nowrap , 浏览器兼容 -em-text-overflow:ellipsis, 处理溢出的方法 text-overflow:ellipsis , 清除多出部分 overflow: hidden
p {width: 200px;height: 120px;border: 1px solid #000;/* white-space: nowrap 不允许折行 */white-space: nowrap;/* 清除多余部分 */overflow: hidden;}.p1 {/* 文本溢出 *//* 必须要有 overflow: hidden 和 不允许文本折行 white-space: nowrap *//* IE9 一下还需要做兼容 */white-space: nowrap;overflow: hidden;text-overflow: clip;}.p2 {overflow: hidden;/* 用省略号表示多出的文本 */text-overflow: ellipsis;}.p3 {overflow: hidden;/* text-overflow: 。。。。; */}
- 多行溢出 IE9以下的版本不支持,主要是谷歌支持
.p4 {/* 多行溢出 处理 */width: 300px;/* white-space: normal 允许折行(默认), nowrap 不允许折行 */white-space: normal;display: -webkit-box;-webkit-box-orient: vertical;/* 允许存在3行 */-webkit-line-clamp: 3;overflow: hidden;}
CSS3 边框
CSS3 对边框做出了一些改进
圆角边框 (常用)
border-radius : 1-4 length (1-4个长度值) | %
四个方位的值 :
- top-left : 左上角
- top-right : 右上角
- bottom-left : 左下角
- bottom-right : 右下角
border-radius: 左上 右上 右下 左下
div {width: 200px;height: 200px;border: 1px solid #999;margin: 100px auto;/* 浏览器的兼容 *//* -webkit-border-radius: 10px;-moz-border-radius: 10px;border-radius: 10px; *//* 另一种写法 *//* border-radius: 30%; *//* 只让单个角变圆 左上角 */border-top-left-radius: 100%;border-top-right-radius: 20px;/* 让两个角 或 三个角圆border-radius : 左上 右上 右下 左下 */border-radius: 0 10px 30px 40px;}img {/* 图片圆角 */width: 200px;height: 200px;border: 1px solid #999;margin: 100px auto;display: block;border-radius: 50%;}img:hover {width: 200px;height: 200px;border: 1px solid #999;margin: 100px auto;display: block;border-radius: 10%;/* 取消圆角 *//* border-radius: 0; */}
边框阴影
IE9以上支持 常用
box-shadow: 水平偏移 垂直偏移 [模糊度] [阴影的尺寸] [颜色] [inset] ;
写法基本个 文字阴影一样text-shadow
div {width: 200px;height: 200px;background-color: #f0f;/* 边框阴影 */box-shadow: 3px 2px 3px 2px yellow;/* 不同浏览器需要做 兼容 -moz- -webkit- */box-shadow: inset 3px 2px 4px 5px red;/* 默认阴影在 右下角, 加了 inset 阴影在左上角 */}
边框图片
IE11.0 以后的版本支持
border-image: 图片 向内偏移距离 宽度 图片区域超出边缘的距离 重复效果 ;
重复效果 : round / strech / repeat
div,img {width: 200px;height: 160px;/* transparent 边框透明 */border: 1px solid #ccc;border-image: url(img5.png) 40 20 20 round;/* 不同的浏览器需要做兼容 */}img {width: 600px;height: 500px;border-image: url(img5.png) 40 round;}
CSS3 背景
background-image背景图片background-size设定背景图像的尺寸background-origin设置背景图片的位置区域background-clip: 设置背景图片的绘制区域background-image: linear-gradient背景渐变
多重背景
background-img : url(img)
div {width: 600px;height: 500px;margin: 100px auto;/* 多重背景,1. 需要设置多张背景图片2. 需要设置平铺方式3. 需要设置排序位置 */background-image: url(./img5.png), url(./001.jpg), url(./002.jpg);background-repeat: no-repeat;background-position: 50% 100% 0 0, 0 0;}
背景属性
使用前,必须要设置背景图,和图片的平铺方式 no-reprter
background-size 设定背景图片的尺寸
- 固定长度 px
- 百分比值 %
- cover : 满足背景图区域的最高宽度 ,高度就平铺
- contain : 满足背景图区域的最高的高度,宽度平铺
background-size: 50% 30% :设置背景图片的大小
background-size: 50px 30px
p {width: 500px;height: 400px;background-image: url(./003.jpg);background-repeat: no-repeat;margin: 100px auto;/* `background-size` 设定背景图片的尺寸- 固定长度 px- 百分比值 %- cover : 满足背景图区域的最高宽度 ,高度就平铺- contain : 满足背景图区域的最高的高度,宽度平铺` background-size: 50% 30%` :设置背景图片的大小不同浏览器需要做兼容 -moz- -webkit-*//* 一般使用 contain 和 cover 这两个 */background-size: contain;/* background-size: cover; */}
background-origin 设置背景图像的位置区域
- padding-box : 背景图像相对于内边距框来定位
- border-box : 背景图像相对于边框盒来定位
- content-box : 背景图像相对于内容框来定位
p {width: 500px;height: 400px;background-image: url(./003.jpg);background-repeat: no-repeat;margin: 100px auto;border: 3px solid rgba(204, 204, 204, 0.401);/* cover 方式设置尺寸 */background-size: cover;/* background-origin:设置背景图像的位置区域, 也就是说,背景图是以padding或者border 还是content的位置显示区域padding-box : 以内边距设置border-box : 以边框设置content-box : 以内容设置*/background-origin: padding-box;background-origin: border-box;background-origin: content-box;}
background-clip 属性规定背景的绘制区域
- border-box : 被裁剪到边框
- padding-box : 背景被裁剪到内容框
- content-box : 背景被裁剪到内容框
p {width: 500px;height: 400px;background-image: url(./003.jpg);background-repeat: no-repeat;margin: 100px auto;border: 3px solid rgba(204, 204, 204, 0.401);/* cover 方式设置尺寸 */background-size: cover;/* `background-clip` 属性规定背景的绘制区域- border-box : 被裁剪到边框- padding-box : 背景被裁剪到内容框- content-box : 背景被裁剪到内容框*/background-clip: padding-box;background-clip: content-box;background-clip: border-box;}
CSS3 颜色
background-color: hsla()
一般用下边元素来设置 遮挡的 蒙版 层
rgba(r , g , b, a )
- a : 不透明度 , 取值范围 (0 - 1 之间的一个小数)
HSL
hsl (h,s,l ) : 取值范围 ( 0-360)
- h : 色调
- s : 饱和度
- l : 亮度
HSLA
hsl (h,s,l ) : 取值范围 ( 0-360)
- h : 色调
- s : 饱和度
- l : 亮度
- a : 不透明度 , 取值范围 (0 - 1 之间的一个小数)
.container {position: relative;width: 800px;height: 600px;background-color: #00f;}.div1,.div2 {width: 100%;height: 100%;position: absolute;/* 复习: 当元素使用了定位 absolute 后,margin 和 padding 不再起作用 */top: 0;left: 0;}.div1 {background-image: url(./003.jpg);background-size: cover;}.div2 {/* background-color: hsla(120, 50%, 50%, .6); *//* 设置 rgba 元素 */background-color: rgba(0, 333, 25, .5);/* 设置蒙版 *//* color: hsla(120, 50%, 50%, .6); */}.div2:hover {background-color: hsla(120, 50%, 50%, .6);}
CSS3 中的 Opacity 不透明度
Opacity : 调整元素的不透明度 ,
opacity: 0-1 : 透明度
filter:alpha(opacity=50) : IE8以及IE8一下的版本不识别上一行代码, 但是可以识别这一行 , 所以需要设置透明度时候, 把这两行代码都写上
* {margin: 0;padding: 0;}li {list-style-type: none;}ul {width: 600px;height: 30px;/* 居中 */margin: 100px auto 0;/* 字体居中 */text-align: center;}ul li {background-color: #00f;width: 100px;color: yellow;display: inline-block;margin-left: -4px;}ul li:hover {/* 设置不透明度 */background-color: #0f0;opacity: .5;filter: alpha(opacity=50);}
CSS3 渐变
渐变 : 从一种颜色变到另一种颜色的过度
线性渐变
background: linear-gradient(方向或角度,颜色1, 颜色2)
方向 :
- to top : 顶部
- to top left : 上左
- to top right : 上右
- to bottom : 底端
- to bottom left : 下左
- to bottom right 下右
角度:
- 45度角 ,应该成 45deg;
颜色取值 : 颜色单词 / 16进制颜色/ 表示颜色的函数 rgb/rgba/hsl/hsla
div {width: 200px;height: 200px;/* 设置渐变 */background: linear-gradient(to top, red, blue);/* 颜色写法 */background: linear-gradient(to bottom left, rgb(12, 211, 158), #444000, rgba(156, 213, 44, 0.701));/* 角度写法 30度 30deg *//* background: linear-gradient(30deg, #ff5da2, #ee904f, rgb(155, 155, 23)) *//* 颜色加上百分比 */background: linear-gradient(30deg, red 50%, blue 70%);}
径向渐变
沿半径方向渐变
background: radial-gradient(形状 渐变大小 at 位置, 颜色1, ..., 颜色n )
形状 :
- ellipse : 椭圆径向渐变(默认)
- circle : 圆径向渐变
渐变大小 :
- farthest-corner : 渐变的半径长度为 从圆心到离圆心最远的角 (默认)
- closest-side : 渐变的半径长度为 从圆心到离圆心最近的边
- closest-corner 渐变的半径长度为 从圆心到离圆心最远的边
- farthest-side : 渐变的半径长度为 从圆心到离圆心最近的角
位置 :
- center : 设置圆心在中心的位置
- top : 设置圆心在顶部位置
- bottom : 设置圆心在底端位置
.box {width: 500px;height: 300px;/* 经向渐变默认值在中线, background: radial-gradient()沿着半径方向渐变 */background: radial-gradient(red, green, blue);/* circle : 圆径向渐变 */background: radial-gradient( circle, red, green, blue);/* closest-corner :**从圆心到离圆心最远的边** */background: radial-gradient( circle closest-corner at 25% 75%, red, green, blue);/* farthest-corner **从圆心到离圆心最远的角** */background: radial-gradient( circle farthest-corner at 25% 75%, red, green, blue);}
文字渐变
background-image: linear-gradient() / radial-gradient()
需要的核心: 以下三样
- background-image: 线性渐变 / 径向渐变
- -webkit-background-clip: text; : 超出修剪
- -webkit-text-fill-color: transparent; : 透明背景
p {/* 背景色, 也可以设为渐变 ,这就是文字渐变 , 需要做 浏览器的兼容 */background-image: linear-gradient(#50baff, #ff4bcc, #abe424);background-image: -webkit-linear-gradient(35deg, #50baff, #ff4bcc, #abe424);/* 这里需要浏览器的兼容 */-webkit-background-clip: text;-webkit-text-fill-color: transparent;text-shadow: 3px 1px 1px #005050;}
CSS3 盒模型
box-sizing
允许你以某种方式定义某些元素 , 以适应指定的区域
box-sizing (火狐和谷歌低版本需要浏览器兼容)
- content-box : (默认的)盒子实际的宽度为242px (包含文本宽度200px + 边框2px + 内边距20px )
- border-box : 盒子实际的宽度为200px不变 (包含文本宽度 158px + 边框2px + 内边距40px)
.container {width: 400px;height: 300px;border: 1px solid #000;}.box {/* width: 200px;height: 200px;float: left;border: 1px solid #f00; *//* 当给浮动时, 需要加上边框的像素,超过container的宽度时,盒子就会掉下来 *//* 解决方法 加上 box-sizing 盒子定义区域,适应元素*/width: 200px;height: 200px;float: left;border: 1px solid #f00;padding: 20px;/* border-sizing : 盒子实际的宽度为200px不变 (包含文本宽度 158px + 边框2px + 内边距40px) */box-sizing: border-box;/* box-sizing: content-box (默认的): 盒子实际的宽度为242px (包含文本宽度200px + 边框2px + 内边距20px ) */box-sizing: content-box;}
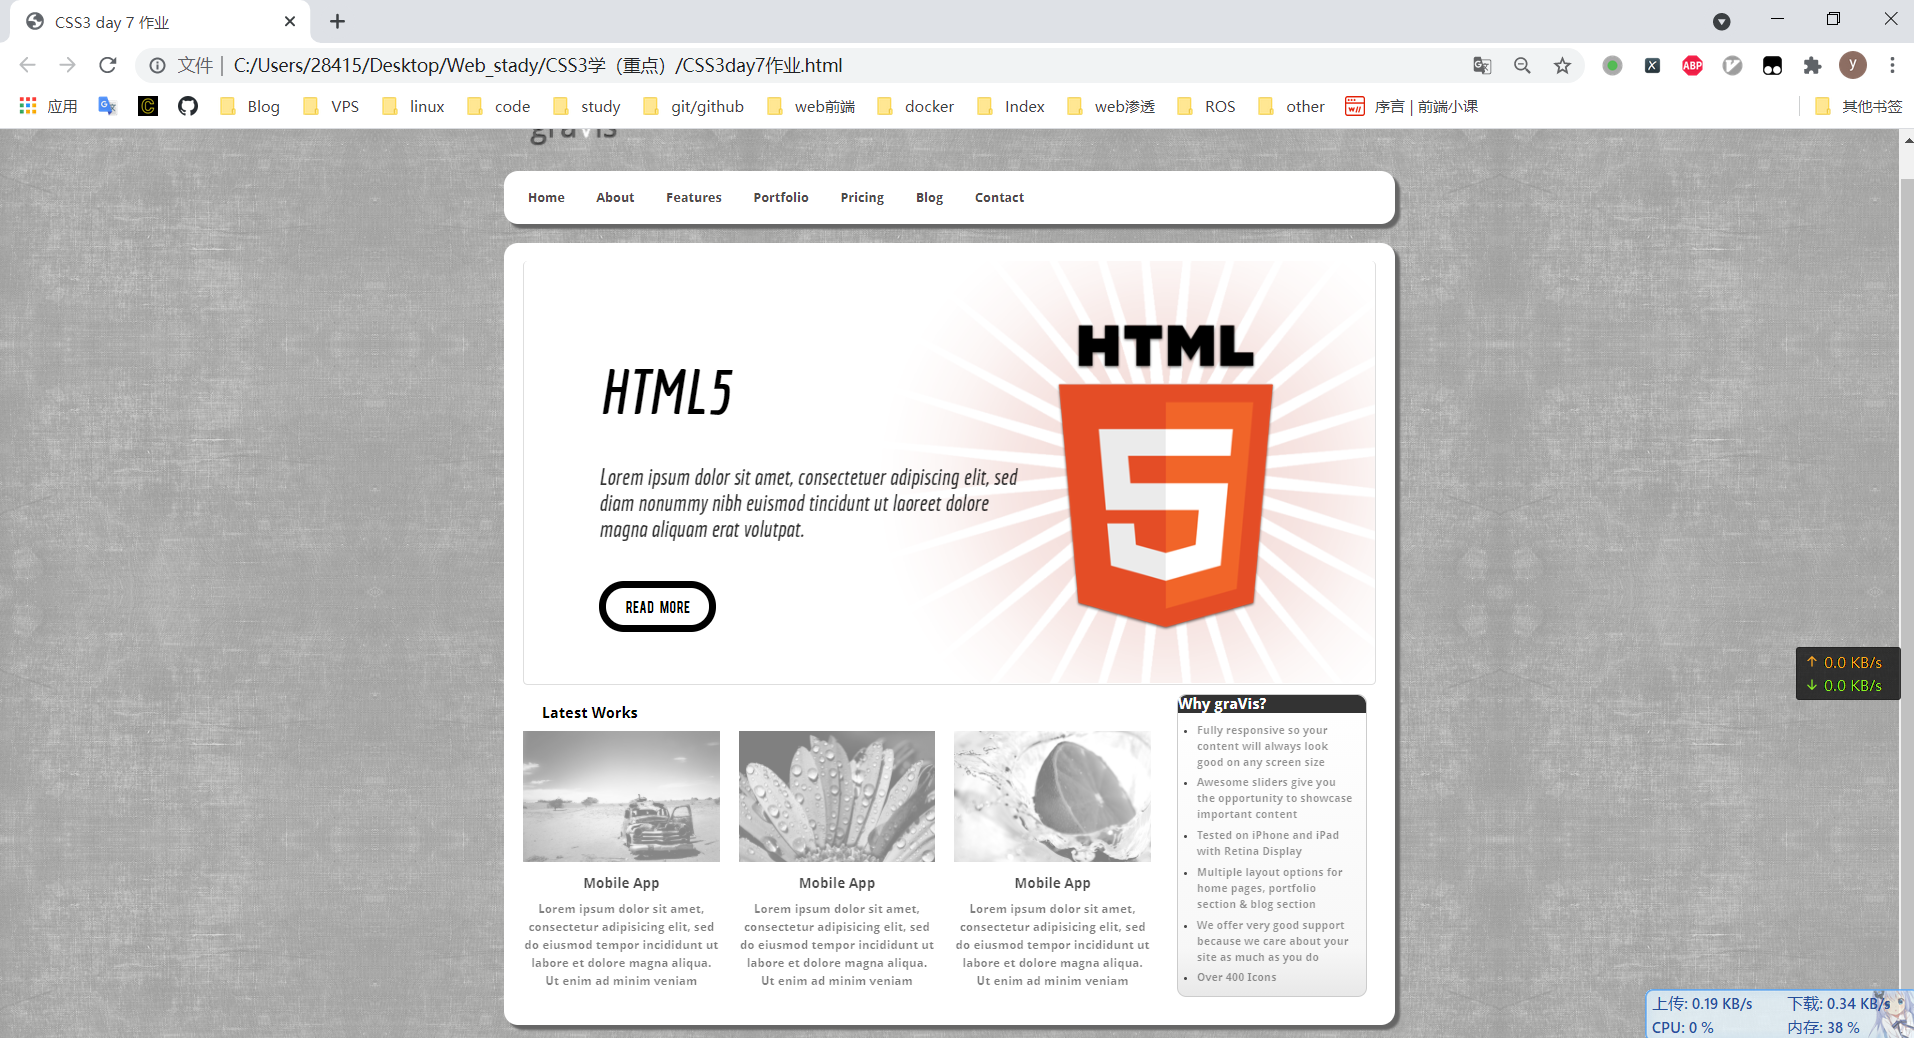
CSS3实例一
<!DOCTYPE html><html lang="en"><head><meta charset="UTF-8"><meta http-equiv="X-UA-Compatible" content="IE=edge"><meta name="viewport" content="width=device-width, initial-scale=1.0"><title>CSS3 day 7 作业</title><link rel="stylesheet" href="./CSS/day7作业.css"></head><body><div class="container"><!-- 页首 --><header><!-- logo --><img src="./课后实训素材/img/logo.png" alt="logo" width="105" height="46"><!-- 导航 --><nav><ul class="nav"><li><a href="#">Home</a></li><li><a href="#">About</a></li><li><a href="#">Features</a></li><li><a href="#">Portfolio</a></li><li><a href="#">Pricing</a></li><li><a href="#">Blog</a></li><li><a href="#">Contact</a></li></ul></nav></header><!-- 主题内容 --><div class="content"><!-- banner 部分 --><div class="banner"><h2>HTML5</h2><p>Lorem ipsum dolor sit amet, consectetuer adipiscing elit, sed diam nonummy nibh euismod tincidunt ut laoreet dolore magna aliquam erat volutpat.</p><a href="#">READ MORE</a></div><!-- 左侧内容--><div class="left-content"><h3>Latest Works</h3><!-- 左侧分类 --><div class="classic1"><img src="./课后实训素材/img/car.jpg" alt="car"><h4>Mobile App</h4><p>Lorem ipsum dolor sit amet, consectetur adipisicing elit, sed do eiusmod tempor incididunt ut labore et dolore magna aliqua. Ut enim ad minim veniam</p></div><div class="classic1 cl2"><img src="./课后实训素材/img/web_app1.jpg" alt="web"><h4>Mobile App</h4><p>Lorem ipsum dolor sit amet, consectetur adipisicing elit, sed do eiusmod tempor incididunt ut labore et dolore magna aliqua. Ut enim ad minim veniam</p></div><div class="classic1"><img src="./课后实训素材/img/mobile_app1.jpg" alt="mobile"><h4>Mobile App</h4><p>Lorem ipsum dolor sit amet, consectetur adipisicing elit, sed do eiusmod tempor incididunt ut labore et dolore magna aliqua. Ut enim ad minim veniam</p></div></div><!-- 右侧内容 --><div class="right-content"><h3>Why graVis?</h3><ul><li><a href="#">Fully responsive so your content will always look good on any screen size</a></li><li><a href="#">Awesome sliders give you the opportunity to showcase important content</a></li><li><a href="#">Tested on iPhone and iPad with Retina Display</a></li><li><a href="#">Multiple layout options for home pages, portfolio section & blog section</a></li><li><a href="#">We offer very good support because we care about your site as much as you do</a></li><li><a href="#">Over 400 Icons</a></li></ul></div></div></div></body></html>
* {margin: 0;padding: 0;}/* 引入外部字体 */@font-face {font-family: DroidSans;/* format() 设置字体类型 */src: url("../课后实训素材/font/DroidSans-Bold.ttf") format("truetype");}@font-face {font-family: Economica;/* format() 设置字体类型 */src: url("../课后实训素材/font/Economica-Bold-OTF.otf") format("OpenType");}@font-face {font-family: Economica-BoldItalic;/* format() 设置字体类型 */src: url("../课后实训素材/font/Economica-BoldItalic-OTF.otf") format("OpenType");}@font-face {font-family: BEBAS;/* format() 设置字体类型 */src: url("../课后实训素材/font/BEBAS___.ttf") format("truetype");}a {text-decoration: none;color: #000;}/* body */body {background: url("../课后实训素材/img/tbg.png") repeat;font: 14px DroidSans;}/* container */.container {width: 950px;/* 居中 */margin: 0 auto;}/* logo */header img {margin: 10px 0 20px 20px;}/* nav */nav {background-color: #fff;/* 边框圆角 */border-radius: 15px;/* 边框阴影 横向 纵向 阴影度 颜色*/box-shadow: 5px 5px 2px #666;}nav ul {/* 设置导航栏的文本内容宽度 */padding: 20px 0 20px 10px;}nav ul li {display: inline-block;padding: 0 15px;}nav ul li a {color: rgb(78, 73, 73);}nav ul li a:hover {/* 下划线 */text-decoration: underline;color: #000;}/* content 部分 */.content {/* 内容圆角 */border-radius: 15px;box-shadow: 5px 5px 2px #666;background-color: #fff;padding: 20px;margin: 20px 0;/* 清除下边浮动 */overflow: hidden;}/* .banner 部分 */.banner {height: 350px;border-left: 1px solid #ddd;border-right: 1px solid #ddd;border-bottom: 2px solid #ddd;border-radius: 5px;/* 内容区的宽高 */padding: 100px 0 0 80px;/* 添加背景图 : url背景图片, no-repeat不允许平铺 350px背景图从左到右的距离, top向顶端靠齐*/background: url("../课后实训素材/img/html5.png") no-repeat 350px top;}/* h2 */.banner h2 {font-family: Economica-BoldItalic;font-size: 66px;/* 向下靠40px */margin-bottom: 40px;}.banner p {font: 24px Economica-BoldItalic;/* 设置p的宽度 */width: 450px;/* 设置不透明度 */opacity: .8;/* 设置向下的距离 */margin-bottom: 60px;}.banner a {font: 14px BEBAS;border: 8px solid #000;color: #000;/* 圆角 */border-radius: 30px;/* 设置边距 */padding: 10px 20px;/* 字间距 */word-spacing: 5px;}.banner a:hover {color: #666666;}/* 左侧分类内容 */.left-content {width: 670px;float: left;/* 不清除浮动 */clear: none;}.left-content .classic1 {/* 210宽度让内容显示在一行 */width: 210px;/* 文字居中 */text-align: center;float: left;/* 不清除浮动 */clear: none;}.left-content .cl2 {/* 图片内容之间的距离 */margin: 0 20px;}.left-content h3 {/* 去掉宽度 */font-weight: normal;/* 设置h3的间距 */padding: 20px 0 10px 20px;}.left-content .classic1 h4 {font-weight: normal;font-size: 15px;/* 设置不透明度 */opacity: .7;/* h4拉开距离 */margin: 10px 0;}.left-content .classic1:hover h4 {opacity: 1;filter: alpha(opacity(100));}.left-content .classic1 img {width: 100%;opacity: .5;}.left-content .classic1:hover img {opacity: 1;filter: alpha(opacity(100));}.left-content .classic1 p {font-size: 13px;opacity: .5;line-height: 1.5em;}.left-content .classic1:hover p {opacity: 1;filter: alpha(opacity(100));}/* 右侧内容 */.right-content {border: 1px solid #ccc;float: right;width: 200px;background-color: #fff;/* 渐变 需要做 浏览器的兼容 */background: linear-gradient(top, #fff 0%, #f7f7f7 84%, #e8e8e8 100%);background: -webkit-linear-gradient(top, #fff 0%, #f7f7f7 84%, #e8e8e8 100%);/* 圆角效果 */border-radius: 10px;/* margin 给出距离 */margin: 10px;}.right-content h3 {font-family: DroidSans;font-weight: normal;color: #fff;background-color: #333;/* 设置H3的圆角 左上 右上 */border-radius: 10px 10px 0 0;}.right-content ul {/* 间距 */margin: 10px;}.right-content ul li {font: 12px DroidSans;opacity: .7;filter: alpha(opacity(70));line-height: 1.5em;margin: 5px 0 5px 10px;}.right-content ul li a {opacity: .6;filter: alpha(opacity(70));}.right-content ul li a:hover {opacity: 1;filter: alpha(opacity(100));}
效果
CSS3 盒子的变形
transform
需要按照浏览器进行兼容 transform
CSS3 新增的属性 : 位移 , 缩放, 旋转 , 扭曲
translate 【盒子横向纵向偏移】
- translate(x,y) : 定义2D转换,沿着X轴和Y轴 移动元素
- translateX(n) : 沿着X轴移动元素
- translateY(n) : 沿着Y轴移动元素
* {margin: 0;padding: 0;}box {width: 200px;height: 200px;/* translate 需要进行 浏览器的兼容*/transform: translate(200px, 100px);-webkit-transform: translate(200px, 100px);-moz-transform: translate(200px, 100px);-o-transform: translate(200px, 100px);-ms-transform: translate(200px, 100px);/* 沿着 X轴进行偏移 */-webkit-transform: translateX(100px);/* 这里单写一个属性值,表示X轴 */transform: translate(100px);/* 沿着Y轴进行偏移 */-webkit-transform: translateY(200px);transform: translate(0, 200px);}
盒子缩放 scale
scale(x,y): 缩放, X轴放大 多少倍数 ,Y轴方法多少倍数scaleX(n):X轴放大 多少倍数scaleY: Y轴方法多少倍数
同样的, 不同浏览器需要进行兼容
.box {width: 200px;height: 200px;background-color: #f00;/* scale 缩放 *//* X轴方法2倍, Y轴放大 0.5倍 */-webkit-transform: scale(2, .5);transform: scale(2, .5);/* X轴方法6倍 */-webkit-transform: scaleX(6);transform: scaleX(6);transform: scale(6, 1);/* Y轴方法6倍 */-webkit-transform: scaleY(6);transform: scaleY(6);transform: scale(1, 6);}
旋转 rotate
rotate(度数) : 旋转多少度
.box {width: 200px;height: 200px;background-color: #f00;margin: 200px auto;/* rotate 旋转 参数值是 读书 30deg*/-webkit-transform: rotate(30deg);transform: rotate(30deg);transform: rotate(-30deg);}
倾斜转换, 扭曲 skew
skew(X角度,Y角度) : 沿着 X Y 轴进行扭曲
skewX(angle) : 沿着 X 轴进行扭曲
skewY(angle) : 沿着 Y轴 进行扭曲
.box {width: 200px;height: 200px;background-color: #f00;margin: 200px auto;/* skew 扭曲 *//* X Y 轴进行扭曲 */-webkit-transform: skew(30deg, 45deg);transform: skew(30deg, 45deg);/* X 轴进行扭曲 */-webkit-transform: skewX(30deg);transform: skewX(30deg);/* 指代一个参数表示沿着X轴扭曲 */transform: skew(30deg);/* Y 轴的扭曲 */-webkit-transform: skewY(30deg);transform: skewY(30deg);transform: skew(0, 30deg);}
matrix 所有方法组合 (不建议使用)
matrix 方法将所有的 2D 转化方法组合在一起
matrix() 方法需要六个参数 , 需要包含数学函数,旋转, 缩放, 移动 ,倾斜 等元素
matrix(a,b,c,d,e,f) : 定义2D变形 。 使用的是六个值得矩阵 。 表示如下 :
(a c e
b d f
0 0 1 )
ab 列表示X轴 (缩放,如果没有缩放,值设为1 )
cd列表示 Y 轴(扭曲,如果没有扭曲,值设为0)
ef 表示 Z 轴 (位移,如果没有位移,值设为0)
如果要旋转 , 会影响到 abcd的值: 需要三角函数
a | b | c | d = cos30deg / sin30deg ;
如果要扭曲 skew(deg 1, deg 2 ,) 它会影响 bc的值 :
b = tan30deg 1 ;
c = tan30deg 2;
每次旋转和扭曲都会产生一个新的矩阵, 最终形成多个矩阵,要做乘法运算
如果对一个元素同时有旋转, 扭曲, 缩放,这里需要用到多个矩阵相乘,需要优先考虑旋转和缩放
最后矩阵相乘(线性代数)
.box {width: 200px;height: 150px;background-color: #f00;margin: 200px auto;/* 需求:x : 100pxy : -200px;旋转 : 30degx缩放: 1.5y缩放:2*//* 方法1 分着使用方法translate() 位移routate() 旋转scale() 缩放 */transform: translate(100px, 200px) rotate(30deg) scale(1.5, 2);/* 方法二 matrix() 参数需要进行多次运算, 而且 matrix() 函数不带 px */transform: matrix(1.299, 0.75, -1, 1.732, 100, 200);}
调整变形的基点
transform-origin
transform-origin : 是和transform一样,是一个属性,也具有属性值, 同级
设置视图基点的位置,之后盒子变形,的源点就是按照这个基点的位置开始
具有的属性值
- x-axis : 基点在X轴哪里,可能的值: left top , center , right , lenght , %
- y-axis : 基点在Y轴哪里,可能的值: left top , center , right , lenght , %
- z-axis : 基点在Z轴哪里,可能的值:lenght
设置视图位置基点
(默认在盒子的中心)
.content {width: 400px;height: 400px;border: 1px solid #000;}/* transform-origin 使用 */.box {width: 200px;height: 200px;background-color: #f00;/* 设置旋转 *//* transform: rotate(60deg); *//* 设置旋转的源点left top 左上 *//* transform-origin: left top; */transform: translate(150px, 50px);transform-origin: right top;}
CSS3 3D变形
记住: 使用时要加浏览器的兼容, 和 父子元素之间的定位 position
perspective 属性
perspective 属性定义 3D 元素距视图的距离 , px 。
当为元素定义 perspective 属性时,其子元素会获得透视效果 , 而不是元素本身。
perspective: number | none ;
.father {width: 500px;height: 400px;border: 1px solid #999;padding: 10px;margin: 200px auto;position: relative;/* perspective 需要浏览器的兼容 ,要加上厂商前缀*/perspective: 150px;-webkit-perspective: 100;}.son {padding: 50px;width: 50px;height: 40px;position: absolute;border: 1px solid #f00;background-color: #0ff;transform: rotateX(45deg);}
transform-style 3D 效果
在3D空间中呈现被嵌套的元素 , 必须与 transform属性一同使用
transform-style : flat | preserver-3d
- flat : 子元素将不保留其3D位置 (默认值)
- preserve-3d: 子元素将保留其3D 元素 , 一般用这个
.content {width: 500px;height: 400px;border: 1px solid #ccc;margin: 200px auto;}.div1,.div2 {width: 200px;height: 100px;}.div1 {background-color: #0ff;-webkit-transform: rotateY(60deg);transform: rotateY(60deg);/* transform-style 必须要和 transform 属性一同使用 , 而且还需要浏览器的兼容 */-webkit-transform-style: preserve-3d;transform-style: preserve-3d;/* transform-style: flat; */}.div2 {background-color: #3412ff;-webkit-transform: rotateY(80deg);transform-style: preserve-3d;}
rotate-Z 3D 空间里的Z 轴
.box {width: 400px;height: 500px;margin: 200px auto;border: 1px solid #000;/* 沿着 Z 轴 旋转 */transform: rotateZ(30deg);/* 沿着 Y 轴旋转 */transform: rotateY(30deg);/* 沿着 X 轴 旋转*/transform: rotateX(30deg);}
立方体
/* 上下左右前后 都要进行 旋转 和 位移 */
CSS3 过度动画 【transition】
过度动画(重要)
用法 :
复合用法 : transition: property duration timing-function delay
常规用法 :
transition-property 和 transistion-duration 必不可少
- transition-property : 要带的属性
- -name 属性名
- -list 多个属性名
- -all 所有属性
- transistion-duration: 动画持续时间
- 一般以秒 和 毫秒 为单位
- transition-timing-function : 动画的函数
- linear : 匀速
- ease : 变速 慢 -> 快 -> 慢
- ease-in : 变速 , 慢 -> 快
- ease-out : 变速 , 快 -> 慢
- ease-in-out : 变速 慢 -> 慢
- cubic-bezier (n,n,n,n) : 自行设定变速, n的值在 0-1 之间
- transition-delay : 动画延时时间
- 一般以秒 和 毫秒 为单位
.box {width: 800px;height: 800px;position: relative;border: 1px solid #000;}.demo {width: 100px;height: 100px;background-color: #f00;position: absolute;left: 100px;top: 100px;/* 在 demo 上做动画 *//* transition 过度动画 all 表示全部属性*//* 加上旋转 初始为 0*/-webkit-transform: rotate(30deg);transform: rotate(30deg);/* 过度属性值 ease 慢快慢 , 0.5s 延迟 *//* -webkit-transition: all 2s ease 2s;transition: all 2s ease 2s; *//* 当多个 属性值,自定义 带多个参数 */-webkit-transition: left 2s ease 2s, width 3s ease-in-out;transition: left 2s ease 2s, width 3s ease-in-out;}/* 动画 */.box:hover .demo {/* 当鼠标移到 box时,demo 在运动 */width: 300px;left: 500px;/* 接触后旋转 */transition: left 2s ease 2s, width 3s ease-in-out;-webkit-transform: rotate(0deg);transform: rotate(0deg);}
animation 关键帧动画 (重要)
表示动画 , 有一个点到另一个点的过程,其中,要设置动画弯曲等,需要关键帧,分为多个帧,然后在这个关键帧上做操作。
具体步骤 :
- 设置关键帧,
- 只有两个关键帧
@keyframes 动画名 {0%:{样式表}100%:{样式表}}或:@keyframes 动画名 {from:{样式表}to:{样式表}}
- 只有两个关键帧
- 多个关键帧
@keyframes 动画名 {0%:{样式表}25%:{样式表}60%:{样式表}...100%:{样式表}}/* 注意:这里的百分比一般是升序值,可以是0%-100%之间的做任意值,也可以是倒序。*/
- 实施动画 ```css a)常规用法 animation-name:来自于@keyframes定义的动画名
animation-duration:动画持续时间,一般以秒(s)或毫秒(ms)为单位(默认为0)
animation-timing-function:动画函数 i)linear:匀速(默认值) ii)ease:变速(先慢后快,最后再慢) iii)ease-in:变速(由慢到快) iv)ease-out:变速(由快到慢) v)ease-in-out:变速(慢速开始,慢速结束) vi)cubic-bezier(n,n,n,n):自行设定变速,n的值在0-1之间
animation-delay:动画延时时间,一般以秒(s)或毫秒(ms)为单位
animation-iteration-count:动画循环播放的次数 1)number:按设定次数循环播放(默认次数为1次) 2)infinite:一直循环播放
animation-direction:动画播放完后是否反向播放 1)normal:不反向(默认值) 2)alternate:反向
animation-play-state:动画播放或停止播放 1)paused:停止播放 2)running:播放(默认值)
b)简洁用法 (6个参数) animation:name duration timing-function delay iteration-count direction;
关键帧动画```css.content {width: 100px;height: 800px;position: relative;}.box {width: 100px;height: 100px;border-radius: 50%;background-color: #f00;/* 定位 */position: absolute;/* 设置帧动画 */animation: move 5s linear 1s 1 normal;}/* 设置关键帧 *//* 两个关键帧 *//* @keyframes move {*//* !*0% {*!*//* !* left: 0px;*!*//* !*}*!*//* !*100% {*!*//* !* left: 500px;*!*//* !*}*!*//* from {*//* left: 0px;*//* }*//* to {*//* left: 400px;*//* }*//* }*//* 多个关键帧*/@keyframes move {0% {left: 0px;top:0px;/*background-color: #cba6a6;*/}45% {left: 120px;top: 30px;background-color: #3850C660;}75% {right: 200px;bottom: 30px;background-color: #52c4aa;}100% {background-color: #f0f;bottom: 50px;}}
CSS3 布局
- 多列表布局 (分栏布局)
- box 布局 (盒子布局)
- flex 布局 (弹性盒子)
- 响应式布局
- Web字体
多列布局 (分栏)重点
不支持IE浏览器
- column-count : 规定元素应该被分隔的列数 (栏数)
- column-count : number | auto;
- column-gap : 设置栏间距
- cloumn-gap : length | auto;
- column-rule-* : 设置分栏间的分隔线
- column-rule-style : 设置分割线型
属性值:- none : 没有分割线
- hidden 隐藏线
- dotted 点线
- dashed 虚线
- solid 实现
- double 双线
- …..
- column-rule-width : 设置线宽
- column-rule-color: 设置分隔线颜色
- column-rule-style : 设置分割线型
复合写法 :
column-rule: width style color;
- column-width : 设置栏宽
- cloumn-width : length | auto ;
分类的简洁写法:
- columns: width count;
p {/* 设置分栏个数 需要兼容写法 */-webkit-column-count: 3;-moz-column-count: 3;column-count: 3;/* 设置分栏的间隔线 */-webkit-column-rule-style: dashed;-moz-column-rule-style: dashed;column-rule-style: dashed;/* 设置 分栏线的宽度和颜色*/-webkit-column-rule-width: 20px;-moz-column-rule-width: 20px;column-rule-width: 20px;-webkit-column-rule-color: #52c4aa;-moz-column-rule-color: #52c4aa;column-rule-color: #52c4aa;/* 复合写法 : column-rule: width style color*/column-rule: 30px dashed #000000;/* 设置分栏的间距 */-webkit-column-gap: 100px;-moz-column-gap: 100px;column-gap: 100px;/* 设置栏宽 */-webkit-column-width: 20px;-moz-column-width: 20px;column-width: 20px;/* columns: 栏宽 分栏的栏数*/columns: auto 2;}
CSS3 flex 布局(弹性布局)重点
弹性布局: 当页面需要适应不同的屏幕大小以及设备类型时,确保元素拥有恰当的行为 的布局方式。
弹性布局的目的: 引入弹性布局模型的目的是提供一种更加有效的方式来对一个容器中的子元素进行排列、对齐和分配空白空间
需要兼容写法 display: -webkit-flex
弹性布局的定义方式
需要设置 display: flex , 必须要设置它的在父级元素上,子元素才拥有弹性布局
<ul class="flex"><li>内容栏1</li><li>内容栏2</li><li>内容栏3</li><li>内容栏4</li><li>内容栏5</li></ul>
* {margin: 0;padding: 0;}.flex {width: 100%;height: 100px;/* 弹性布局 需要做浏览器的兼容*/display: -webkit-flex;display: -ms-flexbox;display: -moz-flex;display: -o-flex;display: flex;}ul li {list-style-type: none;/* 这里条宽度,弹性布局自适应*/width: 30%;/*height: 300px;*/padding: 50px;text-align: center;/*height: 100px;*/background-color: #00ffff;}
常用属性
flex-driection
flex-driection 用来指定子元素在父元素中的位置 应用于父元素
flex-driection: row | row-reverse | column | column-reverse
- row : 左对齐 (默认)
- row-reverse : 右对齐,反转
- column : 纵向排列
- column-reverse : 反转,纵向排列
.flex {width: 100%;height: 100px;/* 弹性布局 需要做浏览器的兼容*/display: -webkit-flex;display: -ms-flexbox;display: -moz-flex;display: -o-flex;display: flex;/* 左对齐 (默认 )*/flex-direction: row;/* 反向 左对齐 */flex-direction: row-reverse;/* 纵向排序 */flex-direction: column;/* 纵向反转 */flex-direction: column-reverse;}
justify-content
justify-content : 把弹性项沿着盒子的主轴线对齐 ( 重要) 应用于父元素
一般用在li标签,存放多个内容时,设置父级元素和li标签的宽度,使用上space-around 和 space-between 等属性,让li标签内容自动排列
属性值:
- flex-start : 紧凑方式左对齐
- flex-end : 紧凑方式右对齐
- center : 紧凑方式居中对齐
- space-between : 除了第1 个和最后一个元素以外,其他的子元素等分空白区域 (重要)
- space-around: 所有子元素等分空白区域 (重要)
* {margin: 0;padding: 0;}.demo {width: 100%;font-size: 20px;/* 弹性布局 */display: flex;/* justify-content: 主轴线对齐*//* flex-start 紧凑方式左对齐 *//* justify-content: flex-start;*//* flex-end : 紧凑方式右对齐 *//* justify-content: flex-end;*//* center : 居中对齐*//* justify-content: center;*//* space-between : 除了第1 个和最后一个元素以外,其他的子元素等分空白区域 (重要)*//*justify-content: space-between;*//* 所有子元素等分空白区域 (重要) */justify-content: space-around;}ul li {list-style-type: none;text-align: center;}
align-items
align-items : 子元素在侧轴(纵轴)方向上的对齐方式 ,应用于 父元素
写在父级元素上
参数:
- flex-start : 沿着纵轴顶端对齐
- flex-end : 沿着纵轴底端对齐
- center : 纵轴居中对齐
- baseline : 沿着纵轴基线对齐
- stretch : 纵向拉伸对齐
* {margin: 0;padding: 0;}.box {width: 100%;height: 800px;border: 1px solid #0000ff;/* 定义弹性布局*/display: flex;/* **align-items** : 子元素在侧轴(纵轴)方向上的对齐方式 ,此属性作用于父容器 *//* - flex-start : 沿着纵轴顶端对齐- flex-end : 沿着纵轴底端对齐- center : 纵轴居中对齐- baseline : 沿着纵轴基线对齐- stretch : 纵向拉伸对齐 , 子元素不用给高度*//*align-items: flex-start; !* 默认*!*//* flex-end : 沿着纵轴底端对齐 *//*align-items: flex-end;*//* 纵轴居中对齐 *//*align-items: center;*//* baseline : 沿着纵轴基线对齐, 基线就是文字顶端的线 *//*align-items: baseline;*//* 纵向拉伸对齐 , 子元素不用给高度* */align-items: stretch;}.box div {width: 300px;color: #ffffff;text-align: center;}.box1 {/*height: 200px;*/background-color: #ff0000;}.box2 {/*height: 500px;*/background-color: #ff0;}.box3 {/*height: 400px;*/background-color: #0f0fff;}
flex-grow
flex-grow: 用来定义子元素放大的比例 , 默认为 0 , 如果存在剩余空间, 也不放大 , 该属性用于子元素
语法: flex-grow : number
* {margin: 0;padding: 0;}.box {width: 100%;height: 800px;border: 1px solid #0000ff;/* 定义弹性布局*/display: flex;}.box div {width: 300px;color: #ffffff;text-align: center;}.box1 {height: 200px;background-color: #ff0000;/* flex-grow : 用来定义子元素放大的比例 写数字,生成按照比例 */flex-grow: 1;}.box2 {height: 500px;background-color: #ff0;/* flex-grow : 用来定义子元素放大的比例 写数字,生成按照比例 */flex-grow: 3;}.box3 {height: 400px;background-color: #0f0fff;/* flex-grow : 用来定义子元素放大的比例 写数字,生成按照比例 */flex-grow: 2;}
flex
flex 指定弹性子元素如何分配空间 应用于子元素
语法:
flex: auto| initial | none | inherit | [flex-grow] | [flex-shrink] | [flex-basis]
- auto : 等价于 1 1 auto
- initial :
flex可以带1-3个参数
- 一个参数 :
- 无单位 : 会被当作 flex-grow
- 带单位: 会被当做 flex-basis(基本宽度)的值
- auto(自动宽度)| initial (初始宽度)| none (无)
flex: auto; auto比例 , 1 比例
- 两个参数
- 第一个参数必须是一个无单位的数值 , 会被当做flex-grow(比例)
- 第二个参数
- 无单位: 数值会被当做 flex-shrink(收缩比例) 的值
- 带单位: 数值会被当做 flex-basis (基本宽度) 的值
flex: 1 500px : 1 比例 , 500px 的基本宽度(收缩时候保留500px的值)
- 三个参数
- 分别对应 [flex-grow] | [flex-shrink] | [flex-basis] 值
- flex: 比例 收缩比例 基本宽度(第三个参数必须具有数值)
flex: 2 2 300px;
CSS3 响应式布局
Responsive Design , 在实现不同屏幕分辨率的终端上浏览网页的不同展示方式。通过响应式设计能使网站在手机和 平板上有更好的浏览体验。
响应式布局: 就是一个网站能够兼容多个终端
响应式布局和 自适应布局的区别(面试问题)
- 响应式布局只需要开发一套代码,通过检测视口的分辨率, 针对不同客户端在客户端代码进行处理, 来展示不同的布局和内容
- 自适应需要开发多套界面,也是通过检测视口的分辨率,来判断当前访问的设备使PC、手机、平板等, 从而请求服务层,返回不同的页面内容
- 响应式布局等同于流动网格布局, 而自适应等同于使用固定分割点来进行布局
- 自适应布局给出了更多的设计空间 , 只用考虑几种不同的状态就可以了 ; 而响应式布局要考虑上百种不同的状态 , 虽然有些状态差异小,也要考虑到
响应式布局开发实现方法
- 媒体查询
- 百分比布局
- rem布局 ( 相对于 HTML 中的字号布局)
- 视口单位布局 (vm/vh)
响应式布局设计的步骤
- 设置meta标签
- 通过媒体查询来设置样式
- 设置多种视图的宽度
- 宽度百分比 rem / vm vh 等
- 处理图片缩放
- 其他属性处理,如 pre / iframe / video 等都要缩放大小 , table ,建议不要使用 padding ,使用center 居中操作
<!DOCTYPE html><html lang="en"><head><meta charset="UTF-8"><!-- 响应式布局 1. 设置 mate 标签--><!-- 设置视口viewport: 视口width=device-width : 宽度initial-scale=1.0 : 初始时,不缩放maximum-scale=1.0 : 最大缩放user-scalable=no : 用户是否能改变视口大小--><meta name="viewport" content="width=device-width, initial-scale=1.0, maximum-scale=1.0,user-scalable=no"><title>CSS3响应式布局 </title><style>.container {width: 100%;overflow: hidden;}.container div {/* 让元素浮动起来*/float: left;height: 300px;}.box1 {width: 20%;background-color: #ff0000;}.box2 {width: 50%;background-color: #ffff00;}.box3 {width: 30%;background-color: #13c7b2;}</style></head><body><div class="container"><div class="box1"></div><div class="box2"></div><div class="box3"></div></div></body></html>
媒体查询
媒体查询通过不同的媒体类型和条件定义样式表规则
设置meta
<meta name="viewport" content="width=device-width, initial-scale=1.0, minimum-scale=1.0, maximum-scale=1.0, user-scalable=no"><!-- 设置视口viewport: 视口 (移动端 )width=device-width : 宽度等于当前设备的宽度initial-scale=1.0 : 初始缩放比例值 (默认为1.0)maximum-scale=1.0 : 允许用户缩放到最大比例(默认为1.0)user-scalable=no : 用户是否能可以手动缩放视口大小 (默认为no)-->
设置IE渲染方式默认为最高版本
<meta http-equiv="X-UA-Compatible" content="IE=edge, chrome=1">
说明: 以上代码表示如果浏览器有chrome插件,将以chrome提供的V8引擎渲染页面;如果没有,将以IE最高版本渲染页面
引入兼容的JS文件
<!-- [if lt IE 9]> 条件Hack<script src="https://oss.maxcdn.cm/libs/html5shiv/3.7.0/html5shiv.js"></script><script src="https://oss.maxcdn.cm/libs/respond.js/1.3.0/respond.min.js"></script><![endif] -->
说明:
因为IE8及IE8以下版本既不支持html5,也不支持CSS3 Media,所以我们需要加载JS文件来处理这个兼容。
上面的代码是一个注释语句,也就是说,IE9及以上的版本不会编译这几行代码。
进入CSS3提供的媒体查询
根据屏宽使用不同的CSS文件
- 根据外部CSS文件使用
<link rel="stylesheet" href="css/screen480.css" media="screen and (max-width:480px)" >如果屏宽为480px及以下,将加载screen480.css文件。<link rel="stylesheet" href="css/screen800.css" media="screen and (min-width:480px) and (max-width:800px)" >如果屏宽为480px以上且在800px以下,将加载screen800.css文件。<link rel="stylesheet" href="css/screengt800.css" media="screen and (min-width:800px)" > 如果屏宽为800px以上,将加载screengt800.css文件。
当屏幕显示到小于480px 宽度,.meun { display: none} 把 .meun 元素隐藏
在style标签中用@media定义
如:@media screen and (max-width: 480px){.menu{display: none;}
例子
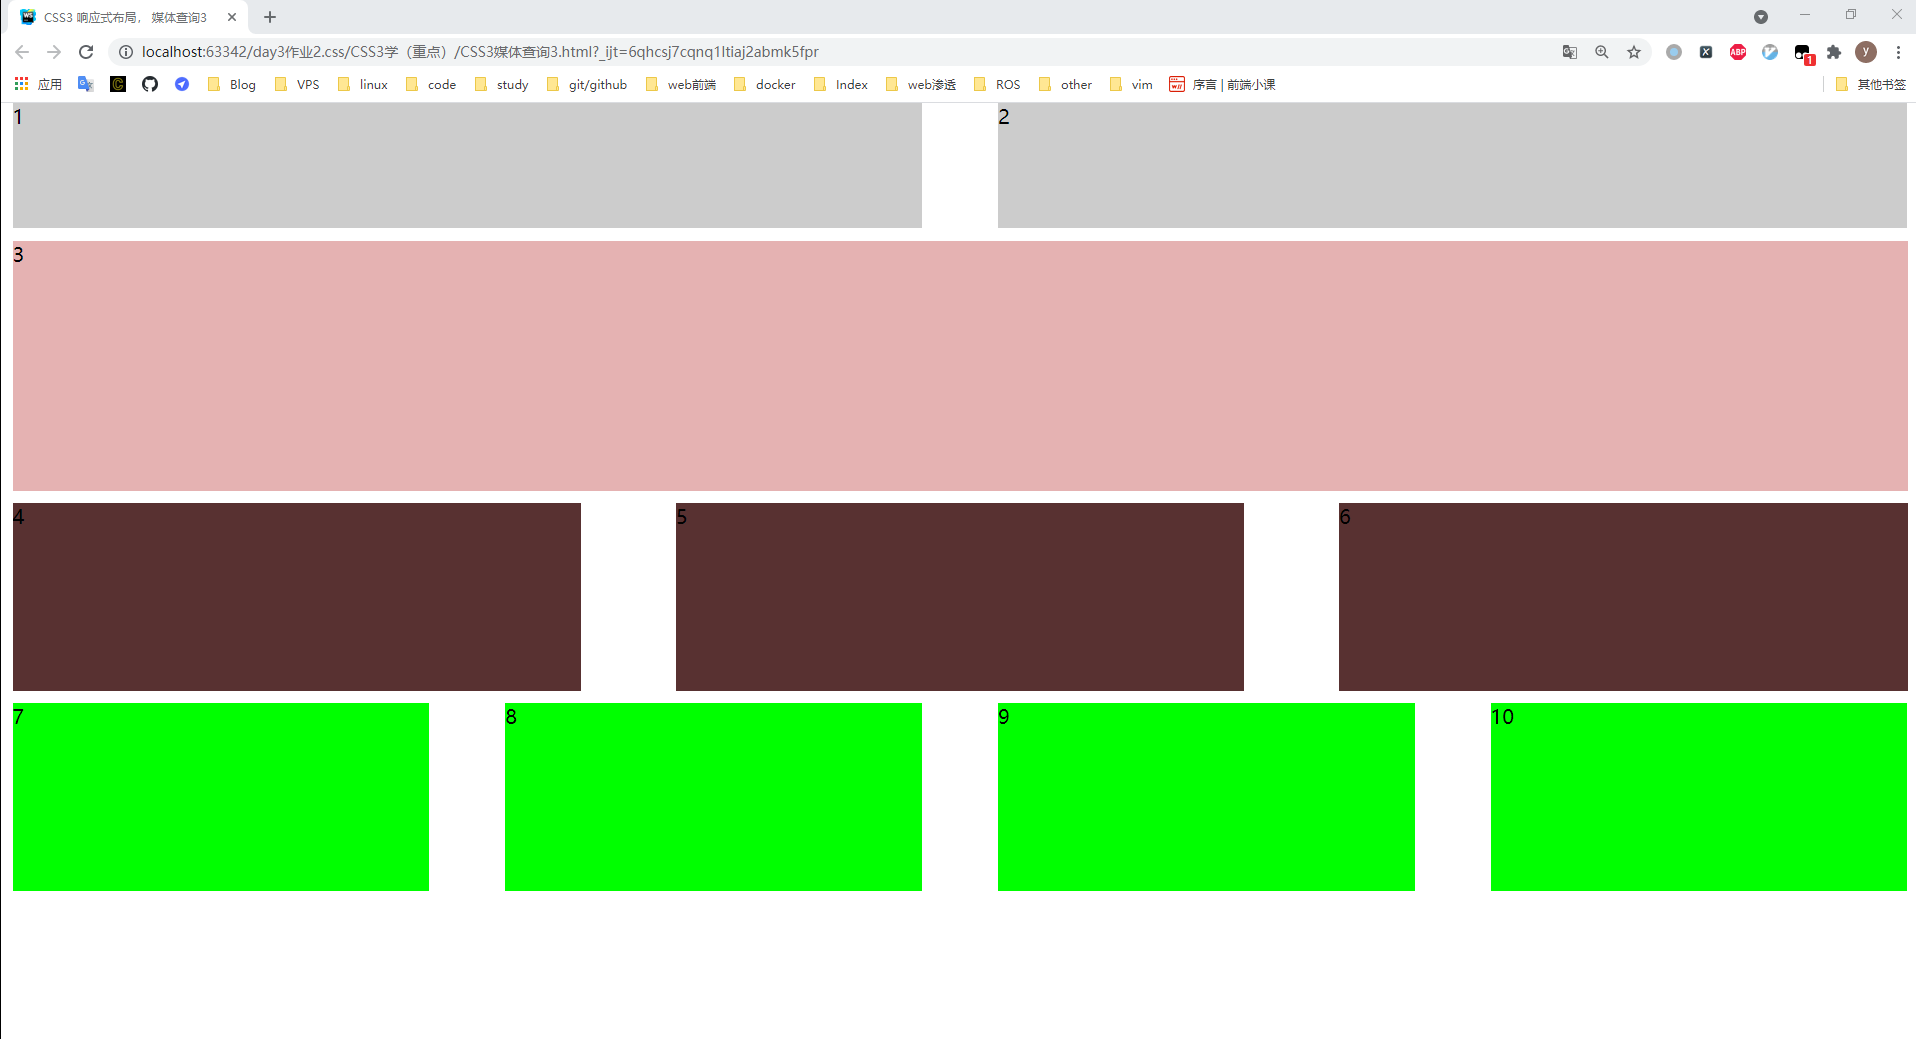
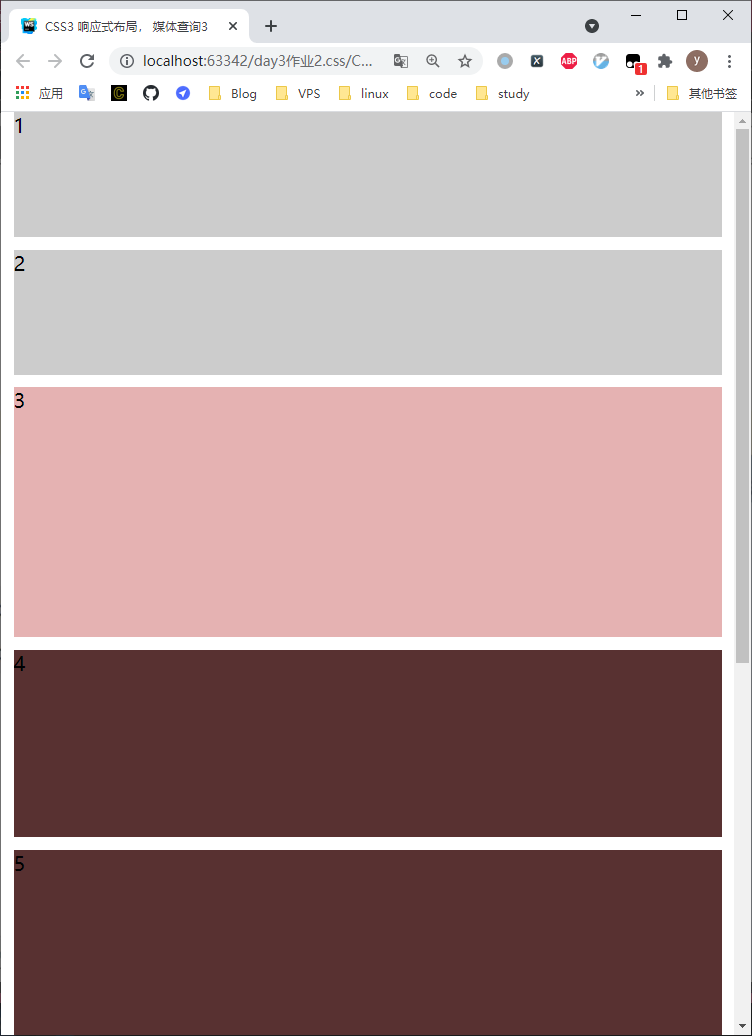
* {margin: 0;padding: 0;}:root {/* 上下为 0 左右为10*/padding: 0 10px;}/* 网格布局*/section {/* 清除浮动*/overflow: hidden;}/* 给每个元素浮动*/section div {float: left;}.row1 div {width: 48%;height: 100px;background-color: #ccc;}.row1 div:first-child {/* 1, 盒子的margin-right为 4%*/margin-right: 4%;}.row2 {width: 100%;height: 200px;background-color: #e5b2b2;margin-top: 10px;}.row3 div ,.row4 div{/* 每一个盒子的宽度*/width: 30%;height: 150px;background-color: #583131;margin-left: 5%;}.row3 div:first-child {margin-left: 0;}.row3 ,.row4 {margin-top: 10px;}.row4 div {width: 22%;height: 150px;background-color: #00ff00;margin-left: 4%;}.row4 div:first-child {margin-left: 0;}.row4 div:last-child {margin-right: 0;}/* 以上布置网格*//* 下面设置屏幕变小时, 网格的变形 */@media (max-width: 600px) {.row1 div , .row3 div {width: 100%;}.row1 div:first-child{margin-bottom: 10px;}.row3 div {margin-bottom: 10px;}.row3 div+div {/* 5, 6, 往左的距离为 0 */margin-left: 0;}.row4 {margin-top: 0;}.row4 div {/* 两个盒子显示在一行*/width: 48%;margin-bottom: 10px;}.row4 div:nth-child(3){/* 设置第三个左偏移的距离为0 */margin-left: 0;}}
<section class="row1"><div>1</div><div>2</div></section><section class="row2"><div>3</div></section><section class="row3"><div>4</div><div>5</div><div>6</div></section><section class="row4"><div>7</div><div>8</div><div>9</div><div>10</div></section>
Web 字体
开发者引入外部字体。
语法
@font-face {font-family: 字体名;src: url("./字体文件路径") format("字体文件格式以处理浏览器兼容")}
可以同时引入多个字体文件, 字体一样,文件的扩展名不一样, 目的是为了处理浏览器的兼容
url(“”) : 也可以是网上开源的字体
@font-face {font-family: bebas;src: url(./课后实训素材/font/BEBAS___.ttf) format("truetype");}@font-face {font-family: dro;src: url(./课后实训素材/font/DroidSans.ttf) format("truetype");}p {font-family: "dro";}
iconfont 图标字体
由阿里提供的 iconfont 字体 iconfont.cn
- 进入官网登录
- 新建项目,添加图标
- 下载图标文件,解压后复制到项目中
- 在代码中使用下载好的 iconfont.css 文件
- 使用图标方法
- 方法一
<!-- 使用方法1, class="iconfont 图标类名" --><!-- 到 iconfont 官网去 复制 class的类名 --><p><i class="iconfont icon-ai36"></i></p>
- 方法一
- 方法二
<!-- 使用方法二 , 使用 iconfont 的类名, 再使用 Unicode 表示符, 到 iconfont官网去复制 Unicode 表示符--><p> <i class="iconfont icon-Homehomepagemenu "> </i> test </p>
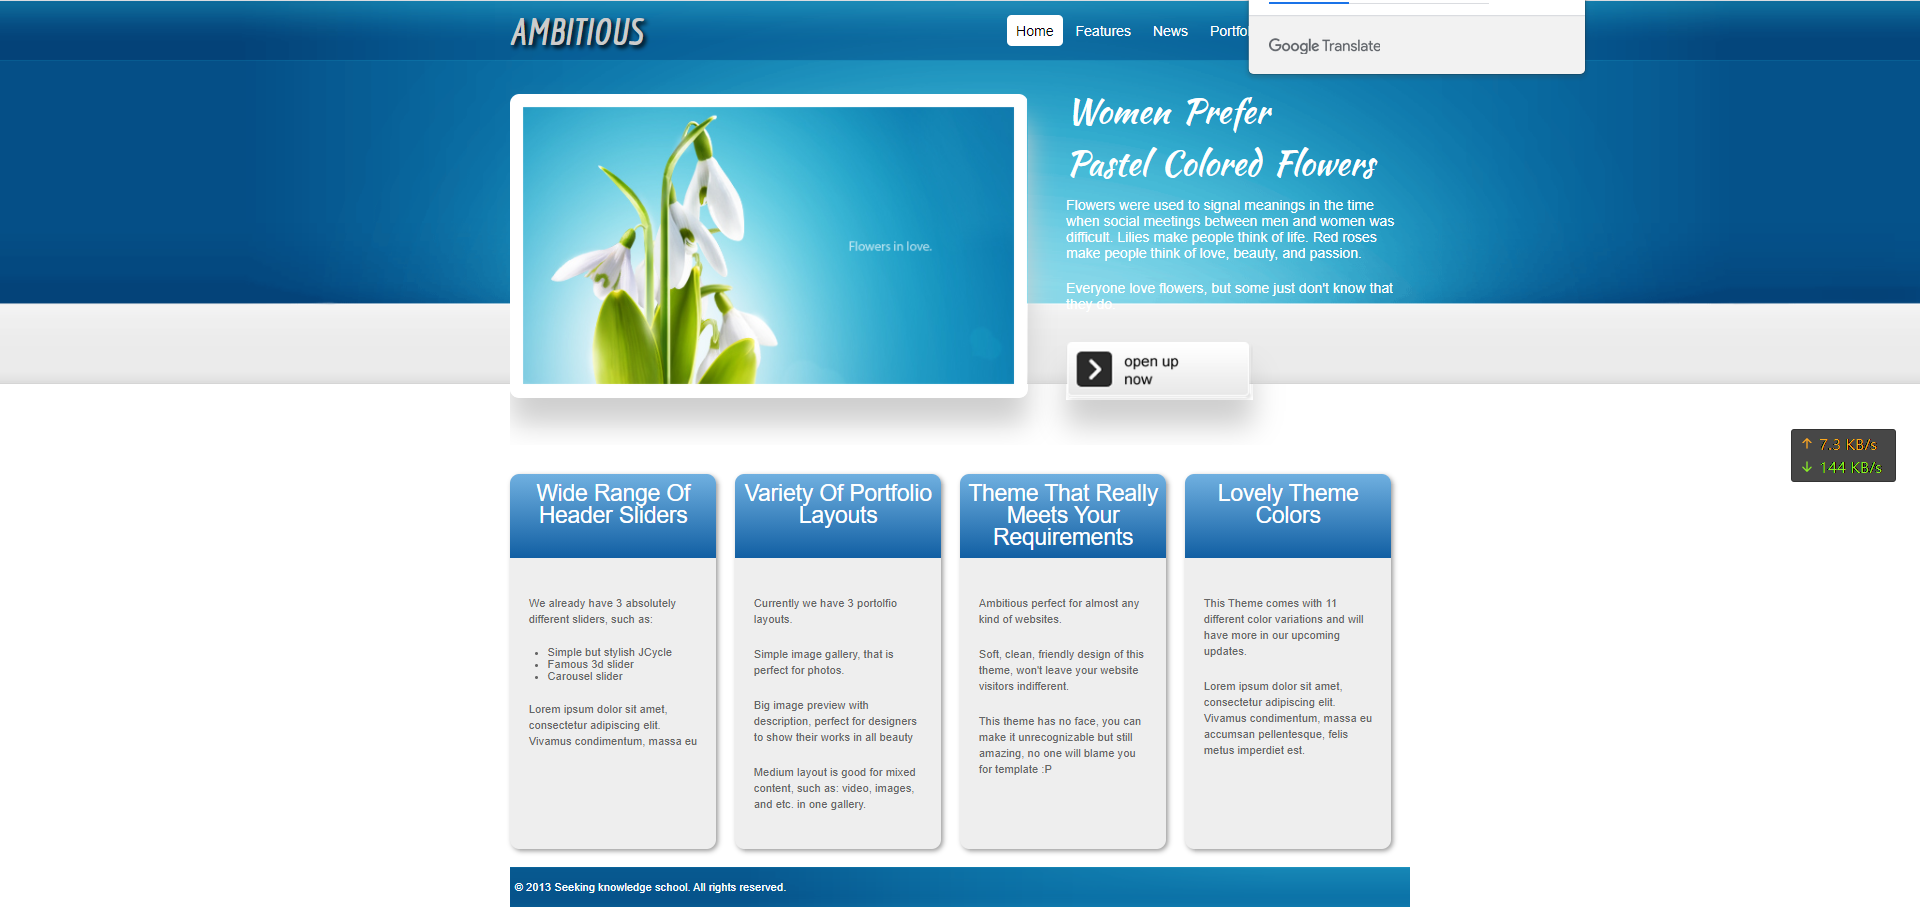
CSS3实例二
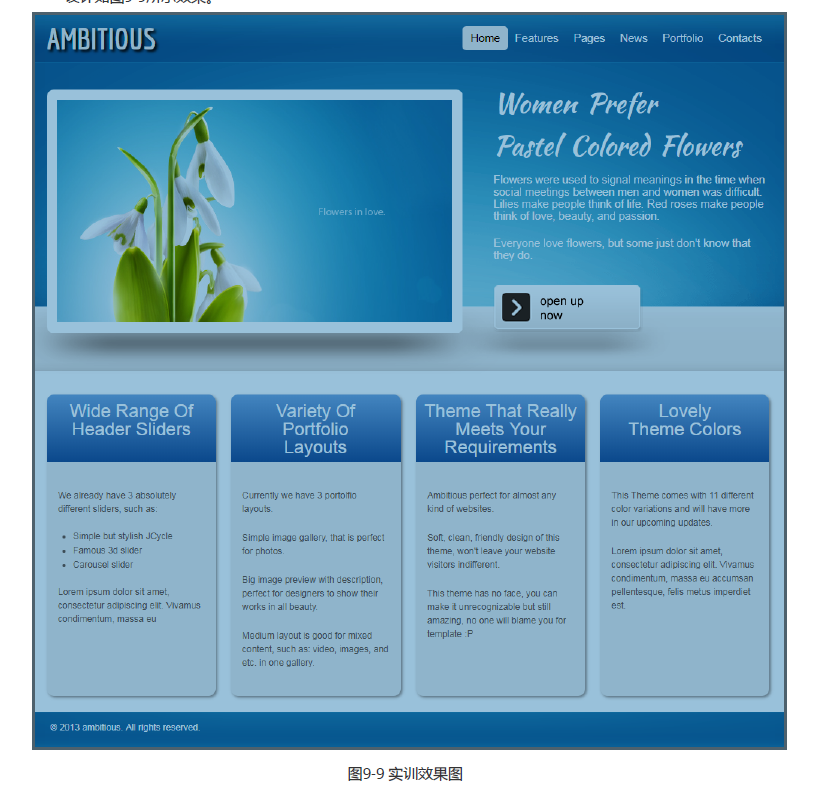
<!DOCTYPE html><html lang="en"><head><meta charset="UTF-8"><title>Day 9 作业 </title><link rel="stylesheet" href="./CSS/Day9作业.css"></head><body><!-- 网页整体的类 --><div class="container"><!-- 页首 --><header class="header"><!-- logo --><h1>AMBITIOUS</h1><nav class="nav"><!-- <div class="logo"> --><!-- </div> --><!-- 导航栏 --><ul><li><a href="#" class="active">Home</a></li><li><a href="#">Features</a></li><li><a href="#">News</a></li><li><a href="#">Portfolio</a></li><li><a href="#">Contacts</a></li><li><a href="#">Pages</a></li></ul></nav></header><!-- 内容区 --><div class="content"><!-- 上方内容 --><div class="banner"><!-- 左侧内容,img图片 --><img src="./day9课后实训素材/img/ambitios_pic1.png" alt="banner" class="leftimg"><!-- 右侧内容,详情描述 --><h2>Women Prefer</h2><h2>Pastel Colored Flowers</h2><p>Flowers were used to signal meanings in the time when social meetings between men and women was difficult. Lilies make people think of life. Red roses make people think of love, beauty, and passion.</p><p>Everyone love flowers, but some just don't know that they do.</p><a href="#"><img src="./day9课后实训素材/img/ambitios_footer_button.png" alt="footer" with="200" height="62" class="bottom"></a></div><!-- 下方内容 --><div class="content-bottom"><div class="box1"><h2>Wide Range Of Header Sliders</h2><div class="box"><p>We already have 3 absolutely different sliders, such as:</p><ul><li>Simple but stylish JCycle</li><li>Famous 3d slider</li><li>Carousel slider</li></ul><p>Lorem ipsum dolor sit amet, consectetur adipiscing elit. Vivamus condimentum, massa eu</p></div></div><div class="box2"><h2>Variety Of Portfolio Layouts</h2><div class="box"><p>Currently we have 3 portolfio layouts.</p><p>Simple image gallery, that is perfect for photos.</p><p>Big image preview with description, perfect for designers to show their works in all beauty</p><p>Medium layout is good for mixed content, such as: video, images, and etc. in one gallery.</p></div></div><div class="box3"><h2>Theme That Really Meets Your Requirements</h2><div class="box"><p>Ambitious perfect for almost any kind of websites.</p><p>Soft, clean, friendly design of this theme, won't leave your website visitors indifferent.</p><p>This theme has no face, you can make it unrecognizable but still amazing, no one will blame you for template :P</p></div></div><div class="box4"><h2>Lovely Theme Colors</h2><div class="box"><p>This Theme comes with 11 different color variations and will have more in our upcoming updates.</p><p>Lorem ipsum dolor sit amet, consectetur adipiscing elit. Vivamus condimentum, massa eu accumsan pellentesque, felis metus imperdiet est.</p></div></div></div></div><!-- 页尾区 --><footer><!-- 一张背景,一个文案 --><p>© 2013 Seeking knowledge school. All rights reserved.</p></footer></div></body></html>
* {padding: 0;margin: 0;}/* 引入外部字体 */@font-face {font-family: economica;src: url(../day9课后实训素材/font/Economica-BoldItalic-OTF.otf) format("OpenType");}@font-face {font-family: kaushan;src: url(../day9课后实训素材/font/KaushanScript-Regular.otf) format("OpenType")}/* 网页整体 */body {background-color: #fff;font-size: 12px;font-family: Arial;background-image: url(../day9课后实训素材/img/ambitios_header_bg.gif), url(../day9课后实训素材/img/ambitios_first_row_bg.gif), url(../day9课后实训素材/img/ambitios_footer_bg.gif);background-repeat: no-repeat, no-repeat, no-repeat;/* 每一张图片的位置 */background-position: content top, content 74%, content bottom;}.container {/* 总体 */width: 960px;margin: 0 auto;}/* 页首 */.header {/* 高度 64px */height: 64px;/* 清除浮动 */overflow: hidden;}.header h1 {/* 取消加粗 */font-weight: normal;font-size: 40px;/* 使用字体 */font-family: economica;color: #ccc;text-shadow: 3px 3px 5px #000;/* 文字到top的距离 */padding-top: 8px;/* 因为H1和后面的导航栏在一行,所以需要浮动 */float: left;}/* nav 部分 */.nav {/* 这里左右浮动 */float: right;}.nav ul {list-style-type: none;/* 行高 */padding-top: 15px;}.nav ul li {display: inline-block;font-size: 15px;/* 首字母大写 */text-transform: capitalize;}.nav ul li a {/* 去掉下划线 */text-decoration: none;color: #fff;display: block;/* float: right; *//* a 标签的盒子 */padding: 8px 10px;}.nav ul li .active {color: #000;background-color: #fff;border-radius: 5px;}.nav ul li a:hover {background-color: #09598a;background-color: #fff;color: #000;border-radius: 5px;}/* banner 部分 */.banner {padding-top: 35px;height: 375px;overflow: hidden;}.banner .leftimg {/* 左浮动,image */float: left;/* 偏移 */margin-right: 40px;/* 圆角 */border-radius: 10px;-webkit-box-shadow: 0px 28px 30px #cecece;}.banner h2 {font-size: 36px;font-weight: normal;font-family: kaushan;color: #fff;line-height: 1em;margin-bottom: 20px;word-spacing: 5px;}.banner p {font-size: 15px;color: #fff;margin-bottom: 20px;}.banner .bottom {margin-top: 12px;-webkit-box-shadow: 0px 28px 30px #cecece;}/* content-bottom 部分 */.content-bottom {padding-top: 30px;/* 弹性布局 */display: flex;}.content-bottom h2 {font: normal 24px Arial, Helvetica, sans-serif;color: #fff;height: 80px;text-align: center;line-height: 1em;vertical-align: middle;padding-top: 10px;border-radius: 10px 10px 0 0;/* 背景色 */background-color: #70b0e0;background-image: linear-gradient(to bottom, #70b0e0 0%, #115fa3 100%)}.box1,.box2,.box3,.box4 {/* 弹性布局 */flex: 1;width: 225px;height: 400px;margin-right: 20px;background-color: #eee;/* 圆角 */border-radius: 10px;/* 边框阴影 */box-shadow: 2px 2px 5px #999;}.box {padding: 20px;}.bo4 {margin-right: 0;}.content-bottom p {color: #666;line-height: 1.5em;margin: 20px 0;}.content-bottom ul {margin-left: 20px;color: #666;}/* footer 布局 */footer {background-image: url(../day9课后实训素材/img/ambitios_footer_bg.gif);background-repeat: repeat-x;padding: 15px 0 15px 5px;color: #fff;margin-top: 20px;}
效果
