title: SpringBoot启动流程—-SpringApplication类
author: thetianxia
readmore: true
categories: [Java,框架]
tags: [Java,面试,SpringBoot]
SpringBoot启动类 2.4.5
@SpringBootApplicationpublic class Application {public static void main(String[] args) {SpringApplication.run(Application.class);}}
启动类的代码非常简单,我们只需要在SpringBoot项目启动类加上注解@SpringBootApplication,即可标注该类是启动类。在该类的main方法中调用了
SpringApplication.run(Application.class),所以启动流程就在run中。通过debug,我们看一下源码。
//1、main方法进来之后,调用了这个run方法,然后这个run又封装了一下参数,调用另一个重载方法runpublic static ConfigurableApplicationContext run(Class<?> primarySource, String... args) {return run(new Class[]{primarySource}, args);}//2、该run方法,首先新创建一个SpringApplication,该类构造器接受一个启动类参数对象,在构造器中,SpringBoot进行了一系列参数初始化。public static ConfigurableApplicationContext run(Class<?>[] primarySources, String[] args) {return (new SpringApplication(primarySources)).run(args);}
SpringApplication构造器,初始化
//3、run方法创建新的SpringApplication对象,调用该构造器,该构造器又调用另一个构造器public SpringApplication(Class<?>... primarySources) {//默认资源加载器ResourceLoader为nullthis((ResourceLoader)null, primarySources);}//4、初始化public SpringApplication(ResourceLoader resourceLoader, Class<?>... primarySources) {this.sources = new LinkedHashSet(); //配置sourcesthis.bannerMode = Mode.CONSOLE; //配置横幅,默认打印到控制台。Mode枚举 OFF关闭,CONSOLE控制台打印,LOG日志打印;this.logStartupInfo = true; //配置是否开启日志,默认开启this.addCommandLineProperties = true; //配置是否添加命令行属性,默认开启this.addConversionService = true; //是否添加转换服务,默认开启this.headless = true; //headless模式this.registerShutdownHook = true;this.additionalProfiles = Collections.emptySet();this.isCustomEnvironment = false;this.lazyInitialization = false;this.applicationContextFactory = ApplicationContextFactory.DEFAULT;this.applicationStartup = ApplicationStartup.DEFAULT; //DefaultApplicationStartupthis.resourceLoader = resourceLoader; //nullAssert.notNull(primarySources, "PrimarySources must not be null"); //如果没有启动类,启动失败。primarySources一般只有一个启动类,或者nullthis.primarySources = new LinkedHashSet(Arrays.asList(primarySources)); //保存主配置类this.webApplicationType = WebApplicationType.deduceFromClasspath(); //判断web类型,SERVLETthis.bootstrapRegistryInitializers = this.getBootstrapRegistryInitializersFromSpringFactories(); //获取所有的BootstrapRegistryInitializer实现类保存在List<BootstrapRegistryInitializer> bootstrapRegistryInitializers,锚点1this.setInitializers(this.getSpringFactoriesInstances(ApplicationContextInitializer.class)); //从资源文件配置ApplicationContextInitializer实例并存在List<ApplicationContextInitializer<?>> initializers;锚点2this.setListeners(this.getSpringFactoriesInstances(ApplicationListener.class)); //从资源文件创建应用监听器,保存在List<ApplicationListener<?>> listenersthis.mainApplicationClass = this.deduceMainApplicationClass(); //配置应用的主方法所在类}
锚点1
SpringBoot启动时初始化上下文时,最终会调用该方法。再改方法中获取classLoader,因为构造器中resourceLoader是null,所以得到的是默认构造器
然后执行该方法SpringFactoriesLoader.loadFactoryNames(type, classLoader),锚点1之后的流程如下。
private <T> Collection<T> getSpringFactoriesInstances(Class<T> type) {return this.getSpringFactoriesInstances(type, new Class[0]);}//最终会调用该方法。private <T> Collection<T> getSpringFactoriesInstances(Class<T> type, Class<?>[] parameterTypes, Object... args) {ClassLoader classLoader = this.getClassLoader(); //return this.resourceLoader != null ? this.resourceLoader.getClassLoader() : ClassUtils.getDefaultClassLoader();返回系统默认类加载器Set<String> names = new LinkedHashSet(SpringFactoriesLoader.loadFactoryNames(type, classLoader));List<T> instances = this.createSpringFactoriesInstances(type, parameterTypes, classLoader, args, names);AnnotationAwareOrderComparator.sort(instances);return instances;}
然后进入SpringFactoriesLoader.loadFactoryNames(type, classLoader)。
public static List<String> loadFactoryNames(Class<?> factoryType, @Nullable ClassLoader classLoader) {ClassLoader classLoaderToUse = classLoader; //默认加载器if (classLoader == null) {classLoaderToUse = SpringFactoriesLoader.class.getClassLoader();}String factoryTypeName = factoryType.getName(); //锚点1处是BootstrapRegistryInitializer.class类的全类名return (List)loadSpringFactories(classLoaderToUse).getOrDefault(factoryTypeName, Collections.emptyList());}
获得全类名之后,进入loadSpringFactories(classLoaderToUse)方法,并得到一个Map类。该方法会从”META-INF/spring.factories”下的文件中读取配置。SpringBoot中只有如图三个路径下存在”META-INF/spring.factories”。我们以锚点1的BootstrapRegistryInitializer为例。
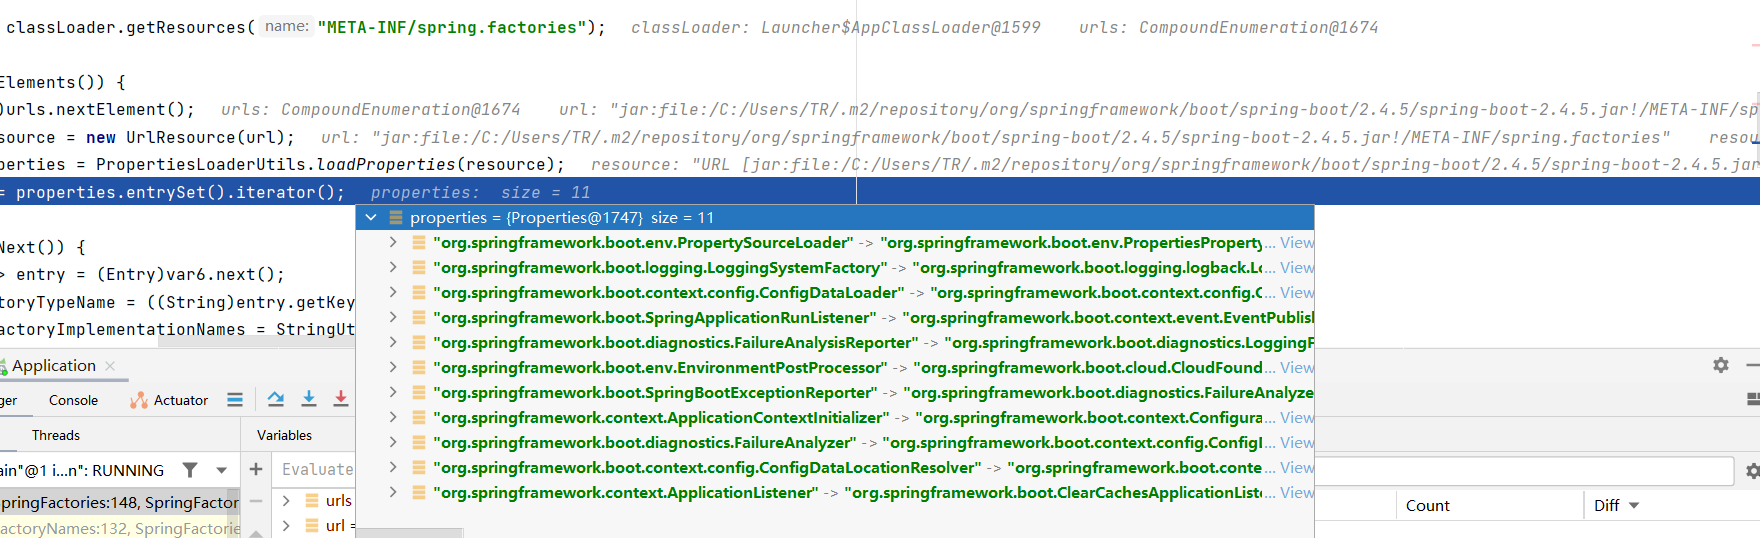
urls中存在3个地址,分别在spring-boot,spring-boot-autoconfigure,spring-beans中。循环将对应地址的文件读入为properties,内容如下图。
如果缓存没有,则读取配置文件,获得Enumeration类型的urls,Enumeration的key是HashTable并且对应的值也存于HashTable中。因此该类将配置文件中的内容做映射。之后通过迭代,获得每一个key和对应的values。
private static Map<String, List<String>> loadSpringFactories(ClassLoader classLoader) {//先从缓存获取,如果有就直接返回Map<String, List<String>> result = (Map)cache.get(classLoader);if (result != null) {return result;} else {HashMap result = new HashMap();try {//没有则从"META-INF/spring.factories"文件中读取,获取"META-INF/spring.factories"的urlEnumeration urls = classLoader.getResources("META-INF/spring.factories");//遍历urlwhile(urls.hasMoreElements()) {URL url = (URL)urls.nextElement();UrlResource resource = new UrlResource(url);Properties properties = PropertiesLoaderUtils.loadProperties(resource); //从url中读入数据Iterator var6 = properties.entrySet().iterator(); //获得迭代器//迭代while(var6.hasNext()) {Entry<?, ?> entry = (Entry)var6.next(); //String,StringString factoryTypeName = ((String)entry.getKey()).trim(); //去掉key字符串开头和结尾的空白//value转为数组String[] factoryImplementationNames = StringUtils.commaDelimitedListToStringArray((String)entry.getValue()); //将value字符转为数组String[] var10 = factoryImplementationNames;int var11 = factoryImplementationNames.length;for(int var12 = 0; var12 < var11; ++var12) {String factoryImplementationName = var10[var12];((List)result.computeIfAbsent(factoryTypeName, (key) -> { //第一次会返回空数组,并将第一个元素去掉开头和结尾的空白并添加到数组,之后都获取该数组并向其中添加元素。return new ArrayList();})).add(factoryImplementationName.trim());}}}//最后将map中所有key对应的value去重后更新result.replaceAll((factoryType, implementations) -> {return (List)implementations.stream().distinct().collect(Collectors.collectingAndThen(Collectors.toList(), Collections::unmodifiableList));});cache.put(classLoader, result); //放入缓存return result; //返回map} catch (IOException var14) {throw new IllegalArgumentException("Unable to load factories from location [META-INF/spring.factories]", var14);}}}
返回之后,会通过getOrDefault方法返回BootstrapRegistryInitializer.class对应的配置集合。然后执行List instances = this.createSpringFactoriesInstances(type, parameterTypes, classLoader, args, names);
该方法通过反射,用names中的全部类的全类名创建实例对象集合,然后排序之后返回。

返回之后,保存到SpringApplication对象的属性中。
锚点2
初始化BootstrapRegistryInitializer.class之后,会初始化ApplicationContextInitializer和ApplicationListener监听器相关的类。过程同锚点1一样。只不过在loadSpringFactories方法中,会直接返回缓存中的map并返回对应的list。
Run具体启动
public ConfigurableApplicationContext run(String... args) {StopWatch stopWatch = new StopWatch(); //计时stopWatch.start();DefaultBootstrapContext bootstrapContext = this.createBootstrapContext();ConfigurableApplicationContext context = null;this.configureHeadlessProperty();//创建并启动监听器SpringApplicationRunListeners listeners = this.getRunListeners(args); //锚点3,获取监听器listeners.starting(bootstrapContext, this.mainApplicationClass); //锚点4,启动监听器try {ApplicationArguments applicationArguments = new DefaultApplicationArguments(args);ConfigurableEnvironment environment = this.prepareEnvironment(listeners, bootstrapContext, applicationArguments); //锚点7,准备环境this.configureIgnoreBeanInfo(environment);Banner printedBanner = this.printBanner(environment); //根据配置打印banner//创建ioccontext = this.createApplicationContext();context.setApplicationStartup(this.applicationStartup);this.prepareContext(bootstrapContext, context, environment, listeners, applicationArguments, printedBanner);this.refreshContext(context);this.afterRefresh(context, applicationArguments);stopWatch.stop();if (this.logStartupInfo) {(new StartupInfoLogger(this.mainApplicationClass)).logStarted(this.getApplicationLog(), stopWatch);}listeners.started(context);this.callRunners(context, applicationArguments);} catch (Throwable var10) {this.handleRunFailure(context, var10, listeners);throw new IllegalStateException(var10);}try {listeners.running(context);return context;} catch (Throwable var9) {this.handleRunFailure(context, var9, (SpringApplicationRunListeners)null);throw new IllegalStateException(var9);}}
锚点3
SpringApplicationRunListeners listeners = this.getRunListeners(args);这个方法比较重要,目的是获取一个封装的SpringApplicationRunListeners对象。该类中一个属性List listeners中最后会有一个元素EventPublishingRunListener。

下面,通过断点,我们看一下封装过程。
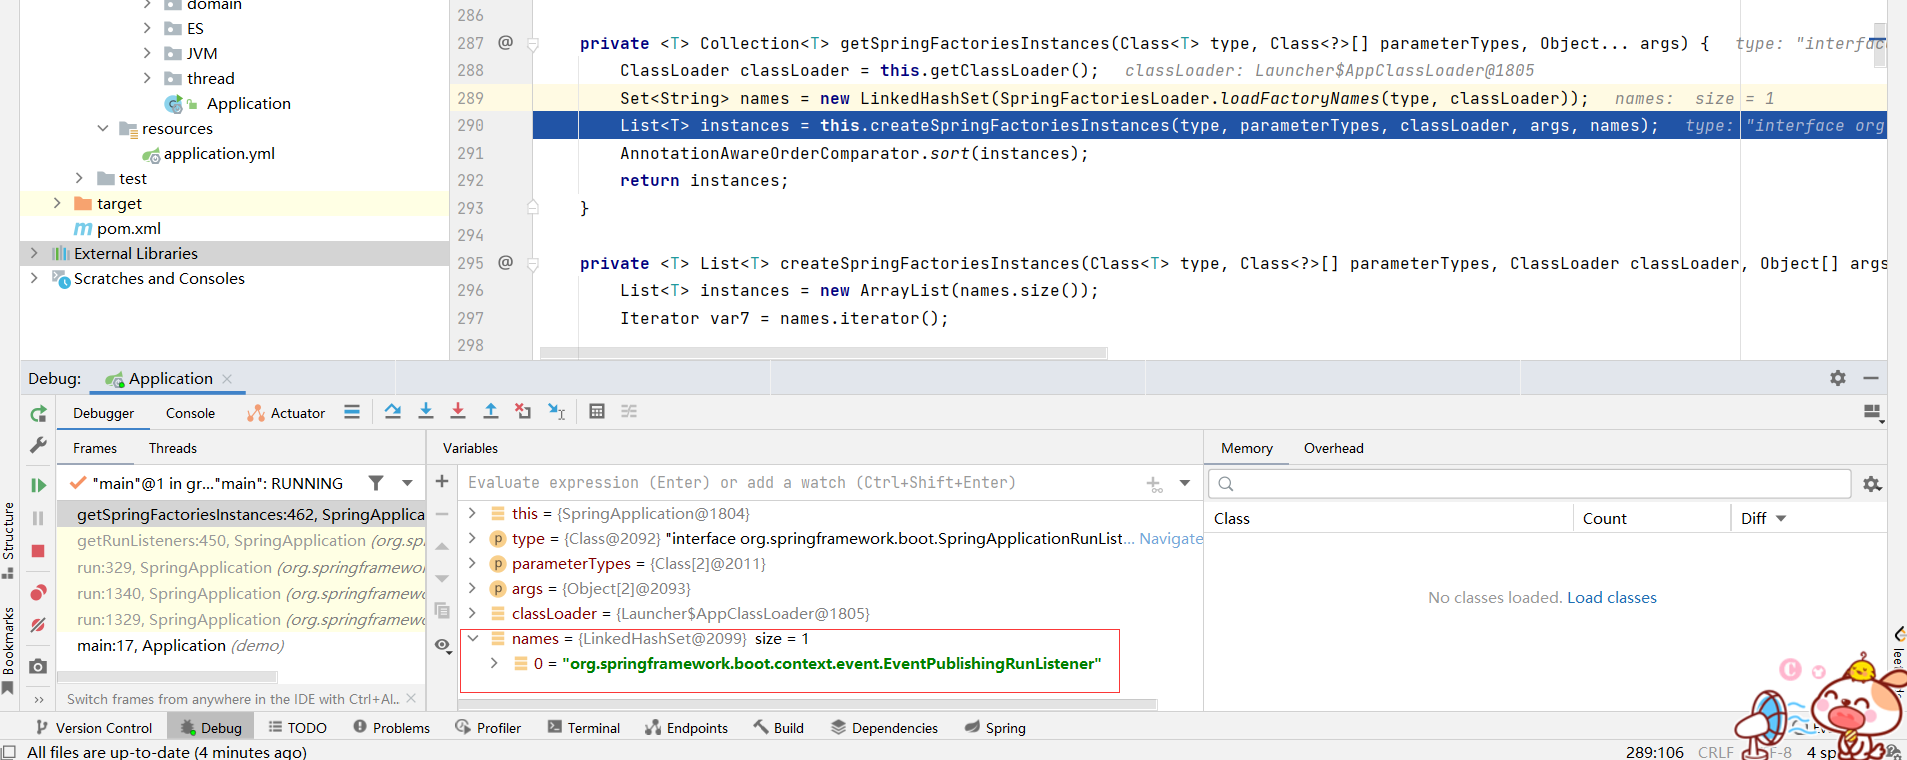
可以看到getRunListeners直接new了一个SpringApplicationRunListeners。之后我们看该构造函数,现在我们先看参数this.getSpringFactoriesInstances(SpringApplicationRunListener.class, types, this, args)最后会是什么。
private SpringApplicationRunListeners getRunListeners(String[] args) {Class<?>[] types = new Class[]{SpringApplication.class, String[].class};return new SpringApplicationRunListeners(logger, this.getSpringFactoriesInstances(SpringApplicationRunListener.class, types, this, args), this.applicationStartup);}
这个方法,我们在之前SpringApplication构造其中,就见过多次。它从一个map中获取对应的List集合。我们进去看一下,果然,一样的配方。最后names只有一个元素,就是EventPublishingRunListener类的全限定类名。之后又调用了List instances = this.createSpringFactoriesInstances(type, parameterTypes, classLoader, args, names);这行代码进行反射获取实例。最后代码会运行到EventPublishingRunListener的构造器处。我们往下看。
标注的这一行,将过去的构造函数和参数传入,反射创建对象。
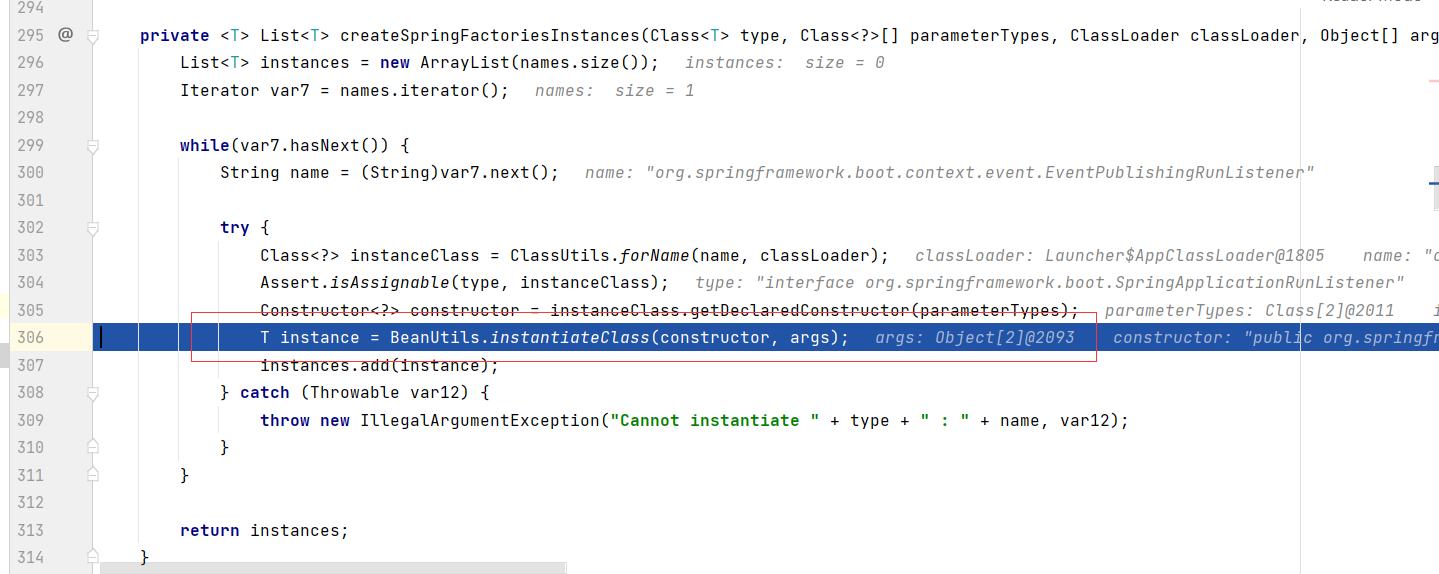
ctor就是上一步的传入的构造函数,这里直接传入参数开始构建。参数中包含的就是之前new的并且初始化的SpringApplication对象。
调用EventPublishingRunListener构造器创建对象。该类有三个参数,application是通过参数传递的,用来获取初始化时创建的监听器对象集合,并获取迭代器var3。然后将监听器封装到initialMulticaster属性中。initialMulticaster的类型是 public class SimpleApplicationEventMulticaster extends AbstractApplicationEventMulticaster,它的父类中,有一个内部类,该内部类中有一个集合,最终这些listener会存到该集合中。
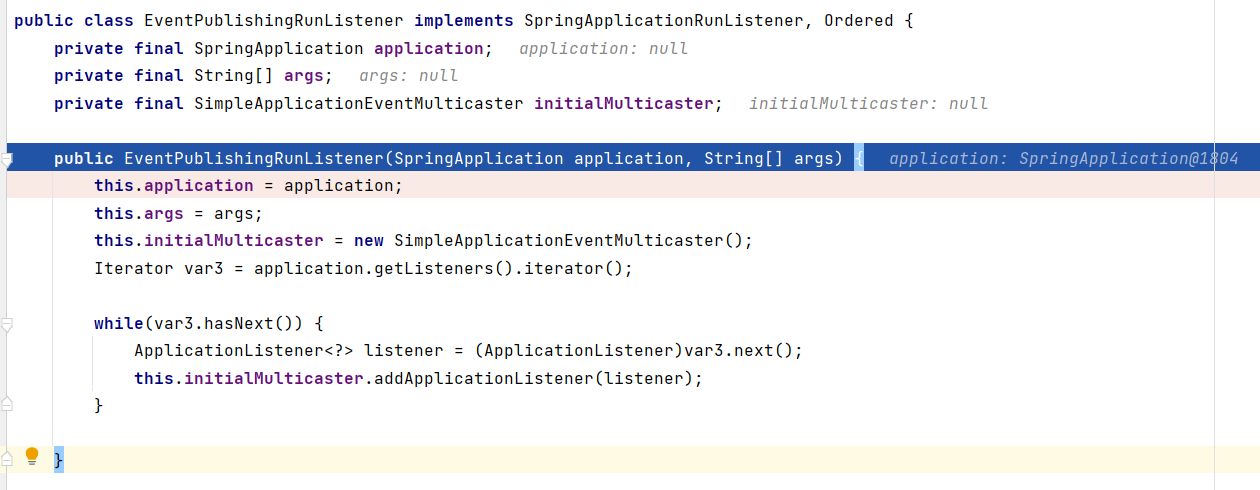
内部类部分代码
public void addApplicationListener(ApplicationListener<?> listener) {synchronized(this.defaultRetriever) {Object singletonTarget = AopProxyUtils.getSingletonTarget(listener);if (singletonTarget instanceof ApplicationListener) {this.defaultRetriever.applicationListeners.remove(singletonTarget);}this.defaultRetriever.applicationListeners.add(listener);this.retrieverCache.clear();}}//内部类private class DefaultListenerRetriever {public final Set<ApplicationListener<?>> applicationListeners; //最终存放监听器处public final Set<String> applicationListenerBeans;private DefaultListenerRetriever() {this.applicationListeners = new LinkedHashSet();this.applicationListenerBeans = new LinkedHashSet();}}
因为初始化一共有9个监听器,所以最终这个集合里面会添加9个监听器。如下图,返回的参数就是instances,里面封装了一个EventPublishingRunListener,EventPublishingRunListener里面有个属性initialMulticaster,里面又封装了一个包含9个监听器的集合。封装套娃。。。。最后通过SpringApplicationRunListeners构造函数,赋值给listeners。最后返回生成的SpringApplicationRunListeners对象。
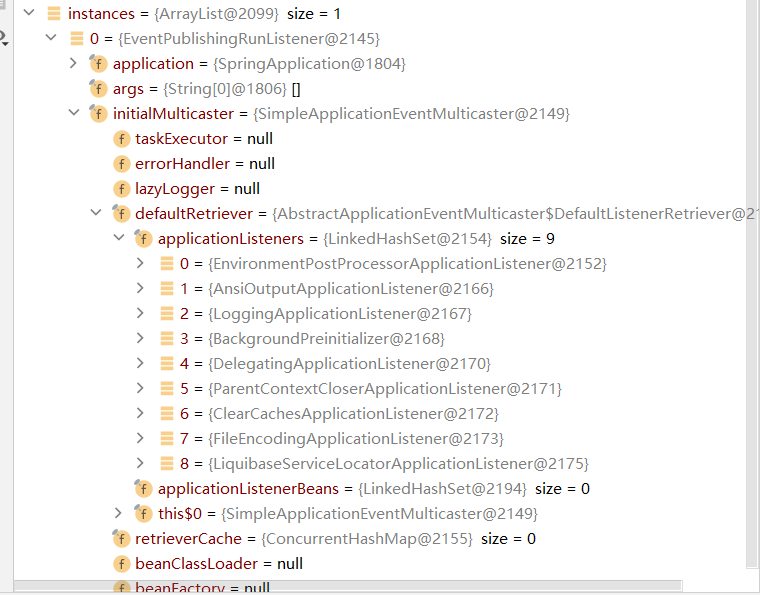
到此为止,锚点3结束。如果套的头晕,建议多看几遍就好了。
锚点4
获得监听器之后,启动监听器。这个方法最后调用了doWithListeners方法。我们可以看到里面将linsteners中的监听器(其实就是EventPublishingRunListener)分别执行lambda中listener.starting(bootstrapContext),所以我们去EventPublishingRunListener中找对应的方法。
void starting(ConfigurableBootstrapContext bootstrapContext, Class<?> mainApplicationClass) {this.doWithListeners("spring.boot.application.starting", (listener) -> {listener.starting(bootstrapContext);}, (step) -> {if (mainApplicationClass != null) {step.tag("mainApplicationClass", mainApplicationClass.getName());}});}private void doWithListeners(String stepName, Consumer<SpringApplicationRunListener> listenerAction, Consumer<StartupStep> stepAction) {StartupStep step = this.applicationStartup.start(stepName);this.listeners.forEach(listenerAction);if (stepAction != null) {stepAction.accept(step);}step.end();}
调用该方法

然后来到SimpleApplicationEventMulticaster,最终调用的是下面这个方法。该方法中,重要的是Iterator var5 = this.getApplicationListeners(event, type).iterator();获取符合eventType的监听器的迭代器。我们进入看下。
public void multicastEvent(ApplicationEvent event, @Nullable ResolvableType eventType) {ResolvableType type = eventType != null ? eventType : this.resolveDefaultEventType(event);Executor executor = this.getTaskExecutor(); //nullIterator var5 = this.getApplicationListeners(event, type).iterator(); //锚点5//从锚点6回来,遍历符合条件的监听器,并执行while(var5.hasNext()) {ApplicationListener<?> listener = (ApplicationListener)var5.next();if (executor != null) {executor.execute(() -> {this.invokeListener(listener, event);});} else {//执行this.invokeListener(listener, event);}}}
this.invokeListener(listener, event)最后会执行到这里,根据监听器执行不同的逻辑。
锚点5
protected Collection<ApplicationListener<?>> getApplicationListeners(ApplicationEvent event, ResolvableType eventType) {Object source = event.getSource(); //初始化创建的SpringApplication对象Class<?> sourceType = source != null ? source.getClass() : null; //SpringApplication的全限定类名AbstractApplicationEventMulticaster.ListenerCacheKey cacheKey = new AbstractApplicationEventMulticaster.ListenerCacheKey(eventType, sourceType); //将eventType和sourceType封装一个key,后面获取 existingRetrieverAbstractApplicationEventMulticaster.CachedListenerRetriever newRetriever = null;AbstractApplicationEventMulticaster.CachedListenerRetriever existingRetriever = (AbstractApplicationEventMulticaster.CachedListenerRetriever)this.retrieverCache.get(cacheKey); //因为开始缓存没有,所以是null,所以进入下边的ifif (existingRetriever == null && (this.beanClassLoader == null || ClassUtils.isCacheSafe(event.getClass(), this.beanClassLoader) && (sourceType == null || ClassUtils.isCacheSafe(sourceType, this.beanClassLoader)))) {//因为第一次retrieverCache缓存没有,所以new了一个newRetriever,然后放入缓存,cacheKey作为key,newRetriever作为值newRetriever = new AbstractApplicationEventMulticaster.CachedListenerRetriever();//因为不存在,所以newRetriever被放入,返回null,所以existingRetriever是nullexistingRetriever = (AbstractApplicationEventMulticaster.CachedListenerRetriever)this.retrieverCache.putIfAbsent(cacheKey, newRetriever);if (existingRetriever != null) {newRetriever = null;}}//existingRetriever==null,不会执行if (existingRetriever != null) {Collection<ApplicationListener<?>> result = existingRetriever.getApplicationListeners(); //符合条件的监听器集合,分析见锚点6if (result != null) {return result;}}//这一步筛选符合条件的监听器并返回。锚点6return this.retrieveApplicationListeners(eventType, sourceType, newRetriever);}
锚点6
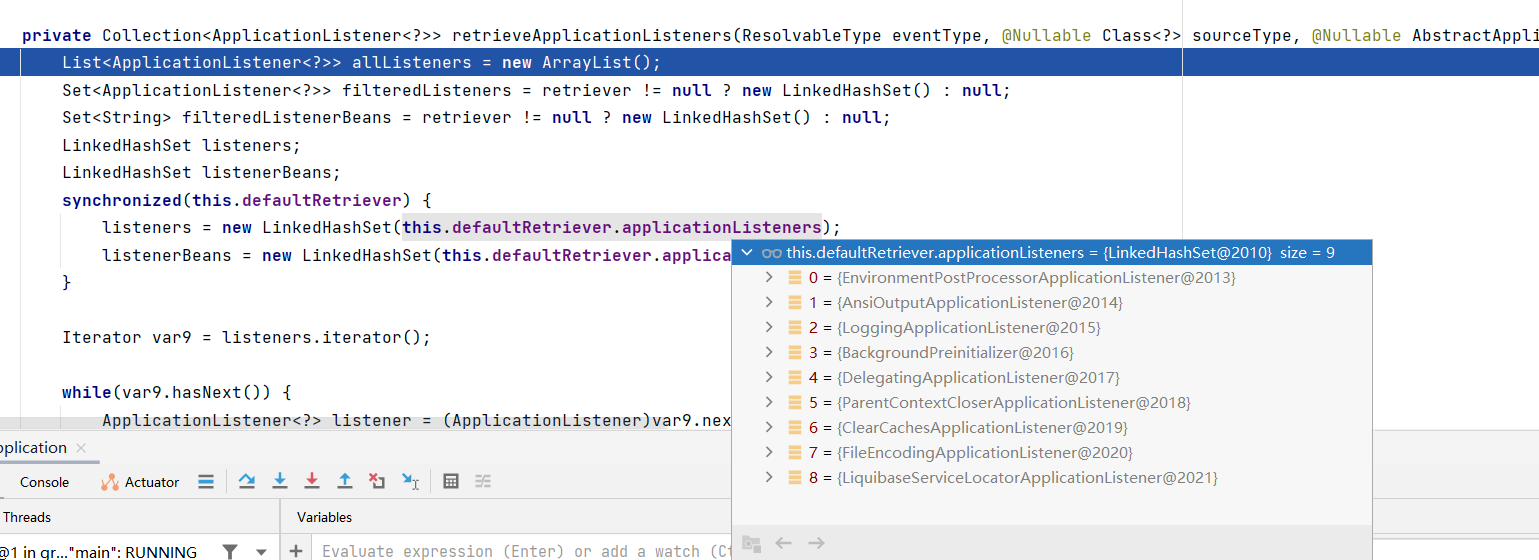
private Collection<ApplicationListener<?>> retrieveApplicationListeners(ResolvableType eventType, @Nullable Class<?> sourceType, @Nullable AbstractApplicationEventMulticaster.CachedListenerRetriever retriever) {List<ApplicationListener<?>> allListeners = new ArrayList();Set<ApplicationListener<?>> filteredListeners = retriever != null ? new LinkedHashSet() : null;Set<String> filteredListenerBeans = retriever != null ? new LinkedHashSet() : null;LinkedHashSet listeners;LinkedHashSet listenerBeans;synchronized(this.defaultRetriever) {//我们 锚点3分析过,this.defaultRetriever.applicationListeners存放的是加载classpath路径下的9个监听器//这里加锁,为了防止在执行这一步的同时值被其他线程修改listeners = new LinkedHashSet(this.defaultRetriever.applicationListeners);listenerBeans = new LinkedHashSet(this.defaultRetriever.applicationListenerBeans);}Iterator var9 = listeners.iterator();while(var9.hasNext()) {ApplicationListener<?> listener = (ApplicationListener)var9.next();//通过方法名字,我们可以推测,如果listener符合eventType和sourceType,那么返回true,最终有4个监听器满足if (this.supportsEvent(listener, eventType, sourceType)) {if (retriever != null) {//第一次加入filteredListenersfilteredListeners.add(listener);}//符合条件加入filteredListenersallListeners.add(listener);}}//listenerBeans大小为0,不会执行if (!listenerBeans.isEmpty()) {ConfigurableBeanFactory beanFactory = this.getBeanFactory();Iterator var16 = listenerBeans.iterator();while(var16.hasNext()) {String listenerBeanName = (String)var16.next();try {if (this.supportsEvent(beanFactory, listenerBeanName, eventType)) {ApplicationListener<?> listener = (ApplicationListener)beanFactory.getBean(listenerBeanName, ApplicationListener.class);if (!allListeners.contains(listener) && this.supportsEvent(listener, eventType, sourceType)) {if (retriever != null) {if (beanFactory.isSingleton(listenerBeanName)) {filteredListeners.add(listener);} else {filteredListenerBeans.add(listenerBeanName);}}allListeners.add(listener);}} else {Object listener = beanFactory.getSingleton(listenerBeanName);if (retriever != null) {filteredListeners.remove(listener);}allListeners.remove(listener);}} catch (NoSuchBeanDefinitionException var13) {}}}AnnotationAwareOrderComparator.sort(allListeners);//将过滤的结果存入缓存,下次通过cacheKey直接获取if (retriever != null) {if (filteredListenerBeans.isEmpty()) {retriever.applicationListeners = new LinkedHashSet(allListeners);retriever.applicationListenerBeans = filteredListenerBeans;} else {retriever.applicationListeners = filteredListeners;retriever.applicationListenerBeans = filteredListenerBeans;}}return allListeners; //锚点6结束,回到锚点4}
锚点7
private ConfigurableEnvironment prepareEnvironment(SpringApplicationRunListeners listeners, DefaultBootstrapContext bootstrapContext, ApplicationArguments applicationArguments) {ConfigurableEnvironment environment = this.getOrCreateEnvironment(); //获取系统配置信息,以及控制台配置this.configureEnvironment((ConfigurableEnvironment)environment, applicationArguments.getSourceArgs());ConfigurationPropertySources.attach((Environment)environment);listeners.environmentPrepared(bootstrapContext, (ConfigurableEnvironment)environment); //处理环境准备完成相关的监听器,过程参考锚点3到锚点6,不同的是type,因此广播的监听器不同。DefaultPropertiesPropertySource.moveToEnd((ConfigurableEnvironment)environment);this.configureAdditionalProfiles((ConfigurableEnvironment)environment);this.bindToSpringApplication((ConfigurableEnvironment)environment);if (!this.isCustomEnvironment) {environment = (new EnvironmentConverter(this.getClassLoader())).convertEnvironmentIfNecessary((ConfigurableEnvironment)environment, this.deduceEnvironmentClass());}ConfigurationPropertySources.attach((Environment)environment);return (ConfigurableEnvironment)environment;}
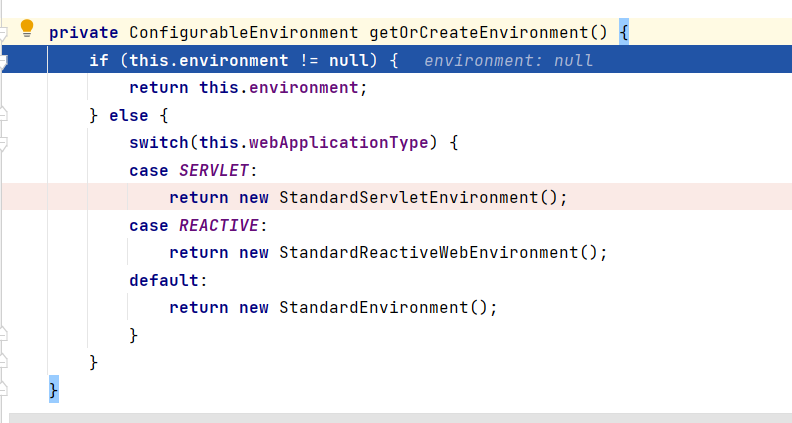
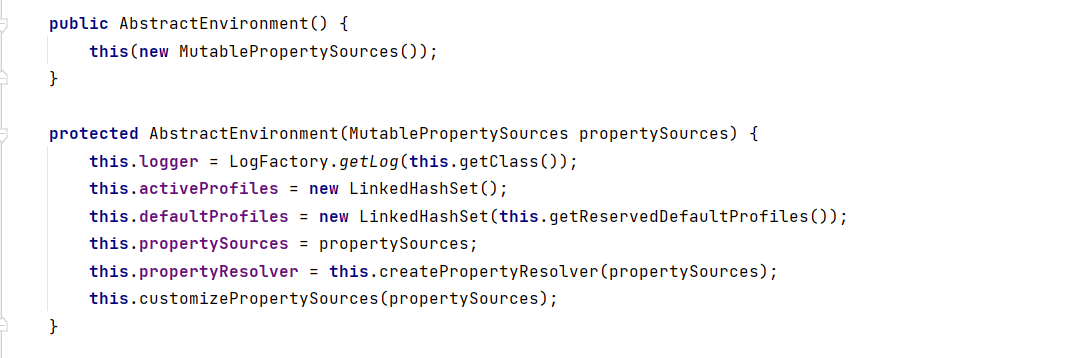
我们进入getOrCreateEnvironment方法,因为开始的时候环境是空,所以这里会创建StandardServletEnvironment(),里面进去这里会先调用父类的构造器,StandardEnvironment,AbstractEnvironment。
所以最终调用的是AbstractEnvironment的构造器,具体逻辑也是在这里执行的。


这段逻辑里面,进行了一些初始值的设置,然后再最后一行代码进行了重要的操作。最后一行代码执行的不是该类的方法,而是StandardServletEnvironment类的重写方法。
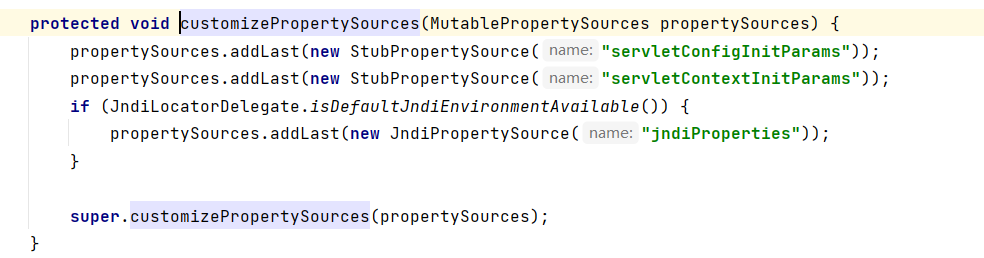
StandardServletEnvironment执行该方法后,又调用父类StandardEnvironment的重写方法。
这里进行了一些初值的设置。
重点在父类中。getSystemProperties方法中,会调用System.getProperties(),从这个方法里面就可以获取计算机系统的属性。
接下来会执行这一句。具体作用就如同注释一样。因为到这里环境准备的差不多了,所以就要处理环境准备之后的一些监听器。因此eventType类型是ApplicationEnvironmentPreparedEvent,找到之后进行广播。

锚点8
web项目,会创建一个AnnotationConfigServletWebServerApplicationContext()类。
之后创建启动器,在准备需要创建的beans。

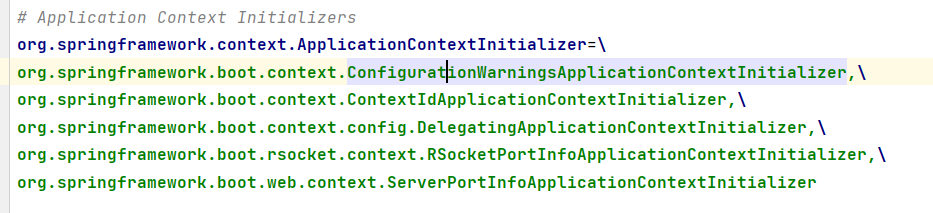
prepareContext中会调用下面这个方法。可以看到,这里将this.setInitializers(this.getSpringFactoriesInstances(ApplicationContextInitializer.class))这个地方从配置中读到的初始化相关类进行遍历,并且初始化。初始化前会进行断言,如果不能初始化则抛出异常。
之后会执行相应的监听器。并且会注册单例对象的类名。

prepareContext执行完毕之后,会调用refreshContext方法,该方法会将容器的对象刷新激活,之后处理刷新之后的操作。
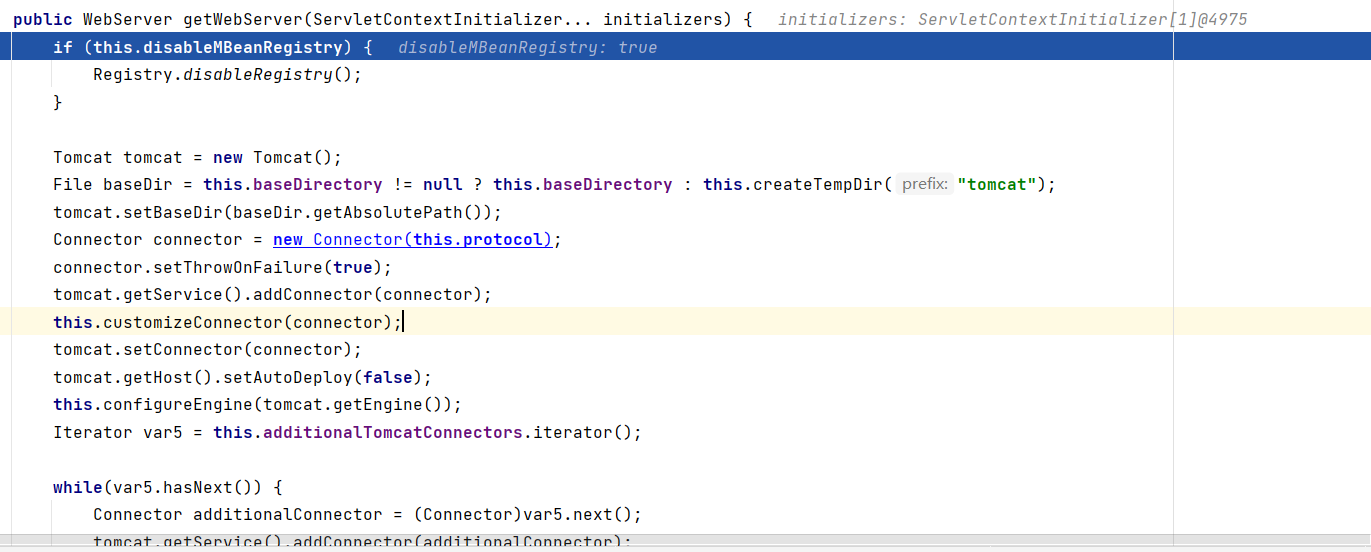
在激活对象的时候,我们深入会发现,在refresh方法中,会调用onRefresh方法。在这个地方会启动tomcat。启动tomcat之后还会加载一些其他bean。
到此,springboot启动完毕。

若有收获,就点个赞吧
0 人点赞
