优点:
并发高
传输快
封装好
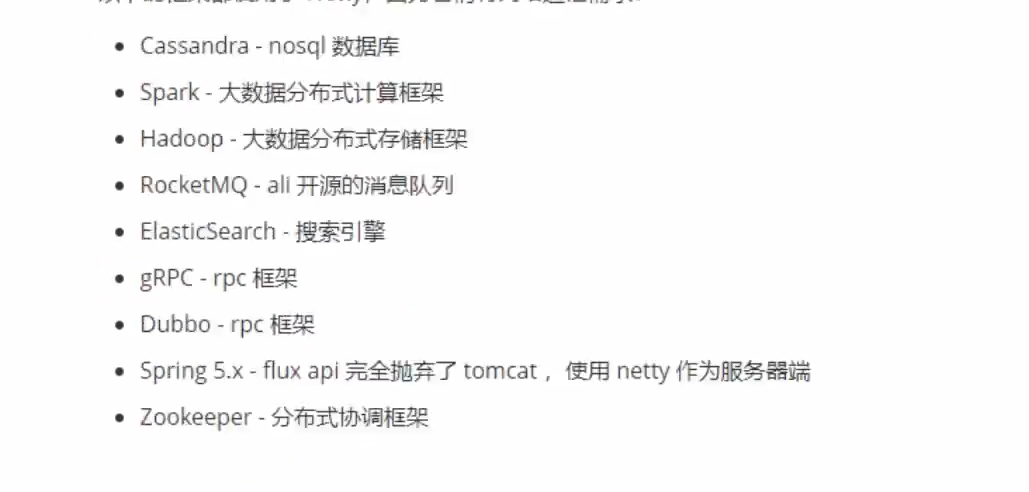
netty的底层是nio,所以第一阶段我们先了解nio

学习前的准备,NIO学习

传统的bio 阻塞i/o模型,一个线程只能处理一个客户端,客户端没任务时线程阻塞,资源利用率较低,引入线程同样如此
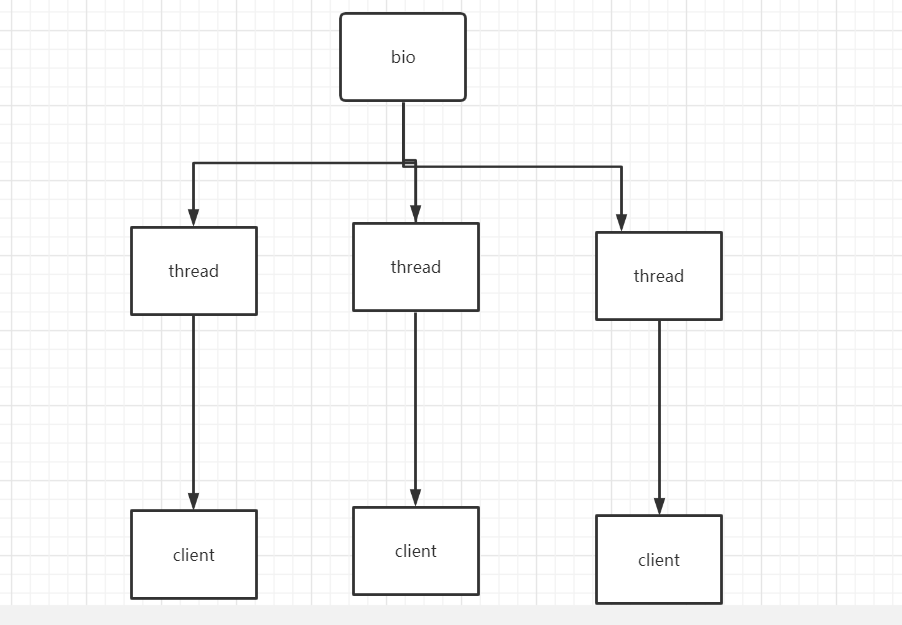
image.png
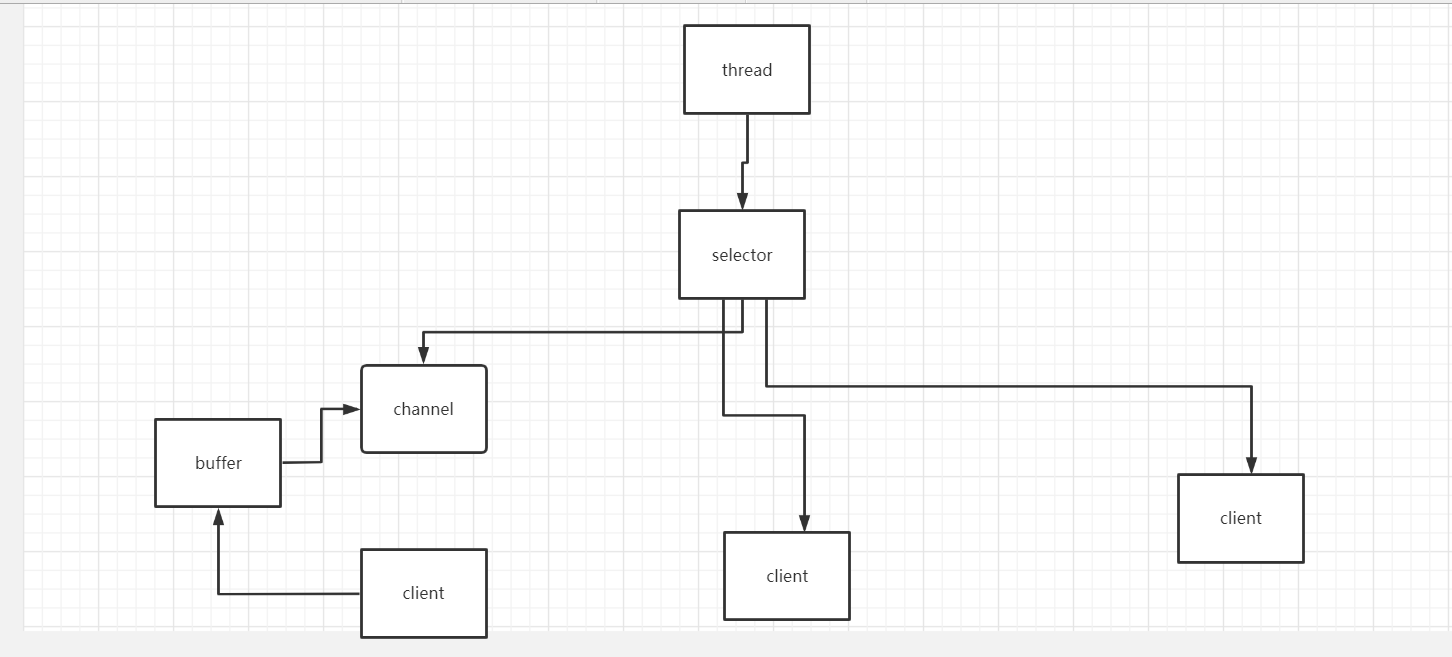
nio 非阻塞i/o模型,引入三大组件
image.png

三大组件

channel

  1. # 管道 数据输入输出的通道的通道
  2. # 常见的channel
  3. FileChannel
  4. ServerSocketChannel
  5. SocketChannel
  1. //工作在阻塞模式下
  2. FileChannel channel = new FileInputStream("1.txt").getChannel();
  3. public static void main(String[] args) {
  4. try {
  5. FileChannel from =new FileInputStream("1.txt").getChannel();
  6. FileChannel to = new FileOutputStream("2.txt").getChannel();
  7. from.transferTo(0, from.size(), to);//一次只能传输2g的文件
  8. System.out.println("ok");
  9. } catch (IOException e) {
  10. // TODO Auto-generated catch block
  11. e.printStackTrace();
  12. }
  13. }

buffer

  1. # 缓冲区 用来协助数据输入与输出
  2. ByteBuffer
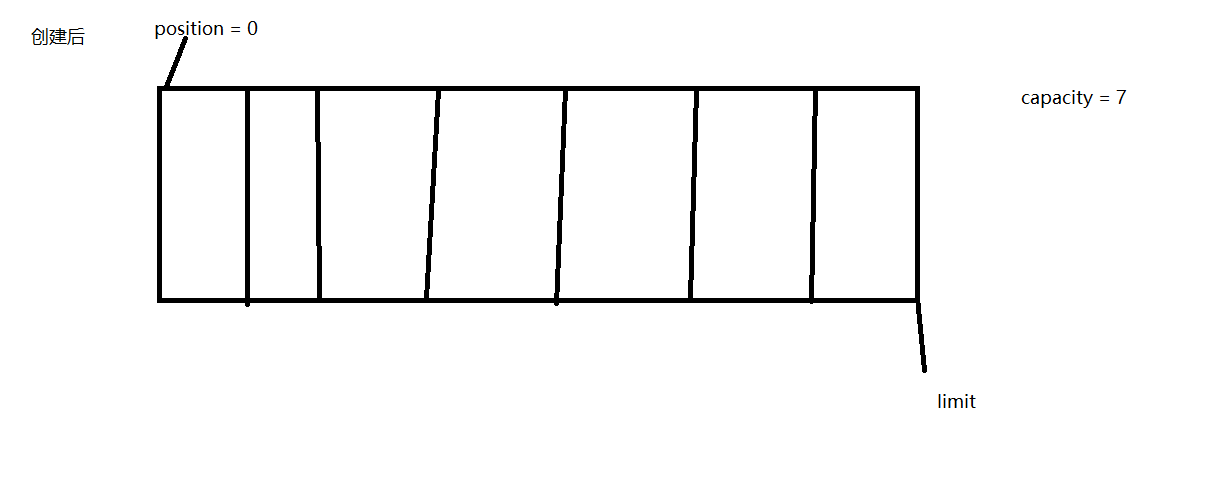
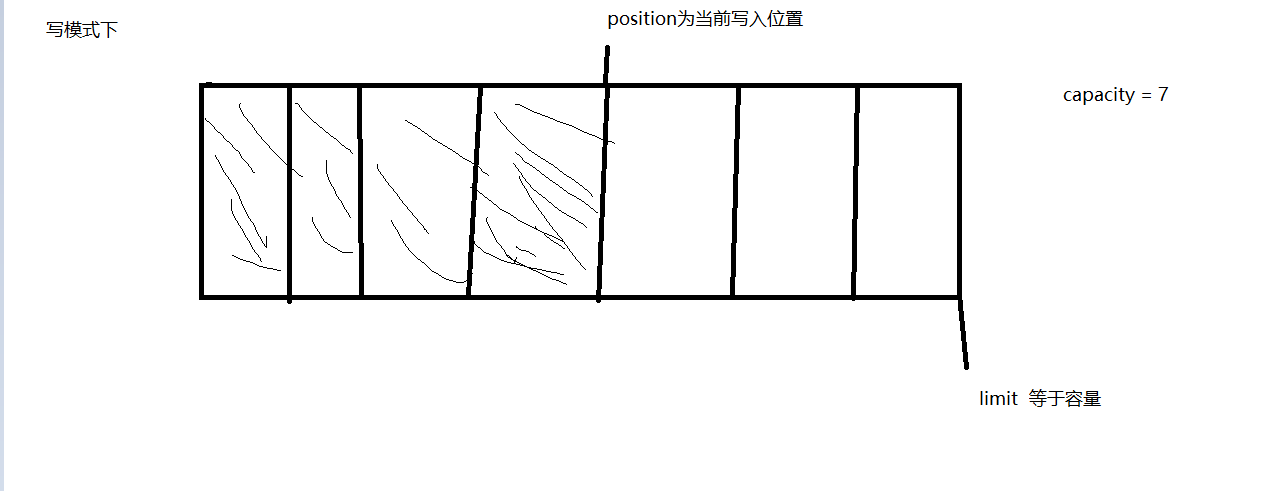
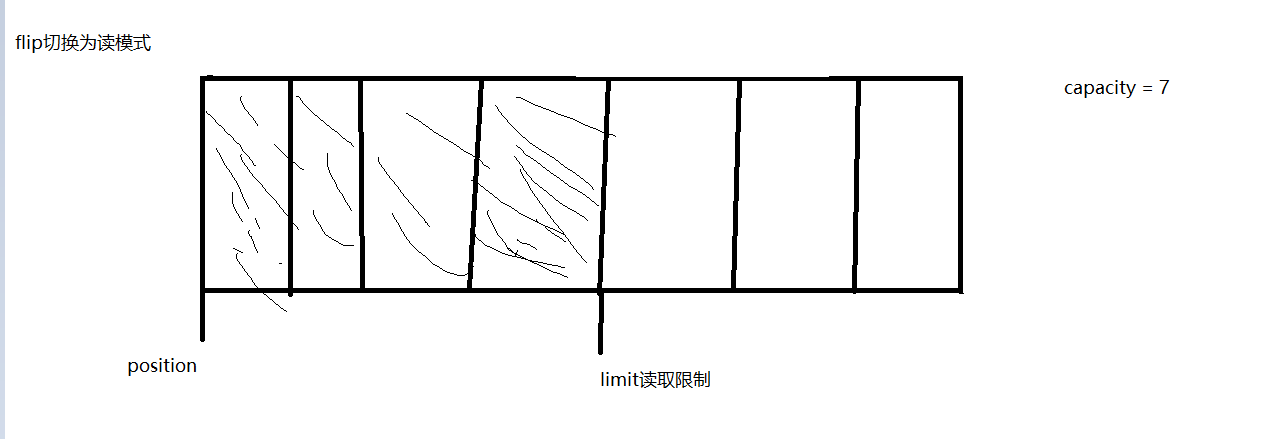
  3. 数据结构
  4. private int position = 0; //buffer当前读写位置
  5. private int limit;//buffer的读写限制
  6. private int capacity;//buffer的大小

image.png
image.png
image.png

  1. ByteBuffer buffer = ByteBuffer.allocate(12); //使用allocate创建并分配空间,分配堆内存,读写效率高
  2. ByteBuffer buffer = ByteBuffer.allocateDirect(12);//分配的是直接内存,读写效率低,且不受垃圾回收影响
  3. 常用api
  4. buffer.put();//向缓冲区写入
  5. buffer.get();//从缓冲区获取
  6. buffer.flip();//切换为读模式
  7. buffer.clear();//切换为写模式
  8. buffer.compact();//切换为写模式,并将没读取的字节向前移动
  9. buffer.remaining();//获得buffer中未读的字节数
  10. buffer.hasRemaining();//判断buffer是否全部读取
  11. buffer.rewind();//从头开始读
  12. buffer.mark();//记录position的位置
  13. buffer.reset();//跳转到mark标记的位置
  14. String str = Charset.defaultCharset().decode(buffer).toString();//buffer转换为String
  15. buffer = StandardCharsets.UTF_8.encode(str);//字符串转换为buffer

selector

阻塞模式

  1. server
  2. package feizuse;
  3. import java.io.IOException;
  4. import java.net.InetSocketAddress;
  5. import java.nio.ByteBuffer;
  6. import java.nio.channels.ServerSocketChannel;
  7. import java.nio.channels.SocketChannel;
  8. import java.nio.charset.Charset;
  9. import java.util.ArrayList;
  10. import java.util.List;
  11. public class server {
  12. public static void main(String[] args) throws IOException {
  13. //创建服务器
  14. ServerSocketChannel server = ServerSocketChannel.open();
  15. //绑定监听端口
  16. server.bind(new InetSocketAddress(8080));
  17. //创建数组用来存放客户端channel
  18. List<SocketChannel> channels = new ArrayList<SocketChannel>();
  19. server.configureBlocking(false);//ServerSocketChannel改为非阻塞模式
  20. while(true) {
  21. System.out.println("accept -------before");
  22. SocketChannel sc = server.accept(); //阻塞方法
  23. System.out.println("accept -------after");
  24. channels.add(sc);
  25. if(sc != null) {
  26. sc.configureBlocking(false);//SocketChannel非阻塞模式
  27. }
  28. //读取channel里面的数据
  29. for(SocketChannel s :channels) {
  30. ByteBuffer buffer = ByteBuffer.allocate(16);
  31. System.out.println("read -------before");
  32. s.read(buffer);//阻塞方法
  33. System.out.println("read -------after");
  34. buffer.flip();
  35. String str = Charset.defaultCharset().decode(buffer).toString();
  36. System.out.println(str+s.getLocalAddress());
  37. buffer.clear();
  38. }
  39. }
  40. }
  41. }
  42. client
  43. package feizuse;
  44. import java.io.IOException;
  45. import java.net.InetSocketAddress;
  46. import java.nio.channels.SocketChannel;
  47. import java.nio.charset.Charset;
  48. import java.util.Scanner;
  49. public class client1 {
  50. public static void main(String[] args) throws IOException {
  51. SocketChannel sc = SocketChannel.open();
  52. sc.connect(new InetSocketAddress(8080));
  53. while(true) {
  54. Scanner scanner =new Scanner(System.in);
  55. String str = scanner.next();
  56. sc.write(Charset.defaultCharset().encode(str));
  57. }
  58. }
  59. }

selector处理

  1. package feizuse;
  2. import java.io.IOException;
  3. import java.net.InetSocketAddress;
  4. import java.nio.ByteBuffer;
  5. import java.nio.channels.SelectionKey;
  6. import java.nio.channels.Selector;
  7. import java.nio.channels.ServerSocketChannel;
  8. import java.nio.channels.SocketChannel;
  9. import java.util.Iterator;
  10. public class server2 {
  11. public static void main(String[] args){
  12. try {
  13. //创建一个Selector
  14. Selector selector =Selector.open();
  15. //创建服务器
  16. ServerSocketChannel server = ServerSocketChannel.open();
  17. server.configureBlocking(false);
  18. //绑定监听端口
  19. server.bind(new InetSocketAddress(8080));
  20. //建立Selector与ServerSocketChannel的连接
  21. //SelectionKey可以知道是哪个客户端发生的事件
  22. /**
  23. * accept --连接时触发
  24. * connect --连接建立后触发
  25. * read --可读事件
  26. * write --可写事件
  27. */
  28. SelectionKey sskey = server.register(selector, 0);
  29. //只关注连接事件
  30. sskey.interestOps(SelectionKey.OP_ACCEPT);
  31. while(true) {
  32. selector.select();//阻塞方法,没有事件就阻塞
  33. Iterator<SelectionKey> iter = selector.selectedKeys().iterator();//获取所有事件的合集
  34. //如果是连接事件
  35. while(iter.hasNext()) {
  36. SelectionKey key =iter.next();
  37. iter.remove();
  38. if(key.isAcceptable()) {
  39. ServerSocketChannel channel =(ServerSocketChannel) key.channel();
  40. SocketChannel schannel = channel.accept();
  41. schannel.configureBlocking(false);
  42. SelectionKey skey = schannel.register(selector, 0, null);
  43. skey.interestOps(SelectionKey.OP_READ);
  44. }else if(key.isReadable()) {
  45. try {
  46. /**
  47. * 客户端断开连接会添加一个read事件
  48. */
  49. SocketChannel channel=(SocketChannel) key.channel();
  50. ByteBuffer buffer =ByteBuffer.allocate(16);
  51. int iscancel =channel.read(buffer);//正常情况下返回传输的字节,正常推出返回-1
  52. if(iscancel==-1) {
  53. key.cancel();
  54. System.out.println("正常推出");
  55. }
  56. }catch(IOException e) {
  57. e.printStackTrace();
  58. //异常退出
  59. key.cancel();
  60. }
  61. }
  62. }
  63. }
  64. }catch(IOException e) {
  65. e.printStackTrace();
  66. }
  67. }
  68. }

多线程优化

  1. package feizuse;
  2. import java.io.IOException;
  3. import java.net.InetSocketAddress;
  4. import java.nio.channels.SelectionKey;
  5. import java.nio.channels.Selector;
  6. import java.nio.channels.ServerSocketChannel;
  7. import java.nio.channels.SocketChannel;
  8. import java.util.Iterator;
  9. public class boss {
  10. public static void main(String[] args) {
  11. //当前是boos线程
  12. Thread.currentThread().setName("boos");
  13. try {
  14. //建立服务端
  15. ServerSocketChannel ssc = ServerSocketChannel.open();
  16. //绑定接口
  17. ssc.bind(new InetSocketAddress(8080));
  18. ssc.configureBlocking(false);//开启非阻塞模式
  19. Selector selector =Selector.open();
  20. SelectionKey sskey = ssc.register(selector,SelectionKey.OP_ACCEPT);//注册selector并关注连接事件
  21. //创建指定数量的worker
  22. worker w1 = new worker("w1");
  23. while(true) {
  24. selector.select();//阻塞方法等待事件
  25. Iterator<SelectionKey> iter = selector.selectedKeys().iterator();//获取所有事件的合集
  26. while(iter.hasNext()) {
  27. SelectionKey key = iter.next();
  28. iter.remove();
  29. if(key.isAcceptable()) {
  30. //如果是连接事件
  31. ServerSocketChannel channel =(ServerSocketChannel) key.channel();
  32. SocketChannel schannel = channel.accept();
  33. //给该channel注册key
  34. schannel.configureBlocking(false);
  35. //注册w1的selector并关注读事件
  36. w1.regesit(schannel);
  37. }
  38. }
  39. }
  40. } catch (IOException e) {
  41. // TODO Auto-generated catch block
  42. e.printStackTrace();
  43. }
  44. }
  45. }
  46. package feizuse;
  47. import java.io.IOException;
  48. import java.nio.ByteBuffer;
  49. import java.nio.channels.ClosedChannelException;
  50. import java.nio.channels.SelectionKey;
  51. import java.nio.channels.Selector;
  52. import java.nio.channels.SocketChannel;
  53. import java.nio.charset.Charset;
  54. import java.util.Iterator;
  55. import java.util.concurrent.ConcurrentLinkedQueue;
  56. public class worker implements Runnable{
  57. //处理读事件
  58. private Thread t1;//当前线程
  59. private Selector selector;//selector
  60. private ConcurrentLinkedQueue<Runnable> queue =new ConcurrentLinkedQueue<Runnable>();
  61. worker(String name){
  62. this.t1 =new Thread(this,name);
  63. try {
  64. this.selector =Selector.open();
  65. } catch (IOException e) {
  66. // TODO Auto-generated catch block
  67. e.printStackTrace();
  68. }
  69. t1.start();
  70. }
  71. void regesit(SocketChannel s) {
  72. System.out.println(Thread.currentThread().getName()+"注册");
  73. queue.add(()->{
  74. try {
  75. s.register(selector, SelectionKey.OP_READ);
  76. } catch (ClosedChannelException e) {
  77. // TODO Auto-generated catch block
  78. e.printStackTrace();
  79. }
  80. });
  81. selector.wakeup();
  82. }
  83. @Override
  84. public void run() {
  85. while(true) {
  86. try {
  87. System.out.println(Thread.currentThread().getName()+"run");
  88. System.out.println("阻塞");
  89. selector.select();
  90. Runnable task = queue.poll();
  91. if(task!=null) {
  92. System.out.println(Thread.currentThread().getName()+"任务");
  93. System.out.println("执行任务");
  94. task.run();
  95. }
  96. Iterator<SelectionKey> iter = selector.selectedKeys().iterator();
  97. while(iter.hasNext()) {
  98. SelectionKey key =iter.next();
  99. iter.remove();
  100. if(key.isReadable()) {
  101. System.out.println("有读任务");
  102. try {
  103. SocketChannel channel = (SocketChannel) key.channel();
  104. ByteBuffer buffer=ByteBuffer.allocate(16);
  105. int isclose = channel.read(buffer);
  106. if(isclose ==-1) {
  107. key.cancel();
  108. }
  109. System.out.println(buffer.position());
  110. }catch(IOException e) {
  111. key.cancel();
  112. }
  113. }
  114. }
  115. } catch (IOException e) {
  116. // TODO Auto-generated catch block
  117. e.printStackTrace();
  118. }
  119. }
  120. }
  121. }

Netty入门

Netty是什么

netty是异步的,事件驱动的网络编程框架

image.png

服务器

  1. package com.netty;
  2. import io.netty.bootstrap.ServerBootstrap;
  3. import io.netty.channel.ChannelInitializer;
  4. import io.netty.channel.nio.NioEventLoopGroup;
  5. import io.netty.channel.socket.nio.NioServerSocketChannel;
  6. import io.netty.channel.socket.nio.NioSocketChannel;
  7. import io.netty.handler.codec.string.StringDecoder;
  8. public class server01 {
  9. public static void main(String[] args) {
  10. //服务器启动器
  11. new ServerBootstrap()
  12. .group(new NioEventLoopGroup())
  13. .channel(NioServerSocketChannel.class)
  14. .childHandler(new ChannelInitializer<NioSocketChannel>() {
  15. @Override
  16. protected void initChannel(NioSocketChannel nioSocketChannel) throws Exception {
  17. nioSocketChannel.pipeline().addLast(new StringDecoder());
  18. }
  19. }).bind(8080);
  20. }
  21. }

客户端

  1. package com.netty;
  2. import io.netty.bootstrap.Bootstrap;
  3. import io.netty.channel.ChannelInitializer;
  4. import io.netty.channel.nio.NioEventLoopGroup;
  5. import io.netty.channel.socket.nio.NioSocketChannel;
  6. import io.netty.handler.codec.string.StringDecoder;
  7. import java.net.InetSocketAddress;
  8. public class client01 {
  9. public static void main(String[] args) throws InterruptedException {
  10. new Bootstrap()
  11. .group(new NioEventLoopGroup())
  12. .channel(NioSocketChannel.class)
  13. .handler(new ChannelInitializer<NioSocketChannel>() {
  14. @Override
  15. protected void initChannel(NioSocketChannel nioSocketChannel) throws Exception {
  16. nioSocketChannel.pipeline().addLast(new StringDecoder());
  17. }
  18. }).connect(new InetSocketAddress(8080))//连接服务器
  19. .sync()
  20. .channel()
  21. .writeAndFlush("nihao");
  22. }
  23. }

组件

EventLoop

  1. #EventLoop是处理事件的类,他包含selectorthread
  2. package com.netty;
  3. import io.netty.bootstrap.ServerBootstrap;
  4. import io.netty.buffer.ByteBuf;
  5. import io.netty.channel.*;
  6. import io.netty.channel.nio.NioEventLoopGroup;
  7. import io.netty.channel.socket.nio.NioServerSocketChannel;
  8. import io.netty.channel.socket.nio.NioSocketChannel;
  9. import java.nio.charset.Charset;
  10. public class server01 {
  11. public static void main(String[] args) {
  12. //服务器启动器,用来装配组件
  13. //创建一个独立的eventgroup
  14. EventLoopGroup group = new DefaultEventLoopGroup(1);
  15. new ServerBootstrap()
  16. //装配eventloop组,
  17. .group(new NioEventLoopGroup(1),new NioEventLoopGroup(2))
  18. //channel具体实现
  19. .channel(NioServerSocketChannel.class)
  20. //eventloop处理逻辑
  21. .childHandler(new ChannelInitializer<NioSocketChannel>() {
  22. @Override
  23. protected void initChannel(NioSocketChannel nioSocketChannel) throws Exception {
  24. nioSocketChannel.pipeline().addLast(new ChannelInboundHandlerAdapter(){
  25. @Override
  26. public void channelRead(ChannelHandlerContext ctx, Object msg) throws Exception {
  27. ByteBuf buf = (ByteBuf) msg;
  28. System.out.println(buf.toString(Charset.defaultCharset()));
  29. System.out.println(Thread.currentThread().getName());
  30. //多个hander需要将消息向下传递
  31. ctx.fireChannelRead(msg);
  32. }
  33. }).addLast(group,new ChannelInboundHandlerAdapter(){
  34. @Override
  35. public void channelRead(ChannelHandlerContext ctx, Object msg) throws Exception {
  36. ByteBuf buf = (ByteBuf) msg;
  37. System.out.println(Thread.currentThread().getName());
  38. System.out.println(buf.toString(Charset.defaultCharset())+"2");
  39. }
  40. });
  41. }
  42. })
  43. .bind(8080);
  44. }
  45. }

channel

  1. //关闭连接
  2. channel.close();
  3. //写入内存但不立即刷出
  4. channel.write();
  5. //将内存的数据刷出
  6. channel.flush();
  7. //写入内存并立即刷出
  8. channel.writeAndFlush("1231");
  9. //用来处理异步处理的结果的类
  10. ChannelFuture
  11. //connect是异步非阻塞方法,调用该方法的线程会继续向下执行代码,连接过程交给另外一个线程处理
  12. 如果不调用sync,连接的线程并没有执行完毕,也就是不存在channel,会出错,主线程需要等待连接建立成功后才能向下运行
  13. .connect(new InetSocketAddress("localhost", 8080));
  14. //连接服务器
  15. 处理的两种方式
  16. 1sync()是让主线程阻塞,等待nio线程执行完建立连接的过程返回连接对象ChannelFuture后在向下执行
  17. //sync()是main线程处理,等待结果返回后自己向下继续处理
  18. channelFuture.sync();
  19. Channel channel = channelFuture.channel();
  20. channel.writeAndFlush();
  21. 2:另外一个处理方式,main调用connect后自己不等待结果,让nio线程自己处理
  22. nio建立连接之后,会继续调用operationComplete方法,并执行里面的代码
  23. channelFuture.addListener(new ChannelFutureListener() {
  24. @Override
  25. public void operationComplete(ChannelFuture channelFuture) throws Exception {
  26. Channel channel = channelFuture.channel();
  27. channel.writeAndFlush();
  28. }
  29. });
  30. 处理断开连接的善后操作
  31. close是异步操作,所以和connect一样,我们有两种处理办法。
  32. channel.close();//异步操作
  33. //同步处理办法
  34. ChannelFuture close = channel.closeFuture();
  35. close.sync();//阻塞当前线程,等待连接关闭后主线程进行善后处理
  36. //异步处理办法,关闭连接的线程关闭连接后执行该方法
  37. close.addListener(new ChannelFutureListener() {
  38. @Override
  39. public void operationComplete(ChannelFuture channelFuture) throws Exception {
  40. System.out.println("善后处理");
  41. }
  42. });
  • 关闭eventloop

    group.shutdownGracefully();//停止eventloop

Future

  • jdk future ```java package com.netty;

import java.util.concurrent.*;

public class future01 {

  1. public static void main(String[] args) throws ExecutionException, InterruptedException {
  2. /**
  3. * jdk版本的future
  4. */
  5. //创建线程池
  6. ExecutorService service = Executors.newFixedThreadPool(2);
  7. Future<Integer> future = service.submit(new Callable<Integer>() {
  8. //提交任务
  9. @Override
  10. public Integer call() throws Exception {
  11. Thread.sleep(1000);
  12. return 70;
  13. }
  14. });
  15. //主线程接收结果
  16. System.out.println(future.get());
  17. }

}

  1. - netty future
  2. ```java
  3. /**
  4. * netty 版本的future
  5. */
  6. NioEventLoopGroup group = new NioEventLoopGroup(2);
  7. EventLoop next = group.next();
  8. Future<Integer> future = next.submit(new Callable<Integer>() {
  9. @Override
  10. public Integer call() throws Exception {
  11. Thread.sleep(1000);
  12. return 70;
  13. }
  14. });
  15. //netty有同步和异步两种
  16. System.out.println(future.get());
  17. //第二种异步
  18. future.addListener(new GenericFutureListener<Future<? super Integer>>() {
  19. @Override
  20. public void operationComplete(Future<? super Integer> future) throws Exception {
  21. System.out.println(future.getNow());
  22. }
  23. });

  • promise ```java package com.netty;

import io.netty.channel.EventLoop; import io.netty.channel.nio.NioEventLoopGroup; import io.netty.util.concurrent.DefaultPromise;

import java.util.concurrent.ExecutionException;

public class promise { public static void main(String[] args) throws ExecutionException, InterruptedException { NioEventLoopGroup group =new NioEventLoopGroup(2); EventLoop next = group.next(); DefaultPromise promise = new DefaultPromise<>(next);
  1. new Thread(()->{
  2. try {
  3. Thread.sleep(1000);
  4. } catch (InterruptedException e) {
  5. e.printStackTrace();
  6. //失败了添加异常
  7. promise.setFailure(e);
  8. }
  9. promise.setSuccess(80);
  10. }).start();
  11. System.out.println(promise.get());
  12. }

}

  1. <a name="DaUl9"></a>
  2. #### popeline和handler
  3. ```java
  4. package com.netty;
  5. import io.netty.bootstrap.ServerBootstrap;
  6. import io.netty.channel.*;
  7. import io.netty.channel.nio.NioEventLoopGroup;
  8. import io.netty.channel.socket.SocketChannel;
  9. import io.netty.channel.socket.nio.NioServerSocketChannel;
  10. import io.netty.channel.socket.nio.NioSocketChannel;
  11. public class hander {
  12. public static void main(String[] args) {
  13. new ServerBootstrap()
  14. .group(new NioEventLoopGroup(1),new NioEventLoopGroup(2))
  15. .channel(NioServerSocketChannel.class)
  16. .childHandler(new ChannelInitializer<NioSocketChannel>() {
  17. @Override
  18. protected void initChannel(NioSocketChannel ch) throws Exception {
  19. ChannelPipeline pipeline = ch.pipeline();
  20. //向流水线添加处理器
  21. //head -> h1->h2->h3->h4->h5->tail
  22. pipeline.addLast(new ChannelInboundHandlerAdapter(){
  23. @Override
  24. public void channelRead(ChannelHandlerContext ctx, Object msg) throws Exception {
  25. System.out.println("h1");
  26. super.channelRead(ctx, msg);
  27. }
  28. });
  29. pipeline.addLast(new ChannelInboundHandlerAdapter(){
  30. @Override
  31. public void channelRead(ChannelHandlerContext ctx, Object msg) throws Exception {
  32. System.out.println("h2");
  33. ctx.fireChannelRead(msg);
  34. }
  35. });
  36. pipeline.addLast(new ChannelInboundHandlerAdapter(){
  37. @Override
  38. public void channelRead(ChannelHandlerContext ctx, Object msg) throws Exception {
  39. System.out.println("h3");
  40. //服务器发送数据才会触发出站处理器
  41. //ch的writeAndFlush是从tail从后向前执行出站处理器
  42. ch.writeAndFlush(ctx.alloc().buffer().writeBytes("nishi".getBytes()));
  43. //ctx的writeAndFlush是从当前处理器向前寻找出站处理器
  44. //ctx.writeAndFlush(ctx.alloc().buffer().writeBytes("132".getBytes()));
  45. }
  46. });
  47. pipeline.addLast(new ChannelOutboundHandlerAdapter(){
  48. @Override
  49. public void write(ChannelHandlerContext ctx, Object msg, ChannelPromise promise) throws Exception {
  50. System.out.println("h4");
  51. super.write(ctx, msg, promise);
  52. }
  53. });
  54. pipeline.addLast(new ChannelOutboundHandlerAdapter(){
  55. @Override
  56. public void write(ChannelHandlerContext ctx, Object msg, ChannelPromise promise) throws Exception {
  57. System.out.println("h5");
  58. super.write(ctx, msg, promise);
  59. }
  60. });
  61. }
  62. }).bind(8080);
  63. }
  64. }

image.png这里使用的ch的writeandflush
image.png这里使用的ctx的writeandflush,因为h3之前没有出站处理器,所以没有打印结果

handler的调试工具类

  1. package com.netty;
  2. import io.netty.buffer.ByteBufAllocator;
  3. import io.netty.channel.embedded.EmbeddedChannel;
  4. public class testhandler {
  5. public static void main(String[] args) {
  6. /**
  7. * 假设以上有n个入站处理器和n个出站处理器
  8. */
  9. EmbeddedChannel channel = new EmbeddedChannel();
  10. //模拟入站操作
  11. channel.writeInbound(ByteBufAllocator.DEFAULT.buffer().writeBytes("1231".getBytes()));
  12. //模拟出站操作
  13. channel.writeOutbound(ByteBufAllocator.DEFAULT.buffer().writeBytes("1231".getBytes()));
  14. }
  15. }

Bytebuf

  1. package com.netty;
  2. import io.netty.buffer.ByteBuf;
  3. import io.netty.buffer.ByteBufAllocator;
  4. public class buf {
  5. public static void main(String[] args) {
  6. //默认大小是256,也可以自己设置,netty的bytebuf可以自动扩容
  7. ByteBuf buffer = ByteBufAllocator.DEFAULT.buffer();
  8. buffer.writeBytes("1213".getBytes());
  9. //支持两种内存分配,堆内存和直接内存(读写效率高)
  10. ByteBuf buf1 = ByteBufAllocator.DEFAULT.heapBuffer();//堆内存,垃圾回收
  11. ByteBuf buf2 = ByteBufAllocator.DEFAULT.directBuffer();//直接内存,建议手动释放
  12. //池化
  13. //4.1之后windows平台默认开启池化
  14. }
  15. }

组成 image.png bytebuf有两个指针分别用于读和写,而且自动动态扩容。 扩容规则: 未超过512,按16的整数倍扩容 超过512,按照 2 的n次方扩容,512是2^9


写入

  1. 可以写入所有类型
  2. writeIntLE() //大端写入,一般采用
  3. writeInt() //小端写入

读取

  1. buffer.readByte();
  2. buffer.markReaderIndex();//标记都指针位置
  3. buffer.resetReaderIndex();//回到标记位置

内存回收
零拷贝

  1. //物理内存一致,但是有独立的指针
  2. package com.netty;
  3. import io.netty.buffer.ByteBuf;
  4. import io.netty.buffer.ByteBufAllocator;
  5. import java.nio.charset.Charset;
  6. import java.nio.charset.StandardCharsets;
  7. public class buf {
  8. public static void main(String[] args) {
  9. //默认大小是256,也可以自己设置,netty的bytebuf可以自动扩容
  10. ByteBuf buffer = ByteBufAllocator.DEFAULT.buffer();
  11. buffer.writeBytes("123456789\n123132145465\n".getBytes(StandardCharsets.UTF_8));
  12. ByteBuf buf = buffer.slice(0,9);
  13. System.out.println(buf.toString(Charset.defaultCharset()));
  14. }
  15. }
  16. //内存释放使用的是计数
  17. buf.release();//计数减1
  18. buf.retain();//计数加1
  19. buf.duplicate();//零拷贝,拷贝全部
  20. buf.copy();//数据复制,拷贝的和原来的不是一块内存
  21. 小的bytebuf整合为大的,零拷贝
  22. CompositeByteBuf byteBufs = ByteBufAllocator.DEFAULT.compositeBuffer();
  23. byteBufs.addComponent(true,buf1,buf2);
  24. 在切片的过程中没有发生数据的赋值,两个buf使用的同一块内存的数据
  25. 切片后会对新产生的bytebuf的容量加以限制,不能新增,只能修改

工具类unpooled

  1. 提供了非池化bytebuf的创建、组合复制
  2. Unpooled.wrappedBuffer(buffer,buf);

总结

bytebuf的优势:

  1. 使用池化技术,可以重复利用池中的bytebuf,节省内存
  2. 读写独立
  3. 可以自动扩容
  4. 可以零拷贝,减少内存赋值

Netty进阶

粘包和半包

粘包: 一次发送多个数据包 产生原因: 接收方的缓存设置过大 滑动窗口缓存了多个报文 半包: 没有接收到一个完整的数据包,数据不完整 产生原因: MSS限制 接收方缓存设置太小,一次存放不下全部报文 滑动窗口无法发送全部


粘包半包解决方案

  1. 短连接

解决粘包问题,不能解决半包问题

  1. 定长解码器

能够正确解决粘包半包问题,但是浪费内存
image.png

  1. //FixedLengthFrameDecoder
  2. //server
  3. public class ChildHandler extends ChannelInitializer<SocketChannel> {
  4. @Override
  5. protected void initChannel(SocketChannel socketChannel) throws Exception {
  6. Logger logger = LoggerFactory.getLogger(ChildHandler.class);
  7. ChannelPipeline pipeline = socketChannel.pipeline();
  8. pipeline.addLast(new FixedLengthFrameDecoder(20)); //从channel中每次读取20字节
  9. pipeline.addLast(new StringDecoder());
  10. pipeline.addLast(new EchoServerHandler());//打印服务器handler
  11. pipeline.addLast(new StringEncoder());
  12. }
  13. }
  1. 行解码器

    A decoder that splits the received ByteBufs on line endings.Both “\n” and “\r\n” are handled. The byte stream is expected to be in UTF-8 character encoding or ASCII. The current implementation uses direct byte to char cast and then compares that char to a few low range ASCII characters like ‘\n’ or ‘\r’. UTF-8 is not using low range [0..0x7F] byte values for multibyte codepoint representations therefore fully supported by this implementation. For a more general delimiter-based decoder, see DelimiterBasedFrameDecoder.

  1. //LineBasedFrameDecoder
  2. public class ChildHandler extends ChannelInitializer<SocketChannel> {
  3. @Override
  4. protected void initChannel(SocketChannel socketChannel) throws Exception {
  5. Logger logger = LoggerFactory.getLogger(ChildHandler.class);
  6. ChannelPipeline pipeline = socketChannel.pipeline();
  7. pipeline.addLast(new LineBasedFrameDecoder(1024)); //行解码器将读到数据按照\n划分,如果在最大长度(1024)仍未读到换行符,则抛出异常。
  8. pipeline.addLast(new StringDecoder());
  9. //pipeline.addLast(new TimeServerHandler());
  10. pipeline.addLast(new EchoServerHandler());
  11. pipeline.addLast(new StringEncoder());
  12. }
  13. }
  1. LTC解码器

    lengthFieldOffset = 0 //长度字段偏移量 lengthFieldLength = 2 //长度字段长度 lengthAdjustment = 0 //长度字段之后还要隔几个字节才是内容 initialBytesToStrip = 0 //从头剥离几个字节 image.png image.png

  1. LengthFieldBasedFrameDecoder
  1. 分隔符解码器

    1. public class ChildHandler extends ChannelInitializer<SocketChannel> {
    2. @Override
    3. protected void initChannel(SocketChannel socketChannel) throws Exception {
    4. Logger logger = LoggerFactory.getLogger(ChildHandler.class);
    5. ChannelPipeline pipeline = socketChannel.pipeline();
    6. ByteBuf byteBuf = Unpooled.copiedBuffer("$_".getBytes());
    7. pipeline.addLast(new DelimiterBasedFrameDecoder(1024,byteBuf));//分隔符解码器,按照指定分隔符划分。并且划分之后数据不含分隔符。
    8. pipeline.addLast(new StringDecoder());
    9. //pipeline.addLast(new TimeServerHandler());
    10. pipeline.addLast(new EchoServerHandler());
    11. pipeline.addLast(new StringEncoder());
    12. }
    13. }

    序列化

    Java序列化的性能较低,并且无法跨语言,序列化效率低并且文件过大。 如今业界主流的编解码框架有 谷歌的 protobuf,脸书的thrift以及使用并不广泛的JBoss Marshalling。

netty Java序列化

  1. //server
  2. public class ChildHandler extends ChannelInitializer<SocketChannel> {
  3. @Override
  4. protected void initChannel(SocketChannel socketChannel) throws Exception {
  5. Logger logger = LoggerFactory.getLogger(ChildHandler.class);
  6. ChannelPipeline pipeline = socketChannel.pipeline();
  7. pipeline.addLast(new ObjectDecoder(1024*1024, ClassResolvers.weakCachingResolver(
  8. this.getClass().getClassLoader()
  9. )));
  10. pipeline.addLast(new ObjectEncoder());
  11. pipeline.addLast(new GoodsServerHandler());
  12. }
  13. }
  14. //client
  15. public class NettyClient {
  16. public static void main(String[] args) throws InterruptedException {
  17. ChannelFuture future = new Bootstrap()
  18. .group(new NioEventLoopGroup())
  19. .channel(NioSocketChannel.class)
  20. .handler(new ChannelInitializer<NioSocketChannel>() {
  21. @Override
  22. protected void initChannel(NioSocketChannel nioSocketChannel) throws Exception {
  23. ChannelPipeline pipeline = nioSocketChannel.pipeline();
  24. pipeline.addLast(new ObjectDecoder(1024*1024, ClassResolvers.cacheDisabled(this.getClass().getClassLoader())));
  25. pipeline.addLast(new ObjectEncoder());
  26. pipeline.addLast(new ChannelInboundHandlerAdapter() {
  27. @Override
  28. public void channelRead(ChannelHandlerContext ctx, Object msg) throws Exception {
  29. System.out.println(msg);
  30. }
  31. @Override
  32. public void exceptionCaught(ChannelHandlerContext ctx, Throwable cause) throws Exception {
  33. cause.printStackTrace();
  34. }
  35. });
  36. }
  37. }).connect(new InetSocketAddress(8080))//连接服务器
  38. .sync();
  39. Channel channel = future.channel();
  40. for (int i = 0; i < 10; i++) {
  41. UserOrder userOrder = new UserOrder(150322154+i,"zhangsan"+i,"手机");
  42. channel.writeAndFlush(userOrder);
  43. }
  44. }
  45. }

Protobuf 基本使用

使用protobuf,我们不能使用自己创建的类,而是需要编写扩展名为.proto的配置文件。然后使用工具生成类。

  1. syntax ="proto3"; //什么版本就写什么
  2. package netty; //默认包名
  3. option java_package="项目存放类的全包名如com.netty02.bean"; //如果不一致,会报错,还要自己改包名很麻烦。
  4. option java_outer_classname = "生成的类的类名"; //如果我们要使用的bean类名叫xxx,这里就写xxxProto,因为生成的类是 xxxProto,该类里面有个内部类叫 xxx
  5. //message定义类属性
  6. message xxx{
  7. int32 reqId =0;
  8. string name =2;
  9. string address =3;
  10. }
  11. //最后需要注意的是v2和v3有改动,具体请自行查阅。

然后就是使用工具生成类了。
在bin目录下有可执行文件,我这里在当前目录下创建新文件,会车之后,当前目录下就会出现结构和java_package一样的目录,在里面就能找到java文件,我们复制进项目即可。
image.png

  1. //server
  2. public class ChildHandler extends ChannelInitializer<SocketChannel> {
  3. @Override
  4. protected void initChannel(SocketChannel socketChannel) throws Exception {
  5. Logger logger = LoggerFactory.getLogger(ChildHandler.class);
  6. ChannelPipeline pipeline = socketChannel.pipeline();
  7. //解码
  8. pipeline.addLast(new ProtobufVarint32FrameDecoder());
  9. pipeline.addLast(new ProtobufDecoder(SubBeanProto.SubBean.getDefaultInstance())); //这里面就是我们要解码的类的类型。
  10. pipeline.addLast(new GoodsServerHandler()); //自定义处理器
  11. pipeline.addLast(new ProtobufVarint32LengthFieldPrepender());
  12. pipeline.addLast(new ProtobufEncoder()); //编码
  13. }
  14. }
  15. //client
  16. public static void main(String[] args) throws InterruptedException {
  17. ChannelFuture future = new Bootstrap()
  18. .group(new NioEventLoopGroup())
  19. .channel(NioSocketChannel.class)
  20. .handler(new ChannelInitializer<NioSocketChannel>() {
  21. @Override
  22. protected void initChannel(NioSocketChannel nioSocketChannel) throws Exception {
  23. ChannelPipeline pipeline = nioSocketChannel.pipeline();
  24. pipeline.addLast(new ProtobufVarint32FrameDecoder());
  25. pipeline.addLast(new ProtobufDecoder(SubRespProto.SubResp.getDefaultInstance()));
  26. pipeline.addLast(new ChannelInboundHandlerAdapter() {
  27. @Override
  28. public void channelRead(ChannelHandlerContext ctx, Object msg) throws Exception {
  29. SubRespProto.SubResp resp = (SubRespProto.SubResp) msg;
  30. System.out.println(resp.toString());
  31. }
  32. @Override
  33. public void exceptionCaught(ChannelHandlerContext ctx, Throwable cause) throws Exception {
  34. cause.printStackTrace();
  35. }
  36. });
  37. pipeline.addLast(new ProtobufVarint32LengthFieldPrepender());
  38. pipeline.addLast(new ProtobufEncoder());
  39. }
  40. }).connect(new InetSocketAddress(8080))//连接服务器
  41. .sync();
  42. Channel channel = future.channel();
  43. for (int i = 0; i < 10; i++) {
  44. //使用protobuf
  45. //这里构建对象使用builder,获取builder方法如下
  46. SubBeanProto.SubBean.Builder builder =SubBeanProto.SubBean.newBuilder();
  47. builder.setSubReqId(i);
  48. builder.setName("zhangsan"+i);
  49. builder.setProductName("手机");
  50. channel.writeAndFlush(builder.build());
  51. }
  52. }

上面有两个netty支持protobuf的编解码器,ProtobufVarint32FrameDecoder和ProtobufVarint32LengthFieldPrepender,这两个编解码器请看源码。
源码分析博客

protobuf只能处理ascall码,汉字会根据系统设置编码,使用toString方法,不能将汉字解码,建议单独正确解码后打印。

结果
image.png

协议

Redis通信协议

  1. 例:
  2. set key value
  3. 1.语句长度 *3
  4. 2.命令长度(set $3
  5. 3.命令 set
  6. 4.长度(key $4
  7. 5. name
  8. 6.长度 value $8
  9. 7. zhangsan

Http通信协议

  1. package com.netty;
  2. import io.netty.bootstrap.ServerBootstrap;
  3. import io.netty.channel.*;
  4. import io.netty.channel.nio.NioEventLoopGroup;
  5. import io.netty.channel.socket.nio.NioServerSocketChannel;
  6. import io.netty.channel.socket.nio.NioSocketChannel;
  7. import io.netty.handler.codec.http.DefaultFullHttpResponse;
  8. import io.netty.handler.codec.http.HttpRequest;
  9. import io.netty.handler.codec.http.HttpResponseStatus;
  10. import io.netty.handler.codec.http.HttpServerCodec;
  11. import static io.netty.handler.codec.http.HttpHeaderNames.CONTENT_LENGTH;
  12. public class httpserve {
  13. public static void main(String[] args) throws InterruptedException {
  14. ServerBootstrap bootstrap = new ServerBootstrap()
  15. .group(new NioEventLoopGroup())
  16. .channel(NioServerSocketChannel.class)
  17. .childHandler(new ChannelInitializer<NioSocketChannel>() {
  18. @Override
  19. protected void initChannel(NioSocketChannel ch) throws Exception {
  20. ChannelPipeline pipeline = ch.pipeline();
  21. pipeline.addLast(new HttpServerCodec());
  22. pipeline.addLast(new SimpleChannelInboundHandler<HttpRequest>(){
  23. @Override
  24. protected void channelRead0(ChannelHandlerContext ctx, HttpRequest msg) throws Exception {
  25. System.out.println(msg);
  26. DefaultFullHttpResponse res =new DefaultFullHttpResponse(msg.getProtocolVersion(), HttpResponseStatus.OK);
  27. byte[] bytes = "nihao".getBytes();
  28. res.headers().setInt(CONTENT_LENGTH,bytes.length);
  29. res.content().writeBytes(bytes);
  30. ctx.writeAndFlush(res);
  31. }
  32. });
  33. }
  34. });
  35. ChannelFuture bind = bootstrap.bind(8080);
  36. bind.sync();
  37. }
  38. }

自定义协议要素

  1. 魔数:

用来在第一时间判断是否是无效数据包

  1. 版本号:

可支持协议的升级

  1. 序列化算法

消息正文到底采用哪种序列化反序列化方式

  1. 指令类型

是登录注册还是其他业务

  1. 请求序号

为了双工通信,提供异步功能

  1. 正文长度
  2. 消息正文

编码解码

优化

连接超时

  1. .option(ChannelOption.CONNECT_TIMEOUT_MILLIS,5000)