服务安全
服务安全概述
- SELinux
- 数据加密 (http https)
- 常用服务安全 (dns)
SELinux
访问控制分类
- DAC
Discretionary Access Control,自主访问被控制,依据进程的所有者与文件资源的rwx权限来决定有无访问权限。
缺点:- 如果某个进程以root身份运行,可能被恶意使用
- 用户可以取得进程来获得文件的访问权限
总结:DAC针对控制的主体是用户
- MAC
Mandatory Access Control,强制访问控制,依据策略规则决定进程可以访问哪些文件
优点:- 即使是root用户,在使用不同进程时,所能取得的权限并不一定是root,需要看当时进程的设置而定
总结:MAC针对控制的主体是进程
SELinux介绍
SELinux(安全增强型Linux)是美国国家安全局开发,是实现系统安全性的额外机制,其目标之一是保护用户的数据免受已泄露的系统服务的威胁。
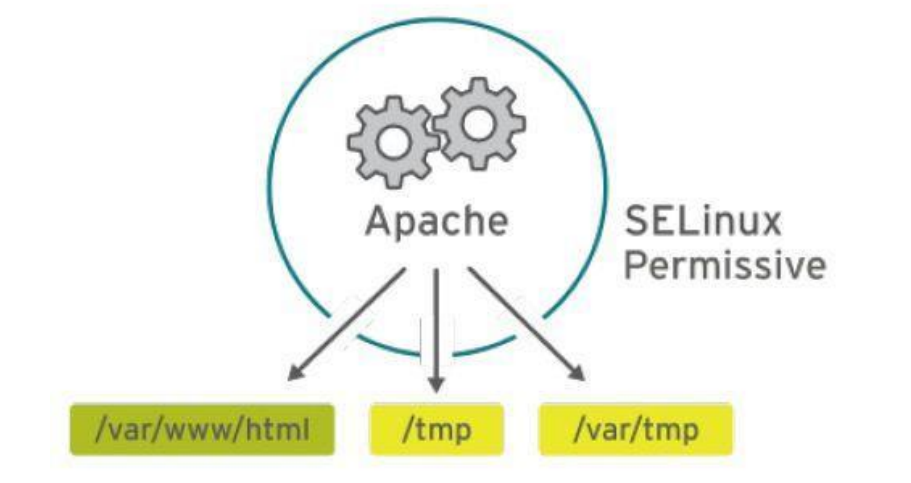
SELinux提供一些默认的策略(Policy), 并在该策略内提供多个规则(rule),让用户可以选择是否启用该控制规则
例如:在强制访问控制的设置下,进程能够活动的空间变小了,httpd进程默认只能访问/var/www/目录中的文件,所以即使httpd被黑客取得了控制权,其也将无法对系统中其它目录或文件进行浏览或更改。
selinux 可以对进程使用的端口和文件进行限制
无强制访问控制
[root@localhost ~]#cat /etc/selinux/configSELINUX=disabled

有强制访问控制
[root@localhost ~]#cat /etc/selinux/config
SELINUX=enforcing

- 许可访问控制
[root@localhost ~]#cat /etc/selinux/config
SELINUX=permissive
总结:
- selinux 安全增强型linux
- 限制进程读系统中文件以及目录的访问
- 策略 enforcing permissive
- 规则
SELinux策略模式设置
查看selinux 策略
[root@localhost ~]# ls -Z
-rw-r--r--. root    root    unconfined_u:object_r:admin_home_t:s0 1.txt
-rw-r--r--. root    root    unconfined_u:object_r:admin_home_t:s0 2.txt
-rw-------. root    root    system_u:object_r:admin_home_t:s0 anaconda-ks.cfg
-rw-r--r--. root    root    unconfined_u:object_r:admin_home_t:s0 a.txt
-rw-r--r--. root    root    unconfined_u:object_r:admin_home_t:s0 b.txt
-rw-r--r--. tcpdump tcpdump unconfined_u:object_r:admin_home_t:s0 file.tcpdump
-rw-r--r--. root    root    unconfined_u:object_r:admin_home_t:s0 httpconf.md5
-rw-r--r--. root    root    system_u:object_r:admin_home_t:s0 initial-setup-ks.cfg
-rw-r--r--. root    root    unconfined_u:object_r:admin_home_t:s0 VMware-Workstation-Full-16.1.1-17801498
配置文件 : /etc/selinux/config
- 交互式
关闭selinux
[root@localhost ~]# vim /etc/selinux/config
# This file controls the state of SELinux on the system.
# SELINUX= can take one of these three values:
#   enforcing - SELinux security policy is enforced.   强制
#   permissive - SELinux prints warnings instead of enforcing 警告(放任的)
#   disabled - No SELinux policy is loaded.  无效的
SELINUX=disabled
# SELINUXTYPE= can take one of three two values:  selinux 类型
#   targeted - Targeted processes are protected,
#   minimum - Modification of targeted policy. Only selected processes are
protected.
#   mls - Multi Level Security protection.
#  mls > targeted > minimum

SELINUXTYPE=targeted

[root@localhost ~]# reboot
- 非交互式
[root@localhost ~]# sed -ri 's/SELINUX=disabled/SELINUX=enforcing/' /etc/selinux/config
[root@localhost ~]# grep SELINUX /etc/selinux/config
# SELINUX= can take one of these three values:
SELINUX=enforcing
# SELINUXTYPE= can take one of three two values:
SELINUXTYPE=targeted

[root@localhost ~]# reboot
- 命令行
[root@localhost ~]# getenforce
[root@localhost ~]# setenforce 0 #0为许可模式,1为强制模式
[root@localhost ~]# sestatus
SELinux status:         enabled
SELinuxfs mount:        /sys/fs/selinux
SELinux root directory:     /etc/selinux
Loaded policy name:       targeted
Current mode:          enforcing
Mode from config file:     enforcing
Policy MLS status:       enabled
Policy deny_unknown status:   allowed
Max kernel policy version:    31
[root@localhost ~]# ps auxZ | grep httpd
数据加密技术
数据加密概述
加/解密就是函数变换的过程

加密体系分类
根据加密钥匙不同,可以分为:
- 传统加密/对称加密(des、base64)
- 加密和解密使用一同把钥匙
- 优点:效率高,加密速度快,可以加密大量的数据,几个G 至几十个G
- 缺点:密钥的传递问题

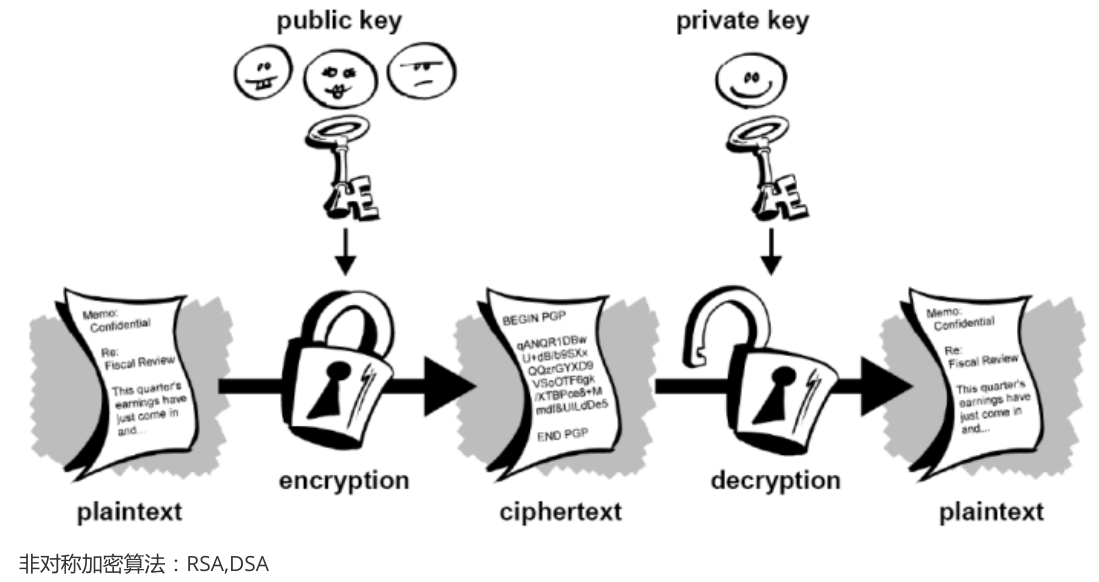
- 公钥加密/非对称加密(rsa 、dsa)
- 加密和解密使不用的同钥匙,一般是公钥加密,私钥解密 优点:解决了密钥传递的问题
- 缺点:效率低,加密速度慢,比对称加密速度慢1000倍,只能加密少量数据
- 单向加密
只能单向加密,不可逆
Hash算法:md5 、sha1
对称加密 OpenSSL
#加密
[root@localhost ~]# openssl enc -des3 -in /etc/passwd -out /home/passwd.enc
#解密
[root@localhost ~]# openssl enc -des3 -d -in /home/passwd.enc -out
/home/pwd.enc

#加密
[root@localhost ~]# openssl enc -des3 -a -in /etc/passwd -out /home/passwd1.enc
#解密
[root@localhost ~]# openssl enc -des3 -a -d -in /home/passwd1.enc -out
/password_new.txt


# 对称加密应用例子
# 用DES3算法的CBC模式加密文件plaintext.doc,
# 加密结果输出到文件ciphertext.bin
openssl enc -des3 -salt -in plaintext.doc -out ciphertext.bin

# 用DES3算法的OFB模式解密文件ciphertext.bin,
# 提供的口令为trousers,输出到文件plaintext.doc
# 注意:因为模式不同,该命令不能对以上的文件进行解密
openssl enc -des-ede3-ofb -d -in ciphertext.bin -out plaintext.doc -pass pass:trousers


生成1024位DSA参数集,并输出到文件dsaparam.pem:
[root@linuxcool ~]# openssl dsaparam -out dsaparam.pem 1024
使用参数文件dsaparam.pem生成DSA私钥匙,采用3DES加密后输出到文件dsaprivatekey.pem:
[root@linuxcool ~]# openssl gendsa -out dsaprivatekey.pem -des3 dsaparam.pem
产生1024位RSA私匙,用3DES加密它,口令为trousers,输出到文件rsaprivatekey.pem:

[root@linuxcool ~]# openssl genrsa -out rsaprivatekey.pem -passout pass:trousers -des3 1024
非对称加密 GnuPG
公钥加密,私钥解密
GnuPG(开源)非对称加密:
主机A: 必须通过gdm或文本登录系统,不能使用su进行切换。
[root@localhost ~]# useradd jack
[root@localhost ~]# su - jack
[jack@localhost ~]$
#错误的,不能生密钥
下方是正确的
生成秘钥
[jack@localhost ~]$ gpg --gen-key
gpg (GnuPG) 2.0.22; Copyright (C) 2013 Free Software Foundation, Inc.
This is free software: you are free to change and redistribute it.
There is NO WARRANTY, to the extent permitted by law.
请选择您要使用的密钥种类:
 (1) RSA and RSA (default)
 (2) DSA and Elgamal
 (3) DSA (仅用于签名)
 (4) RSA (仅用于签名)
您的选择? 1
RSA 密钥长度应在 1024 位与 4096 位之间。
您想要用多大的密钥尺寸?(2048)
您所要求的密钥尺寸是 2048 位
请设定这把密钥的有效期限。
    0 = 密钥永不过期
  <n>  = 密钥在 n 天后过期
  <n>w = 密钥在 n 周后过期
  <n>m = 密钥在 n 月后过期
  <n>y = 密钥在 n 年后过期
密钥的有效期限是?(0) 0
密钥永远不会过期
以上正确吗?(y/n)y
You need a user ID to identify your key; the software constructs the user ID
from the Real Name, Comment and Email Address in this form:
  "Heinrich Heine (Der Dichter) <heinrichh@duesseldorf.de>"
真实姓名:jackuser
电子邮件地址:jackuser@aiops.net.cn
注释:abc
您选定了这个用户标识:
 “jackuser (abc) <jackuser@aiops.net.cn>”
更改姓名(N)、注释(C)、电子邮件地址(E)或确定(O)/退出(Q)?O
您需要一个密码来保护您的私钥。

我们需要生成大量的随机字节。这个时候您可以多做些琐事(像是敲打键盘、移动
鼠标、读写硬盘之类的),这会让随机数字发生器有更好的机会获得足够的熵数。

gpg: 密钥 9A2CF9E0 被标记为绝对信任
公钥和私钥已经生成并经签名。
gpg: 正在检查信任度数据库
gpg: 需要 3 份勉强信任和 1 份完全信任,PGP 信任模型
gpg: 深度:0 有效性:  1 已签名:  0 信任度:0-,0q,0n,0m,0f,1u
pub  2048R/9A2CF9E0 2019-02-26
密钥指纹 = 0BE4 1DCA 4E00 6954 83D8 5C5E 5F25 BF4D 9A2C F9E0
uid         jackuser (abc) <jackuser@aiops.net.cn>
sub  2048R/7873327D 2019-02-26
查看密钥
[jack@localhost ~]$ gpg --list-keys
/home/jack/.gnupg/pubring.gpg
-----------------------------
pub  2048R/9A2CF9E0 2019-02-26
uid         jackuser (abc) <jackuser@aiops.net.cn>
sub  2048R/7873327D 2019-02-26
发送公钥至密钥接收方(接收方是主机B)
第一步:导出
[jack@localhost ~]$ gpg -a -o jackuserpub  --export jackuser
#-o 导出位置及文件名
#--export jackuser  表示导出哪个用户的,是UID(查看秘钥看到的UID)
第二步:发送
[jack@localhost ~]$ scp jackuserpub root@192.168.2.20:/home/owen
#注意要使用root用户
主机B:
第一步:导入传过来的公钥
[owen@localhost ~]$ gpg --import jackuserpub
gpg: 已创建目录‘/home/owen/.gnupg’
gpg: 新的配置文件‘/home/owen/.gnupg/gpg.conf’已建立
gpg: 警告:在‘/home/owen/.gnupg/gpg.conf’里的选项于此次运行期间未被使用
gpg: 钥匙环‘/home/owen/.gnupg/secring.gpg’已建立
gpg: 钥匙环‘/home/owen/.gnupg/pubring.gpg’已建立
gpg: /home/owen/.gnupg/trustdb.gpg:建立了信任度数据库
gpg: 密钥 9A2CF9E0:公钥“jackuser (abc) <jackuser@aiops.net.cn>”已导入
gpg: 合计被处理的数量:1
gpg:      已导入:1 (RSA: 1)
第二步:查看
[owen@localhost ~]$ gpg --list-keys
/home/owen/.gnupg/pubring.gpg
-----------------------------
pub  2048R/9A2CF9E0 2019-02-26
uid         jackuser (abc) <jackuser@aiops.net.cn>
sub  2048R/7873327D 2019-02-26
第三步:使用公钥加密文件
使用公钥加密文件 123.enc.txt
[owen@localhost ~]$ gpg -e -a -r jackuser 123.enc.txt #jackuser是uid
gpg: 7873327D:没有证据表明这把密钥真的属于它所声称的持有者
pub 2048R/7873327D 2019-02-26 jackuser (abc) <jackuser@aiops.net.cn>
主钥指纹: 0BE4 1DCA 4E00 6954 83D8 5C5E 5F25 BF4D 9A2C F9E0
子钥指纹: F426 9D44 A5CB 0A00 C88E FDAF CF27 0859 7873 327D
这把密钥并不一定属于用户标识声称的那个人。如果您真的知道自
己在做什么,您可以在下一个问题回答 yes。
无论如何还是使用这把密钥吗?(y/N)y

[owen@localhost ~]$
[owen@localhost ~]$ ls
jackuserpub   123.enc.txt   123.enc.txt.asc(这是生成加密的文件)

#又一个实例:指定加密文件输出目录
[owen@localhost ~]$ gpg -e -a -o /tmp/456.txt.asc -r jackuser 456.txt
gpg: 7873327D:没有证据表明这把密钥真的属于它所声称的持有者
pub 2048R/7873327D 2019-02-26 jackuser (abc) <jackuser@aiops.net.cn>
主钥指纹: 0BE4 1DCA 4E00 6954 83D8 5C5E 5F25 BF4D 9A2C F9E0
子钥指纹: F426 9D44 A5CB 0A00 C88E FDAF CF27 0859 7873 327D
这把密钥并不一定属于用户标识声称的那个人。如果您真的知道自
己在做什么,您可以在下一个问题回答 yes。
无论如何还是使用这把密钥吗?(y/N)y
第四步:传给公钥拥有者(主机A jack)
[owen@localhost ~]$ scp 123.enc.txt.asc root@192.168.2.10:/home/jack
主机A操作解密:必须gdm登录或文本登录
[jack@localhost ~]$ gpg -d -a -o 123.txt 123.enc.txt.asc  #-o 指定输出目录
您需要输入密码,才能解开这个用户的私钥:“jackuser (abc) <jackuser@aiops.net.cn>”
2048 位的 RSA 密钥,钥匙号 7873327D,建立于 2019-02-26 (主钥匙号 9A2CF9E0)
gpg: 由 2048 位的 RSA 密钥加密,钥匙号为 7873327D、生成于 2019-02-26
  “jackuser (abc) <jackuser@aiops.net.cn>”
非对称加密 SSL/TLS
加密传输的数据
用于验证通信的双方是彼此声称的那个人!
CA简介
CA:CertificateAuthority的缩写,通常翻译成认证权威或者认证中心,主要用途是为用户发放数字证书
- 功能:证书发放、证书更新、证书撤销和证书验证。
- 作用:身份认证,数据的不可否认性
证书请求文件:CSR是Cerificate Signing Request的英文缩写,即证书请求文件,也就是证书申请者在申请数字证书时由CSP(加密服务提供者)在生成私钥的同时也生成证书请求文件,这个证书请求文件即我们所说的自签名证书,证书申请者只要把CSR文件提交给证书颁发机构后,证书颁发机构使用其根证书的私钥签名就生成了证书文件,也就是颁发给用户的证书
HTTP转HTTPS
HTTPS(全称:Hyper Text Transfer Protocol over Secure Socket Layer),是以安全为目标的HTTP通道,简单讲是HTTP的安全版。
SSL:(Secure Socket Layer)安全套接字层,通过一种机制在互联网上提供密钥传输 其主要目标是保证两个应用间通信数据的保密性和可靠性,可在服务器端和用户端同时支持的一种加密算法 目前主流版本SSLV2、SSLV3(常用)。

SSL四次握手安全传输:
加密协议: SSL 3.0 或 TLS 1.0
C -------------------------------------------------> S
1. 请求一个安全的会话,协商算法

C <------------------------------------------------- S
2. 将自己Server端的证书给客户端,证书中包括了64自己的公钥

C -------------------------------------------------> S
3. 客户端用浏览器中存放CA的根证书检测client证书,如果对,使用CA根证书中的公钥解密 得到CA的公钥; 然后生成一把对称的加密密钥,用client的公钥加密这个密钥发给CA , 后期使用对称密钥加密数据

C <------------------------------------------------> S
4.client使用私钥解密,得到对称的加密密钥然后,使用对称加密密钥来进行安全快速传输数据
CA认证实现

CA 实现原理:
- Web server 向CA证书颁发机构请求申请证书。
- CA 证书颁发机构使用其根证书的私钥签名生成证书文件,然后颁发证书给Web server 端
- User 用户请求一个安全的会话连接,Web 服务端把证书发送给User 客户端
- User 在本地的根CA 证书列表中检查这个证书的资质
环境准备:
所有主机
[root@localhost ~]# cat /etc/hosts
...
192.168.2.10 ca.aiops.net.cn
192.168.2.20 www.aiops.net.cn
CA主机
[root@localhost ~]# hostnamectl set-hostname ca
#软件是否安装
[root@ca ~]# rpm -q openssl
openssl-1.0.2k-12.el7.x86_64
[root@ca ~]# rpm -ql openssl | grep /etc*
/etc/pki/CA
/etc/pki/CA/certs
/etc/pki/CA/crl
/etc/pki/CA/newcerts
/etc/pki/CA/private
/etc/pki/tls/certs/Makefile
/etc/pki/tls/certs/make-dummy-cert
/etc/pki/tls/certs/renew-dummy-cert
/etc/pki/tls/misc/CA
/etc/pki/tls/misc/c_hash
/etc/pki/tls/misc/c_info
/etc/pki/tls/misc/c_issuer
/etc/pki/tls/misc/c_name

[root@ca ~]# ls /etc/pki/tls/
cert.pem  certs  misc  openssl.cnf  private
①修改CA配置文件
修改50 55 130  135  138行
#vim /etc/pki/tls/openssl.cnf
[ CA_default ]
dir       = /etc/pki/CA   #保存目录    # Where everything is kept
certs      = $dir/certs       # Where the issued certs are kept
crl_dir     = $dir/crl        # Where the issued crl are kept
database     = $dir/index.txt     # database index file.
#unique_subject = no          # Set to 'no' to allow creation of
                    # several ctificates with same subject.
new_certs_dir  = $dir/newcerts     # default place for new certs.
certificate   = $dir/ca.crt   #修改   # The CA certificate ##
serial      = $dir/serial      # The current serial number
crlnumber    = $dir/crlnumber     # the current crl number
                    # must be commented out to leave a V1 CRL
crl       = $dir/crl.pem      # The current CRL
private_key   = $dir/private/ca.key  #修改 # The private key 私钥
RANDFILE     = $dir/private/.rand   # private random number file
x509_extensions = usr_cert        # The extentions to add to the cert

[ req_distinguished_name ]

countryName           = Country Name (2 letter code)
countryName_default       = CN     #修改
countryName_min         = 2
countryName_max         = 2
stateOrProvinceName       = State or Province Name (full name)
stateOrProvinceName_default   = BJ   #修改市 或 省份
localityName           = Locality Name (eg, city)
localityName_default       = BJ     #城市
0.organizationName        = Organization Name (eg, company)
0.organizationName_default    = aiops  #公司组织的名称
②生成CA私钥和CA自签名证书
生成的私钥 传给别人权限是不足的要改成644 传完之后给为600
- 生成CA私钥
[ CA_default ]
dir       = /etc/pki/CA   #保存目录
database     = $dir/index.txt     # database index file.
crl_dir     = $dir/crl        # Where the issued crl are kept
new_certs_dir  = $dir/newcerts     # default place for new certs.
serial      = $dir/serial      # The current serial number 当前序列号

【准备文件 数据库文件index.txt和序列号文件serial】
[root@ca tls]# cd /etc/pki/CA
[root@ca CA]# ls
certs crl newcerts private
[root@ca CA]# touch index.txt
[root@ca CA]# echo 00 > serial
[root@ca CA]# ls
certs crl index.txt newcerts private serial

【生成private私钥 至private/ca.key】
[root@ca CA]# (umask 077;openssl genrsa -out private/ca.key -des3 2048)
Generating RSA private key, 2048 bit long modulus
.............+++
...................+++
e is 65537 (0x10001)
Enter pass phrase for private/ca.key: #输入密码
Verifying - Enter pass phrase for private/ca.key: #再次输入密码
[root@ca CA]# ls private/
ca.key
- CA生成CA自签名证书
【利用private/ca.key 私钥 生成自签名证书ca.crt】
-key    私钥文件(指明从哪个私钥文件中提取公钥创建证书签署请求)
-out    指定证书文件存放在位置
-new    生成新的证书签署请求;
-days n   证书有效时长,单位为“天”;
-x509    生成自签证书
参数中带-x509表示直接生成自签证书,不带则表示生成证书签署请求
[root@ca CA]# openssl req -new -x509 -days 7300 -key private/ca.key > ca.crt
Enter pass phrase for private/ca.key: #输入密码
You are about to be asked to enter information that will be incorporated
into your certificate request.
What you are about to enter is what is called a Distinguished Name or a DN.
There are quite a few fields but you can leave some blank
For some fields there will be a default value,
If you enter '.', the field will be left blank.
-----
Country Name (2 letter code) [CN]: #回车
State or Province Name (full name) [Beijing]:#回车
Locality Name (eg, city) [Beijing]:#回车
Organization Name (eg, company) [aiops]:#回车
Organizational Unit Name (eg, section) []:IT #写入部门名称
Common Name (eg, your name or your server's hostname) []:ca.aiops.net.cn #服务器名称,一定能解析。
Email Address []:ca@aiops.net.cn #可写可不写


[root@ca CA]# ls
ca.crt certs crl index.txt newcerts private serial
web服务器(httpd)
Apache环境配置SSL证书教程:https://www.moerats.com/archives/123/
[root@localhost ~]# hostnamectl set-hostname web
①安装httpd及ssl模块
[root@web ~]# yum -y install httpd mod_ssl
[root@web ~]# echo "test" >> /var/www/html/index.html
②生成web服务器私钥
[root@web ~]# openssl genrsa -out /etc/httpd/httpd.key
Generating RSA private key, 2048 bit long modulus
......................................+++
........+++
e is 65537 (0x10001)
③生成web证书签名的请求文件CSR
[root@web ~]# openssl req -new -key /etc/httpd/httpd.key -out /tmp/httpd.csr
You are about to be asked to enter information that will be incorporated
into your certificate request.
What you are about to enter is what is called a Distinguished Name or a DN.
There are quite a few fields but you can leave some blank
For some fields there will be a default value,
If you enter '.', the field will be left blank.
-----
Country Name (2 letter code) [XX]:CN  #与CA一致
State or Province Name (full name) []:Beijing #与CA一致
Locality Name (eg, city) [Default City]:Beijing #与CA一致
Organization Name (eg, company) [Default Company Ltd]:aiops #与CA一致
Organizational Unit Name (eg, section) []:IT  #自己填写
Common Name (eg, your name or your server's hostname) []:www.aiops.net.cn #与主机名称一致
Email Address []:web@aiops.net.cn
Please enter the following 'extra' attributes
to be sent with your certificate request
A challenge password []: #回车
An optional company name []:#回车
④发送CSR文件给CA
[root@web ~]# scp /tmp/httpd.csr 192.168.2.10:/tmp
⑤CA给web服务器颁发证书
根据CSR请求文件生成证书
证书申请者只要把`CSR文件`提交给证书颁发机构后,证书颁发机构使用其根证书的私钥签名就生成了证书文件,也就是颁发给用户的证书

-in     证书请求签署文件
-out    签发后的证书文件
-days    证书有效天数

[root@ca CA]# openssl ca -in /tmp/httpd.csr -out /tmp/httpd.crt
Using configuration from /etc/pki/tls/openssl.cnf
Enter pass phrase for /etc/pki/CA/private/ca.key:
Check that the request matches the signature
Signature ok
Certificate Details:
   Serial Number: 0 (0x0)
   Validity
     Not Before: Feb 26 05:28:03 2019 GMT
     Not After : Feb 26 05:28:03 2020 GMT
   Subject:
     countryName        = CN
     stateOrProvinceName    = Beijing
     organizationName      = aiops
     organizationalUnitName   = web
     commonName         = www.aiops.net.cn
     emailAddress        = web@aiops.net.cn
   X509v3 extensions:
     X509v3 Basic Constraints:
       CA:FALSE
     Netscape Comment:
       OpenSSL Generated Certificate
     X509v3 Subject Key Identifier:
        28:AF:47:16:83:C3:EC:2B:06:AE:A1:E1:F0:85:E1:D0:30:6F:C5:0F
     X509v3 Authority Key Identifier:
       keyid:A0:E3:92:C7:D7:F0:B5:16:17:8E:FD:04:8D:09:4B:38:CC:DF:99:5A
Certificate is to be certified until Feb 26 05:28:03 2020 GMT (365 days)
Sign the certificate? [y/n]:y
1 out of 1 certificate requests certified, commit? [y/n]y
Write out database with 1 new entries
Data Base Updated
⑥CA把颁发证书发送给web服务器
[root@ca CA]# scp /tmp/httpd.crt 192.168.2.20:/etc/httpd/
web服务器应用证书
- Apache支持SSL
[root@web ~]# yum -y install mod_ssl
[root@web ~]# ls /etc/httpd/conf.d/
autoindex.conf README ssl.conf userdir.conf welcome.conf
配置指定证书和私钥
[root@httpdweb ~]# cat /etc/httpd/conf.d/www.conf
<VirtualHost 192.168.2.20:80>
 DocumentRoot /var/www/html
 ServerName www.aiops.net.cn
 ServerAlias aiops.net.cn
 RewriteEngine On
 RewriteRule ^(.*)$ https://www.aiops.net.cn$1 [R=301,L]
</VirtualHost>
<VirtualHost 192.168.2.20:443>
 ServerName www.aiops.net.cn
 DocumentRoot /var/www/html
 SSLEngine on
  #SSLProtocol all -SSLv2 -SSLv3
  #SSLCipherSuite ALL:!ADH:!EXPORT:!SSLv2:RC4+RSA:+HIGH:+MEDIUM:+LOW
 SSLCertificateFile /etc/httpd/httpd.crt
 SSLCertificateKeyFile /etc/httpd/httpd.key
</VirtualHost>
Linux客户机验证
[root@localhost ~]# hostnamectl set-hostname webclient
Linux客户机命令行验证
这取决于您的使用情况.大多数人应该使用ca-bundle.crt.如果您“是”银行或在线商店需要非常高水平的认证和“信任”,那么您应该使用ca-bundle.trust.crt.
[root@localhost certs]# ls  /etc/pki/tls/certs
ca-bundle.crt  ca-bundle.trust.crt  make-dummy-cert  Makefile  renew-dummy-cert

/etc/pki/tls/certs/ca-bundle.crt 保存的是全球被信任的根ca
[root@webclient ~]# cat ca.crt >> /etc/pki/tls/certs/ca-bundle.crt
[root@webclient ~]# curl http://www.aiops.net.cn
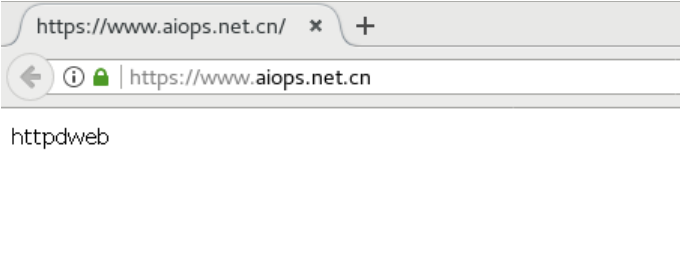
Linux客户机浏览器验证


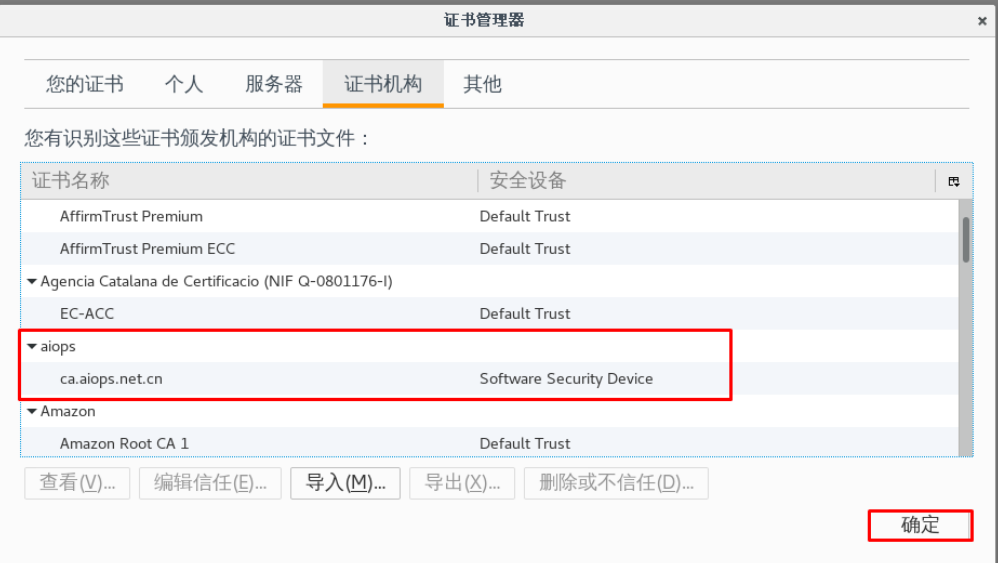
客户机浏览器验证结果

web服务器(nginx)
①nginx服务器安装
[root@web ~]# yum -y install epel-release
[root@web ~]# yum -y install nginx
②证书获取
[root@web cert]# pwd
/etc/nginx/cert
[root@web cert]# ls
nginx.crt nginx.key
③nginx服务器配置
https://www.moerats.com/archives/33/
Nginx配置http跳转https访问 : https://www.cnblogs.com/lpjnote/p/10759847.html
[root@web nginx]# cat nginx.conf
server {
listen    80; #修改
   server_name www.aiops.net.cn aiops.net.cn; #修改
    #root     /usr/share/nginx/html;
   return 301   https://www.aiops.net.cn/$request_uri; #添加
    # Load configuration files for the default server block.
   include /etc/nginx/default.d/*.conf;
   location / {
   }
   error_page 404 /404.html;
     location = /40x.html {
   }
   error_page 500 502 503 504 /50x.html;
     location = /50x.html {
   }
 }
# Settings for a TLS enabled server.
#
 server {
   listen    443 ssl; #修改
#    listen    [::]:443 ssl http2 default_server;
   server_name www.aiops.net.cn; #修改
   root     /usr/share/nginx/html; #开启
   ssl on; #开启
   ssl_certificate "/etc/nginx/cert/nginx.crt"; #修改
   ssl_certificate_key "/etc/nginx/cert/nginx.key"; #修改
#    ssl_session_cache shared:SSL:1m;
   ssl_session_timeout 10m; #开启
   ssl_protocols SSLv2 SSLv3 TLSv1; #添加
#    ssl_ciphers HIGH:!aNULL:!MD5;
#    ssl_prefer_server_ciphers on;
#
#    # Load configuration files for the default server block.
#    include /etc/nginx/default.d/*.conf;
#
#    location / {
#    }
#
#    error_page 404 /404.html;
#      location = /40x.html {
#    }
#
#    error_page 500 502 503 504 /50x.html;
#      location = /50x.html {
#    }
 } #开启
}
④重启nginx
[root@web nginx]# nginx -s reload
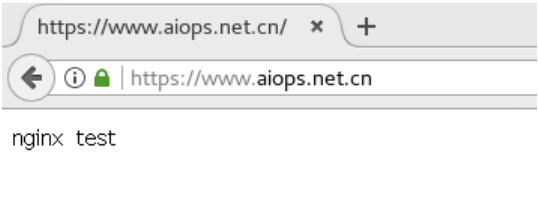
⑤客户机访问验证结果
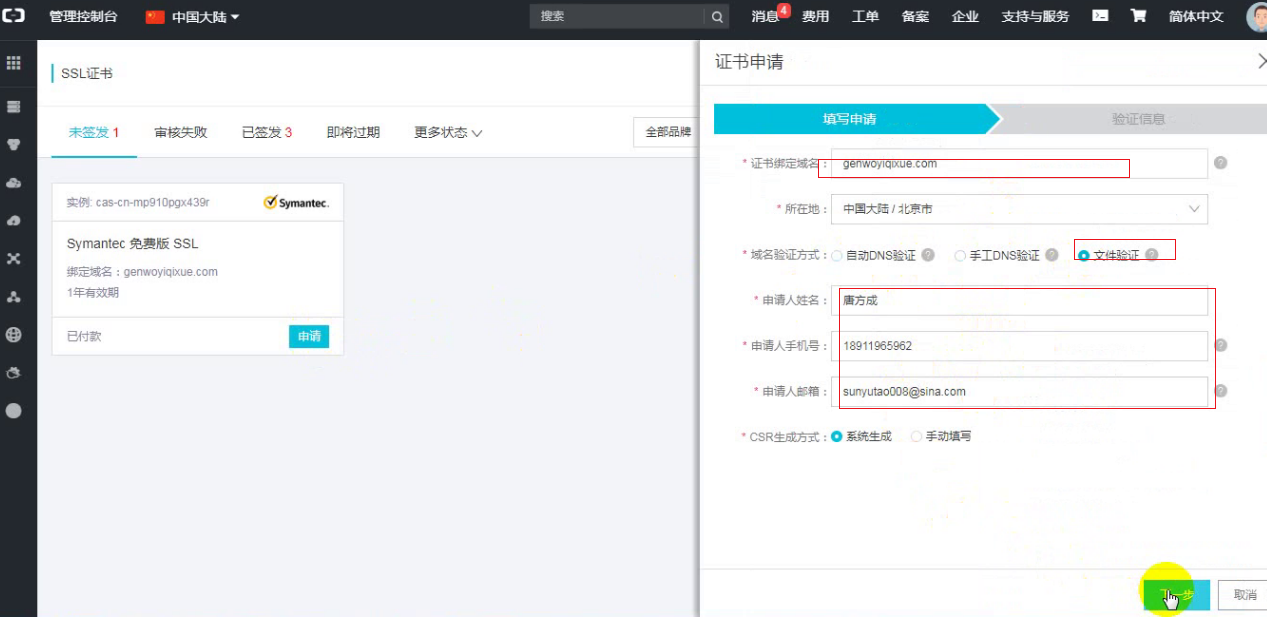
互联网证书获取
在日常工作中,我们经常遇到一些网站要求把web访问协议http转成https协议,这就要求我们必须对域名进行SSL证书申请并应用。
申请域名:www.aliyun.com


点击添加记录把上图中的信息复制到添加记录选项
(到您的域名解析管理系统中根据域名授权配置要求添加一条记录。请务必正确填写主机记录、记录值和记录类型,注意不要把主机记录和记录值配置反了。)

 下载证书并重名
注意点:
阿里云域名管理:https://help.aliyun.com/document_detail/29719.html?spm=a2c1d.8251892.0.dexternal.78365b76OLZcHU
添加解析记录:https://help.aliyun.com/document_detail/29725.html?spm=a2c1d.8251892.0.dexternal.78365b76OLZcHU
如何配置域名授权验证?
Apache 、tomcat、nginx 等ssl 配置
https://help.aliyun.com/document_detail/98728.html?spm=5176.14113079.0.dexternal.3e471b4cLDdCHR

若有收获,就点个赞吧
0 人点赞
