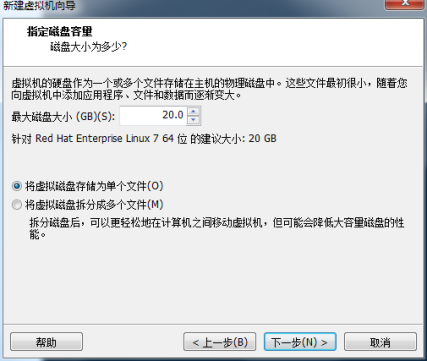
- 1. 首先,我们在现有的linux添加一块大小为20G的硬盘
- 2. 添加完成后,点击确定,然后启动现有的linux(centos7.6)。 通过fdisk来给我们的/dev/sdb进行分区
- 3. 接下来,我们对/dev/sdb的分区进行格式化
- 4. 创建目录,并挂载新的磁盘
- mkdir -p /mnt/boot /mnt/sysroot
#mount /dev/sdb1 /mnt/boot
#mount /dev/sdb2 /mnt/sysroot/ - grub2-install —root-directory=/mnt /dev/sdb
#我们可以来看一下二进制确认我们是否安装成功
#hexdump -C -n 512 /dev/sdb
#cp -rf /boot/* /mnt/boot/ - mkdir -pv /mnt/sysroot/{etc/rc.d,usr,var,proc,sys,dev,lib,lib64,bin,sbin,boot,srv,mnt,media,home,root}
- cp /lib64/. /mnt/sysroot/lib64/
#cp /bin/bash /mnt/sysroot/bin/
1. 首先,我们在现有的linux添加一块大小为20G的硬盘


2. 添加完成后,点击确定,然后启动现有的linux(centos7.6)。 通过fdisk来给我们的/dev/sdb进行分区
1 [root@localhost ~]# fdisk /dev/sdb2 Device contains neither a valid DOS partition table, nor Sun, SGI or OSF disklabel3 Building a new DOS disklabel with disk identifier 0x4fde4cd0.4 Changes will remain in memory only, until you decide to write them.5 After that, of course, the previous content won't be recoverable.678 Warning: invalid flag 0x0000 of partition table 4 will be corrected by w(rite)91011 WARNING: DOS-compatible mode is deprecated. It's strongly recommended to12 switch off the mode (command 'c') and change display units to13 sectors (command 'u').141516 Command (m for help): n17 Command action18 e extended19 p primary partition (1-4)20 p21 Partition number (1-4): 122 First cylinder (1-2610, default 1):23 Using default value 124 Last cylinder, +cylinders or +size{K,M,G} (1-2610, default 2610): +500M252627 Command (m for help): n28 Command action29 e extended30 p primary partition (1-4)31 p32 Partition number (1-4): 233 First cylinder (15-2610, default 15):34 Using default value 1535 Last cylinder, +cylinders or +size{K,M,G} (15-2610, default 2610):36 Using default value 261037 #查看分区38 Command (m for help): p394041 Disk /dev/sdb: 21.5 GB, 21474836480 bytes42 255 heads, 63 sectors/track, 2610 cylinders43 Units = cylinders of 16065 * 512 = 8225280 bytes44 Sector size (logical/physical): 512 bytes / 512 bytes45 I/O size (minimum/optimal): 512 bytes / 512 bytes46 Disk identifier: 0x4fde4cd0474849 Device Boot Start End Blocks Id System50 /dev/sdb1 1 14 112423+ 83 Linux51 /dev/sdb2 15 2610 20852370 83 Linux52 #保存并退出53 Command (m for help): w54 The partition table has been altered!
3. 接下来,我们对/dev/sdb的分区进行格式化
[root@localhost ~]# mkfs.ext4 /dev/sdb1
[root@localhost ~]# mkfs.ext4 /dev/sdb2
4. 创建目录,并挂载新的磁盘
mkdir -p /mnt/boot /mnt/sysroot
#mount /dev/sdb1 /mnt/boot
#mount /dev/sdb2 /mnt/sysroot/
5. 安装grub, 内核文件拷贝至目标磁盘
grub2-install —root-directory=/mnt /dev/sdb
#我们可以来看一下二进制确认我们是否安装成功
#hexdump -C -n 512 /dev/sdb
#cp -rf /boot/* /mnt/boot/
6. 修改 grub2/grub.cfg 文件, 标红的部分 是需要使用 指令来查看的

在grub.cfg文件中 , 红色部分用 上面 sdb1 的 UUID替换,蓝色部分用 sdb2的UUID来替换, 紫色部分是添加的,表示selinux给关掉,同时设定一下init,告诉内核不要再去找这个程序了,不然开机的时候会出现错误的
### BEGIN /etc/grub.d/10_linux ###menuentry 'CentOS Linux (3.10.0-957.el7.x86_64) 7 (Core)' --class centos --class gnu-linux --class gnu --class os --unrestricted $menuentry_id_option 'gnulinux-3.10.0-957.el7.x86_64-advanced-2eef594e-68fc-49a0-8b23-07cf87dda424' {load_videoset gfxpayload=keepinsmod gzioinsmod part_msdosinsmod ext2set root='hd0,msdos1'if [ x$feature_platform_search_hint = xy ]; thensearch --no-floppy --fs-uuid --set=root --hint-bios=hd0,msdos1 --hint-efi=hd0,msdos1 --hint-baremetal=ahci0,msdos1 --hint='hd0,msdos1' 6ba72e9a-19ec-4552-ae54-e35e735142d4elsesearch --no-floppy --fs-uuid --set=root 6ba72e9a-19ec-4552-ae54-e35e735142d4filinux16 /vmlinuz-3.10.0-957.el7.x86_64 root=UUID=d2e0ce0f-e209-472a-a4f1-4085f777d9bb ro crashkernel=auto rhgb quiet LANG=zh_CN.UTF-8 selinux=0 init=/bin/bashinitrd16 /initramfs-3.10.0-957.el7.x86_64.img}menuentry 'CentOS Linux (0-rescue-5bd4fb8d8e9d4198983fc1344f652b5d) 7 (Core)' --class centos --class gnu-linux --class gnu --class os --unrestricted $menuentry_id_option 'gnulinux-0-rescue-5bd4fb8d8e9d4198983fc1344f652b5d-advanced-2eef594e-68fc-49a0-8b23-07cf87dda424' {load_videoinsmod gzioinsmod part_msdosinsmod ext2set root='hd0,msdos1'if [ x$feature_platform_search_hint = xy ]; thensearch --no-floppy --fs-uuid --set=root --hint-bios=hd0,msdos1 --hint-efi=hd0,msdos1 --hint-baremetal=ahci0,msdos1 --hint='hd0,msdos1' 6ba72e9a-19ec-4552-ae54-e35e735142d4elsesearch --no-floppy --fs-uuid --set=root 6ba72e9a-19ec-4552-ae54-e35e735142d4filinux16 /vmlinuz-0-rescue-5bd4fb8d8e9d4198983fc1344f652b5d root=UUID=d2e0ce0f-e209-472a-a4f1-4085f777d9bb ro crashkernel=auto rhgb quiet selinux=0 init=/bin/bashinitrd16 /initramfs-0-rescue-5bd4fb8d8e9d4198983fc1344f652b5d.img}### END /etc/grub.d/10_linux ###
7. 创建目标主机根文件系统
mkdir -pv /mnt/sysroot/{etc/rc.d,usr,var,proc,sys,dev,lib,lib64,bin,sbin,boot,srv,mnt,media,home,root}
8. 拷贝需要的bash(也可以拷贝你需要的指令)和库文件给新的系统使用
cp /lib64/. /mnt/sysroot/lib64/
#cp /bin/bash /mnt/sysroot/bin/
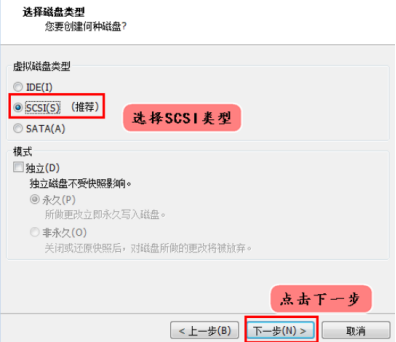
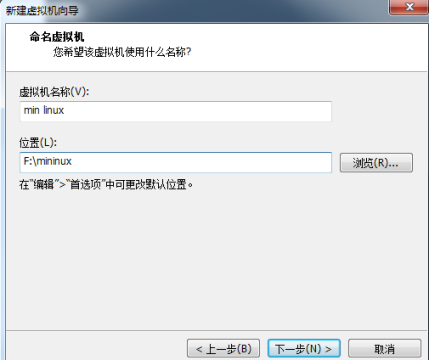
9. 现在我们就可以创建一个新的虚拟机,然后将默认分配的硬盘 移除掉,指向我们刚刚创建的磁盘即可.


10. 这时,很多指令都不能使用,比如 ls , reboot 等,可以将需要的指令拷贝到对应的目录即可
11. 如果要拷贝指令
重新进入到原来的linux系统拷贝相应的指令即可,比较将/bin/ls 拷贝到 /mnt/sysroot/bin 将/sbin/reboot 拷贝到 /mnt/sysroot/sbin
root@hspedu100 ~]# mount /dev/sdb2 /mnt/sysroot/
[root@hspedu100 ~]# cp /bin/ls /mnt/sysroot/bin/
[root@hspedu100 ~]# cp /bin/systemctl /mnt/sysroot/bin/
[root@hspedu100 ~]# cp /sbin/reboot /mnt/sysroot/sbin/
12. 再重新启动新的min linux系统,就可以使用 ls , reboot 指令了


若有收获,就点个赞吧
0 人点赞
