参考:
https://www.jianshu.com/p/1dec08d290c1
一、四个阶段和拓展点
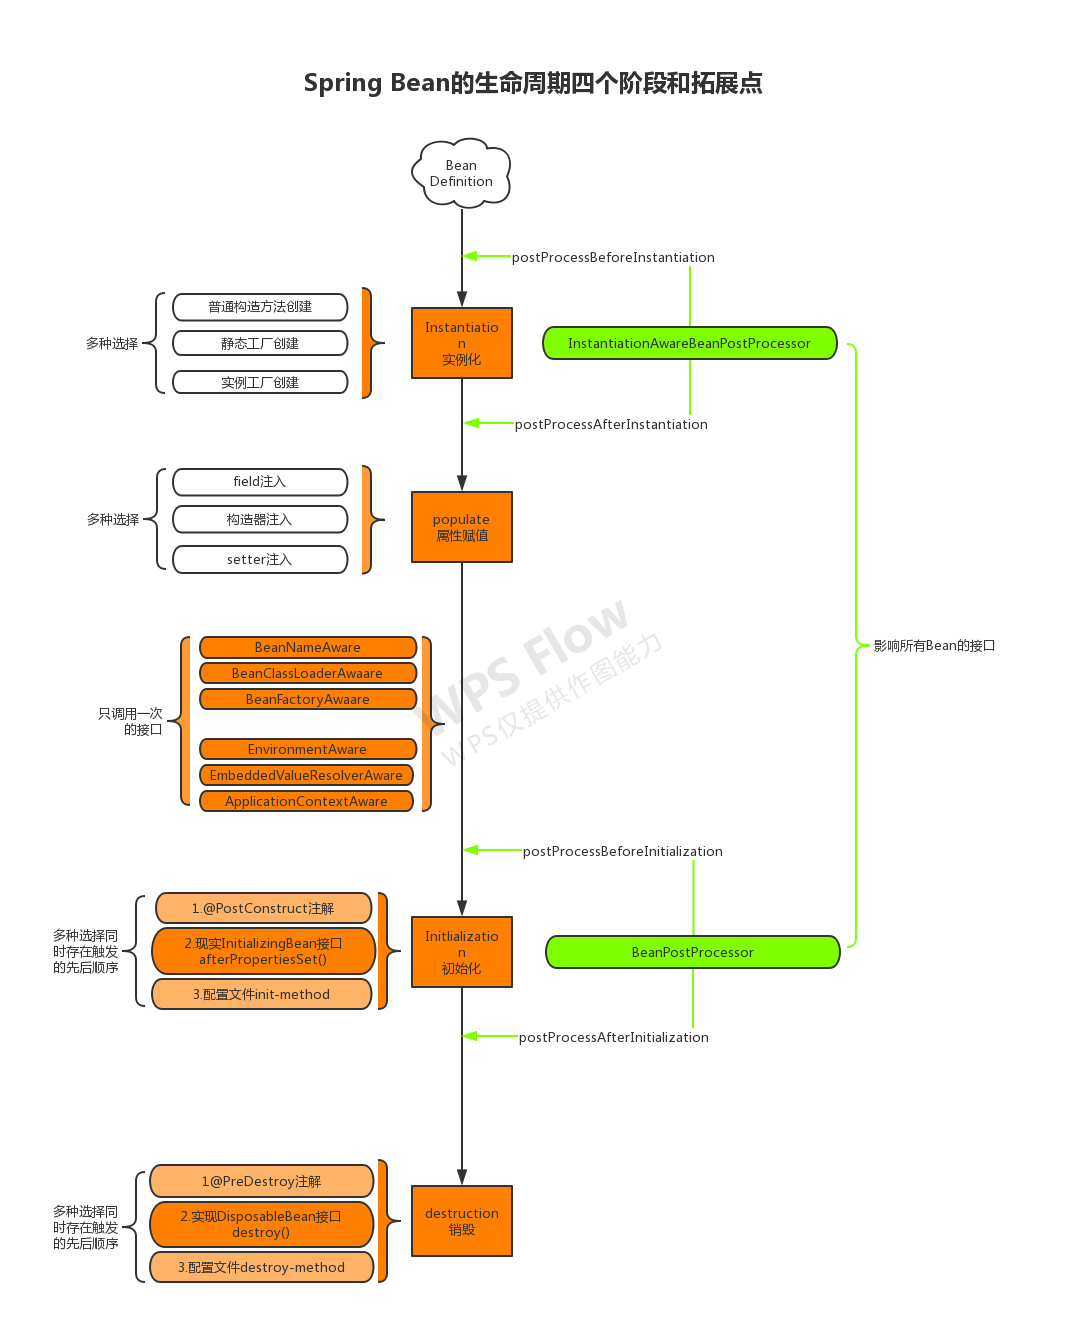
1.四个阶段
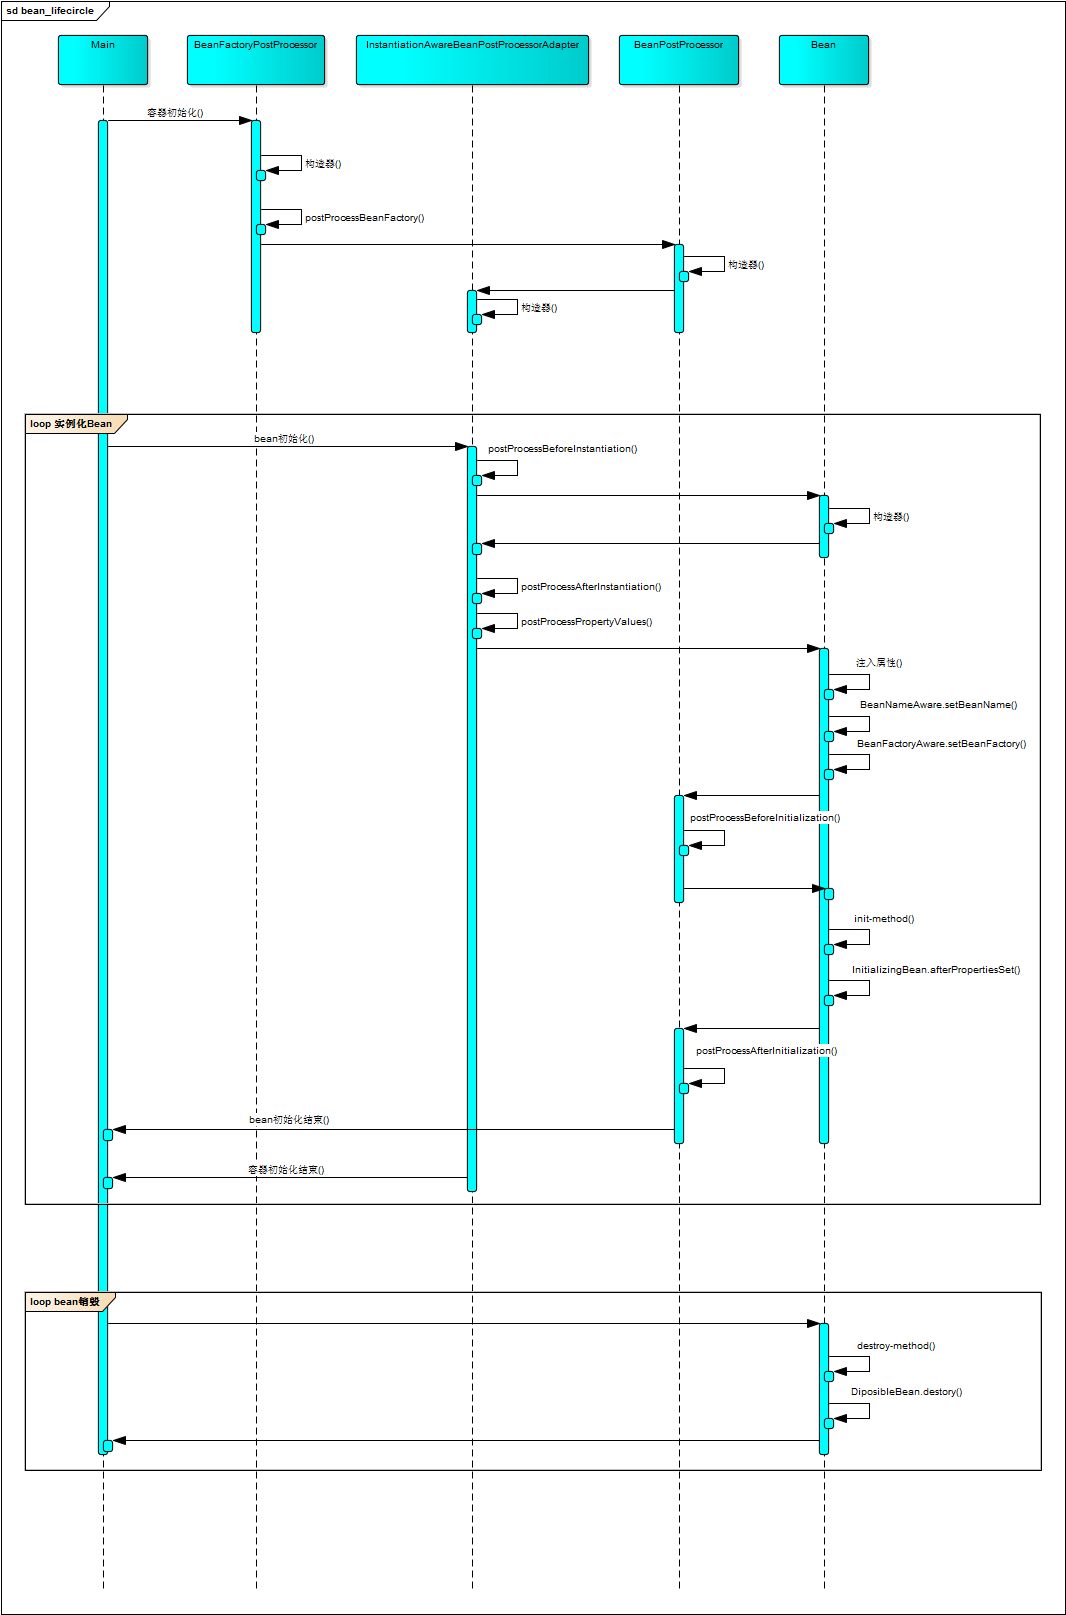
SpringBean有且只有四个阶段,这四个阶段和对应的拓展点柔和在一起。实例化和属性赋值对应的构造方法和setter方法的注入。初始化和销毁是用户可以自定义的两个阶段。
主要逻辑都在doCreateBean方法中。
// 忽略了无关代码protected Object doCreateBean(final String beanName, final RootBeanDefinition mbd, final @Nullable Object[] args)throws BeanCreationException {// Instantiate the bean.BeanWrapper instanceWrapper = null;if (instanceWrapper == null) {// 实例化阶段!instanceWrapper = createBeanInstance(beanName, mbd, args);}// Initialize the bean instance.Object exposedObject = bean;try {// 属性赋值阶段!populateBean(beanName, mbd, instanceWrapper);// 初始化阶段!exposedObject = initializeBean(beanName, exposedObject, mbd);}}
2.常用拓展点
2.1影响多个Bean的接口
实现了这些接口的Bean会切入到多个Bean的生命周期中。正因为如此,这些接口的功能非常强大,Spring内部扩展也经常使用这些接口,例如自动注入以及AOP的实现都和他们有关。
- BeanPostProcessor
- InstantiationAwareBeanPostProcessor
这两兄弟可能是Spring扩展中最重要的两个接口!InstantiationAwareBeanPostProcessor作用于实例化阶段的前后,BeanPostProcessor作用于初始化阶段的前后。正好和第一、第三个生命周期阶段对应。
InstantiationAwareBeanPostProcessor实际上继承了BeanPostProcessor接口,严格意义上来看他们不是两兄弟,而是两父子。但是从生命周期角度我们重点关注其特有的对实例化阶段的影响,图中省略了从BeanPostProcessor继承的方法。
InstantiationAwareBeanPostProcessor extends BeanPostProcessor
InstantiationAwareBeanPostProcessor源码分析:
postProcessBeforeInstantiation调用点,忽略无关代码: ```java @Override protected Object createBean(String beanName, RootBeanDefinition mbd, @Nullable Object[] args) throws BeanCreationException { try {
  // Give BeanPostProcessors a chance to return a proxy instead of the target bean instance.
  // postProcessBeforeInstantiation方法调用点,这里就不跟进了,
  // 有兴趣的同学可以自己看下,就是for循环调用所有的InstantiationAwareBeanPostProcessor
  Object bean = resolveBeforeInstantiation(beanName, mbdToUse);
  if (bean != null) {
      return bean;
  }
}
try {
  // 上文提到的doCreateBean方法,可以看到
  // postProcessBeforeInstantiation方法在创建Bean之前调用
  Object beanInstance = doCreateBean(beanName, mbdToUse, args);
  if (logger.isTraceEnabled()) {
      logger.trace("Finished creating instance of bean '" + beanName + "'");
  }
  return beanInstance;
}
}
- postProcessAfterInstantiation调用点,忽略无关代码:
```java
protected void populateBean(String beanName, RootBeanDefinition mbd, @Nullable BeanWrapper bw) {
   // Give any InstantiationAwareBeanPostProcessors the opportunity to modify the
   // state of the bean before properties are set. This can be used, for example,
   // to support styles of field injection.
   boolean continueWithPropertyPopulation = true;
    // InstantiationAwareBeanPostProcessor#postProcessAfterInstantiation()
    // 方法作为属性赋值的前置检查条件,在属性赋值之前执行,能够影响是否进行属性赋值!
   if (!mbd.isSynthetic() && hasInstantiationAwareBeanPostProcessors()) {
      for (BeanPostProcessor bp : getBeanPostProcessors()) {
         if (bp instanceof InstantiationAwareBeanPostProcessor) {
            InstantiationAwareBeanPostProcessor ibp = (InstantiationAwareBeanPostProcessor) bp;
            if (!ibp.postProcessAfterInstantiation(bw.getWrappedInstance(), beanName)) {
               continueWithPropertyPopulation = false;
               break;
            }
         }
      }
   }
   // 忽略后续的属性赋值操作代码
}
2.2只调一次的接口
这一大类接口的特点是功能丰富,常用于用户自定义扩展。
第二大类中又可以分为两类:
- Aware类型的接口
- 生命周期接口(InitializingBean、DisposableBean)
调用时机需要注意:所有的Aware方法都是在初始化阶段之前调用的!Aware Group1
- BeanNameAware
- BeanClassLoaderAware
- BeanFactoryAware
Aware Group2
- EnvironmentAware
- EmbeddedValueResolverAware 这个知道的人可能不多,实现该接口能够获取Spring EL解析器,用户的自定义注解需要支持spel表达式的时候可以使用,非常方便。
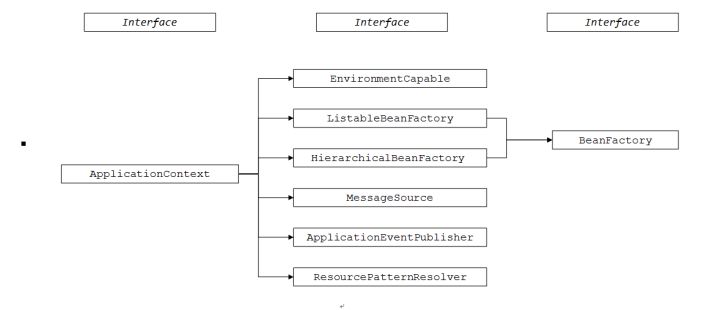
- ApplicationContextAware(ResourceLoaderAware\ApplicationEventPublisherAware\MessageSourceAware) 这几个接口可能让人有点懵,实际上这几个接口可以一起记,其返回值实质上都是当前的ApplicationContext对象,因为ApplicationContext是一个复合接口,如下:
public interface ApplicationContext extends EnvironmentCapable, ListableBeanFactory, HierarchicalBeanFactory,
     MessageSource, ApplicationEventPublisher, ResourcePatternResolver {}
Aware调用时机源码分析
// 见名知意,初始化阶段调用的方法
protected Object initializeBean(final String beanName, final Object bean, @Nullable RootBeanDefinition mbd) {
    // 这里调用的是Group1中的三个Bean开头的Aware
    invokeAwareMethods(beanName, bean);
    Object wrappedBean = bean;

    // 这里调用的是Group2中的几个Aware,
    // 而实质上这里就是前面所说的BeanPostProcessor的调用点!
    // 也就是说与Group1中的Aware不同,这里是通过BeanPostProcessor(ApplicationContextAwareProcessor)实现的。
    wrappedBean = applyBeanPostProcessorsBeforeInitialization(wrappedBean, beanName);
    // 下文即将介绍的InitializingBean调用点
    invokeInitMethods(beanName, wrappedBean, mbd);
    // BeanPostProcessor的另一个调用点
    wrappedBean = applyBeanPostProcessorsAfterInitialization(wrappedBean, beanName);
    return wrappedBean;
}
二、BeanPostProcessor接口
作用
如果我们需要在Spring容器完成Bean的实例化、配置和其他的初始化前后添加一些自己的逻辑处理,我们就可以定义一个或者多个BeanPostProcessor接口的实现,然后注册到容器中。
配置了后置处理器,不管是实例化哪个Bean,都会先调用 postProcessBeforeInitialization方法。
Spring容器中所有的注册的bean都会调用这个接口的实现
5.前bean===PROPAGATION_REQUIRED,ISOLATION_DEFAULT-------transactionTemplate
7.后bean===PROPAGATION_REQUIRED,ISOLATION_DEFAULT-------transactionTemplate
5.前bean===org.springframework.boot.autoconfigure.web.WebClientAutoConfiguration$$EnhancerBySpringCGLIB$$9baebd77@781711b7-------org.springframework.boot.autoconfigure.web.WebClientAutoConfiguration
7.后bean===org.springframework.boot.autoconfigure.web.WebClientAutoConfiguration$$EnhancerBySpringCGLIB$$9baebd77@781711b7-------org.springframework.boot.autoconfigure.web.WebClientAutoConfiguration
2019-07-29 18:45:56.894  INFO 20108 --- [           main] com.aliyun.devata.testmoudel.TestMq      : Started TestMq in 20.563 seconds (JVM running for 28.885)
5.前bean===com.aliyun.devata.testmoudel.TestMq@1e461e41-------com.aliyun.devata.testmoudel.TestMq
7.后bean===com.aliyun.devata.testmoudel.TestMq@1e461e41-------com.aliyun.devata.testmoudel.TestMq
注意
1、接口中的两个方法都要将传入的bean返回,而不能返回null,如果返回的是null那么我们通过getBean方法将得不到目标。
2、BeanFactory和ApplicationContext对待bean后置处理器稍有不同。ApplicationContext会自动检测在配置文件中实现了BeanPostProcessor接口的所有bean,并把它们注册为后置处理器,然后在容器创建bean的适当时候调用它,因此部署一个后置处理器同部署其他的bean并没有什么区别。而使用BeanFactory实现的时候,bean 后置处理器必须通过代码显式地去注册,在IoC容器继承体系中的ConfigurableBeanFactory接口中定义了注册方法:
void addBeanPostProcessor(BeanPostProcessor beanPostProcessor);
3、不要将BeanPostProcessor标记为延迟初始化。因为如果这样做,Spring容器将不会注册它们,自定义逻辑也就无法得到应用。假如你在
使用场景
记录每个对象被实例化的时间
过滤每个调用对象的IP
给所有对象添加一个属性,获取其他的函数(所谓AOP,面向切面编程,针对所有对象编程)
@Component
public class UserService implements BeanNameAware, BeanFactoryAware, ApplicationContextAware , InitializingBean {
    public UserService() {
        System.out.println("1.自定义的构造器");
    }

    @Override
    public void setBeanName(String s) {
        System.out.println("2.当前Bean的ID号为:" + s);
    }

    @Override
    public void setBeanFactory(BeanFactory beanFactory) throws BeansException {
        System.out.println("3.当前beanFactory"+beanFactory);
    }

    @Override
    public void setApplicationContext(ApplicationContext applicationContext) throws BeansException {
        System.out.println("4.当前applicationContext"+applicationContext);
    }

    @PostConstruct
    public void init(){
        System.out.println("6.1================自定义的初始化注解标签@PostConstruct");
    }

    @Override
    public void afterPropertiesSet() throws Exception {
        System.out.println("6.2================afterPropertiesSet");
        System.out.println("6.3================自定义的初始化配置文件init-method");
    }
}
@Component
public class CustomerBeanPostProcessor implements BeanPostProcessor {
    @Override
    public Object postProcessBeforeInitialization(Object bean, String beanName) throws BeansException {
        System.out.println("5.前bean==="+bean+"-------"+beanName);
        return bean;
    }

    @Override
    public Object postProcessAfterInitialization(Object bean, String beanName) throws BeansException {
        System.out.println("7.后bean==="+bean+"-------"+beanName);
        return bean;
    }
}
执行输出
1.自定义的构造器
2.当前Bean的ID号为:userService
3.当前beanFactoryorg.springframework.beans.factory.support.DefaultListableBeanFactory@7a55f148: defining beans [org.springframework.context.annotation.internalConfigurationAnnotationProcessor,org.springframework.context.annotation.internalAutowiredAnnotationProcessor,org.springframework.context.annotation.internalRequiredAnnotationProcessor,org.springframework.context.annotation.internalCommonAnnotationProcessor,org.springframework.context.event.internalEventListenerProcessor,org.springframework.context.event.internalEventListenerFactory,org.springframework.boot.test.mock.mockito.MockitoPostProcessor$SpyPostProcessor,org.springframework.boot.test.mock.mockito.MockitoPostProcessor,application,org.springframework.boot.autoconfigure.internalCachingMetadataReaderFactory,searchServiceImpl,producter,customerBeanPostProcessor,customerManagerListener,diamondService,userService,messageHandlerServiceImpl,queryMappingConfigServiceImpl,wormholeMetaqTopicDataServiceImpl,topicClientDispatcher,currentLimitedModes,serviceCheckUtils,topicConfigUtils,elasticsearchRestClient,elasticsearchConnectionConfig,dataSourceConfig,postgreConnectionConfig,lockService,tairWrapper,searchServiceImpl#HSFProvider,restClientBuilder,highLevelClient,restClient,wormholePostgreDataSource,wormholePostgreTransactionManager,wormholePostgreSqlSessionFactory,wormholePostgreSqlSessionTemplate,wormholePostgreJdbcTemplate,tagUniqueCodeIndexMappingMapper,wormholeGroovyScriptMapper,wormholeMetaqTopicDataMapper,org.springframework.transaction.annotation.ProxyTransactionManagementConfiguration,org.springframework.transaction.config.internalTransactionAdvisor,transactionAttributeSource,transactionInterceptor,org.springframework.transaction.config.internalTransactionalEventListenerFactory,org.springframework.boot.autoconfigure.AutoConfigurationPackages,org.springframework.aop.config.internalAutoProxyCreator,com.alibaba.rhino.boot.keycenter.KeyCenterHttpAutoConfiguration,keyStore,org.springframework.boot.autoconfigure.condition.BeanTypeRegistry,cryptograph,spring.keycenter-com.alibaba.rhino.boot.keycenter.KeyCenterHttpProperties,org.springframework.boot.context.properties.ConfigurationPropertiesBindingPostProcessor,org.springframework.boot.context.properties.ConfigurationPropertiesBindingPostProcessor.store,org.springframework.boot.autoconfigure.context.PropertyPlaceholderAutoConfiguration,propertySourcesPlaceholderConfigurer,com.alibaba.boot.hsf.consumer.HsfConsumerAutoConfiguration,hsfConsumerPostProcessor,com.alibaba.druid.spring.boot.autoconfigure.stat.DruidFilterConfiguration,statFilter,com.alibaba.druid.spring.boot.autoconfigure.DruidDataSourceAutoConfigure,spring.datasource.druid-com.alibaba.druid.spring.boot.autoconfigure.properties.DruidStatProperties,spring.datasource-org.springframework.boot.autoconfigure.jdbc.DataSourceProperties,com.taobao.pandora.boot.spring.LoggerConflictDetector,com.taobao.pandora.boot.springboot2.PandoraAutoConfiguration,org.springframework.boot.autoconfigure.jdbc.metadata.DataSourcePoolMetadataProvidersConfiguration$TomcatDataSourcePoolMetadataProviderConfiguration,tomcatPoolDataSourceMetadataProvider,org.springframework.boot.autoconfigure.jdbc.metadata.DataSourcePoolMetadataProvidersConfiguration,org.springframework.boot.autoconfigure.jdbc.DataSourceAutoConfiguration,dataSourceInitializer,dataSourceInitializerPostProcessor,org.mybatis.spring.boot.autoconfigure.MybatisAutoConfiguration,mybatis-org.mybatis.spring.boot.autoconfigure.MybatisProperties,org.springframework.boot.autoconfigure.context.ConfigurationPropertiesAutoConfiguration,org.springframework.boot.autoconfigure.dao.PersistenceExceptionTranslationAutoConfiguration,persistenceExceptionTranslationPostProcessor,org.springframework.boot.autoconfigure.gson.GsonAutoConfiguration,gson,org.springframework.boot.autoconfigure.info.ProjectInfoAutoConfiguration,spring.info-org.springframework.boot.autoconfigure.info.ProjectInfoProperties,org.springframework.boot.autoconfigure.jdbc.DataSourceTransactionManagerAutoConfiguration$DataSourceTransactionManagerConfiguration,org.springframework.boot.autoconfigure.jdbc.DataSourceTransactionManagerAutoConfiguration,org.springframework.boot.autoconfigure.jdbc.JdbcTemplateAutoConfiguration,namedParameterJdbcTemplate,org.springframework.boot.autoconfigure.transaction.TransactionAutoConfiguration$TransactionTemplateConfiguration,transactionTemplate,org.springframework.boot.autoconfigure.transaction.TransactionAutoConfiguration,platformTransactionManagerCustomizers,spring.transaction-org.springframework.boot.autoconfigure.transaction.TransactionProperties,org.springframework.boot.autoconfigure.web.WebClientAutoConfiguration]; root of factory hierarchy
4.当前applicationContextorg.springframework.context.annotation.AnnotationConfigApplicationContext@68e62ca4: startup date [Mon Jul 29 18:45:44 CST 2019]; root of context hierarchy
5.前bean===com.aliyun.devata.wormhole.search.service.middleware.UserService@60d6fdd4-------userService
6.1================自定义的初始化注解标签@PostConstruct
6.2================afterPropertiesSet
6.3================自定义的初始化配置文件init-method
7.后bean===com.aliyun.devata.wormhole.search.service.middleware.UserService@60d6fdd4-------userService
BeanPostProcessor 注册时机与执行顺序
我们知道BeanPostProcessor也会注册为Bean,那么Spring是如何保证BeanPostProcessor在我们的业务Bean之前初始化完成呢?
请看我们熟悉的refresh()方法的源码,省略部分无关代码:
@Override
public void refresh() throws BeansException, IllegalStateException {
    synchronized (this.startupShutdownMonitor) {
        try {
            // Allows post-processing of the bean factory in context subclasses.
            postProcessBeanFactory(beanFactory);
            // Invoke factory processors registered as beans in the context.
            invokeBeanFactoryPostProcessors(beanFactory);
            // Register bean processors that intercept bean creation.
            // 所有BeanPostProcesser初始化的调用点
            registerBeanPostProcessors(beanFactory);
            // Initialize message source for this context.
            initMessageSource();
            // Initialize event multicaster for this context.
            initApplicationEventMulticaster();
            // Initialize other special beans in specific context subclasses.
            onRefresh();
            // Check for listener beans and register them.
            registerListeners();
            // Instantiate all remaining (non-lazy-init) singletons.
            // 所有单例非懒加载Bean的调用点
            finishBeanFactoryInitialization(beanFactory);
            // Last step: publish corresponding event.
            finishRefresh();
        }
    }
可以看出,Spring是先执行registerBeanPostProcessors()进行BeanPostProcessors的注册,然后再执行finishBeanFactoryInitialization初始化我们的单例非懒加载的Bean。
执行顺序
BeanPostProcessor有很多个,而且每个BeanPostProcessor都影响多个Bean,其执行顺序至关重要,必须能够控制其执行顺序才行。关于执行顺序这里需要引入两个排序相关的接口:PriorityOrdered、Ordered
- PriorityOrdered是一等公民,首先被执行,PriorityOrdered公民之间通过接口返回值排序
- Ordered是二等公民,然后执行,Ordered公民之间通过接口返回值排序
- 都没有实现是三等公民,最后执行
在以下源码中,可以很清晰的看到Spring注册各种类型BeanPostProcessor的逻辑,根据实现不同排序接口进行分组。优先级高的先加入,优先级低的后加入。
// First, invoke the BeanDefinitionRegistryPostProcessors that implement PriorityOrdered.
// 首先,加入实现了PriorityOrdered接口的BeanPostProcessors,顺便根据PriorityOrdered排了序
String[] postProcessorNames =
    beanFactory.getBeanNamesForType(BeanDefinitionRegistryPostProcessor.class, true, false);
for (String ppName : postProcessorNames) {
    if (beanFactory.isTypeMatch(ppName, PriorityOrdered.class)) {
        currentRegistryProcessors.add(beanFactory.getBean(ppName, BeanDefinitionRegistryPostProcessor.class));
        processedBeans.add(ppName);
    }
}
sortPostProcessors(currentRegistryProcessors, beanFactory);
registryProcessors.addAll(currentRegistryProcessors);
invokeBeanDefinitionRegistryPostProcessors(currentRegistryProcessors, registry);
currentRegistryProcessors.clear();
// Next, invoke the BeanDefinitionRegistryPostProcessors that implement Ordered.
// 然后,加入实现了Ordered接口的BeanPostProcessors,顺便根据Ordered排了序
postProcessorNames = beanFactory.getBeanNamesForType(BeanDefinitionRegistryPostProcessor.class, true, false);
for (String ppName : postProcessorNames) {
    if (!processedBeans.contains(ppName) && beanFactory.isTypeMatch(ppName, Ordered.class)) {
        currentRegistryProcessors.add(beanFactory.getBean(ppName, BeanDefinitionRegistryPostProcessor.class));
        processedBeans.add(ppName);
    }
}
sortPostProcessors(currentRegistryProcessors, beanFactory);
registryProcessors.addAll(currentRegistryProcessors);
invokeBeanDefinitionRegistryPostProcessors(currentRegistryProcessors, registry);
currentRegistryProcessors.clear();
// Finally, invoke all other BeanDefinitionRegistryPostProcessors until no further ones appear.
// 最后加入其他常规的BeanPostProcessors
boolean reiterate = true;
while (reiterate) {
    reiterate = false;
    postProcessorNames = beanFactory.getBeanNamesForType(BeanDefinitionRegistryPostProcessor.class, true, false);
    for (String ppName : postProcessorNames) {
        if (!processedBeans.contains(ppName)) {
            currentRegistryProcessors.add(beanFactory.getBean(ppName, BeanDefinitionRegistryPostProcessor.class));
            processedBeans.add(ppName);
            reiterate = true;
        }
    }
    sortPostProcessors(currentRegistryProcessors, beanFactory);
    registryProcessors.addAll(currentRegistryProcessors);
    invokeBeanDefinitionRegistryPostProcessors(currentRegistryProcessors, registry);
    currentRegistryProcessors.clear();
}
根据排序接口返回值排序,默认升序排序,返回值越低优先级越高。
/**
  * Useful constant for the highest precedence value.
  * @see java.lang.Integer#MIN_VALUE
  */
int HIGHEST_PRECEDENCE = Integer.MIN_VALUE;
/**
  * Useful constant for the lowest precedence value.
  * @see java.lang.Integer#MAX_VALUE
  */
int LOWEST_PRECEDENCE = Integer.MAX_VALUE;
PriorityOrdered、Ordered接口作为Spring整个框架通用的排序接口,在Spring中应用广泛,也是非常重要的接口。
二、ApplicationContext和BeanFactory
 BeanFactory介绍
则当你实例化该对象的时候,配置的Bean不会被马上实例化,当你使用的时候才被实例化。BeanFacotry会延迟加载所有的Bean。这样的好处是节约内存,缺点是速度。
BeanFactory 是 Spring 的“心脏”。它就是 Spring IoC 容器的真面目。Spring 使用 BeanFactory 来实例化、配置和管理 Bean。
BeanFactory:是IOC容器的核心接口, 它定义了IOC的基本功能,我们看到它主要定义了getBean方法。getBean方法是IOC容器获取bean对象和引发依赖注入的起点。方法的功能是返回特定的名称的Bean。
BeanFactory 是初始化 Bean 和调用它们生命周期方法的“吃苦耐劳者”。注意,BeanFactory 只能管理单例(Singleton)Bean 的生命周期。它不能管理原型(prototype,非单例)Bean 的生命周期。这是因为原型 Bean 实例被创建之后便被传给了客户端,容器失去了对它们的引用。
BeanFactory最常见的实现类为XmlBeanFactory,可以从classpath或文件系统等获取资源。
(1)File file = new File("fileSystemConfig.xml");
Resource resource = new FileSystemResource(file);
BeanFactory beanFactory = new XmlBeanFactory(resource);
(2)
Resource resource = new ClassPathResource("classpath.xml");
BeanFactory beanFactory = new XmlBeanFactory(resource);
通过BeanFactory启动IoC容器时,并不会初始化配置文件中定义的Bean,初始化动作发生在第一个调用时。
对于单实例(singleton)的Bean来说,BeanFactory会缓存Bean实例,所以第二次使用getBean时直接从IoC容器缓存中获取Bean。
ApplicationContext介绍
则配置的Bean如果scope属性是singleton,那么当容器被加载时,这些Bean就会被实例化。好处是可以预先加载,速度快;缺点是耗内存。
ApplicationContext拓展功能:
1.提供文本解析工具,包括对国际化的支持
2.提供载入文件资源的通用方法,如图片。
3.可以向注册为监听器的bean发送事件。
ApplicationContext三种经常用到的实现:
1.ClassPathXmlApplicationContext:从类路径中加载。
2.FileSystemXmlApplicationContext:从文件系统加载。
3.XmlWebApplicationContext:从Web系统中加载。
/第一种加载方法,加载的是classpath下的配置文件。
ApplicationContext applicationContext = new ClassPathXmlApplicationContext("applicationContext.xml");
//第二种加载方法,加载的是磁盘路径下的文件。
ApplicationContext applicationContext = new FileSystemXmlApplicationContext("applicationContext.xml");
//第三种加载方法,XmlWebApplicationContext,从web系统中加载。
ApplicationContext context1 = WebApplicationContextUtils.getWebApplicationContext(ServletContext sc);
ApplicationContext context2 = WebApplicationContextUtils.getRequiredWebApplicationContext(ServletContext sc);
WebApplicationContext webApplicationContext = (WebApplicationContext) servletContext.getAttribute(WebApplicationContext.ROOT_WEB_APPLICATION_CONTEXT_ATTRIBUTE);

//得到配置文件后,就能拿到想要的对象。例如:
HelloService helloService = (HelloService) applicationContext.getBean("userService");
//在这当中getBean中的参数为你在配置文件下,这个对象的id,一个标识。
三、Spring中bean实例化的三种方式
普通构造方法创建
public class User {
    public void add() {
        System.out.println("add()---------");
    }
}

<bean class="org.sang.User" id="user"/>

ApplicationContext context = new ClassPathXmlApplicationContext("applicationContext.xml");
User user = (User) context.getBean("user");
System.out.println(user);
静态工厂创建
public class User2 {
    public void add() {
        System.out.println("add2()---------");
    }
}

public class User2Factory {
    public static User2 getInstance() {
        return new User2();
    }
}

<bean id="user2" class="org.sang.User2Factory" factory-method="getInstance"/>

ApplicationContext context = new ClassPathXmlApplicationContext("applicationContext.xml");
User2 user = (User2) context.getBean("user2");
user.add();
实例工厂创建
public class User3 {
    public void add() {
        System.out.println("add3()---------");
    }
}

public class User3Factory {
    public User3 getUser3() {
        return new User3();
    }
}

<bean class="org.sang.User3Factory" id="user3Factory"/>
 <bean id="user3" factory-bean="user3Factory" factory-method="getUser3"/>
四、依赖注入
1) field注入
@Controller
public class FooController {
  @Autowired
  private FooService fooService;

  public List<Foo> listFoo() {
      return fooService.list();
  }
}
2) 构造器注入
@Controller
public class FooController {

  private final FooService fooService;

  @Autowired
  public FooController(FooService fooService) {
      this.fooService = fooService;
  }

}
或者
@Controller
public class FooController {

  private final FooService fooService;
  // 当只有一个参数时可不写@Autowired
  public FooController(FooService fooService) {
      this.fooService = fooService;
  }
}
3) setter注入
@Controller
public class FooController {

  private FooService fooService;

  @Autowired
  public void setFooService(FooService fooService) {
      this.fooService = fooService;
  }
}
为什么Spring4.x推荐构造函数注入
在上面的分析看来,构造函数注入好像并没有显现出来它的优势,但问什么Spring4.x会推翻之前推荐的setter注入,采用构造函数注入呢?官方的理由汇总如下:
- 依赖不可变:加入了final来约束修饰Field,这条是很显然的;
- 依赖不可为空:在实例化的时候会检查构造函数参数是否为空,如果为空(未找到改类型的实例对象)则会抛出异常。
- 单一职责:当使用构造函数注入时,如果参数过多,你会发现当前类的职责过大,需要进行拆分。而使用Field注入时,你并不会意识到此问题。
- 更利于单元测试:按照其他两种方式注入,当单元测试时需要初始化整个spring的环境,而采用构造方法注入时,只需要初始化需要的类即可,即可以直接实例化需要的类。
- 避免IOC容器以外环境调用时潜在的NPE(空指针异常)。
- 避免循环依赖。
- 保证返回客户端(调用)的代码的时候是完全初始化的状态。

若有收获,就点个赞吧
0 人点赞
