之前学习了 Java 的各种必备基础知识,这一篇是一个分水岭,开始真正从零创建一个 Spring Web 项目,可以运用到生产环境中的那种。
使用 Spring 进行基本的 Java Web 开发:
- 创建和声明 Service Bean
- 创建和声明 Controller Bean
- 处理各种各样的 HTTP 请求
1. 从零开始 Spring 应用
从官网 Building an Application with Spring Boot 抄即可。
- pom.xml
- src/main/java/hello/Application.java
- src/main/java/hello/HelloController.java
添加 pom.xml:
<?xml version="1.0" encoding="UTF-8"?><project xmlns="http://maven.apache.org/POM/4.0.0" xmlns:xsi="http://www.w3.org/2001/XMLSchema-instance"xsi:schemaLocation="http://maven.apache.org/POM/4.0.0 https://maven.apache.org/xsd/maven-4.0.0.xsd"><modelVersion>4.0.0</modelVersion><parent><groupId>org.springframework.boot</groupId><artifactId>spring-boot-starter-parent</artifactId><version>2.2.2.RELEASE</version><relativePath/> <!-- lookup parent from repository --></parent><groupId>com.example</groupId><artifactId>spring-boot</artifactId><version>0.0.1-SNAPSHOT</version><name>spring-boot</name><description>Demo project for Spring Boot</description><properties><java.version>1.8</java.version></properties><dependencies><dependency><groupId>org.springframework.boot</groupId><artifactId>spring-boot-starter-web</artifactId></dependency><dependency><groupId>org.springframework.boot</groupId><artifactId>spring-boot-starter-test</artifactId><scope>test</scope><exclusions><exclusion><groupId>org.junit.vintage</groupId><artifactId>junit-vintage-engine</artifactId></exclusion></exclusions></dependency></dependencies><build><plugins><plugin><groupId>org.springframework.boot</groupId><artifactId>spring-boot-maven-plugin</artifactId></plugin></plugins></build></project>
创建基本的 Spring 目录结构,在 src/main/java 下面定义自己的包名: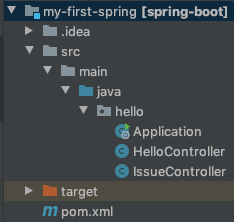
创建一个入口类,以便让 Spring 来启动我们的程序:
package hello;

import java.util.Arrays;

import org.springframework.boot.CommandLineRunner;
import org.springframework.boot.SpringApplication;
import org.springframework.boot.autoconfigure.SpringBootApplication;
import org.springframework.context.ApplicationContext;
import org.springframework.context.annotation.Bean;

@SpringBootApplication
public class Application {

    public static void main(String[] args) {
        SpringApplication.run(Application.class, args);
    }

    @Bean
    public CommandLineRunner commandLineRunner(ApplicationContext ctx) {
        return args -> {

            System.out.println("Let's inspect the beans provided by Spring Boot:");

            String[] beanNames = ctx.getBeanDefinitionNames();
            Arrays.sort(beanNames);
            for (String beanName : beanNames) {
                System.out.println(beanName);
            }

        };
    }

}
现在在浏览器中请求 localhost:8080,已经有响应了,但是 404。
所以再创建一个 Web Controller 作为一个简单的 Web 应用,该 Controller 中定义了一个可以用来处理路径响应并顺便返回个字符串的方法。
也就是我们常说的前后端通信时的“接口”,科学点叫做“路径”,这是 HTTP 协议中的概念:
package hello;

import org.springframework.web.bind.annotation.RequestParam;
import org.springframework.web.bind.annotation.RestController;
import org.springframework.web.bind.annotation.RequestMapping;

@RestController
public class HelloController {

    @RequestMapping("/")
    public String index() {
        return "Hello World";
    }
}
2. Web 应用的本质(HTTP)
处理 HTTP 请求:
- 从 HTTP 请求中提取 query string (查询字符串)
- 从 HTTP 请求中接收 payload(负载/请求体/请求 body)中的参数
返回 HTTP 响应:
- status code
- HTTP response header
- HTTP response body:JSON、HTML 等等
3. 从 GET 请求的查询字符串中获取参数
一条请求的参数可以来自于:
- 查询字符串:通常用来传递非敏感信息 ?name=tony&age=25
- 请求路径
- 请求体
其实还有其他的请求,比如 POST 也可以在查询字符串中携带参数。但实际应用中,如果用了 POST,参数就可以全放在请求体中,而用不着放在请求路径后面了。
使用 @RequestParam 处理查询字符串参数:
@RequestMapping("/search")
public String index(@RequestParam("q") String searchKeyword) {
    return "You are searching: " + searchKeyword;
}

可以继续增加查询参数,并且可以指定为非必传:
@RequestMapping("/search")
public String index(@RequestParam("q") String searchKeyword,
                    @RequestParam(value = "charset", required = false) String charset) {
    return "You are searching: " + searchKeyword + " " + charset;
}

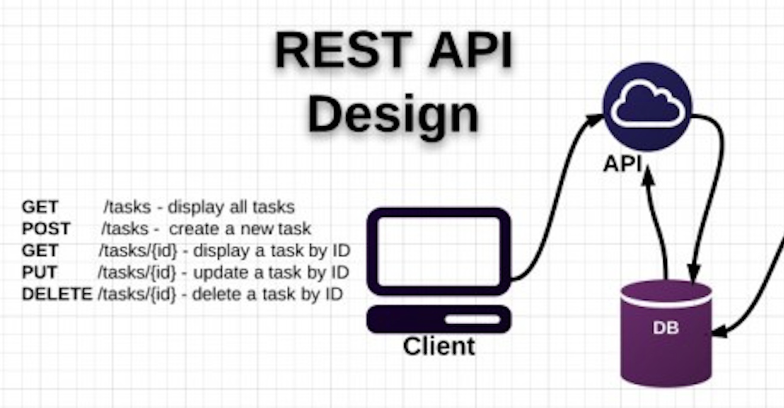
4. RESTful API、HTTP method 与参数获取
RESTful API 只是一种近年来流行的约定。
参考 MDN 中 HTTP 的方法动词,以及 RESTful API 的业界标杆 Github 的 REST API v3。
使用 HTTP 动词来代表动作:
- GET:获取资源
- POST:新建资源
- PUT:更新资源
- DELETE:删除资源
使用 URL 名词来代表资源:
- 资源里面没有动词
- 使用复数来代表资源列表
RESTful 风格好处:
- 清晰、优雅、语义化
- 方便批量自动创建接口
接下来实现一个 Github 风格的 API:
Unlock an issue: Users with push access can unlock an issue’s conversation. DELETE /repos/:owner/:repo/issues/:issue_number/lock
可以继续使用 @RequestMapping 注解,会把所有类型(动词)的请求都映射到当前方法中进行处理。
可以为注解传入参数 method,限制为只处理 delete 请求。
或者,直接使用 @DeleteMapping(当然,也可以同时配合 @RequestMapping 定义在类上来处理根路径)。
Spring 会识别路径中的参数并和方法的参数进行绑定:
package hello;

import org.springframework.web.bind.annotation.DeleteMapping;
import org.springframework.web.bind.annotation.PathVariable;
import org.springframework.web.bind.annotation.RequestMapping;
import org.springframework.web.bind.annotation.RequestMethod;
import org.springframework.web.bind.annotation.RestController;

import java.util.Arrays;
import java.util.HashMap;

@RestController
@RequestMapping("repos") // 该 Controller 响应 repos 路径及其子路径的所有请求类型
public class IssueController {

    // DELETE /repos/:owner/:repo/issues/:issue_number/lock
    @DeleteMapping("{owner}/{repo}/issues/{issueNumber}/lock") // 只响应 delete 方法
//    @RequestMapping(
//            value = "{owner}/{repo}/issues/{issueNumber}/lock",
//            method = { RequestMethod.DELETE }
//    )
    public void unlock(
            @PathVariable("owner") String owner,
            @PathVariable("repo") String repo,
            @PathVariable("issueNumber") String issueNumber) {
        System.out.println(owner);
        System.out.println(repo);
        System.out.println(issueNumber);
    }

}
5. 从 POST 请求中获取参数
从 HTTP POST 请求中提取 body:
| 场景 | Content-Type | 使用注解 | 适用于 |
|---|---|---|---|
| 提取整个 body 中的对象 | application/json | @RequestBody | JSON |
| 提取 body 中的参数 | application/x-www-form-urlencoded | @RequestParam | 表单 |
Create an issue
POST /repos/:owner/:repo/issues
本例中,同时处理了路径参数和请求体中的参数。
安装插件,帮助把 json 参数变成有类型的 Java Bean,方便进一步获取 body 中的参数。否则 @RequestBody 默认会把 json 处理成 LinkedHashMap 传入进来:
// POST /repos/:owner/:repo/issues
@PostMapping("/{owner}/{repo}/issues")
public void create(
    @PathVariable("owner") String owner,
    @PathVariable("repo") String repo,
    @RequestBody RequestBodyBean object) {
    System.out.println(object);

    object.getTitle();
    object.getLabels().get(0);
}
另一种 POST 请求体中的参数还可以是 form 表单的形式,这和查询字符串其实是一样的,只不过是放在了 body 中,所以还是继续使用 @RequestParam 来处理这种形式的字符串参数。
一般适用于参数比较少的时候,也就不再单独绑定一个 Java Bean,而是直接将参数取出:
@PostMapping("/login")
public void formDemo(
    @RequestParam("username") String username,
    @RequestParam("password") String password
) {
    System.out.println(username);
    System.out.println(password);
}
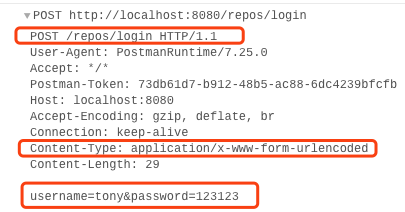
Postman 抓包看一下原始 http 请求文本可以验证,虽然使用了 POST,参数放在了请求体,但因为使用 x-www-form-urlencoded,所以还是和查询字符串的拼接形式一样,还是拼出了字符串。其实很好理解,因为信息交流,这样子拼是雅信达的。典型的比如登录场景中,比较适合。至少用户名密码不会被记录在 URL 地址中。
6. 返回 HTTP 响应
- 直接操作 HttpServletResponse 对象【简单、粗暴、原始】
- 直接返回 HTML 字符串【简单、粗暴、原始】
- 返回对象,并自动序列化为 JSON 字符串【常用,@ResponseBody】
- 模板引擎渲染【JSP/Velocity/Freemaker(参见下一篇笔记)】
Spring boot 底层内嵌了 Servlet 容器,Servlet 是 Java 世界中 Web 容器的标准。
从机器端口中读取字节流,封装成 Java 对象,方便上层 WebApp 处理,处理完之后再把返回值交给 Servlet 容器转化为字节流作为 HTTP 的响应。
字节流 <—> Servlet(HttpServletRequest/HttpServletResponse) <—> Java 对象
操作“裸”的 Servlet 接口:
@RequestMapping("/servlet")
public void search(HttpServletRequest request, HttpServletResponse reponse) throws IOException {
  reponse.setStatus(HttpServletResponse.SC_NOT_FOUND);
  reponse.getWriter().write("404 Not Found");
}
使用 @ResponseBody 标记响应,默认会被自动转换为 JSON:
@RequestMapping("/demo")
@ResponseBody
public Object search() {
  HashMap<String, Object> map = new HashMap<>();
  map.put("name", "Tony");
  map.put("friends", Arrays.asList("Tom", "Bob", "Eric"));
  return map;
}
Accpet/Content-Type 是一对 HTTP Header,请求方可以指定接受的媒体类型。
7. 周边生态系统
- HTTPS
- 分布式部署
- 扩展功能
- 数据库
- Redis缓存
- 消息队列
- RPC(Dubbo/Spring Cloud)
- 微服务化

若有收获,就点个赞吧
0 人点赞
