关于动态代理、AOP 的原理以及和 Spring 的集成。
1. 什么是 AOP 以及装饰器模式
- Aspect-Oriented Programming ⾯向切⾯编程
- 相对于 OOP 面向对象编程
- AOP 是面向切面编程,关注一个统一的切面
- AOP 和 Spring 是不同的东西,只是大多数实际应用中会在 Spring 中使用 AOP。
- AOP 适用场景:日志、缓存、鉴权等
为已有的类进行增强,可以采用:
- 直接修改原来的实现类
- 使用装饰器模式
- 使用 AOP 技术
使用装饰器模式(Decorator pattern)
装饰器模式是 OOP 的一种,本质上是一个“包装”,不改变原先实现类就能提供新的功能。
装饰器模式适用场景:
- 面向接口
- 原始方法执行前后分别做一些事情
不同的东西实现同一个接口时,可以使用装饰器模式为其增加新的功能。
装饰器一般结合接口使用,接口的好处就是不关心具体实现接口的手段,只关心是否符合接口的要求即可。
实现一个日志装饰器:
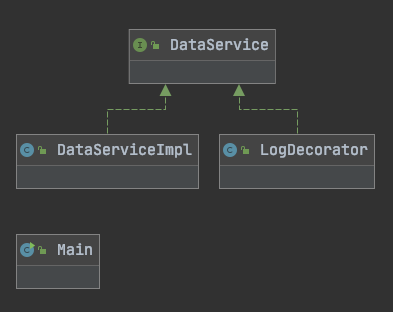
DataService 中的 a 和 b 方法每次进入的时候,都想打印出参数、返回值、日志等信息。
LogDecorator 和 DataServiceImpl 都实现了 DataService 接口,实际使用时使用 LogDecorator,而其内部委托了 DataServiceImpl:
package learn;public interface DataService {String a(int i);String b(int i);}
package learn;

import java.util.UUID;

public class DataServiceImpl implements DataService {
    @Override
    public String a(int i) {
        System.out.println("a is called " + i);
        String ret = UUID.randomUUID().toString();
        return ret;
    }

    @Override
    public String b(int i) {
        System.out.println("b is called " + i);
        String ret = UUID.randomUUID().toString();
        return ret;
    }
}
package learn;

public class LogDecorator implements DataService {
    DataService delegate;

    public LogDecorator(DataService delegate) {
        this.delegate = delegate;
    }

    @Override
    public String a(int i) {
        System.out.println("Log a is called!");
        return delegate.a(i);
    }

    @Override
    public String b(int i) {
        System.out.println("Log b is called!");
        return delegate.b(i);
    }
}
package learn;

public class Main {
    public static void main(String[] args) {
        DataService dataService = new LogDecorator(new DataServiceImpl());
        System.out.println(dataService.a(1));
        System.out.println(dataService.b(2));
    }
}
举个例子,Mybatis 的 CachingExecutor 就是一个典型的装饰器,装饰了 Executor: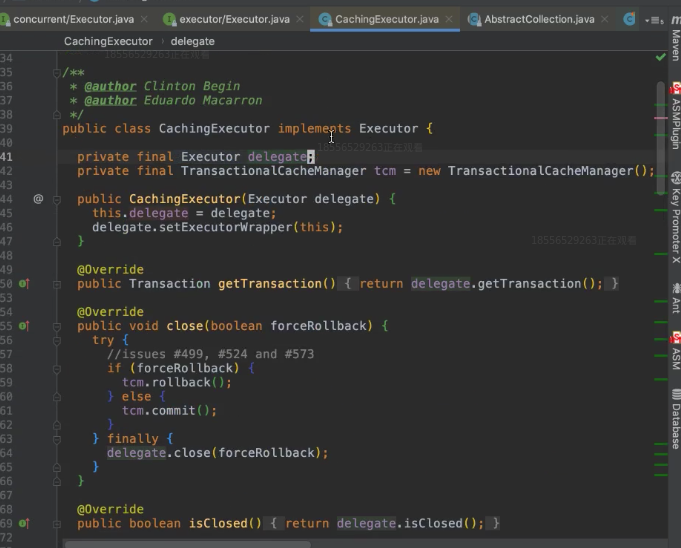
2. AOP 的两种实现:JDK 动态代理与字节码生成
装饰器(OOP)虽强大,但有些时候显得有些臃肿,需要实现相同的接口。特定场景下,使用 AOP 可能更好。
- JDK 动态代理:
- 优点:方便,不需要依赖任何第三方库
- 缺点:功能受限,只适用于接口
- CGLib/ByteBuddy 动态字节码生成
- 优点:强大,不受接口的限制
- 缺点:需要引用额外的第三方类库
它们都不能增强 final 类(因为不能被继承)、final/private 方法(因为不能被重写)。
JDK 动态代理
在目标接口的任何方法被调用时,都会被拦截,进入 LogProxy 中,然后在 invoke 方法中通过反射调用,或者直接在实例上调用。
不是针对某个具体方法,而是所有方法被调用时的那一刻(切面)进行统一处理,这就是面向切面。
每个代理实例都有与之关联的 InvocationHandler,当代理实例的方法被调用时会被派送到 InvocationHandler 的 method 方法中。
package learn;

import java.lang.reflect.InvocationHandler;
import java.lang.reflect.Method;
import java.util.Arrays;

public class LogProxy implements InvocationHandler {
    DataService delegate;

    public LogProxy(DataService delegate) {
        this.delegate = delegate;
    }

    @Override
    public Object invoke(Object proxy, Method method, Object[] args) throws Throwable {
        System.out.println(method.getName() + " is invoked: " + Arrays.toString(args));
        Object retValue = method.invoke(delegate, args);
        System.out.println(method.getName() + " is finished: " + retValue);
        return retValue;
    }
}
Proxy 类提供静态方法用来创建动态代理类和实例,Proxy 类也是用这些方法创造出的动态代理类的超类。
Proxy.newProxyInstance 返回代理类的实例。
package learn;

import java.lang.reflect.Proxy;

public class Main {
    static DataService service = new DataServiceImpl();

    public static void main(String[] args) {

        DataService dataService = (DataService) Proxy.newProxyInstance(
                service.getClass().getClassLoader(), // 用来定义代理类的 class loader
                new Class[]{DataService.class}, // 需要被代理实现的接口数组
                new LogProxy(service)); // Invocation handler

        dataService.a(1);
        dataService.b(2);
    }
}
动态字节码生成
- CGLib
- Byte Buddy
CGLib 此类的本质是在 JVM 内部动态生成原先类的增强后的子类的实例,是通过继承实现的。
// 动态字节码生成时的本质
class DataServiceImpl$EnhancedByCglig extends DataServiceImpl {
    // 重写时进行强化
}
Byte Buddy 和 CGLib 类似,可以参考 中级15 - Java的注解 中借助 Byte Buddy 实现 @Log 和 @Cache 注解。
演示 CGLib:
<!-- https://mvnrepository.com/artifact/cglib/cglib -->
<dependency>
  <groupId>cglib</groupId>
  <artifactId>cglib</artifactId>
  <version>3.3.0</version>
</dependency>
LogInterceptor:
package learn;

import net.sf.cglib.proxy.MethodInterceptor;
import net.sf.cglib.proxy.MethodProxy;

import java.lang.reflect.Method;
import java.util.Arrays;

public class LogInterceptor implements MethodInterceptor {
    private DataServiceImpl delegate;

    public LogInterceptor(DataServiceImpl delegate) {
        this.delegate = delegate;
    }

    @Override
    public Object intercept(Object o, Method method, Object[] objects, MethodProxy methodProxy) throws Throwable {
        System.out.println(method.getName() + " is invoked: " + Arrays.toString(objects));
        Object retValue = method.invoke(delegate, objects);
        System.out.println(method.getName() + " is finished: " + retValue);
        return retValue;
    }
}
Main:
package learn;

import net.sf.cglib.proxy.Enhancer;

public class Main {
    static DataServiceImpl service = new DataServiceImpl(); // 忘掉刚才的接口,现在就是一个类

    public static void main(String[] args) {
        Enhancer enhancer = new Enhancer();
        enhancer.setSuperclass(DataServiceImpl.class); // 把需要动态代理的类设置为代理类的超类
        enhancer.setCallback(new LogInterceptor(service)); // 当代理类的方法被调用时,调用给定的 callback

        DataServiceImpl enhancedService = (DataServiceImpl) enhancer.create();
        enhancedService.a(1);
        enhancedService.b(2);
    }
}
以上几个演示的输出: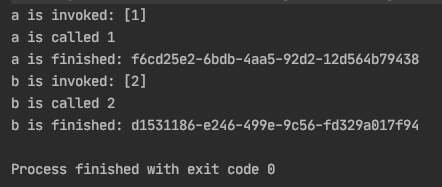
3. AOP 与 Spring
先尝试自行了解一下 AOP 的核心概念。接下来,继续使用上一篇中的代码(项目代码演示地址)。
具体操作层面,SpringBoot 用户只需引入 spring-boot-starter-aop 依赖即可:
<dependency>
  <groupId>org.springframework.boot</groupId>
  <artifactId>spring-boot-starter-aop</artifactId>
</dependency>
application.properties 配置文件中增加:spring.aop.proxy-target-class=true
用于切换 JDK 基于接口与的动态代理/CGLIB基于子类的代理
“description”: “Whether subclass-based (CGLIB) proxies are to be created (true), as opposed to standard Java interface-based proxies (false).”
下面,为接口添加缓存功能,缓解数据库压力,提高接口响应效率。
希望拦截 RankService 中的 getRank 方法,增加缓存功能。
为需要进入 Cache 切面的方法添加 @Cache 注解:
package hello.service;

import hello.anno.Cache;
import hello.dao.RankDao;
import hello.entity.RankItem;
import org.springframework.beans.factory.annotation.Autowired;
import org.springframework.stereotype.Service;

import java.util.List;

@Service
public class RankService {
    @Autowired
    RankDao rankDao;

    @Cache
    public List<RankItem> getRank() {
        return rankDao.getRank();
    }
}
还是那句话,实际的注解并不干什么事情,只是一个会在运行时被保留的标记,以便被 Spring 扫描到:
@Cache:
package hello.anno;

import java.lang.annotation.Retention;
import java.lang.annotation.RetentionPolicy;

@Retention(RetentionPolicy.RUNTIME)
public @interface Cache {
}
@Aspect 声明切面:
- @Before
- @After
- @Around
任何标注了 @Cache 的方法被调用的时候,都会进入切点。
而更具体的切入通知点主要分为三个时机: around、before、after。
因为使用 @Around 则表示在目标方法被调用的整个时期,实际上就是包了一层,最强大的一个通知点类型,官方文档中建议尽量时候最小满足需求的那一种,因为功效越大,也越容易人工犯错。
切面定义:
package hello;

import org.aspectj.lang.ProceedingJoinPoint;
import org.aspectj.lang.annotation.Around;
import org.aspectj.lang.annotation.Aspect;
import org.springframework.context.annotation.Configuration;

@Aspect
@Configuration
public class CacheAspect {
    @Around("@annotation(hello.anno.Cache)")
    public Object cache(ProceedingJoinPoint joinPoint) throws Throwable {
        System.out.println("method is called!");
        return joinPoint.proceed();  //JoinPoint.proceed() 表示继续做原方法该做的事情
    }
}
现在访问 http://localhost:8080/rank.html,后台可以看到输出:method is called!
接下来,实现缓存功能,先做内存中的缓存:
package hello;

import org.aspectj.lang.ProceedingJoinPoint;
import org.aspectj.lang.annotation.Around;
import org.aspectj.lang.annotation.Aspect;
import org.aspectj.lang.reflect.MethodSignature;
import org.springframework.context.annotation.Configuration;

import java.util.HashMap;
import java.util.Map;

@Aspect
@Configuration
public class CacheAspect {
    Map<String, Object> cache = new HashMap<>();

    @Around("@annotation(hello.anno.Cache)")
    public Object cache(ProceedingJoinPoint joinPoint) throws Throwable {
        MethodSignature signature = (MethodSignature) joinPoint.getSignature();
        String methodName =signature.getName();
        Object cachedValue = cache.get(methodName);

        if (cachedValue != null) {
            System.out.println("Get value from cache!");
            return cachedValue;
        } else {
            System.out.println("Get value from database!");
            Object realValue = joinPoint.proceed();
            cache.put(methodName, realValue);
            return realValue;
        }
    }
}
4. Redis 简介与在 SpringBoot 中使用 Redis
REmote DIctionary Server(Redis) 是一个由Salvatore Sanfilippo写的key-value存储系统。 Redis是一个开源的使用ANSI C语言编写、遵守BSD协议、支持网络、可基于内存亦可持久化的日志型、Key-Value数据库,并提供多种语言的API。 它通常被称为数据结构服务器,因为值(value)可以是 字符串(String), 哈希(Hash), 列表(list), 集合(sets) 和 有序集合(sorted sets)等类型。
- Redis 是广泛使用的内存缓存,常见的数据结构有 String/List/Set/Hash/ZSet
- 可以完全基于内存,所以可以很快
- 优秀的数据结构设计
- 单一线程,避免上下文切换开销
- 事件驱动,非阻塞
REmote DIctionary Server,远程字典服务器,本质还是通过 socket 传递字节流,简单起见,使用 docker 快速启动一个 Redis 服务:
docker run --name some-redis -dp 6379:6379 redis
下面演示用 Redis 替换刚才的 HashMap,继续实现对方法返回值进行缓存的功能。
pom.xml 增加依赖:
<dependency>
  <groupId>org.springframework.boot</groupId>
  <artifactId>spring-boot-starter-data-redis</artifactId>
  <version>2.3.0.RELEASE</version>
</dependency>
application.properties 文件中增加 Redis 配置:
spring.datasource.url=jdbc:h2:file:./target/test
spring.datasource.username=root
spring.datasource.password=root
spring.datasource.driver-class-name=org.h2.Driver
mybatis.config-location=classpath:db/mybatis/config.xml
# 使用 CGLIB 来实现 AOP
spring.aop.proxy-target-class=true
# 配置 Redis
spring.redis.host=localhost
spring.redis.port=6379
Java 中使用 Redis,需要一个 RedisTemplate,该类简化了 Redis 的数据访问。
Spring 会自动扫描带 @Bean 的方法并生成相应的 Bean:
package hello.config;

import org.springframework.context.annotation.Bean;
import org.springframework.context.annotation.Configuration;
import org.springframework.data.redis.connection.RedisConnectionFactory;
import org.springframework.data.redis.core.RedisTemplate;

@Configuration
public class AppConfig {
    @Bean
    RedisTemplate<String, Object> redisTemplate(RedisConnectionFactory factory) {
        RedisTemplate<String, Object> redisTemplate = new RedisTemplate<>();
        redisTemplate.setConnectionFactory(factory);
        return redisTemplate;
    }
}
一个 HashMap 是存在于一个特定的 JVM 中的,而一台机器总有宕机、回滚、断电、爆炸、甚至地震、海啸、火山喷发的时候,单机器提供服务,压力可想而知,所以需要多台机器部署服务,因此 Redis 是一种中心化的服务(当然 Redis 本身也可以集群化),供各个机器上的服务来访问,回归到程序运行的本质,其实就是把需要共享的数据放在了更高一层的作用域上。
Redis 自带若干优秀的数据结构: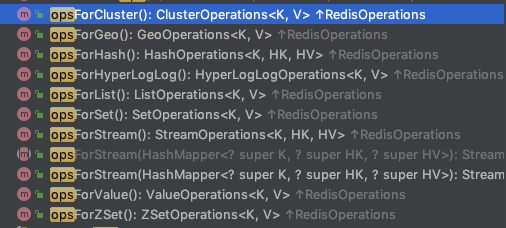
把刚才的 CacheAspect 由 HashMap 改为 Redis 来存储和读取,使用 @Autowired 自动装配刚才声明的 RedisTemplate Bean:
package hello;

import org.aspectj.lang.ProceedingJoinPoint;
import org.aspectj.lang.annotation.Around;
import org.aspectj.lang.annotation.Aspect;
import org.aspectj.lang.reflect.MethodSignature;
import org.springframework.beans.factory.annotation.Autowired;
import org.springframework.context.annotation.Configuration;
import org.springframework.data.redis.core.RedisTemplate;

@Aspect
@Configuration
public class CacheAspect {
    // Map<String, Object> cache = new HashMap<>();

    @Autowired
    RedisTemplate<String, Object> redisTemplate;

    @Around("@annotation(hello.anno.Cache)")
    public Object cache(ProceedingJoinPoint joinPoint) throws Throwable {
        MethodSignature signature = (MethodSignature) joinPoint.getSignature();
        String methodName = signature.getName();
        Object cachedValue = redisTemplate.opsForValue().get(methodName);

        if (cachedValue != null) {
            System.out.println("Get value from cache!");
            System.out.println(cachedValue);
            return cachedValue;
        } else {
            System.out.println("Get value from database!");
            Object realValue = joinPoint.proceed();
            redisTemplate.opsForValue().set(methodName, realValue);
            return realValue;
        }
    }
}
序列化:把对象转化为可传输的字节序列过程称为序列化。
反序列化:把字节序列还原为对象的过程称为反序列化。
为什么需要序列化:
序列化最终的目的是为了对象可以跨平台存储,和进行网络传输。而进行跨平台存储和网络传输的方式就是 IO,而 IO 支持的数据格式就是字节数组。所以序列化本质是对象的拆装规则。
然后由于使用 @Cache 拦截的是 RankService 中的 getRank 方法,而 getRank 方法的返回值是 List
// 具体代码省略,参见仓库
public class RankItem implements Serializable {}
public class User implements Serializable {}
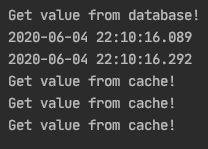
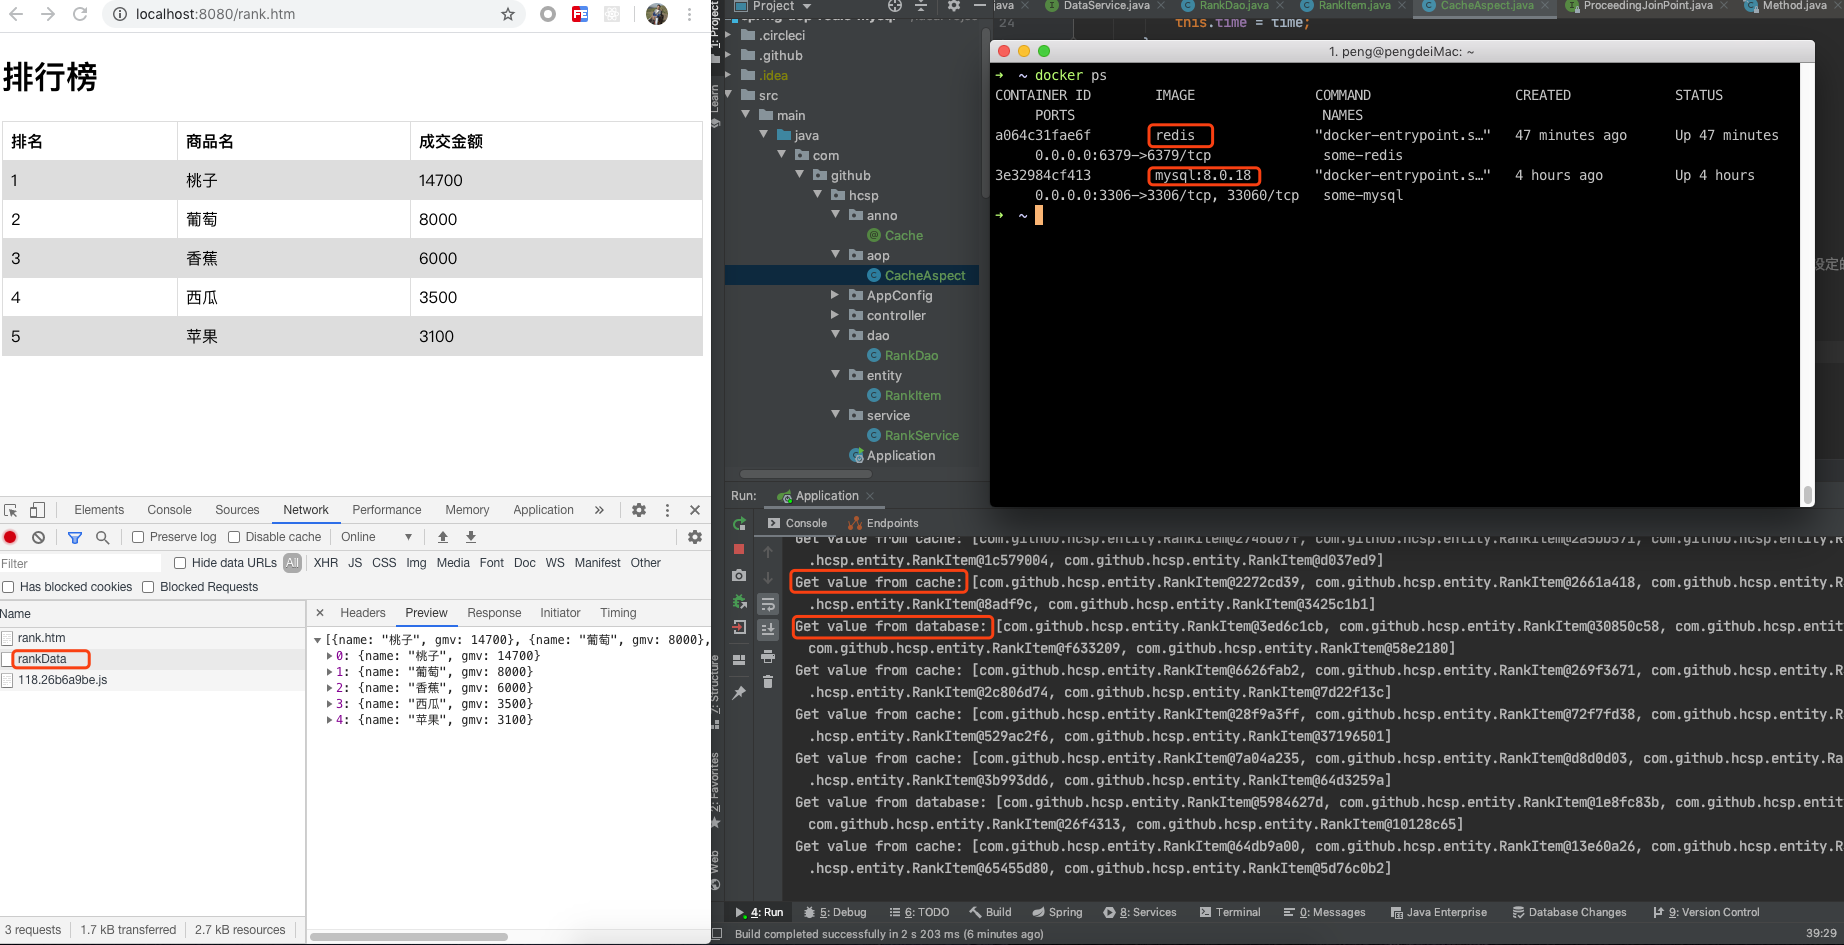
之后每次访问相同方法,都会从 Redis 缓存中读取:
以上,实现了一个基于 AOP 的缓存功能,其拦截带 @Cache 注解的方法,并使用 Redis 对原方法的返回值进行缓存。
6. Spring+AOP+Redis+MySQL 练习
7. 参考

若有收获,就点个赞吧
0 人点赞
