Vscode 设置
{"editor.fontSize": 16,"editor.tabSize": 2,"editor.detectIndentation": false,"files.autoSave": "afterDelay","explorer.confirmDelete": false,"editor.formatOnSave": true,"[javascript]": {"editor.formatOnSave": true,"editor.defaultFormatter": "esbenp.prettier-vscode"},"[vue]": {"editor.formatOnSave": true,"editor.tabSize": 2,"editor.defaultFormatter": "octref.vetur"},"update.showReleaseNotes": false,// 开启 vscode 文件路径导航"breadcrumbs.enabled": true,"vetur.validation.template": true,"vetur.format.defaultFormatter.html": "js-beautify-html","vetur.format.defaultFormatterOptions": {"js-beautify-html": {"wrap_attributes": "force-aligned" //属性强制折行对齐}},"vetur.format.defaultFormatter.js": "vscode-typescript","prettier.singleQuote": true, //使用单引号而不是双引号"prettier.semi": false,"prettier.jsxBracketSameLine": true, //将>多行JSX元素放在最后一行的末尾,而不是单独放在下一行"emmet.triggerExpansionOnTab": true,"files.associations": {"*.vue": "vue"},"javascript.implicitProjectConfig.experimentalDecorators": true,"fileheader.Author": "zhangjx","fileheader.LastModifiedBy": "mikey.zhangjx","fileheader.customMade": {}, // 头部注释"fileheader.cursorMode": {}, // 函数注释"fileheader.configObj": {"autoAdd": true, // 将该选项设置为true即可开启},"editor.codeActionsOnSave": {"source.fixAll.eslint": true},"git.confirmSync": false,"git.autofetch": true,"outline.showPackages": false,"explorer.compactFolders": false,}
页面刷新
关于页面的刷新我们使用了三种方式
第一种 只刷新需要的接口数据,页面不刷新,浏览器不刷新—实现方式 混入方法
体验性好,性能不损失。
export default {data() {return {loading:true}},methods:{async init () {if (!(await this.beforeInit())) {return}return new Promise((resolve, reject) => {// 请求接口获得接口响应后this.loading = true})}},beforeInit () {return true}}
在页面中引入刚才写的js文件
import initData from 'initData.js'
在js块的地方混入
export default {name:'组件',mixins: [initData],data(){return {...}},created() {this.$nextTick(() => {this.init() // 也就是刚才js文件中写的init方法})this.getTableData()},methods:{getTableData(){this.init()}}}
给表格加上加载等待的样式,element table 直接加上下面一句就行了
v-loading="loading"
第二种 刷新页面,浏览器不刷新 —- 实现方法 provide/project 注入方法
1.在权限管理这层,由于刷新接口路由还是会缓存,造成影响,所以我们采用了刷新页面来处理,虽然这种刷新会损失一定的性能。
在app.vue中
export default {name: 'app',provide () {return {reload: this.reload}},data () {return {isRouterAlive: true}},methods: {reload () {this.isRouterAlive = falsethis.$nextTick(() => {this.isRouterAlive = true})}}}
HTML部分中
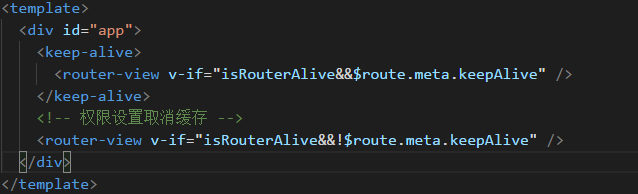
根据路由中的meta.keepAlive 判断当前路由需不需要刷新整个页面,对需要的路由组件取消缓存,这样才会起作用。
2.还有一种是使用 refresh 刷新路由
第三种 通过跳转空页面然后再跳转回来进行刷新
路由配置
{path: 'refresh',name: 'refresh',hidden: true,component: {beforeRouteEnter (to, from, next) {next(vm => vm.$router.replace(from.fullPath))},render: h => h()}}
页面中使用
this.$router.replace('/refresh')
第四种 浏览器也刷新 —- 常规的js刷新方法
这种方式体验性不好,性能上也有损失一般不用
使用方法:
- window.location.reload(),
- window.history.go(0)和
- document.execCommand(‘’Refresh’’),
这三个方法是最快速的。其他的都有明显的浏览器滚动条的出现。
页面自动刷新:
1.页面自动刷新:把如下代码加入区域中
<meta http-equiv="refresh" content="20">
其中20指每隔20秒刷新一次页面.
function myrefresh(){window.location.reload();}setTimeout('myrefresh()',1000); //指定1秒刷新一次
如果想关闭窗口时刷新或者想开窗时刷新的话
<body onload="opener.location.reload()"> 开窗时刷新<body onUnload="opener.location.reload()"> 关闭时刷新<script language="javascript">window.opener.document.location.reload()</script>
懒加载节点方法如何动态更新
基于element实现的懒加载动态更新
定义变量:
data() {return {node: [],resolve: [],}},methods: {async loadNode(node, resolve) {this.node = nodethis.resolve = resolve// 处理业务逻辑if (node.level === 0 || node === undefined) {await electoralLevelList({ par_id: 0 }).then(res => {return resolve(res)})}},// 更新业务数据updateNodeData() {this.node.childNodes = []this.loadNode(this.node, this.resolve)},}
npm 设置及使用
//设置淘宝源npm config set registry https://registry.npm.taobao.org//设置公司的源npm config set registry http://127.0.0.1:4873//查看源,可以看到设置过的所有的源npm config get registry// 安装依赖,修改sass 源npm config set sass_binary_site=https://npm.taobao.org/mirrors/node-sass
二维码生成和下载图片
使用库:npm install —save vue-qriously
main.js 中引入
import VueQriously from ‘vue-qriously’
Vue.use(Antd)
Vue.use(VueQriously)
开发实例
<template><div><qriously :value="qrcodeLink":size="size"v-show="false":backgroundAlpha="backgroundAlpha" /><img :src="qrcodeImgSrc"alt="老人二维码"@click="downloadIamge" /></div></template><script>export default {name: 'qriously',props: {qrcodeLink: {type: String,default: 'test'},size: {type: Number,default: 120},downloadIamgeName: {type: String,default: '下载二维码图片'}},data () {return {// 背景透明度,默认透明 0backgroundAlpha: 1,qrcodeImgSrc: ''}},mounted () {const qrcodeCanvas = this.$children[0].$refs.qrcodethis.qrcodeImgSrc = this.canvasToImage(qrcodeCanvas).src},methods: {canvasToImage (canvas) {var image = new Image()image.src = canvas.toDataURL('image/png')return image},downloadIamge (e) {let image = new Image()// 解决跨域 Canvas 污染问题image.setAttribute('crossOrigin', 'anonymous')image.onload = function () {let canvas = document.createElement('canvas')canvas.width = image.widthcanvas.height = image.heightlet context = canvas.getContext('2d')context.drawImage(image, 0, 0, image.width, image.height)let url = canvas.toDataURL('image/png') // 得到图片的base64编码数据let a = document.createElement('a') // 生成一个a元素let event = new MouseEvent('click') // 创建一个单击事件a.download = this.downloadIamgeName || 'photo' // 设置图片名称a.href = url // 将生成的URL设置为a.href属性a.dispatchEvent(event) // 触发a的单击事件}image.src = this.qrcodeImgSrc}}}</script>
方法说明:
canvasToImage :因为生成的二维码是canvas 所以需要转化为图片才能下载
作者源码中给生成的canvas 定义了ref 属性,所以我就直接查找节点取ref了,如下图(源码)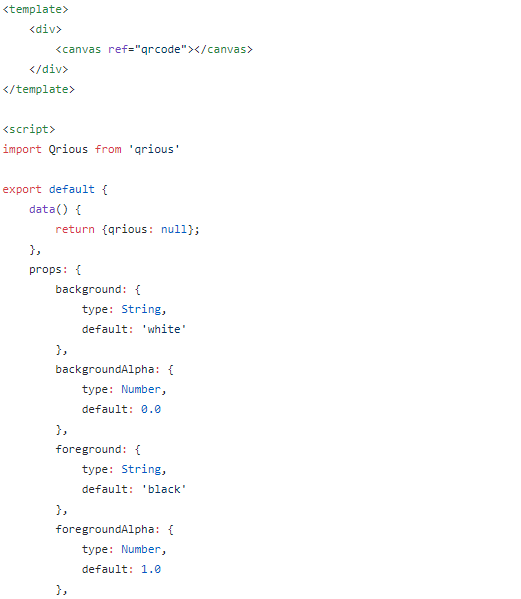
在下载图片我使用js生成a标签也可以直接a标签包裹img比如:
<a href="qrcodeImgSrc"><img :src="qrcodeImgSrc"alt="老人二维码"@click="downloadIamge" /></a>
我刚开始用的这种,后面参照了

这个老哥的代码,做了修改
[Vue CLI 3] 配置 webpack-bundle-analyzer 插件
1. 安装插件
# NPMnpm install --save-dev webpack-bundle-analyzer# Yarnyarn add -D webpack-bundle-analyzer
2. 配置
在2.x的版本中<br />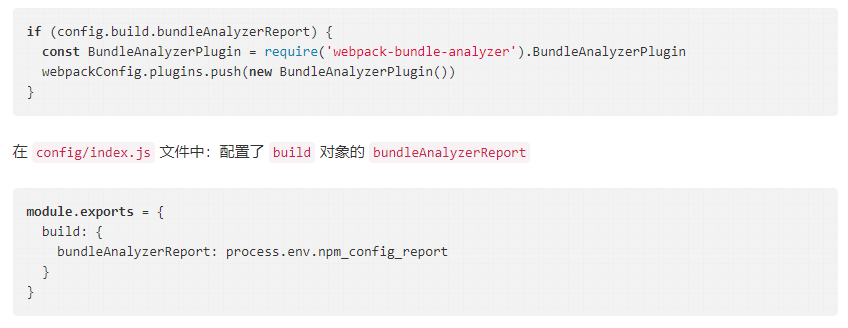
3.x 的版本中 vue.config.js
if (process.env.npm_config_report) {config.plugin('webpack-bundle-analyzer').use(require('webpack-bundle-analyzer').BundleAnalyzerPlugin).end()}
.env 环境中配置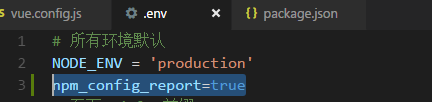
最后在package.js中配置 scripts

3. 使用
npm run build -- report
WebSocket 使用
//data () {return {websock:null}},create () {this.initWebSocket()},destroyed () {// 离开路由之后断开websocket连接this.websock.close()},methods: {initWebSocket() {const UID = 32const wsuri = 'ws://127.0.0.1:8081?uid=' + UIDthis.websock = new WebSocket(wsuri)this.websock.onopen = this.websocketonopenthis.websock.onerror = this.websocketonerrorthis.websock.onmessage = this.websocketonmessagethis.websock.onclose = this.websocketclose},websocketonopen () { // 连接建立之后执行send方法发送数据console.log('连接成功')let actions = { 'test': '1234567' }this.websocketsend(JSON.stringify(actions))},websocketonerror () { // 连接建立失败重连console.log('连接建立失败正在重连...')this.initWebSocket()},websocketonmessage (e) { // 数据接收console.log('数据接受')const redata = JSON.parse(e.data)},websocketsend (Data) { // 数据发送console.log('数据发送' + Data)this.websock.send(Data)},websocketclose (e) { // 关闭console.log('断开连接', e.code)}}
VUE 批量监听 WebSocket
export default {data() {return {websocket: []}},created() {this.getInitSocket()},destroyed() {// 离开路由之后断开websocket连接console.log('sock', this.websock)this.onClose},methods: {getInitSocket() {const wsuri1 = 'ws//你的socket地址1'const wsuri2 = 'wss//你的socket地址2' // wss 相当于httpsthis.setInIt(1,wsuri1)this.setInIt(2,wsuri2)},setInIt(seq,wsurl) {this.websocket[seq] = new WebSocket(wsurl)this.websocket[seq].onopen = this.onOpenthis.websocket[seq].onclose = this.onClosethis.websocket[seq].onmessage = this.onMessagethis.websocket[seq].onerror = this.onError},onOpen(evt) {console.log('Connected to WebSocket server.')let actions = {'test': '1234567'}// 测试发送数据this.webSocketSend(1, JSON.stringify(actions))},onMessage(evt) {console.log('数据接收->', evt)},onClose() {console.log('Disconnected')},onError(evt) {console.log('Error occured: ' + evt.data)},webSocketSend(seq, data) {this.websocket[seq].send(data)}}
Style转Scss
#下载工具npm install -g stylus-converter#运行脚本stylus-conver -i test.styl -o test.scss
开发实战[CLI-3.x]
安装配置
1. 安装脚手架
npm install -g @vue/cli# ORyarn global add @vue/cli
2. 创建项目:vue create vuetao

从官方拿过来一张图,为啥呢(他的好看),上下方向键移动,空格键选中,看自己需要了,一般 Babel、Router、Vuex、Css Pre-processors、Linter / Formatter 这几个为必选的了,下面的两个测试用的自己选择。
3. 项目配置- vue.config.js
- 编译相关配置
// 基础路径:按自己的项目修改 线上: './.' 本地: '/'let publicPath = process.env.NODE_ENV === 'development' ? '/' : './.'module.exports = {publicPath,// https://cli.vuejs.org/zh/config/#lintonsavelintOnSave: true,outputDir: 'dist',// 编译后文件的目录名称assetsDir: 'static', // 编译后资源文件的目录//生产环境的 source map,可以看到打包前的源码,一般在线上有问题需要排查的时候需要productionSourceMap: false,// 代理配置devServer: {disableHostCheck: true,// 这个不用配置,我这边内网穿透的时候加的port: 8085,publicPath,proxy: {'/api': {target: process.env.VUE_APP_BASE_URL,// 这个是你域名地址我加在env文件中调用了ws: true,changeOrigin: true,pathRewrite: {'^/api': '/api/'}}}},}
- 全局css 配置
module.exports = {css: {loaderOptions: {// 设置 scss 公用变量文件sass: {prependData: `@import '~@/assets/style/public.scss';`}}},}
- 删除prefetch 降低带宽压力
module.exports = {
  chainWebpack: config => {
     config.plugins
      .delete('prefetch')
      .delete('preload')
  }
}
/**
 * 删除懒加载模块的 prefetch preload,降低带宽压力
 * https://cli.vuejs.org/zh/guide/html-and-static-assets.html#prefetch
 * https://cli.vuejs.org/zh/guide/html-and-static-assets.html#preload
 * 而且预渲染时生成的 prefetch 标签是 modern 版本的,低版本浏览器是不需要的
 */
- alias 设置
module.exports = {
  chainWebpack: config => {
      config.resolve.alias
      .set('@', resolve('src'))
      .set('@v', resolve('src/views'))
      .set('~', resolve('public'))
  }
}
上面单个示例合起来就是咱们需要配置的文件
使用CDN优化
打包编译速度减少项目体积 | 此处配置参考d2Admin 作者
1. 根目录创建cdn 依赖文件
// dependencies-cdn.js

module.exports = [{
  name: 'vue',
  library: 'Vue',
  js: 'https://cdn.jsdelivr.net/npm/vue@2.6.10/dist/vue.js',
  css: ''
},
{
  name: 'vue-router',
  library: 'VueRouter',
  js: 'https://cdn.jsdelivr.net/npm/vue-router@3.1.3/dist/vue-router.js',
  css: ''
},
{
  name: 'vuex',
  library: 'Vuex',
  js: 'https://cdn.jsdelivr.net/npm/vuex@3.1.2/dist/vuex.js',
  css: ''
},
{
  name: 'axios',
  library: 'axios',
  js: 'https://cdn.jsdelivr.net/npm/axios@0.19.0/dist/axios.min.js',
  css: ''
},
{
  name: 'better-scroll',
  library: 'BScroll',
  js: 'https://cdn.jsdelivr.net/npm/better-scroll@1.15.2/dist/bscroll.min.js',
  css: ''
},
{
  name: 'element-ui',
  library: 'ELEMENT',
  js: 'https://cdn.jsdelivr.net/npm/element-ui@2.13.0/lib/index.js',
  css: 'https://cdn.jsdelivr.net/npm/element-ui@2.13.0/lib/theme-chalk/index.css'
},
{
  name: 'nprogress',
  library: 'NProgress',
  js: 'https://cdn.jsdelivr.net/npm/nprogress@0.2.0/nprogress.min.js',
  css: 'https://cdn.jsdelivr.net/npm/nprogress@0.2.0/nprogress.css'
}
]
2. vue.config.js 配置
const cdnDependencies = require('./dependencies-cdn') // cdn 依赖文件
// 设置不参与构建的库
let externals = {
  'vue': 'Vue',
  'vue-router': 'VueRouter',
  'vuex': 'Vuex',
  'axios': 'axios',
  'element-ui': 'ELEMENT'
}
cdnDependencies.forEach(packages => {
  externals[packages.name] = packages.library
})
// 引入文件的 cdn 链接
const cdn = {
  css: cdnDependencies.map(e => e.css).filter(e => e),
  js: cdnDependencies.map(e => e.js).filter(e => e)
}
module.exports = {
   chainWebpack: config => {
     //添加 CDN 参数到 htmlWebpackPlugin 配置中
     config.plugin('html').tap(args => {
      if (process.env.NODE_ENV === 'production') {
        args[0].cdn = cdn
      } else {
        args[0].cdn = []
      }
      return args
    })
   }
}
3. html 中引入cdn 链接
<!DOCTYPE html>
<html>
<head>
  <meta charset="utf-8" />
  <meta http-equiv="X-UA-Compatible" content="IE=edge" />
  <meta name="viewport" content="width=device-width, initial-scale=1.0, maximum-scale=1.0, user-scalable=0" />
    <!-- 使用 CDN 加速的 CSS 文件,配置在 vue.config.js 下 -->
  <% for (var i in htmlWebpackPlugin.options.cdn&&htmlWebpackPlugin.options.cdn.css) { %>
  <link href="<%= htmlWebpackPlugin.options.cdn.css[i] %>" rel="preload" as="style">
  <link href="<%= htmlWebpackPlugin.options.cdn.css[i] %>" rel="stylesheet">
  <% } %>
  <!-- 使用 CDN 加速的 JS 文件,配置在 vue.config.js 下 -->
  <% for (var i in htmlWebpackPlugin.options.cdn&&htmlWebpackPlugin.options.cdn.js) { %>
  <link href="<%= htmlWebpackPlugin.options.cdn.js[i] %>" rel="preload" as="script">
  <% } %>
</head>
<body>
 <noscript>
    <strong>
      很抱歉,没有 JavaScript 支持。
    </strong>
 </noscript>
 <div id="app">
    xxx
 </div>
  <!-- 使用 CDN 加速的 JS 文件,配置在 vue.config.js 下 -->
  <% for (var i in htmlWebpackPlugin.options.cdn&&htmlWebpackPlugin.options.cdn.js) { %>
  <script src="<%= htmlWebpackPlugin.options.cdn.js[i] %>"></script>
  <% } %>
</body>
</html>
开启GzipGzip 压缩
本来这些都是在项目使用的时候遇到需要优化的时候才会去寻求解决的,都是需要配置的我就当放一起一次性写出来了,以后查看也方便。
1. 安装插件 compression-webpack-plugin
npm install compression-webpack-plugin -D
2. vue.config.js 配置
文件开启Gzip,也可以通过服务端(如:nginx)(https://github.com/webpack-contrib/compression-webpack-plugin)
const CompressionPlugin = require('compression-webpack-plugin') // Gzip

module.exports = {
  configureWebpack: config => {
    let pluginsPro = [
      new CompressionPlugin({
        filename: '[path].gz[query]',
        algorithm: 'gzip',
        test: new RegExp('\\.(' + ['js', 'css'].join('|') + ')$'),
        threshold: 10240,
        deleteOriginalAssets: false, // 不删除源文件
        minRatio: 0.8
      })
    ]
    const configNew = {}
    // 非开发环境
    if (process.env.NODE_ENV !== 'development') {
       config.plugins = [ ...pluginsPro]
    }
    return configNew
  }
}
顺带再加个webpack 去掉console和简要的文档说明,和这个压缩在同一个地方,我就直接在上面的配置中加了
const CompressionPlugin = require('compression-webpack-plugin') // Gzip

module.exports = {
  configureWebpack: config => {
    let pluginsPro = [
      new CompressionPlugin({
        filename: '[path].gz[query]',
        algorithm: 'gzip',
        test: new RegExp('\\.(' + ['js', 'css'].join('|') + ')$'),
        threshold: 10240,
        deleteOriginalAssets: false, // 不删除源文件
        minRatio: 0.8
      })
    ]
    const configNew = {}
    // 非开发环境
    if (process.env.NODE_ENV !== 'development') {
      configNew.externals = externals
      config.optimization.minimizer[0].options.terserOptions.compress.warnings = false
      config.optimization.minimizer[0].options.terserOptions.compress.drop_console = true
      config.optimization.minimizer[0].options.terserOptions.compress.drop_debugger = true
      config.optimization.minimizer[0].options.terserOptions.compress.pure_funcs = ['console.log']
      config
        .optimization.splitChunks = {
          chunks: 'all',
          cacheGroups: {
            libs: {
              name: 'chunk-libs',
              test: /[\\/]node_modules[\\/]/,
              priority: 10,
              chunks: 'initial' // only package third parties that are initially dependent
            },
            elementUI: {
              name: 'chunk-elementUI', // split elementUI into a single package
              priority: 20, // the weight needs to be larger than libs and app or it will be packaged into libs or app
              test: /[\\/]node_modules[\\/]_?element-ui(.*)/ // in order to adapt to cnpm
            },
            commons: {
              name: 'chunk-commons',
              test: resolve('src/components'), // can customize your rules
              minChunks: 2, //  minimum common number
              priority: 5,
              reuseExistingChunk: true
            }
          }
        }
      config.optimization.runtimeChunk = 'single'
      config.plugins = [...config.plugins, ...pluginsPro]
    }
    return configNew
  }
}
路由配置
- 路由钩子配置(路由拦截权限判断处理)
- 路由文件配置
- 公共路由文件配置(404,重定向,路由刷新配置等)
- 动态路由配置 (一般是权限控制后端控制菜单路由,其他动态匹配了)
路由钩子配置
// src/router/index.js

import Vue from 'vue'
import VueRouter from 'vue-router'
// 进度条-需要安装插件,不用的话需要删除
import NProgress from 'nprogress'
import 'nprogress/nprogress.css'

// 路由数据
import routes from './routes' // 静态路由文件,包括公共路由,404 路由
if (process.env.NODE_ENV === 'development') {
  Vue.use(VueRouter)// 开发环境不用cdn,不配置cdn的话直接使用不用判断
}
// 路由白名单
let WhiteList = routes.map(item=>item.path)

// 导出路由 在 main.js 里使用
const router = new VueRouter({
  routes
})
// 路由钩子,访问路由
router.beforeEach((to, from, next) => {
  // 开始进度条
  NProgress.start()
  // 这地方可对权限什么的进行判断
  if(!WhiteList.includes(to.path)) {// 白名单内的不需要校验权限相关直接next
    //登陆判断 暂时以是否存在token作为示例
     const token = util.cookies.get('token')
    // token这边存在cokkies 具体封装cokkies下面专门说明
     if(token) {
       // 这边就可以对通过登陆的用户进行动态路由权限的校验处理
       // 主要使用 router.addRoutes(array) 权限路由设计处理有点多,这地方不做说明了下面专门写
        next()
     }else {
       if (to.path === '/login') {
        // 如果是登录页面路径,就直接next()
        next()
       }else {
        // 不然就跳转到登录;
        next({
          name: 'login',
          query: {
            redirect: to.fullPath
          }
        })
        NProgress.done()
       }
     }
  }else {
   next()
  }
})
// 路由钩子,访问之后
router.afterEach(to => {
   // 结束进度条
  NProgress.done()
})
export default router
公共路由元配置
// src/router/routes.js   这个js 中会设计到相关的一些组件文件,我就不写出来了
const frameIn = [
  {
        path: '/',
          redirect: {
            name: 'index'
          },
        component: () => import(/* webpackChunkName: 'layout' */ '@/layout'),// 主体布局组件
     children: [
        {
            path:'index',
            name:'index',
            meta: {
                  auth: true
              },
              component:()=>import('@/system/index')
          },
        // 刷新页面
        {
          path: 'refresh',
          name: 'refresh',
          hidden: true,
          component: {
            beforeRouteEnter(to, from, next) {
              next(vm => vm.$router.replace(from.fullPath))
            },
            render: h => h()
          }
        },
        // 页面重定向
        {
          path: 'redirect/:route*',
          name: 'redirect',
          hidden: true,
          component: {
            beforeRouteEnter(to, from, next) {
              next(vm => vm.$router.replace(JSON.parse(from.params.route)))
            },
            render: h => h()
          }
           }
    ]
  }
]

const frameOut = [
  {
      path:'/login',
    name:'login',
    component: () => import('@/system/login')
  }
]
const errorPage = [
  {
      path:'*',
    name:'404',
    component: () => import('@/system/error/404')
  }
]

export default = [ ...frameIn, ...frameOut, ...errorPage ]
路由文件定义,主要是为了后端权限控制返回的时候好匹配,也为了防止组件多了不易查找
// src/router/routerMap.js
const demo = {
  // 为了防止名称重复,这个地方命名可以以:内容形式+后端控制器+方法名去命名,如下
  list_demo_page1: () => import(/* webpackChunkName: 'demo' */ '@/views/demo/page1'),
  list_demo_page2: () => import(/* webpackChunkName: 'demo' */ '@/views/demo/page2'),
  list_demo_page3: () => import(/* webpackChunkName: 'demo' */ '@/views/demo/page3')
}
export default file => {
  return {
    ...demo,// 上面定义几个这地方引入几个,一般一个大模块定义一个
  }[file] || null
}
路由跳转
<template>
    <div>
            <!-- 页面中-大体相当于a标签 -->
            <router-link to ="/home">返回首页</router-link>
            <!-- 事件操作跳转 -->
            <button @click="handleClickReturn">返回首页</button>
    </div>
</template>

<script>
export default {
     methods: {
      handleClickReturn() {
         this.$router.push('/home') // 跳转路由
      this.$router.replace('/home') // 路由替换导航后不会留下 history 记录
    }
  }
}
</script>
路由传参于接收
总的来说有两种,一种是 query另一种是params 效果类型于 get和post 的区别,url 中看到于看不到传递的参数
<!-- 页面中-传参 命名的路由 -->
<router-link :to="{ name: 'user', params: { id: 123 }}">User</router-link>

<!-- 带查询参数,下面的结果为 /register?plan=private -->
<router-link :to="{ path: 'register', query: { id: '122' }}">Register</router-link>


<!--事件操作-传参 -->
<button @click="handleClickReturn">返回首页</button>
<script>
export default {
     methods: {
      handleClickReturn() {
         this.$router.push('/home') // 跳转路由
      this.$router.replace('/home') // 路由替换
    }
  }
}
</script>
// 接收页面- 需要注意的是使用 route 没有r
this.$route.query.id
this.$route.params.id
动态匹配
// 定义路由 router.js
 {
     path: "/navigate/:name",
     name: "navigate",
     component: () => import(/* webpackChunkName: 'navigate' */ "@/views/navigate")
 }
实现如:
navigate/page1
navigate/page2
navigate/page3
...
不同路由跳转到同一个文件,实现同一文件不同数据的渲染

// 路由跳转
this.$router.push({
  name: "navigate",
  params: {
      name: 'page1'
  }
});

// 接收页面 两种方法
// 第一种: 路由导航钩子
 beforeRouteEnter(to, from, next) {
    next(vm => {
      to.params.name = vm.name;
    });
 }

// 第二种: 监听路由变化执行函数
created () {
    // 组件创建完后获取数据,
    // 此时 data 已经被 observed 了
    this.fetchData()
},
watch: {
       // 如果路由有变化,会再次执行该方法
    '$route': 'fetchData'
},
methods: {
 fetchData(e) {
      console.log(e)
 }
}
组件
全局组件
- 组件定义
创建公共全局组件文件 /src/components/index.js

// 异步加载组件
const vueFiles = require.context('./tao-component', true, /component\.vue$/)
vueFiles.keys().forEach(key => {
  const component = vueFiles(key).default
  Vue.component(component.name, component)
})

const jsFiles = require.context('./tao-component', true, /component\.js$/)
jsFiles.keys().forEach(key => {
  const component = jsFiles(key).default
  Vue.component(component.name, component)
})

// 遍历 tao-component 目录下的所有 compoent.js 或 component.vue 文件注册为组件
// 需要注意的一点是组件中的name一定要定义并与文件夹名保持一致作为组件的名称
- 示例 tao-hello 组件
创建文件 src/components/tao-component/tao-hello/component.vue

<template>
    <div>Hello Tao</div>
</template>
<script>
export default {
     name:'tao-hello'
}
</script>
- 全局注册
main.js 中引入刚才创建的文件夹
// 组件
import '@/components'
- 使用
<tao-hello />
组件传值及插槽
- 父组件传值 子组件接收
//父组件 传递值不做限制,以子组件接收的类型为基准

<tao-hello :title="父组件传递" />
// 或者
<tao-hello v-bind="父组件传递" />

<!-- 子组件 文件 src/components/tao-component/tao-hello/component.vue -->

<template>
    <div>
            <h1>Hello Tao</h1>
            <small>{{title}}</small>
    </div>
</template>
<script>
export default {
     name:'tao-hello' ,
  props: { // 可以用数据如: props:['title']
      title: {
        type: String,
      default:null
    }
  }
}
</script>
- 子组件给父组件传值与父组件接收
// 子组件传递
<template>
    <div>
            <h1>Hello Tao</h1>
            <small>{{title}}</small>
            <button @click="handleClick">累加</button>
    </div>
</template>
<script>
export default {
     name:'tao-hello' ,
  props: { // 可以用数据如: props:['title']
      title: {
        type: String,
      default:null
    }
  },
  data() {
       return  {
         count: 0
    }
  },
  methods: {
    handleClick() {
         this.count++
      this.$emit('addEvent', this.count)
      // 子组件通过$emit 触发事件传递数据
    }
}
</script>

// 父组件接收-通过事件监听接收
  <tao-hello :title="父组件传递" @addEvent="handleClickChi"/>
  <script>
export default {
     name:'tao-hello-parent' ,
  methods: {
    handleClickChi(e) {
      console.log(e)
    }
}
</script>
- 插槽
https://cn.vuejs.org/v2/guide/components-slots.html
// 子组件
<template>
    <div>
            <h1>Hello Tao</h1>
            <small>{{title}}</small>
            <button @click="handleClick">累加</button>
            <slot name="header"></slot>
      <slot></slot>
    </div>
</template>
<script>
export default {
     name:'tao-hello' ,
  props: { // 可以用数据如: props:['title']
      title: {
        type: String,
      default:null
    }
  },
  data() {
       return  {
         count: 0
    }
  },
  methods: {
    handleClick() {
         this.count++
      this.$emit('addEvent', this.count)
      // 子组件通过$emit 触发事件传递数据
    }
}
</script>

<!-- 注意 v-slot 只能添加在 <template> 上 -->

<tao-hello :title="父组件传递" @addEvent="handleClickChi">
    <template v-slot:header>
      <p>这里是具名插槽-header</p>
  </template>
  <template>
      <p>默认插槽</p>
  </template>
</tao-hello>

<!-- 另一种写法 可以使用子组件中的数据 -->
<tao-hello :title="父组件传递" @addEvent="handleClickChi" v-slot="slotProps">
  <p>{{slotProps}}</p>
  <!-- 注意默认插槽的缩写语法不能和具名插槽混用 -->
</tao-hello>
<script>
export default {
     name:'tao-hello-parent' ,
  methods: {
    handleClickChi(e) {
      console.log(e)
    }
}
</script>
深层组件传值与接收值
场景:a,b,c 三个文件 传值 a->b->c(c->b->a)
<!--page-a -->
<page-a :title="title" @_setData="handleSetData"/>
<script>
data() {
 return {
  title: 'xx'
 }
},
methods: {
 handleSetData(e) {
   this.$emit('c页面传递', e)
 }
}
</script>

<!--page-b -->

<page-b v-bind="$attrs" v-on="$listeners"/>
<script>
created() {
    console.info(this.$attrs, this.$listeners)
}
</script>

<!-- page-c -->
<div>
  <button @click="handleClick">add</button>
</div>
<script>
created() {
    console.log(this.$attrs)
},
methods: {
 handleClick() {
   this.$emit('_setData', 'xx')
 }
}
</script>
内置组件妙用
介绍:使用 is 去绑定不同的组件,可根据js 动态切换组件
<component :is="which_to_show" />
<script>
components: {
  demoPageOne:() => import('@/views/demo/page1')
},
data() {
    return {
        which_to_show:'demoPageOne'
  }
}
</script>
比如当前列表页面需要详情,编辑,新增… 等每个都是一个组件,可能会打开很多次,这个时候就可以用keep-alive
<!--路由缓存 -->
<keep-alive>
  <component :is="which_to_show" ref="ruleFomOperate" />
</keep-alive>
<button @click="handleClickOpe('add')">add</button>
<button @click="handleClickOpe('detail')">detail</button>
<script>
components: {
  demoPageOne:() => import('@/views/demo/page1'),
  demoPageTwo:() => import('@/views/demo/page2')
},
data() {
    return {
        which_to_show:'demoPageOne'
  }
},
methods: {
 // 根据操作类型的不同加载不同的组件
 handleClickOpe(type) {
   if(type === 'add') {
      this.which_to_show = 'demoPageOne'
   }else {
     this.which_to_show = 'demoPageTwo'
   }
 }
}
</script>
状态管理
- state — 辅助函数 — mapState — 状态树
- getter — 辅助函数 — mapGetters — 从状态数中获得状态
- action — 辅助函数 — mapActions —
- mutations
请求响应-axios
封装
// src/api/service.js

import axios from 'axios'
import {
  Message
} from 'element-ui'
// 记录和显示错误
function errorLog(err) {
  // 打印到控制台
  if (process.env.NODE_ENV === 'development') {
    console.log(err)
  }
  // 显示提示
  Message({
    message: err.message,
    type: 'error',
    duration: 5 * 1000
  })
}

const service = axios.create()
// 不用可省略此处
service.interceptors.request.use(config => {
  // 可在此设置加载等待loading 当然不用loading可以不写这部分
});
service.interceptors.response.use(
  async response => {
    // 加了loading可在此数据响应后关闭
    if (response.status === 200) {
      const dataAxios = response.data
      if (dataAxios.code === 200) {
        // 正常返回数据
        return dataAxios
      } else {
        errorLog(dataAxios)
        return dataAxios
      }
    } else {
      return Promise.reject(response.msg)
    }
  },
  error => {
    if (error && error.response) {
      // 对常用的http 状态码进行判断
      switch (error.response.status) {
        case 400:
          error.message = '请求错误'
          break
        case 401:
          error.message = '未授权,请登录'
          break
        case 403:
          error.message = '拒绝访问'
          break
        case 404:
          error.message = `请求地址出错: ${error.response.config.url}`
          break
        case 408:
          error.message = '请求超时'
          break
        case 500:
          error.message = '服务器内部错误'
          break
        case 501:
          error.message = '服务未实现'
          break
        case 502:
          error.message = '网关错误'
          break
        case 503:
          error.message = '服务不可用'
          break
        case 504:
          error.message = '网关超时'
          break
        case 505:
          error.message = 'HTTP版本不受支持'
          break
        default:
          break
      }
    }else if(error.message.includes('timeout')) {
        // 请求超时状态
      error.message = '请求超时,请检查你的网络是否正常!'
    }
    errorLog(error)
    return Promise.reject(error)
  }
)

export function request(config) {
  let configDefault = {
    headers: {
      token: 'you-token',
      from: 'web',
      'Content-Type': 'application/json'
    },
    timeout: 5000,
    baseURL: process.env.VUE_APP_API,// 基础请求路径
    data: {}
  }
  return service(Object.assign(configDefault, config))
}
API请求响应
// 自动匹配modules 下的所有.js 文件
src/api/index.js

import { request } from './service'
const files = require.context('./modules', false, /\.js$/)
const apiGenerators = files.keys().map(key => files(key).default)

let api = {}
apiGenerators.forEach(generator => {
  const apiInstance = generator({
    request
  })
  for (const apiName in apiInstance) {
    if (apiInstance.hasOwnProperty(apiName)) {
      api[apiName] = apiInstance[apiName]
    }
  }
})

export default api
// modules 下的接口文件示例,modules 下的接口文件名称最好和你的页面文件夹名称一致,便于管理
src/api/modules/test.js
...
export default ({
  request
}) => ({
  USER_LOGIN(data) {
    return request({
      url: '/login/cellphone',
      method: 'post',
      data
    })
  }
})
注册插件
由于api 文件整个系统中会多地方调用,比较常用的可以使用 Vue.use() 注册为插件全局使用,需要注意的是必须提供 install方法
//src/utils/api.js

import api from '@/api'

export default {
  install(Vue, options) {
    Vue.prototype.$api = api
  }
}
// main.js
import pluginApi from '@/utils/api'
Vue.use(pluginApi)
UI 框架 Element-ui 学习总结
安装配置 文档地址
自定义主题
直接通过浏览器中修改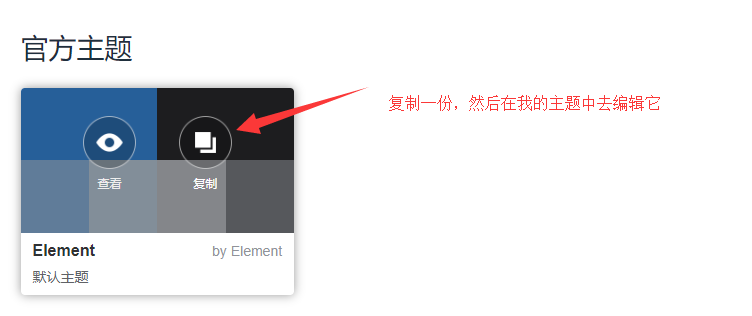
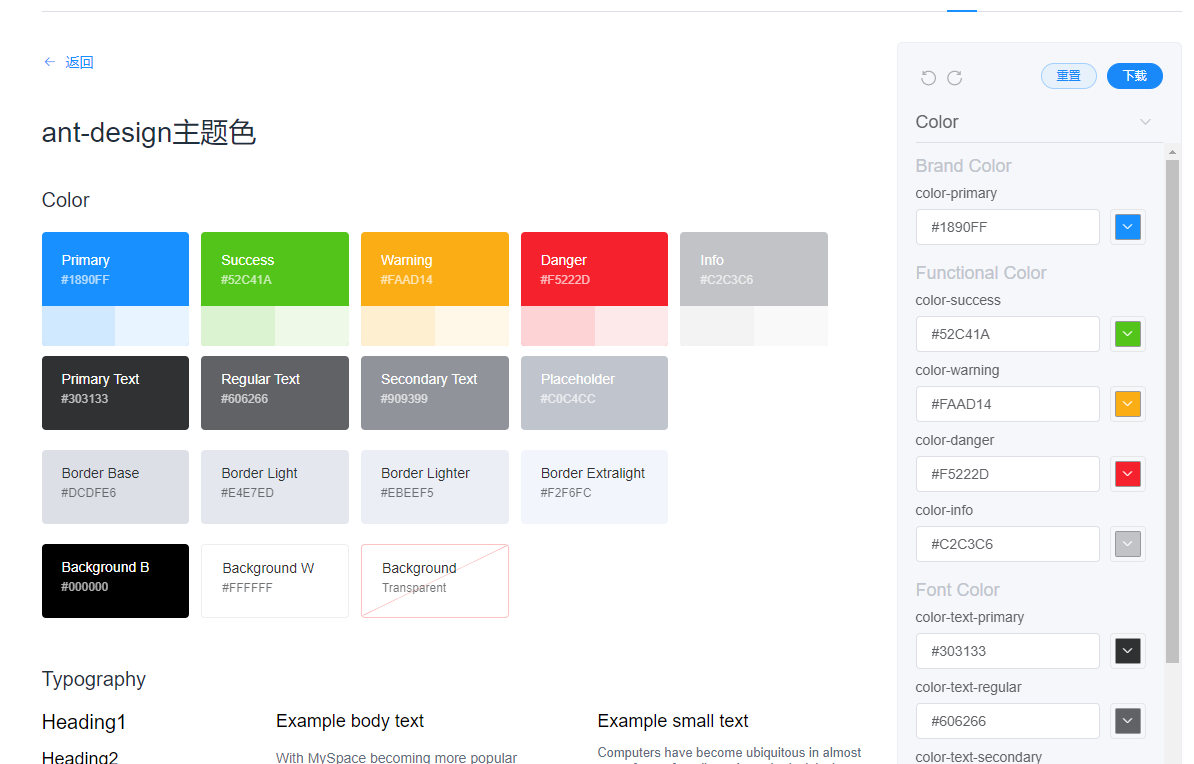
调整好你的主题色配置后下载
本地项目中新建文件 element-variables.scss
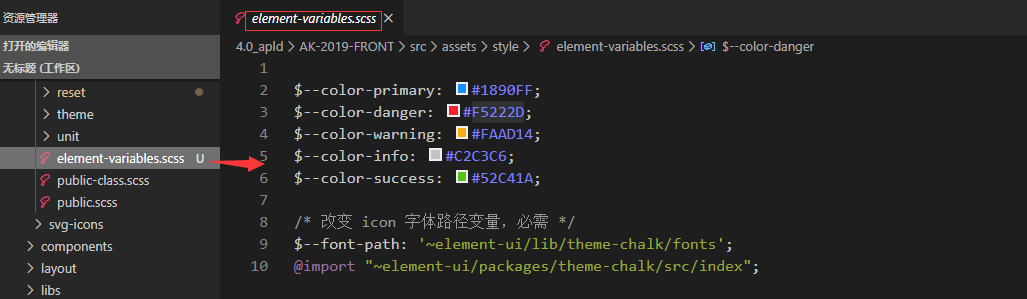
需要注意的是 字体路径一定是需要的
最后引入刚才新增的文件,原先的css 样式文件就可以去掉了

后台开发项目推荐
d2Admin https://github.com/d2-projects/d2-admin

若有收获,就点个赞吧
0 人点赞
