列表名.函数名(对象)
append:在列表的最后 list.append(value)insert:插入到指定位置 list.insert(index,value)pop:删除 leave=list.pop(index) index缺省表示最后一个访问:注意是 list[index]
如果想打印列表和字符串相连,则需要对列表用str()
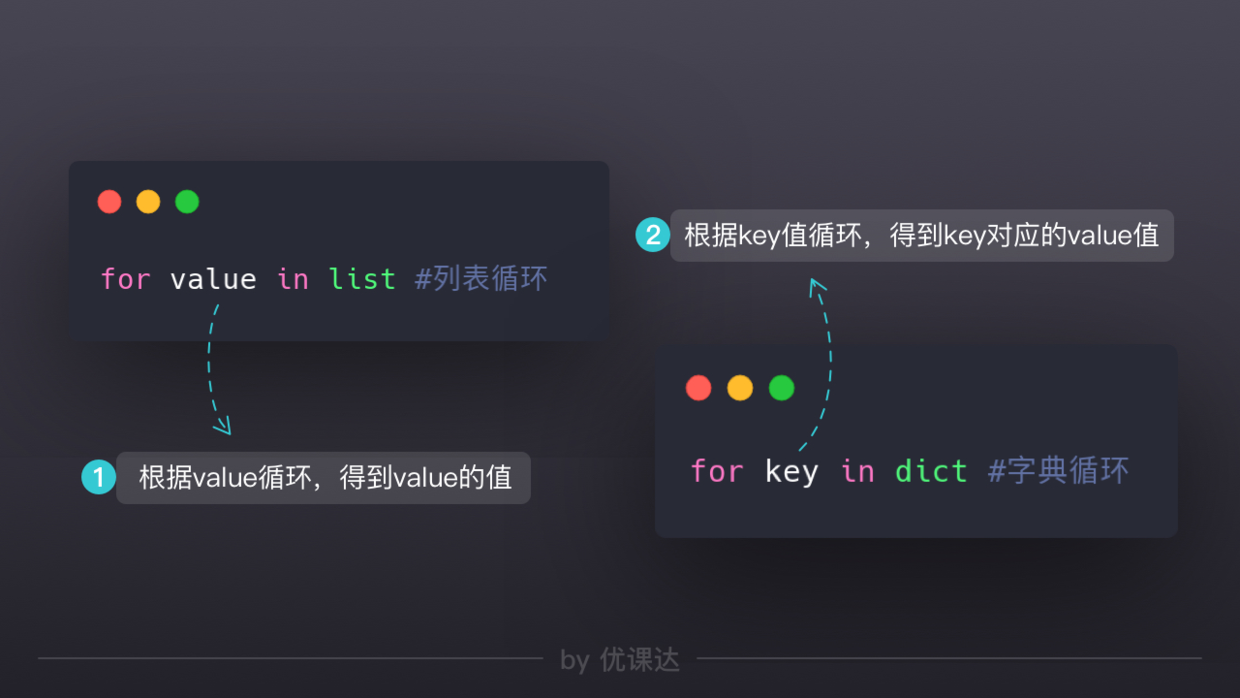
for循环
for name in list:print(name)
索引循环
for index in range(len(list)):print(str(index)+list[index])
字符串遍历
for char in 'xxxxxxx':print(char)
range创建的类型其实是range object,类列表,range(10)表示[0,10) range:range(start,end,step) step为-1时,为倒序
break与continue
break表示跳出这次循环continue表示忽略这次循环
打印不换行
print('之前', end=' ')tips:end表示打印之后添加的字符串,默认是\n,这一将其替换为空格
str与list的相互转换
list1=list(str1)
str[satrt:end]
str='abcde'str[0:2] #结果为ab
字典
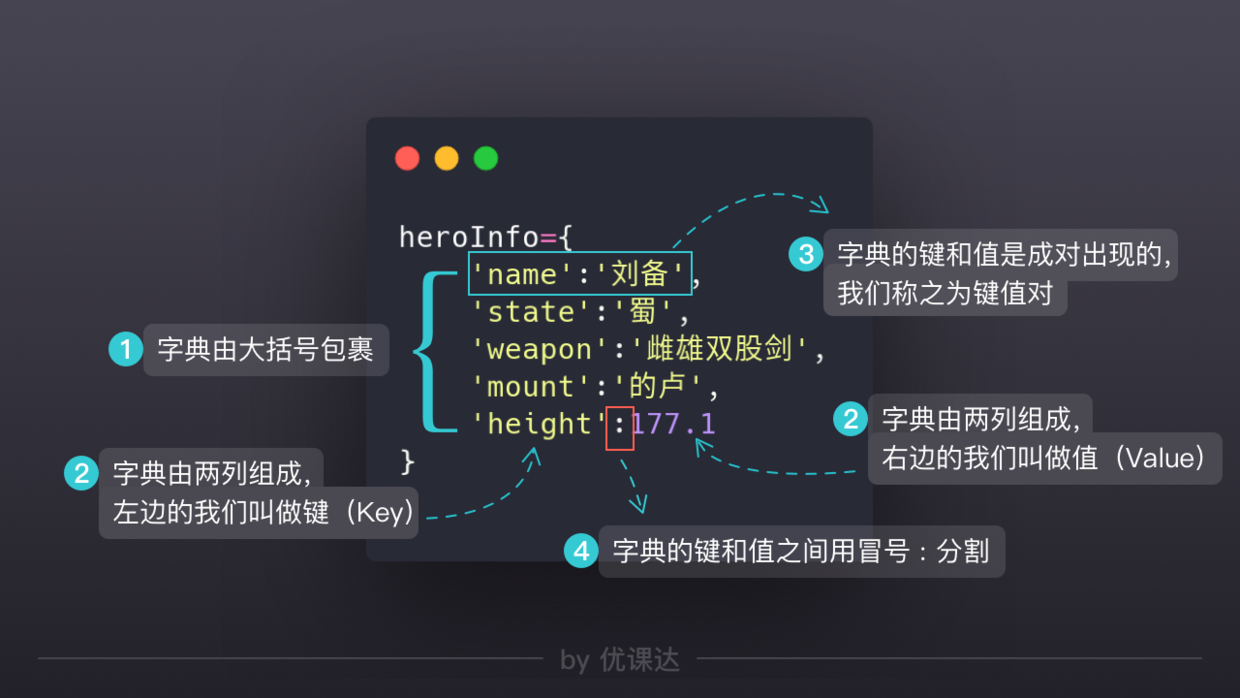
字典的访问
dicname['keyname'](字典通过key进行访问,索引在字典中无意义,区别于列表的有序,字典是无序的key只要是不变的数据都可以 常见有字符串、数值类型、布尔类型 `列表不行` `元组可以`)
字典的删除
del dicname[keyname]清空: dictname.clear()
字典的遍历
集合Set:非重复的无序列表
元组中的数据只能被读取,不能被修改
列表解决多个有序元素的问题
字典解决描述和值的映射问题
集合:非重复,无序——去重提高运行效率

集合的增加与删除与遍历
heros.add('name')heros.remove('name')for hero in heros:
Set的去重应用
9.3的两种做法
一、 不用字典直接输出
import csvwith open('calls.csv', 'r') as f:reader = csv.reader(f)texts = list(reader)phone = '16560480842'# 统计每个相关电话号码的总通话时长list1=[]for text in texts:if phone==text[0]:list1.append(text[1])if phone==text[1]:list1.append(text[0])#接听de记录sets=set(list1) #集合去重的应用for set1 in sets:sum=0for text in texts:if set1 in text and phone in text:sum=sum+int(text[3])min=sum//60print('通话号码:'+str(set1)+'-总时长:'+str(min)+'分钟')
二、 用字典记录
import csvwith open('calls.csv', 'r') as f:reader = csv.reader(f)texts = list(reader)phone = '16560480842'# 字典存储每个相关号码的通话时长,key为电话号码,value为通话时长duration = {}for text in texts:callingPhone = text[0] # 主叫号码calledPhone = text[1] # 被叫号码# 判断是否为相关号码if phone == callingPhone or calledPhone == phone:# 下面三行逻辑,找到另一个号码,有可能是主叫,也可能是被叫otherPhone = calledPhoneif phone == calledPhone:otherPhone = callingPhone# 如果字典中不存在号码通话总时长,则我们将其设置为0if otherPhone not in duration:duration[otherPhone] = 0# 字典中的通话时长总时长,往上累加duration[otherPhone] += int(item[3])for key in duration:print('通话号码:' + key + '-总时长:' + str(duration[key] // 60) + '分钟')
排序笔记及其拓展
'冒泡排序:每次比较相邻的两个,进行交换,多次循环'#以下保证最上面那个数字为最大数字nums = [8, 6, 7, 9, 4, 5, 3, 1, 2]for index in range(len(nums) - 1):# 如果底部元素>顶部元素,则交换if nums[index] > nums[index + 1]:# 交换元素temp = nums[index + 1]nums[index + 1] = nums[index]nums[index] = tempprint(nums[-1])#……#以下保证全部nums = [8, 6, 7, 9, 4, 5, 3, 1, 2]for time in range(len(nums) - 1):# 此处表示循环次数,9个元素,循环8次可以找到最大的8个元素,及完成了排序for index in range(len(nums) - 1 - time):' # 注意此处,我们减去time,因此每次顶部的元素已经找到了,不需要再次遍历了'# 如果底部元素>顶部元素,则交换if nums[index] > nums[index + 1]:# 交换元素temp = nums[index + 1]nums[index + 1] = nums[index]nums[index] = tempprint(nums)
'插入排序,有原list跟sort,拿出一个数据,依次跟sort中比对过去,替代或者放在最后(用insertindex==-1来区分)'nums = [8, 6, 7, 9, 4, 5, 3, 1, 2]sorts = []for item in nums:# 当有序列表为空时,插入一个元素if len(sorts) == 0:sorts.append(item)else:insertIndex = -1;for index in range(len(sorts)):# 遍历直到当前元素大于将插入的元素if sorts[index] > item:insertIndex = indexbreak# 如果insertIndex = -1,也就是全部有序列表中都小于将插入的元素# 可以使用append插入到最后# 否则利用insert进行插入,并break停止查找if insertIndex == -1:sorts.append(item)else:sorts.insert(insertIndex, item)#注意这边做的是插入而不是替换print(sorts)
'选择排序:从未排列表中找到最值,放到列表首位,之后在剩下的列表中重复以上步骤。时间复杂度 O(n²)'nums = [8, 6, 7, 9, 4, 5, 3, 1, 2]for i in range(len(nums)-1):# 记录最小数的索引minIndex = ifor j in range(i + 1, len(nums)):if nums[j] < nums[minIndex]:minIndex = j# i 不是最小数时,将 i 和最小数进行交换if i != minIndex:nums[i], nums[minIndex] = nums[minIndex], nums[i]print(nums)
'快速排序:从列表中选择一个基准元素,比之大的放到左边,反之右边,再分别对两部分继续执行上述步骤(函数实现递归)'def sort(data):if len(data) >= 2:mid = data[len(data)//2] # 选取基准值left, right = [], [] # 定义基准值左右两侧的列表data.remove(mid) # 从原始数组中移除基准值for num in data:if num >= mid:right.append(num)else:left.append(num)return sort(left) + [mid] + sort(right)else:return data
函数定义
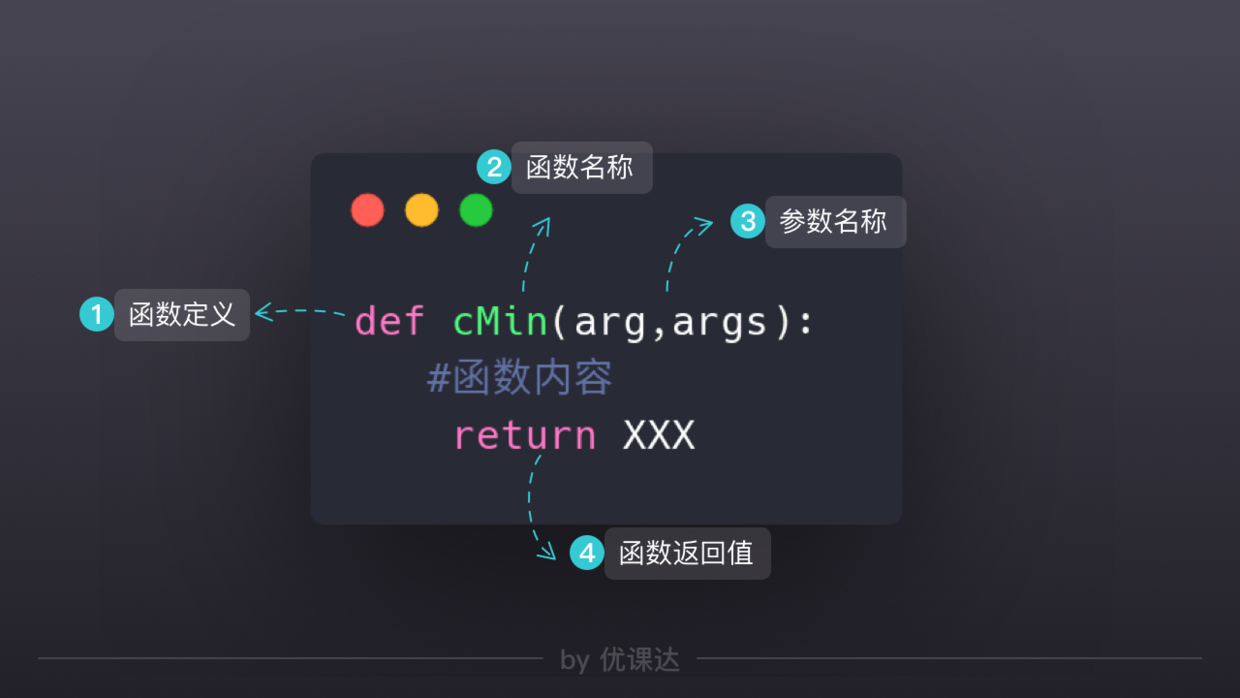
动态参数
def cMin(arg1, arg2, *args):print(arg1)print(arg2)print(args) # 注意这里没有*号咯,*号在这里是可变参数的规则表示cMin(1,2,3,4,5,6)#结果为12(3, 4, 5, 6)'我们可以看到args把剩余的参数合并成一个元组'
'把所有连在一起打印'def cPrint(*args):for arg in args:print(arg, end=' ')cPrint('hello', 'my', 'world')#结果为hello my world
递归
在处理f(n)的时候,我们假设f(n-1)已经搞定了,于是我们不需要考虑其他,只需要考虑在f(n-1)基础上所增加的内容
'用递归实现阶乘'# 定义一个递归函数def fact(n):# 加入递归条件if n == 1:return 1# 把fact(n-1)的结果和n相乘,剩下的交给fact(n-1)return fact(n-1) * nfact(10)
模块
'用模块来管理函数'#phone.py 中包含与phone相关的函数'注意不用加后缀py'#调用import xxxxxx.function()#直接导入函数from xxx import function
平级关系才能使用

pillow
https://www.osgeo.cn/pillow/index.html
from PIL import Image #从PIL中导入 Image函数im = Image.open('1.jpg') #im为变量,用open函数打开图片out = im.rotate(45) #对im 使用rotate函数 赋值给 outout.save('result.jpg')#对 out用save函数,保存
人脸识别实战
截取人脸
# 引入Pillow库from PIL import Image# 引入face_recognition的库import face_recognition# 用这个库加载1.jpg图片image = face_recognition.load_image_file('1.jpg')'#注意这边的image的格式只是图片的列表形式的数据'# 开始进行人脸识别face_locations = face_recognition.face_locations(image)top, right, bottom, left = face_locations[0]origin = Image.open('1.jpg') '#因此这里需要重新打开一张图片,为节省内存,可以用'#origin = Image.fromarray(image)'代替'out = origin.crop((left, top, right, bottom))out.save('result.jpg')
draw = ImageDraw.Draw(im) # 先用PIL图片创建一个画板,我么叫做drawdraw.line([(0,0), (100, 200), (400, 300)])origin.save('result.jpg')
from PIL import Image, ImageDrawimport face_recognitionimage = face_recognition.load_image_file("1.jpg") #image是图片的列表形式的数据#该函数在face_recognition的库下,因此可以直接对 image 做处理# 获取图片的面部特征位置face_landmarks_list = face_recognition.face_landmarks(image)print(face_landmarks_list)#结果会得到一个列表 列表中有三个字典(以下为key的含义)chin: 脸轮廓left_eyebrow: 左眉毛right_eyebrow: 右眉毛nose_bridge: 鼻梁nose_tip: 鼻尖left_eye: 左眼right_eye: 右眼top_lip: 上嘴唇bottom_lip: 下嘴唇
获取眼睛中点位置
from PIL import Image, ImageDrawimport utilimport face_recognitionimage = face_recognition.load_image_file("1.jpg")face_landmarks_list = face_recognition.face_landmarks(image)# 获取第一个小女孩的五官信息face_landmarks = face_landmarks_list[0]# 获取小女孩的左眼信息left_eye = face_landmarks['left_eye']right_eye = face_landmarks['right_eye']leftPoint, rightPoint = util.getLeftRightPoint(left_eye)leftCenterPoint = util.getCenter(leftPoint, rightPoint)leftPoint, rightPoint = util.getLeftRightPoint(right_eye)rightCenterPoint = util.getCenter(leftPoint, rightPoint)print('左眼中心的点: ' + str(leftCenterPoint) + '右眼中心的点:' + str(rightCenterPoint))
util为自己封装的模块
def getLeftRightPoint(points):# 先假设第一个点为需要的点,之后我们再喜欢leftPoint = points[0]rightPoint = points[0]for point in points:# 当x更小的时候,更新左侧的点if point[0] < leftPoint[0]: #我们去比较的是他的横坐标,但是我们更新的是整个点leftPoint = point# 当x更大的时候,更新右侧的点if point[0] > rightPoint[0]:rightPoint = point# 返回一个元组return leftPoint, rightPointdef getCenter(leftPoint, rightPoint):return (leftPoint[0] + rightPoint[0]) / 2, (leftPoint[1] + rightPoint[1]) / 2
额头的顶点暂定为 两眼中点往上移动1.2倍的眼间距离
browPoint = (centerPoint[0], centerPoint[1] - (rightCenterPoint[0] - leftCenterPoint[0]) * 1.2)print('额头的顶部点:' + str(browPoint))
画十字
origin = Image.fromarray(image)draw = ImageDraw.Draw(origin)draw.line([(browPoint[0] - 5, browPoint[1]), (browPoint[0] + 5, browPoint[1])])draw.line([(browPoint[0], browPoint[1] - 5), (browPoint[0], browPoint[1] + 5)])origin.save('result.jpg')
图片放缩
result=origin.resize((width, height))# 函数里面的第一个参数是一个元组,表示新的长宽# 返回一个新的PIL图片
from PIL import Imageim = Image.open('christmas_hat.png')width, height = im.size #获取尺寸resizeImg = im.resize((width // 2, height // 2))'#注意这里的做法是用 整除 代替 普通除 ,因为resize只能接受整数'resizeImg.save("thumbnail.png")
图片合成
# 需要合成在大图中的位置,依次是左,上,右,下box = (100, 100, 400, 400)# hat为需要合成的图片,origin为大图origin.paste(hat, box)'注意合成的图片与box框的大小必须一致,否则会报错'
from PIL import Imageorigin = Image.open('1.jpg')hat = Image.open('christmas_hat.png')# 将帽子大小缩小到300*300,这样才能与下面的box吻合resizeHat= hat.resize((300, 300))# 注意这里第三个参数传入透明通道,去除黑边origin.paste(resizeHat, (100, 100, 400, 400), resizeHat)origin.save('merge.jpg')

若有收获,就点个赞吧
0 人点赞
