Jupyter notebook
shift+enter 执行生效
Z 恢复删除的单元格
按esc键进入命令模式。在命令行模式在,按y m切换markdown和code模式
numpy
科学计算基础库
N维数组对象 array
广播函数功能
线性代数、傅里叶变换、随机数生成
Array(数组)
列表与数组
共同:一组数据的有序结构
区别:
列表:数据类型可以不同
数组:数据类型相同
优化速度,去除循环步骤
有利于节省运算和存储的空间
对象属性
import numpy as npa=np.array([[1,2,3,4,5],[1,4,5,6,4],[3,4,2,5,6]])a.nidm#秩,轴的数量,即维数 2:横轴与纵轴a.shape#对象的尺度 (3,5)a.size#对象的个数 15a.dtype#对象的类型 dtype('int32')a.itemsize#对象中每个元素的大小,以字节为单位 4
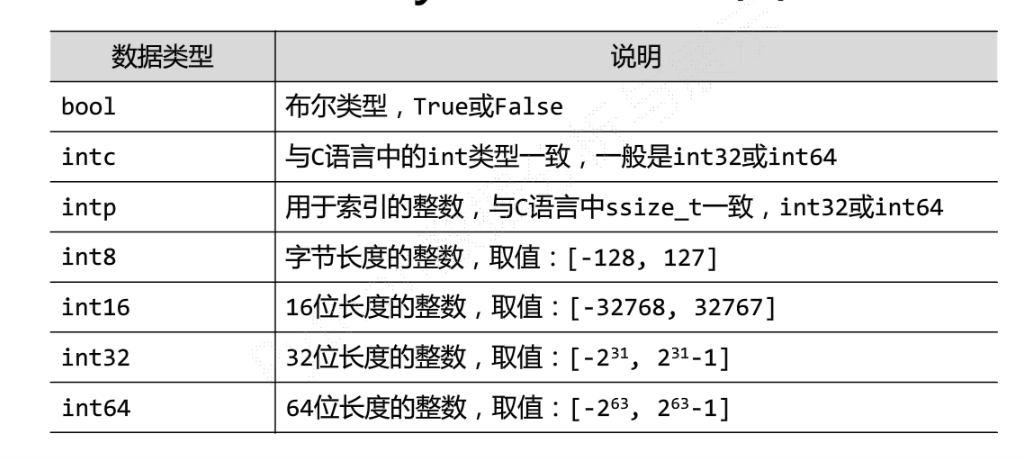
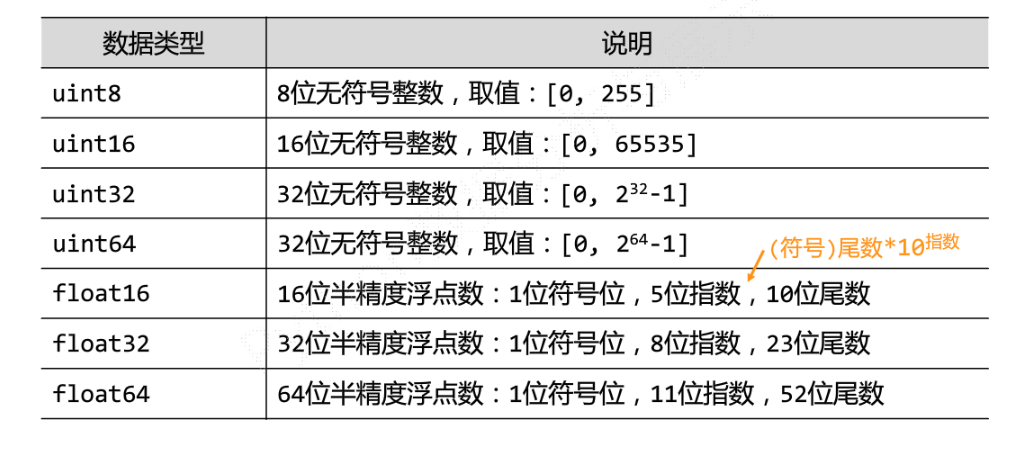
元素类型

基本使用
ndarray在程序中的别名是array
import numpy as npa=np.array([1,2,3])type(a)a.shape #(3,) 一维数组a=a.reshape((1,-1)) #重塑维数,表示整个数组只有一行,-1 占位符#索引 从0开始a[2,0] #第三行第一列 注:a[][] 不可以作为索引#自带数组a=np.zeros((2,3))a=np.ones((2,3))a=np.full((3,3),0) #全0数组a=np.eye(3) #单位矩阵a=np.random.random(3,4) #随机数#索引和切片a[ax1,ax2,ax3]#表示每个维度,用逗号分割,维度中,用:分割a[1:4:1,,] #起始1,终点4,步长1a[np.arange(3),1] #第一到三行的第二列a[a>10]#数学运算与常用函数#标量运算np.add(a,b) #数组各元素相加np.subtract(a,b)#相减np.multiply(a,b)#乘法np.divide(a,b)#除法np.abs(a) #绝对值np.square(a) #平方np.log(a) np.log10(a) #对数np.ceil(a) np.floor(a) #取整的天花板与地板np.rint(a) #s四舍五入np.modf() #小数和整数部分分开返回np.cos() #三角函数np.exp() #指数np.sign() #符号值np.sqrt(a)#算术平方根#有两个同型数组a b,求对应位的最大值np.maximum(a,b) #返回新数组#针对矩阵的操作a.dot(b) 或 np.dot(a,b) #矩阵乘法#常用函数np.sum(a) #求和所有元素np.sum(a,axis=0) #对所有列求和np.sum(a,axis=1) #对行操作np.mean(a) #平均值np.random.uniform(3,4) #生成一个在3,4的随机数值np.tile(a,(2,3))#将a在行上重复两次,在列上重复三次a.argsort() #对每行从小到大排序 返回的是下标a.argsort(axis=0) #对列操作a.T 或者 np.transpose(a) #转置#广播特性自动重复
ndarray的创建方法
#从列表、元组等类型创建x=np.array([listname,tuplename],dtype=np.float32) #dtype可缺省#函数创建np.ones_like(a) #根据数组a的形状生成一个全1数组np.zeros_like(a)np.full_like(a,val)#指定值np.linspace(初始值,结束值,个数)np.concatenate()#数组合并import numpy as npb=np.linspace(1,10,4,endpoint=False)print(b)[out]:[1. 3.25 5.5 7.75]
变换
.reshape(shape) #返回shape形状的数组,原数组不变(生成备份).resize(shape)#同上,原数组改变.swapaxes(ax1,ax2)#将数组的两个维度调换.flatten() #降维,返回一维数组(不改变).tolist() #转换生成列表#swapaxesimport numpy as npa=np.ones((2,3,4))aOut[4]:array([[[1., 1., 1., 1.],[1., 1., 1., 1.],[1., 1., 1., 1.]],[[1., 1., 1., 1.],[1., 1., 1., 1.],[1., 1., 1., 1.]]])a.swapaxes(0,1)Out[5]:array([[[1., 1., 1., 1.],[1., 1., 1., 1.]],[[1., 1., 1., 1.],[1., 1., 1., 1.]],[[1., 1., 1., 1.],[1., 1., 1., 1.]]])#flattenimport numpy as npa=np.ones((2,3,4),dtype=np.int32)b=a.flatten()print(b)#[1 1 1 1 1 1 1 1 1 1 1 1 1 1 1 1 1 1 1 1 1 1 1 1]
随机数函数
numpy.random.rand(d0, d1, ..., dn)Random values in a given shape.Create an array of the given shape and populate it with random samples from a uniform distribution over [0, 1)生成给定形状的随机值,随机值在[0,1)import numpy as npnp.random.rand(10)Out[2]:array([ 0.41103285, 0.19043225, 0.30385602, 0.19330136, 0.09727556,0.96518049, 0.29930132, 0.00633969, 0.64269577, 0.79953589])np.random.rand(2,3)Out[3]:array([[ 0.86213038, 0.56657202, 0.83083843],[ 0.48660386, 0.20508572, 0.4927877 ]])np.random.rand(2,3,1)Out[4]:array([[[ 0.06676746],[ 0.55548283],[ 0.04411342]],[[ 0.18659571],[ 0.02209355],[ 0.83529269]]])numpy.random.rand(d0, d1, ..., dn)Random values in a given shape.Create an array of the given shape and populate it with random samples from a uniform distribution over [0, 1)生成给定形状的随机值,随机值在[0,1)import numpy as npnp.random.rand(10)Out[2]:array([ 0.41103285, 0.19043225, 0.30385602, 0.19330136, 0.09727556,0.96518049, 0.29930132, 0.00633969, 0.64269577, 0.79953589])np.random.rand(2,3)Out[3]:array([[ 0.86213038, 0.56657202, 0.83083843],[ 0.48660386, 0.20508572, 0.4927877 ]])np.random.rand(2,3,1)Out[4]:array([[[ 0.06676746],[ 0.55548283],[ 0.04411342]],[[ 0.18659571],[ 0.02209355],[ 0.83529269]]])numpy.random.randint(low, high=None, size=None, dtype='l')返回随机整数,左闭右开[low,high)np.random.randint(low=1,high=10,size=8)Out[10]: array([4, 2, 6, 7, 2, 4, 3, 8])#high为空的话,直接[0,low)np.random.randint(10,size=5)Out[11]: array([1, 3, 7, 9, 9])np.random.randint(low=1,high=10,size=(2,3))Out[12]:array([[8, 3, 6],[4, 1, 9]])numpy.random.random_integers(low, high=None, size=None)返回随机整数,闭区间[low,high]这个和random.randint类似,已经不推荐使用了np.random.random_integers(low=1,high=5,size=5)__main__:1: DeprecationWarning: This function is deprecated. Please call randint(1, 5 + 1) insteadOut[13]: array([3, 2, 2, 4, 5])numpy.random.random_sample(size=None)numpy.random.random(size=None)numpy.random.ranf(size=None)numpy.random.sample(size=None)返回随机的浮点值,左闭右开区间[0.0, 1.0)np.random.random_sample(8)Out[14]:array([ 0.70353035, 0.79018004, 0.50390916, 0.46261548, 0.85556642,0.68129238, 0.07098945, 0.65927063])np.random.random_sample([2,3])Out[16]:array([[ 0.37546444, 0.50352846, 0.3496647 ],[ 0.02849239, 0.6035842 , 0.32514876]])
文件存取
csv文件 逗号分割 只能 一维二维
#写入文件np.savetxt(frame,array,fmt='%.18e',delimiter=None)#默认科学记数法保留18位小数 分割字符串a=np.arange(10).reshape(5,2)np.savetxt('a.csv',a,fmt='%d',delimiter=',')#默认保存在 C User lenovo#读取文件np.loadtxt(frame,dtype=np.float,delimiter=None,unpack=False)#读入属性写入同一个变量
多维数据
tofile
a.tofile(frame,sep='',format='%s')a=np.arange(100).reshape(5,10,2)a.tofile("b.dat",sep=',',format='%d')#sep:数据分割字符串,不指定:写入为二进制#。dat#format:数据的格式#读取文件,读取时需要知道存入文件的数组的维度和数据类型np.fromfile(frame,dtype=float,count=-1,sep='')c=np.fromfile('b.dat',dtype=np.int,sep=",").reshape(5,10,2)#count:读入元素个数,-1表示读入整个文件
多维的便捷文件存取
np.save(fname,array)#frame:文件名,以.npy为拓展名,压缩拓展名为.npz#array:数组变量np.load(fname)
统计函数
sum(a,axis=None) 求和,none默认全部mean(a,axis=None) 期望average(a,axis=None,weights=None) 加权平均值std(a,axis=None) 标准差var(a,axis=None) 方差argmin(a) argmax(a) 得到下标(扁平化一维)unravel_index(index,shape) 根据shape将一维下标index转换成多维下标ptp(a) 计算数组中最大值和最小值的差median(a) 计算中位数In [1]: import numpy as npIn [2]: a=np.arange(15).reshape(3,5)In [3]: aOut[3]:array([[ 0, 1, 2, 3, 4],[ 5, 6, 7, 8, 9],[10, 11, 12, 13, 14]])In [4]: np.average(a,axis=0,weights=[10,5,1])#axis=0代表往跨行(down),而axis=1代表跨列(across)Out[4]: array([2.1875, 3.1875, 4.1875, 5.1875, 6.1875])In [5]: np.unravel_index(np.argmax(a),a.shape)Out[5]: (2, 4)
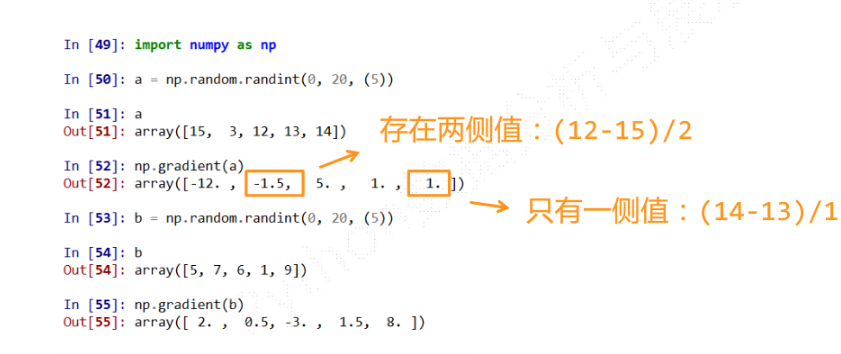
梯度函数
np.gradient(f) #计算数组f中元素的梯度,当f为多维时,返回每个维度梯度
最外层表示列,其次是行
图像或声音的边缘

图像的手绘效果
图像的数组表示
RGB色彩模式
0-255
PIL库
pillow 图像处理库
图像表示
一个由像素组成的二维矩阵,每一个元素是一个RBG值
from PIL import Imageimport numpy as npim=np.array(Image.open("D:/360MoveData/Users/lenovo/Desktop/grand.png"))print(im.shape,im.dtype)(353, 780, 4) uint8 图像是一个三维数组,维度分别是高度,宽度,像素的RGB值
图像的变换
from PIL import Imageimport numpy as npa=np.array(Image.open("M:/NOW/pythontest/grand.png"))print(a,a.shape,a.dtype)b=[255,255,255,255]-aim=Image.fromarray(b.astype('uint8'))im.save("M:/NOW/pythontest/grand2.png")
打开图像;对RGB像素运算;保存为文件
from PIL import Imageimport numpy as npa=np.array(Image.open("M:/NOW/pythontest/grand.png").convert('L'))#convert('L')生成灰度值图片print(a,a.shape,a.dtype)b=255-aim=Image.fromarray(b.astype('uint8'))im.save("M:/NOW/pythontest/grand2.png")
from PIL import Imageimport numpy as npa=np.array(Image.open("M:/NOW/pythontest/grand.png").convert('L'))#convert('L')生成灰度值图片b=(100/255)*a+150#区间变换 颜色比较淡的灰度c=255*(a/255)**2#像素平方 加深灰度im=Image.fromarray(b.astype('uint8'))im.save("M:/NOW/pythontest/grand2.png")im=Image.fromarray(c.astype('uint8'))im.save("M:/NOW/pythontest/grand3.png")
手绘实例
特征
黑白灰 边界线条粗 相同相近色彩趋于白色 略有光源效果
利用像素之间的梯度值和虚拟深度值对图像进行重构
根据灰度变化模拟人类视觉的明暗程度
depth=10 #预设深度值为10 取值范围0-100grad=np.gradient(a)grad_x,grad_y=grad #提取xy方向的梯度值grad_x=grad_x*depth/100grad_y=grad_y*depth/100 #根据深度调整xy的梯度值'梯度归一化'A=np.sqrt(grad_x**2+grad_y**2+1.) #构造三维归一化坐标系uni_x=grad_x/Auni_y=grad_y/Auni_z=1./Ab=255*(dx*uni_x+dy*uni_y+dz*uni_z) #梯度与光源相互作用,将梯度转化为灰度
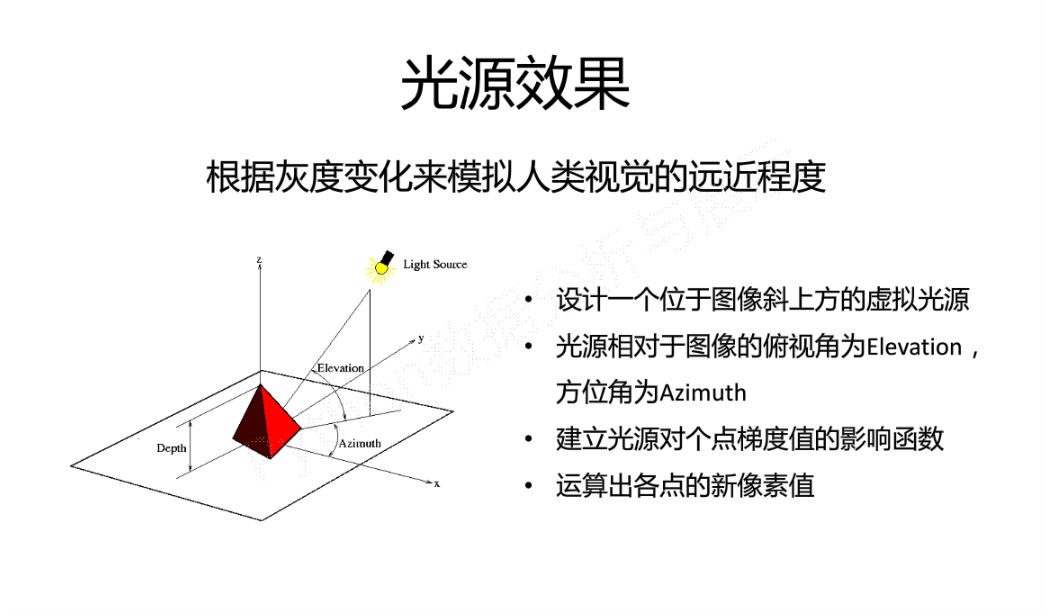
vec_el=np.pi/2.2vel_az=np.pi/4.dx=np.cos(vec_el)*np.cos(vel_az)dy=np.cos(vec_el)*np.sin(vel_az)dz=np.sin(vec_el) #单位光线在坐标轴上的坐标 在此视为光源对三方向的影响程度
图像生成(避免数据越界)
b=b.clip(0,255)im=Image.fromarray(b.astype('uint8'))im.save('')

若有收获,就点个赞吧
0 人点赞
