查看环境

修改nginx配置文件

红线是nginx的文件地址
Finder —-> shift + command + G 找到nginx,修改配置文件
一开始是根据某位大哥的文章改的,网址自取 https://segmentfault.com/a/1190000002556269
但是改了以后,还是打不开wordpress,后来麻烦了可爱的后端小哥哥
在nginx文件下,新建conf.d和global

在conf.d/下,新建文件default.conf,配置default.conf:
server {# 端口listen 8000 default_server;# listen [::]:80 default_server;# 访问的域名# server_name localhost;# 默认网站根目录(www目录)root /users/skywen_cp/Documents/work/wordpress-skywen-site;index index.php index.html;location / {try_files $uri $uri/ /index.php?$query_string;}location ~ \.php$ {# 设置监听端口fastcgi_pass 127.0.0.1:9000;# 设置nginx的默认首页文件(上面已经设置过了,可以删除)fastcgi_index index.php;# 设置脚本文件请求的路径fastcgi_param SCRIPT_FILENAME $document_root$fastcgi_script_name;# 引入fastcgi的配置文件include fastcgi_params;fastcgi_intercept_errors on;}}
同样在conf.d/下,新建文件mywordpress.conf,配置mywordpress.conf:
server {server_name mywordpress;root /users/skywen_cp/Documents/work/wordpress-skywen-site; #自定义,如/var/www/mywordpressindex index.php;include global/restrictions.conf;include global/wordpress.conf;}
在global/下,新建文件restrictions.conf,配置restrictions.conf:
# Global restrictions configuration file.# Designed to be included in any server {} block.</p>location = /favicon.ico {log_not_found off;access_log off;}location = /robots.txt {allow all;log_not_found off;access_log off;}# Deny all attempts to access hidden files such as .htaccess, .htpasswd, .DS_Store (Mac).# Keep logging the requests to parse later (or to pass to firewall utilities such as fail2ban)location ~ /\. {deny all;}# Deny access to any files with a .php extension in the uploads directory# Works in sub-directory installs and also in multisite network# Keep logging the requests to parse later (or to pass to firewall utilities such as fail2ban)location ~* /(?:uploads|files)/.*\.php$ {deny all;}
在global/下,新建文件wordpress.conf,配置wordpress.conf:
# WordPress single blog rules.# Designed to be included in any server {} block.# This order might seem weird - this is attempted to match last if rules below fail.# http://wiki.nginx.org/HttpCoreModulelocation / {try_files $uri $uri/ /index.php?$args;}# Add trailing slash to */wp-admin requests.rewrite /wp-admin$ $scheme://$host$uri/ permanent;# Directives to send expires headers and turn off 404 error logging.location ~* ^.+\.(ogg|ogv|svg|svgz|eot|otf|woff|mp4|ttf|rss|atom|jpg|jpeg|gif|png|ico|zip|tgz|gz|rar|bz2|doc|xls|exe|ppt|tar|mid|midi|wav|bmp|rtf)$ {access_log off; log_not_found off; expires max;}# Uncomment one of the lines below for the appropriate caching plugin (if used).#include global/wordpress-wp-super-cache.conf;#include global/wordpress-w3-total-cache.conf;# Pass all .php files onto a php-fpm/php-fcgi server.location ~ [^/]\.php(/|$) {fastcgi_split_path_info ^(.+?\.php)(/.*)$;if (!-f $document_root$fastcgi_script_name) {return 404;}# This is a robust solution for path info security issue and works with "cgi.fix_pathinfo = 1" in /etc/php.ini (default)include fastcgi.conf;fastcgi_index index.php;# fastcgi_intercept_errors on;fastcgi_pass php;}
重启nginx
sudo nginx -s reload
本地安装mysql
brew install mysql
第一次安装失败(原因:网不好),重复命令再来一次

安装成功,显示如下

开启mysql
无数次失败(啥都不懂)之所以 >mysql -uroot 会失败,是因为 命令错误

正确命令
brew info mysql

正确命令
mysql.server startmysql -uroot

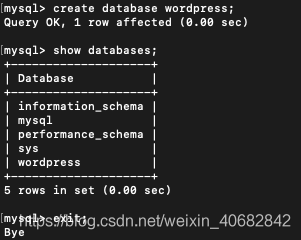
创建数据库
创建数据库wordpress
[mysql> create database wordpress;
注意 每句命令一定要加分号!!!
查看数据库
[mysql> show databases;
修改数据库的密码
[mysql> ALTER USER 'root'@'localhost' IDENTIFIED WITH mysql_native_password BY '123';
退出
[mysql> exit;
结果显示
问题踩点
1、创建第二个wordpress项目的时候,想在mysql创建第二个数据库的时候,报错:
ERROR 1045 (28000): Access denied for user ‘root’@’localhost’ (using password:YES)
解决方法:找到mysql的my.cnf文件 ,在最后添加一句 skip-grant-tables
2、连接数据库时报错:Can ‘t connect to local MySQL server through socket ‘/tmp/mysql.sock ‘(2) “;
原因:mysql服务没启动(应该mysql.server start)还有其他可能,这里尚未遇到,先不说明
填写数据库的参数
访问localhost:8000/index.php,链接自动跳转wordpress的安装网页,
nginx配置
如果填写完以后,跳转了403网页,就表示数据库是连上了,但是nginx配置错误了
正确配置如下(缺少红框的内容):

重启nginx
sudo nginx -s reload
开启php-fpm
开启php-fpm,才能访问wordpress后台
sudo php-fpm
访问网站
修改数据库的表 xxx_posts将前面两个字段的地址改为本地地址,访问localhost:8000/wp-admin,从后台的官网入口,进入官网

启动mysql
mysql.server start
启动fpm
sudo php-fpm
开启网站
浏览器 localhost:8000/wp-admin
修改主题
首先选择主题文件,开启热启动(样式实时更新)
npm run start
注意点
1.在 sass/mystyles.scss 中写自己的样式
2.functions.php添加bulma样式库
wp_enqueue_style( “mystyles”, get_template_directory_uri() . ‘/css/mystyles.css’, array(), _S_VERSION );
3.如果样式没变,一定要清缓存!!!

若有收获,就点个赞吧
0 人点赞
