- 1.前言
- 2.windows单节点部署(无权限验证)
- 禁止启动时下载地图相关数据库
- Enable security features
- Enable encryption for HTTP API client connections, such as Kibana, Logstash, and Agents
- Enable encryption and mutual authentication between cluster nodes
- Create a new cluster with the current node only
- Additional nodes can still join the cluster later
- Allow HTTP API connections from anywhere
- Connections are encrypted and require user authentication
- Allow other nodes to join the cluster from anywhere
- Connections are encrypted and mutually authenticated
- transport.host: 0.0.0.0
- ———————————- END SECURITY AUTO CONFIGURATION ————————————-
- End of file
- 4.linux单机集群部署(无权限校验)
- 集群名称,保证唯一
- 节点名称,必须不一样
- ip地址.
- 端口
- 内部节点之间沟通端口
- es7.x 之后新增的配置,节点发现
- es7.x 之后新增的配置,初始化一个新的集群时需要次配置来选举master
- 数据和存储路径
- 禁止启动时下载地图相关数据库
- Enable security features
- Enable encryption for HTTP API client connections, such as Kibana, Logstash, and Agents
- Enable encryption and mutual authentication between cluster nodes
- 5.kibana部署
1.前言
下述所有部署都是基于elasticsearch8.3.3版本部署。其他版本请自行决定是否参考
:::success
后续部署发现,由于是新版本所以会导致各种分词插件没有匹配版本而无法使用。。。。
还是老老实实用稳定的版本吧。。。。。后来我改成了8.0版本
:::
2.windows单节点部署(无权限验证)
下载
下载地址:https://www.elastic.co/cn/downloads/elasticsearch
国内镜像地址(最新版本8.0):https://repo.huaweicloud.com/elasticsearch/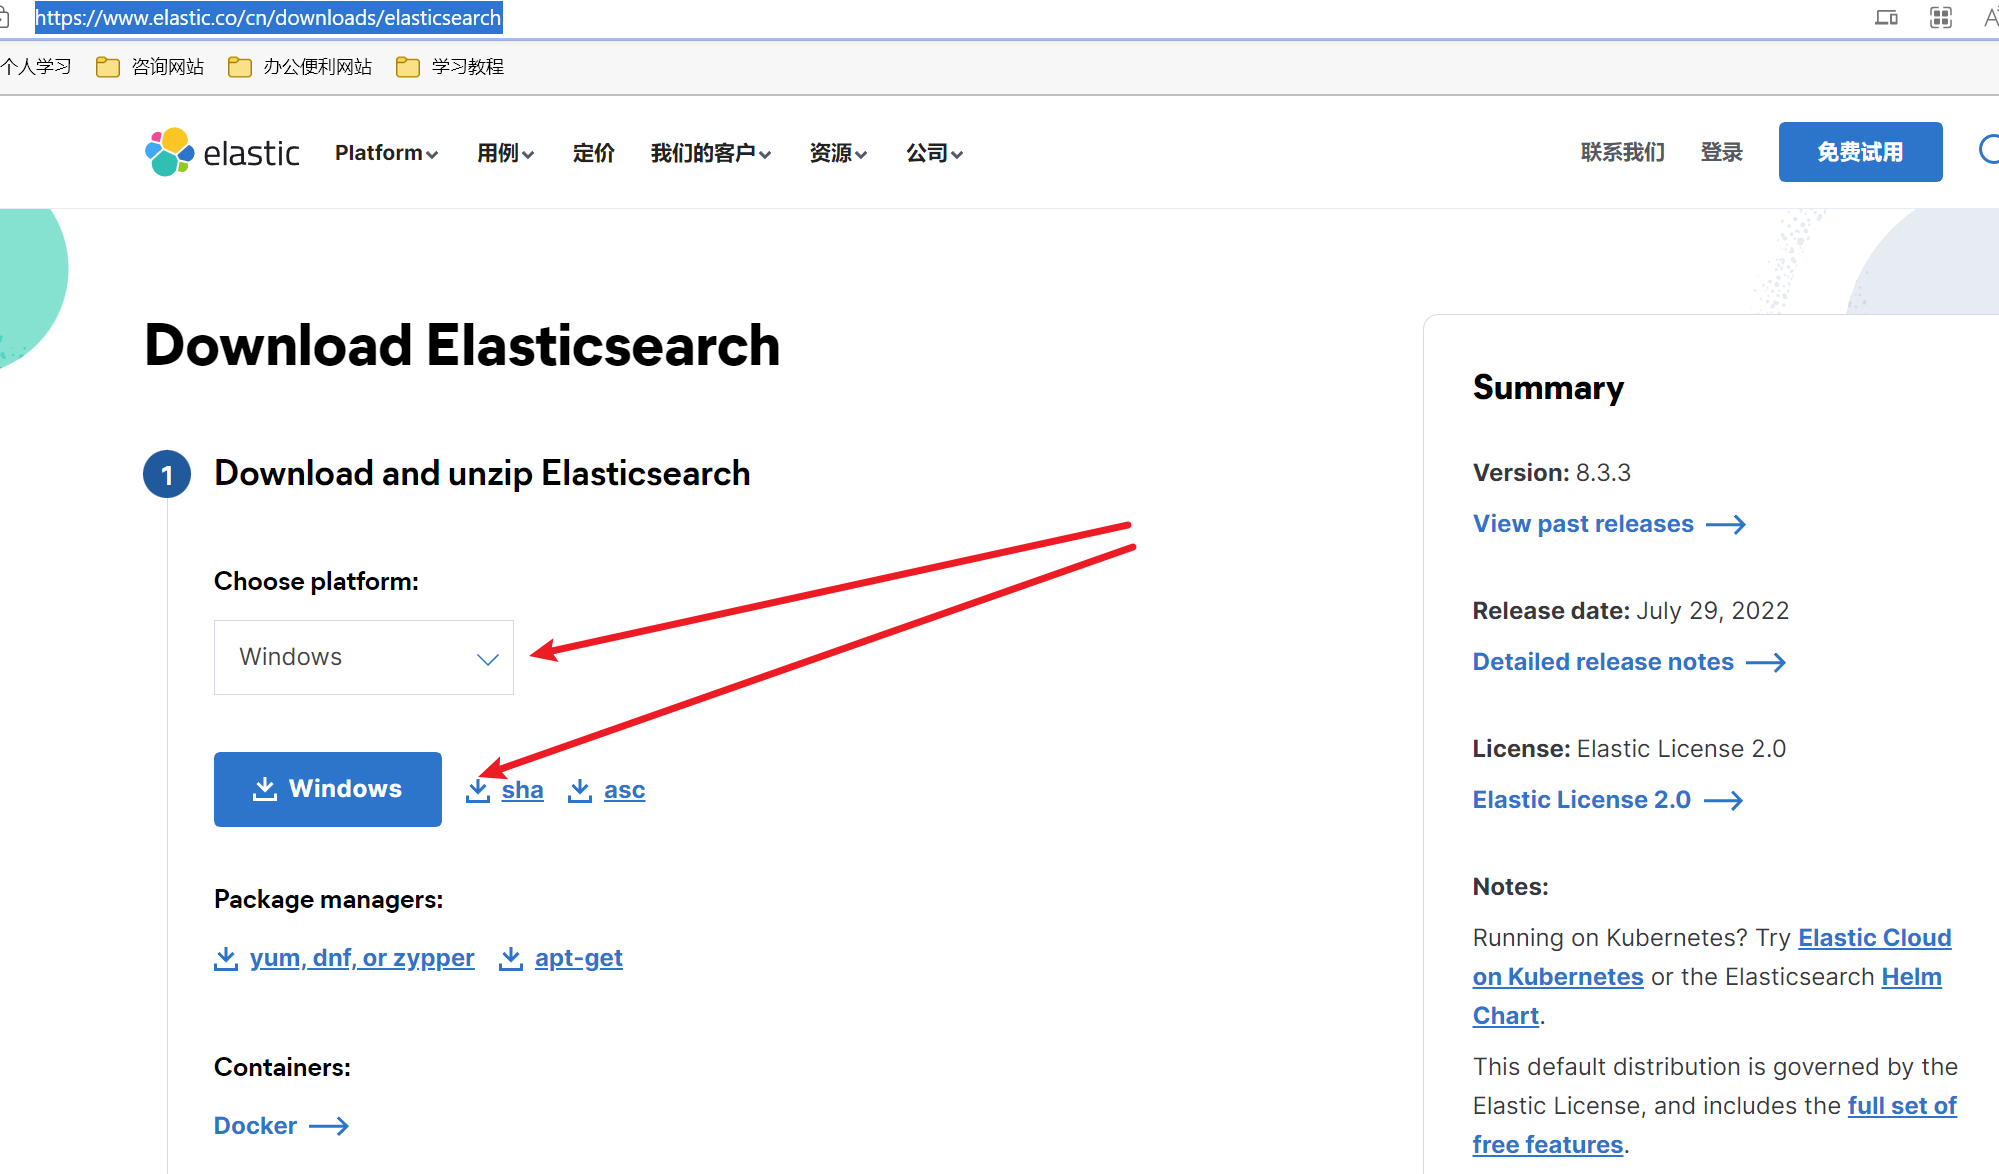
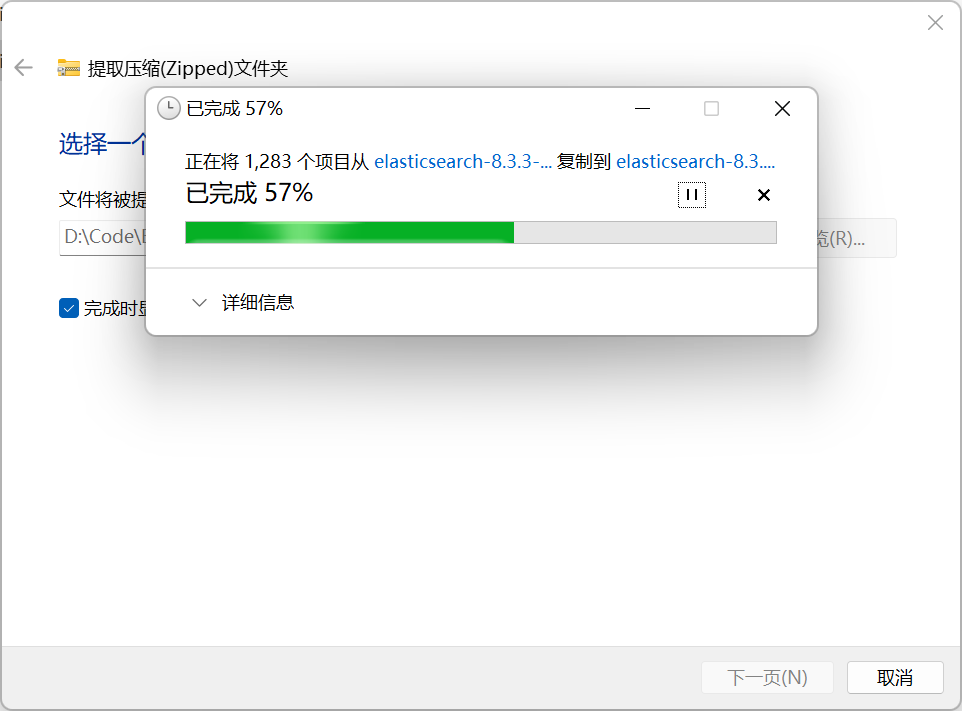
解压
目录介绍

- bin:可执行脚本目录
- config:配置目录
- jdk:内置 JDK 目录(ES是采用Java语言开发的)
- lib:类库
- logs:日志目录
- modules:模块目录
- plugins:插件目录
配置文件修改
ElasticSearch-8.3.3默认启动是开启权限校验,并且要下载geo地理位置相关功能的库,如果不需要开启权限且下载geo相关库时,可关闭这些功能启动
修改部分内容如下:
其中 cluster.initial_master_nodes 选项默认为当前主机标识,每台电脑都不一样 ```yaml禁止启动时下载地图相关数据库
ingest.geoip.downloader.enabled: false
Enable security features
xpack.security.enabled: false
xpack.security.enrollment.enabled: false
Enable encryption for HTTP API client connections, such as Kibana, Logstash, and Agents
xpack.security.http.ssl: enabled: false keystore.path: certs/http.p12
Enable encryption and mutual authentication between cluster nodes
xpack.security.transport.ssl: enabled: false verification_mode: certificate keystore.path: certs/transport.p12 truststore.path: certs/transport.p12
Create a new cluster with the current node only
Additional nodes can still join the cluster later
cluster.initial_master_nodes: [“LAPTOP-KQB7KV6K”]
Allow HTTP API connections from anywhere
Connections are encrypted and require user authentication
http.host: 0.0.0.0
Allow other nodes to join the cluster from anywhere
Connections are encrypted and mutually authenticated
transport.host: 0.0.0.0
———————————- END SECURITY AUTO CONFIGURATION ————————————-
<a name="frpKw"></a>### 启动项目进入bin目录下,双击elasticsearch.bat文件启动elasticsearch节点<br />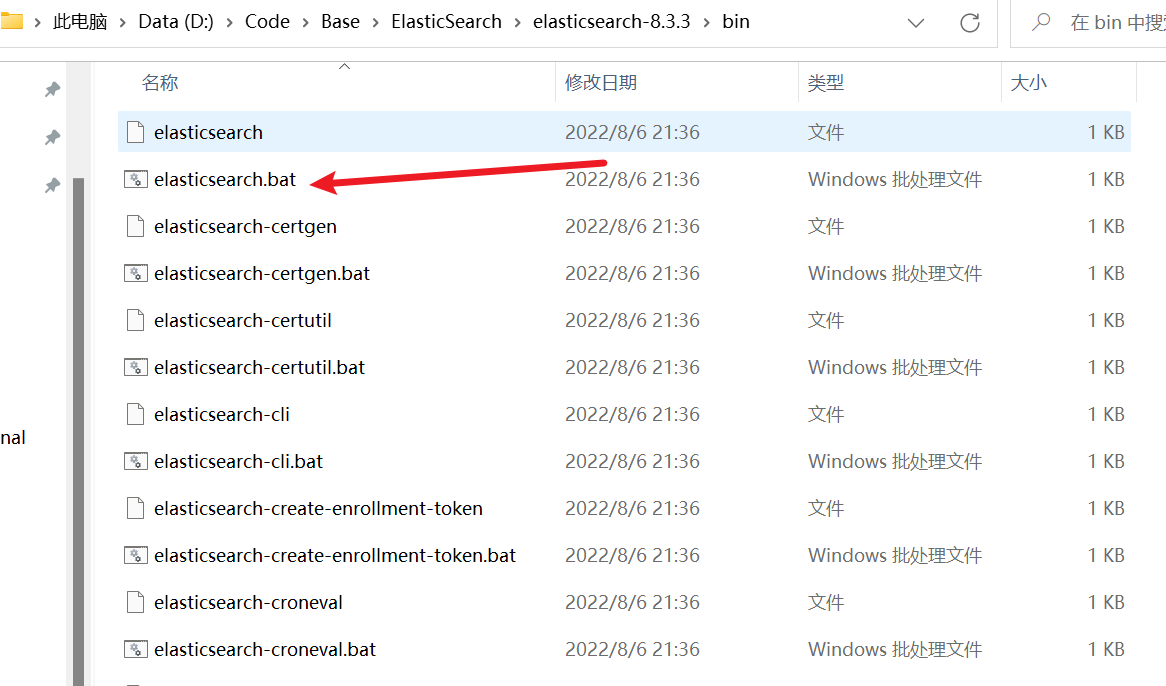<br />出现如下图的started字样,代表节点启动成功<br />> **9300 端口为 Elasticsearch 集群间组件的通信端口**> **9200 端口为浏览器访问的 http 协议的 RESTful 端口。**<a name="d89Fa"></a>### 验证浏览器输入http://localhost:9200,出现如下json返回,启动成功<br />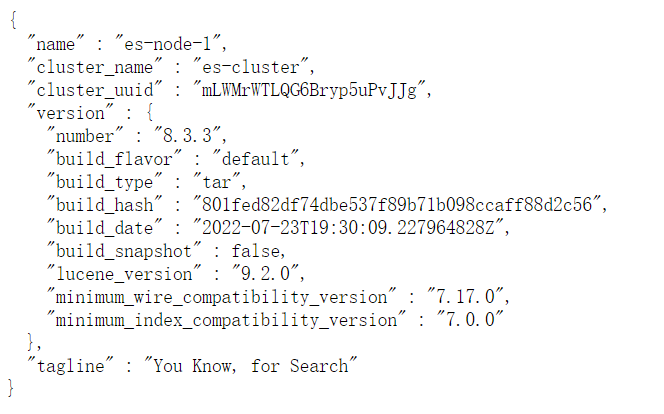<a name="ecIEw"></a>## 3.linux单节点部署(无权限验证)<a name="RudTM"></a>### 进入目录cd /usr/local<a name="pvro6"></a>### 下载下载地址:[https://www.elastic.co/cn/downloads/elasticsearch](https://www.elastic.co/cn/downloads/elasticsearch)<br />国内镜像地址(最新版本8.0):[https://repo.huaweicloud.com/elasticsearch/](https://repo.huaweicloud.com/elasticsearch/)<br />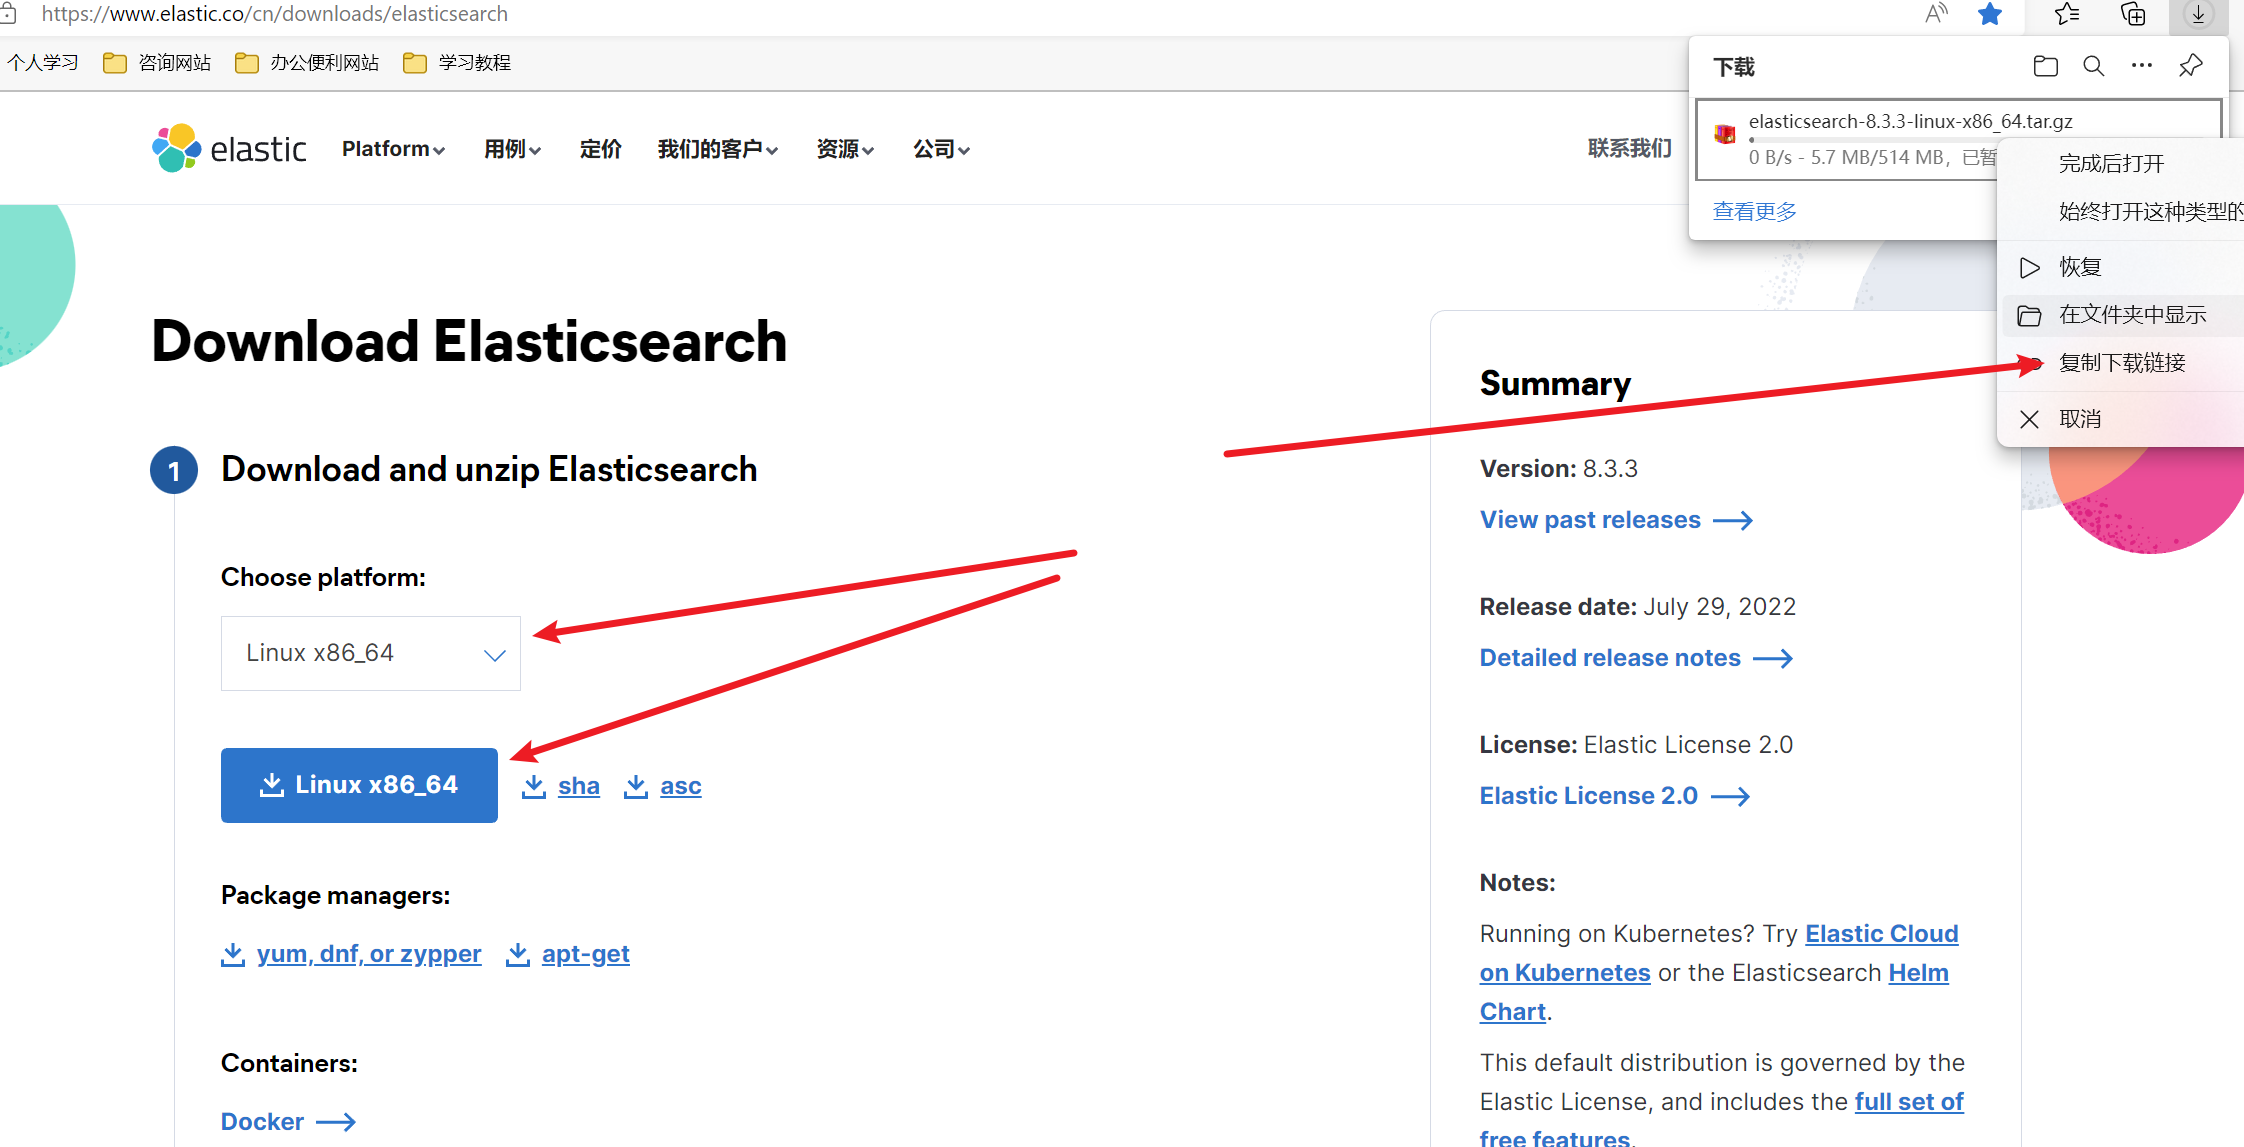<br />如图复制下载链接即可<br />下载命令示例:wget https://artifacts.elastic.co/downloads/elasticsearch/elasticsearch-8.3.3-linux-x86_64.tar.gz<a name="fYIp9"></a>### 解压1. tar -zxvf elasticsearch-8.3.3-linux-x86_64.tar.gz2. rm -rf elasticsearch-8.3.3-linux-x86_64.tar.gz3. mv elasticsearch-8.3.3/ elasticsearch4. ls<a name="j9hfK"></a>### 建立存储数据和日志的文件夹1. cd elasticsearch2. mkdir data3. mkdir logs(如果存在就不用创建了)4. ls<a name="yybIP"></a>### 修改jvm启动参数elasticsearch默认启动jvm堆内存大小=4g,对于学习而言这种内存要求过高,因此我们改为512m即可1. vim /usr/local/elasticsearch/config/jvm.options2. 找到IMPORTANT: JVM heap size配置项,并修改为以下内容```properties-Xms512m-Xmx512m
修改配置文件
修改部分与windows大致一样,修改部分yml如下
其中集群名称与节点名称自定义即可,文档只提供参考
# ======================== Elasticsearch Configuration =========================# ---------------------------------- Cluster -----------------------------------## Use a descriptive name for your cluster:#cluster.name: es-cluster## ------------------------------------ Node ------------------------------------## Use a descriptive name for the node:#node.name: es-node-1## Add custom attributes to the node:##node.attr.rack: r1## ----------------------------------- Paths ------------------------------------## Path to directory where to store the data (separate multiple locations by comma):#path.data: /usr/local/elasticsearch/data## Path to log files:#path.logs: /usr/local/elasticsearch/logs## ---------------------------------- Network -----------------------------------## By default Elasticsearch is only accessible on localhost. Set a different# address here to expose this node on the network:#network.host: 0.0.0.0## By default Elasticsearch listens for HTTP traffic on the first free port it# finds starting at 9200. Set a specific HTTP port here:#http.port: 9200## For more information, consult the network module documentation.#stop download geoingest.geoip.downloader.enabled: false# Enable security featuresxpack.security.enabled: falsexpack.security.enrollment.enabled: false# Enable encryption for HTTP API client connections, such as Kibana, Logstash, and Agentsxpack.security.http.ssl:enabled: falsekeystore.path: certs/http.p12# Enable encryption and mutual authentication between cluster nodesxpack.security.transport.ssl:enabled: falseverification_mode: certificatekeystore.path: certs/transport.p12truststore.path: certs/transport.p12# Create a new cluster with the current node only# Additional nodes can still join the cluster latercluster.initial_master_nodes: ["es-node-1"]#----------------------- END SECURITY AUTO CONFIGURATION -------------------------
修改系统进程内存限制
- vim /etc/security/limits.conf
- 文档末尾改为如下内容即可,未修改时soft nofile和hard nofile都为65535
```shell
End of file
root soft nofile 65535 root hard nofile 65535
- soft nofile 65536
- hard nofile 65536 ```
- vim /etc/sysctl.conf
新增如下内容即可
# 修改属性vm.max_map_count=655360
-
新建用户并授权
因为es不允许用root用户启动,因此需要新建es用户
useradd esuser
- passwd esuser
- 输入密码
- 再次输入确认密码
- chgrp -R esuser /usr/local/elasticsearch
- chown -R esuser /usr/local/elasticsearch
chmod 777 /usr/local/elasticsearch
切换用户启动测试
su esuser
- /usr/local/elasticsearchbin/elasticsearch
如图,启动成功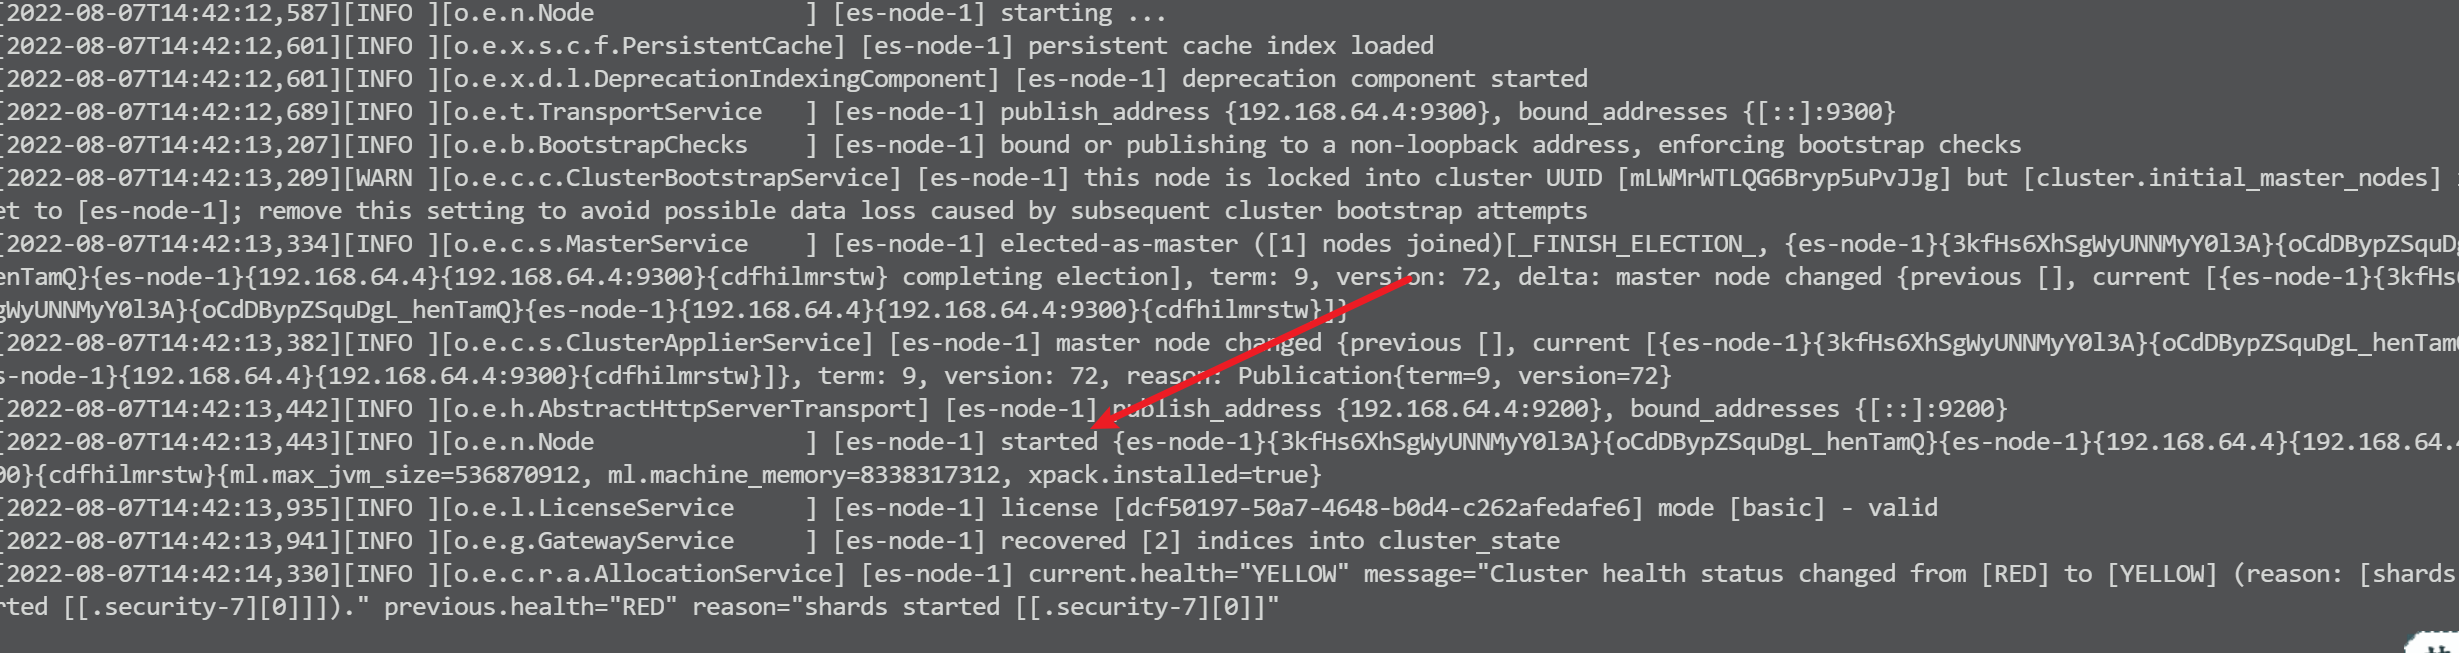
浏览器输入http://120.48.107.224:9200/,出现如下JSON字样,启动成功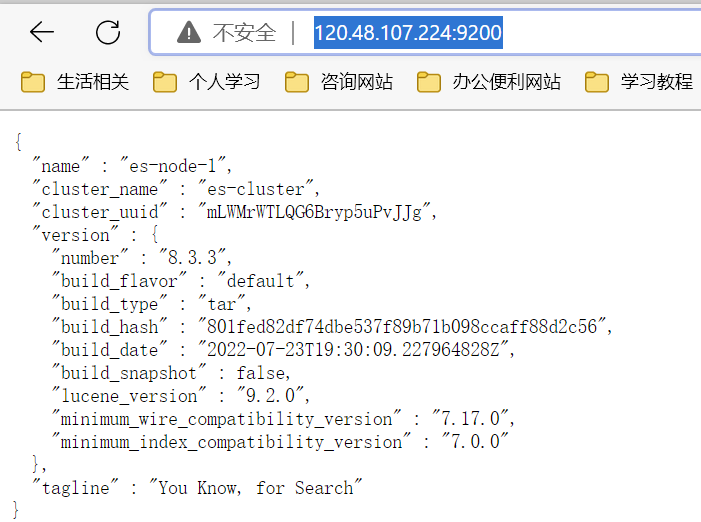
后台运行
可以通过:/usr/local/elasticsearch/bin/elasticsearch -d 来直接后台运行elasticsearch服务
个人更倾向用supervisor来管理java服务后台运行
- supervisor下载与配置。参考:Boot项目 CI/CD 部署流程
- cd /usr/local/elasticsearch/logs
- touch run.log
supervisor配置文件如下
[program:elastic-search-single]directory=/usr/local/elasticsearchcommand=/usr/local/elasticsearch/bin/elasticsearchautorestart=trueredirect_stderr=truestdout_logfile=/usr/local/elasticsearch/logs/run.loguser=esuser
supervisorctl update
- supervisorctl status

- ps -ef|grep elasticsearch

- 浏览器输入:浏览器输入http://120.48.107.224:9200/,出现如下JSON字样,后台启动成功
4.linux单机集群部署(无权限校验)
集群预设
| 集群名称 | 节点name | 端口号 |
|---|---|---|
| ftc-es | es-1 | 9201 |
| ftc-es | es-2 | 9202 |
| ftc-es | es-3 | 9203 |
进入目录
- cd /usr/local
- mkdir elasticsearch-set
-
下载
下载地址:https://www.elastic.co/cn/downloads/elasticsearch
国内镜像地址(最新版本8.0):https://repo.huaweicloud.com/elasticsearch/
如图复制下载链接即可
下载命令示例:wget https://artifacts.elastic.co/downloads/elasticsearch/elasticsearch-8.3.3-linux-x86_64.tar.gz解压
tar -zxvf elasticsearch-8.3.3-linux-x86_64.tar.gz
- rm -rf elasticsearch-8.3.3-linux-x86_64.tar.gz
- mv elasticsearch-8.3.3/ elasticsearch-1
- ls

建立存储数据和日志的文件夹
- cd elasticsearch-1
- mkdir data
- mkdir logs(如果存在就不用创建了)
- ls

修改jvm启动参数
- vim /usr/local/elasticsearch-set/elasticsearch-1/config/jvm.options
找到IMPORTANT: JVM heap size配置项,并修改为以下内容
-Xms256m-Xmx256m
复制多节点
cd /usr/local/elasticsearch-set/
- cp -r elasticsearch-1/ elasticsearch-2
- cp -r elasticsearch-1/ elasticsearch-3
- ls

修改配置文件
- 节点1:vim /usr/local/elasticsearch-set/elasticsearch-1/config/elasticsearch.yml
```yaml
集群名称,保证唯一
cluster.name: ftc-es
节点名称,必须不一样
node.name: es-1
ip地址.
network.host: 0.0.0.0
端口
http.port: 9201
内部节点之间沟通端口
transport.port: 9700
es7.x 之后新增的配置,节点发现
discovery.seed_hosts: [“127.0.0.1:9700”,”127.0.0.1:9800”,”127.0.0.1:9900”]
es7.x 之后新增的配置,初始化一个新的集群时需要次配置来选举master
cluster.initial_master_nodes: [“es-1”,”es-2”,”es-3”]
数据和存储路径
path.data: /usr/local/elasticsearch-set/elasticsearch-1/data path.logs: /usr/local/elasticsearch-set/elasticsearch-1/logs
禁止启动时下载地图相关数据库
ingest.geoip.downloader.enabled: false
Enable security features
xpack.security.enabled: false xpack.security.enrollment.enabled: false
Enable encryption for HTTP API client connections, such as Kibana, Logstash, and Agents
xpack.security.http.ssl: enabled: false
Enable encryption and mutual authentication between cluster nodes
xpack.security.transport.ssl: enabled: false
2. 节点2:vim /usr/local/elasticsearch-set/elasticsearch-2/config/elasticsearch.yml```yaml#集群名称,保证唯一cluster.name: ftc-es# 节点名称,必须不一样node.name: es-2#ip地址.network.host: 0.0.0.0#端口http.port: 9202#内部节点之间沟通端口transport.port: 9800#es7.x 之后新增的配置,节点发现discovery.seed_hosts: ["127.0.0.1:9700","127.0.0.1:9800","127.0.0.1:9900"]#es7.x 之后新增的配置,初始化一个新的集群时需要次配置来选举mastercluster.initial_master_nodes: ["es-1","es-2","es-3"]#数据和存储路径path.data: /usr/local/elasticsearch-set/elasticsearch-2/datapath.logs: /usr/local/elasticsearch-set/elasticsearch-2/logs# 禁止启动时下载地图相关数据库ingest.geoip.downloader.enabled: false# Enable security featuresxpack.security.enabled: falsexpack.security.enrollment.enabled: false# Enable encryption for HTTP API client connections, such as Kibana, Logstash, and Agentsxpack.security.http.ssl:enabled: false# Enable encryption and mutual authentication between cluster nodesxpack.security.transport.ssl:enabled: false
- 节点3:vim /usr/local/elasticsearch-set/elasticsearch-3/config/elasticsearch.yml
```yaml
集群名称,保证唯一
cluster.name: ftc-es
节点名称,必须不一样
node.name: es-3
ip地址.
network.host: 0.0.0.0
端口
http.port: 9203
内部节点之间沟通端口
transport.port: 9900
es7.x 之后新增的配置,节点发现
discovery.seed_hosts: [“127.0.0.1:9700”,”127.0.0.1:9800”,”127.0.0.1:9900”]
es7.x 之后新增的配置,初始化一个新的集群时需要次配置来选举master
cluster.initial_master_nodes: [“es-1”,”es-2”,”es-3”]
数据和存储路径
path.data: /usr/local/elasticsearch-set/elasticsearch-3/data path.logs: /usr/local/elasticsearch-set/elasticsearch-3/logs
禁止启动时下载地图相关数据库
ingest.geoip.downloader.enabled: false
Enable security features
xpack.security.enabled: false xpack.security.enrollment.enabled: false
Enable encryption for HTTP API client connections, such as Kibana, Logstash, and Agents
xpack.security.http.ssl: enabled: false
Enable encryption and mutual authentication between cluster nodes
xpack.security.transport.ssl: enabled: false
<a name="BJpq2"></a>### 修改系统进程内存限制1. vim /etc/security/limits.conf2. 文档末尾改为如下内容即可,未修改时soft nofile和hard nofile都为65535```shell# End of fileroot soft nofile 65535root hard nofile 65535* soft nofile 65536* hard nofile 65536
- vim /etc/sysctl.conf
新增如下内容即可
# 修改属性vm.max_map_count=655360
-
新建用户并授权
因为es不允许用root用户启动,因此需要新建es用户
useradd esuser
- passwd esuser
- 输入密码
- 再次输入确认密码
- chgrp -R esuser /usr/local/elasticsearch-set
- chown -R esuser /usr/local/elasticsearch-set
chmod 777 /usr/local/elasticsearch-set
切换用户启动测试
su esuser
- /usr/local/elasticsearch-set/elasticsearch-1/bin/elasticsearch -d
- /usr/local/elasticsearch-set/elasticsearch-2/bin/elasticsearch -d
- /usr/local/elasticsearch-set/elasticsearch-3/bin/elasticsearch -d
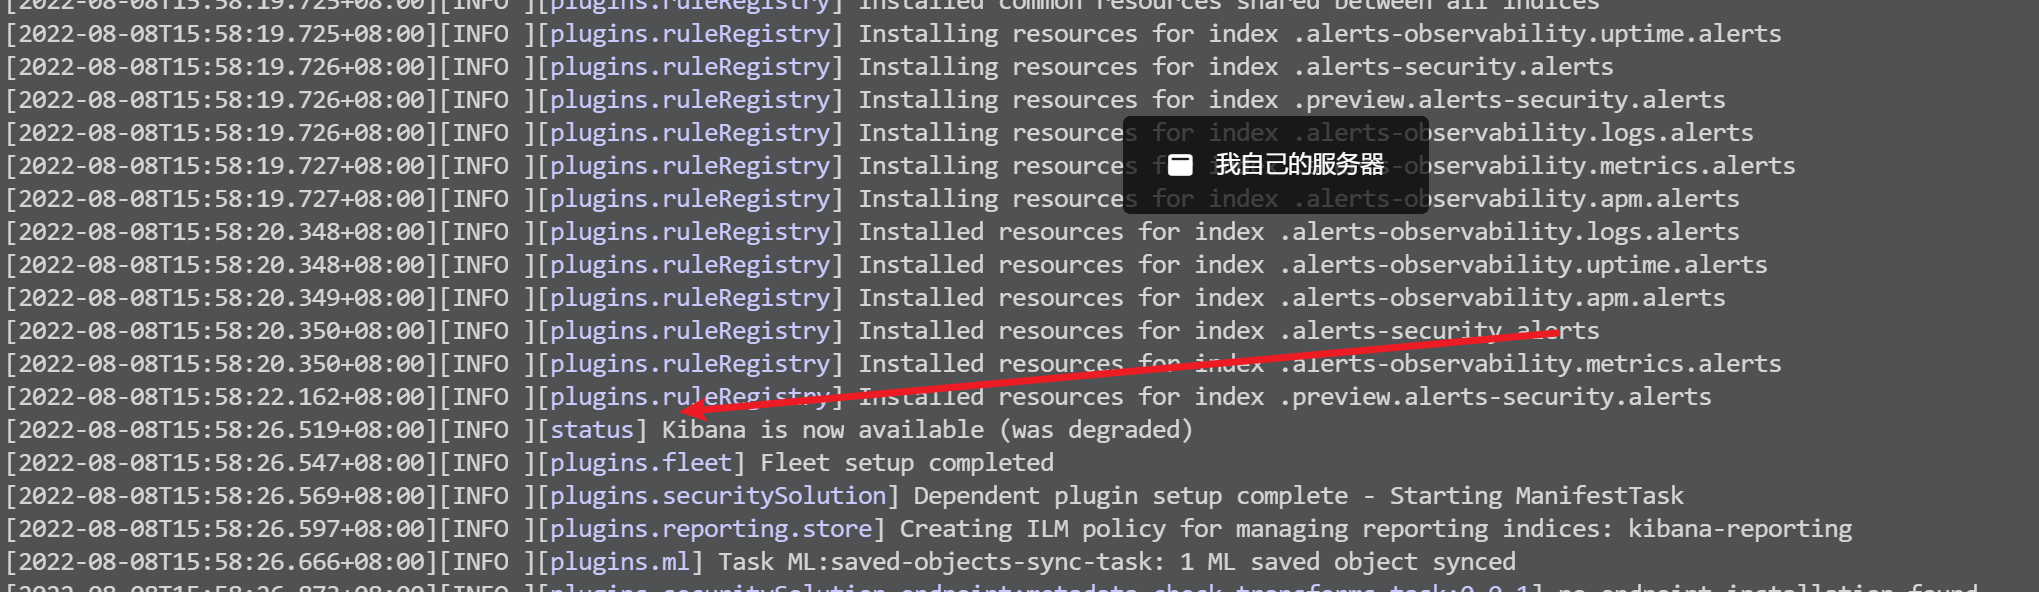
- 每个节点都启动完成后,浏览器输入:http://120.48.107.224:9203/_cat/health?v

后台运行
创建supervisor日志
- touch /usr/local/elasticsearch-set/elasticsearch-1/logs/run.log
- touch /usr/local/elasticsearch-set/elasticsearch-2/logs/run.log
touch /usr/local/elasticsearch-set/elasticsearch-3/logs/run.log
创建supervisor文件
vim /etc/supervisord.d/elasticsearch-1.ini
[program:elastic-1]directory=/usr/local/elasticsearch-set/elasticsearch-1command=/usr/local/elasticsearch-set/elasticsearch-1/bin/elasticsearchautorestart=trueredirect_stderr=truestdout_logfile=/usr/local/elasticsearch-set/elasticsearch-1/logs/run.loguser=esuser
vim /etc/supervisord.d/elasticsearch-2.ini
[program:elastic-2]directory=/usr/local/elasticsearch-set/elasticsearch-2command=/usr/local/elasticsearch-set/elasticsearch-2/bin/elasticsearchautorestart=trueredirect_stderr=truestdout_logfile=/usr/local/elasticsearch-set/elasticsearch-2/logs/run.loguser=esuser
vim /etc/supervisord.d/elasticsearch-3.ini
[program:elastic-3]directory=/usr/local/elasticsearch-set/elasticsearch-3command=/usr/local/elasticsearch-set/elasticsearch-3/bin/elasticsearchautorestart=trueredirect_stderr=truestdout_logfile=/usr/local/elasticsearch-set/elasticsearch-3/logs/run.loguser=esuser
更新supervisor并运行
supervisorctl update

- supervisorctl status


5.kibana部署
其实本来我是不想部署kibana的。但是我发现用apipost或postman来操作es,好多方法都有稀奇古怪的问题。虽然说es是基于restful形式进行调用,但是好多方法和预想的不一样。所以我屈服了,kibana作为elastic生态中原生的可视化工具,kibana你赢了!!!
进入目录
下载
下载地址:https://www.elastic.co/cn/downloads/kibana
国内镜像地址(最新版本8.0):https://repo.huaweicloud.com/kibana/
如图,复制下载链接即可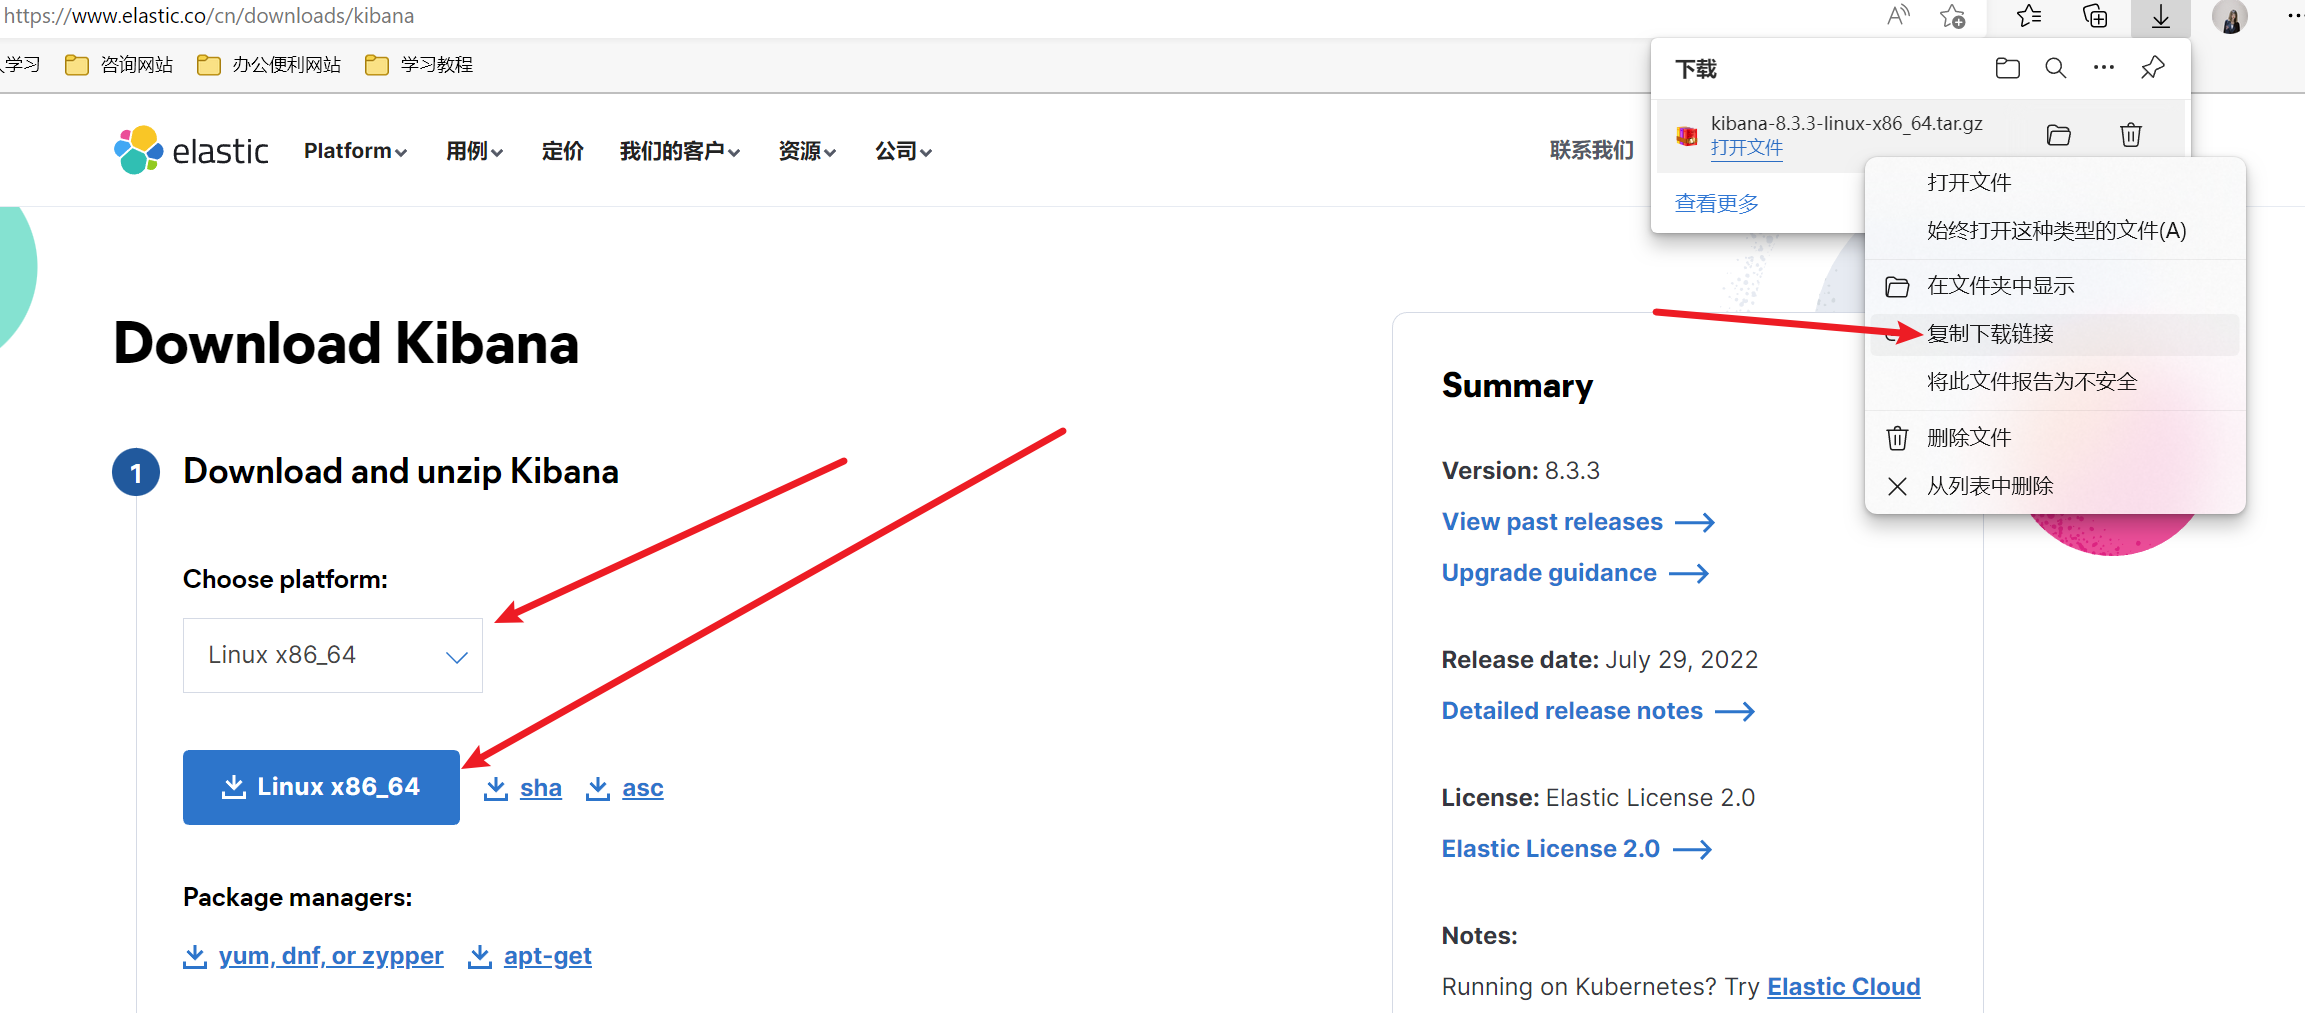
下载命令示例:wget https://artifacts.elastic.co/downloads/kibana/kibana-8.3.3-linux-x86_64.tar.gz
解压
- tar -zxvf kibana-8.3.3-linux-x86_64.tar.gz
- rm -rf kibana-8.3.3-linux-x86_64.tar.gz
- mv kibana-8.3.3 kibana
- ls

修改配置文件
- vim /usr/local/kibana/config/kibana.yml
修改链接地址
# =================== System: Kibana Server ===================# Specifies the address to which the Kibana server will bind. IP addresses and host names are both valid values.# The default is 'localhost', which usually means remote machines will not be able to connect.# To allow connections from remote users, set this parameter to a non-loopback address.server.host: "0.0.0.0"
修改es实例地址
# =================== System: Elasticsearch ===================# The URLs of the Elasticsearch instances to use for all your queries.elasticsearch.hosts: ["http://localhost:9201"]
新建用户并授权
因为es不允许用root用户启动,因此需要新建es用户
useradd esuser
- passwd esuser
- 输入密码
- 再次输入确认密码
- chgrp -R esuser /usr/local/kibana
- chown -R esuser /usr/local/kibana
-
启动测试
/usr/local/kibana/bin/kibana
- 出现如图,kibana启动成功
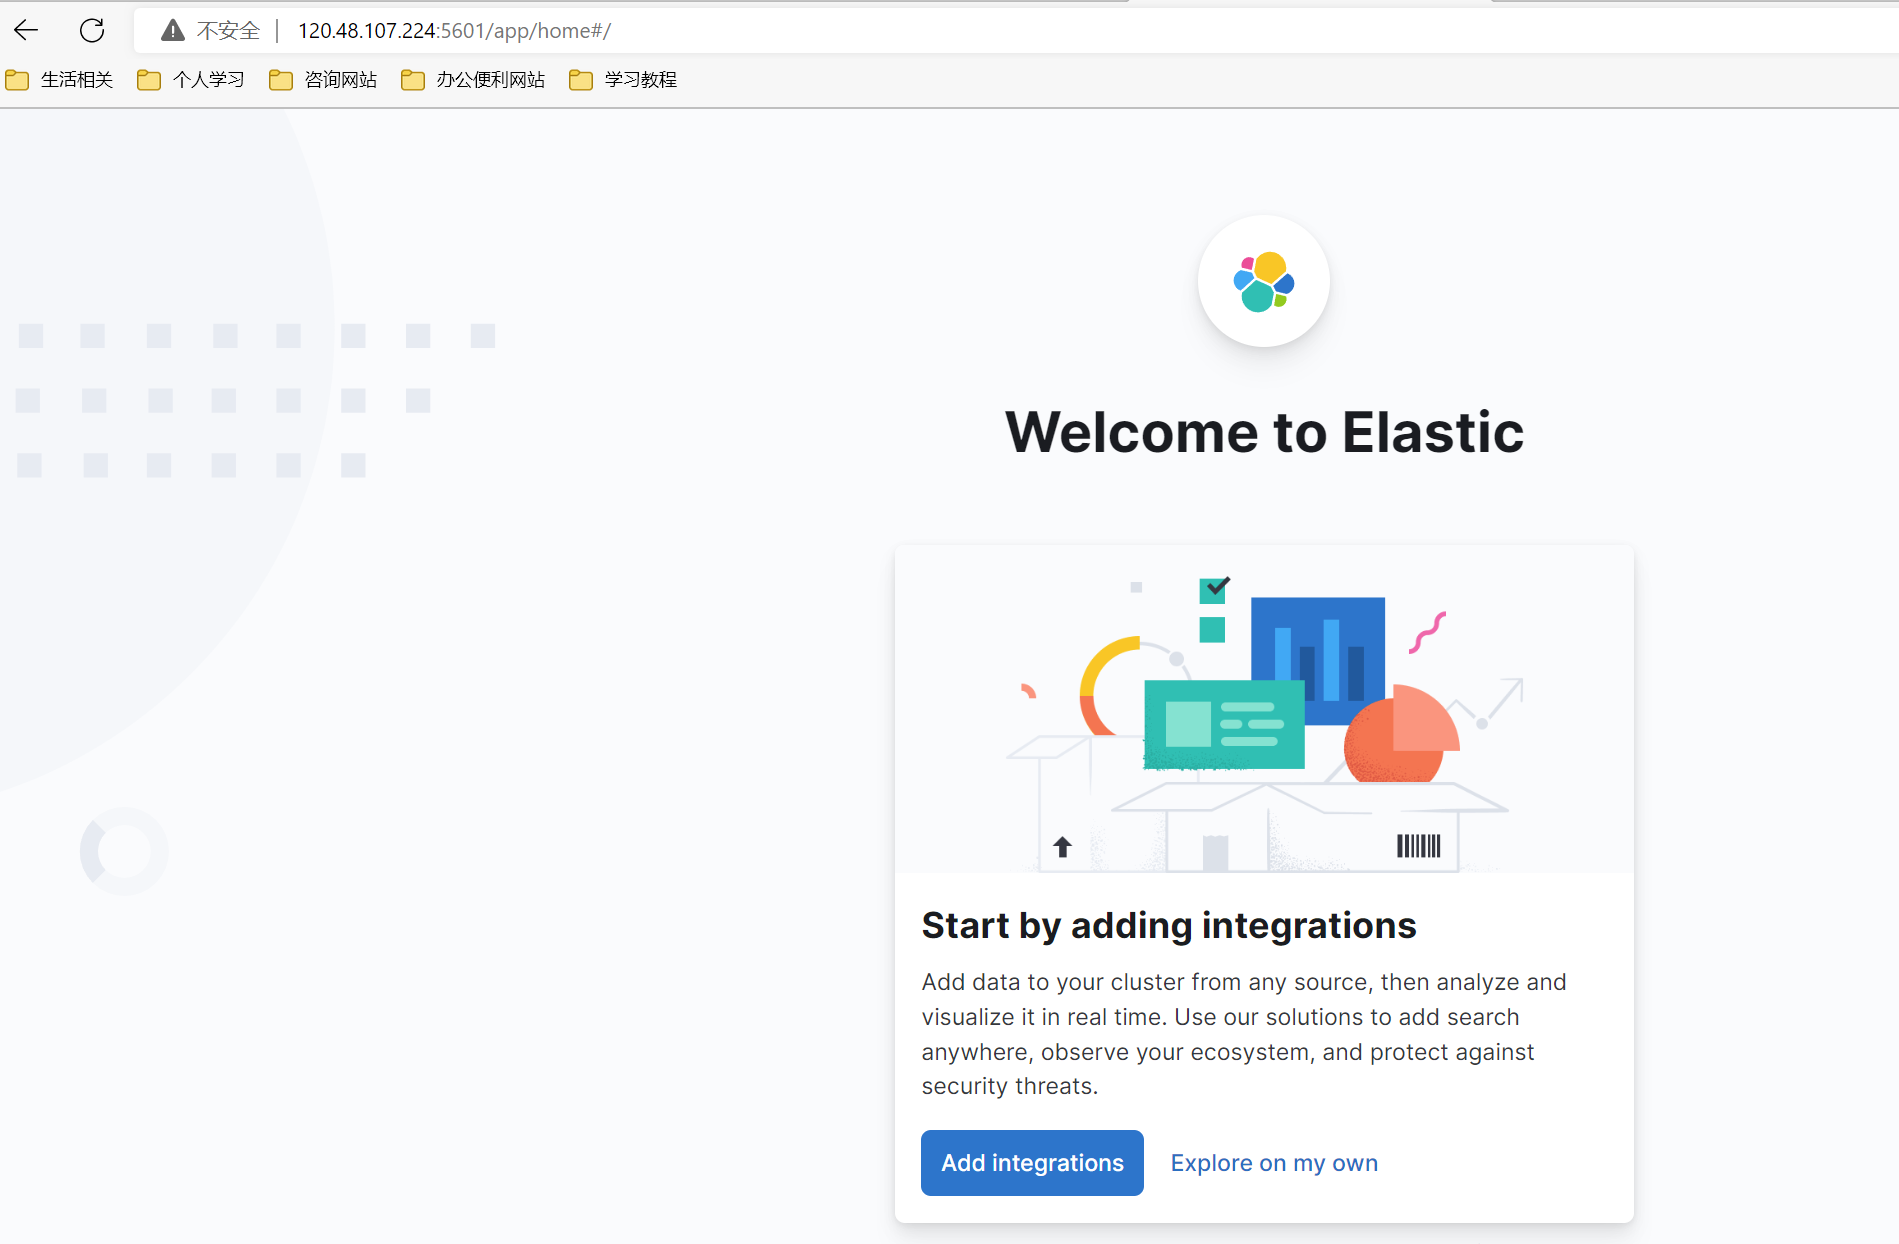
- 浏览器输入:http://120.48.107.224:5601/。如图,kibana启动成功

后台运行
与ElasticSearch同理,kibana同样用supervisor管理进程
- su esuser
- touch /usr/local/kibana/logs/run.log
- su root
vim /etc/supervisord.d/kibana.ini
[program:kibana]directory=/usr/local/kibanacommand=/usr/local/kibana/bin/kibanaautorestart=trueredirect_stderr=truestdout_logfile=/usr/local/kibana/logs/run.loguser=esuser
supervisorctl update
- supervisorctl status

- 浏览器输入:http://120.48.107.224:5601/。如图,kibana启动成功

若有收获,就点个赞吧
0 人点赞
