1. CompletableFuture
1.线程基础知识复习-Future
- 本源的Future接口相关架构

- 编码案例 —- get()方法 ```java
import java.util.concurrent.ExecutionException; import java.util.concurrent.FutureTask; import java.util.concurrent.TimeUnit; import java.util.concurrent.TimeoutException;
/**
- 一旦调用get()方法,不管是否计算完成都会导致阻塞,
如果是get(1,TimeUnit) 就会等待指定的时间 , 如果在指定的时间内没有完成就会抛出异常 **/ public class FutureTaskDemo_2 {
public static void main(String[] args) throws ExecutionException, InterruptedException, TimeoutException {
FutureTask<String> futureTask = new FutureTask<>(() -> {TimeUnit.SECONDS.sleep(5);System.out.println("进入Future方法=====");return "执行完成";});new Thread(futureTask, "t1").start();// get方法会一直阻塞 , 等待结果执行完成// String s = futureTask.get();// System.out.println("s = " + s);// 会阻塞1秒钟, 如果1秒内没有执行完成, 就会结束掉方法抛出异常String s1 = futureTask.get(1, TimeUnit.SECONDS);System.out.println("s1 = " + s1);
} } ```
3.isDone 使用轮询的方式 ```java FutureTask
futureTask = new FutureTask<>(() -> { TimeUnit.SECONDS.sleep(2);return "123123";});new Thread(futureTask, "t1").start();while (true) { // 使用轮询策略 , 如果想要异步获取结果,通常都会以轮询的方式去获取结果,尽量不要阻塞if (futureTask.isDone()) {System.out.println(futureTask.get());break;}}
> 如果想完成一些复杂的任务,> - 将两个异步计算合成一个异步计算,这两个异步计算互相独立,同时第二个又依赖第一个的结果。> - 当Future集合中某个任务最快结束时,返回结果。> - 等待Future结合中的所有任务都完成。<a name="GvNrZ"></a>## 2.CompletableFuture和CompletionStage<a name="MZoMC"></a>### 1.CompletableFuture和CompletionStage源码分别介绍- 类架构图说明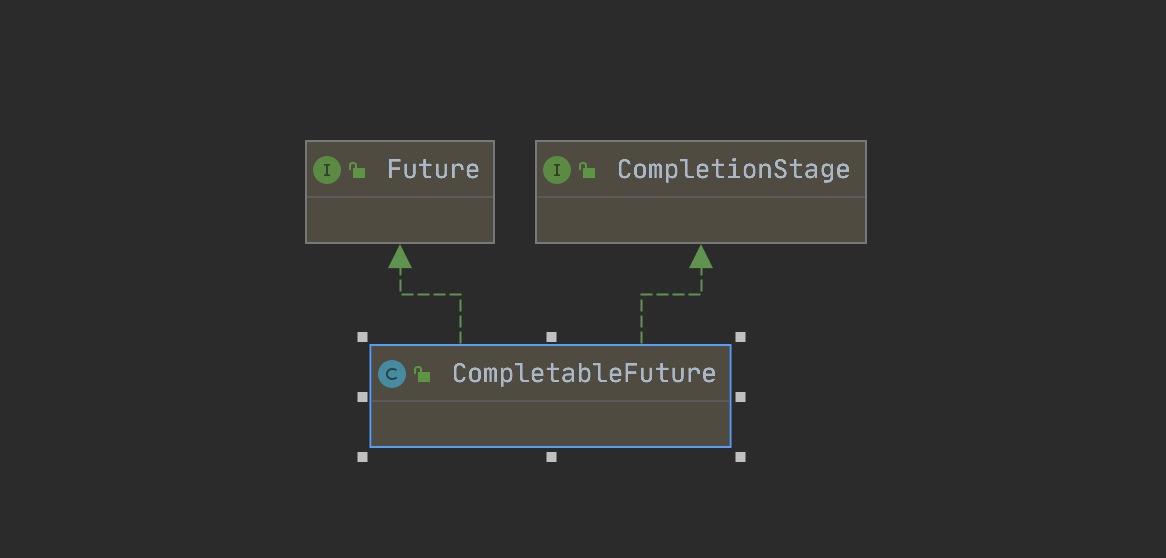- 接口CompletionStage代表异步计算过程中的某一个阶段,一个阶段完成以后可能会触发另外一个阶段,有些类似Linux系统的管道分隔符传参数。- 类CompletableFuture在Java8中, CompletableFuture提供了非常强大的Future的扩展功能,可以帮助我们简化异步编程,并且提供了函数式编程的能力,可以通过一个回调的方式的处理计算,也提供转换和组合的能力CompletableFuture的方法<br />CompletableFuture实现了Future和CompletableStage<a name="Ff8ls"></a>### 2.CompletableFuture 四个核心静态方法- 1.runAsync 无返回值```javapublic static CompletableFuture<Void> runAsync(Runnable runnable)public static CompletableFuture<Void> runAsync(Runnable runnable,Executor executor)
import java.util.concurrent.*;public class CompletableFuture_Demo_2 {final static ThreadPoolExecutor threadPollExecutor = new ThreadPoolExecutor(2, 10, Integer.MAX_VALUE, TimeUnit.SECONDS,new LinkedBlockingQueue<>(), Executors.defaultThreadFactory(), new ThreadPoolExecutor.DiscardPolicy());public static void main(String[] args) {CompletableFuture<Void> voidCompletableFuture1 = CompletableFuture.runAsync(() -> {System.out.println(Thread.currentThread().getName() + "无参数无返回值=========");});CompletableFuture<Void> voidCompletableFuture2 = CompletableFuture.runAsync(() -> {System.out.println(Thread.currentThread().getName() + "自定义线程池====无参数无返回值=========");}, threadPollExecutor);threadPollExecutor.shutdown();}}
- supplyAsync有返回值
```javapublic static <U> CompletableFuture<U> supplyAsync(Supplier<U> supplier)public static <U> CompletableFuture<U> supplyAsync(Supplier<U> supplier,Executor executor)
import java.util.concurrent.*;
public class CompletableFuture_Demo_applyAsync_2 {
final static ThreadPoolExecutor threadPollExecutor = new ThreadPoolExecutor(2, 10, Integer.MAX_VALUE, TimeUnit.SECONDS,new LinkedBlockingQueue<>(), Executors.defaultThreadFactory(), new ThreadPoolExecutor.DiscardPolicy());public static void main(String[] args) throws ExecutionException, InterruptedException {CompletableFuture<String> stringCompletableFuture1 = CompletableFuture.supplyAsync(() -> Thread.currentThread().getName() + "21323123123");CompletableFuture<String> stringCompletableFuture2 = CompletableFuture.supplyAsync(() -> Thread.currentThread().getName() + "21323123123", threadPollExecutor);// 获取异步结果String s1 = stringCompletableFuture1.get();System.out.println("s1 = " + s1);String s2 = stringCompletableFuture2.get();System.out.println("s2 = " + s2);threadPollExecutor.shutdown();}
}
> 上述Executor executor参数说明> 没有指定Executor的方法,直接使用默认的ForkJoinPool.commonPool() 作为它的线程池执行异步代码。> 如果指定线程池,则使用我们自定义的或者特别指定的线程池执行异步代码> **join 和 get 区别**> **区别: **> **----> join 不会抛出异常, **> **----> get 会抛出异常**> **相同:**> **----> 都会阻塞,等待结果的返回**<br /><a name="qvHVC"></a>### 3.CompletableFuture常用方法- 1.获得结果和触发计算```javaimport java.util.concurrent.CompletableFuture;import java.util.concurrent.ExecutionException;import java.util.concurrent.TimeUnit;import java.util.concurrent.TimeoutException;public class CompletableFutureDemo_3 {public static void main(String[] args) throws ExecutionException, InterruptedException, TimeoutException {CompletableFuture<String> stringCompletableFuture = CompletableFuture.supplyAsync(() -> {/* try {TimeUnit.SECONDS.sleep(3);} catch (InterruptedException e) {e.printStackTrace();}*/return Thread.currentThread().getName();});/*** 阻塞获取结果*/// String s = stringCompletableFuture.get();/*** 阻塞获取结果 , 如果在2秒内没有获取到结果抛出异常*/// String s = stringCompletableFuture.get(2, TimeUnit.SECONDS);/*** 立即获取结果 , 在没有完成计算的情况下立即给我一个结果*/// String s = stringCompletableFuture.getNow("替代结果");/*** 阻塞获取结果 , 不抛出异常*/// String s = stringCompletableFuture.join();/****/TimeUnit.SECONDS.sleep(2);if (stringCompletableFuture.complete("获取阻塞的值")) {System.out.println("s = " + stringCompletableFuture.get());}}}
- 2.对计算结果进行处理 ```java
public class CompletableFutureDemo_4 {
public static void main(String[] args) throws ExecutionException, InterruptedException, TimeoutException {// completablefuture_thenApply();completablefuture_handle();}/*** handle 结果出现异常也会将值往下面传递 ,直到最后的 whenComplete*/private static void completablefuture_handle() {CompletableFuture.supplyAsync(() -> {int num = 10 / 0;return Thread.currentThread().getName();}).handle((v, e) -> {if (e == null) {return v + "handle";} else {return v + "handle";}}).whenComplete((v, e) -> {if (e == null) {System.out.println(v + "顺利执行完成了");} else {System.out.println("抛出异常了, 请处理异常" + e.getMessage());}}).exceptionally(e -> "出现异常了");}/*** thenApply 出现异常直接到whenComplete , 不会接收异常*/private static void completablefuture_thenApply() {CompletableFuture<String> stringCompletableFuture = CompletableFuture.supplyAsync(() -> {return Thread.currentThread().getName();}).thenApply((v) -> {return v + "thenApply";}).whenComplete((v, e) -> {if (e == null) {System.out.println(v + "顺利执行完成了");} else {System.out.println("抛出异常了, 请处理异常" + e.getMessage());}}).exceptionally(e -> {System.out.println(e.getMessage());return "出现异常了";});}
}
- 3.对计算结果进行消费```javaimport java.util.concurrent.CompletableFuture;/****/public class CompletableFutureDemo_5 {public static void main(String[] args) {handle_thenApply();handle_thenAccept();handle_thenRun();}/*** 接收任务的处理 , 无返回结果:* 比如A处理完成之后 , 在执行B , B是不需要A的执行结果 , 后续也不需要将B的结果返回*/private static void handle_thenRun() {CompletableFuture.supplyAsync(() ->Thread.currentThread().getName()).thenRun(() ->System.out.println("thenRun没有任何返回值===========")); // void}/*** 接收任务的处理结果,并消费处理,无返回结果:* 比如A处理完成之后 , 需要将结果交给B , 后续也不需要将B处理的结果返回*/private static void handle_thenAccept() {CompletableFuture.supplyAsync(() -> Thread.currentThread().getName()).thenAccept((v) -> {System.out.println("v = " + v);}); // void}/*** 接收任务的处理结果,并消费处理,有返回结果:* 比如A处理完成之后 , 需要将结果交给B , 同时也需要将B的结果返回*/private static void handle_thenApply() {CompletableFuture.supplyAsync(() -> Thread.currentThread().getName()).thenApply(v -> v);}}
- 4.对计算速度进行选用 ```java
public class CompletableFutureDemo_6 {
/*** @param args*/public static void main(String[] args) throws ExecutionException, InterruptedException {CompletableFuture<String> stringCompletableFuture = CompletableFuture.supplyAsync(() -> {try {TimeUnit.SECONDS.sleep(3);} catch (InterruptedException e) {e.printStackTrace();}return Thread.currentThread().getName();}).applyToEither(CompletableFuture.supplyAsync(() -> {try {TimeUnit.SECONDS.sleep(1);} catch (InterruptedException e) {e.printStackTrace();}return Thread.currentThread().getName();}), (v) -> v);String s = stringCompletableFuture.get();System.out.println("s = " + s);}
}
- 5.对计算结果进行合并(thenCombine)```javaimport java.util.concurrent.CompletableFuture;import java.util.concurrent.ExecutionException;public class CompletableFutureDemo_7 {/**多个CompletionStage任务都完成后,最终能把两个任务的结果一起交给thenCombine 来处理* @param args*/public static void main(String[] args) throws ExecutionException, InterruptedException {CompletableFuture<String> stringCompletableFuture = CompletableFuture.supplyAsync(() -> "AAAAA").thenCombine(CompletableFuture.supplyAsync(() -> "BBBBB").thenCombine(CompletableFuture.supplyAsync(() -> "CCCCCC"), (v1, v2) -> v1 + v2).thenCombine(CompletableFuture.supplyAsync(() -> "DDDDD"), (v1, v2) -> v1 + v2), (v1, v2) -> v1 + v2).thenCombine(CompletableFuture.supplyAsync(() -> "EEEEE"), (v1, v2) -> v1 + v2);System.out.println("stringCompletableFuture.get() = " + stringCompletableFuture.get());}}
- 6.对计算结果进行合并并对类型进行转换(thenCompose) ```java import java.util.concurrent.CompletableFuture; import java.util.concurrent.ExecutionException;
public class CompletableFutureDemo_8 {
public static void main(String[] args) throws ExecutionException, InterruptedException {CompletableFuture<Integer> integerCompletableFuture = CompletableFuture.supplyAsync(() -> "1").thenCompose(v -> CompletableFuture.supplyAsync(() ->String.valueOf(Integer.parseInt(v) + 123)).thenCompose(v1 -> CompletableFuture.supplyAsync(() -> Integer.parseInt(v1) + 1)));System.out.println("integerCompletableFuture = " + integerCompletableFuture.get());}
}
<a name="T38Dr"></a># 2. JUC锁<a name="ispaM"></a>## 1. 悲观锁适合写操作多的场景,先加锁可以保证写操作时数据正确。<br />认为自己在使用数据的时候一定有别的线程来修改数据,因此在获取数据的时候会先加锁,确保数据不会被别的线程修改。 <br />synchronized 关键字和 Lock 的实现类都是悲观锁```javaimport java.util.concurrent.atomic.AtomicInteger;import java.util.concurrent.locks.Lock;import java.util.concurrent.locks.ReentrantLock;public class LeBeiLock {private static Lock lock = new ReentrantLock(false);public static void main(String[] args) {// 悲观锁的实现方式synchronized (LeBeiLock.class) {}// 悲观锁的实现方式lock.lock();try {System.out.println("加锁成功");} finally {lock.unlock();}}}
2. 乐观锁
采用版本号机制 CAS(Compare-and-Swap,即比较并替换)算法实现
适合读操作多的场景,不加锁的特点能够使其读操作的性能大幅提升。
乐观锁认为自己在使用数据时不会有别的线程修改数据,所以不会添加锁,只是在更新数据的时候去判断之前有没有别的线程更新了这个数据。
如果这个数据没有被更新,当前线程将自己修改的数据成功写入。如果数据已经被其他线程更新,则根据不同的实现方式执行不同的操作
乐观锁在Java中是通过使用无锁编程来实现,最常采用的是CAS算法,Java原子类中的递增操作就通过CAS自旋实现的。
// 乐观锁AtomicInteger atomicInteger = new AtomicInteger();atomicInteger.incrementAndGet();
- 通过8种情况演示锁运行案例,看看我们到底锁的是什么 ```java
import java.util.concurrent.TimeUnit;
public class Lock8Demo_2 {
/*** lock1() / lock2()* 当一个实例对象了里面有多个synchronized的实例方法时候 , 只能有一个线程去访问该方法, 意思就是在某个时间内 ,* 只能有持有锁的的对象才能方法, 其他方法要想获取锁就得等待释放锁才能获取* <p>* lock3():* hello是不带有锁, 不需要受到限制 , 直接打印* <p>* lock4():* 因为是有两个对象, 每个对象里面都会有一个实例化锁* <p>* lock5/lock6:* --> 对于普通方法而言, 锁的是当前实例对象,通常指的是this.具体的一部手机,所有的普通同步方法用的都是同一个对象, 也就是同一把锁* --> 对于静态方法而言, 锁的是当前类对象, 指向类锁Phone.class , 类锁在全局都是唯一 , 不会因为new的次数而增加* <p>* lock7/lock8* --> 类锁和对象锁是不同的 , 两者互不影响** @param args*/public static void main(String[] args) {// lock1();// lock2();// lock3();// lock4();// lock5();// lock6();// lock7();lock8();}/*** 标准访问 a,b两个线程 , 是先打电话还是先发邮件*/public static void lock1() {Phone1 phone = new Phone1();new Thread(phone::sendEmail, "a").start();new Thread(phone::sendSms, "b").start();}/*** 标准访问 a,b两个线程 , a线程先沉睡3秒 是先打电话还是先发邮件*/public static void lock2() {Phone1 phone = new Phone1();new Thread(() -> {phone.sendEmail();}, "a").start();new Thread(() -> {phone.sendSms();}, "b").start();}/*** 标准访问 a,b两个线程 , a线程先沉睡3秒 新增一个hello() method. 是先打印hello world 还是发送邮件*/public static void lock3() {Phone1 phone = new Phone1();new Thread(phone::hello, "a").start();new Thread(phone::sendEmail, "b").start();}/*** 标准访问 a,b两个线程 , 有两部手机 , 是先打印发送短信还是发送邮件*/public static void lock4() {Phone1 phone = new Phone1();Phone1 phone2 = new Phone1();new Thread(() -> {phone.sendEmail();}, "a").start();new Thread(() -> {phone2.sendSms();}, "b").start();}/*** 两个静态同步方法, 1部手机,是先打印发送短信还是打电话*/public static void lock5() {new Thread(Phone1::sendEmail_, "a").start();new Thread(Phone1::sendSms_, "b").start();}/*** 两个静态同步方法, 2部手机,是先打印发送短信还是打电话*/public static void lock6() {Phone1 phone1 = new Phone1();Phone1 phone2 = new Phone1();new Thread(() -> {phone1.sendEmail_();}, "a").start();new Thread(() -> {phone2.sendSms_();}, "b").start();}/*** 一个静态同步方法 一个普通同步方法, 1部手机,是先打印发送短信还是打电话*/public static void lock7() {Phone1 phone = new Phone1();new Thread(() -> {phone.sendEmail_();}, "a").start();new Thread(() -> {phone.sendSms();}, "b").start();}/*** 一个静态同步方法 一个普通同步方法, 2部手机,是先打印发送短信还是打电话*/public static void lock8() {Phone1 phone1 = new Phone1();Phone1 phone2 = new Phone1();new Thread(() -> {phone1.sendEmail_();}, "a").start();new Thread(() -> {phone2.sendSms();}, "b").start();}
}
class Phone1 {
public synchronized void sendSms() {System.out.println(Thread.currentThread().getName() + "打电话===");}public synchronized void sendEmail() {try {TimeUnit.SECONDS.sleep(3);} catch (InterruptedException e) {e.printStackTrace();}System.out.println(Thread.currentThread().getName() + "发邮件===");}public synchronized static void sendEmail_() {try {TimeUnit.SECONDS.sleep(3);} catch (InterruptedException e) {e.printStackTrace();}System.out.println(Thread.currentThread().getName() + "发邮件===");}public synchronized static void sendSms_() {System.out.println(Thread.currentThread().getName() + "打电话===");}public void hello() {System.out.println("hello===");}
}
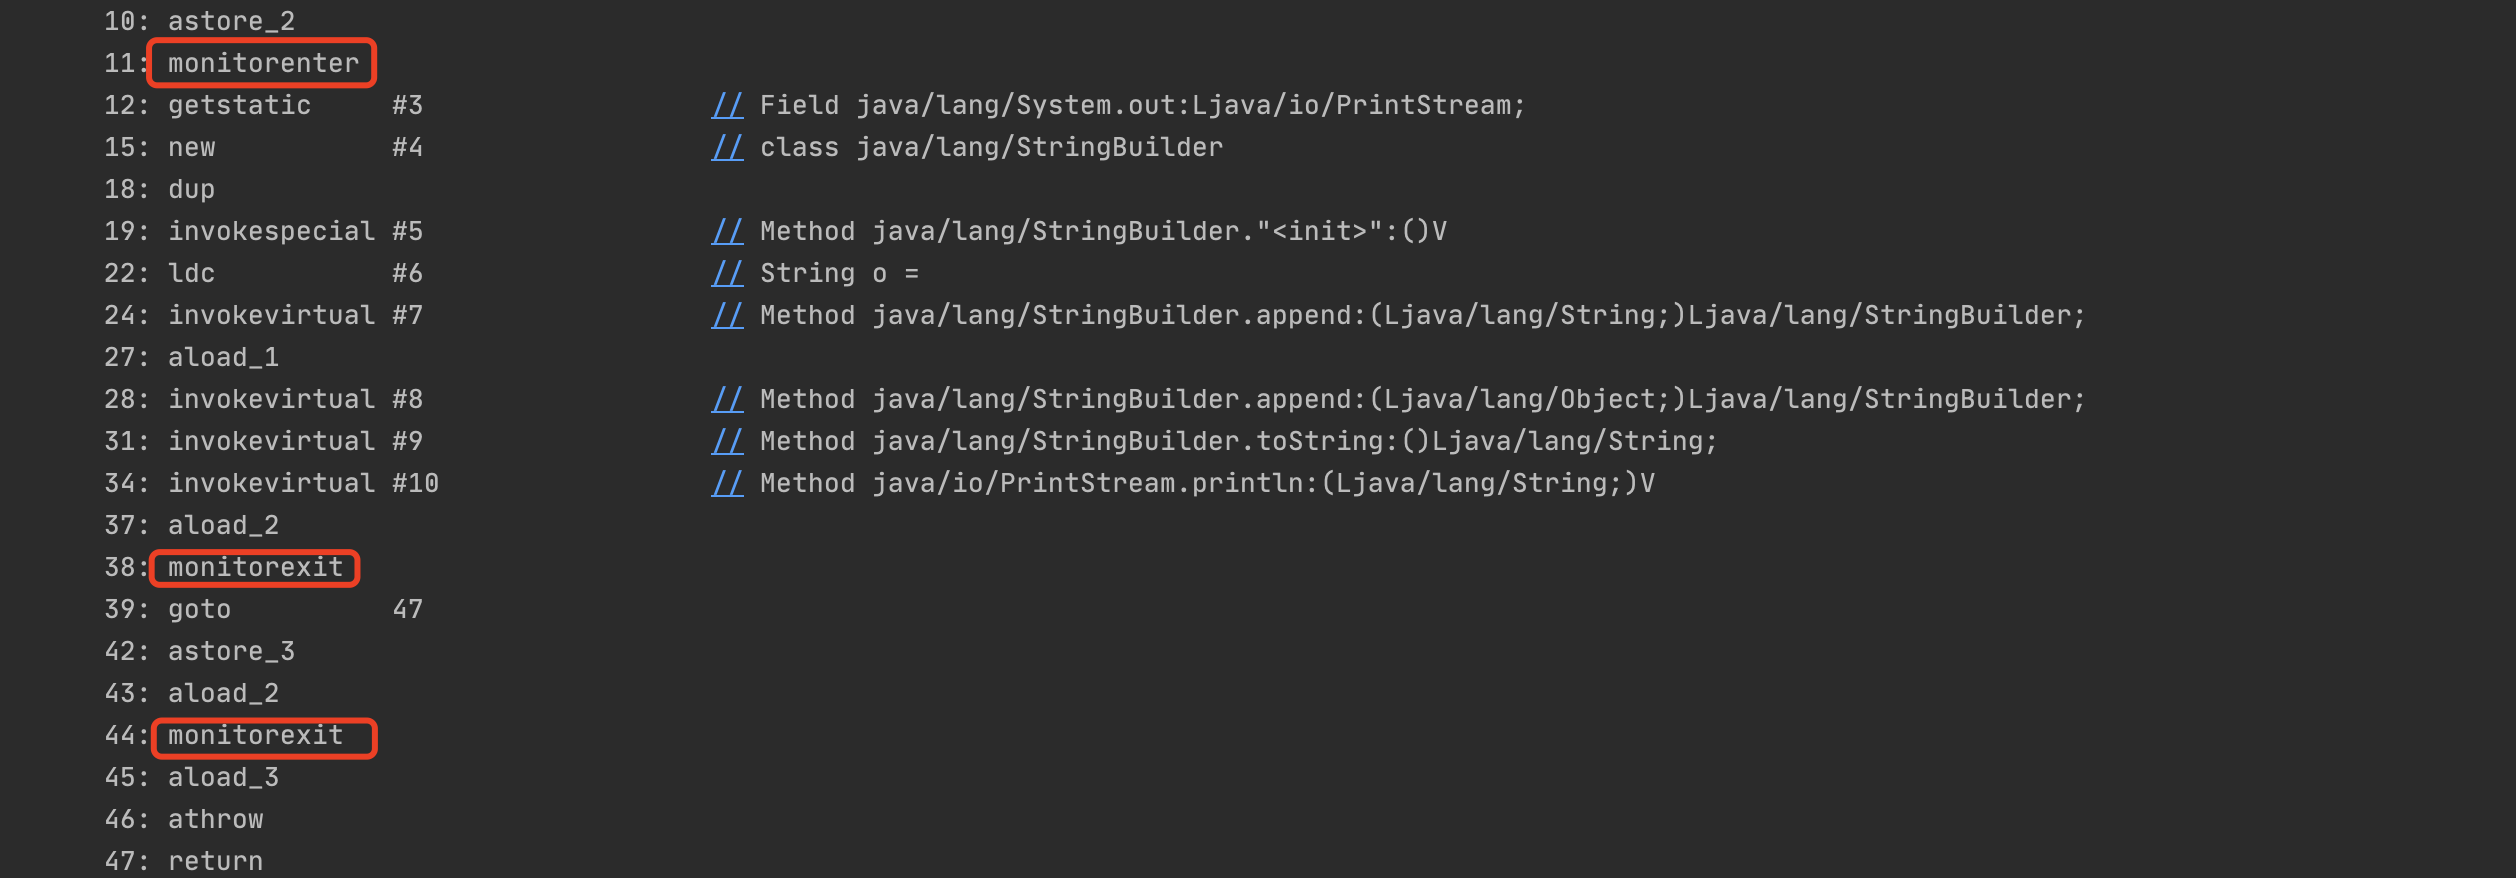
- 从字节码角度分析synchronized实现> javap -c ***.class文件反编译> 假如你需要更多信息:> javap -v ***.class文件反编译> -v -verbose 输出附加信息(包括行号、本地变量表,反汇编等详细信息)- synchronized同步代码块```java// javap -c ***.class文件反编译public class TestDemo {public static void main(String[] args) {Object o = new Object();synchronized (o) {System.out.println("o = " + o);}}}// 一定是一个enter两个exit吗?// 从下面可以看到 , 出现两次monitorexit退出 , 第一次是因为synchronized自己释放锁// 第二次确保能够正确释放在finally里面释放锁,由JVM控制
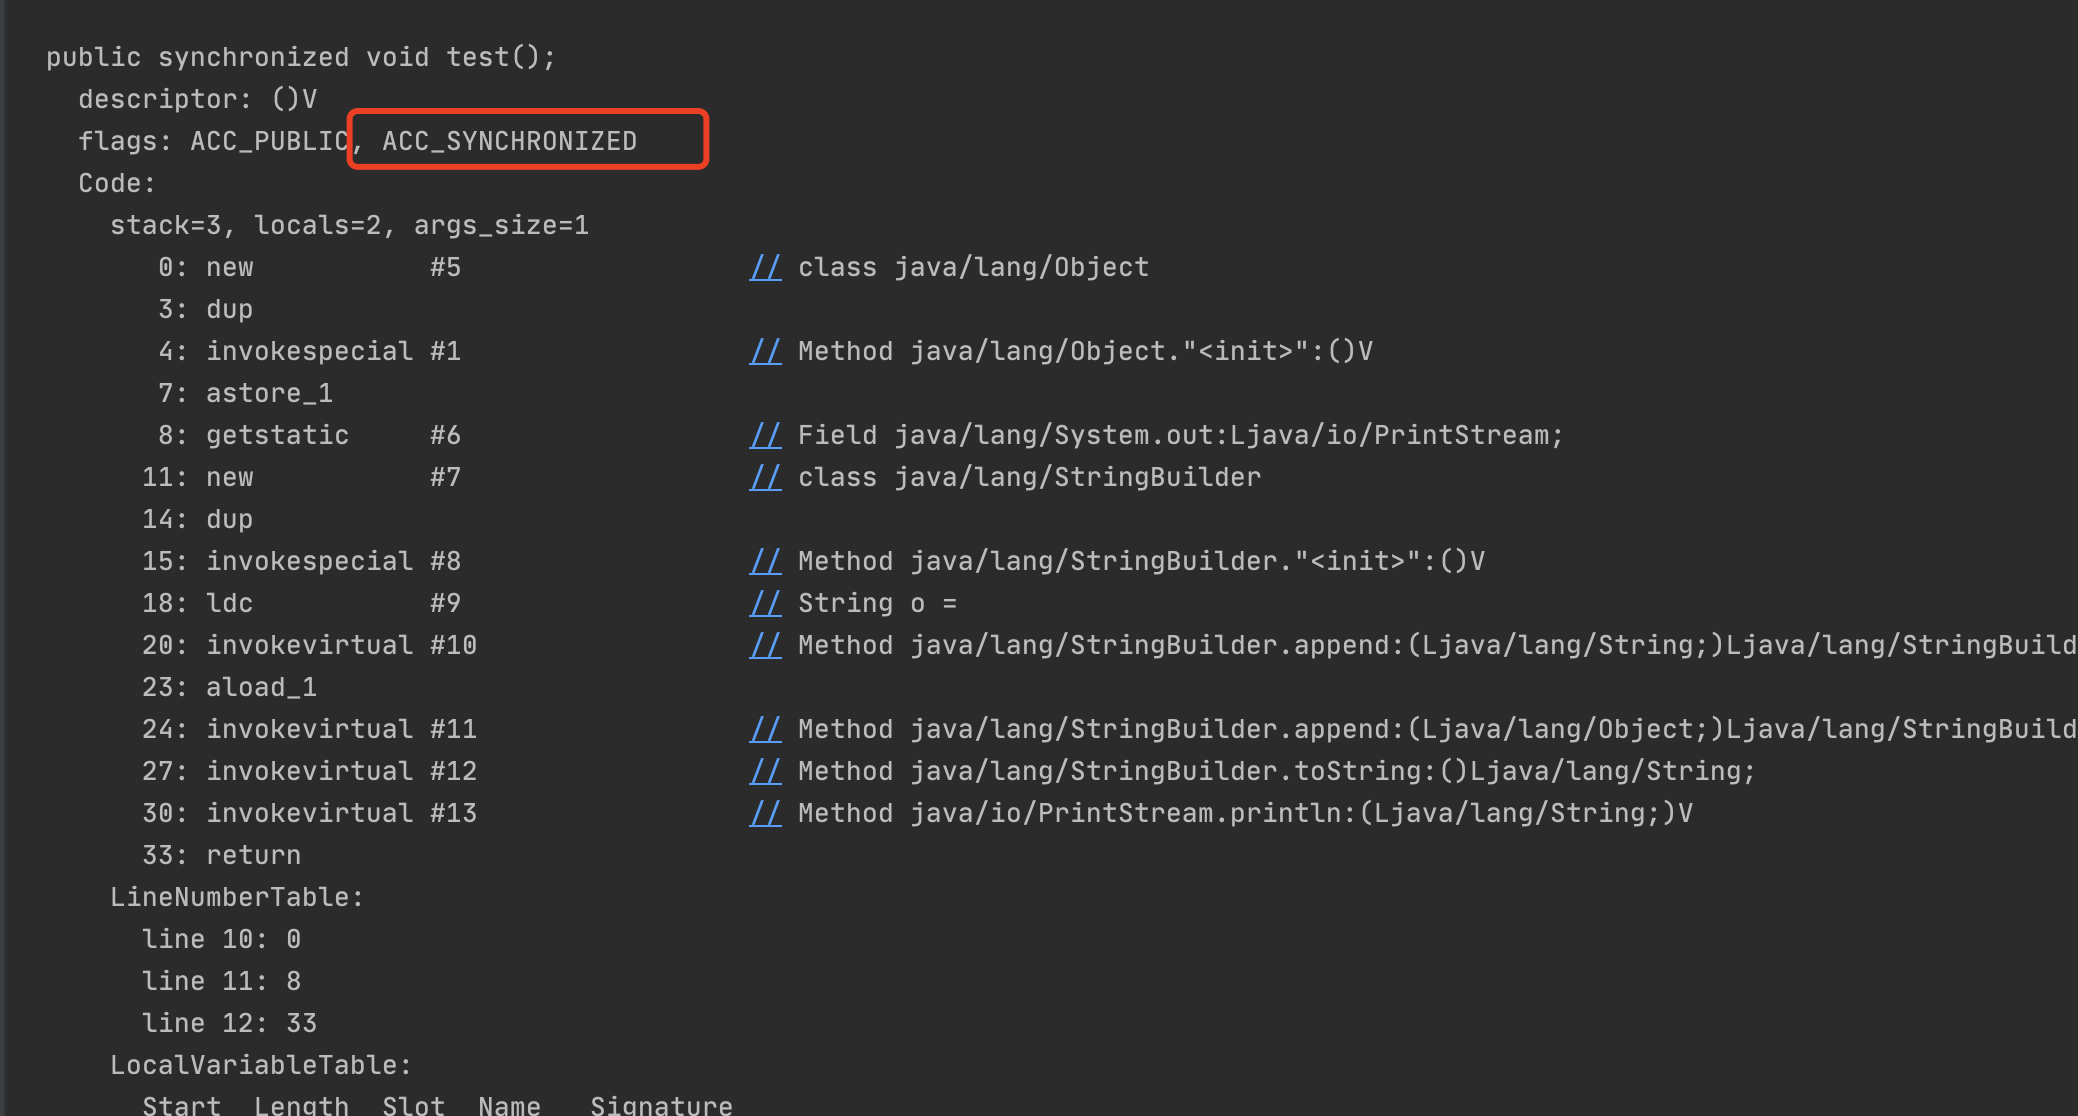
- synchronized普通同步方法 ```java
public class TestDemo {
public static void main(String[] args) {new TestDemo().test();}public synchronized void test() {Object o = new Object();System.out.println("o = " + o);}
}
// 调用指令将会检查方法的ACC_SYNCHRONIZED访问标志是否被设置。 // 如果设置了,执行线程会将先持有monitor然后再执行方法, // 最后在方法完成(无论是正常完成还是非正常完成)时释放 monitor
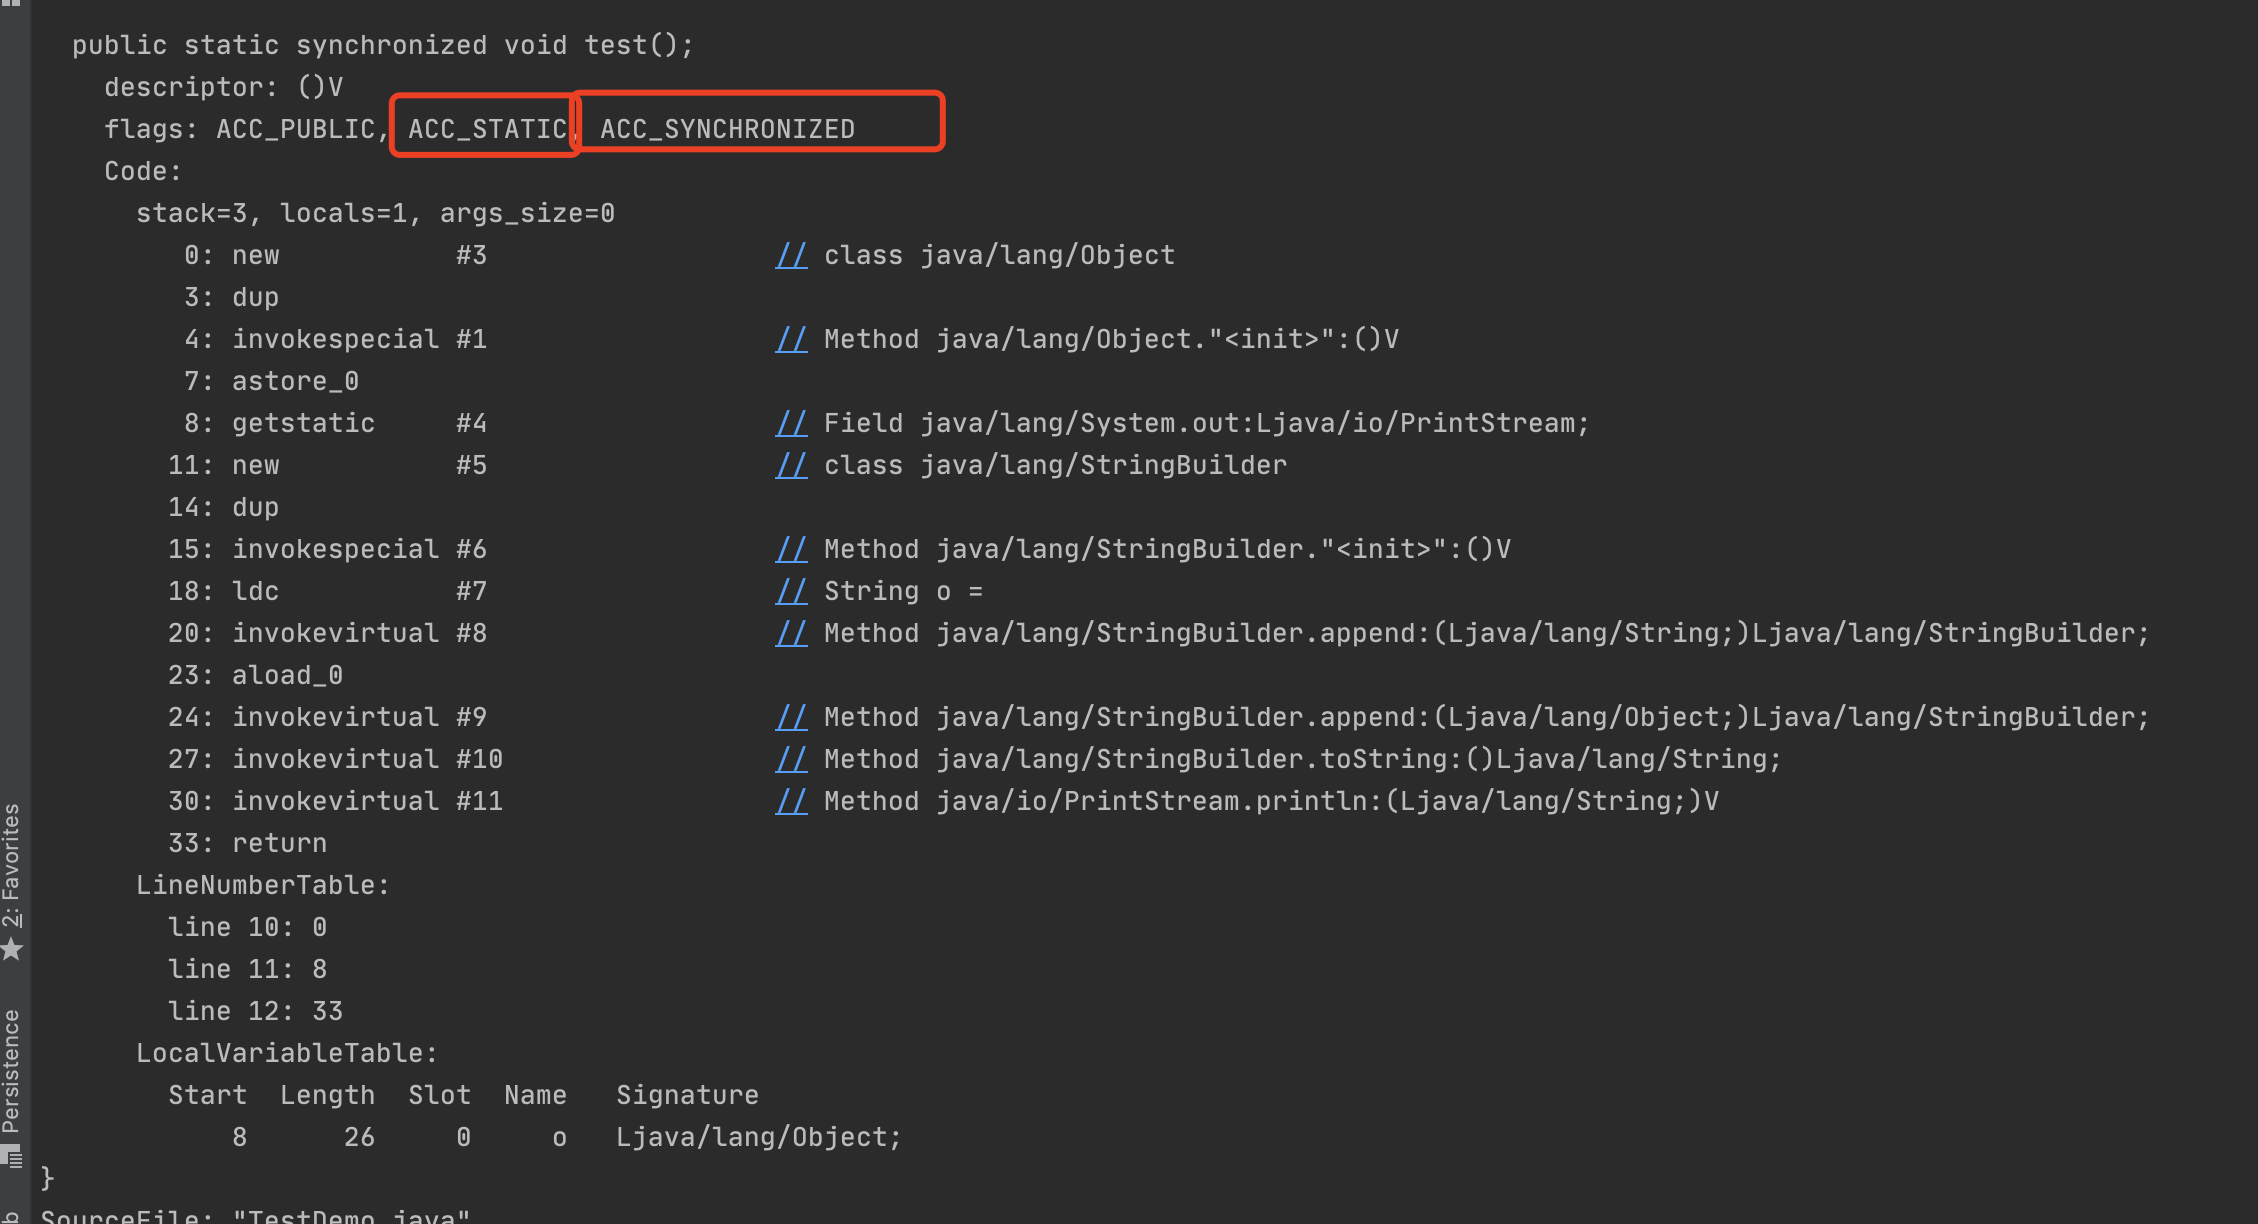
- synchronized静态同步方法```java// ACC_STATIC, ACC_SYNCHRONIZED访问标志区分该方法是否静态同步方法public class TestDemo {public static void main(String[] args) {test();}public static synchronized void test() {Object o = new Object();System.out.println("o = " + o);}}
3. 公平锁和非公平锁
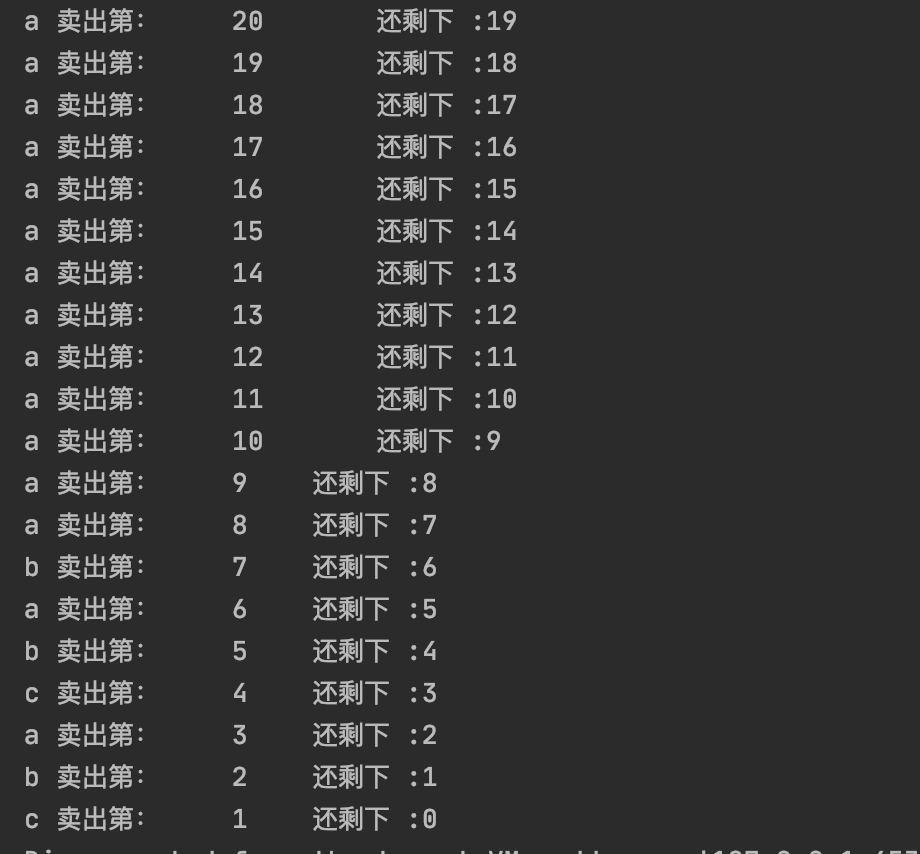
// 非公平锁import java.util.concurrent.locks.Lock;import java.util.concurrent.locks.ReentrantLock;class Ticket {private int number = 20;private static Lock lock = new ReentrantLock(false);public void scalc() {lock.lock();try {if (number > 0) {System.out.println(Thread.currentThread().getName() + " 卖出第: \t " + (number--) + " \t 还剩下 :" + number);}} finally {lock.unlock();}}}public class FairAndNoFairDemo {public static void main(String[] args) {Ticket ticket = new Ticket();new Thread(() -> {for (int i = 0; i < 55; i++) {ticket.scalc();}}, "a").start();new Thread(() -> {for (int i = 0; i < 55; i++) {ticket.scalc();}}, "b").start();new Thread(() -> {for (int i = 0; i < 55; i++) {ticket.scalc();}}, "c").start();new Thread(() -> {for (int i = 0; i < 55; i++) {ticket.scalc();}}, "d").start();new Thread(() -> {for (int i = 0; i < 55; i++) {ticket.scalc();}}, "e").start();}}

这样抢票全部都是线程a去抢票了, 线程b,c,d,e线程没有机会抢到嫖
// 公平锁class Ticket {private int number = 20;private static Lock lock = new ReentrantLock(true);public void scalc() {lock.lock();try {if (number > 0) {System.out.println(Thread.currentThread().getName() + " 卖出第: \t " + (number--) + " \t 还剩下 :" + number);}} finally {lock.unlock();}}}public class FairAndNoFairDemo {public static void main(String[] args) {Ticket ticket = new Ticket();new Thread(() -> {for (int i = 0; i < 55; i++) {ticket.scalc();}}, "a").start();new Thread(() -> {for (int i = 0; i < 55; i++) {ticket.scalc();}}, "b").start();new Thread(() -> {for (int i = 0; i < 55; i++) {ticket.scalc();}}, "c").start();new Thread(() -> {for (int i = 0; i < 55; i++) {ticket.scalc();}}, "d").start();new Thread(() -> {for (int i = 0; i < 55; i++) {ticket.scalc();}}, "e").start();}}
源码解读
// hasQueuePredecessors 判断当前队列是否有线程在排队, 如果有就执行当前线程// 公平锁底层实现protected final boolean tryAcquire(int acquires) {final Thread current = Thread.currentThread();int c = getState();if (c == 0) {if (!hasQueuedPredecessors() &&compareAndSetState(0, acquires)) {setExclusiveOwnerThread(current);return true;}}else if (current == getExclusiveOwnerThread()) {int nextc = c + acquires;if (nextc < 0)throw new Error("Maximum lock count exceeded");setState(nextc);return true;}return false;}// 非公平锁底层实现final boolean nonfairTryAcquire(int acquires) {final Thread current = Thread.currentThread();int c = getState();if (c == 0) {if (compareAndSetState(0, acquires)) {setExclusiveOwnerThread(current);return true;}}else if (current == getExclusiveOwnerThread()) {int nextc = c + acquires;if (nextc < 0) // overflowthrow new Error("Maximum lock count exceeded");setState(nextc);return true;}return false;}
为什么会有公平锁/非公平锁的设计为什么默认非公平? 1 恢复挂起的线程到真正锁的获取还是有时间差的,从开发人员来看这个时间微乎其微,但是从CPU的角度来看,这个时间差存在的还是很明显的。所以非公平锁能更充分的利用CPU 的时间片,尽量减少 CPU 空闲状态时间。 2 使用多线程很重要的考量点是线程切换的开销,当采用非公平锁时, 当1个线程请求锁获取同步状态,然后释放同步状态,因为不需要考虑是否还有前驱节点,所以刚释放锁的线程在此刻再次获取同步状态的概率就变得非常大,所以就减少了线程的开销 。 使⽤公平锁会有什么问题? 公平保证了线程之间排队的顺序性, 并且按照排队顺序去执行,而非公平锁则不需要理会管理排队的顺序性. 非公平锁会出现锁的饥饿性 什么时候用公平?什么时候用非公平? 非公平: 如果增加系统的吞吐量,建议使用非公平锁,这样就会减少很多线程之间的上下文切换 公平: 业务需求考虑,比如按照顺序去执行的流程
4. 可重入锁
隐式锁(即synchronized关键字使用的锁)默认是可重入锁
public class RestartLock {public static void main(String[] args) throws Exception {// reset_synchronized();reset_synchronized_method();}/*** sync 可重入锁 , 方法*/private static void reset_synchronized_method() {RestartLock restartLock = new RestartLock();restartLock.reset_1();}public synchronized void reset_1() {System.out.println("第一次进入");reset_2();}public synchronized void reset_2() {System.out.println("第二次进入");reset_3();}public synchronized void reset_3() {System.out.println("第三次进入");}/*** 可重入锁, 代码块*/public static void reset_synchronized() {Object finalObject = new Object();new Thread(() -> {synchronized (finalObject) {System.out.println("进入一次锁方法");synchronized (finalObject) {System.out.println("进入二次锁方法");synchronized (finalObject) {System.out.println("进入三次锁方法");}}}}).start();}}
每个锁对象拥有一个锁计数器和一个指向持有该锁的线程的指针。
当执行monitorenter时,如果目标锁对象的计数器为零,那么说明它没有被其他线程所持有,Java虚拟机会将该锁对象的持有线程设置为当前线程,并且将其计数器加1。
在目标锁对象的计数器不为零的情况下,如果锁对象的持有线程是当前线程,那么 Java 虚拟机可以将其计数器加1,否则需要等待,直至持有线程释放该锁。
当执行monitorexit时,Java虚拟机则需将锁对象的计数器减1。计数器为零代表锁已被释放。
显式锁(即Lock)也有ReentrantLock这样的可重入锁。
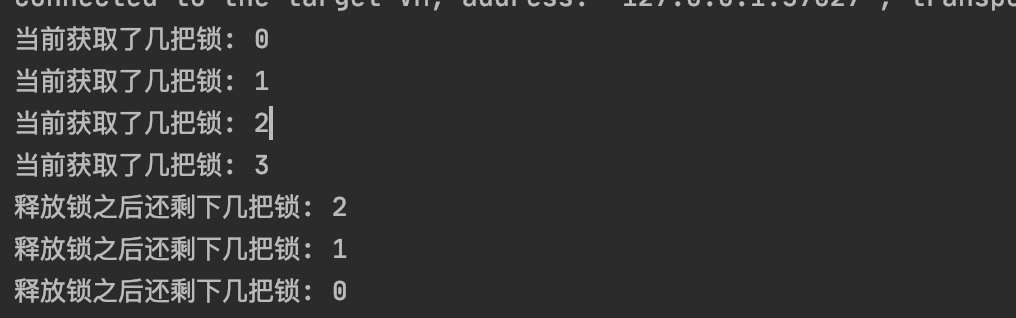
import java.util.concurrent.locks.ReentrantLock;public class ResetLock_Lock {public final static ReentrantLock lock = new ReentrantLock(false);public static void main(String[] args) {try {System.out.println("当前获取了几把锁: " + lock.getHoldCount());lock.lock();System.out.println("当前获取了几把锁: " + lock.getHoldCount());lock.lock();System.out.println("当前获取了几把锁: " + lock.getHoldCount());lock.lock();System.out.println("当前获取了几把锁: " + lock.getHoldCount());} finally {lock.unlock();System.out.println("释放锁之后还剩下几把锁: " + lock.getHoldCount());lock.unlock();System.out.println("释放锁之后还剩下几把锁: " + lock.getHoldCount());lock.unlock();System.out.println("释放锁之后还剩下几把锁: " + lock.getHoldCount());}}}
5. 死锁
- 死锁是什么
死锁是指两个或两个以上的线程在执行过程中,因争夺资源而造成的一种互相等待的现象,若无外力干涉那它们都将无法推进下去,如果系统资源充足,进程的资源请求都能够得到满足,死锁出现的可能性就很低,否则就会因争夺有限的资源而陷入死锁。
- 产生死锁主要原因
- 系统资源不足
- 进程运行推进的顺序不合适
- 资源分配不当
- 案例 ```java
import java.util.concurrent.TimeUnit; // 死锁案例 public class DeadLockDemo_Dead {
public static void main(String[] args) {final Object finalA = new Object();final Object finalB = new Object();new Thread(() -> {synchronized (finalA) {try {TimeUnit.SECONDS.sleep(2);} catch (InterruptedException e) {e.printStackTrace();}System.out.println(Thread.currentThread().getName() + "====已经获取到A锁啦, 但是还想要获取B锁 ==========");synchronized (finalB) {System.out.println(Thread.currentThread().getName() + "====成功获取到B锁了");}}}, "FIRST_ONE").start();new Thread(() -> {synchronized (finalB) {try {TimeUnit.SECONDS.sleep(2);} catch (InterruptedException e) {e.printStackTrace();}System.out.println(Thread.currentThread().getName() + "====已经获取到B锁啦, 但是还是想要获取到A锁 ==========");synchronized (finalA) {System.out.println(Thread.currentThread().getName() + "====成功获取到A锁了");}}}, "SECOND_TWO").start();}
}
4. 如何排查死锁1. jps -l && jstack 进程编号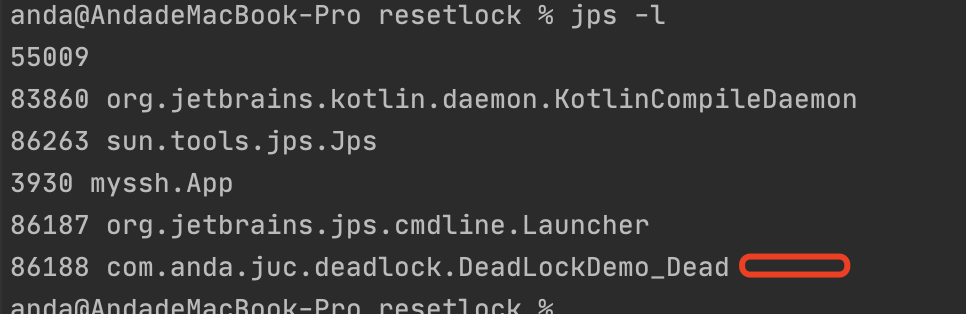<br />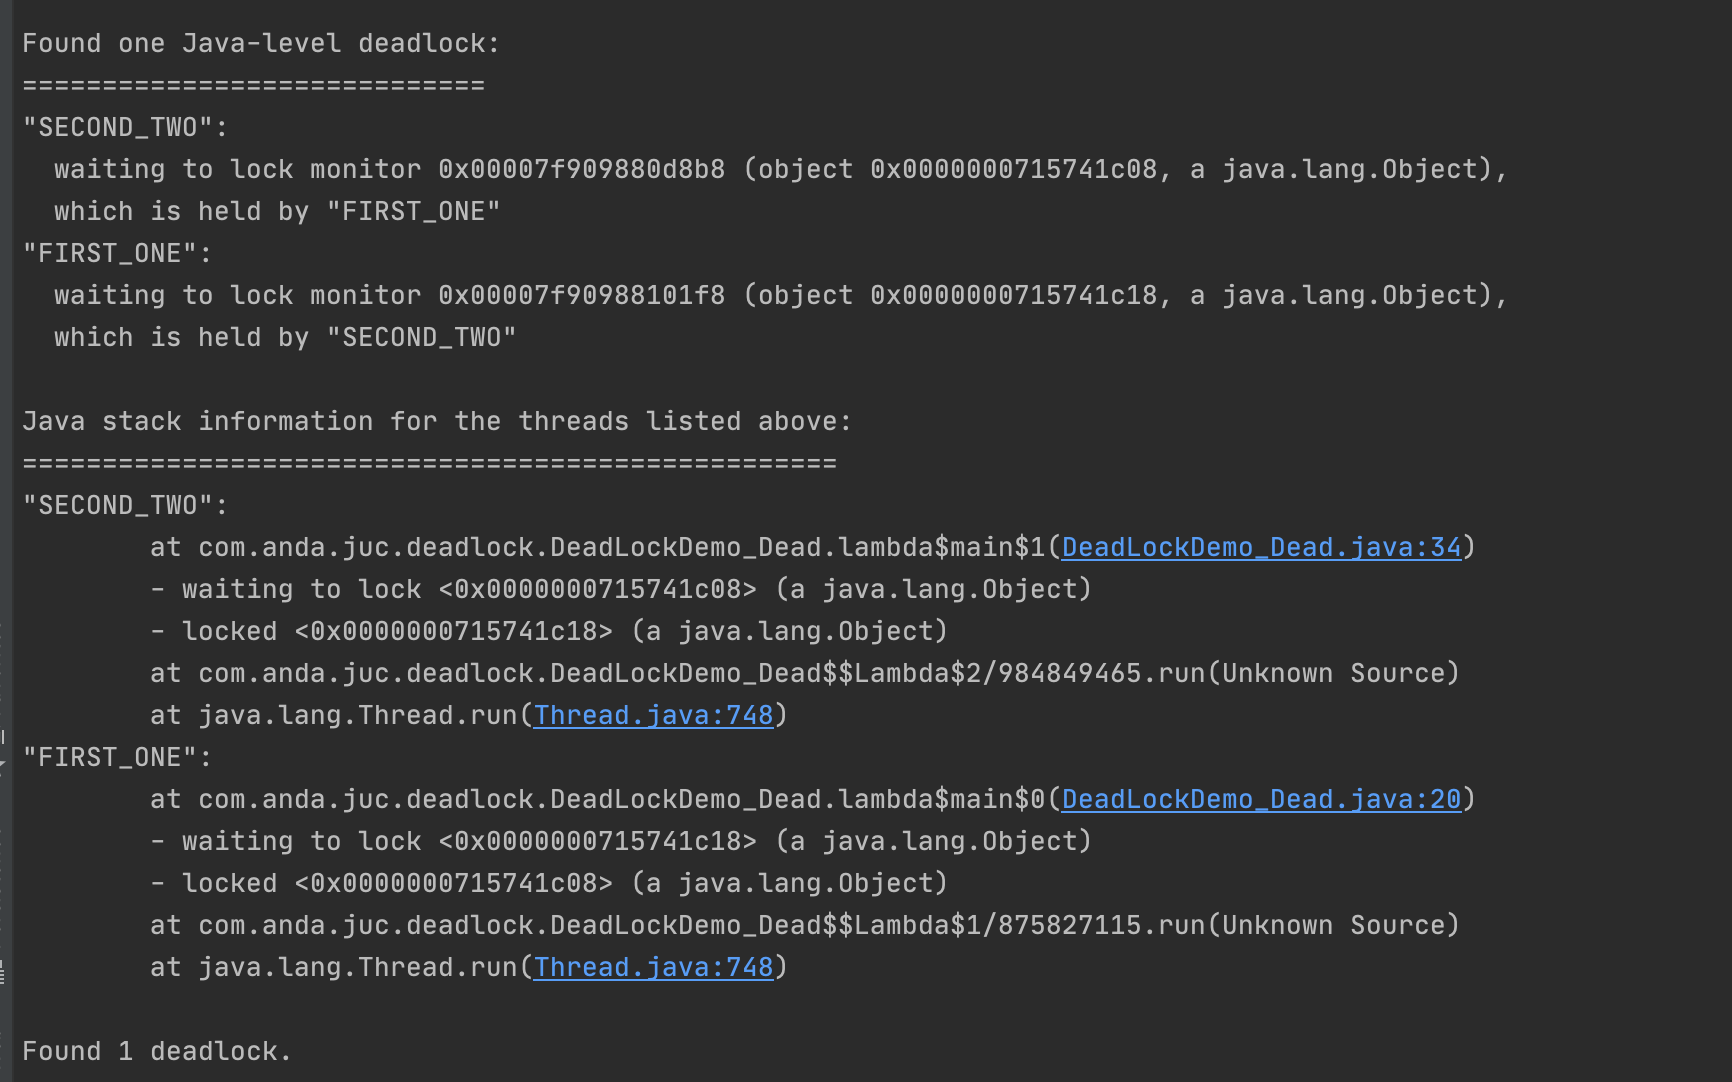2. jconsole<a name="xpi4f"></a># 3. **LockSupport与线程中断**<a name="Tac5W"></a>## 1.线程中断1. 什么是中断?**首先** <br />一个线程不应该由其他线程来强制中断或停止,而是应该由线程自己自行停止。 <br />所以,Thread.stop, Thread.suspend, Thread.resume 都已经被废弃了。 <br /> <br />**其次 **<br />在Java中没有办法立即停止一条线程,然而停止线程却显得尤为重要,如取消一个耗时操作。 <br />因此,Java提供了一种用于停止线程的机制——中断。 <br /> <br />中断只是一种协作机制,Java没有给中断增加任何语法,中断的过程完全需要程序员自己实现。 <br />若要中断一个线程,你需要手动调用该线程的interrupt方法,该方法也仅仅是将线程对象的中断标识设成true ; <br />接着你需要自己写代码不断地检测当前线程的标识位,如果为true,表示别的线程要求这条线程中断, <br />此时究竟该做什么需要你自己写代码实现。 <br /> <br />每个线程对象中都有一个标识,用于表示线程是否被中断;该标识位为true表示中断,为false表示未中断; <br />通过调用线程对象的interrupt方法将该线程的标识位设为true;可以在别的线程中调用,也可以在自己的线程中调用。2. 中断的相关API方法| public void interrupt() | 实例方法,<br />实例方法interrupt()仅仅是设置线程的中断状态为true,不会停止线程 || --- | --- || **public static boolean interrupted() ** | 静态方法,Thread.interrupted(); <br />**判断线程是否被中断,并清除当前中断状态 **<br />**这个方法做了两件事: **<br />**1 返回当前线程的中断状态 **<br />**2 将当前线程的中断状态设为false **<br />** **<br />**这个方法有点不好理解,因为连续调用两次的结果可能不一样。** || public boolean isInterrupted() | 实例方法,<br />判断当前线程是否被中断(通过检查中断标志位) |3. 如何使用中断标识停止线程?1. volatile变量实现```javaimport java.util.concurrent.TimeUnit;public class VolatileDemo {private static volatile boolean isStop = false;public static void main(String[] args) throws InterruptedException {new Thread(() -> {while (true) {if (isStop) {System.out.println(Thread.currentThread().getName() + "当isStop为true的时候已经退出了");break;}System.out.println("-------hello interrupt");}}).start();TimeUnit.SECONDS.sleep(3);new Thread(() -> {isStop = true;}).start();}}
AtomicBoolean实现 ```java public class AtomicBooleanDemo {
private static AtomicBoolean atomicBoolean = new AtomicBoolean(false);
public static void main(String[] args) throws InterruptedException { new Thread(() -> {
while (true) {if (atomicBoolean.get()) {System.out.println(Thread.currentThread().getName() + "=====当前的atomicBoolean值已经为true了,准备退出");break;}System.out.println("AtomicBoolean=======");}
}).start();
TimeUnit.SECONDS.sleep(3); new Thread(() -> {
atomicBoolean.set(true);
}).start(); } }
3. Thread类自带的中断api方法实现```javaimport java.util.concurrent.TimeUnit;public class InterrupDemo_Ed {public static void main(String[] args) throws InterruptedException {Thread a = new Thread(() -> {while (true) {if (Thread.currentThread().isInterrupted()) {System.out.println(Thread.currentThread().getName() + "当前线程是已经终止了=============");break;}System.out.println("running==============");}}, "A");a.start();TimeUnit.SECONDS.sleep(3);new Thread(a::interrupt, "B").start();}}
1. 实例方法interrupt(),没有返回值
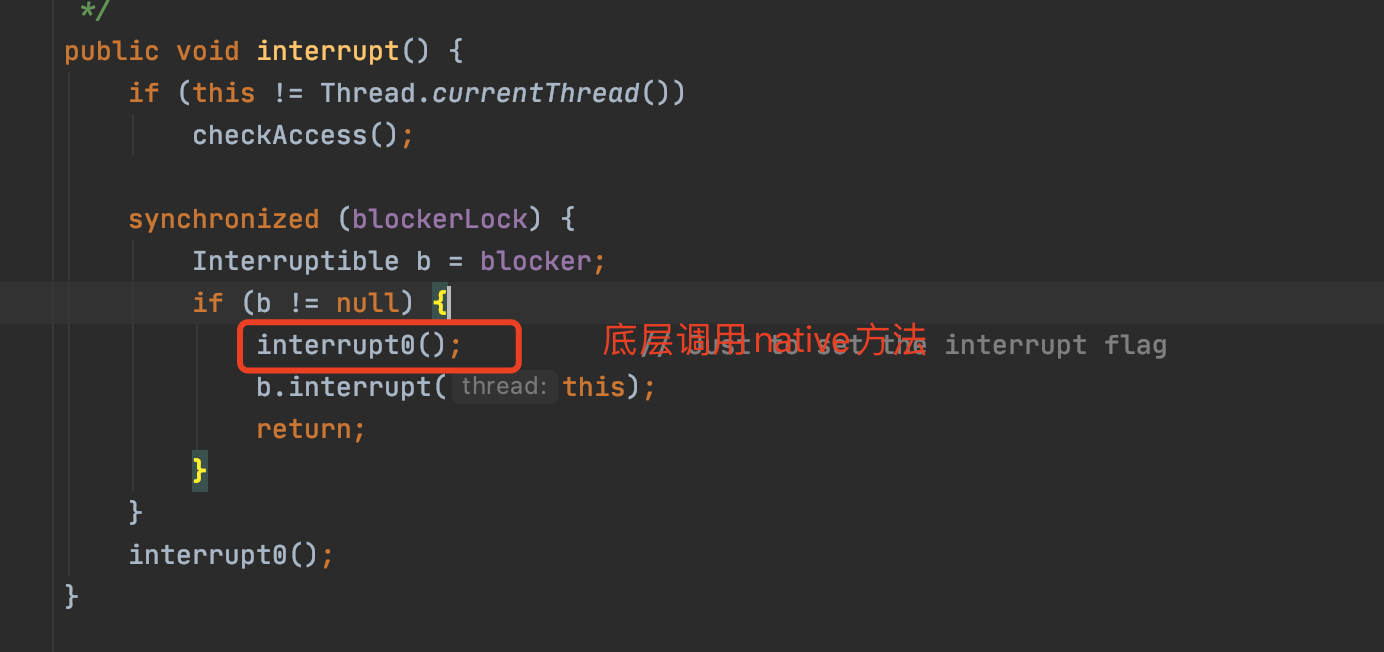
2. 实例方法isInterrupted,返回布尔值

- 当前线程的中断标识为true,是不是就立刻停止?
- 具体来说,当对一个线程,调用 interrupt() 时:
- 如果线程处于正常活动状态,那么会将该线程的中断标志设置为 true,仅此而已。
- 具体来说,当对一个线程,调用 interrupt() 时:
被设置中断标志的线程将继续正常运行,不受影响。所以, interrupt() 并不能真正的中断线程,需要被调用的线程自己进行配合才行。
2. 如果线程处于被阻塞状态(例如处于sleep, wait, join 等状态),在别的线程中调用当前线程对象的interrupt方法, 那么线程将立即退出被阻塞状态,并抛出一个InterruptedException异常。
- 案例1 ```java import java.util.concurrent.TimeUnit;
public class InterruptDemo_ {
public static void main(String[] args) throws InterruptedException {Thread t1 = new Thread(() -> {for (int i = 0; i <= 300; i++) {System.out.println(Thread.currentThread().getName() + "执行到的数字是: " + i);}// 还处于活动状态System.out.println("中断状态后的第二次查询======" + Thread.currentThread().isInterrupted());});t1.start();System.out.println("暂停前查询一次状态=========" + t1.isInterrupted()); // false// interrupt 仅仅只是把中断状态设置为true,并不会中断线程t1.interrupt();//活动状态现在还在执行System.out.println("中断状态后的第一次查询======" + t1.isInterrupted());TimeUnit.SECONDS.sleep(3);// 非活动状态,表示t1线程不在执行中,已经结束执行System.out.println("中断状态后的第三次查询======" + t1.isInterrupted());}
}
3. 案例2```javaimport java.util.concurrent.TimeUnit;public class Interrupt_LockDemo {public static void main(String[] args) throws InterruptedException {Thread t1 = new Thread(() -> {while (true) {if (Thread.currentThread().isInterrupted()) {System.out.println(Thread.currentThread().getName() + "=========已经被中断了");break;}try {Thread.sleep(200);} catch (InterruptedException e) {Thread.currentThread().interrupt();/*** sleep方法抛出InterruptedException,中断标识也会被清空,* 没有通过 在catch里面使用 Thread.currentThread().interrupt() 将状态复位*/e.printStackTrace();}System.out.println("Hello=========");}}, "t1");t1.start();TimeUnit.SECONDS.sleep(1);t1.interrupt(); // 将中断状态设置为 true}}/*** Causes the currently executing thread to sleep (temporarily cease* execution) for the specified number of milliseconds, subject to* the precision and accuracy of system timers and schedulers. The thread* does not lose ownership of any monitors.** @param millis* the length of time to sleep in milliseconds** @throws IllegalArgumentException* if the value of {@code millis} is negative** @throws InterruptedException* if any thread has interrupted the current thread. The* <i>interrupted status</i> of the current thread is* cleared when this exception is thrown.*/// Thread.sleep的时候 , 会抛出InterruptedException异常, 会将中断线程里面的中断线程标记清理掉,将true-->false,// 这个时候我们需要在catch里面将中断标记进行复位public static native void sleep(long millis) throws InterruptedException;
- 静态方法Thread.interrupted()
- 静态方法Thread.interrupted() ```java public class Interrupted_Demo_Lock { public static void main(String[] args) { System.out.println(Thread.currentThread().getName() + “—-“ + Thread.interrupted()); System.out.println(Thread.currentThread().getName() + “—-“ + Thread.interrupted()); System.out.println(“111111”); Thread.currentThread().interrupt(); System.out.println(“222222”); System.out.println(Thread.currentThread().getName() + “—-“ + Thread.interrupted()); System.out.println(Thread.currentThread().getName() + “—-“ + Thread.interrupted()); } }
2. 都会返回中断状态,两者对比```javapublic static boolean interrupted() {return currentThread().isInterrupted(true);} // 静态方法 , 设置为true 就是为了将中断之后自动复位public boolean isInterrupted() {return isInterrupted(false); // 实例方法 , false, 不会复位,也就是清除标志位}
- 结论 ```java 方法的注释也清晰的表达了“中断状态将会根据传入的ClearInterrupted参数值确定是否重置”。
所以, 静态方法interrupted将 会清除中断状态(传入的参数ClearInterrupted为true),
实例方法isInterrupted则不会(传入的参数ClearInterrupted为false)。
5. 总结**interrupt()方法是一个实例方法 **<br />它通知目标线程中断,也就是设置目标线程的中断标志位为true,中断标志位表示当前线程已经被中断了。**isInterrupted()方法也是一个实例方法 **<br />它判断当前线程是否被中断(通过检查中断标志位)并获取中断标志**Thread类的静态方法interrupted() **<br />返回当前线程的中断状态(boolean类型)且将当前线程的中断状态设为false,此方法调用之后会清除当前线程的中断标志位的状态(将中断标志置为false了),返回当前值并清零置false<a name="Kg97g"></a>## 2.LockSupport是什么1. LockSupport是用来创建锁和其他同步类的基本线程阻塞原语, LockSupport中的park() 和 unpark() 的作用分别是阻塞线程和解除阻塞线程1. 线程等待和唤醒的方法1. 方式1:使用Object中的wait()方法让线程等待,使用Object中的notify()方法唤醒线程1. 案例1```javaimport java.util.concurrent.TimeUnit;public class Object_wait_notify {public static void main(String[] args) throws InterruptedException {Object objectLock = new Object();new Thread(() -> {synchronized (objectLock) {try {System.out.println(Thread.currentThread().getName() + "========" + "come in====");objectLock.wait();} catch (InterruptedException e) {e.printStackTrace();}}System.out.println(Thread.currentThread().getName() + "线程被唤醒了\t");}, "t1").start();TimeUnit.SECONDS.sleep(3);new Thread(() -> {synchronized (objectLock) {objectLock.notify();System.out.println("发出通知了");}}, "t2").start();}}
2. (异常)案例2
import java.util.concurrent.TimeUnit;public class Object_wait_notify {public static void main(String[] args) throws InterruptedException {Object objectLock = new Object();new Thread(() -> {try {TimeUnit.SECONDS.sleep(3);} catch (InterruptedException e) {e.printStackTrace();}/*** 此时就会一直形成阻塞状态, 因为objectLock已经发出过了通知, 这个时候t1还在睡眠, 等待t1睡眠完成, 通知已经发过了* 就会一直阻塞*/synchronized (objectLock) {try {System.out.println(Thread.currentThread().getName() + "========" + "come in====");objectLock.wait();} catch (InterruptedException e) {e.printStackTrace();}}System.out.println(Thread.currentThread().getName() + "线程被唤醒了\t");}, "t1").start();new Thread(() -> {synchronized (objectLock) {objectLock.notify();System.out.println("发出通知了");}}, "t2").start();}}
3. (异常)案例3
public class Object_wait_notify {public static void main(String[] args) throws InterruptedException {Object objectLock = new Object();new Thread(() -> {synchronized (objectLock) {objectLock.notify();System.out.println("发出通知了");}}, "t2").start();new Thread(() -> {/*** 此时就会一直形成阻塞状态, 因为objectLock notify在上面就已经发过通知了**/synchronized (objectLock) {try {System.out.println(Thread.currentThread().getName() + "========" + "come in====");objectLock.wait();} catch (InterruptedException e) {e.printStackTrace();}}System.out.println(Thread.currentThread().getName() + "线程被唤醒了\t");}, "t1").start();}}
4. 总结:1. wait和notify方法必须要在同步块或者方法里面,且成对出现使用1. 先wait后notify才OK
- 方式2:使用JUC包中Condition的await()方法让线程等待,使用signal()方法唤醒线程
- 案例1 ```java
import java.util.concurrent.locks.Condition; import java.util.concurrent.locks.ReentrantLock;
public class Lock_await_signal {
static ReentrantLock reentrantLock = new ReentrantLock();static Condition condition = reentrantLock.newCondition();public static void main(String[] args) {new Thread(() -> {reentrantLock.lock();try {condition.await();System.out.println(Thread.currentThread().getName() + "已经被唤醒了===========");} catch (InterruptedException e) {e.printStackTrace();} finally {reentrantLock.unlock();}}, "lock_1").start();new Thread(() -> {reentrantLock.lock();try {condition.signal();System.out.println(Thread.currentThread().getName() + "发出通知了==========");} finally {reentrantLock.unlock();}}, "lock_2").start();}
}
2. 案例2(异常)```javaimport java.util.concurrent.TimeUnit;import java.util.concurrent.locks.Condition;import java.util.concurrent.locks.ReentrantLock;public class Lock_await_signal {static ReentrantLock reentrantLock = new ReentrantLock();static Condition condition = reentrantLock.newCondition();public static void main(String[] args) {new Thread(() -> {try {TimeUnit.SECONDS.sleep(3);} catch (InterruptedException e) {e.printStackTrace();}/*** lock_1线程先沉睡3秒 , 让lock_2线程发出通知, 结果就会造成阻塞*/reentrantLock.lock();try {System.out.println("come in================");condition.await();System.out.println(Thread.currentThread().getName() + "已经被唤醒了===========");} catch (InterruptedException e) {e.printStackTrace();} finally {reentrantLock.unlock();}}, "lock_1").start();new Thread(() -> {reentrantLock.lock();try {condition.signal();System.out.println(Thread.currentThread().getName() + "发出通知了==========");} finally {reentrantLock.unlock();}}, "lock_2").start();}}
3. 案例3(异常)
import java.util.concurrent.locks.Condition;import java.util.concurrent.locks.ReentrantLock;public class Lock_await_signal {static ReentrantLock reentrantLock = new ReentrantLock();static Condition condition = reentrantLock.newCondition();public static void main(String[] args) {new Thread(() -> {reentrantLock.lock();try {condition.signal();System.out.println(Thread.currentThread().getName() + "发出通知了==========");} finally {reentrantLock.unlock();}}, "lock_2").start();new Thread(() -> {/*** 线才能lock_2先发出通知, 之后lock_1进入等待, 结果就会造成阻塞*/reentrantLock.lock();try {System.out.println("come in================");condition.await();System.out.println(Thread.currentThread().getName() + "已经被唤醒了===========");} catch (InterruptedException e) {e.printStackTrace();} finally {reentrantLock.unlock();}}, "lock_1").start();}}
4. 总结:1. Condtion中的线程等待和唤醒方法之前,需要先获取锁1. 一定要先await后signal,不要反了
- 方式3:LockSupport类可以阻塞当前线程以及唤醒指定被阻塞的线程
- Object和Condition使用的限制条件
- 线程先要获得并持有锁,必须在锁块(synchronized或lock)中
- 必须要先等待后唤醒,线程才能够被唤醒
- LockSupport类中的park等待和unpark唤醒
- 是什么
- 通过park()和unpark(thread)方法来实现阻塞和唤醒线程的操作
- LockSupport类使用了一种名为Permit(许可)的概念来做到阻塞和唤醒线程的功能,每个线程都有一个许可(permit), permit只有两个值1和零,默认是零。 可以把许可看成是一种(0,1)信号量(Semaphore),但与 Semaphore 不同的是,许可的累加上限是1。
- 主要方法
- park() /park(Object blocker)
- 唤醒处于阻塞状态的指定线程
- 案例 ```java import java.util.concurrent.TimeUnit; import java.util.concurrent.locks.LockSupport;
public class LockSupper_park_no_park {
public static void main(String[] args) {Thread t1 = new Thread(() -> {try {TimeUnit.SECONDS.sleep(4);} catch (InterruptedException e) {e.printStackTrace();}System.out.println("lock park in");LockSupport.park();System.out.println("lock park out");});t1.start();new Thread(() -> {System.out.println("unpark park in");LockSupport.unpark(t1);System.out.println("unpark park out");}).start();}
}
<a name="jlUv8"></a># 4. CAS<a name="Yq1bJ"></a>## 1. 没有CAS之前- 1. 多线程环境不使用原子类保证线程安全(基本数据类型):- 案例```javaimport java.util.concurrent.BrokenBarrierException;import java.util.concurrent.CountDownLatch;import java.util.concurrent.CyclicBarrier;class Volatile_Demo {volatile int number = 0;public int getNumber() {return number;}public synchronized void setNumber() {number++;}}public class Volatile_Synchronized_Demo {public static void main(String[] args) throws InterruptedException, BrokenBarrierException {CyclicBarrier cyclicBarrier = new CyclicBarrier(50);CountDownLatch countDownLatch = new CountDownLatch(50);Volatile_Demo volatile_demo = new Volatile_Demo();for (int i = 1; i <= 50; i++) { // 50 * 10cyclicBarrier.await();new Thread(() -> {try {for (int j = 0; j < 10; j++) {volatile_demo.setNumber();}} finally {countDownLatch.countDown();}}).start();}countDownLatch.await();int number = volatile_demo.getNumber();System.out.println("number = " + number);}}
- 多线程环境 使用原子类保证线程安全(基本数据类型)
- 案例 ```java import java.util.concurrent.CountDownLatch; import java.util.concurrent.atomic.AtomicInteger;
- 多线程环境 使用原子类保证线程安全(基本数据类型)
public class AtomicIntegerDemo {
final static AtomicInteger A = new AtomicInteger();public static void main(String[] args) throws InterruptedException {CountDownLatch countDownLatch = new CountDownLatch(50);for (int i = 0; i < 50; i++) {new Thread(() -> {try {for (int j = 0; j < 50; j++) {A.incrementAndGet();}} finally {countDownLatch.countDown();}}).start();}countDownLatch.await();System.out.println(A.get());}
}
<a name="q5gHy"></a>## 2. CAS是什么- 1. 说明compare and swap的缩写,中文翻译成比较并交换,实现并发算法时常用到的一种技术。它包含三个操作数——内存位置、预期原值及更新值。 <br />执行CAS操作的时候,将内存位置的值与预期原值比较: <br />如果相匹配,那么处理器会自动将该位置值更新为新值, <br />如果不匹配,处理器不做任何操作,多个线程同时执行CAS操作只有一个会成功。- 2. 原理CAS有三个操作数, 内存值V, 预期值A,更新值B,仅仅只有内存值V和旧值预期值A相等, 才会将更新值B,否则什么都不处理<br />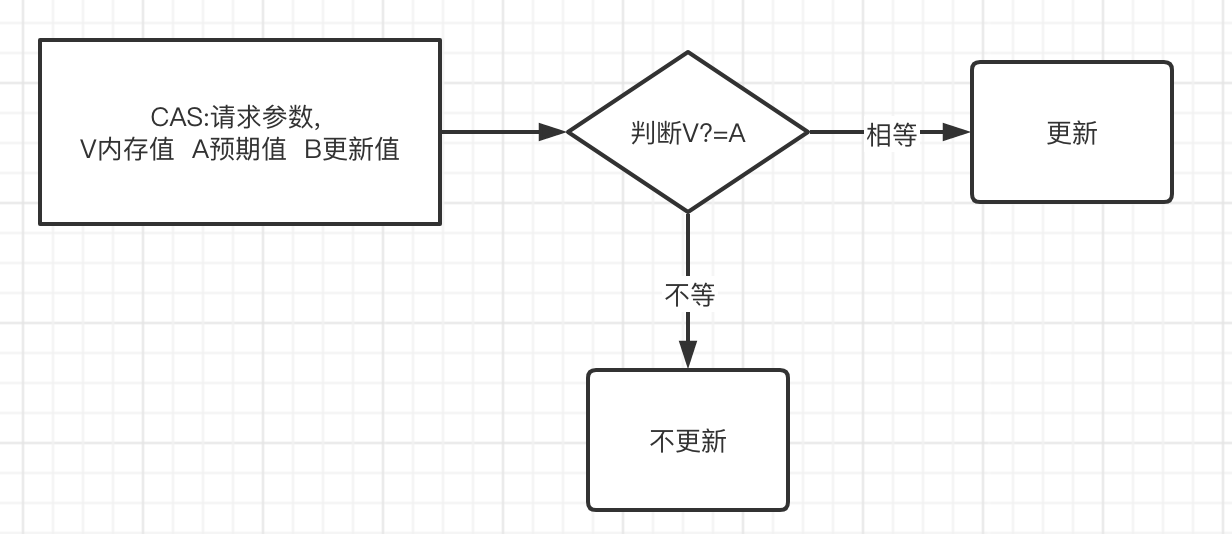- 3.案例```javaimport java.util.concurrent.atomic.AtomicInteger;public class CASDemo {public static void main(String[] args) {AtomicInteger atomicInteger = new AtomicInteger(5);System.out.println(atomicInteger.compareAndSet(5, 2021) + "\t" + atomicInteger.get()); // true 2021System.out.println(atomicInteger.compareAndSet(5, 1024) + "\t" + atomicInteger.get()); // false 2021}}
3.CAS底层原理?如果知道,谈谈你对UnSafe的理解
- 1.UnSafe
- 是CAS的核心类,由于Java方法无法直接访问底层系统,需要通过本地(native)方法来访问,Unsafe相当于一个后门,基于该类可以直接操作特定内存的数据。Unsafe类存在于sun.misc包中,其内部方法操作可以像C的指针一样直接操作内存,因为Java中CAS操作的执行依赖于Unsafe类的方法。
注意Unsafe类中的所有方法都是native修饰的,也就是说Unsafe类中的方法都直接调用操作系统底层资源执行相应任务
- 变量valueOffset,表示该变量值在内存中的偏移地址,因为Unsafe就是根据内存偏移地址获取数据的。
- 变量value用volatile修饰,保证了多线程之间的内存可见性。
- 2.源码分析
new AtomicInteger().getAndIncrement();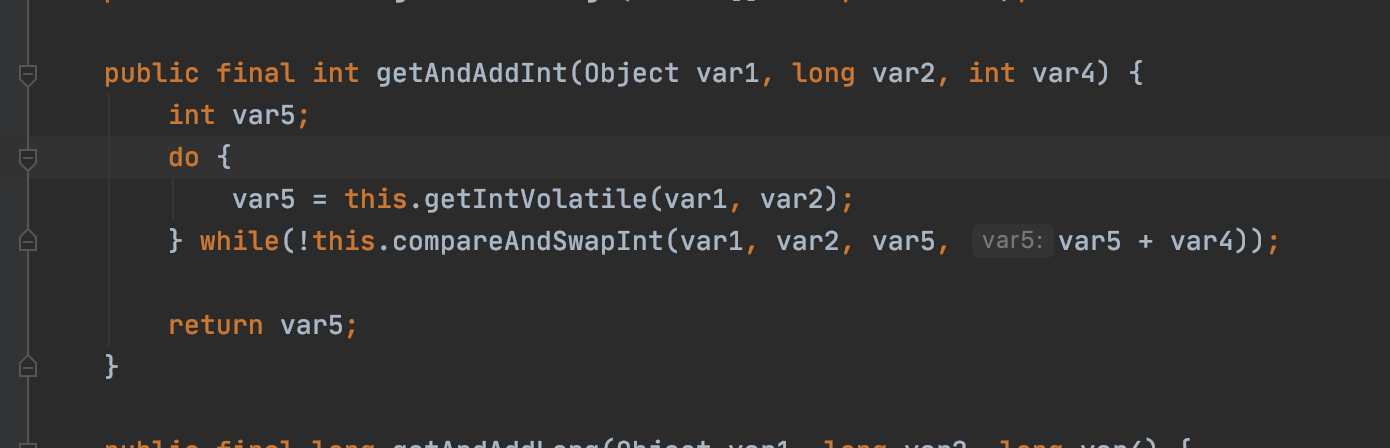
假设A,B两个线程去同时去执行getAndIncrement()方法,底层才有getAndAddInt()方法.
1 AtomicInteger里面的value原始值为3,即主内存中AtomicInteger的value为3,根据JMM模型,线程A和线程B各自持有一份值为3的value的副本分别到各自的工作内存。
2 A线程通过getIntVolatile获取到数据之后被挂起
3 之后B线程也通过getIntVolatile方法获取到value值3,此时线程没有被挂起 , 并且执行了compareAndSwapInt之后将数据更新到4了
4 此时线程A恢复过来了, 执行compareAndSwapInt方法发现自己携带的值和原主内存中的值不一样了 , 变成4了,此时就会更新失败,只能重新再次读取一次,然后更新
5 A线程又重新获取了一次, 因为变量被volatile修饰 , 所以变量是对多个线程是可见的,也就是对A是可见的,
此时A线程再次执行compareAndSwapInt就会将4更新为5
4.自旋锁,借鉴CAS思想
- 1.是什么
是指尝试获取锁的线程不会立即阻塞,而是采用循环的方式去尝试获取锁,
当线程发现锁被占用时,会不断循环判断锁的状态,直到获取。这样的好处是减少线程上下文切换的消耗,缺点是循环会消耗CPU
2.案例 ```java public class SpinLockDemo {
AtomicReference
threadAtomicReference = new AtomicReference<>(); public void myLock() {
Thread thread = Thread.currentThread();System.out.println(thread.getName() + "\t" + "lock");while (!threadAtomicReference.compareAndSet(null, thread)) { // 当第一个线程进入的时候回获取成功}
}
public void myUnLock() {
Thread thread = Thread.currentThread();System.out.println(thread.getName() + "\t" + "unlock");threadAtomicReference.compareAndSet(thread, null);
}
public static void main(String[] args) {SpinLockDemo spinLockDemo = new SpinLockDemo();new Thread(() -> {spinLockDemo.myLock();try {Thread.sleep(3000);} catch (InterruptedException e) {e.printStackTrace();}spinLockDemo.myUnLock();}, "A").start();try {Thread.sleep(3);} catch (InterruptedException e) {e.printStackTrace();}new Thread(() -> {spinLockDemo.myLock();spinLockDemo.myUnLock();}, "B").start();}
}
<a name="N9pK6"></a>## 5.CAS缺点- 1. ABA问题就是当一个线程A从内存中取出内存值V时,比如取出的值是"LL",这个时候B线程也从内存中取出值"LL",<br />但是这个时候B线程把内存中的V值修改成"KK"了,之后A线程又把值修改为"LL",这个时候虽然A线程操作是成功的, **尽管线程one的CAS操作成功,但是不代表这个过程就是没有问题的。 **- 版本号时间戳原子引用 - AtomicStampedReference- 案例```javapublic class ABADemo {static AtomicInteger atomicInteger = new AtomicInteger(100);public static void main(String[] args) {new Thread(() -> {atomicInteger.compareAndSet(100, 101);atomicInteger.compareAndSet(101, 100);}).start();new Thread(() -> {try {TimeUnit.SECONDS.sleep(1);} catch (InterruptedException e) {e.printStackTrace();}System.out.println(atomicInteger.compareAndSet(100, 2019) + "\t" + atomicInteger.get());}).start();}}
- 解决案例 ```java
import java.util.concurrent.TimeUnit; import java.util.concurrent.atomic.AtomicStampedReference;
public class ABAStampedDemo {
static AtomicStampedReference<Integer> atomicStampedReference= new AtomicStampedReference<>(100, 1);public static void main(String[] args) throws InterruptedException {new Thread(() -> {int stamp = atomicStampedReference.getStamp();try {TimeUnit.SECONDS.sleep(1);} catch (InterruptedException e) {e.printStackTrace();}System.out.println(Thread.currentThread().getName() + "\t" + "首次获取版本号" + stamp);atomicStampedReference.compareAndSet(100, 101,stamp, stamp + 1);System.out.println(Thread.currentThread().getName() + "\t" + "第二次获取版本号" + atomicStampedReference.getStamp());atomicStampedReference.compareAndSet(101, 100,atomicStampedReference.getStamp(), atomicStampedReference.getStamp() + 1);System.out.println(Thread.currentThread().getName() + "\t" + "第三次获取版本号" + atomicStampedReference.getStamp());}).start();new Thread(() -> {int stamp = atomicStampedReference.getStamp();System.out.println(Thread.currentThread().getName() + "\t" + "首次获取版本号" + stamp);try {TimeUnit.SECONDS.sleep(3);} catch (InterruptedException e) {e.printStackTrace();}boolean result = atomicStampedReference.compareAndSet(100, 1002,stamp, stamp + 1);System.out.println(Thread.currentThread().getName() + "\t" + "第二次获取版本号" + atomicStampedReference.getStamp());System.out.println("执行状态: " + result);}).start();}
}
- 扩展:AtomicMarkableReference<a name="YZaNS"></a># 5.原子类操作<a name="rsoQl"></a>## 1.基本类型原子类- AtomicInteger```javaimport java.util.concurrent.CountDownLatch;import java.util.concurrent.atomic.AtomicInteger;class MyNumber {private AtomicInteger atomicInteger = new AtomicInteger();public void add() {atomicInteger.getAndIncrement();}public Integer get() {return atomicInteger.get();}}public class AtomicInteger_Demo_ {public static void main(String[] args) throws InterruptedException {CountDownLatch countDownLatch = new CountDownLatch(50);MyNumber myNumber = new MyNumber();for (int i = 1; i <= 50; i++) {new Thread(() -> {try {for (int j = 1; j <= 500; j++) {myNumber.add();}} finally {countDownLatch.countDown();}}).start();}countDownLatch.await();System.out.println("myNumber = " + myNumber.get());}}
- AtomicBoolean ```java import java.util.concurrent.atomic.AtomicBoolean;
public class AtomicBooleanDemo {
private static AtomicBoolean atomicBoolean = new AtomicBoolean(false);public static void main(String[] args) {atomicBoolean.set(true);boolean b = atomicBoolean.get();System.out.println("b = " + b);}
}
- AtomicLong```javaimport java.util.concurrent.CountDownLatch;import java.util.concurrent.atomic.AtomicLong;class MyNumber_ {private AtomicLong atomicLong = new AtomicLong();public void add() {atomicLong.getAndIncrement();}public Long get() {return atomicLong.get();}}public class AtomicLong_Demo_ {public static void main(String[] args) throws InterruptedException {CountDownLatch countDownLatch = new CountDownLatch(500);MyNumber_ myNumber_ = new MyNumber_();for (int i = 1; i <= 500 ; i++) {new Thread(()->{try {for (int j = 1; j <= 5000; j++) {myNumber_.add();}}finally {countDownLatch.countDown();}}).start();}countDownLatch.await();System.out.println(myNumber_.get());}}
常用API:
- public final int get() //获取当前的值
- public final int getAndSet(int newValue)//获取当前的值,并设置新的值
- public final int getAndIncrement()//获取当前的值,并自增
- public final int getAndDecrement() //获取当前的值,并自减
- public final int getAndAdd(int delta) //获取当前的值,并加上预期的值
- boolean compareAndSet(int expect, int update) //如果输入的数值等于预期值,则以原子方式将该值设置为输入值(update)
2.数组类型原子类
AtomicIntegerArray ```java import java.util.concurrent.atomic.AtomicIntegerArray;
public class AtomicIntegerArrayDemo {
private static AtomicIntegerArray atomicIntegerArray = new AtomicIntegerArray(10);public static void main(String[] args) {atomicIntegerArray.set(1, 1);atomicIntegerArray.set(2, 1);atomicIntegerArray.set(3, 1);System.out.println(atomicIntegerArray.get(1));System.out.println(atomicIntegerArray.incrementAndGet(1));System.out.println(atomicIntegerArray.get(1));}
}
- AtomicLongArray```javaimport java.util.concurrent.atomic.AtomicLongArray;public class AtomicLongArray_Demo_1 {private static AtomicLongArray atomicLongArray = new AtomicLongArray(10);public static void main(String[] args) {atomicLongArray.set(0, 1);atomicLongArray.set(1, 2);atomicLongArray.set(2, 3);atomicLongArray.set(3, 4);atomicLongArray.set(4, 5);System.out.println(atomicLongArray.get(0));System.out.println(atomicLongArray.incrementAndGet(0));}}
- AtomicReferenceArray ```java
import java.util.concurrent.atomic.AtomicReferenceArray;
public class AtomicReferenceArray_Demo {
private static AtomicReferenceArray<String> atomicReferenceArray = new AtomicReferenceArray<>(10);public static void main(String[] args) {atomicReferenceArray.set(0, "A");atomicReferenceArray.set(1, "B");atomicReferenceArray.set(2, "C");atomicReferenceArray.set(3, "D");String c = atomicReferenceArray.getAndAccumulate(0, "A",(v1, v2) -> v1 + v2);System.out.println("c = " + atomicReferenceArray.get(0));}
}
<a name="B9bbn"></a>## 3.引用类型原子类- AtomicReference```java@ToString@AllArgsConstructor@Getter@Setterclass User_ {private Integer age;private String username;}public class AtomicReference_Demo_ {private static AtomicReference<User_> atomicReference = new AtomicReference<>();public static void main(String[] args) throws InterruptedException {User_ anda_1 = new User_(12, "ANDA");User_ anda_2 = new User_(12, "ANDA");atomicReference.set(anda_1);boolean b = atomicReference.compareAndSet(anda_1, anda_2);System.out.println("b = " + b);atomicReference.compareAndSet(anda_2, anda_1);TimeUnit.SECONDS.sleep(3);boolean b1 = atomicReference.compareAndSet(anda_1, anda_2);System.out.println("b1 = " + b1);}}
- AtomicStampedReference ```java
import java.util.concurrent.TimeUnit; import java.util.concurrent.atomic.AtomicStampedReference;
public class AtomicStampedReferenceDemo {
private static AtomicStampedReference<Long> atomicStampedReference = new AtomicStampedReference<>(100L, 1);public static void main(String[] args) {new Thread(() -> {int stamp = atomicStampedReference.getStamp();try {TimeUnit.SECONDS.sleep(1);} catch (InterruptedException e) {e.printStackTrace();}boolean b = atomicStampedReference.compareAndSet(100L, 101L, stamp, stamp + 1);System.out.println(Thread.currentThread().getName() + "====>" + b);boolean b1 = atomicStampedReference.compareAndSet(101L, 100L, atomicStampedReference.getStamp(), atomicStampedReference.getStamp() + 1);System.out.println(Thread.currentThread().getName() + "====>" + b1);}).start();new Thread(() -> {int stamp = atomicStampedReference.getStamp();try {TimeUnit.SECONDS.sleep(3);} catch (InterruptedException e) {e.printStackTrace();}boolean b1 = atomicStampedReference.compareAndSet(100L, 1000L, stamp, stamp + 1);System.out.println("b1 = " + b1);}).start();}
}
- AtomicMarkableReference```javaimport java.util.concurrent.atomic.AtomicMarkableReference;public class AtomicMarkableReference_Demo_ {private static AtomicMarkableReference<Integer> atomicMarkableReference = new AtomicMarkableReference(1, false);public static void main(String[] args) {atomicMarkableReference.set(1, false);Integer integer = atomicMarkableReference.get(new boolean[]{true});System.out.println("integer = " + integer);}}
4.对象的属性修改原子类
- 使用目的
- 以一种线程安全的方式操作非线程安全对象内的某些字段
- 使用要求
- 更新的对象属性必须使用 public volatile 修饰符。
- 因为对象的属性修改类型原子类都是抽象类,所以每次使用都必须
使用静态方法newUpdater()创建一个更新器,并且需要设置想要更新的类和属性
- AtomicIntegerFieldUpdater ```java
import java.util.concurrent.CountDownLatch; import java.util.concurrent.atomic.AtomicIntegerFieldUpdater;
@Getter @Setter @ToString @AllArgsConstructor @NoArgsConstructor class Demo_ {
private static AtomicIntegerFieldUpdater<Demo_>atomicIntegerFieldUpdater = AtomicIntegerFieldUpdater.newUpdater(Demo_.class, "sum");private String username;private volatile int sum;public void add(Demo_ demo_) {atomicIntegerFieldUpdater.incrementAndGet(demo_);}
}
public class AtomicIntegerFieldUpdaterDemo { public static void main(String[] args) throws InterruptedException { Demo anda = new Demo(“Anda”,100); CountDownLatch countDownLatch = new CountDownLatch(100); for (int i = 1; i <= 100; i++) { new Thread(() -> { try { anda.add(anda); } finally { countDownLatch.countDown(); } } ).start(); } countDownLatch.await(); int sum = anda.getSum(); System.out.println(“sum = “ + sum);
}
}
- AtomicLongFieldUpdater```javaimport lombok.*;import java.util.concurrent.CountDownLatch;import java.util.concurrent.atomic.AtomicLongFieldUpdater;@Getter@Setter@ToString@AllArgsConstructor@NoArgsConstructorclass _DEMO_ {private String username;private volatile long sum;private static AtomicLongFieldUpdater<_DEMO_> atomicLongFieldUpdater = AtomicLongFieldUpdater.newUpdater(_DEMO_.class, "sum");public void add(_DEMO_ demo_) {atomicLongFieldUpdater.incrementAndGet(demo_);}}public class AtomicLongReference_Demo_ {public static void main(String[] args) throws InterruptedException {CountDownLatch countDownLatch = new CountDownLatch(100);_DEMO_ demo_ = new _DEMO_("TESt", 0);for (int i = 1; i <= 100; i++) {new Thread(() -> {try {demo_.add(demo_);} finally {countDownLatch.countDown();}}).start();}countDownLatch.await();System.out.println(demo_.getSum());}}
- AtomicReferenceFieldUpdater ```java
import java.util.concurrent.atomic.AtomicReferenceFieldUpdater;
class AtomicReference_Demo { private volatile Boolean status = Boolean.FALSE;
private AtomicReferenceFieldUpdater<_AtomicReference_Demo_, Boolean> atomicReferenceFieldUpdater = AtomicReferenceFieldUpdater.newUpdater(_AtomicReference_Demo_.class, Boolean.class, "status");public void get_status(_AtomicReference_Demo_ atomicReference_demo_) {if (atomicReferenceFieldUpdater.compareAndSet(atomicReference_demo_, Boolean.FALSE, Boolean.TRUE)) {System.out.println(Thread.currentThread().getName() + "获取到说了");} else {System.out.println(Thread.currentThread().getName() + "没有获取到");}}
}
public class AtomicReferenceFieldUpdaterDemo {
public static void main(String[] args) {_AtomicReference_Demo_ atomicReference_demo_ = new _AtomicReference_Demo_();for (int i = 1; i <= 5; i++) {new Thread(() -> {atomicReference_demo_.get_status(atomicReference_demo_);}).start();}}
}
<a name="Nxzj7"></a>## 5.原子操作增强类> 注意DoubleAccumulator 和DoubleAdder 区别就是DoubleAdder只能增加数据, DoubleAccmulator可以增加,可以减少 , LongAccmulator和LongAdder同理- DoubleAccumulator- get() 获取当前累加的数量- accumulate(long x) 定义自增的数字- reset() 重置当前的内部累加的数据- getThenReset() 获取并且重置当前内部累加的数据```javaimport java.util.concurrent.atomic.DoubleAccumulator;public class DoubleAccumulator_Demo {public static void main(String[] args) {DoubleAccumulator doubleAccumulator = new DoubleAccumulator(Double::sum, 1);doubleAccumulator.accumulate(12);doubleAccumulator.accumulate(12);double v = doubleAccumulator.doubleValue();System.out.println("v = " + v); // 25.0doubleAccumulator.reset(); // 1.0doubleAccumulator.accumulate(3);System.out.println("v = " + doubleAccumulator.get()); // 4.0}}
- DoubleAdder ```java import java.util.concurrent.atomic.DoubleAdder;
public class DoubleAddr_Demo {
public static void main(String[] args) {DoubleAdder doubleAdder = new DoubleAdder();doubleAdder.add(1);doubleAdder.add(1);doubleAdder.add(1);doubleAdder.add(1);double sum = doubleAdder.sum();System.out.println("sum = " + sum);doubleAdder.reset();System.out.println(doubleAdder.sum());}
}
- LongAccumulator```javaimport java.util.concurrent.atomic.LongAccumulator;public class LongAccumulator_Demo {public static void main(String[] args) {LongAccumulator accumulator = new LongAccumulator(Long::sum, 1);accumulator.accumulate(1);accumulator.accumulate(1);accumulator.accumulate(1);accumulator.accumulate(1);accumulator.accumulate(1);System.out.println(accumulator.get());accumulator.reset();System.out.println(accumulator.get());}}
- LongAdder ```java import java.util.concurrent.atomic.LongAdder;
public class LongAdder_Demo {
public static void main(String[] args) {LongAdder longAdder = new LongAdder();longAdder.increment();longAdder.increment();longAdder.increment();longAdder.increment();longAdder.increment();System.out.println(longAdder.sum());longAdder.reset();System.out.println(longAdder.sum());}
} ```
- 点赞计数器,看看性能

若有收获,就点个赞吧
0 人点赞
