使用场景
Redux 的适用场景:多交互、多数据源。
从组件角度看,如果你的应用有以下场景,可以考虑使用 Redux。
- 某个组件的状态,需要共享
- 某个状态需要在任何地方都可以拿到
- 一个组件需要改变全局状态
- 一个组件需要改变另一个组件的状态
工作流程
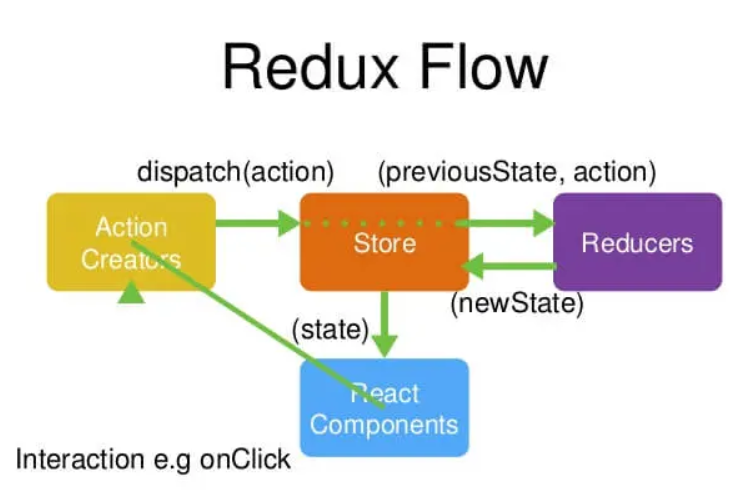
首先,用户发出 Action。
然后,Store 自动调用 Reducer,并且传入两个参数:当前 State 和收到的 Action。 Reducer 会返回新的 State 。store.dispatch(action);
State 一旦有变化,Store 就会调用监听函数。let nextState = todoApp(previousState, action);
listener可以通过store.getState()得到当前状态。如果使用的是 React,这时可以触发重新渲染 View。// 设置监听函数store.subscribe(listener);
function listerner() {let newState = store.getState();component.setState(newState);}
API介绍
action:
View的展示是根据State数据而来的,想要View变化,只能改变State(存在store里),想要修改State就必须发出一个action通知,store接收到通知后处理state,从而改变View。
Action 是一个对象。其中的type属性是必须的,表示 Action 的名称。其他属性可以自由设置,const action = {type: "ADD",num: 1,}
reducer:
Store 收到 Action 以后,必须给出一个新的 State,这样 View 才会发生变化。这种 State 的计算过程就叫做 Reducer。
Reducer 函数最重要的特征是,它是一个纯函数。也就是说,只要是同样的输入,必定得到同样的输出。const reducer = (state = 10, action) => {switch (action.type) {case "ADD":return state + action.numcase "SQUARE":return state * statedefault:return state}}
store:
Store 就是保存数据的地方,你可以把它看成一个容器。整个应用只能有一个 Store。
store就是把action和reducer联系到一起的对象,store本质上是一个状态树,保存了所有对象的状态。任何UI组件都可以直接从store访问特定对象的状态,其具有dispatch,subscribe,getState方法(敲黑板划重点)。
createStore方法还可以接受第二个参数,表示 State 的最初状态。这通常是服务器给出的。 ```jsx import { createStore } from ‘redux’;import { createStore } from 'redux';const store = createStore(reducer);
const initalState = { name:’ade’ }
const store = createStore(reducer,initalState);
<a name="UCcwn"></a>#### store.subscribe()Store 允许使用store.subscribe方法**设置监听函数**,一旦 State 发生变化,就自动执行这个函数。```jsximport { createStore } from 'redux';const store = createStore(reducer);store.subscribe(listener);
store.dispatch()
store.dispatch()是 View 发出 Action 的唯一方法,这就需要在View中引入store然后调用dispatch派发Action,dispatch一调用就会调用reducer来改变state从而改变View。
store.dispatch(action)
store.getState()
getState方法可以获取返回当前state的值,可以在任意位置打印state的值。
console.log(store.getState())
State
Store对象包含所有数据。如果想得到某个时点的数据,就要对 Store 生成快照。这种时点的数据集合,就叫做 State。
当前时刻的 State,可以通过store.getState()拿到。
import { createStore } from 'redux';const store = createStore(fn);const state = store.getState();
示例
import React from "react"import { createStore } from "redux"const addOne = {type: "ADD",num: 1,}const addTwo = {type: "ADD",num: 2,}const square = {type: "SQUARE",}const reducer = (state = 10, action) => {switch (action.type) {case "ADD":return state + action.numcase "SQUARE":return state * statedefault:return state}}const store = createStore(reducer)// 获取stateconsole.log(store.getState())// 操作console.log(store.dispatch(addOne))console.log(store.getState())console.log(store.dispatch(addTwo))console.log(store.getState())console.log(store.dispatch(square))console.log(store.getState())function App() {return (<div className='App'><h1>123</h1></div>)}export default App
中间件与异步操作
applyMiddleware
import { applyMiddleware, createStore } from 'redux';import createLogger from 'redux-logger';const logger = createLogger();const store = createStore(reducer,applyMiddleware(logger));
createStore方法可以接受整个应用的初始状态作为参数,那样的话,applyMiddleware就是第三个参数了。
const store = createStore(reducer,initial_state,applyMiddleware(logger));
store.dispatch方法正常情况下,参数只能是对象,不能是函数。
所以使用redux-thunk中间件,改造store.dispatch,使得后者可以接受函数作为参数。
import { createStore, applyMiddleware } from 'redux';import thunk from 'redux-thunk';import reducer from './reducers';// Note: this API requires redux@>=3.1.0const store = createStore(reducer,applyMiddleware(thunk));
异步action
const getAction = () => {return (dispatch, getState) => {fetch("https://api.github.com/users/ruanyf").then(res => res.json()).then(data => {console.log(data)dispatch({type: "GET",num: data.id,})})}}
React-Readux的用法
connect()
React-Redux 提供connect方法,用于从 UI 组件生成容器组件。connect的意思,就是将这两种组件连起来。
import { connect } from 'react-redux'export default connect(mapStateToProps, mapDispatchToProps)(Container)
mapStateToProps()
mapStateToProps是一个函数。它的作用就是像它的名字那样,建立一个从(外部的)state对象到(UI 组件的)props对象的映射关系。
const mapStateToProps = state => {return {num: state,}}
它接受state作为参数,返回一个对象。
mapStateToProps会订阅 Store,每当state更新的时候,就会自动执行,重新计算 UI 组件的参数,从而触发 UI 组件的重新渲染。
mapStateToProps的第一个参数总是state对象,还可以使用第二个参数,代表容器组件的props对象。
const mapStateToProps = (state, ownProps) => {return {isActive: ownProps.filter === state.visibilityFilter}}
mapDispatchToProps
mapDispatchToProps是connect函数的第二个参数,用来建立 UI 组件的参数到store.dispatch方法的映射。
也就是说,它定义了哪些用户的操作应该当作 Action,传给 Store。它可以是一个函数,也可以是一个对象。
同样它接受2个参数 ,第一个是dispatch,第二个是ownProps
const mapDispatchToProps = dispatch => {return {add: value => dispatch(addAction(value)),square: () => dispatch(squareAction()),get: () => dispatch(getAction()),}}
mapDispatchToProps是一个对象,它的每个键名也是对应 UI 组件的同名参数,键值应该是一个函数,会被当作 Action creator ,返回的 Action 会由 Redux 自动发出。
组件
connect方法生成容器组件以后,需要让容器组件拿到state对象,才能生成 UI 组件的参数。
一种解决方法是将state对象作为参数,传入容器组件。但是,这样做比较麻烦,尤其是容器组件可能在很深的层级,一级级将state传下去就很麻烦。
React-Redux 提供Provider组件,可以让容器组件拿到state。
import React, { useState } from "react"import Container from "./components/container"import { Provider } from "react-redux"import store from "./store/store"function App() {return (<div className='App'><Provider store={store}><Container /></Provider></div>)}export default App
示例
APP.js 使用Provider 注入store到app.js供全局使用
import React, { useState } from "react"import Container from "./components/container"import { Provider } from "react-redux"import store from "./store/store"function App() {return (<div className='App'><Provider store={store}><Container /></Provider></div>)}export default App
reducer.js 定义这个组件的 Reducer。
const math = (state = 10, action) => {switch (action.type) {case "ADD":return state + action.numcase "SQUARE":return state * 2case "GET":return action.numdefault:return state}}export default math
生成store对象,并使用Provider在根组件外面包一层。
import math from "../reducer/math"import { createStore, applyMiddleware } from "redux"import thunk from "redux-thunk"const store = createStore(math, applyMiddleware(thunk))export default store
import React, { useState } from "react"import { addAction, squareAction, getAction } from "../actions/actions"import { connect } from "react-redux"const Container = props => {console.log(props)const { num, add, square, get } = propsreturn (<div><button onClick={() => {add(1)}}>+1</button><button onClick={() => {add(2)}}>+1</button><button onClick={() => {square()}}>+1</button><button onClick={() => {get()}}>+1</button><h1>{num}</h1></div>)}const mapStateToProps = state => {return {num: state,}}const mapDispatchToProps = dispatch => {return {add: value => dispatch(addAction(value)),square: () => dispatch(squareAction()),get: () => dispatch(getAction()),}}export default connect(mapStateToProps, mapDispatchToProps)(Container)
action.js
import { ADD, SQUARE } from "../types/types"const addAction = num => {return {type: ADD,num,}}const squareAction = () => {return {type: SQUARE,}}const getAction = () => {return (dispatch, getState) => {fetch("https://api.github.com/users/ruanyf").then(res => res.json()).then(data => {console.log(data)dispatch({type: "GET",num: data.id,})})}}export { addAction, squareAction, getAction }
上面的代码是不是看着很复杂,没错很复杂,那我们用一个新的插件Redux Toolkit。
Redux Toolkit
没错上面 reducer action state的代码可以直接简化为一个文件。
import { createSlice } from "@reduxjs/toolkit"const initialSate = {num: 0,}const mathCount = createSlice({name: "math",initialState: initialSate,reducers: {addNum: (state, action) => {state.num += action.payload},},})export const { addNum } = mathCount.actionsexport default mathCount.reducer
生成store
import { configureStore } from "@reduxjs/toolkit"import mathCount from "../features/mathCount"export default configureStore({reducer: {math: mathCount,},})
在app.js注入
import React, { useState } from "react"import Container from "./components/container"import { Provider } from "react-redux"import store from "./store/store"function App() {return (<div className='App'><Provider store={store}><Container /></Provider></div>)}export default App
组件使用
import React, { useState } from "react"import { useSelector, useDispatch } from "react-redux"import { addNum } from "../features/mathCount"const Container = props => {const dispatch = useDispatch()const { num } = useSelector(state => {return state.math})return (<div><buttononClick={() => {dispatch(addNum(1))}}>+1</button><buttononClick={() => {dispatch(addNum(10))}}>+10</button><h1>{num}</h1></div>)}export default Container


