webpack基础配置
安装
mkdir webpack-democd webpack-demoyarn inityarn add webpack webpack-cli -D
文件目录结构
webpack/|- /src|- index.js|- index.html|- package.json
默认文件配置
在文件根目录下创建:
touch webpack.config.js复制代码
webpack.config.js
// webpack 配置文件const path = require('path'); // node.js 的路径模块module.exports = {// entry: './src/index.js', // 入口文件(简写形式)entry: {main: './src/index.js',},output: {path: path.resolve(__dirname, 'dist'), // 打包后的路径filename: 'bundle.js', // 打包后的文件名}}复制代码
以上是简单的打包配置,配置项包括入口文件、打包路径、打包文件名。
简化打包流程
在 package.json 中的 scripts 字段来编写运行脚本,通过脚本进行打包。
"scripts": {"bundle": "webpack"},
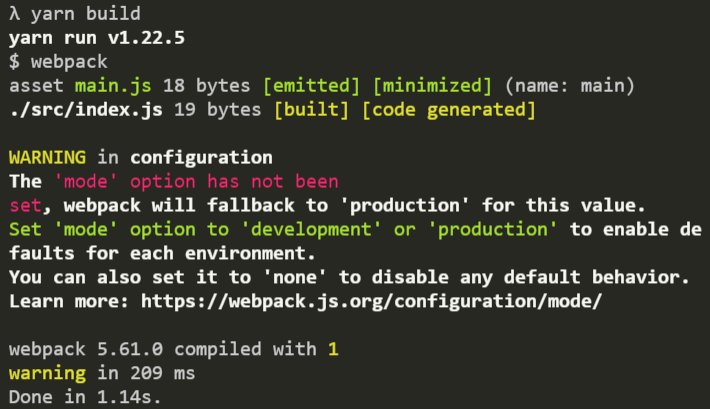
这个时候只需要运行 yarn build就可打包了。
打包模式
// webpack.config.jsconst path = require('path');module.exports = {mode: 'development', // 'development' | 'production'// entry: './src/index.js',entry: {main: './src/index.js',},output: {path: path.resolve(__dirname, 'dist'),filename: 'bundle.js'},}
可以配置为开发模式或者生产模式:
- 开发模式:本地环境
- 生产模式:线上环境(代码是压缩的)
具体有何不同,在打包后,打开 dist 文件夹下的 main.js,便可一目了然,此处不再赘述。
静态资源处理
- 样式文件(CSS)
- 图片(Images)
- 字体(Fonts)
- 数据文件(Data)
Asset Modules — 静态资源模块
根据 Webpack5 的文档,它简化了之前版本对于文件方面的配置,提供了 Asset Modules(静态资源模块),替代了之前常用的 raw-loader、url-loader、file-loader。
也就是说不用再安装这几个 loader 了,直接通过一行type: 'asset' 搞定,书写更加方便!(注意 module 中 type 的设置)
// webpack 配置文件const path = require("path");module.exports = {mode: "production",entry: {main: "./src/index.js",},output: {path: path.resolve(__dirname, "dist"),filename: "bundle.js",},// *** 模块选项中匹配的文件会通过 loaders 来转换!module: {rules: [// 图片文件{test: /\.(jpe?g|png|gif|svg)$/i,type: "asset", // 一般会转换为 "asset/resource"},// 字体文件{test: /\.(otf|eot|woff2?|ttf|svg)$/i,type: "asset", // 一般会转换为 "asset/inline"},// 数据文件{test: /\.(txt|xml)$/i,type: "asset", // 一般会转换成 "asset/source"},],},};
最小化svg
yarn add mini-svg-data-uri -D
配置静态文件名
const path = require('path') // node.js 的路径模块const miniSVGDataURI = require("mini-svg-data-uri"); // 最小化svgmodule.exports = {mode: 'development', // 'development' | 'production'// entry: './src/index.js', // 入口文件(简写形式)entry: {main: './src/index.js',},output: {path: path.resolve(__dirname, 'dist'), // 打包后的路径filename: 'bundle.js', // 打包后的文件名// 静态文件打包后的路径及文件名(默认是走全局的,如果有独立的设置就按照自己独立的设置来。)assetModuleFilename: "assets/[name]_[hash][ext]",},// *** 模块选项中匹配的文件会通过 loaders 来转换!module: {rules: [// 图片文件{test: /\.(jpe?g|png|gif|svg)$/i,type: 'asset', // 一般会转换为 "asset/resource"generator: {filename: "images/[name]_[hash][ext]", // 独立的配置},parser: {dataUrlCondition: {maxSize: 8 * 1024 // 8kb (低于8kb都会压缩成 base64)}},},// 字体文件{test: /\.(otf|eot|woff2?|ttf|svg)$/i,type: 'asset', // 一般会转换为 "asset/inline"generator: {filename: "fonts/[name]_[hash][ext]",},},// 数据文件{test: /\.(txt|xml)$/i,type: 'asset/source', // 一般会转换成 "asset/source"},// svg文件{test: /\.svg$/i,type: "asset",generator: {dataUrl(content) {content = content.toString();return miniSVGDataURI(content);},},parser: {dataUrlCondition: {maxSize: 2 * 1024 // 2kb (低于2kb都会压缩)}},},],},}
assetModuleFilename: 'assets/[name][ext]', 用于设置全局的静态文件路径及文件名。如果文件模块没有单独进行配置,就按照这个来设置文件名。
其中,[name] 表示原来的文件名,[hash] 表示散列值,[ext] 表示文件后缀。
样式文件的处理
yarn add css-loader style-loader -D
// css配置{test: /\.css$/i,use: ["style-loader", "css-loader"],},
yarn add sass-loader sass webpack -D
// ...{test: /\.s[ac]ss$/i,use: [// Creates `style` nodes from JS strings"style-loader",// Translates CSS into CommonJS"css-loader",// Compiles Sass to CSS"sass-loader",],},
yarn add postcss-loader postcss -D
{test: /\.s?css$/i,use: ["style-loader", "css-loader", "sass-loader", "postcss-loader"],},
注意,postcss-loader 要放在最后。
yarn add postcss-preset-env autoprefixer postcss-scss -D
{test: /\.sc?ss$/i,use: ["style-loader",{loader: "css-loader",options: {importLoaders: 2,// 0 => no loaders (default);// 1 => postcss-loader;// 2 => postcss-loader, sass-loadermodules: true, // 默认是 false ***},},"sass-loader","postcss-loader",],},
开发环境配置
yarn add html-webpack-plugin -D
const HtmlWebpackPlugin = require("html-webpack-plugin");module.exports = {// ...plugins: [new HtmlWebpackPlugin({template: "./src/index.html", // 这里设置自己模板文件}),],};
CleanWebpackPlugin
第二个问题的解决办法是在打包之前清除输出目录中的内容,然后让它重新生成。CleanWebpackPlugin 插件虽然不是官方的,但是在 5.20.0 之前的版本中仍然值得推荐。
yarn add clean-webpack-plugin -D
output.clean
在 webpack 5.20.0+ 的版本中,内置了清除输出目录内容的功能,只要在 output 选项中配置一个参数即可。
// webpack.config.jsmodule.exports = {//...output: {clean: true, // Clean the output directory before emit.},};
1. 开发环境中的 source map
webpack.config.js
module.exports = {mode: 'development',devtool: 'eval-cheap-module-source-map' // development}复制代码
2. 生产环境中的 source map
module.exports = {mode: 'production',devtool: 'nosources-source-map', // production}
DevServer
watch
监听打包
// package.json{"scripts": {"watch": "webpack --watch", // 监听打包"bundle": "webpack" // 普通打包},}
webpack-dev-server (本地开发服务器)
yarn add webpack-dev-server -D
package.json
{"scripts": {"start": "webpack serve", // 开启本地服务器"watch": "webpack --watch", // 监听打包"bundle": "webpack" // 普通打包},}复制代码
webpack.config.js
const path = require('path');const HtmlWebpackPlugin = require('html-webpack-plugin');module.exports = {// ...mode: 'development',devtool: 'eval-cheap-module-source-map',devServer: {static: {directory: path.join(__dirname, 'dist'),// 指定被访问html页面所在目录的路径},client: {progress: true, // 在浏览器中以百分比显示编译进度。},open: true, // 开启服务器时,自动打开页面compress: true, // 开启 gzip 压缩port: 8888, // 自定义端口号hot: true, // 开启热更新hotOnly: true, // 强制热更新,不会刷新页面},// ...}复制代码
注意:
- 在开发环境中,mode、devtool、devServer这三个配置是非常重要的!
- webpack-dev-server 在编译后不会在输出目录写入任何文件。相反,它会将打包的文件存在内存中,就好像它们被安装在服务器根路径上的真实文件一样。如果希望在其他路径上找到打包的文件,可以通过使用 devServer 中的 publicPath 选项更改此设置。
- 为了以模板为支撑更有效率地输出打包文件,我们需要 HtmlWebpackPlugin;
- 为了快速定位代码错误的位置,我们需要 source map;
- 为了更好地模拟真实环境进行开发,我们需要 devServer(WDS);
- 为了实时局部更新修改的内容而非全局更新,我们需要 Hot Module Replacement(HMR)!
Babel配置
有一些版本的浏览器对于JS新的语法(例如 ES6+)的支持不好,这时就需要将新的语法转换成 ES5 标准的语法,让浏览器正常识别它们,保证程序的稳定运行。
为了实现这种转换,我们该怎么办呢?用 Babel,它会把新语法转换为旧语法。
yarn add babel-loader @babel/core @babel/preset-env -D
// webpack.config.jsmodule: {rules: [{test: /\.m?js$/,exclude: /node_modules/,use: {loader: 'babel-loader'}}]}
// babel.config.json{"presets": [["@babel/preset-env", {"useBuiltIns": "usage", // 按需引入 corejs 中的模块"corejs": 3, // 核心 js 版本"targets": "> 0.25%, not dead" // 浏览器支持范围}]]}
还需要下载的依赖:
npm i core-js@3 --save
yarn add @babel/plugin-transform-runtime -Dyarn add @babel/runtimeyarn add @babel/runtime-corejs3
Tree Shaking
optimization: {usedExports: true,}
webpack-merge
yarn add webpack-merge -D
配置typescript
yarn add core-jsyarn add -D babel-loader @babel/core @babel/cli @babel/preset-envyarn add @babel/polyfillyarn add -D @babel/preset-typescriptyarn add typescriptyarn add -D ts-loader
// ts配置{test: /\.(jsx|ts|tsx)$/,use: [{loader: 'babel-loader',options: {presets: ['@babel/preset-env'],},},{loader: 'ts-loader',options: {compilerOptions: {noEmit: false,},},},],exclude: /node_modules/},
{"compilerOptions": {"target": "es6","experimentalDecorators": false,"module": "esnext","lib": ["dom","dom.iterable","esnext","webworker"],"noImplicitAny": true,"noImplicitThis": true,"strictNullChecks": true,"allowJs": true,"skipLibCheck": true,"esModuleInterop": true,"allowSyntheticDefaultImports": true,"strict": true,"forceConsistentCasingInFileNames": true,"moduleResolution": "node","resolveJsonModule": true,"isolatedModules": false,"noEmit": true,"jsx": "react","noFallthroughCasesInSwitch": true,"typeRoots": ["./src/types","./node_modules/@types"],"baseUrl": ".","paths": {"@/*": ["src/*"]}},"include": ["src"],"exclude": ["node_modules","./mock"]}
配置react
yarn add react react-dom @types/react @types/react-dom
项目babel配置
yarn add -D @babel/core @babel/preset-env babel-loader @babel/plugin-transform-runtime @babel/preset-react
// babelrc,json{"presets": ["react-app",["@babel/preset-env",{"useBuiltIns": "entry","corejs": 3}]],"plugins": ["@babel/plugin-proposal-class-properties",["import", { "libraryName": "antd-mobile", "libraryDirectory": "lib", "style": "css" }, "antd-mobile"],["import", { "libraryName": "antd", "libraryDirectory": "lib", "style": true }, "antd"]]}
Eslint & prettier
完成了核心的应用流程打包代码,接下来我们来聊一些轻松的代码检查。
一份良好的工程架构代码规范检查是必不可少的配置。
prettier
yarn add --dev --exact prettier复制代码
安装完成之后我们在项目根目录下:
echo {}> .prettierrc.js复制代码
我们来个这个js内容添加一些基础配置
module.exports = {printWidth: 100, // 代码宽度建议不超过100字符tabWidth: 2, // tab缩进2个空格semi: false, // 末尾分号singleQuote: true, // 单引号jsxSingleQuote: true, // jsx中使用单引号trailingComma: 'es5', // 尾随逗号arrowParens: 'avoid', // 箭头函数仅在必要时使用()htmlWhitespaceSensitivity: 'css', // html空格敏感度}复制代码
我们再来添加一份.prettierignore让prettier忽略检查一些文件:
//.prettierignore**/*.min.js**/*.min.css.idea/node_modules/dist/build/复制代码
同时让我们为我们的代码基于husky和lint-staged添加git hook
具体配置可以参照这里[husky&list-staged](https://link.juejin.cn?target=https%3A%2F%2Fprettier.io%2Fdocs%2Fen%2Fprecommit.html%23option-1-lint-stagedhttpsgithubcomokonetlint-staged)
安装完成后,在我们每次commit时候都会触发lit-staged自动修复我们匹配的文件:

因为我们项目中是ts文件,所以要稍微修改一下他支持的后缀文件:
// package.json..."lint-staged": {"*.{js,css,md,ts,tsx,jsx}": "prettier --write"}...复制代码
ESlint
Eslint其实就不用多说了,大名鼎鼎嘛。
yarn add eslint --dev复制代码
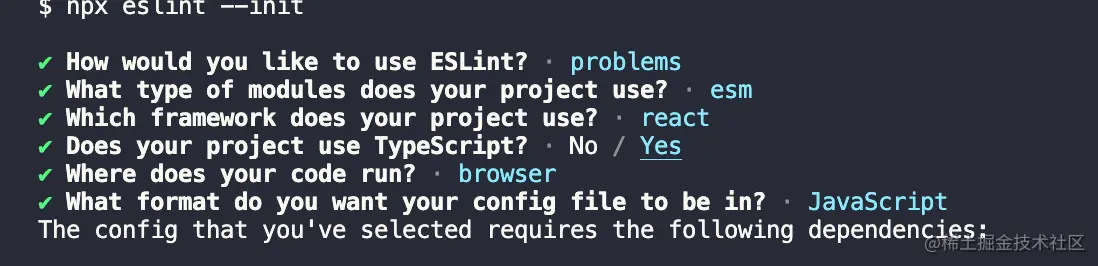
初始化eslint
npx eslint --init复制代码
eslint回和我们进行一些列的交互提示,按照提示进行选择我们需要的配置就可以了:
当
prettier和eslint共同工作时,他们可能会冲突。我们需要安装yarn add -D eslint-config-prettie插件并且覆盖eslint部分规则。
安装完成之后,我们稍微修改一下eslint的配置文件,让冲突时,优先使用prettier覆盖eslint规则:
// .eslint.jsmodule.exports = {"env": {"browser": true,"es2021": true},"extends": ["eslint:recommended","plugin:react/recommended","plugin:@typescript-eslint/recommended",// 添加`prettier`拓展 用于和`prettier`冲突时覆盖`eslint`规则"prettier"],"parser": "@typescript-eslint/parser","parserOptions": {"ecmaFeatures": {"jsx": true},"ecmaVersion": 12,"sourceType": "module"},"plugins": ["react","@typescript-eslint"],"rules": {}};复制代码
同时我们来添加.eslintignore忽略掉一些我们的非ts目录文件,比如构建的一些脚本文件。
*.d.tsscripts/**
优化打包体积
使用CompressionPlugin对文件进行压缩
yarn add compression-webpack-plugin -D
const CompressionPlugin = require("compression-webpack-plugin")plugins:[new CompressionPlugin({threshold: 0,minRatio:0.6,test:/\.(css|js)/i,algorithm:"gzip"})]
优化打包速度,开启DLL
// 输出文件output: {publicPath: './',path: path.resolve(__dirname, 'dist'),filename: '[name].dll.js',assetModuleFilename: 'assets/[name]_[hash][ext]',clean: true,// 存放动态链接库的全局变量名称,例如对应 react 来说就是 _dll_react// 之所以在前面加上 _dll_ 是为了防止全局变量冲突library: '_dll_[name]',},
const path = require('path')const DllPlugin = require('webpack/lib/DllPlugin')const DllReferencePlugin = require('webpack/lib/DllReferencePlugin');plugins: [new MiniCssExtractPlugin({filename: '[name].css',}),new CompressionPlugin({threshold: 0,minRatio: 0.6,test: /\.(css|js)/i,algorithm: 'gzip',}),new HTMLWebpackPlugin({template: './src/index.html',inject: 'body',cache: true,minify: {removeComments: true, // 是否删除注释removeRedundantAttributes: true, // 是否删除多余(默认)属性removeEmptyAttributes: true, // 是否删除空属性collapseWhitespace: false, // 折叠空格removeStyleLinkTypeAttributes: true, // 比如link中的type="text/css"minifyCSS: true, // 是否压缩style标签内的cssminifyJS: {// 压缩JS选项,可参考Terser配置mangle: {toplevel: true,},},},}),new DllPlugin({// 动态链接库的全局变量名称,需要和 output.library 中保持一致// 该字段的值也就是输出的 manifest.json 文件 中 name 字段的值// 例如 react.manifest.json 中就有 "name": "_dll_react"name: '_dll_[name]',// 描述动态链接库的 manifest.json 文件输出时的文件名称path: path.join(__dirname, '[name].manifest.json'),}),new DllReferencePlugin({// 描述 react 动态链接库的文件内容manifest: require(path.join(__dirname, 'main.manifest.json')),}),],

若有收获,就点个赞吧
0 人点赞
