参考链接
ELK日志分析系统就是Elasticsearch、Logstash、Kibana的简称,这三者是核心套件,可以把部署在不同机房应用的日志统一采集、分析、输出。
Elasticsearch是实时全文搜索和分析引擎,提供搜集、分析、存储数据三大功能;是一套开放REST和JAVA API等结构提供高效搜索功能,可扩展的分布式系统。
Logstash是一个用来搜集、分析、过滤日志的工具。它支持几乎任何类型的日志,包括系统日志、错误日志和自定义应用程序日志。它可以从许多来源接收日志,这些来源包括 syslog、消息传递(例如 RabbitMQ)和JMX,它能够以多种方式输出数据,包括电子邮件、websockets和Elasticsearch。
Kibana是一个基于Web的图形界面,用于搜索、分析和可视化存储在 Elasticsearch指标中的日志数据。
Filebeat是用于转发和集中日志数据的轻量级传送工具。Filebeat监视您指定的日志文件或位置,收集日志事件,并将它们转发到Elasticsearch或 Logstash进行索引。
Filebeat安装
参考链接
在需要收集日志的服务器上安装filebeat,主要指的是个人网厅服务器、单位网厅服务器
安装步骤
1、上传压缩包(filebeat-8.1.0-linux-x86_64.tar.gz)到/opt/filebeat/目录下
2、解压filebeat
tar -zxvf filebeat-8.1.0-linux-x86_64.tar.gz
3、在目录/opt/filebeat/filebeat-8.1.0-linux-x86_64/下,新建一个配置文件filebeat-kafka.yml
filebeat.inputs:- type: logenabled: truepaths:- /var/logs/pwServiceLog/hsa-pss-pw-local-service.*.log- /var/logs/pwServiceLog/hsa-pss-pw-local-manager.*.logoutput.kafka:hosts: ["18.3.63.224:9097","18.3.63.224:9098","18.3.63.224:9095","18.3.63.224:9096","18.3.63.224:9094"]topic: "pss-pw-kafka-log"partition.round_robin:reachable_only: falserequired_acks: 1compression: gzipmax_message_bytes: 1000000
4、在目录/opt/filebeat/filebeat-8.1.0-linux-x86_64/下,新建启动文件start.sh
./filebeat -e -c filebeat-kafka.yml
5、解决Filebeat自动关闭问题
vim /usr/lib/systemd/system/filebeat.servicechmod +x /usr/lib/systemd/system/filebeat.servicesystemctl daemon-reloadsystemctl enable filebeatsystemctl start filebeat
filebeat.service文件内容
[Unit]Description=Filebeat sends log files to Logstash or directly to Elasticsearch.Documentation=https://www.elastic.co/products/beats/filebeatWants=network-online.targetAfter=network-online.target[Service]Type=simpleEnvironment="LOG_OPTS=-e"Environment="CONFIG_OPTS=-c /opt/filebeat/filebeat-8.1.0-linux-x86_64/filebeat-kafka.yml"Environment="PATH_OPTS=-path.home /opt/filebeat/filebeat-8.1.0-linux-x86_64/filebeat -path.config /opt/filebeat/filebeat-8.1.0-linux-x86_64/filebeat -path.data /opt/filebeat/filebeat-8.1.0-linux-x86_64/data -path.logs /opt/filebeat/filebeat-8.1.0-linux-x86_64/logs"ExecStart=/opt/filebeat/filebeat-8.1.0-linux-x86_64/filebeat $LOG_OPTS $CONFIG_OPTS $PATH_OPTSRestart=always[Install]WantedBy=multi-user.target
同时在目录/opt/filebeat/filebeat-8.1.0-linux-x86_64/下,需要创建data、logs两个文件夹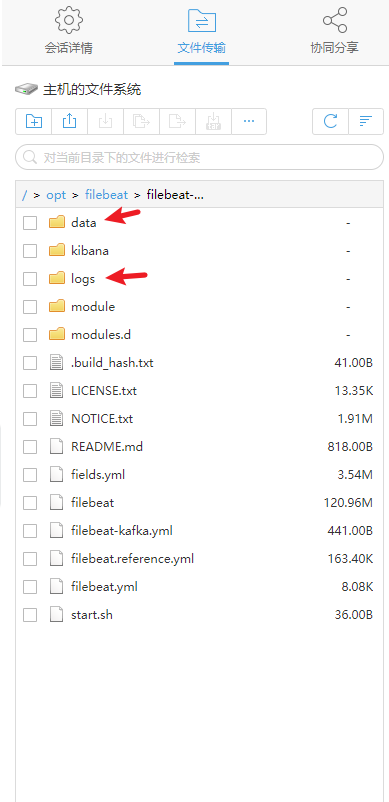
Logstash安装
日志收集工具,可以从各个方面收集各种各样的日志,然后进行过滤分析,并把日志输出到ES中
安装步骤
1、下载安装包(logstash-8.1.0.tar.gz),要与es版本一致
2、解压安装包到/opt/logstash/
3、复制并重命名配置文件
cp logstash-sample.conf filebeat-filter-es.conf
4、修改配置文件filebeat-filter-es.conf
D:\ylz\work_documents\9.6福建项目\开发任务及接口文档\elk安装配置文件\logstash
input {# beats {# port => 5044 # }kafka {bootstrap_servers => "18.3.63.224:9097,18.3.63.224:9098,18.3.63.224:9095,18.3.63.224:9096,18.3.63.224:9094"topics => ["pss-pw-kafka-log"]codec => "json"}}filter {grok {match => {"message" => "%{TIMESTAMP_ISO8601:create_time} - %{GREEDYDATA:tracertId} - %{GREEDYDATA:thread} %{GREEDYDATA:level} %{GREEDYDATA:methodPath} - %{GREEDYDATA:logType} - %{GREEDYDATA:data}"}}mutate {enable_metric => "false"add_field => {"data_temp" => "%{data}"}remove_field => ["message", "log", "tags", "input", "agent", "host", "ecs", "@version","data","create_time","thread","level","methodPath","event","original","tags"]}json {source => "data_temp"remove_field => ["data_temp"]}date {match => ["optTime", "dd/MMM/yyyy:HH:mm:ss Z"] #匹配timestamp字段target => "@timestamp" #将匹配到的数据写到@timestamp字段中}}output {stdout {codec => rubydebug}if [logType] == "InftLog"{elasticsearch {hosts => ["18.3.63.35:9200" ,"18.3.63.116:9200" ,"18.3.63.201:9200","18.3.63.237:9200"]index => "pss_pw_inftlog_%{logTime}"}}if [logType] == "OptLog"{elasticsearch {hosts => ["18.3.63.35:9200" ,"18.3.63.116:9200" ,"18.3.63.201:9200","18.3.63.237:9200"]index => "pss_pw_optlog_%{logTime}"}}if [logType] == "OptTestLog"{elasticsearch {hosts => ["18.3.63.35:9200" ,"18.3.63.116:9200" ,"18.3.63.201:9200","18.3.63.237:9200"]index => "pss_pw_optTestLog_%{logTime}"}}if [logType] == "InftTestLog"{elasticsearch {hosts => ["18.3.63.35:9200" ,"18.3.63.116:9200" ,"18.3.63.201:9200","18.3.63.237:9200"]index => "pss_pw_inftTestLog_%{logTime}"}}}
Logstash事件处理有三个阶段:inputs → filters → outputs。是一个接收,处理,转发日志的工具。
5、编写启动文件 startLogstash.sh(文件所在位置:/opt/logstash/logstash-8.1.0/bin/)
nohup ./logstash -f /opt/logstash/logstash-8.1.0/config/filebeat-filter-es.conf --config.reload.automatic >> ../logs/logstash-log-`date +%Y-%m-%d`.out 2>&1 &
--config.reload.automatic 设置为自动重新加载配置文件,默认为3秒检测一次,如需要改变时间,则可以配置:--config.reload.interval 参数指定 Logstash 检查配置文件更改的间隔,默认为3秒检测一次,该参数的单位为秒,设置的参数单位s一定要写上
输出到../logs/logstash-log-date +%Y-%m-%d.out文件中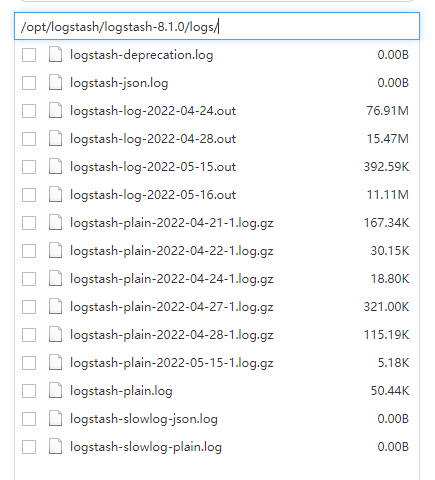
Elasticsearch安装
搜索引擎,为了把指定时间的日志生成一个索引,加快日志查询和访问速度
1.1安装Elasticsearch集群
Elasticsearch 安装.md
ElasticSearch集群搭建.md
1、上传ElasticSearch安装包
2、执行解压操作 ,如下图
# 将elasticsearch-7.4.0-linux-x86_64.tar.gz解压到opt文件夹下. -C 大写tar -zxvf elasticsearch-8.1.0-linux-x86_64.tar.gz -C /opt
3、创建普通用户
因为安全问题,Elasticsearch 不允许root用户直接运行,所以要创建新用户,在root用户中创建新用户,执行如下命令:
useradd es # 新增itheima用户
passwd es # 为itheima用户设置密码
5、为新用户授权,如下图
chown -R es:es /opt/es/elasticsearch-8.1.0/ #文件夹所有者
将 /opt/es/elasticsearch-8.1.0/文件夹授权给es用户,由下图可见,我们的文件夹权限赋给了es
6、修改elasticsearch.yml文件
vim /opt/es/elasticsearch-8.1.0/config/elasticsearch.yml
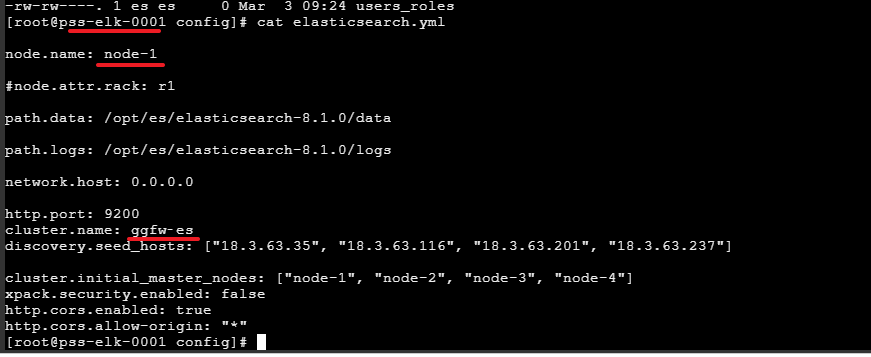
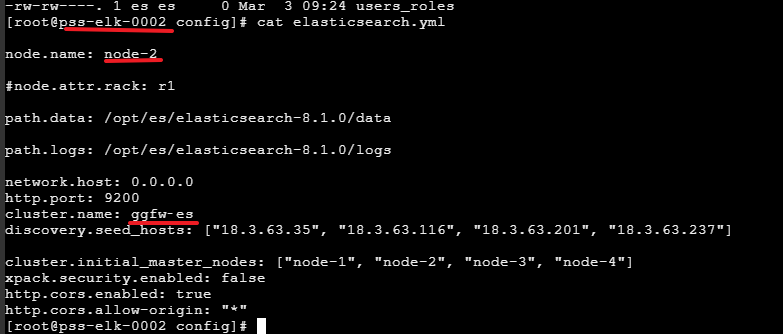
# ======================== Elasticsearch Configuration =========================node.name: node-1#node.attr.rack: r1path.data: /opt/es/elasticsearch-8.1.0/datapath.logs: /opt/es/elasticsearch-8.1.0/logsnetwork.host: 0.0.0.0http.port: 9200cluster.name: ggfw‐esdiscovery.seed_hosts: ["18.3.63.35", "18.3.63.116", "18.3.63.201", "18.3.63.237"]cluster.initial_master_nodes: ["node-1", "node-2", "node-3", "node-4"]xpack.security.enabled: falsehttp.cors.enabled: truehttp.cors.allow-origin: "*"
cluster.name:配置elasticsearch的集群名称,默认是elasticsearch。建议修改成一个有意义的名称
node.name:节点名,elasticsearch会默认随机指定一个名字,建议指定一个有意义的名称,方便管理
network.host:设置为0.0.0.0允许外网访问
http.port:Elasticsearch的http访问端口
cluster.initial_master_nodes:初始化新的集群时需要此配置来选举master(仅在集群首次启动会使用)
discovery.seed_hosts: 配置该节点会与哪些候选地址进行通信(每次启动都需要)
7、启动elasticsearch
su es# 切换到es用户启动cd /opt/es/elasticsearch-8.1.0/bin/./elasticsearch #监听启动,不能关闭启动窗口
1.2 访问elasticsearch
1、在访问elasticsearch前,请确保防火墙是关闭的,执行命令:
#暂时关闭防火墙systemctl stop firewalld# 或者#永久设置防火墙状态systemctl enable firewalld.service #打开防火墙永久性生效,重启后不会复原systemctl disable firewalld.service #关闭防火墙,永久性生效,重启后不会复原
浏览器输入http://18.3.63.35:9200/,如下图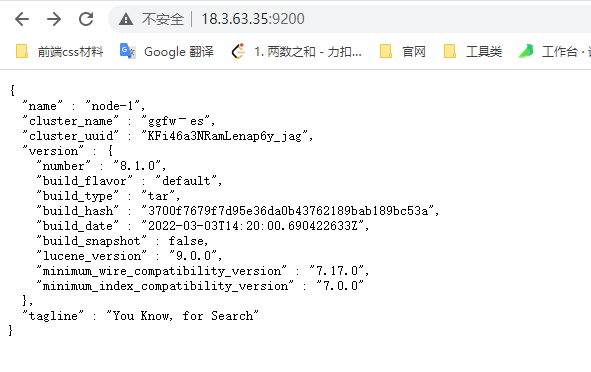
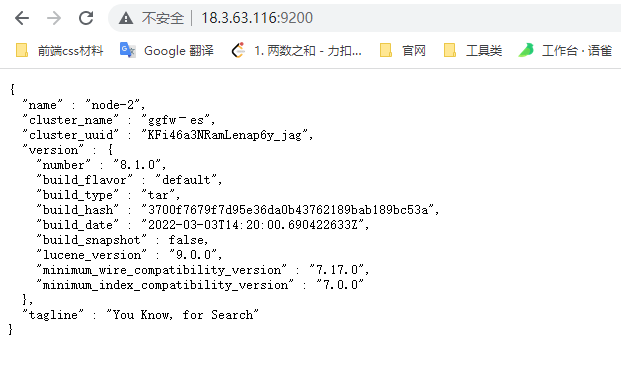
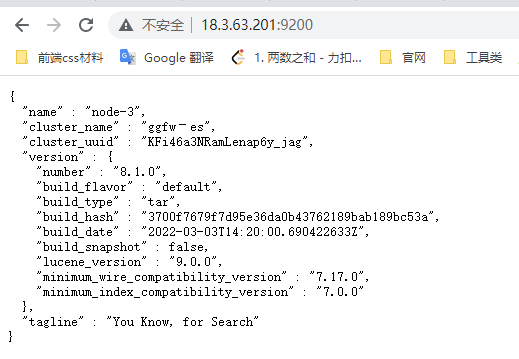
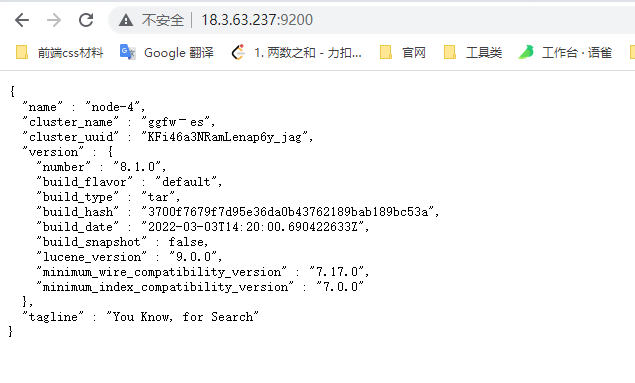
此时elasticsearch已成功启动:
重点几个关注下即可:
number" : "8.1.0" 表示elasticsearch版本lucene_version" : "9.0.0" 表示lucene版本name : 默认启动的时候指定了 ES 实例名称cluster_name : 默认名为 elasticsearch
1.3 集群访问
访问集群状态信息http://18.3.63.35:9200/_cat/health?v
安装Elasticsearch谷歌插件,可以查看当前集群的状态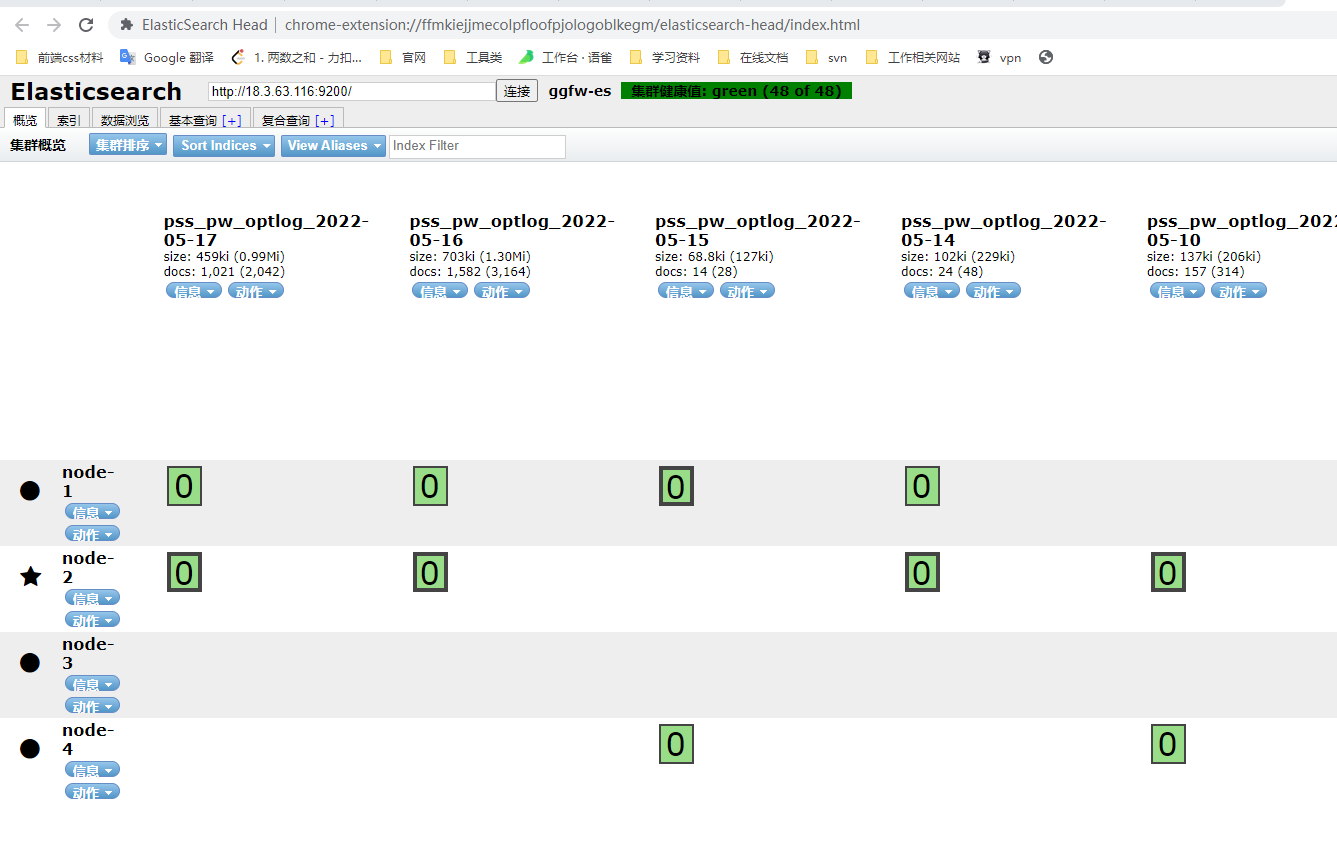
健康状况结果解释:cluster 集群名称status 集群状态green代表健康;yellow代表分配了所有主分片,但至少缺少一个副本,此时集群数据仍旧完整;red 代表部分主分片不可用,可能已经丢失数据。node.total代表在线的节点总数量node.data代表在线的数据节点的数量shards 存活的分片数量pri 存活的主分片数量 正常情况下 shards的数量是pri的两倍。relo迁移中的分片数量,正常情况为 0init 初始化中的分片数量 正常情况为 0unassign未分配的分片 正常情况为 0pending_tasks准备中的任务,任务指迁移分片等 正常情况为 0max_task_wait_time任务最长等待时间active_shards_percent正常分片百分比 正常情况为 100%
集群配置
| cluster name | node name | IP Addr | http端口 |
|---|---|---|---|
| ggfw-es | node-1 | 18.3.63.35 | 9200 |
| ggfw-es | node-2 | 18.3.63.116 | 9200 |
| ggfw-es | node-3 | 18.3.63.201 | 9200 |
| ggfw-es | node-4 | 18.3.63.237 | 9200 |
kibana安装
安装步骤
安装参考链接
操作步骤:
上传kibana压缩包(D:\develop\java_tools)到服务器(ip:18.3.63.166)的
/opt/kibana/目录下,进行解压tar zxvf kibana-8.1.0-linux-x86_64.tar.gz
找到kibana.yml配置文件,修改参数
cd /opt/kibana/kibana-8.1.0/config/
修改kibana配置:
server.port: 5601#改成安装的本机ip或者0.0.0.0server.host: "0.0.0.0"i18n.locale: "zh-CN"elasticsearch.hosts: ["http://18.3.63.35:9200"] #可以用来集群配置server.publicBaseUrl: "http://18.3.63.166:5601"
server.port:http访问端口
server.host:ip地址,0.0.0.0表示可远程访问
server.publicBaseUrl: 指定Kibana对终端用户可用的公共URL
elasticsearch.hosts:elasticsearch地址在/opt/kibana/kibana-8.1.0/bin/目录下,编写一个启动文件start.sh(一定要在es启动情况下启动kibana)
cd /opt/kibana/kibana-8.1.0/bin/vim start.shsh start.sh
start.sh文件内容
nohup ./kibana > kibana.out 2>&1 &
怎么理解nohup 2>&1 & ,参看https://www.cnblogs.com/songwp/p/15552300.html
访问页面:http://18.3.63.166:5601/app/home#/
停止kibana服务
ps -ef|grep kibanaps -ef|grep 5601都找不到的话,尝试使用 fuser -n tcp 5601kill -9 端口ps -ef|grep node 或 netstat -anltp|grep 5601启动即可 ./kibana

