1. 基本要求
- 统计一小时内的热门商品,每5分钟更新一次
- 热门度用浏览次数(“pv”)来衡量
2. 解决思路
- 在所有的用户行为数据中,过滤出浏览(“pv”)行为进行统计
- 构建滑动窗口,窗口长度为1小时,滑动距离为5分钟
3. 处理流程
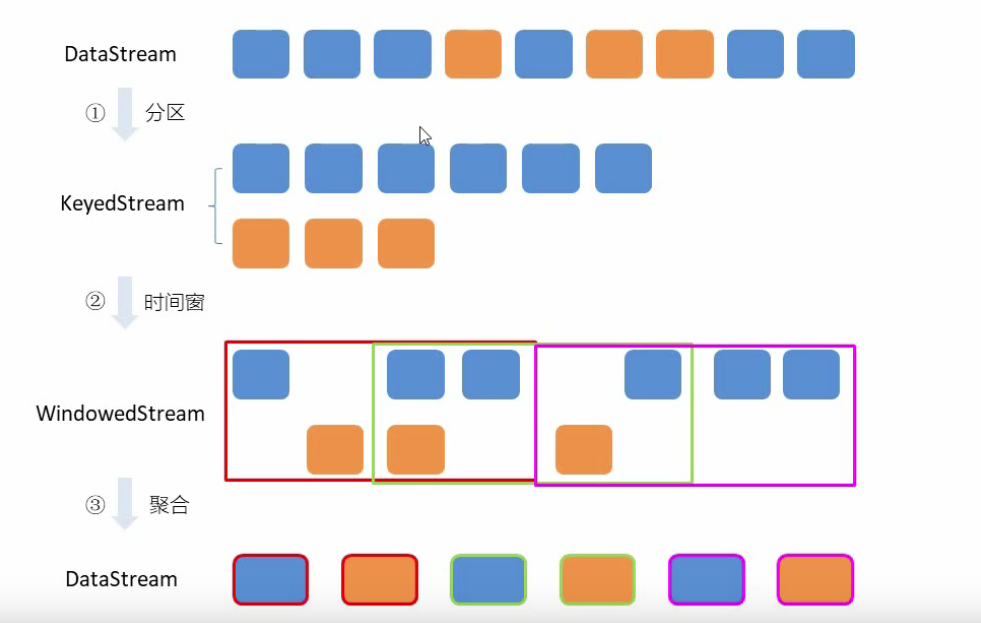
- 首先在流数据中进行filter过滤,过滤出pv行为
- 根据商品进行分组,key为商品id

- 开窗


一份数据同时输入12个滑动窗口(60分钟/5=12)
- 计算每个窗口内,每个商品有多少个


基于 UserBehavior 数据集来进行 分析。项目主体用 Scala 编写,采用 IDEA 作为开发环境进行项目编写,采用 maven 作为项目构建和管理工具。
UserBehaviorAnalysis
HotItemsAnalysis
4. 创建maven项目
4.1 项目框架搭建
打开 IDEA,创建一个 maven 项目,命名为 UserBehaviorAnalysis(不要勾选create from archetype)。由于包含了 多个模块,我们可以以UserBehaviorAnalysis 作为父项目,并在其下建一个名为 HotItemsAnalysis 的子项目,用于实时统计热门 top N 商品。
在 UserBehaviorAnalysis 下 新 建 一 个 maven module 作 为 子 项 目 , 命 名 为 HotItemsAnalysis。 父项目只是为了规范化项目结构,方便依赖管理,本身是不需要代码实现的, 所以 UserBehaviorAnalysis 下的 src 文件夹可以删掉 
可以发现父pom文件中包含子模块
4.2 pom文件配置
声明项目中工具的版本信息
整个项目需要的工具的不同版本可能会对程序运行造成影响,所以应该在最外层的 UserBehaviorAnalysis 中声明所有子模块共用的版本信息。
在父pom文件(UserBehaviorAnalysis)中添加配置:
UserBehaviorAnalysis/pom.xml
<properties><flink.version>1.11.2</flink.version><scala.binary.version>2.11</scala.binary.version><scala.version>2.11</scala.version></properties>
添加项目依赖
UserBehaviorAnalysis 中引入flink相关组件公有依赖:
  <dependencies>
      <dependency>
          <groupId>org.apache.flink</groupId>
          <artifactId>flink-clients_${scala.binary.version}</artifactId>
          <version>${flink.version}</version>
          <scope>provided</scope>
      </dependency>

      <dependency>
          <groupId>org.apache.flink</groupId>
          <artifactId>flink-streaming-scala_${scala.binary.version}</artifactId>
          <version>${flink.version}</version>
          <scope>provided</scope>
      </dependency>

      <dependency>
          <groupId>org.apache.kafka</groupId>
          <artifactId>kafka_${scala.binary.version}</artifactId>
          <version>${kafka.version}</version>
      </dependency>

      <dependency>
          <groupId>org.apache.flink</groupId>
          <artifactId>flink-connector-kafka_${scala.binary.version}</artifactId>
          <version>${flink.version}</version>
      </dependency>

  </dependencies>
引入maven插件
<plugin>
    <groupId>org.apache.maven.plugins</groupId>
    <artifactId>maven-shade-plugin</artifactId>
    <version>3.1.1</version>
    <executions>
        <!-- Run shade goal on package phase -->
        <execution>
            <phase>package</phase>
            <goals>
                <goal>shade</goal>
            </goals>
            <configuration>
                <artifactSet>
                    <excludes>
                        <exclude>org.apache.flink:force-shading</exclude>
                        <exclude>com.google.code.findbugs:jsr305</exclude>
                        <exclude>org.slf4j:*</exclude>
                        <exclude>org.apache.logging.log4j:*</exclude>
                    </excludes>
                </artifactSet>
                <filters>
                    <filter>
                        <!-- Do not copy the signatures in the META-INF folder.
                        Otherwise, this might cause SecurityExceptions when using the JAR. -->
                        <artifact>*:*</artifact>
                        <excludes>
                            <exclude>META-INF/*.SF</exclude>
                            <exclude>META-INF/*.DSA</exclude>
                            <exclude>META-INF/*.RSA</exclude>
                        </excludes>
                    </filter>
                </filters>
                <transformers>
                    <transformer implementation="org.apache.maven.plugins.shade.resource.ManifestResourceTransformer">
                        <mainClass>org.example.StreamingJob</mainClass>
                    </transformer>
                </transformers>
            </configuration>
        </execution>
    </executions>
</plugin>
在 HotItemsAnalysis 子模块中,我们并没有引入更多的依赖,所以不需要改动 pom 文件。
4.3 导入数据
在 src/main/目录下,可以看到已有的默认源文件目录是 java,我们可以将其改 名为 scala。将数据文件 UserBehavior.csv 复制到资源文件目录 src/main/resources 下, 我们将从这里读取数据。 至此,我们的准备工作都已完成,接下来可以写代码了。
5. 代码实现
在HotItemsAnalysis/src/scala路径下新建HotItems(Scala object)
创建代码,new时如果没有Scala选项时,

5.1 定义样例类
//定义输入数据样例类
case class UserBehavior(userId: Long, itemId: Long, categoryId: Int, behavior: String, timestamp: Long)

//定义窗口聚合结果样例类
case class ItemViewCount(itemId: Long, windowEnd: Long, count: Long)
5.2 将文本数据写入kafka
实际项目中数据一般是从kafka中读取的,本案例所给数据源为文件数据,为了模拟实际项目中的情况,现将本地文件中的数据写入到kafka中,然后从kafka读取数据。
KafkaProducerUtil工具类
将文本数据写入kafka
src\main\scala\hotitems_analysis\KafkaProducerUtil.scala
import java.util.Properties

import org.apache.kafka.clients.producer.{KafkaProducer, ProducerRecord}

object KafkaProducerUtil {
  def main(args: Array[String]): Unit = {
    writeToKafka("hostitems")
  }
  def writeToKafka(topic: String): Unit ={
    val properties = new Properties()
    properties.setProperty("bootstrap.servers", "192.168.188.8:9092")
    properties.setProperty("key.serializer",
      "org.apache.kafka.common.serialization.StringSerializer")
    properties.setProperty("value.serializer",
      "org.apache.kafka.common.serialization.StringSerializer")

    val producer = new KafkaProducer[String,String](properties)

    //从文件读数据,逐行写入kafka
    val bufferedSource =io.Source.fromFile("D:\\IDEA\\UserBehaviorAnalysis\\HotItemsAnalysis\\src\\main\\resources\\UserBehavior.csv")
    for (line <-bufferedSource.getLines()){
      val record = new ProducerRecord[String,String](topic,line)
      producer.send(record)
    }
    producer.close()
  }
}
- 需要导入 import org.apache.kafka.clients.producer.{KafkaProducer, ProducerRecord}
- writeToKafka(“hostitems”)自定义写入方法,并传入topic
- 其他代码讲解,请看之前连接中实例代码讲解:https://www.yuque.com/u1046159/qstfva/ve8ydf#LIZyZ
5.3 从kafka中读取数据
//从kafka读取数据
val properties = new Properties()
properties.setProperty("bootstrap.servers", "192.168.188.8:9092")
properties.setProperty("group.id", "consumer-group")
properties.setProperty("key.deserializer",
  "org.apache.kafka.common.serialization.StringSerializer")
properties.setProperty("value.serializer",
  "org.apache.kafka.common.serialization.StringSerializer")

val inputStream = env.addSource(new FlinkKafkaConsumer[String]("hostitems", new SimpleStringSchema(), properties))
使用Flink时,如果从Kafka中读取输入流,默认提供的是String类型的Schema:val myConsumer = new FlinkKafkaConsumer08String, properties)
5.4 将数据转化为样例类
val dataStream: DataStream[UserBehavior] = inputStream
.map(data => {
  val arr = data.split(",")
  UserBehavior(arr(0).toLong, arr(1).toLong, arr(2).toInt, arr(3), arr(4).toLong)
})
5.4 提取时间戳生成watermark
.assignAscendingTimestamps(_.timestamp * 1000L)之所以使用assignAscendingTimestamps,是因为数据文件中时间戳是单调递增的。此方法是数据流的快捷方式,其中已知元素时间戳在每个并行流中单调递增。在这种情况下,系统可以通过跟踪上升时间戳自动且完美地生成水印。这种方法创建时间戳与水印最简单,返回一个long类型的数字就可以了
**.timestamp 1000L,选择事件时间的字段timestamp ,文本数据时间戳为毫秒,需求是分钟,需要乘 1000L*_5.5 窗口聚合操作
val aggStream: DataStream[ItemViewCount] = dataStream .filter(_.behavior == "pv") .keyBy("itemId") .timeWindow(Time.hours(1), Time.minutes(5)) .aggregate(new CountAgg(), new ItemViewWindowResult())聚合操作前需要先过滤,过滤出行为是pv的数据,然后再根据商品id进行分组
- 使用.timeWindow(Time size, Time slide)对每个商品做滑动窗口(1小时窗口,5分钟滑动一次)
- .aggregate(AggregateFunction af, WindowFunction wf)做增量的聚合操作,它能使用AggregateFunction提前聚合掉数据,减少state的存储压力。第一个参数是定义窗口聚合规则,第二个函数将每个key每个窗口聚合后的结果带上其他信息进行输出(即CountAgg()输出结果传入ItemViewWindowResult()中)。
CountAgg()
//COUNT统计的聚合函数实现,每出现一条记录就加一
class CountAgg() extends AggregateFunction[UserBehavior, Long, Long] {

  //累加器count的初始值为0
  override def createAccumulator(): Long = 0L

  //每来一条数据调用add方法,累加器和传入的value进行累加即count值+1
  override def add(value: UserBehavior, accumulator: Long): Long = accumulator + 1

  //得到的结果就是count(count值要传递到CountViewWindowResult进行接下来的操作)
  override def getResult(acc: Long): Long = acc

  //如果有两个分区 合并两个分区的数据
  override def merge(a: Long, b: Long): Long = a + b
}
AggregateFunction()函数输入输出数据类型为:输入数据类型、中间聚合状态类型(此处聚合的是count值,count类型为Long)、输出数据类型
AggregateFunction需要复写的方法有:
- createAccumulator:创建一个新的累加器。聚合状态就是当前商品的count值
- add:将给定的输入添加到给定的累加器,并返回新的累加器值。
- getResult:从累加器获取聚合结果。
- merge:合并两个累加器,返回合并后的累加器的状态。
ItemViewWindowResult()
//自定义窗口函数
class ItemViewWindowResult() extends WindowFunction[Long, ItemViewCount, Tuple, TimeWindow] {
  override def apply(key: Tuple, window: TimeWindow, input: Iterable[Long], out: Collector[ItemViewCount]): Unit = {
    val itemId = key.asInstanceOf[Tuple1[Long]].f0
    val windowsEnd = window.getEnd
    val count = input.iterator.next()
    out.collect(ItemViewCount(itemId, windowsEnd, count))
  }
}
其中WindowFunction(全量窗口函数,WindowFunction 输入数据来自AggregateFuntion, 在窗口结束的时候先执行Aggregate对象的getResult,然后再执行 自己的apply对象)属于Scal,引用时需要注意,WindowFunction传入的参数类型: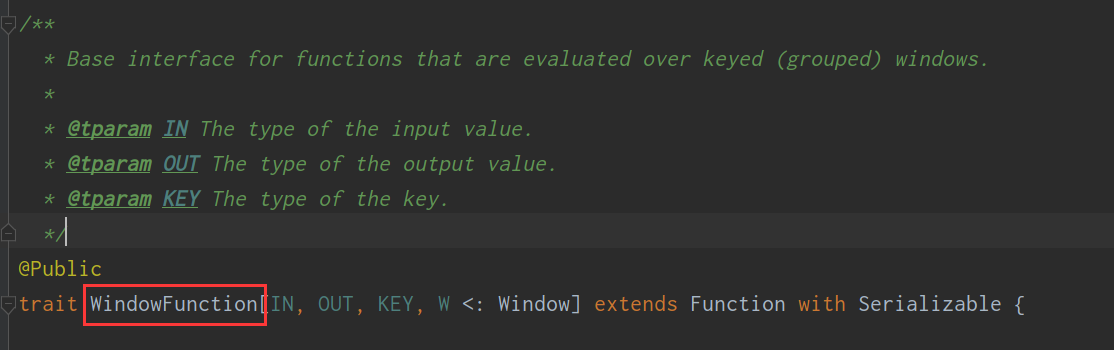
其中输入参数类型为CountAgg()返回的数据类型(本案例为Long),输出为样例类类型ItemViewCountwef,key类型为怎么确定?经过keyby之后得到的KeyedStream是JavaTuple类型,故此处的key为元组类型tuple。窗口类型为TimeWindow
需要拿到参数有:
- itemId(就是AggregateFunction()返回的key [因为之前的keyby就是通过商品id进行分组的 ],因为key目前是java tuple类型,需要先进行类型转换(p.asInstanceOf[XX] 把 p 转换成 XX 对象的实例)
注意:此处的Tuple1含义,属于java类型,需要的api是import **org.apache.flink.api.java.tuple.{Tuple, Tuple1}**
要想拿到一元组中的值,tuple1方法中有个:

- windowsEnd:使用getEnd
- count:input.iterator.next()
输出的时候,apply方法本身没有返回值,输出用Collector,代码使用out.collect()
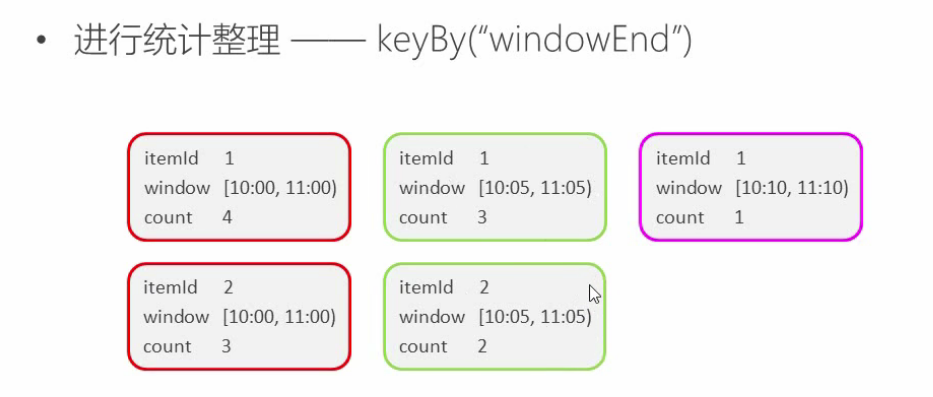
5.6 进行统计整理
val resultStream: DataStream[String] = aggStream
     //按照窗口进行分组,收集窗口内的商品count数据
  .keyBy("windowEnd")
    //自定义处理流程
  .process(new TopNHotItems(5))
为了统计每个窗口下最热门的商品,我们需要再次按窗口进行分组,这里根据ItemViewCount中的windowEnd进行keyBy()操作。然后使用ProcessFunction实现一个自定义的TopN函数TopNHotItems来计算点击量排名前5名的商品,并将排名结果格式化成字符串,便于后续输出。
class TopNHotItems(topSize: Int) extends KeyedProcessFunction[Tuple, ItemViewCount, String] {
  //定义状态:ListState
  lazy val itemViewCountListState: ListState[ItemViewCount] = getRuntimeContext.getListState(new ListStateDescriptor[ItemViewCount]("itemViewCount-list", classOf[ItemViewCount]))

  override def processElement(value: ItemViewCount, ctx: KeyedProcessFunction[Tuple, ItemViewCount, String]#Context, out: Collector[String]): Unit = {
    //每来一条数据,直接加入ListState
    itemViewCountListState.add(value)
    //注册一个WindowEnd + 1 之后触发的定时器
    ctx.timerService().registerEventTimeTimer(value.windowEnd + 1)
  }

  //当定时器触发,可以认为所有窗口统计结果已经到到齐,可以排序输出了
  override def onTimer(timestamp: Long, ctx: KeyedProcessFunction[Tuple, ItemViewCount, String]#OnTimerContext, out: Collector[String]): Unit = {
    //为了方便排序,另外定义一个ListBuffer,保存ListState里面的所有数据
    val allItemViewCounts: ListBuffer[ItemViewCount] = ListBuffer()
    val iter = itemViewCountListState.get().iterator()
    while (iter.hasNext) {
      allItemViewCounts += iter.next()
    }
    //清空状态
    itemViewCountListState.clear()

    //按照count大小进行排序
    val sortedItemViewCounts = allItemViewCounts.sortBy(_.count)(Ordering.Long.reverse).take(topSize)

    //将排序信息格式化成String,便于打印输出可视化展示
    val result: StringBuilder = new StringBuilder
    result.append("窗口结束时间:").append(new Timestamp(timestamp - 1)).append("\n")

    //遍历结果列表中的每一个ItemViewCount,输出到一行
    for (i <- sortedItemViewCounts.indices) {
      val currentItemViewCount = sortedItemViewCounts(i)
      result.append("NO").append(i + 1).append(": ")
        .append("商品ID= ").append(currentItemViewCount.itemId).append("\t")
        .append("热门度= ").append(currentItemViewCount.count).append("\n")
    }

    result.append("==================\n\n")
    Thread.sleep(1000)
    out.collect(result.toString())
  }
}
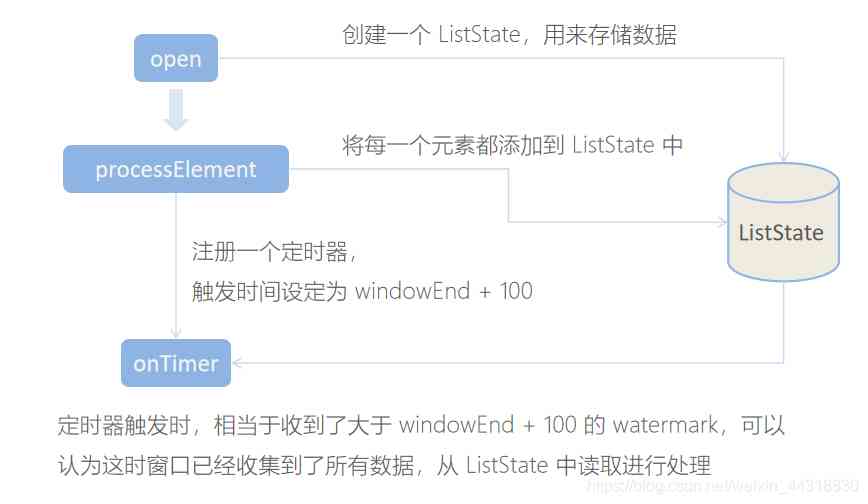
ProcessFunction是主要提供了定时器timer的功能(支持EventTime或ProcessingTime)。本案例中我们将利用timer来判断何时收齐了某个window下所有商品的点击量数据。由于Watermark的进度是全局的,在processElement方法中,每当收到一条数据ItemViewCount,我们就注册一个windowEnd+1的定时器(Flink框架会自动忽略同一时间的重复注册)。windowEnd+1的定时器被触发时,意味着收到了windowEnd+1的Watermark,即收齐了该windowEnd下的所有商品窗口统计值。我们在onTimer()中处理将收集的所有商品及点击量进行排序,选出TopN,并将排名信息格式化成字符串后进行输出。
这里我们还使用了ListState
KeyedProcessFunction方法传入的key的类型为tuple(当keyby传入的是字符转类型时,分组后返回的结果是tuple类型)
_ctx.timerService().registerEventTimeTimer(value.windowEnd + 1)_的含义:注册一个WindowEnd + 1 之后触发的定时器,延迟1毫秒触发,当触发时,说明watermark已经来了(watermark来到代表定义的watermark之前的数据已经全部到齐,那么此时的窗口可以关闭。如:若windowEnd是九点,九点一毫秒的时候watermark到来,说明九点之前的所有数据都到齐,说明九点之前要关的窗口可以关闭了 )收齐了属于windowEnd窗口的所有商品数据,统一排序处理
状态编程的讲解见:理解难点https://www.yuque.com/u1046159/qstfva/msa8xa
6. 数据流程图

若有收获,就点个赞吧
0 人点赞
