之前学习的转换算子是无法访问事件的时间戳信息和水位线信息的。而这在一些应用场景下,极为重要。 基于此,DataStream API 提供了一系列的 Low-Level 转换算子。可以访问时间 戳、watermark 以及注册定时事件。还可以输出特定的一些事件,例如超时事件等。 Process Function 用来构建事件驱动的应用以及实现自定义的业务逻辑(使用之前的 window 函数和转换算子无法实现)。ProcessFunction是一个低阶的流处理操作,可以访问事件(event)(流元素),状态(state)(容错性,一致性,仅在keyed stream中),定时器(timers)(event time和processing time, 仅在keyed stream中)。
Flink 提供了 8 个 Process Function:
ProcessFunctionKeyedProcessFunctionCoProcessFunctionProcessJoinFunctionBroadcastProcessFunctionKeyedBroadcastProcessFunctionProcessWindowFunctionProcessAllWindowFunction
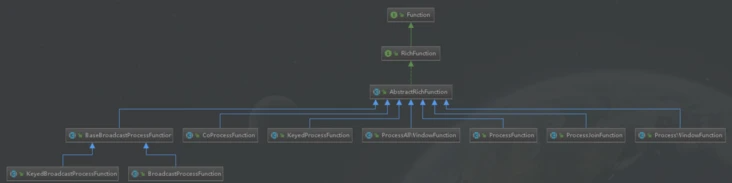
从上面的继承关系中可以看出,都实现了RichFunction接口,所以支持使用open()、close()、getRuntimeContext()等方法的调用。
KeyedProcessFunction
重点介绍 KeyedProcessFunction。
KeyedProcessFunction 用来操作 KeyedStream。KeyedProcessFunction 会处理流 的每一个元素,输出为 0 个、1 个或者多个元素。所有的 Process Function 都继承自 RichFunction 接口,所以都有 open()、close()和 getRuntimeContext()等方法。而 KeyedProcessFunction[KEY, IN, OUT]还额外提供了两个方法:
processElement(v: IN, ctx: Context, out: Collector[OUT]), 流中的每来一个数据都会调用这个方法,调用结果将会放在 Collector 数据类型中输出。Context 可以访问元素的时间戳,元素的 key,以及 TimerService 时间服务。Context 还可以将结果输出到别的流(side outputs)。
onTimer(timestamp: Long, ctx: OnTimerContext, out: Collector[OUT])是一个回调函数。当之前注册的定时器触发时调用。参数 timestamp 为定时器所设定 的触发的时间戳。Collector 为输出结果的集合。OnTimerContext 和 processElement 的 Context 参数一样,提供了上下文的一些信息,例如定时器 触发的时间信息(事件时间或者处理时间)。
TimerService 和 定时器(Timers)
Context 和 OnTimerContext 所持有的 TimerService 对象拥有以下方法 :
- currentProcessingTime(): Long 返回当前处理时间
- currentWatermark(): Long 返回当前 watermark 的时间戳
- registerProcessingTimeTimer(timestamp: Long): Unit 会注册当前 key 的 processing time 的定时器。当 processing time 到达定时时间时,触发 timer
- registerEventTimeTimer(timestamp: Long): Unit 会注册当前 key 的 event time 定时器。当水位线大于等于定时器注册的时间时,触发定时器执行回调函数
- deleteProcessingTimeTimer(timestamp: Long): Unit 删除之前注册处理时间定 时器。如果没有这个时间戳的定时器,则不执行
deleteEventTimeTimer(timestamp: Long): Unit 删除之前注册的事件时间定时 器,如果没有此时间戳的定时器,则不执行
当定时器 timer 触发时,会执行回调函数 onTimer()。注意定时器 timer 只能在 keyed streams 上面使用
案例:温度传感器报警(processing time)
需求:在10秒内,温度传感器的温度数据如果持续上升,就发出警报
错误想法:定义一个10s的时间窗口,对时间窗口内的数据进行判断,如果持续上升,就报警
那这种想法是否正确呢?
当出现上图情况可以判断出在时间窗口1与时间窗口2中温度在十秒内都不是持续上升的,但时间窗口1与时间窗口2中间结合的部分的温度数据是上升的,所以这种方法判断不准确。
正确思路:从某一上升温度数据开始,定义一个十秒钟的定时器,判断十秒内的数据是否持续上升,如果十秒内的数据持续上升就报警,如果中间有降低的温度,就删除该时间戳处的定时器,等到温度上升时再定义一个定时器,反复判断
如图,当时间戳为1秒时的温度数据是上升数据时,定义一个10秒的定时器,遇到时间戳为4秒是的数据是下降的数据,此时删除在时间戳为1秒时定义的定时器,接下来时间戳为5秒的温度数据上升(与前一秒的数据进行比较),重新在该处定义一个定时器
代码编写:
定义样例类
//定义样例类,温度传感器
case class SensorReading(id: String, timestamp: Long, temperature: Double)
将输入数据转化为样例类
 //  先转换为为样例类类型
 val dataStream = inputStream
   .map(data => {
     val arr = data.split(",")
     SensorReading(arr(0), arr(1).toLong, arr(2).toDouble)
   })
定义定时器
val warningStream = dataStream
 .keyBy(_.id)
 .process(new TempIncreWaring(10000L))
process方法定义一个定时器,需要实现一个自定义的TempIncreWaring方法(该方法继承keyedProcessFunction),并将时间参数10秒(这里传递10秒钟的毫秒数10000L)传入自定义方法中
实现自定义的定时器方法
class TempIncreWaring(interval: Long) extends KeyedProcessFunction[String,SensorReading,String]{
override def processElement(value: SensorReading, ctx: KeyedProcessFunction[String, SensorReading, String]#Context, out: Collector[String]): Unit = {}
}
empIncreWaring(interval: Long)传入的参数变量名为interval,类型为长整型(时间戳),继承KeyedProcessFunction方法,KeyedProcessFunction方法需要传递的参数为:key的类型、输入数据类型、输出数据类型(下图为源码中对应的数据类型)
KeyedProcessFunction必须重写processElement方法(只要是状态编程就需要重写相应的构造方法)(关于processElement方法参数的讲解请看KeyedProcessFunction 一节:,每一条数据来之后都会调用processElement方法)定义状态,保存上一个温度值进行比较,保存注册定时器的时间戳用于删除
lazy val lastTempState: ValueState[Double] = getRuntimeContext.getState(new ValueStateDescriptor[Double]("last-time", classOf[Double]))
lazy val timerTsState: ValueState[Long] = getRuntimeContext.getState(new ValueStateDescriptor[Long]("timer-ts", classOf[Long]))
lastTempState为上一个温度值,类型是ValueState,泛型为Double
timerTsState为注册定时器的时间戳取出状态
val lastTemp = lastTempState.value()
val timerTs  = timerTsState.value()
更新温度值
lastTempState.update(value.temperature)这里所传递的温度值为
processElement(value: SensorReading, ctx: KeyedProcessFunction[String, SensorReading, String]#Context, out: Collector[String] )方法传递过来的温度(上面说过,每条数据来之后都会调用一次processElement方法,那么就能拿到每条数据的值)逻辑处理
//    对当前温度与上次温度进行比较
 if(value.temperature > lastTemp && timerTs==0){
//      如果温度上升且没有定时器,那么注册当前时间10s之后的定时器
   val ts = ctx.timerService().currentProcessingTime() + interval
   ctx.timerService().registerProcessingTimeTimer(ts)
   timerTsState.update(ts)
 } else if(value.temperature < lastTemp){
//      如果温度下降,那么删除定时器
   ctx.timerService().deleteProcessingTimeTimer(timerTs)
   //清空状态
   timerTsState.clear()
 }
重写
onTimer()方法override def onTimer(timestamp: Long, ctx: KeyedProcessFunction[String, SensorReading, String]#OnTimerContext, out: Collector[String]): Unit = { //如果状态没有被清空掉,说明温度是持续上升的,直接输出报警信息 out.collect("传感器" + ctx.getCurrentKey + "的温度持续上升" + interval / 1000 + "秒连续上升") timerTsState.clear() }完整代码
代码理解可以看理解难点一
//定义样例类,温度传感器
case class SensorReading(id: String, timestamp: Long, temperature: Double)
object processfunctionTest {
def main(args: Array[String]): Unit = {
val env = StreamExecutionEnvironment.getExecutionEnvironment
env.setParallelism(1)
val inputStream = env.socketTextStream("192.168.188.8", 7777)
// 先转换为为样例类类型
val dataStream = inputStream
.map(data => {
val arr = data.split(",")
SensorReading(arr(0), arr(1).toLong, arr(2).toDouble)
})
val warningStream = dataStream
//根据key进行分组
.keyBy(_.id)
//任务算子
.process(new TempIncreWaring(10000L))
// 输出
warningStream.print()
env.execute("process function test")
}
}
//实现自定义的keyedprocessfunction
class TempIncreWaring(interval: Long) extends KeyedProcessFunction[String, SensorReading, String] {
// 定义状态,保存上一个温度值进行比较,保存注册定时器的时间戳用于删除
lazy val lastTempState: ValueState[Double] = getRuntimeContext.getState(new ValueStateDescriptor[Double]("last-time", classOf[Double]))
lazy val timerTsState: ValueState[Long] = getRuntimeContext.getState(new ValueStateDescriptor[Long]("timer-ts", classOf[Long]))
override def processElement(value: SensorReading, ctx: KeyedProcessFunction[String, SensorReading, String]#Context, out: Collector[String]): Unit = {
// 先取出状态
val lastTemp = lastTempState.value()
val timerTs = timerTsState.value()
// 更新温度值
lastTempState.update(value.temperature)
// 对当前温度与上次温度进行比较
if (value.temperature > lastTemp && timerTs == 0) {
// 如果温度上升且没有定时器,那么注册当前时间10s之后的定时器
val ts = ctx.timerService().currentProcessingTime() + interval
ctx.timerService().registerProcessingTimeTimer(ts)
timerTsState.update(ts)
} else if (value.temperature < lastTemp) {
// 如果温度下降,那么删除定时器
ctx.timerService().deleteProcessingTimeTimer(timerTs)
//清空状态
timerTsState.clear()
}
}
override def onTimer(timestamp: Long, ctx: KeyedProcessFunction[String, SensorReading, String]#OnTimerContext, out: Collector[String]): Unit = {
 //如果状态没有被清空掉,说明温度是持续上升的,直接输出报警信息
 out.collect("传感器" + ctx.getCurrentKey + "的温度持续上升" + interval / 1000 + "秒连续上升")
 timerTsState.clear()
}
}
(1)以上是键控状态(Keyed State)的使用,Keyed State是针对KeyedStream的状态,必须先对一个DataStream进行keyBy,在本案例中对温度传感器的id进行keyby
(2)之后需要实现rich类函数(富函数),比如本案例中KeyedProcessFunction,该函数继承了RichFunction,都有运行时上下文RuntimeContext,RuntimeContext包含了状态的数据。在实现这些算子函数类时,一般是在open方法中声明状态(或者使用lazy关键字进行修饰,只有在使用该变量时,才会调用其实例化方法即open方法)。open是算子的初始化方法,它在实际处理函数之前调用。
(3)状态的使用,需要先注册一个StateDescriptor,StateDescriptor是状态的一种描述,它描述了状态的名字和状态的数据结构。状态的名字可以用来区分不同的状态(一个算子内可以有多个不同的状态,每个状态的StateDescriptor需要设置不同的名字)。状态的数据结构也非常重要,因为Flink要对其进行序列化和反序列化,以便进行Checkpoint和必要的恢复。在本例中,使用new ValueStateDescriptor[Double]("last-time", classOf[Double]),注册了一个ValueStateDescriptor
(4)接着我们通过StateDescriptor向RuntimeContext中获取状态句柄。本例中使用getRuntimeContext.getState(new ValueStateDescriptor[Double]("last-time", classOf[Double]))。状态句柄并不存储状态,它只是Flink提供的一种访问状态的接口,状态数据实际存储在State Backend中。
(5)使用和更新状态发生在实际的处理函数上,比如RichFlatMapFunction中的flatMap方法(上篇文章中温度案例),本案例使用KeyedProcessFunction的process方法。在实现自己的业务逻辑时,比如通过get方法获取状态,使用update方法更新状态。
侧输出流
大部分的 DataStream API 的算子的输出是单一输出,也就是某种数据类型的流。 除了 split 算子,可以将一条流分成多条流,这些流的数据类型也都相同。processfunction 的side outputs 功能可以产生多条流,并且这些流的数据类型可以不一样。 一个 side output 可以定义为 OutputTag[X]对象,X 是输出流的数据类型。process function 可以通过 Context 对象发射一个事件到一个或者多个 side outputs。
案例:温度传感器温度数据分流
需求:将温度传感器温度值高于30度的输出到主流中,低于30度的输出到侧输出流中
object SideOutputTest {
  def main(args: Array[String]): Unit = {
    val env = StreamExecutionEnvironment.getExecutionEnvironment
    env.setParallelism(1)

    val inputStream = env.socketTextStream("192.168.188.8", 7777)
    //  先转换为为样例类类型
    val dataStream = inputStream
      .map(data => {
        val arr = data.split(",")
        SensorReading(arr(0), arr(1).toLong, arr(2).toDouble)
      })

    val higtTempStream = dataStream
        .process(new SplitTempProcess(30.0))

    higtTempStream.print("hight")
    higtTempStream.getSideOutput(new OutputTag[(String,Long,Double)]("low")).print("low")
    env.execute("side output test")

  }

}

// 实现自定义的processfunction,进行分流
//主流的输出类型
class SplitTempProcess(thread: Double) extends ProcessFunction[SensorReading,SensorReading]{
  override def processElement(value: SensorReading, ctx: ProcessFunction[SensorReadin    g, SensorReading]#Context, out: Collector[SensorReading]): Unit = {
    if (value.temperature > thread){
      //如果当前温度值大于30度,那么输出到主流
      out.collect(value)
    }else{
      //如果不超过30度输出到侧输出流
      ctx.output(new OutputTag[(String,Long,Double)]("low"),(value.id,value.timestamp,value.temperature))
    }
  }
}
- 当使用旁路输出时,首先需要定义一个OutputTag来标识一个旁路输出流,本案例中
new OutputTag[(String,Long,Double)]("low")),其中outputTag可以进行类型调整 - 注意:OutputTag是如何根据旁路输出流包含的元素类型typed的,可以通过以下几种函数发射数据到旁路输出,本文给出ProcessFunction的案例
- ProcessFunction
- CoProcessFunction
- ProcessWindowFunction
- ProcessAllWindowFunction
- 侧输出流输出,是基于processelement方法中上下文中的数据:
ctx.output()

若有收获,就点个赞吧
0 人点赞
