时代飞速发展,智能家居已经成为生活中必不可少的存在,在本节课我们将一起来制作一个温控风扇,当温度到达阈值时,则自动启动风扇散热;当温度低于某个阈值时,则自动关闭风扇,接下来让我们看看怎么完成它吧!
知识锦囊
温湿度传感器
温湿度传感器,顾名思义就是用来检测环境中的温度和湿度的传感器,温湿度传感器有多种类型,我们所使用的是已校准数字信号输出的DHT20温湿度传感器,传感器上有电容式传感器元件可以测量相对湿度,温度则通过热敏电阻测量,稳定性强,用它来制作智能温湿度仪再合适不过了。温湿度传感器在农业领域、环境保护、家居生活中都具有非常大的用途。

| 知识窗
早在1592年,伽利略就发明了温度计,它是一种由玻璃圆筒制成的温度计,圆筒中有透明液体及不同密度的重物,实现测温的原理简单来说就是热胀冷缩。当温度改变时,液体的密度也会随之改变,使得不同密度的悬浮物上下移动,直到液体和自身的密度相同。后面经过不同人的优化和迭代,玻璃温度计越来越精确和稳定,应用于各个领域。传统的玻璃温度计已经有300多年的历史,至今仍在投入使用。


随着技术的发展和应用,温度计可供选择的种类越来越多,如水银玻璃温度计、表盘式温度计、热敏电阻温度计、红外温度计、电子温度计等等,不同的温度计有着不用的使用场景。还有一些温度计会加入检测湿度的功能,成为温湿度计,监测环境的温度和湿度。 |
| —- |
迷你风扇模块
迷你风扇是输出模块,包括直流电机、驱动板以及扇叶组成,当设定为高电平时,电机转动,设定低电平时,电机不动,可以用来制作风扇项目。
实践操作
任务一:在串口监视器显示温湿度传感器的值
首先我们将温湿度传感器通过Grove线连接到主控板的IIC接口上。
接下来是程序部分,使用温湿度传感器需要导入温湿度传感器的库文件,点击DHT20库打开库文件的下载页面,然后将库下载到本地。
下载成功之后,将该文件解压到ardunio的库文件夹中(文件夹地址:此电脑/文档/Arduino/libraries)完成温湿度传感器库的导入。
然后打开Arduino IDE,新建一个程序文件,编写以下代码:
#include "DHT.h"#define DHTTYPE DHT20DHT dht(DHTTYPE);#define BAT_ENABLE 19 //Grove端口使能引脚#if defined(ARDUINO_ARCH_AVR)#define debug Serial#elif defined(ARDUINO_ARCH_SAMD) || defined(ARDUINO_ARCH_SAM)#define debug SerialUSB#else#define debug Serial#endifvoid setup() {digitalWrite(BAT_ENABLE, HIGH);//启用Grove端口debug.begin(115200);debug.println("DHTxx test!");Wire.begin();dht.begin();}void loop() {float temp_hum_val[2] = {0}; //将温湿度定义为一个数组if (!dht.readTempAndHumidity(temp_hum_val)) {debug.print("Humidity: ");debug.print(temp_hum_val[0]);//湿度值debug.print(" %\t");debug.print("Temperature: ");debug.print(temp_hum_val[1]);//温度值debug.println(" *C");} else {debug.println("Failed to get temprature and humidity value.");//如果没有读取到传感器值,那么显示报错信息}delay(1500);//延时一段时间读取数据。}
然后,
- 单击工具>开发板> Wio LTE

- 单击工具>端口以选择正确的端口号。(不要选择COM1)

接下来单击Arduino IDE左上方的Upload按钮,几秒钟后,程序成功上传。程序上传成功之后,点击界面右上角的串口监视器图标,打开串口监视器。需要注意的是,在本程序中设定了串口波特率为115200,所以打开串口监视器后,需要在右下角将波特率也选择为115200。
观察温湿度传感器是否正确输出温度值。
任务二:温控风扇
通过任务一的操作你会发现,temp_hum_val[0]输出的是传感器的湿度值,而temp_hum_val[1]输出的则是传感器的温度值。像上一节课一样,我们可以通过简单的if else判断语句编写对应的程序。
逻辑如下:
当温湿度传感器的温度值大于25度时,就控制风扇打开;当温湿度传感器的值小于25时,就控制风扇关闭。
我们首先将温湿度传感器与迷你风扇模块正确的接入开发板上,温湿度传感器接IIC接口,mini风扇接A2/D2接口。
然后打开Arduino IDE,新建一个程序文件,编写以下代码:
#include "DHT.h"#define DHTTYPE DHT20DHT dht(DHTTYPE);#define BAT_ENABLE 19 //Grove端口使能引脚#define FAN_PIN 2 //风扇连接到D2引脚#if defined(ARDUINO_ARCH_AVR)#define debug Serial#elif defined(ARDUINO_ARCH_SAMD) || defined(ARDUINO_ARCH_SAM)#define debug SerialUSB#else#define debug Serial#endifvoid setup() {digitalWrite(BAT_ENABLE, HIGH);//启用Grove端口pinMode(FAN_PIN,OUTPUT);//设置风扇引脚为输出模式debug.begin(115200);debug.println("DHTxx test!");Wire.begin();dht.begin();}void loop() {float temp_hum_val[2] = {0}; //将温湿度定义为一个数组if (!dht.readTempAndHumidity(temp_hum_val)) {if (temp_hum_val[1] > 25) {debug.print("ON\t");digitalWrite(FAN_PIN,HIGH);//如果温度大于25那么就启动风扇}else if (temp_hum_val[1] < 25){debug.println("OFF");digitalWrite(FAN_PIN,LOW);//如果风扇小于25就关闭风扇}}else {debug.println("Failed to get temprature and humidity value.");//如果没有读取到传感器值,那么显示报错信息}debug.print("Temp: ");debug.print(temp_hum_val[1]);//温度值debug.println(" *C");delay(1500);}
然后,
- 单击工具>开发板> Wio LTE
- 单击工具>端口以选择正确的端口号。(不要选择COM1)
然后,单击Arduino IDE左上方的Upload按钮,几秒钟后,程序成功上传。上传完成之后,尝试将传感器放入更热的环境中(比如用手捂住一会),检查风扇是否会正常转动。由于热量的传递需要时间,所以请保证传感器持续获得加热一段时间,以便超过阈值,你还可以根据你现在环境温度去灵活调整阈值大小。

思维拓展
高度检测器
大气压和海拔高度是息息相关的。一般情况下大气压是由大气层受到重力作用而产生的,离地面越高的地方,大气层就越薄,那里的大气压就应该越小。所以我们通过大气压的值就能判断出我们所位于的海拔高度。
Grove-高精度气压传感器可以检测当前环境的气压值,温度值和高度变化。该传感器是气象站中包含的基本传感器之一,在本项目中我们将通过Grove-高精度气压传感器来检测高度变化。
首先下载高精度气压传感器库文件,然后将压缩包解压到ardunio的库文件夹中(文件夹地址:此电脑/文档/Arduino/libraries)完成传感器库的导入。
然后将该传感器连接到IIC接口。
再新建一个程序编写以下代码并上传:
#include <Dps310.h>#define BAT_ENABLE 19 //Grove端口使能引脚// Dps310 OpjectDps310 Dps310PressureSensor = Dps310();void setup(){digitalWrite(BAT_ENABLE, HIGH);//启用Grove端口Serial.begin(9600);while (!Serial);//Call begin to initialize Dps310PressureSensor//The parameter 0x76 is the bus address. The default address is 0x77 and does not need to be given.//Dps310PressureSensor.begin(Wire, 0x76);//Use the commented line below instead of the one above to use the default I2C address.//if you are using the Pressure 3 click Board, you need 0x76Dps310PressureSensor.begin(Wire);Serial.println("Init complete!");}void loop(){float temperature;float pressure;uint8_t oversampling = 7;int16_t ret;Serial.println();//lets the Dps310 perform a Single temperature measurement with the last (or standard) configuration//The result will be written to the paramerter temperature//ret = Dps310PressureSensor.measureTempOnce(temperature);//the commented line below does exactly the same as the one above, but you can also config the precision//oversampling can be a value from 0 to 7//the Dps 310 will perform 2^oversampling internal temperature measurements and combine them to one result with higher precision//measurements with higher precision take more time, consult datasheet for more informationret = Dps310PressureSensor.measureTempOnce(temperature, oversampling);if (ret != 0){//Something went wrong.//Look at the library code for more information about return codesSerial.print("FAIL! ret = ");Serial.println(ret);}else{Serial.print("Temperature: ");Serial.print(temperature);Serial.println(" degrees of Celsius");}//Pressure measurement behaves like temperature measurement//ret = Dps310PressureSensor.measurePressureOnce(pressure);ret = Dps310PressureSensor.measurePressureOnce(pressure, oversampling);if (ret != 0){//Something went wrong.//Look at the library code for more information about return codesSerial.print("FAIL! ret = ");Serial.println(ret);}else{Serial.print("Pressure: ");Serial.print(pressure);Serial.println(" Pascal");}//Wait some timedelay(500);}
打开串口监视器,将波特率设置为9600然后将该传感器竖直慢慢举起来,观察数据变化。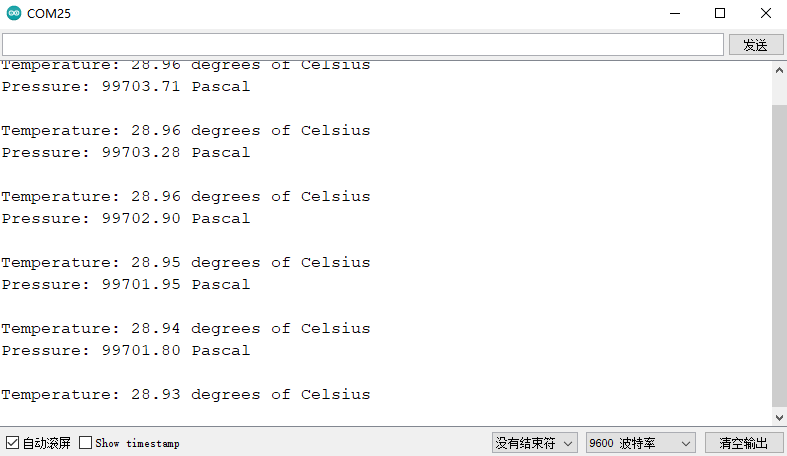


若有收获,就点个赞吧
0 人点赞
