学习目标
- 能够理解SpringBoot设计理念
- 能够使用idea工具构建SpringBoot项目
- 能够熟的应用SpringBoot配置文件
- 能够熟练的整合mybatis、redis
- 能够运用代码测试工具
- 理解版本控制的原理
1 Springboot的介绍
1.1 目标
能够理解springboot的设计理念,知道springboot用来解决什么问题
1.2 学习路径
- 目前项目开发的一些问题
- springboot的解决的问题
- springboot的特点和介绍
1.3 讲解
1.3.1 项目中开发的一些问题?
目前我们开发的过程当中,一般采用一个单体应用的开发采用SSM等框架进行开发,并在 开发的过程当中使用了大量的xml等配置文件,以及在开发过程中使用MAVEN的构建工具来进行构建项目,但是往往有时也会出现依赖的一些冲突,而且开发的时候测试还需要下载和使用tomcat等等这些servlet容器,所以开发的效率不高。
1.3.2 springboot解决的问题
那么在以上的问题中,我们就可以使用springboot来解决这些问题,当然他不仅仅是解决这些问题,来提高我们的开发人员的开发效率。使用springboot:可以不需要配置,可以不需要自己单独去获取tomcat,基本解决了包依赖冲突的问题,一键发布等等特性。
1.3.3 springboot的介绍
官方的说明:
Spring Boot makes it easy to create stand-alone, production-grade Spring based Applications that you can "just run".We take an opinionated view of the Spring platform and third-party libraries so you can get started with minimum fuss. Most Spring Boot applications need very little Spring configuration.
特性:
创建独立的Spring应用程序直接嵌入Tomcat,Jetty或Undertow(无需部署WAR文件)提供“入门”依赖项(起步依赖),以简化构建配置尽可能自动配置Spring和第三方库提供可用于生产的功能,例如指标,运行状况检查和外部化配置完全没有代码生成,也不需要XML配置
1.4 小结
springboot 就是一个基于spring的一个框架。提供了一些自动配置的依赖包,自动嵌入servlet的容器,简化了我们开发的配置,提升开发人员的开发效率,并解决了包依赖的问题。
2 Springboot使用入门
2.1 目标
能使用idea实现springboot的入门程序
2.2 学习路径
- 入门的需求
- 使用环境的准备
- 实现配置和开发
- 测试和小结
2.3 讲解
2.3.1 入门需求
使用springboot在页面中展示一个hello world
2.3.2 环境准备
推荐:使用springboot版本 springboot 2.1.4.RELEASE
推荐:jdk1.8
2.3.3 开始开发和配置
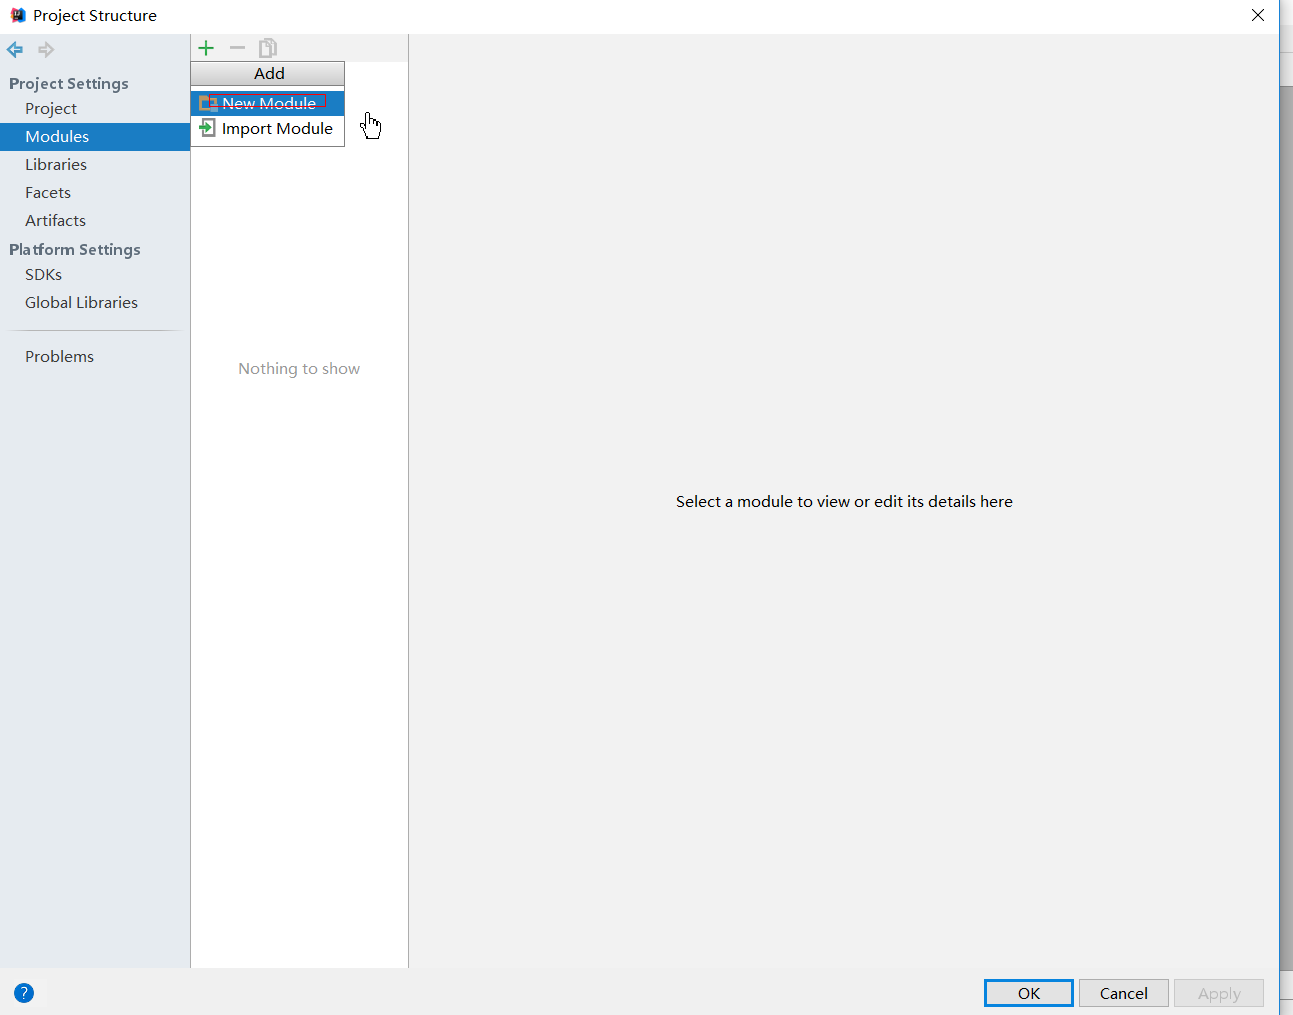
(1)创建空工程

(2)创建maven工程

(3)配置pom.xml
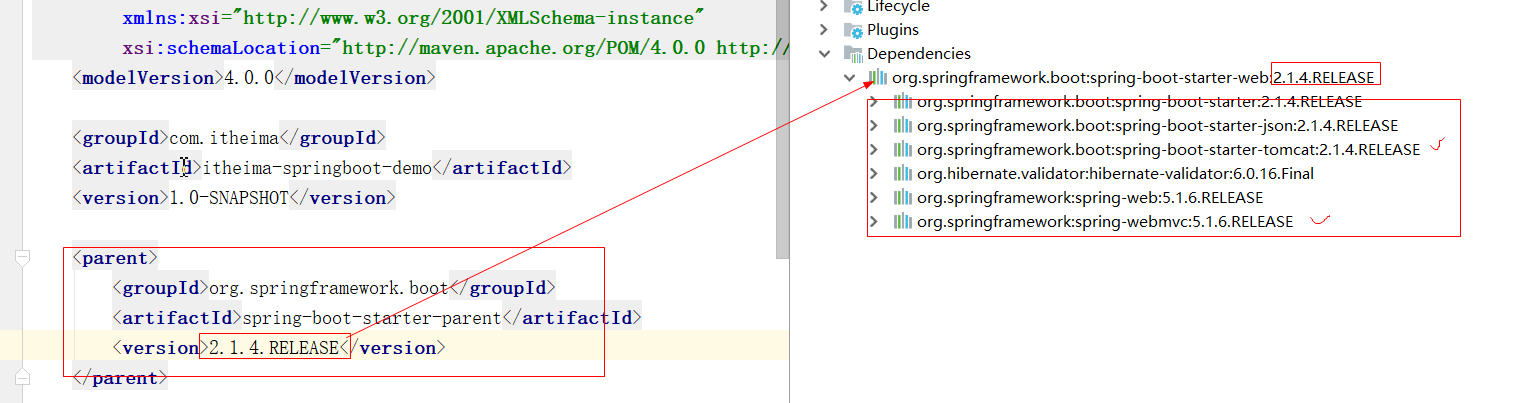
- 添加parent
<parent><groupId>org.springframework.boot</groupId><artifactId>spring-boot-starter-parent</artifactId><version>2.1.4.RELEASE</version></parent>
- 添加起步依赖
<dependency><groupId>org.springframework.boot</groupId><artifactId>spring-boot-starter-web</artifactId></dependency>
- pom.xml的整体代码如下
<?xml version="1.0" encoding="UTF-8"?><project xmlns="http://maven.apache.org/POM/4.0.0"xmlns:xsi="http://www.w3.org/2001/XMLSchema-instance"xsi:schemaLocation="http://maven.apache.org/POM/4.0.0 http://maven.apache.org/xsd/maven-4.0.0.xsd"><modelVersion>4.0.0</modelVersion><groupId>com.itheima</groupId><artifactId>itheima-springboot-demo</artifactId><version>1.0-SNAPSHOT</version><parent><groupId>org.springframework.boot</groupId><artifactId>spring-boot-starter-parent</artifactId><version>2.1.4.RELEASE</version></parent><dependencies><dependency><groupId>org.springframework.boot</groupId><artifactId>spring-boot-starter-web</artifactId></dependency></dependencies></project>
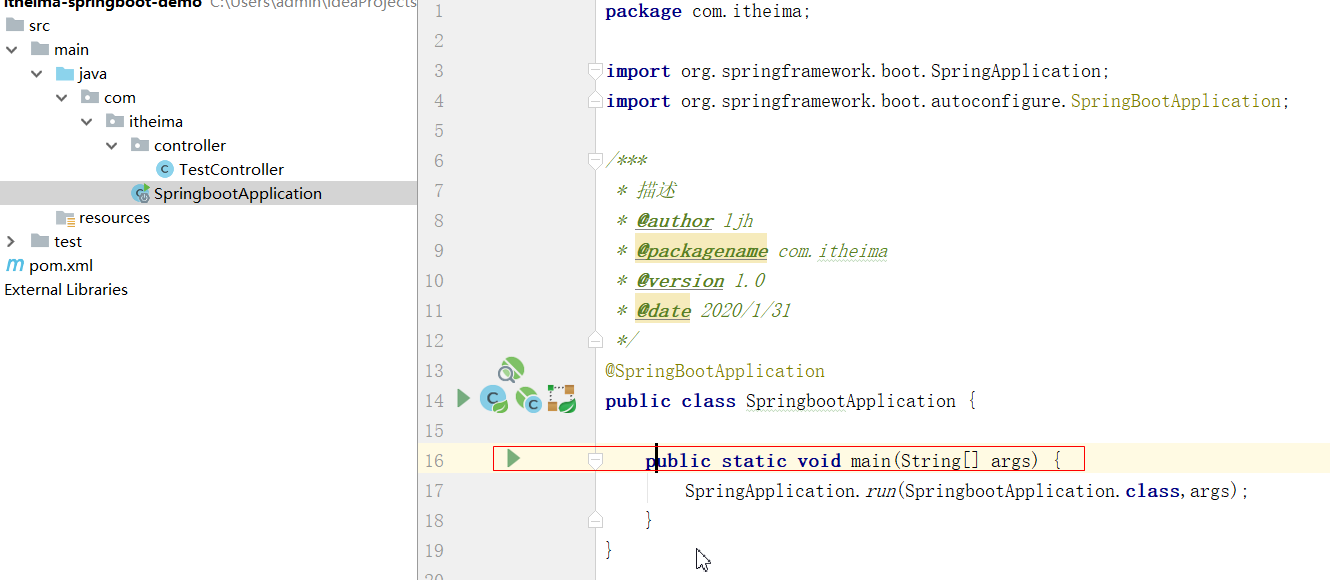
(4)创建启动类(或者 叫引导类)
@SpringBootApplicationpublic class SpringbootApplication {public static void main(String[] args) {SpringApplication.run(SpringbootApplication.class,args);}}
(5)创建controller 实现展示hello world
@RestControllerpublic class TestController {@RequestMapping("/hello")public String showHello(){return "hello world";}}
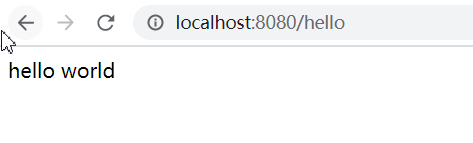
(6)测试
启动启动类的main方法,在浏览器中输入localhost:8080/hello,则在页面中显示hello world
2.4 小结
上边的入门程序 很快开发完成,没有任何的配置,只需要添加依赖,设置springboot的parent,创建引导类即可。springboot的设置parent用于管理springboot的依赖的版本,起步依赖快速的依赖了在web开发中的所需要的依赖项。
2.5 Spring Initializr的方式创建springboot工程
2.5.1 目标
了解相关的操作步骤实现创建springboot项目。
2.5.2 讲解
可以使用idea提供的方式来快速的创建springboot的项目,更加的方便,但是要求需要 联网而且网络需要比较稳定才行。如下步骤:
(1)选中spring initializr

(2)设置包名和坐标名

(3)设置添加依赖

(4)生成成功,自动生成相关引导类,添加依赖了。不需要手动的进行添加。如下图:
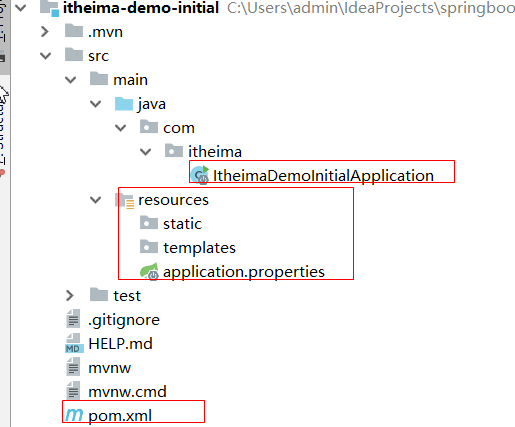
解释:
--ItheimaDemoInitalApplication类为引导类(启动类)--static 目录用于存储静态资源--templates 目录用于存储模板文件--application.properties 用于配置相关的使用到的属性,所有的配置基本上都需要在这里配置,需要注意的是名字不能修改。
3 Springboot的配置文件
SpringBoot是约定大于配置的,所以很多配置都有默认值。如果想修改默认配置,可以用application.properties或application.yml(application.yaml)自定义配置。SpringBoot默认从Resource目录加载自定义配置文件。
3.1 目标
- 掌握常用的properties的属性配置
- 掌握常用的yaml的属性配置
- 掌握获取配置文件中的属性值的常用的方式
- 掌握多配置文件切换
3.2 学习路径
- 常见的默认的配置
- 创建自定义配置格式
- 获取属性值
- 多文件配置和切换
3.3 讲解
3.3.1 properties文件
properties文件的配置多以key.key.key:value的形式组成,那么springboot本身有默认的一些配置,如果要修改这些默认的配置,可以在application.properties中进行配置修改。
比如:修改端口配置
server.port=8081
3.3.2 yaml或者yml文件
yaml文件等价于properties文件,在使用过程中都是一样的效果。但是yml文件书写的方式和properties文件不一样。更加简洁,那么我们可以根据需要选择性的使用properties和yml文件。如果同时存在两个文件,那么优先级properties要高于yml。
语法特点如下:
- 大小写敏感
- 数据值前必须有空格,作为分隔符
- 缩进的空格数目不重要,只需要对齐即可
#表示注释
书写格式如下要求如下:key和key之间需要换行以及空格两次。 简单key value之间需要冒号加空格。
key1:key2:key3: valuekey4: value4
比如:
server:port: 8081
注意:yml语法中,相同缩进代表同一个级别
# 基本格式 key: valuename: zhangsan# 数组 - 用于区分city:- beijing- tianjin- shanghai- chongqing#集合中的元素是对象形式students:- name: zhangsanage: 18score: 100- name: lisiage: 28score: 88- name: wangwuage: 38score: 90#map集合形式maps: {"name":"zhangsan", "age": "15"}#参数引用person:name: ${name} # 该值可以获取到上边的name定义的值
3.3.3 获取配置文件中值
获取配置文件中的值我们一般有几种方式:
- @value注解的方式 只能获取简单值
- Environment的方式
- @ConfigurationProperties
演示如下:
yml中配置:
# 基本格式 key: valuename: zhangsan# 数组 - 用于区分city:- beijing- tianjin- shanghai- chongqing#集合中的元素是对象形式students:- name: zhangsanage: 18score: 100- name: lisiage: 28score: 88- name: wangwuage: 38score: 90#map集合形式maps: {"name":"zhangsan", "age": "15"}#参数引用person:name: ${name} # 该值可以获取到上边的name定义的值age: 12
java代码:
controller
@RestControllerpublic class Test2Controller {@Value("${name}")private String name;@Value("${city[0]}")private String city0;@Value("${students[0].name}")private String studentname;@Value("${person.name}")private String personName;@Value("${maps.name}")//value注解只能获简单的值对象private String name1;@Autowiredprivate Student student;@RequestMapping("/show")public String showHello() {System.out.println(name);System.out.println(city0);System.out.println(studentname);System.out.println(personName);System.out.println(">>>>"+student.getAge());return "hello world";}}
pojo:
@Component@ConfigurationProperties(prefix = "person")public class Student {private String name;private Integer age;public String getName() {return name;}public void setName(String name) {this.name = name;}public Integer getAge() {return age;}public void setAge(Integer age) {this.age = age;}}
3.3.4 profile
在开发的过程中,需要配置不同的环境,所以即使我们在application.yml中配置了相关的配置项,当时在测试是,需要修改数据源等端口路径的配置,测试完成之后,又上生产环境,这时配置又需要修改,修改起来很麻烦。
- properties配置方式

application.properties:
#通过active指定选用配置环境spring.profiles.active=test
application-dev.properties:
#开发环境server.port=8081
application-test.properties
server.port=8082
application-pro.properties
server.port=8083
- yml配置方式

application.yml:
#通过active指定选用配置环境spring:profiles:active: pro
application-dev.yml:
#开发环境server:port: 8081
application-test.yml:
#测试环境server:port: 8082
applicatioin-pro.yml
#生产环境server:port: 8083
还有一种是分隔符的方式(了解)
spring:profiles:active: dev---#开发环境server:port: 8081spring:profiles: dev---#测试环境server:port: 8082spring:profiles: test---#生产环境server:port: 8083spring:profiles: pro
激活profile的方式(了解)
- 配置文件的方式(上边已经说过)
- 运行是指定参数
java -jar xxx.jar --spring.profiles.active=test - jvm虚拟机参数配置 -Dspring.profiles.active=dev
4 Springboot集成第三方框架
在springboot使用过程中,基本是是和第三方的框架整合使用的比较多,就是利用了springboot的简化配置,起步依赖的有效性。我们整合一些常见的第三方框架进行整合使用,后面会需要用到。
4.1目标
- 掌握springboot整合mybatis
- 掌握springboot整合redis
- 掌握springboot整合junit
4.2 学习路径
- 学习springboot整合junit
- 学习springboot整合mybatis
- 学习springboot整合redis
4.3 讲解
4.3.1 springboot整合junit
(1)添加依赖
<dependency><groupId>org.springframework.boot</groupId><artifactId>spring-boot-starter-test</artifactId><scope>test</scope></dependency>
(2)创建在/main/java/下一个类UserService用于测试:
package com.itheima.service;/**** 描述* @author ljh* @packagename com.itheima.service* @version 1.0* @date 2020/2/26*/@Servicepublic class UserService {public String getUser() {System.out.println("获取用户的信息");return "zhangsan";}}
(3)在test/java/下创建测试类,类的包名和启动类的报名一致即可
@RunWith(SpringRunner.class)@SpringBootTestpublic class SpringBootApplicationTests {@Autowiredprivate UserService userService;@Testpublic void getUser() {String userinfo = userService.getUser();System.out.println(userinfo);}}
解释:
@RunWith(SpringRunner.class) 使用springrunner运行器@SpringBootTest 启用springboot测试使用的方式和之前的spring的使用方式差不多。
4.3.2 springboot整合mybatis
(1)实现步骤说明
1.准备数据库创建表2.添加起步依赖3.创建POJO4.创建mapper接口5.创建映射文件6.配置yml 指定映射文件位置7.创建启动类,加入注解扫描8.创建service controller 进行测试
(2)创建数据库表
-- ------------------------------ Table structure for `user`-- ----------------------------DROP TABLE IF EXISTS `user`;CREATE TABLE `user` (`id` int(11) NOT NULL AUTO_INCREMENT,`username` varchar(50) DEFAULT NULL,`password` varchar(50) DEFAULT NULL,`name` varchar(50) DEFAULT NULL,PRIMARY KEY (`id`)) ENGINE=InnoDB AUTO_INCREMENT=3 DEFAULT CHARSET=utf8;-- ------------------------------ Records of user-- ----------------------------INSERT INTO `user` VALUES ('1', 'zhangsan', '123', '张三');INSERT INTO `user` VALUES ('2', 'lisi', '123', '李四');
(3)创建工程并添加依赖pom.xml如下参考
<?xml version="1.0" encoding="UTF-8"?><project xmlns="http://maven.apache.org/POM/4.0.0"xmlns:xsi="http://www.w3.org/2001/XMLSchema-instance"xsi:schemaLocation="http://maven.apache.org/POM/4.0.0 http://maven.apache.org/xsd/maven-4.0.0.xsd"><modelVersion>4.0.0</modelVersion><groupId>com.itheima</groupId><artifactId>itheima-springboot-mybatis-demo04</artifactId><version>1.0-SNAPSHOT</version><parent><groupId>org.springframework.boot</groupId><artifactId>spring-boot-starter-parent</artifactId><version>2.1.4.RELEASE</version></parent><dependencies><!--驱动--><dependency><groupId>mysql</groupId><artifactId>mysql-connector-java</artifactId><scope>runtime</scope></dependency><!--mybatis的 起步依赖--><dependency><groupId>org.mybatis.spring.boot</groupId><artifactId>mybatis-spring-boot-starter</artifactId><version>2.0.1</version></dependency><!--spring web起步依赖--><dependency><groupId>org.springframework.boot</groupId><artifactId>spring-boot-starter-web</artifactId></dependency></dependencies><build><plugins><plugin><groupId>org.springframework.boot</groupId><artifactId>spring-boot-maven-plugin</artifactId></plugin></plugins></build></project>
(4)创建pojo
public class User implements Serializable{private Integer id;private String username;//用户名private String password;//密码private String name;//姓名//getter setter...//toString}
(5)创建mapper接口
package com.itheima.dao;import com.itheima.pojo.User;import java.util.List;/**** mapper接口* @author ljh* @packagename com.itheima.dao* @version 1.0* @date 2020/2/23*/public interface UserMapper {public List<User> findAllUser();}
(6)创建UserMapper映射文件,如下图所示
<?xml version="1.0" encoding="UTF-8" ?><!DOCTYPE mapper PUBLIC "-//mybatis.org//DTD Mapper 3.0//EN" "http://mybatis.org/dtd/mybatis-3-mapper.dtd"><mapper namespace="com.itheima.dao.UserMapper"><select id="findAllUser" resultType="com.itheima.pojo.User">SELECT * from user</select></mapper>

(7)创建配置application.yml文件:
spring:datasource:driver-class-name: com.mysql.jdbc.Driverurl: jdbc:mysql://localhost/springboot_user?useUnicode=true&characterEncoding=UTF-8&serverTimezone=UTCusername: rootpassword: 123456#配置mapper的映射文件的位置mybatis:mapper-locations: classpath:mappers/*Mapper.xml
(8)创建启动类,加入mapper接口注解扫描
@SpringBootApplication@MapperScan(basePackages = "com.itheima.dao")//MapperScan 用于扫描指定包下的所有的接口,将接口产生代理对象交给spriing容器public class MybatisApplication {public static void main(String[] args) {SpringApplication.run(MybatisApplication.class,args);}}
(9)创建service 实现类和接口
package com.itheima.service.impl;import com.itheima.dao.UserMapper;import com.itheima.pojo.User;import com.itheima.service.UserService;import org.springframework.beans.factory.annotation.Autowired;import org.springframework.stereotype.Service;import java.util.List;/**** 描述* @author ljh* @packagename com.itheima.service.impl* @version 1.0* @date 2020/2/23*/@Servicepublic class UserServiceImpl implements UserService {@Autowiredprivate UserMapper userMapper;@Overridepublic List<User> findAllUser() {return userMapper.findAllUser();}}
接口如下:
package com.itheima.service;import com.itheima.pojo.User;import java.util.List;/**** 描述* @author ljh* @packagename com.itheima.service* @version 1.0* @date 2020/2/23*/public interface UserService {public List<User> findAllUser();}
(10)创建controller
package com.itheima.controller;import com.itheima.pojo.User;import com.itheima.service.UserService;import org.springframework.beans.factory.annotation.Autowired;import org.springframework.web.bind.annotation.RequestMapping;import org.springframework.web.bind.annotation.RestController;import java.util.List;/**** 描述* @author ljh* @packagename com.itheima.controller* @version 1.0* @date 2020/2/23*/@RestController@RequestMapping("/user")public class UserController {@Autowiredprivate UserService userService;@RequestMapping("/findAll")public List<User> findAll(){return userService.findAllUser();}}
(11)测试
浏览器中发送请求:http://localhost:8080/user/findAll
4.3.3 springboot整合redis
为了方便 ,我们就在之前的mybatis中的基础上进行测试。
4.3.3.1 整合redis实现数据添加
(1)springboot整合redis的步骤
1.添加起步依赖2.准备好redis服务器 并启动3.在SerService中的方法中使用3.1 注入redisTemplate3.2 在方法中进行调用4.配置yml 配置redis的服务器的地址
(2)添加起步依赖
<dependency><groupId>org.springframework.boot</groupId><artifactId>spring-boot-starter-data-redis</artifactId></dependency>
(3)配置redis链接信息
spring:datasource:driver-class-name: com.mysql.jdbc.Driverurl: jdbc:mysql://localhost/springboot_user?useUnicode=true&characterEncoding=UTF-8&serverTimezone=UTCusername: rootpassword: 123456redis:host: localhostport: 6379#配置mapper的映射文件的位置mybatis:mapper-locations: classpath:mappers/*Mapper.xml
(4)service中进行调用
@Servicepublic class UserServiceImpl implements UserService {@Autowiredprivate UserMapper userMapper;@Autowiredprivate RedisTemplate redisTemplate;@Overridepublic List<User> findAllUser() {//1.获取redis中的数据List<User> list = (List<User>) redisTemplate.boundValueOps("key_all").get();//2.判断 是否有,如果有则返回,如果没有则从mysql中获取设置到redis中再返回if (list != null && list.size() > 0) {return list;}List<User> allUser = userMapper.findAllUser();//3 从mysql中获取设置到redis中再返回redisTemplate.boundValueOps("key_all").set(allUser);return allUser;}}
(5)启动redis
如图双击exe启动

(6)测试,如下图所示

再次访问,则从redis中获取数据了。
4.3.3.2 redis的序列化机制
如上图所示,出现了乱码,这个是由于redis的默认的序列化机制导致的。这里需要注意下:并不是错误,由于序列化机制,导致我们数据无法正常显示。如果有代码的方式获取则是可以获取到数据的。
1,默认的情况下redisTemplate操作key vlaue的时候 必须要求 key一定实现序列化 value 也需要实现序列化2,默认的情况下redisTemplate使用JDK自带的序列化机制:JdkSerializationRedisSerializer3,JDK自带的序列化机制中要求需要key 和value 都需要实现Serializable接口4. RedisTemplate支持默认以下几种序列化机制:机制都实现了RedisSerializer接口+ OxmSerializer+ GenericJackson2JsonRedisSerializer+ GenericToStringSerializer+ StringRedisSerializer+ JdkSerializationRedisSerializer+ Jackson2JsonRedisSerializer

我们可以进行自定义序列化机制:例如:我们定义key 为字符串序列化机制,value:为JDK自带的方式则,应当处理如下:
@Beanpublic RedisTemplate<Object, Object> redisTemplate(RedisConnectionFactory redisConnectionFactory) throws UnknownHostException {RedisTemplate<Object, Object> template = new RedisTemplate<>();template.setConnectionFactory(redisConnectionFactory);//设置key的值为字符串序列化方式 那么在使用过程中key 一定只能是字符串template.setKeySerializer(new StringRedisSerializer());//设置value的序列化机制为JDK自带的方式template.setValueSerializer(new JdkSerializationRedisSerializer());return template;}
整体配置如下:
@SpringBootApplication@MapperScan(basePackages = "com.itheima.dao")//MapperScan 用于扫描指定包下的所有的接口,将接口产生代理对象交给spriing容器public class MybatisApplication {public static void main(String[] args) {SpringApplication.run(MybatisApplication.class,args);}@Beanpublic RedisTemplate<Object, Object> redisTemplate(RedisConnectionFactory redisConnectionFactory) throws UnknownHostException {RedisTemplate<Object, Object> template = new RedisTemplate<>();template.setConnectionFactory(redisConnectionFactory);//设置key的值为字符串序列化方式 那么在使用过程中key 一定只能是字符串template.setKeySerializer(new StringRedisSerializer());//设置value的序列化机制为JDK自带的方式template.setValueSerializer(new JdkSerializationRedisSerializer());return template;}}
重启并重新测试如下效果:

总结:
在工作中,根据我们业务的需要进行设置和选择,如果没有合适的还可以自己定义。只要实现RedisSerializer接口即可。
5. Springboot版本控制的原理分析
我们知道springboot不需要添加版本。版本统一进行管理。那么原理是什么呢?看下边图:

如图所示:我们自己的springboot项目继承于spring-boot-starter-parent,而他又继承与spring-boot-dependencies ,dependencies中定义了各个版本。通过maven的依赖传递特性从而实现了版本的统一管理。

若有收获,就点个赞吧
0 人点赞
